RFWFE100 - Wifi repeater Renkforce - Free user manual and instructions
Find the device manual for free RFWFE100 Renkforce in PDF.
| Product type | WiFi Repeater / Access Point / Router |
| Brand | Renkforce |
| Model | RFWFE100 |
| Weight | 97 g |
| Dimensions (L x H x D) | 81 x 94 x 81 mm |
| Power supply | 100-240 V AC, 50/60 Hz, max. 0.3 A |
| Power consumption | Max. 0.3 A |
| WiFi standard | IEEE 802.11 b/g/n |
| Frequency band | 2.4 GHz (2.412 – 2.472 GHz) |
| Max. WiFi speed | 300 Mbit/s |
| Ports | 1x RJ45 LAN 10/100 Mbit/s, 1x RJ45 WAN/LAN 10/100 Mbit/s |
| Network security | WPA-PSK / WPA2-PSK |
| Operating modes | Repeater, Access Point (AP), Router |
| WPS function | Yes (dedicated button) |
| Indoor range | Up to 100 m |
| Outdoor range | Up to 300 m |
| Transmission power | Max. 20 dBm |
| Antennas | 2 adjustable antennas |
| LED indicators | Power/WPS, WAN/LAN, LAN, WiFi Signal (3 bars) |
| Operating temperature | 0 to +40 °C |
| Operating humidity | 10 to 90 % RH (non-condensing) |
| Maintenance and cleaning | Unplug the device before cleaning; use a dry, lint-free cloth |
| Spare parts and repairability | Not available; repair only by authorized service center |
| Package contents | Extender, RJ45 network cable, user manual |
| General information | Indoor use only; EU declaration of conformity available at www.conrad.com/downloads |
Frequently Asked Questions - RFWFE100 Renkforce
User questions about RFWFE100 Renkforce
0 question about this device. Answer the ones you know or ask your own.
Ask a new question about this device
Download the instructions for your Wifi repeater in PDF format for free! Find your manual RFWFE100 - Renkforce and take your electronic device back in hand. On this page are published all the documents necessary for the use of your device. RFWFE100 by Renkforce.
USER MANUAL RFWFE100 Renkforce
text_image
Diagram of a wireless router with numbered labels pointing to its components.(Repeater/Access Point/Router)
natural_image
Illustration of two wireless devices: a remote network device with two antennas and a control panel with three buttons (no text or symbols present)text_image
Diagram showing wireless device connection with WPS indicator and control knobtext_image
Repeater Wizard Connect to: Windows_530 Wi-Fi Password: ****** Repeater SSD: Windows_Face Connect Select a Wi-Fi Manually enter Windows_530 Windows-80 Windows-X Windows-13 Windows-60Copyright 2020 by Conrad Electronic SE. *2298215_v1_1020_02_jh_m_4L_(1)
GB Operating Instructions
RF-WFE-100 Wi-Fi Extender
Item No. 2298215
Intended use
Use the product in one of three operating modes:
- Repeater: enlarge the coverage of your existing WLAN network.
- Access Point (AP): set up a separate WLAN network.
- Router: set up a WLAN network and provide Internet access.
For this product, WLAN refers to a IEEE802.11 network.
It is intended for indoor use only. Do not use it outdoors. Contact with moisture, e.g. in bathrooms, must be avoided under all circumstances.
For safety and approval purposes, you must not rebuild and/or modify this product. If you use the product for purposes other than those described above, the product may be damaged. In addition, improper use can result in short circuits, fires, electric shocks or other hazards.
Read the instructions carefully and store them in a safe place. Make this product available to third parties only together with its operating instructions.
This product complies with the statutory national and European requirements. All company names and product names are trademarks of their respective owners. All rights reserved.
Delivery content
- Extender • RJ45 network cable • Operating instructions
Up-to-date operating instructions
Download the latest operating instructions at www.conrad.com/downloads or scan the QR code shown. Follow the instructions on the website.

Explanation of symbols

The symbol with the lightning in the triangle is used if there is a risk to your health, e.g. due to an electric shock.

The symbol with the exclamation mark in the triangle is used to indicate important information in these operating instructions. Always read this information carefully.
Safety instructions


Read the operating instructions carefully and especially observe the safety information. If you do not follow the safety instructions and information on proper handling in this manual, we assume no liability for any resulting personal injury or damage to property. Such cases will invalidate the warranty/guarantee.
a) General information
- The device is not a toy. Keep it out of the reach of children and pets.
- Do not leave packaging material lying around carelessly. This may become dangerous playing material for children.
- Protect the appliance from extreme temperatures, direct sunlight, strong jolts, high humidity, moisture, flammable gases, steam and solvents.
- Do not place the product under any mechanical stress.
- If it is no longer possible to operate the product safely, take it out of operation and protect it from any accidental use. Safe operation can no longer be guaranteed if the product:
- is visibly damaged,
- is no longer working properly,
- has been stored for extended periods in poor ambient conditions or
-
has been subjected to any serious transport-related stresses.
-
Please handle the product carefully. Jolts, impacts or a fall even from a low height can damage the product.
- Consult an expert when in doubt about the operation, safety or connection of the appliance.
- Maintenance, modifications and repairs must only be completed by a technician or an authorised repair centre.
- If you have questions which remain unanswered by these operating instructions, contact our technical support service or other technical personnel.
b) Connected devices
- Also observe the safety and operating instructions of any other devices which are connected to the product.
c) Product damage
- If the product is damaged, do not touch it; there is a danger to life from electric shock! Switch off the mains voltage to the mains socket to which the product is connected (switch off at the corresponding circuit breaker or remove the safety fuse and then switch off the corresponding RCD).
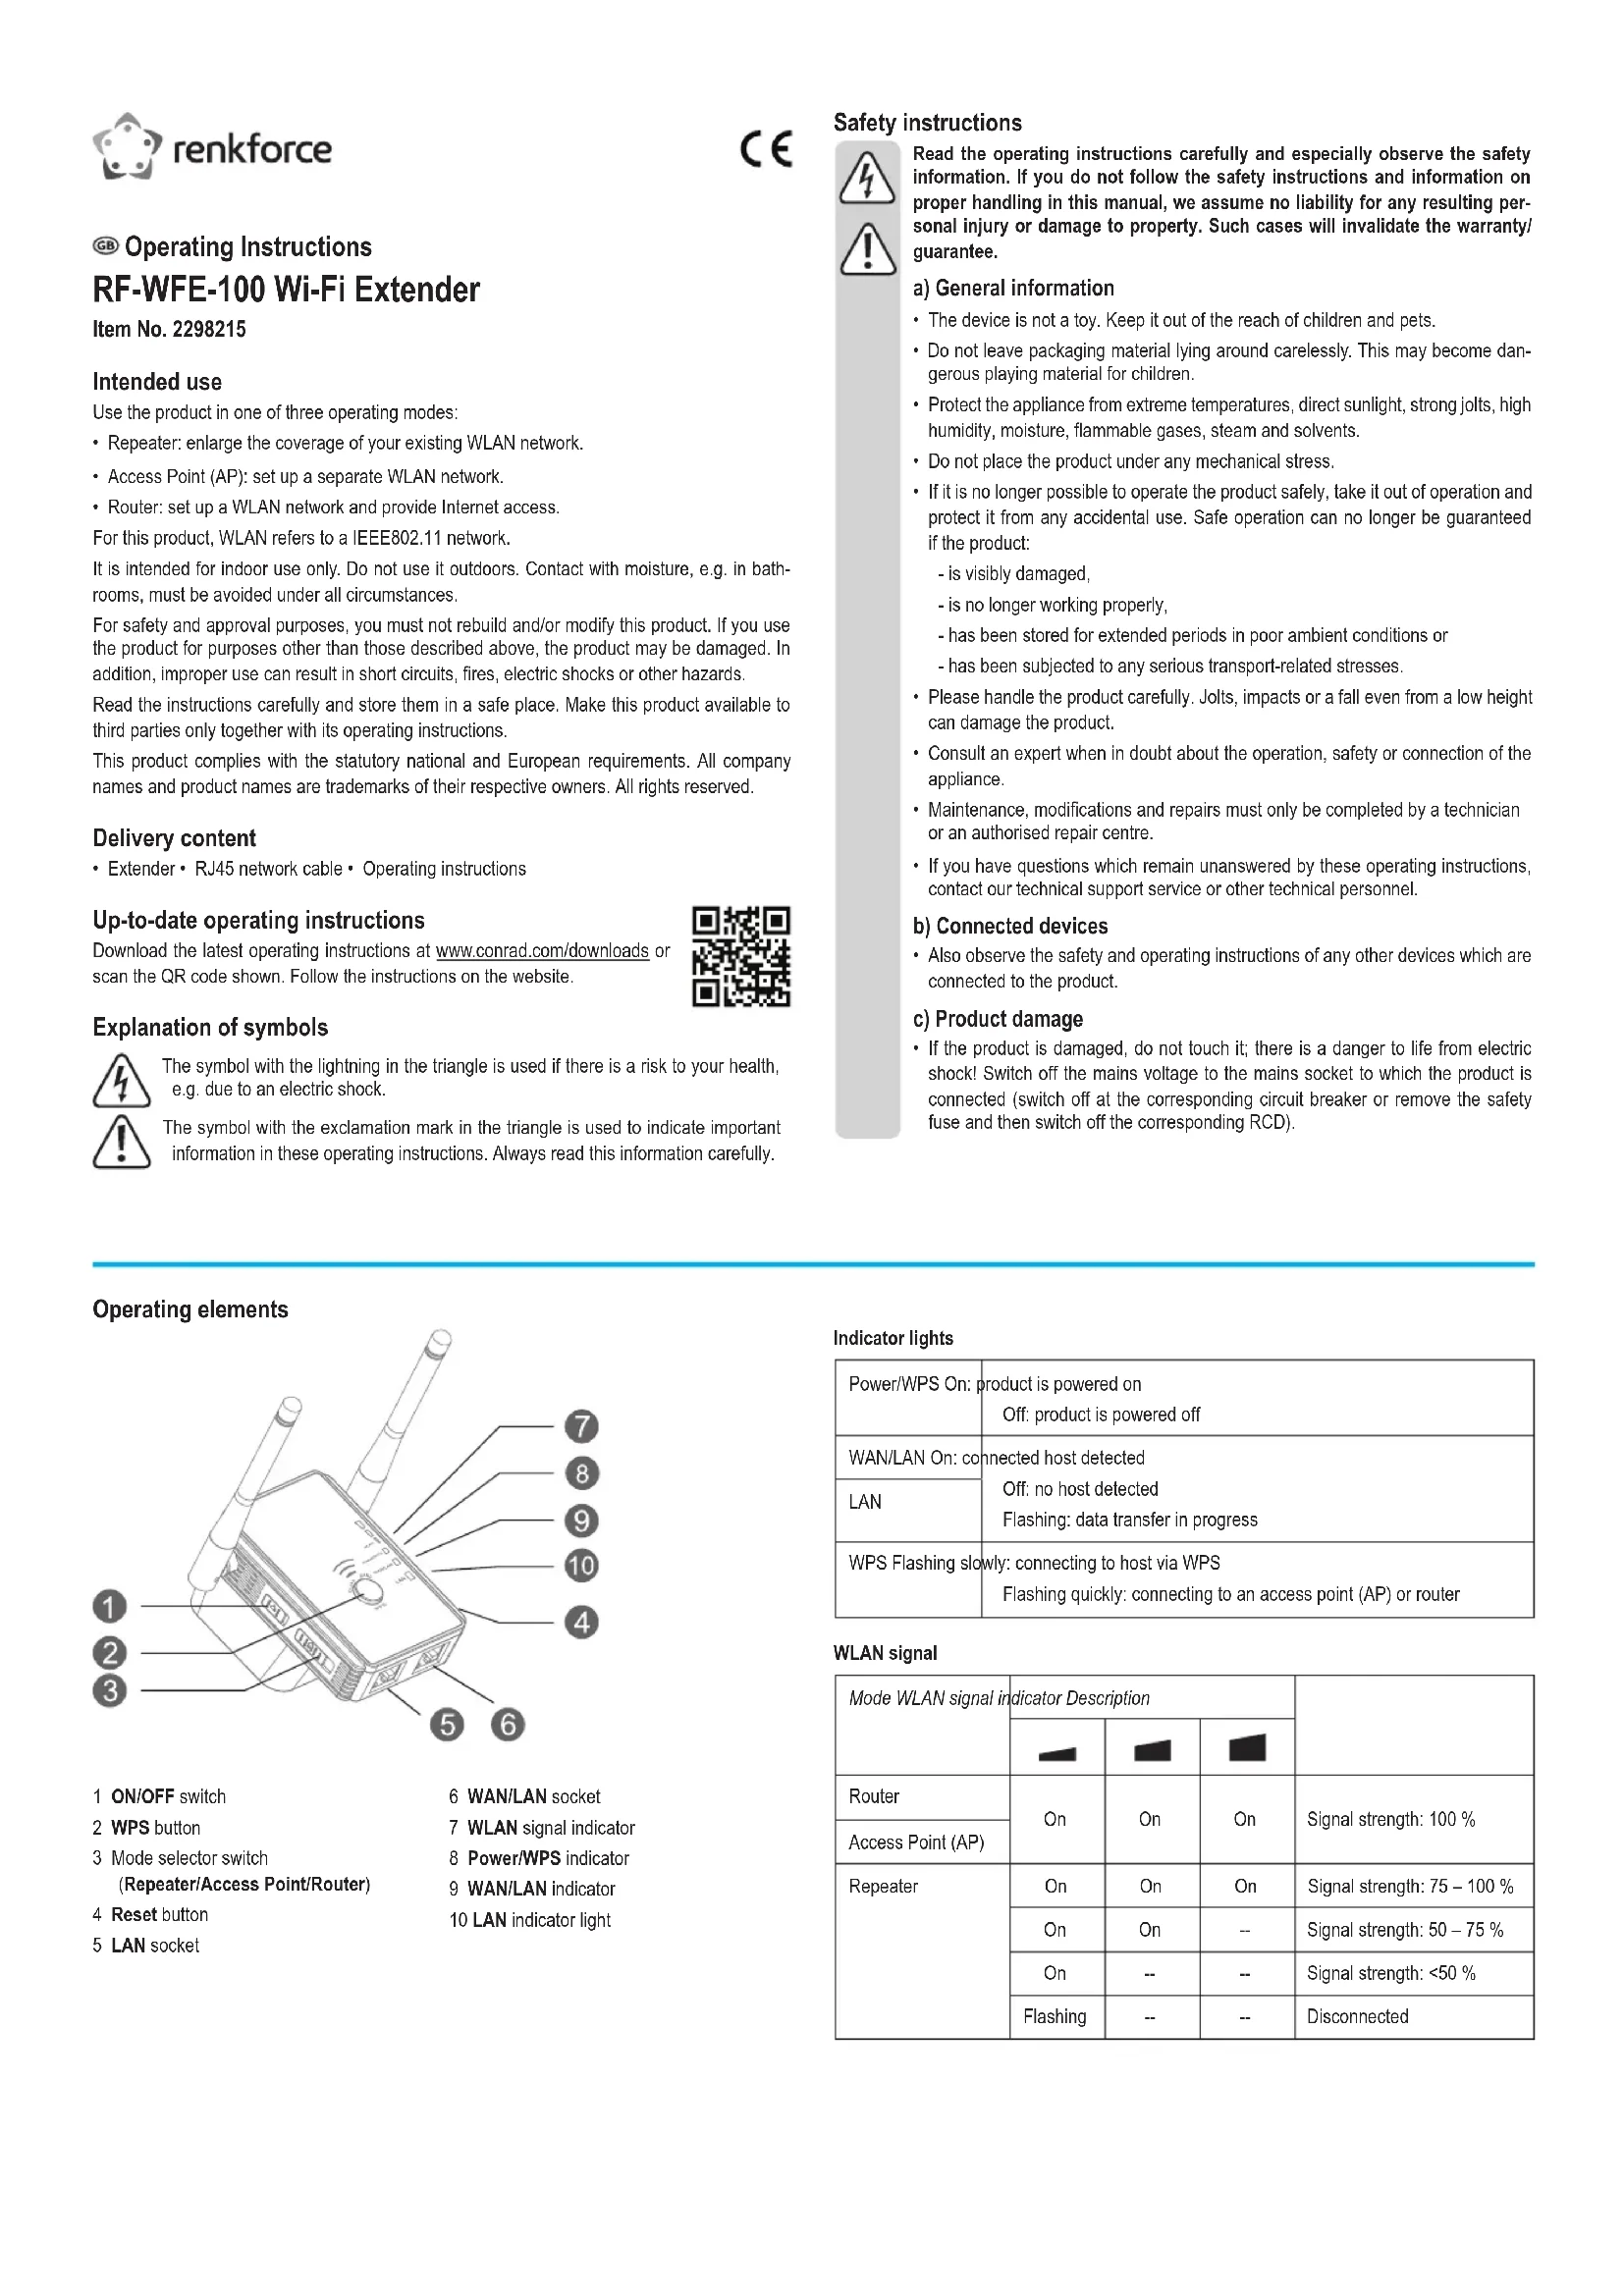
Operating elements
text_image
Diagram of a wireless router with numbered labels pointing to its components.1 ON/OFF switch
2 WPS button
3 Mode selector switch
(Repeater/Access Point/Router)
4 Reset button
5 LAN socket
6 WAN/LAN socket
7 WLAN signal indicator
8 Power/WPS indicator
9 WAN/LAN indicator
10 LAN indicator light
Indicator lights
| Power/WPS On: | product is powered onOff: product is powered off |
| WAN/LAN On: | connected host detectedOff: no host detectedFlashing: data transfer in progress |
| LAN | |
| WPS Flashing slowly: | connecting to host via WPSFlashing quickly: connecting to an access point (AP) or router |
WLAN signal
| Mode WLAN signal indicator Description | ||||
| Router | On | On | On | Signal strength: 100 % |
| Access Point (AP) | ||||
| Repeater | On | On | On | Signal strength: 75 – 100 % |
| On | On | -- | Signal strength: 50 – 75 % | |
| On | -- | -- | Signal strength: <50 % | |
| Flashing | -- | -- | Disconnected | |
Getting started
Learn how to set the product up and turn it on. Log into the web interface and configure basic settings: change the login default password and set the time.
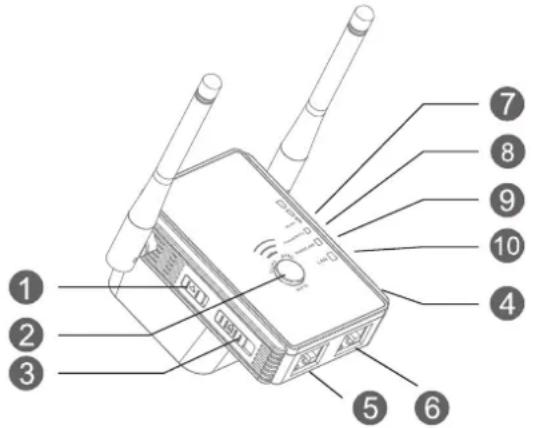
a) Setting up and switching on
- Plug the device into a mains socket.
- Adjust the antennas as shown in the below images.
- Switch on. Slide the ON/OFF switch to ON.
»The Power/WPS indicator lights up.
• To switch off, slide the ON/OFF switch to OFF. The Power/WPS indicator goes out.
natural_image
Illustration of two wireless devices: a remote network device with two antennas and a control panel with three buttons (no text or symbols)b) Logging into the web interface
Requirements:
• The product is switched on.
- You have a management device (computer, tablet computer) available.
| Default parameters | |
| Web interface address | http://ap_setup |
| Default IP address 192.168.10.1 | |
| Default password admin | |
| Default SSID (network name) Renkforce-2.4G | |
- Bring the management device near the product.
-
Connect the management device to the product:
-
Wireless: connect to the product SSID (network name). Unless changed, connect to the default SSID.
-
Wired: use a network cable and connect to the LAN socket.
-
Open the web interface:
- Open a web browser.
- Enter http://ap.setup into the address bar and start the search. The interface loads. This takes some time.
-
(If the interface fails to load) type the product IP address into the URL bar and start the search. Unless changed, use the default IP address.
-
When the interface is loaded, select the desired interface language.
- Enter the password (unless changed, use the default password). Log in.
»The status dashboard shows.
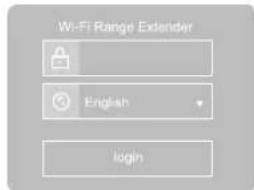
text_image
Wi-Fi Range Extender English loginc) Configuring basics
Requirements:
• The product is switched on.
- You are logged into the web interface.
Changing the login password
- Go to Setup Ⓧ > Login Password. The password mask shows.
- Enter the current password and define a new password. ⚠️ Use a strong password.
- Click Apply to change the password.
You can sign it again using the new password after refreshing the browser window.
Setting the time
- Go to Setup Ⓧ > Time Settings. The settings window opens.
- Apply time settings:
- Select the time zone.
- Enable SYNC Time if you wish to synchronize the time.
- Click Apply to save the changes.
>> What's next
Configure one of the operating modes: Repeater / Access Point (AP) / Router.
■ Repeater mode
In repeater mode, the product is connected to a router or access point (AP) and repeats its WLAN signal to extend network coverage.
You connect network hosts (e.g. computer or smartphone) to the product using the product SSID (network name) and the password set on the router or access point (AP).
Connecting the product
You can connect the product to a router or access point via WPS or manually.
After connecting, the product broadcasts (unless disabled) a new SSID (network name). By default it uses the router/AP network SSID and appends a suffix in the form: SSID_EXT.
You can define your own SSID.
Requirements:
• The product is switched on.
• The product is close to the router/access point you want to connect to.
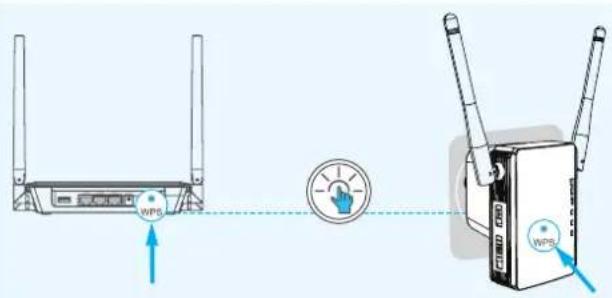
a) Using WPS
WPS (Wi-Fi Protected Setup) must be supported and enabled on the router or access point you intend connect to.
Make sure you know how to use WPS on the router/access point.
NOTICE
Using WPS (Wi-Fi Protected Setup) can make your network vulnerable under certain conditions. If in doubt ask a specialist for assistance.
text_image
Diagram showing wireless device connection with WPS indicator and control knobObserve the diagram and connect:
- Enable the WPS function on the router/access point you intend to connect to.
- Slide the mode selector switch to Repeater.
- Hold down the WPS button for 6 seconds, then release it. »The Power/WPS indicator flashes quickly.
- Start the WPS connection on the router/access point. Wait for the connection to complete (this takes some time).
On successful connection, some WLAN indicator lights are lit solid.
»The product SSID is changed to the router/access point SSID with suffix.
-
(Optional) Change the SSID (network name):
-
Log into the web interface.
- Go to Wizard Wizard. The settings window opens.
- In the Repeater SSID field, overwrite the SSID with your own.
- Click Connect to save the changes.
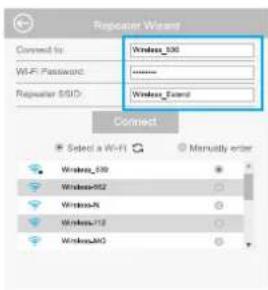
b) Connecting manually
- Slide the mode selector switch to Repeater.
- Log into the web interface.
- Go to Wizard Wizard. The settings window opens.
-
Configure the connection:
-
Select the network of the router/access point or select Manually enter and provide the network details.
- Enter the network password of the router/access point into the Wi-Fi Password field.
-
(Optional) In the Repeater SSID field, overwrite the SSID with your own.
-
Click Connect to complete the configuration.
On successful connection, some WLAN indicator lights are lit solid.
»The product SSID is changed to the router/access point SSID with suffix or your own SSID.
text_image
Repeater Wireless Connected to: Wireless_530 Wi-Fi Password: Wireless_610 Repeater S510: Wireless_Extend Connect Select a Wi-Fi Manually enter Wireless_530 WirelessS52 WirelessN WirelessT12 WirelessM50Placing the repeater
Requirements:
• The product is configured in repeater mode.
• The product is switched off.
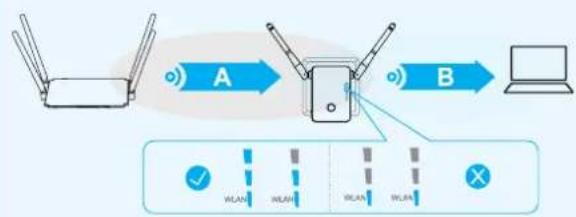
Find a suitable location with satisfactory signal reception.
-
Use a smartphone or network detector to find a suitable location for the product:
-
Decide in which direction and into what area you intend to extend the network.
-
Determine a location with good to excellent reception. Start near the router/access point.
-
Plug the product into a mains socket near the determined location.
- Switch the product on.
- Verify the signal quality. Refer to the below diagram for details.
Good reception is indicated by at least two (2x) WLAN bars.
- Reposition the product if necessary.

flowchart
graph LR
    A["Router"] -->|A| B["Switch"]
    B -->|B| C["Laptop"]
    D["Wi-Fi Signal"] --> E["Wi-Fi Signal"]
    F["Wi-Fi Signal"] --> G["Wi-Fi Signal"]
    H["Wi-Fi Signal"] --> I["Wi-Fi Signal"]
Connecting devices
Connect network hosts (e.g. computer or smartphone) to the product for network access.
You can connect hosts wirelessly (WPS or manually) or using a network cable.
Requirements:
- The product is switched on and configured in repeater mode.
- The product is connected to a router/access point.
a) Wireless: using WPS
NOTICE
Using WPS (Wi-Fi Protected Setup) can make your network vulnerable under certain conditions. If in doubt ask a specialist for assistance.
-
On the device you want to connect, start the WPS connection:
-
Turn on Wi-Fi and enable WPS.
-
Start connecting by WPS (e.g. 'WPS Push Button' on Android).
-
On the product, hold down the WPS button for 2 seconds, then release to start connecting.
While connecting, the Power/WPS indicator on the product flashes slowly.
- Wait for confirmation on the device you are connecting.
On receipt, the device is connected to the product.
b) Wireless: connecting manually
- Connect to the product WLAN network.
- Enter the password of the router/access point the product is connected to.
- Wait for the connection to complete.
c) Network cable
- Connect your device to the LAN port (max. 100 Mbps) on the product using a network cable.
Viewing network status
You can view network metrics on the status dashboard.
- Log into the web interface.
- Go to Status 📄. The status dashboard opens.
- Click Clients to view the detailed client list.
Further configuration
Further configuration options are available through the web interface.
Explore the Setup ⚙ and Wi-Fi 📋 pages.
Make sure you understand what the settings do before you change them. Some are meant for advanced users with specialist knowledge.
■ Access Point (AP) mode
In access point mode (AP mode), the product provides a separate WLAN network.
The product connects to a router or access point using a network cable.
After connecting, the product broadcasts (unless disabled) the user defined SSID (network name). You can connect network hosts (e.g. computer, smartphone) to the WLAN network provided by the product.
Bandwidth is limited to 100 Mbps.
Configuring the product
Configuration can take place away from the operating location.
Requirements:
The product is switched on.
- Slide the mode selector switch to Access Point.
- Log into the web interface.
- Go to Wizard Wizard. The settings window opens.
-
Configure the wireless network:
-
Enter a network SSID (network name) into the Wi-Fi SSID field.
- Select network authentication:
Weakest: OPEN (no security, ⚠ not recommended!)
Strongest: WPA2-PSK (recommended)
Device compatibility: Devices you intend to connect must support the selected option.
- Enter a network password into the Wi-Fi Password field. ⚠ Use a strong password.
- Click on Apply to save the changes.
»The product is ready to be connected to a router/access point.
Connecting the product to a router/access point
Requirements:
- The product is switched on and configured in access point mode.
- Connect the WAN/LAN port on the product to the router/access point using a network cable.
Network cable:
• (Recommended) CAT 6 rated or higher.
• Max length 100 m.
»The product is now ready to accept network hosts (e.g. computer, smartphone).
Connecting devices
Connect network hosts (e.g. computer or smartphone) to the product for network access.
You can connect hosts wirelessly or using a network cable.
Requirements:
- The product is switched on and configured in access point mode.
• The product is connected to a router/access point.
a) Wireless connection
- Connect to the product WLAN network. Use the configured SSID (network name) and password.
b) Network cable
- Connect your device to the LAN port (max. 100 Mbps) on the product using a network cable.
Viewing network status
You can view network metrics on the status dashboard.
- Log into the web interface.
- Go to Status Status. The status dashboard opens.
- Click on Clients to view the detailed client list.
Further configuration
Further configuration options are available through the web interface.
Explore the Setup ⚙ and Wi-Fi ➕ pages.
Make sure you understand what the settings do before you change them. Some are meant for advanced users with specialist knowledge.
- Router mode
In router mode, the product provides a WLAN network and Internet access.
Bandwidth is limited to 100 Mbps.
Configuring the product
Configuration can take place away from the operating location.
Requirements:
• The product is switched on.
- Slide the mode selector switch to Router.
- Log into the web interface.
- Go to Wizard Wizard. The settings window opens.
-
Configure the Internet connection:
-
Decide if your connection uses DSL (select PPoE), a static IP (select Static IP) or dynamic IP (select Dynamic IP) connection. Check with your Internet service provider if needed.
-
Enter the required details for the selected connection type.
-
Configure the wireless network:
-
Enter a network SSID (network name) into the Wi-Fi SSID field.
- Select network authentication:
Weakest: OPEN (no security, ⚠ not recommended!)
Strongest: WPA2-PSK (recommended)
Device compatibility: Ensure your devices support the selected option.
- Enter a network password into the Wi-Fi Password field. Use a strong password.
- Click on Apply to save the changes.
»The product is ready to be connected to the Internet.
Connecting the product to the Internet
- Plug the modem cable into the WAN/LAN port on the product.
On successful signal detection, the WAN/LAN indicator is lit.
»The product is now ready to accept network hosts (e.g. computer, smartphone).
Connecting devices
Connect network hosts (e.g. computer or smartphone) to the product for network access.
You can connect hosts wirelessly or using a network cable.
Requirements:
• The product is switched on and configured in router mode.
• The product is connected to the Internet.
a) Wireless connection
- Connect to the product WLAN network. Use the configured SSID (network name) and password.
b) Network cable
- Connect your device to the LAN port (max. 100 Mbps) on the product using a network cable.
Viewing network status
You can view network metrics on the status dashboard.
-
Log into the web interface.
-
Go to Status 📄. The status dashboard opens.
- Click on Clients to view the detailed client list.
Further configuration
Further configuration options are available through the web interface.
Explore the Setup ⚙ and Wi-Fi 📋 pages.
Make sure you understand what the settings do before you change them. Some are meant for advanced users with specialist knowledge.
Backing up and restoring configurations
Save a backup file of the current configurations.
Restore settings from a backup file.
- (If switched off) switch the product on.
- Log into the web interface.
- Go to Setup Ⓧ > Backup/Restore Settings. The settings window opens.
- Depending on your needs, follow the backup or restore instructions.
Resetting
Resetting the product restores the default settings (including passwords).
- (If the product operates in router mode) disconnect it from the Internet.
- (If switched off) switch the product on.
- Use a paper clip and hold down the Reset button for 3 seconds.
- Wait for the indicator lights to light up again.
»The product is reset.
Care and cleaning
- Disconnect the product from the mains before each cleaning.
- Do not use any aggressive cleaning agents, rubbing alcohol or other chemical solutions as they can cause damage to the housing and malfunctioning.
- Clean the product with a dry, fibre-free cloth.
Declaration of Conformity (DOC)
Conrad Electronic SE, Klaus-Conrad-Straße 1, D-92240 Hirschau hereby declares that this product conforms to the 2014/53/EU directive.
→ Click on the following link to read the full text of the EU declaration of conformity: www.conrad.com/downloads
Enter the product item number in the search box. You can then download the EU declaration of conformity in the available languages.
Disposal

Electronic devices are recyclable waste and must not be disposed of in the household waste. At the end of its service life, dispose of the product in accordance with applicable regulatory guidelines.
You thus fulfill your statutory obligations and contribute to the protection of the environment.
Technical data
Operating voltage 100 - 240 V/AC, 50/60 Hz, max. 0.3 A
LAN.... 1x RJ45 LAN 10/100 Mbps
1x RJ45 WAN/LAN 10/100 Mbps
WLAN...... IEEE 802.11b/g/n, 2.4 GHz, max. 300 Mbps;
Frequency range 2.412 - 2.472 GHz (802.11b/g/n)
Range....Indoors: max. 100 m / Outdoors: max. 300 m
Transmission power..... max. 20 dB
Network security......WPA-PSK/WPA2-PSK
Operating modes.... Repeater / Access point / Router
Operating conditions....0 to +40 °C, 10 - 90 % RH (non-condensing)
Storage conditions....-10 to +70 °C, 10 - 90 % RH (non-condensing)
Dimensions (W x H x D) .... approx. 81 x 94 x 81 mm
Weight .... approx. 97 g
This is a publication by Conrad Electronic SE, Klaus-Conrad-Str. 1, D-92240 Hirschau (www.conrad.com). All rights including translation reserved. Reproduction by any method, e.g. photocopy, microfilming, or the capture in electronic data processing systems require the prior written approval by the editor. Reprinting, also in part, is prohibited. This publication represents the technical status at the time of printing.
Copyright 2020 by Conrad Electronic SE. *2298215_v1_1020_02_jh_m_4L_(1)
F Mode d'emploi
text_image
Diagram of a wireless router with numbered labels pointing to its components.natural_image
Technical line drawings of two wireless devices with antennas and ports (no text or symbols)text_image
Repeater Wizard Connect to: Wireless_000 WiFi Password: Wireless_001 Repeater SSID: Wireless_002 Connect Select a WiFi Manually error Wireless_338 Wireless_967 Wireless_N Wireless_172 Wireless_MGCopyright 2020 by Conrad Electronic SE. *2298215_v1_1020_02_jh_m_4L_(1)