
E-SA9 - Receiver Renkforce - Free user manual and instructions
Find the device manual for free E-SA9 Renkforce in PDF.


| Product type | Audio receiver |
| Brand | Renkforce |
| Model | E-SA9 |
| Dimensions (W x D x H) | 430 x 300 x 100 mm |
| Weight | Approximately 5 kg |
| Power supply | 230 V, 50 Hz |
| Power consumption | 120 W (max) |
| Main functions | Stereo amplification, FM/AM receiver, RCA audio inputs, speaker output, headphone jack |
| Audio inputs | 3x RCA (AUX, CD, Tuner), 1x optical |
| Outputs | 2x speakers (left/right), 1x headphone jack |
| Output power | 2 x 50 W RMS (into 8 Ω) |
| Frequency response | 20 Hz - 20 kHz |
| Signal-to-noise ratio | > 85 dB |
| Harmonic distortion | < 0.05 % |
| Maintenance and cleaning | Unplug the device before cleaning. Use a soft, dry cloth. Do not use chemical products. |
| Safety | Do not expose to moisture, drips or splashes. Do not obstruct ventilation openings. |
| Spare parts | Available on request from Renkforce customer service. Consult the manual for references. |
| Repairability | The device can be repaired by a qualified technician. Use original spare parts. |
| General information | User manual downloadable in multiple languages. Average rating: 8.5/10. |
Frequently Asked Questions - E-SA9 Renkforce
User questions about E-SA9 Renkforce
0 question about this device. Answer the ones you know or ask your own.
Ask a new question about this device
Download the instructions for your Receiver in PDF format for free! Find your manual E-SA9 - Renkforce and take your electronic device back in hand. On this page are published all the documents necessary for the use of your device. E-SA9 by Renkforce.
USER MANUAL E-SA9 Renkforce
natural_image
Abstract geometric star-like pattern with five petal-like shapes and dot patterns (no text or symbols)renkforce
Operating Instructions
Mini Amplifier E-SA9
Item No. 350134 Page 20 - 37
Notice d'Emploi
Amplificateur Miniature E-SA9
www.business.conrad.at
natural_image
Diagram of a mechanical or electrical component with arrows indicating direction, no text or symbols presentSurround 2 x 5 W an 4 Ohm
Klirrfaktor: <0,1 %
Table of Contents GB
Page
- Introduction....21
- Intended Use 22
- Explanation of symbols 22
- Safety instructions....23
- Connection and Control Elements......25
- Setup 28
- Connection 29
a) Connecting the cinch inputs....30
b) Connecting the loudspeaker outputs....31
c) Connecting the power supply....32
- Initial operation 33
- Handling....33
- Maintenance....34
- Disposal 35
- Troubleshooting....36
- Technical data....37
1. Introduction
Dear Customer,
thank you for purchasing this product.
This product complies with the statutory national and European specifications. To maintain this status and to ensure safe operation, you as the user must observe these operating instructions!

These operating instructions are part of this product. They contain important notes on commissioning and handling. Also consider this if you pass on the product to any third party. Therefore, retain these operating instructions for reference!
If there are any technical questions, contact:
Germany: Fon. +49 9604 / 40 88 80
Fax +49 9604/40 88 48
e-mail: tkb@conrad.de
Mon to Thurs 8.00am to 4.30pm
Fri 8.00am to 2.00pm
2. Intended Use
The amplifier is intended for use in private music systems.
The device serves to amplify low-level audio signals. This is achieved by connecting the appliance between the signal source to be amplified and the loudspeakers.
This product is only approved for the connection to 230 V/50 Hz alternating voltage. It can only be used in closed rooms, and therefore not outdoors. Contact with moisture, such as in bathrooms, must be avoided.
The conditions described above could damage the product and could cause short-circuits, fire, and electric shock, etc. No part of the product should be altered or modified and the housing should not be opened!
The safety instructions must be observed at all times.

Take note of all the safety instructions in these operating instructions!
3. Explanation of Symbols

The lightening symbol in a triangle warns you against unprotected live components or elements inside the housing or "live" connection points. Coming into contact with these components or connection points may be fatal.
Cables connected to such connection points may only be connected by an expert or you have to use ready to connect cables.
The device contains no parts that should be serviced by the user. Therefore, do not open the device.

The exclamation mark symbol on the device indicates that the user should read these operating instructions prior to using the product.

The arrow symbol indicates special tips and operating information.
4. Safety instructions

The warranty/guarantee will expire if damage is incurred resulting from non-compliance with these operating instructions. We do not assume liability for any consequential damage.
Nor do we assume any liability for damage to property or personal injury caused by improper use or failure to observe the safety instructions. In such cases the warranty/guarantee is voided.
Dear Customer: The following safety information is intended not only for the protection of the device but also for the protection of your health. Please read the following items carefully:
- For safety and licensing (CE) reasons, unauthorised conversion and/or modifications to the product are not permitted.
- All persons operating, installing, setting up, commissioning or servicing this device must be trained and qualified correspondingly and observe these operating instructions.
- The device is designed according to protection class II. Only connect the amplifier to a normal mains socket (230 V/50 Hz).
- The device must be set up correctly. Please also follow these operating instructions.
- When setting up the product, make sure that the mains cable is not pinched or damaged by sharp edges.
- If the amplifier or its connection cable is damaged, do not touch it. First of all, de-energize the corresponding mains socket (e.g. via the respective circuit-breaker) and afterwards carefully pull the mains plug from the socket. Do not use the product afterwards, but take it to a specialist workshop.
- The product is not a toy and should be kept out of reach of children! Children cannot judge the dangers involved, when dealing with electrical devices.
- Do not place any containers with liquid, e.g. buckets, vases or plants in the immediate proximity of the product. Liquid could get inside the housing and impair electrical safety. There is furthermore a high risk of fire or of a life-threatening electric shock. If this is the case, de-energize the respective socket (e.g. switch off circuit breaker) and only then pull the plug-in mains unit from the socket. Disconnect all cables from the device. Afterwards, the product must no longer be used, bring it to a specialist workshop.
- Never touch the mains plug of the amplifier with wet or damp hands. There is a risk of a fatal electric shock.
-
Make sure the device is adequately ventilated when in operation. Do not cover the ventilation openings with magazines, blankets, curtains or similar. Keep a minimum distance of approx. 15 cm to other devices.
-
Do not expose the device to high temperatures, dripping or splashing water, strong vibrations or high mechanic stress.
- Do not place open sources of fire such as burning candles alongside the appliance.
- Consult an expert when in doubt about the operation, the safety or the connection of the device.
- Do not operate the light when it is unattended.
- Only use the appliance in a moderate climate, and avoid a tropical environment.
- Do not leave packing material unattended. These may become dangerous playing material for children.
- Please also observe further safety instructions in the individual chapters of this operating manual.
- Comply with the safety and operating instructions of any other appliances that are connected to the device.
- If you are not sure about the correct connection or if questions arise which are not covered by the operating instructions, please do not hesitate to contact our technical support or another specialist.
5. Connection and Control Elements
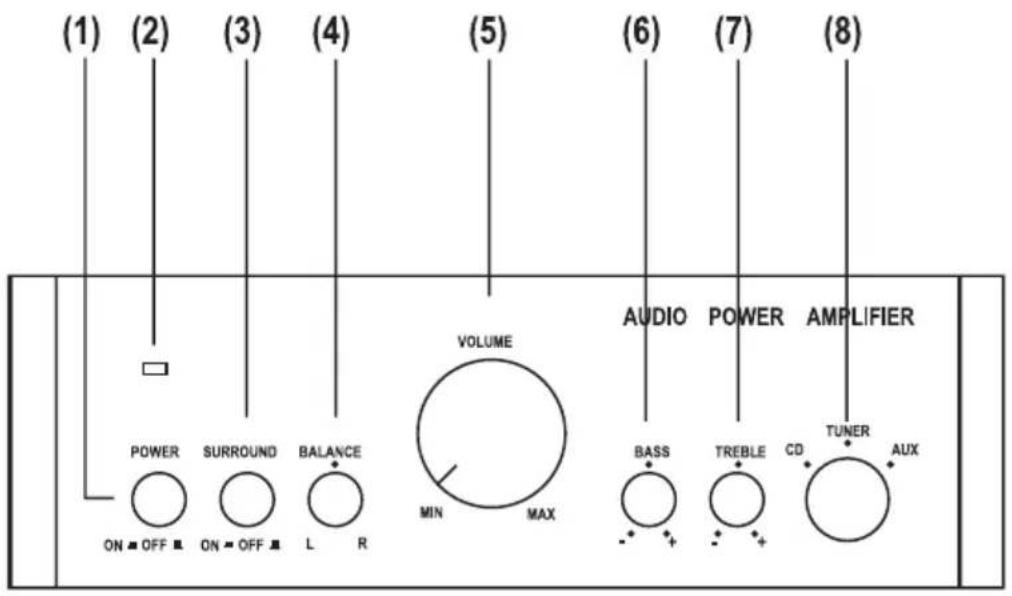

(1) Mains switch POWER
The amplifier is switched on or off using this switch.
When the switch is depressed, the device is on. If the switch is not depressed (position OFF), the device is turned off.
(2) Operating display
This LED will light up when the device is switched on.
(3) Surround switch
By pressing this switch, you activate the SURROUND output on the back of the device.
(4) BALANCE control
With this control, you adjust the volume balance between the left and the right loudspeaker channel.
In the central position, playback takes place at the same volume via both loudspeakers.
Turning clockwise reduces the volume of the left loudspeaker. Turning counter-clockwise reduces the volume of the right loudspeaker.
(5) VOLUME control
Using this control, you can set the volume.
Turning this control clockwise increases the volume. Turning counter-clockwise reduces the volume.
(6) Bass control (BASS)
With the bass control, you influence the intensity of bass playback.
Bass playback is amplified when turning the control clockwise. Bass playback is dampened when turning the control counter-clockwise.
(7) Treble control (TREBLE)
With the treble control, you influence the intensity of treble playback.
Treble playback is amplified when turning the control clockwise. Treble playback is dampened when turning the control counter-clockwise.
(8) Input selection switch
With this switch, you select the input (signal source). You can choose between the inputs CD, TUNER and AUX.
(9) Cinch input AUX
This is where you connect the cinch output sockets of a cassette recorder, video recorder, satellite receiver, etc.
(10) Cinch input TUNER
Here is where you connect the cinch output sockets of the radio device.
(11) Cinch input CD
Here is where you connect the cinch output sockets of the CD player.
(12) Effect loudspeaker output SURROUND
A mono loudspeaker signal is applied to this effect output when pressing the SURROUND switch (3). Here you can connect additional passive loudspeakers. These loudspeakers can be used as rear loudspeakers to achieve a better spatial playback effect.
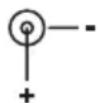
The inner contact of the cinch socket is the positive, the outer contact the negative loudspeaker connection.
(13) Loudspeaker output SPEAKER
Connect the loudspeakers to these clamps.
(14) Mains connection
The mains cable is plugged in here.
(15) Fuse holder
Contains the amplifier's fuse.
To change the fuse, pull the mains plug out of the mains outlet and open the fuse holder with a Phillips screwdriver.
6. Setup
When selecting the installation site, consider the room conditions, meaning the location of the next outlet, etc. Also prevent direct sunlight, vibrations, dust, heat, cold and dampness. Keep the appliance away from strong transformers or motors.

Place the amplifier on a stable, horizontal surface. There must be enough space around the system for air circulation to permit dissipation of the generated heat. Therefore, only place the amplifier on a level surface and not on carpets, etc. Do not cover up the ventilation slots in the casing.
If you do not heed these instructions, the device may be damaged.
Do not drill extra holes or screw any extra screws for mounting purposes into the case. This will damage the device.
Because of the variety of used lacquers and polishes for furniture, the device base might leave residues on furniture due to a chemical reaction. That's why do not place the device without appropriate protection on the valuable furniture surfaces.
7. Connection

Make sure that the mains plug is unplugged before connecting the device and that the volume control is set to minimum (left stop). Before connecting the device, turn off all other equipment to be connected to the mixing desk.

flowchart
graph TD
    CD["CD"] --> A["AUX"]
    TUNER["TUNER"] --> A
    TAPE["TAPE"] --> A
    A --> B["SURROUND"]
    B --> C["SURROUND"]
    C --> D["SURROUND OUT"]
    D --> E["SPEAKER"]
    E --> F["R"]
    E --> G["L"]
    E --> H["+"]
    H --> I["50/60Hz 230V~"]
    style CD fill:#f9f,stroke:#333
    style TUNER fill:#ccf,stroke:#333
    style TAPE fill:#cfc,stroke:#333
    style SURROUND fill:#fcc,stroke:#333
    style SLEVE fill:#ffc,stroke:#333
    style SLEVE fill:#fcc,stroke:#333
a) Connecting the cinch inputs

For the connection of the cinch inputs only use the shielded cinch wires. The use of other cables might cause interference. To avoid distortion or mismatching that may damage the device, only sources with a cinch output may be connected to the cinch inputs of the device.
You may connect devices with a LINE output level, a CD player or cassette deck, to the stereo cinch inputs of the amplifier.
These inputs are not suitable for the direct connection of a record player. In this case, you have to switch an equalizer pre-amplifier upstream.
The white cinch socket of the amplifier is connected with the left cinch output of the respective control source (e.g. CD player).
The red cinch socket of the amplifier is connected with the right cinch output of the respective control source (e.g. CD player).
(9) Cinch input AUX
This is where you connect the audio cinch output sockets of a cassette recorder, video recorder, satellite receiver, etc.
(10) Cinch input TUNER
Connect the audio cinch outputs of the radio to these connections.
(11) Cinch input CD
Connect the audio cinch outputs of the CD player to these connections.
b) Connecting the loudspeaker outputs

The line towards the loudspeakers must be a bifilar cable. Insulate all connecting terminals. Make sure that there are no sharp edges which could damage the cables. Only use loudspeakers which have a sufficiently high loading capacity (see „Technical Data“).
Connect the loudspeakers directly with the amplifier.
Do not use headphone adapters or distribution boxes. If you are unsure about anything, please contact a specialist.
Make sure that all loudspeakers have the correct polarity, i.e. the plus and minus signs must match.
This amplifier has been built for a loudspeaker impedance from 4 to 8 ohm. Only connect one loudspeaker to each output.
If you connect loudspeakers to the surround outputs (12) of the amplifier, the minimum impedance of the loudspeakers connected to the SPEAKER clamps (13) is 8 Ohm each.
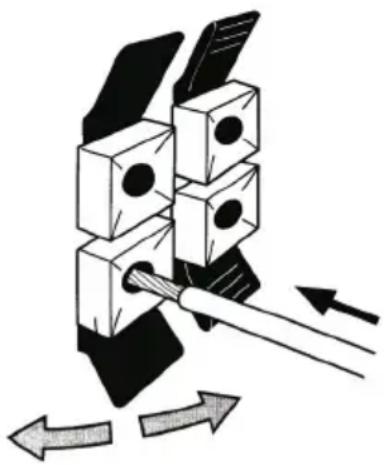
- To open the loudspeaker clamps, press the red/black plastic surface. Slide the stripped end of the loudspeaker cable into the aperture and release the plastic surface. The loudspeaker cable is clamped and good contact is guaranteed.
natural_image
Diagram of a mechanical assembly with arrows indicating motion or force direction (no text or symbols)Connect the loudspeakers to the clamps marked with SPEAKER (13).
- Connect the (+) pole of the left loudspeaker with the red speaker clamps marked with „L+“.
- Connect the (-) pole of the left loudspeaker with the black speaker clamp marked with „L-“.
- Connect the (+) pole of the right loudspeaker with the red speaker clamps marked with „R+“.
- Connect the (-) pole of the right loudspeaker with the black speaker clamp marked with „R-“.
(12) Effect loudspeaker output SURROUND
A mono loudspeaker surround signal (effect signal) is applied to this effect output when pressing the SURROUND switch (3). Here you can connect additional passive loudspeakers. These loudspeakers can be used as rear loudspeakers to achieve a better spatial playback effect.
The white cinch socket of the amplifier is connected with the left, rear loudspeaker.
The red cinch socket of the amplifier is connected with the right, rear loudspeaker.

The rear speakers are switched in series.
why the surround outputs only work when both rear speakers are connected.
The minimum impedance per rear speaker is 4 Ohm per speaker. The minimum impedance of the front speakers on the clamps (13) must be 8 Ohm per speaker in surround mode.
The rear speakers carry an effect signal that strongly differs from the „normal“ speaker signal with respect to volume and sound. The surround effect depends on the stereo input signal of the amplifier.
Cinch socket assignment:
c) Connecting the power supply

The amplifier's mains switch must be off.
The mains outlet must be easily accessible to quickly separate the device from the mains voltage in case of an error.
- Connect the plug of the mains line to the mains connection (14) at the device.
- Plug the mains plug of the mains line into a wall socket.
8. Initial operation

Please note that sound controls that are turned up very high already require very high performance from the amplifier even at medium value and can easily oversteer it. This results in distortions that may damage the loudspeaker.
In case of high volumes and/or highly turned up sound controls, check for distortions and turn down the volume control or the sound controls immediately to prevent damage to the loudspea - kers.
- Check again that all connections are correct.
- Turn the volume control (5) to the „MIN“ (left) setting.
- Switch on the signal sources such as CD players, cassette decks etc.
- Turn the amplifier mains switch (1) on. The power indicator (2) will light up.
- With the input selection switch (8), select the desired input source (e.g. CD player).
- Turn the sound control (5) clockwise until you achieve the desired volume.
- You can change the sound with the sound controls (6) and (7).
- To turn the amplifier off, turn the volume control (5) back to „MIN“ (left) and the turn the amplifier off with the mains switch (1).

If you do not observe this order, the loudspeaker of the amplifier could be damaged.
9. Handling
- Never plug the power plug into a mains socket immediately after the device was taken from a cold to a warm environment. The condensation water created thereby may damage the device.
Allow the device to reach room temperature before connecting it. Wait until the condensation water has evaporated. - Never pull the mains plug by pulling the cable from the socket. Always only use the thus provided grip area.
- Remove the mains plug from the electrical outlet if the device is not in use for a longer period of time.
- For safety reasons always pull the mains plug from the socket during a thunderstorm.
- Do not listen to excessively loud music for long periods of time. This may damage your hearing.
10. Maintenance
Periodically check the technical safety of the amplifier, e.g. check for damage to the power cable or the housing.
If you have a reason to believe that the device can no longer be operated safely, disconnect it immediately and secure it against being operated unintentionally. Pull the power plug out of the socket outlet!
It can be assumed that safe operation is no longer possible if:
- there is visible damage to the device or to the power line,
• the device no longer works - it has been stored for a long time under unfavourable conditions
- it was exposed to extraordinary stress caused by transport
Always observe the following safety instructions before cleaning or servicing the amplifier:

Live components may be exposed if the covering is opened or components are removed. start of maintenance or repair works, the device must be disconnected from all voltage sources.
Capacitors inside the device may still carry voltage even though they have been disconnected from all voltage sources.
Repairs may only be carried out by qualified personnel who are familiar with the hazards involved and the relevant regulations.
If you have to replace fuses, ensure that you only use fuses of the same type and rated current (see „Technical data“).

It is absolutely impermissible to repair fuses or to bridge the fuse holder.
- Switch off the amplifier and all the devices connected.
- Disconnect the mains plug from the mains socket.
- Open the fuse compartment (15) with the aid of a screwdriver turning it in the anticlockwise direction.
- Replace the defective fuse with a new fuse of the same type.
- Retighten the screws on the fuse holder.
Cleaning
The outside of the device should only be cleaned with a soft dry cloth or a soft brush. Never use aggressive cleansing agents or solvents since these may damage the surface of the housing or impair its operation.
11. Disposal
Electronic devices are recyclable waste and must not be disposed of in the household waste! Dispose of the product according to the applicable statutory provisions at the end of its service life.
12. Troubleshooting
In purchasing the miniature amplifier, you have acquired a product which uses the most up-to-date technology available and is operationally reliable. Nevertheless, problems or faults may occur.
Therefore, we would like to describe here how to eliminate possible faults:

Always observe the safety instructions!
No sound is audible:
- A device in the playback chain is not turned on.
- The wrong input was selected on the amplifier.
- The volume control (5) is set to minimum.
- Fuse defective.
One channel does not function:
- A cinch cable was disconnected from the source device (e.g. the cassette recorder) or the amplifier input (9-11).
- The balance control (4) was set wrongly on the amplifier.
- A loudspeaker cable was disconnected from the loudspeaker clamp.
There is a buzzing sound:
- The amplifier input receives an excess signal.
- The volume is set too high and the loudspeakers distort.
- The sound controls for treble and bass are set too high.
Playback is without bass:
- One loudspeakers is connected the wrong way.
- The bass control (6) on the amplifier is set to minimum.
Playback is without treble:
- The treble control (7) on the amplifier is set to minimum.

Repairs other than those described above should only be performed by an authorised specialist.
13. Technical data
Operating voltage: 230 V/50 Hz
Power input: 50 W
Fuse: 250 V/1 A slow-blow (5 x 20 mm)
Input sensitivity: 250 mV/1kHz
Output power: ...... Front 2 x 12 W on 4 Ohm
2 x 10 W on 8 Ohm
Surround 2 x 5 W on 4 Ohm
Distortion factor: ....<0,1 %
Frequency curve: 20 - 20000 Hz
S/N ratio: >70 dB(A)
Channel separation: 60 dB
Sound control: Bass +/-10 dB/100 Hz
Treble +/-10 dB/10 kHz
Operating temperature range: ....+ 10 to +50 °C
Relative air humidity: .... <90 % (non-condensing)
Table des matières
F
Page
natural_image
Diagram of a mechanical or electrical component with arrows indicating direction, no text or symbols presentnatural_image
Diagram of a mechanical assembly with arrows indicating motion or force direction (no text or symbols)© Copyright 2014 by Conrad Electronic SE.
GB Legal notice
These operating instructions are a publication by Conrad Electronic SE, Klaus-Conrad-Str. 1, D-92240 Hirschau (www.conrad.com).
All rights including translation reserved. Reproduction by any method, e.g. photocopy, microfilming, or the capture in electronic data processing systems require the prior written approval by the editor. Reprinting, also in part, is prohibited.
These operating instructions represent the technical status at the time of printing. Changes in technology and equipment reserved.
© Copyright 2014 by Conrad Electronic SE.
© Copyright 2014 by Conrad Electronic SE.
NL Colofon
© Copyright 2014 by Conrad Electronic SE. V4_0414_01

- renkforce
- Mini Amplifier E-SA9
- Amplificateur Miniature E-SA9
- Table of Contents GB
- Page
- Introduction
- Intended Use
- Explanation of Symbols
- Safety instructions
- Connection and Control Elements
- Mains switch POWER
- Operating display
- Surround switch
- BALANCE control
- VOLUME control
- Bass control (BASS)
- Treble control (TREBLE)
- Input selection switch
- Cinch input AUX
- Cinch input TUNER
- Cinch input CD
- Effect loudspeaker output SURROUND
- Loudspeaker output SPEAKER
- Mains connection
- Fuse holder
- Setup
- Connection
- a) Connecting the cinch inputs
- b) Connecting the loudspeaker outputs
- c) Connecting the power supply
- Initial operation
- Handling
- Maintenance
- Cleaning
- Disposal
- Troubleshooting
- Always observe the safety instructions!
- No sound is audible:
- One channel does not function:
- There is a buzzing sound:
- Playback is without bass:
- Playback is without treble:
- Technical data
- Table des matières
- GB Legal notice
- NL Colofon
Brand : Renkforce
Model : E-SA9
Category : Receiver