
A1000 - Receiver Renkforce - Free user manual and instructions
Find the device manual for free A1000 Renkforce in PDF.
| Product type | Stereo amplifier / receiver |
| Brand | Renkforce |
| Model | A1000 |
| Dimensions (W x H x D) | 420 x 135 x 215 mm |
| Weight | 6.2 kg |
| Power supply | 230 V / 50 Hz |
| Power consumption | 100 W |
| Output power | 2 x 50 W (6 ohms) |
| Speaker impedance | 6 - 8 ohms |
| Input sensitivity (Line) | 250 mV / 47 kohms |
| Input sensitivity (Phono) | 2.5 mV / 47 kohms |
| Signal-to-noise ratio (Line) | 70 dB(A) |
| Signal-to-noise ratio (Phono) | 60 dB(A) |
| Channel separation | 60 dB |
| Frequency response | 20 - 20,000 Hz (+1/-2 dB) |
| Total harmonic distortion | < 0.05% |
| Tone controls | Bass ±10 dB / 100 Hz, Treble ±10 dB / 10 kHz |
| Inputs | 5 x stereo RCA (CD, Phono, AV1, AV2, Tuner, Tape) |
| Outputs | Speakers (binding posts), Headphones (6.35 mm jack), Recording (Tape REC), Equalizer (EQ) |
| Special Features | EQ presets (Pop, Rock, Classic, Flat), microphone, infrared remote control |
| Protection class | II |
| Operating temperature | Indoor, moderate climates |
| Maintenance | Clean with a dry, soft cloth |
| Included accessories | Remote control, batteries, user manual |
| Warranty / Repairability | Repairs by a specialist only |
Frequently Asked Questions - A1000 Renkforce
User questions about A1000 Renkforce
0 question about this device. Answer the ones you know or ask your own.
Ask a new question about this device
Download the instructions for your Receiver in PDF format for free! Find your manual A1000 - Renkforce and take your electronic device back in hand. On this page are published all the documents necessary for the use of your device. A1000 by Renkforce.
USER MANUAL A1000 Renkforce
natural_image
Abstract geometric star-like pattern with five petal-like shapes and dot patterns (no text or symbols)renkforce
GB Operating Instructions
A-1000 Amplifier
Item No. 1173728 Page 22 - 41
F Mode d'emploi
(6) Taste EXTERNAL PROZESSOR
(1) Tasten BAND / MEMO SCAN / MEMO HOLD
(3) Taste EXTERNAL PROCESSOR
- Introduction......23
- Intended Use ....24
- Explanation of Symbols....24
- Scope of Delivery....24
- Safety Information 25
- Features....26
- Set-Up....27
- Connection....28
a) Connection of the Cinch Sockets....28
b) Connecting the Speaker Outputs....31
c) Connection of the Control Lines for the Remote Control 32
d) Connecting the Power Supply....32
- Operation....33
a) General....33
b) Playing an Audio Source....36
c) Recording....36
- Remote Control....37
a) Inserting the Batteries/Battery Change....37
b) Function of the Buttons....38
- Handling....39
- Maintenance....39
- Disposal....40
- Troubleshooting....40
- Technical Data....41
1. Introduction
Dear Customer,
thank you for purchasing this product.
This product complies with the statutory national and European specifications. To maintain this status and to ensure safe operation, you as the user must observe these operating instructions!

These operating instructions are part of this product. They contain important notes on commissioning and handling. Also consider this if you pass on the product to any third party. Therefore, retain these operating instructions for reference!
If there are any technical questions, please contact:
International: www.conrad.com/contact
United Kingdom: www.conrad-electronic.co.uk/contact
2. Intended Use
The Renkforce amplifier A-1000 is used to amplify low-level audio signals in home audio systems; it is switched between the signal source to be amplified and the speakers.
The amplifier must only be controlled by a low-level audio source.
This product is only approved for connection to 230 V/50 Hz alternating voltage.
It is intended for indoor use only. Do not use it outdoors. Contact with moisture, e.g. in bathrooms, must be avoided under all circumstances.
Any use other than that described above will damage this product and involves the risk of short circuit, fire, electric shock, etc.
The entire product must not be modified or converted, and the casing must not be opened.

Observe all safety information in these operating instructions!
3. Symbols

The lightning symbol in a triangle warns against unprotected live components or elements inside the housing or „live“ connection points. Touching these components or connection points may pose a danger to life.
Lines must only be connected to such connection points by specialists, or lines ready for connection must be used.
The device contains no parts that require servicing by the user. Therefore, never open the device.

The exclamation mark symbol indicates that the user must read these operating instructions before commissioning of the device, and observe them during operation.

The arrow symbol indicates special advice and operating information.
4. Scope of Delivery
- Amplifier
- Remote Control
- Batteries
- Operating Instructions
5. Safety Information

Warranty/guarantee will expire if damage is incurred resulting from non-compliance with these operating instructions. We do not assume liability for any consequential damage.
Nor do we assume any liability for damage to property or personal injury caused by improper use or failure to observe the safety instructions. In such cases the warranty/guarantee is voided.
Dear Customer: The following safety information is intended not only for the protection of the device but also for the protection of your health. Please read the following items carefully:
- For safety reasons, any unauthorized conversions and/or modifications to the product are not permitted.
- This device is a safety class II product. Only a proper mains socket (230 V/50 Hz) of the public mains supply must be used as a power source.
- Ensure proper commissioning of the device. Observe the operating instructions for it.
- Make sure that the mains cable is not squeezed, bent, damaged by sharp edges or put under mechanical stress. Avoid excessive thermal stress on the mains cable from extreme heat or cold. Do not modify the mains cable. Otherwise the mains cable may be damaged. A damaged mains cable can cause a deadly electric shock.
- Do not touch the mains cable if it is damaged. First, power down the respective mains socket (e.g. via the respective circuit breaker and FI switch) and then carefully pull the mains plug from the mains socket.
- In order to completely separate the device from the mains, you have to pull the mains plug out of the wall socket. It is not sufficient to turn the device off with the on/off switch.
- This product is not a toy and not suitable for children. Children cannot judge the dangers involved when handling electrical devices.
- Never pour liquids on electrical devices and do not place any containers filled with liquids (e.g. vases) on them. There is great danger of fire or potentially fatal electric shock. If this is the case, first power down the respective mains socket (e.g. switch off circuit breaker and FI switch) and then pull the mains cable from the socket. Disconnect all cables from the device. Do not operate the product anymore afterwards, but take it to a specialist workshop.
- Never plug in or unplug the mains plug when your hands are wet.
- Make sure the device is sufficiently ventilated when in operation. Do not cover the ventilation openings with magazines, blankets, curtains or similar.
- Do not expose the device to any high temperatures, dripping or splashing water, strong vibrations or heavy mechanical stress.
- Do not place any open sources of fire, such as burning candles, on the device.

- Consult an expert when in doubt as to the operation, safety or the connection of the device.
- Never operate the device unattended.
- Only use the device in a moderate climate and avoid any tropical environment.
- Do not leave any packaging material unattended. It may become a dangerous toy for children.
- Also observe the additional safety information in the individual chapters of these operating instructions.
- Also observe the safety and operating instructions of any other devices that are connected to the device.
- If you are not sure about the correct connection or if any questions arise which are not covered by the operating instructions, do not hesitate to contact our technical support or another specialist.
6. Features
- 2 x 50 W output performance
- 5 stereo cinch inputs incl. phono input for connection of a record player
• Additional connections for a recorder and an equalizer - Separate bass and treble control
• Equalizer with 3 pre-settings - Connections for headphones and microphone
- System remote control also for the other components of the Renkforce HiFi-system
7. Set-Up
When selecting the set-up location, please take into consideration the room layout such as the whereabouts of the nearest socket, etc.
When selecting the set-up site, observe that direct sunlight, vibration, dust, heat, cold and moisture must be avoided. There also must not be any strong transformers in the device's proximity.

Only operate the device on a stable, horizontal surface. There must be enough air circulation to permit dissipation of the generated heat. Therefore, only place the device on a level surface and not on carpets, etc. Do not cover up the ventilation slots in the casing.
Non-observance of this note may cause damage to the device.
Do not drill or screw any additional screws into the casing to mount the device. This damages the device and it may become possible to touch potentially fatal mains voltage.
Make sure you position the device safely. Falling devices may pose a significant risk of accident.

Due to the diversity of furniture paints and polishes used, it is possible that the device's feet will leave visible residue on furniture due to chemical reaction.
The device therefore should not be placed on valuable furniture surfaces without any suitable protection.
8. Connection

Before connecting the device, ensure that the mains plug is disconnected. Also disconnect all other devices to be connected from their power supply.

Observe connection of the audio connections in the correct direction, i.e. always connect left to left and right to right.
a) Connection of the Cinch Sockets

For the connection of the cinch sockets only use the shielded cinch wires. Use of any other cables may cause interferences.
To avoid distortions or mal-adjustments that may cause damage to the device, only such devices must be connected to the cinch sockets that also have cinch connections.

The white cinch socket is connected to the left cinch connection of the respective device (e.g. CD player).
The red cinch socket is connected to the right cinch connection of the respective device (e.g. CD player).
CD-Player
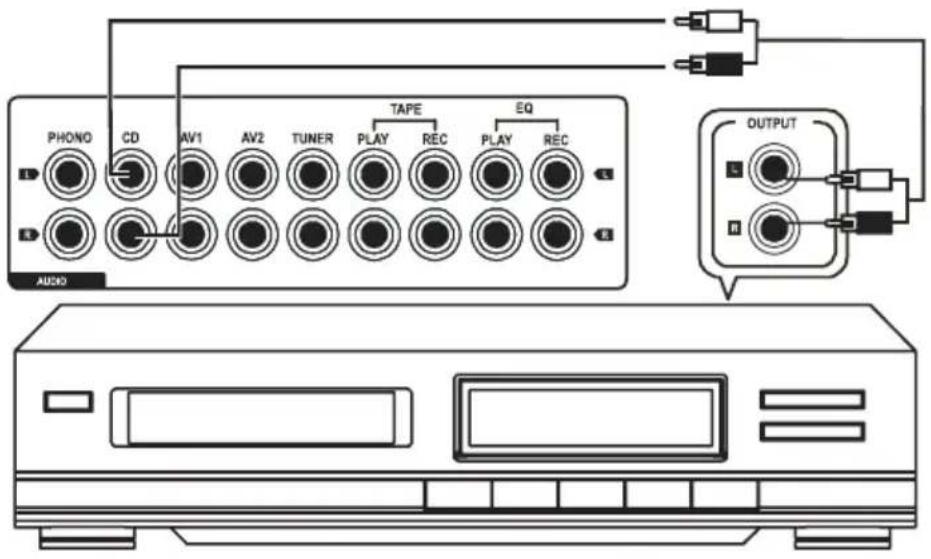
- Connect the outputs of your CD player to the CD sockets.
Connections AV1/AV2
- You can connect your AV devices, such as a TV, a DVD player, etc., to these connections.
- Also connect the outputs of your AV devices to the sockets AV1 or AV2.
Cassette deck
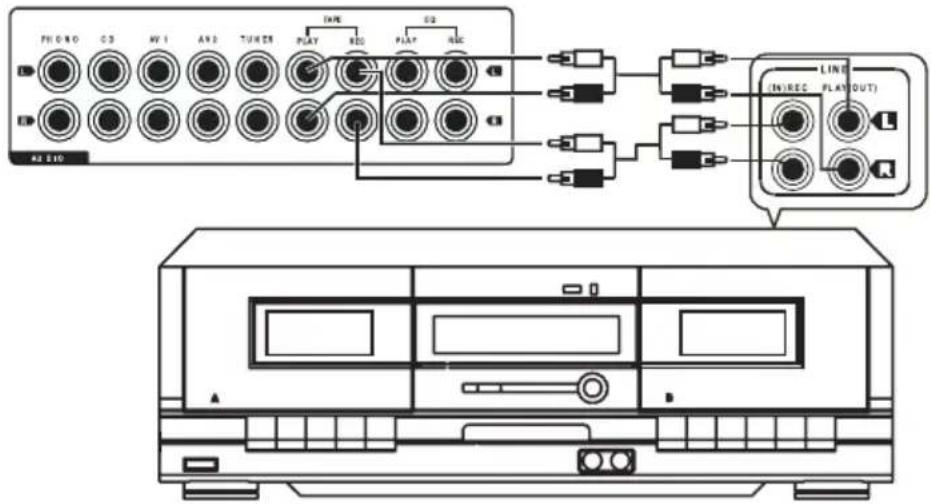
- Connect the outputs of your cassette deck (usually designated PLAY or LINE OUT) to the sockets TAPE PLAY.
- Connect the inputs of your cassette deck (usually designated REC or LINE IN) to the sockets TAPE REC.
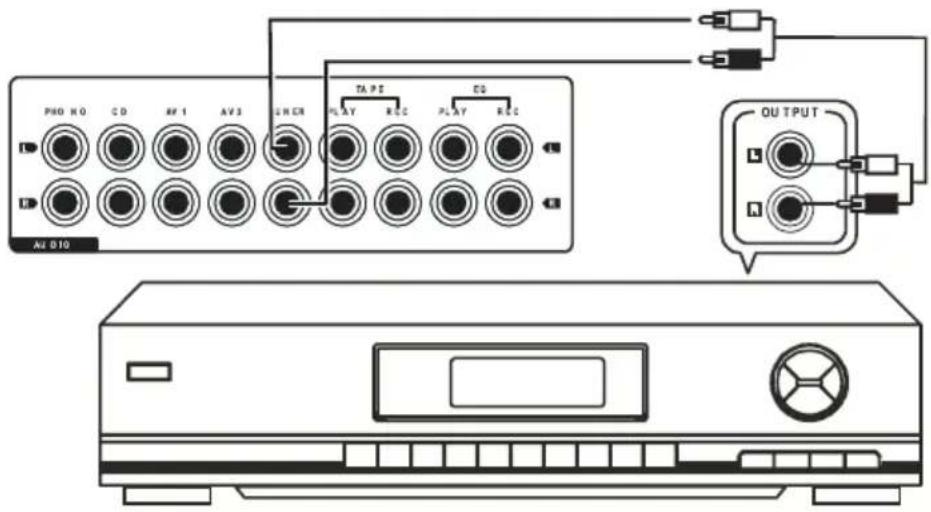
Equalizer connections
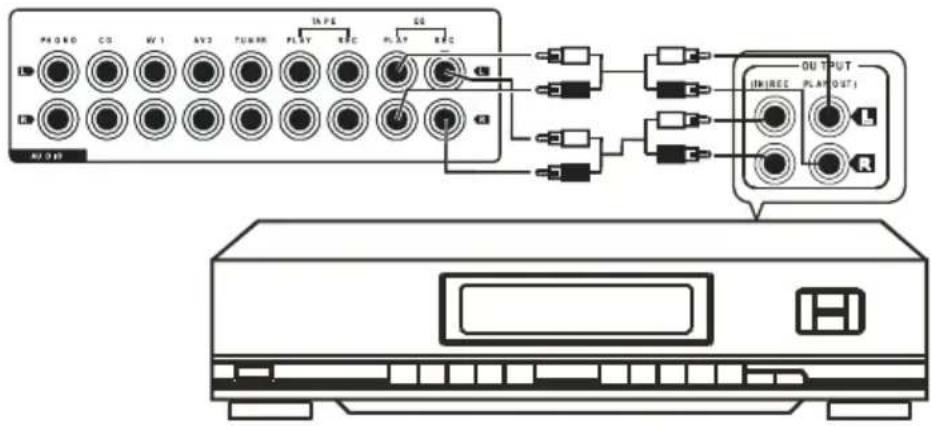
- An equalizer or signal processor can be connected to these connections.
- Connect the outputs of your equalizer (usually designated OUTPUT or LINE OUT) to the sockets EQ PLAY.
- Connect the inputs of your equalizer (usually designated INPUT or LINE IN) to the sockets EQ REC.
Phono connections
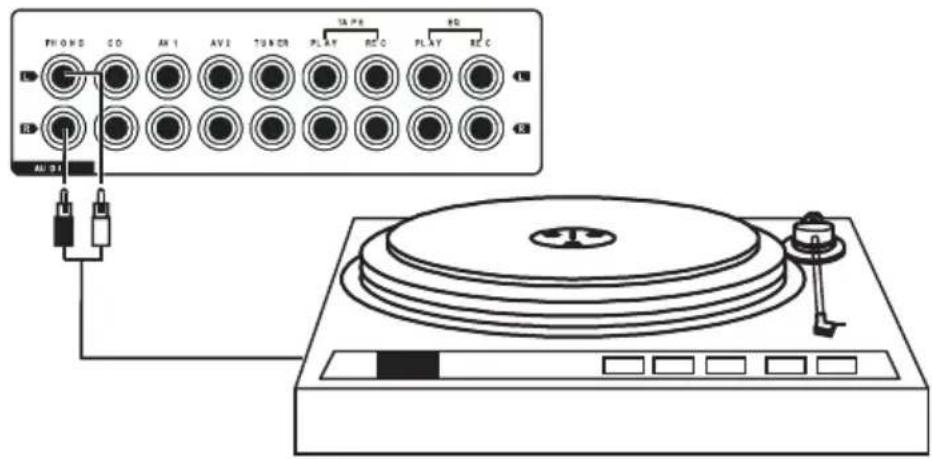
- Connect the outputs of your phono player to the PHONO sockets.

These connections are solely suitable for connecting phono players. Never connect any line devices here (CD players, tuners, etc.) since the phono output will overmodulate otherwise. This may cause damage to the amplifier or the speakers.
Radio
- Connect the outputs of your tuner to the TUNER sockets.
b) Connecting the Speaker Outputs

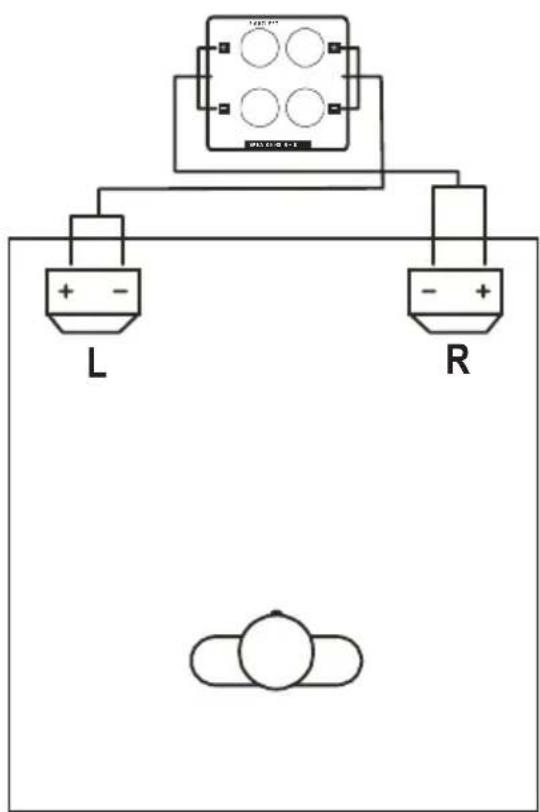
Connection to the speakers must be two-wire each. Insulate all connection points. Make sure that the cables are not damaged by sharp edges. Only use speakers with sufficient load capacity (see „Technical Data“).
Connect the speakers directly with the amplifier. Do not use any headphones or junction boxes. If in doubt, contact a specialist.
Make sure that all speakers have the correct polarity, i.e. the plus and minus signs must match.
This amplifier has been designed for a speaker impedance of 6 to 8 Ohm on each channel. Never use any speakers with a lower impedance. Only connect one speaker to each output.
Connect the speaker pair to the terminals marked SPEAKERS.
- Connect the (+) pole of the left speaker to the red speaker clamp designated „LEFT+“.
- Connect the (-) pole of the left speaker to the black speaker clamp designated „LEFT-“.
- Connect the (+) pole of the right speaker to the red speaker clamp designated „RIGHT+“.
- Connect the (-) pole of the right speaker to the black speaker clamp designated „RIGHT-“.
c) Connection of the Control Lines for the Remote Control
If you connect any other devices of the Renkforce HiFi series to the amplifier, you can remote-control these devices via the system remote control.
For this, the control sockets of the individual devices must be connected to the control sockets of the amplifier. The control lines are enclosed with the individual devices.
- Connect the control socket of the equalizer to the control socket REMOTE SYSTEM EQ at the rear of the amplifier.
- Connect the control socket of the tape recorder to the control socket REMOTE SYSTEM TAPE at the rear of the amplifier.
- Connect the control socket of the tuner to the control socket REMOTE SYSTEM TUNER at the rear of the amplifier.
- Connect the control socket of the CD player to the control socket REMOTE SYSTEM CD at the rear of the amplifier.
d) Mains Connection

Before plugging in the mains plug, ensure that the device voltage indicated at the device corresponds to the available mains voltage. Do not connect the device if the indication does not correspond to the available mains voltage. Wrong supply voltage will cause serious damage.
Be careful when handling mains cables and mains connections. Mains voltage may cause potentially fatal electric shock.
The mains socket to which the device is connected must be easily accessible so that it can be separated from the mains voltage quickly in case of an error.
The amplifier and all connected devices must be switched off when the power supply is connected.
Make sure that no cables lie around openly. Install cables professionally to prevent accidents.
Make sure that all electrical connections and connection cables between the different devices and any extension cables comply with the regulations and the operating instructions. If an extension line is used, ensure that it is designed for the respective load.
- Connect the mains plug of the amplifier to a socket (230 V/50 Hz) of the public mains supply.
9. Operation

Only take the device into operation after familiarising yourself with its functions and these operating instructions.
Check all the connections again.
Please note that sound controls that are turned up very high already require very high performance of the amplifier even at medium volume and can easily oversteer it. This shows in the form of distortions that endanger the speakers.
In case of high volumes and/or highly turned-up sound controls, check for distortions and turn down the volume control or the sound controls immediately to prevent damage to the speakers.

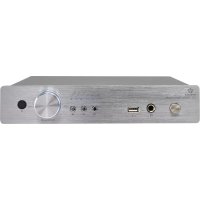
a) General Information
(1) POWER button
This button switches the amplifier on and off.
Position ON > Device is switched on, Position OFF > Device is switched off.
(2) Display FUNCTION
This display shows the selected audio input.
→ If the volume setting is changed, the display visually shows the volume level. The display returns to the marking of the selected audio input after a short time.
(3) Infrared recipient REMOTE SENSOR
This sensor receives the infrared signals of the remote control.
Point the remote control at this sensor when transmitting.
(4) Button PRESET EQ
Push this button repeatedly to select one of the following sound settings:
Pop (green)
Rock (red)
Classic (orange)
FLAT (no colour).
(5) Controller VOLUME
This controller adjusts the volume.
→ While changing the volume, the display FUNCTION (2) visually shows the volume. The display returns to the marking of the selected audio input after a short time.
(6) Button EXTERNAL PROZESSOR
Push this button to add an equalizer or signal processor connected to the sockets EQ Equalizer into the signal path.
(7) Controller MIC LEVEL
With this controller, you can set the volume of the microphone connected to MIC (8).
(8) Connection MIC
Use this connection to connect a dynamic microphone.
(9) PHONO button
This button is used to select the phono input.
(10) CD button
This button is used to select the CD input.
(11) Button AV1/AV2
This button is used to select the AV1/AV2 input.
The two inputs AV1 and AV2 are selected by multiple pushes of the button AV1/AV2 (11).
1x pushing > AV1 selected > Display FUNCTION (2) lights up green
2 x pushing > AV2 selected > Display FUNCTION (2) lights up red
(12) Button TUNER
This button is used to select the TUNER input.
(13) Button TAPE
This button is used to select the TAPE input.
(14) Controller TREBLE
This controller controls the high frequency range.
Turn the controller to the right to increase the volume of the treble, turn it to the left to reduce it.
(15) Controller BASS
This controller controls the low frequency range.
Turn the controller to the right to increase the volume of the bass, turn it to the left to reduce it.
(16) MUTE key
Push this button to mute the tone briefly without changing the set volume (e.g. to make a phone call).
(17) Connection PHONES
You can connect headphones here.
→ The speakers are muted once headphones are connected here.
b) Playing an Audio Source
- Turn the volume control VOLUME (5) all the way to the left.
- Turn the controllers TREBLE (14) and BASS (15) to the middle position.
- Switch on the audio sources, such as your CD player, cassette deck, etc.
- Turn on the amplifier with the POWER button (1).
- Select the desired input source (e.g. CD player) with the input selection buttons (9-13).
- Turn the sound control (5) clockwise until you reach the desired volume.
- Use the controllers TREBLE (14) and BASS (15) or the button PRESET EQ (4) to change the sound.
- To switch off the amplifier, turn the volume controller VOLUME (5) all the way to the left again and then switch off the amplifier with the button POWER (1).

If you do not observe this sequence, the speaker of the amplifier could be damaged.
c) Recording
- Select the desired recording source (e.g. CD player) with the input selection buttons (9-13).
- Push the recording button at the recorder. The recorder must be connected to the sockets TAPE REC.
- The volume setting and sound settings do not affect the recording.
10. Remote Control
Use the enclosed system remote control to control the main function of the amplifier and other devices of the Renkforce HiFi-series comfortably from your chair.
a) Inserting the Batteries/Rechargeable Batteries

Keep batteries out of reach of children.
Batteries are special waste and must not go in the household waste.
Observe correct polarity when inserting the batteries.
Remove the batteries when the device is not in use for extended periods of time.
Do not leave any batteries lying around openly. There is a risk of batteries being swallowed by children or pets. If swallowed, consult a doctor immediately.
Make sure that batteries are not short-circuited or thrown into fire. They also must not be re charged. Danger of explosion.
Leaking or damaged batteries may cause chemical burns to skin when touched. Use adequate protective gloves in this case.
- Slide out the battery compartment cover at the back of the remote control open and remove it.
- Insert two new 1.5 V mignon batteries (AA) in the battery compartment paying attention to the polarity. Correct polarity is imprinted in the bottom of the battery compartment.
- Replace the battery compartment cover.
- If the range of the remote control drops or the remote control no longer works, the batteries must be replaced as described above.
- In the interest of a long battery service life, use only alkaline types.
- Never mix batteries of different charging state, from different manufacturers or batteries and rechargeable batteries.
b) Function of the Buttons
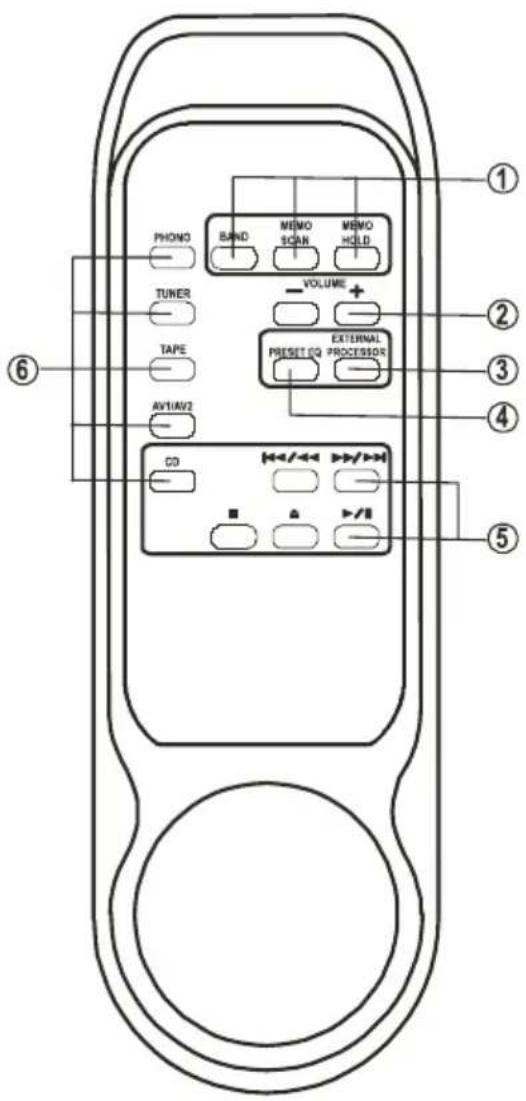
(1) Buttons BAND / MEMO SCAN / MEMO HOLD
Buttons for tuner mode:
BAND switches the reception range AM > FM > AM > FM...
MEMO SCAN samples the stations saved on the station buttons.
MEMO HOLD switches off the MEMO SCAN function and continually plays back the station just heard.
(2) Button VOLUME +/-
Volume control louder/lower
(3) Button EXTERNAL PROCESSOR
This button has the same function as button (6) at the amplifier.
(4) Button PRESET EQ
This button has the same function as button (4) at the amplifier.
(5) Drive function buttons for the CD player
These buttons have the same functions as the buttons at the CD player.
(6) Buttons for input selection at the amplifier
These buttons have the same functions as the buttons (9-13) at the amplifier.
11. Handling
- Never connect the mains plug to a mains socket immediately after the device has been taken from a cold to a warm environment. The resulting condensation may destroy the device.
Allow the device to reach room temperature before connecting it. Wait until the condensation has eva porated. - Never pull the mains plug from the mains socket by the cable. Only pull it from the mains socket by the intended grip areas.
- Unplug the mains plug from the mains socket if you are not using the device for an extended period of time.
- Disconnect the mains plug from the mains socket during thunderstorms for reasons of safety.
- Do not listen to excessively loud music over an extended period of time. This may damage your hearing.
12. Maintenance
Periodically verify the technical safety of the device, e.g. check for damage to the mains cable or the casing.
If you have reason to believe that the device can no longer be operated safely, disconnect it immediately and make sure it is not operated unintentionally. Pull the mains plug from the mains socket!
It can be assumed that safe operation is no longer possible if:
- there is visible damage to the device or to the mains cable
• the device no longer works - the device has been stored under unfavourable conditions for an extended period of time or
• after exposure to extraordinary stress caused by transport
Always observe the following safety information before cleaning or servicing the device:

Live components may be exposed if covers are opened or components are removed.
vice must be disconnected from all power sources before any servicing or repair work is carried out.
Capacitors inside the device may still carry voltage even though they have been disconnected from all power sources.
Only qualified experts familiar with the hazards involved and the relevant regulations must perform repairs.
Cleaning
Clean the exterior of the device with a soft, dry cloth or brush only. Never use any aggressive cleansing agents or chemical solutions since these may damage the casing or impair its function.
13. Disposal
Electronic devices are recyclable waste and must not be disposed of in the household waste! Dispose of the product according to the applicable statutory provisions at the end of its service life.
Remove any inserted batteries and dispose of them separately from the product.
Disposal of Used Batteries/Rechargeable Batteries
You as the end user are required by law (Battery Ordinance) to return all used batteries and rechargeable batteries. Disposing of them in the household waste is prohibited.
Batteries/rechargeable batteries that contain any hazardous substances are labelled with the adjacent icon to indicate that disposal in domestic waste is forbidden. The descriptions for the respective heavy metals are: Cd = cadmium, Hg = mercury, Pub = lead. You may return your used batteries/rechargeable batteries free of charge to collection points in your municipality and anywhere where batteries/rechargeable batteries are sold.
14. Troubleshooting
By purchasing this device, you have acquired a product designed to the state of the art and operationally reliable. Nevertheless, problems or errors may occur.
Therefore, we would like to describe how to eliminate possible errors here:

Always observe the safety information.
No sound is audible:
- A device in the playback chain is not turned on.
- The wrong input was selected on the amplifier.
- The button EXTERNAL PROCESSOR (6) has been pushed at the amplifier, but the connected device is not switched on or no device is connected.
- The VOLUME control (5) is set to the minimum.
One channel does not work:
- An RCA cable is disconnected from the source device (e.g. the cassette recorder) or the amplifier input.
- A speaker cable has come loose from the speaker terminals.
A drone is audible:
- The cinch cable is defective.
There is distortion:
- The amplifier input receives an excessive signal.
- The volume is set too high, the speakers distort.
- The sound controllers for bass and treble are turned up too far.
- The control source is a high-level device and has been connected to the phono input of the amplifier incorrectly.
Playback has no bass share:
• One speaker is connected the wrong way.
- The BASS controller (15) on the amplifier is set to minimum.
Playback has no treble share:
- The TREBLE controller (14) on the amplifier is set to minimum.

Repairs other than those described above must only be carried out by an authorised specialist.
15. Technical Data
Supply voltage: 230 V/50 Hz
Power consumption: 100 W
Loudspeaker impedance: 6-8 Ohm
Input sensitivity/impedance: .... Line 250 mV/47 kOhm
Phono 2.5 mV/47 kOhm
Output power: 2 x 50 W at 6 Ohm
Total harmonic distortion: ....<0,05 %
Frequency response: 20-20000 Hz (+1/-2 dB)
S/N ratio: Line 70 dB(A)
Phono 60 dB(A)
Channel separation: 60 dB
Sound controller: Bass +/-10 dB/100 Hz
Treble +/-10 dB/10 kHz
Dimensions: 420 x 135 x 215 mm
Weight: 6.2 kg
Page
France (email): technique@conrad-france.fr
(6) Touche EXTERNAL PROZESSOR
(1) Touches BAND / MEMO SCAN / MEMO HOLD
(3) Touche EXTERNAL PROCESSOR
11. Manipulation
Apparition de distorsions:
a) Algemeen
(1) Toets POWER
(6) Toets EXTERNAL PROCESSOR
(1) Toetsen BAND / MEMO SCAN / MEMO HOLD
(3) Toets EXTERNAL PROCESSOR
11. Gebruik
© Copyright 2014 by Conrad Electronic SE.
GB Legal notice
This is a publication by Conrad Electronic SE, Klaus-Conrad-Str. 1, D-92240 Hirschau (www.conrad.com).
All rights including translation reserved. Reproduction by any method, e.g. photocopy, microfilming, or the capture in electronic data processing systems require the prior written approval by the editor. Reprinting, also in part, is prohibited. This publication represents the technical status at the time of printing.
© Copyright 2014 by Conrad Electronic SE.
© Copyright 2014 by Conrad Electronic SE. V2_0714_01


- renkforce
- Taste EXTERNAL PROZESSOR
- Tasten BAND / MEMO SCAN / MEMO HOLD
- Taste EXTERNAL PROCESSOR
- Introduction
- Intended Use
- Symbols
- Scope of Delivery
- Safety Information
- Features
- Set-Up
- Connection
- a) Connection of the Cinch Sockets
- CD-Player
- Connections AV1/AV2
- Cassette deck
- Equalizer connections
- b) Connecting the Speaker Outputs
- c) Connection of the Control Lines for the Remote Control
- d) Mains Connection
- Operation
- a) General Information
- POWER button
- Display FUNCTION
- Infrared recipient REMOTE SENSOR
- Button PRESET EQ
- Controller VOLUME
- Button EXTERNAL PROZESSOR
- Controller MIC LEVEL
- Connection MIC
- PHONO button
- CD button
- Button AV1/AV2
- Button TUNER
- Button TAPE
- Controller TREBLE
- Controller BASS
- MUTE key
- Connection PHONES
- b) Playing an Audio Source
- c) Recording
- Remote Control
- a) Inserting the Batteries/Rechargeable Batteries
- b) Function of the Buttons
- Buttons BAND / MEMO SCAN / MEMO HOLD
- Button VOLUME +/-
- Button EXTERNAL PROCESSOR
- Drive function buttons for the CD player
- Buttons for input selection at the amplifier
- Handling
- Maintenance
- Cleaning
- Disposal
- Disposal of Used Batteries/Rechargeable Batteries
- Troubleshooting
- Always observe the safety information.
- No sound is audible:
- One channel does not work:
- A drone is audible:
- There is distortion:
- Playback has no bass share:
- Playback has no treble share:
- Technical Data
- Page
- Touche EXTERNAL PROZESSOR
- Touches BAND / MEMO SCAN / MEMO HOLD
- Touche EXTERNAL PROCESSOR
- Manipulation
- Apparition de distorsions:
- a) Algemeen
- Toets POWER
- Toets EXTERNAL PROCESSOR
- Toetsen BAND / MEMO SCAN / MEMO HOLD
- Toets EXTERNAL PROCESSOR
- Gebruik
- GB Legal notice
Brand : Renkforce
Model : A1000
Category : Receiver