T21 - Receiver Renkforce - Free user manual and instructions
Find the device manual for free T21 Renkforce in PDF.
| Product Type | Mini stereo amplifier / receiver |
| Brand | Renkforce |
| Model | T21 |
| Dimensions (W x D x H) | 240 x 140 x 46 mm |
| Weight | 3.2 kg |
| Power supply | 230 V/AC, 50 Hz |
| Fuse | F1.5 AL/250 V (5 x 20 mm) |
| Output power (RMS) | 2 x 50 W |
| Speaker output impedance | 4 ohms |
| Input impedance | >10 kOhms |
| Audio inputs | 4 x RCA (L/R), Bluetooth, USB |
| Audio outputs | Speakers (4-8 ohms), headphone 6.3 mm |
| Bluetooth | Version 5, range max 30 m (line of sight) |
| USB | Supports up to 32 GB, formats MP3, WAV, APE, FLAC |
| Remote control | Infrared, batteries 2 x AAA 1.5 V |
| Frequency range | 20 - 20,000 Hz |
| Signal-to-noise ratio | >86 dB |
| Harmonic distortion | <0.1% (at 1 kHz) |
| Amplifier class | Class D |
| Operating conditions | 0 to +40 °C, <85% RH |
| Storage conditions | -40 to +55 °C, <93% RH |
| Safety | Indoor use only, avoid moisture and liquids, follow safety instructions |
| Maintenance and cleaning | Disconnect before cleaning, use a dry lint-free cloth |
Frequently Asked Questions - T21 Renkforce
User questions about T21 Renkforce
0 question about this device. Answer the ones you know or ask your own.
Ask a new question about this device
Download the instructions for your Receiver in PDF format for free! Find your manual T21 - Renkforce and take your electronic device back in hand. On this page are published all the documents necessary for the use of your device. T21 by Renkforce.
USER MANUAL T21 Renkforce
natural_image
Abstract geometric star-like pattern with five petal-like shapes and dot patterns (no text or symbols)renkforce
GB Operating Instructions
T21 Mini-amplifier
Item No. Page 238 - 32
F Mode d'emploi
- Introduction....19
- Explanation of symbols....19
- Intended use....20
- Package contents 20
- Safety instructions ....21
- Features and functions 22
- Components and buttons....23
- Installation....24
- Inserting the batteries into the remote control ....24
- Connections....25
a) Connecting the RCA inputs 25
b) Connecting speakers....25
c) Connecting headphones....26
- Connecting the amplifier to the mains .....26
- Using the amplifier....27
a) Basic operations....27
b) Playing music from a USB storage device 27
c) Bluetooth playback....28
- Maintenance and cleaning....29
a) Cleaning 29
b) Replacing the fuse....29
- Handling....30
- Troubleshooting....30
- Disposal 31
a) Product 31
b) Batteries 31
- Technical data....32
- Declaration of conformity (DOC)....32
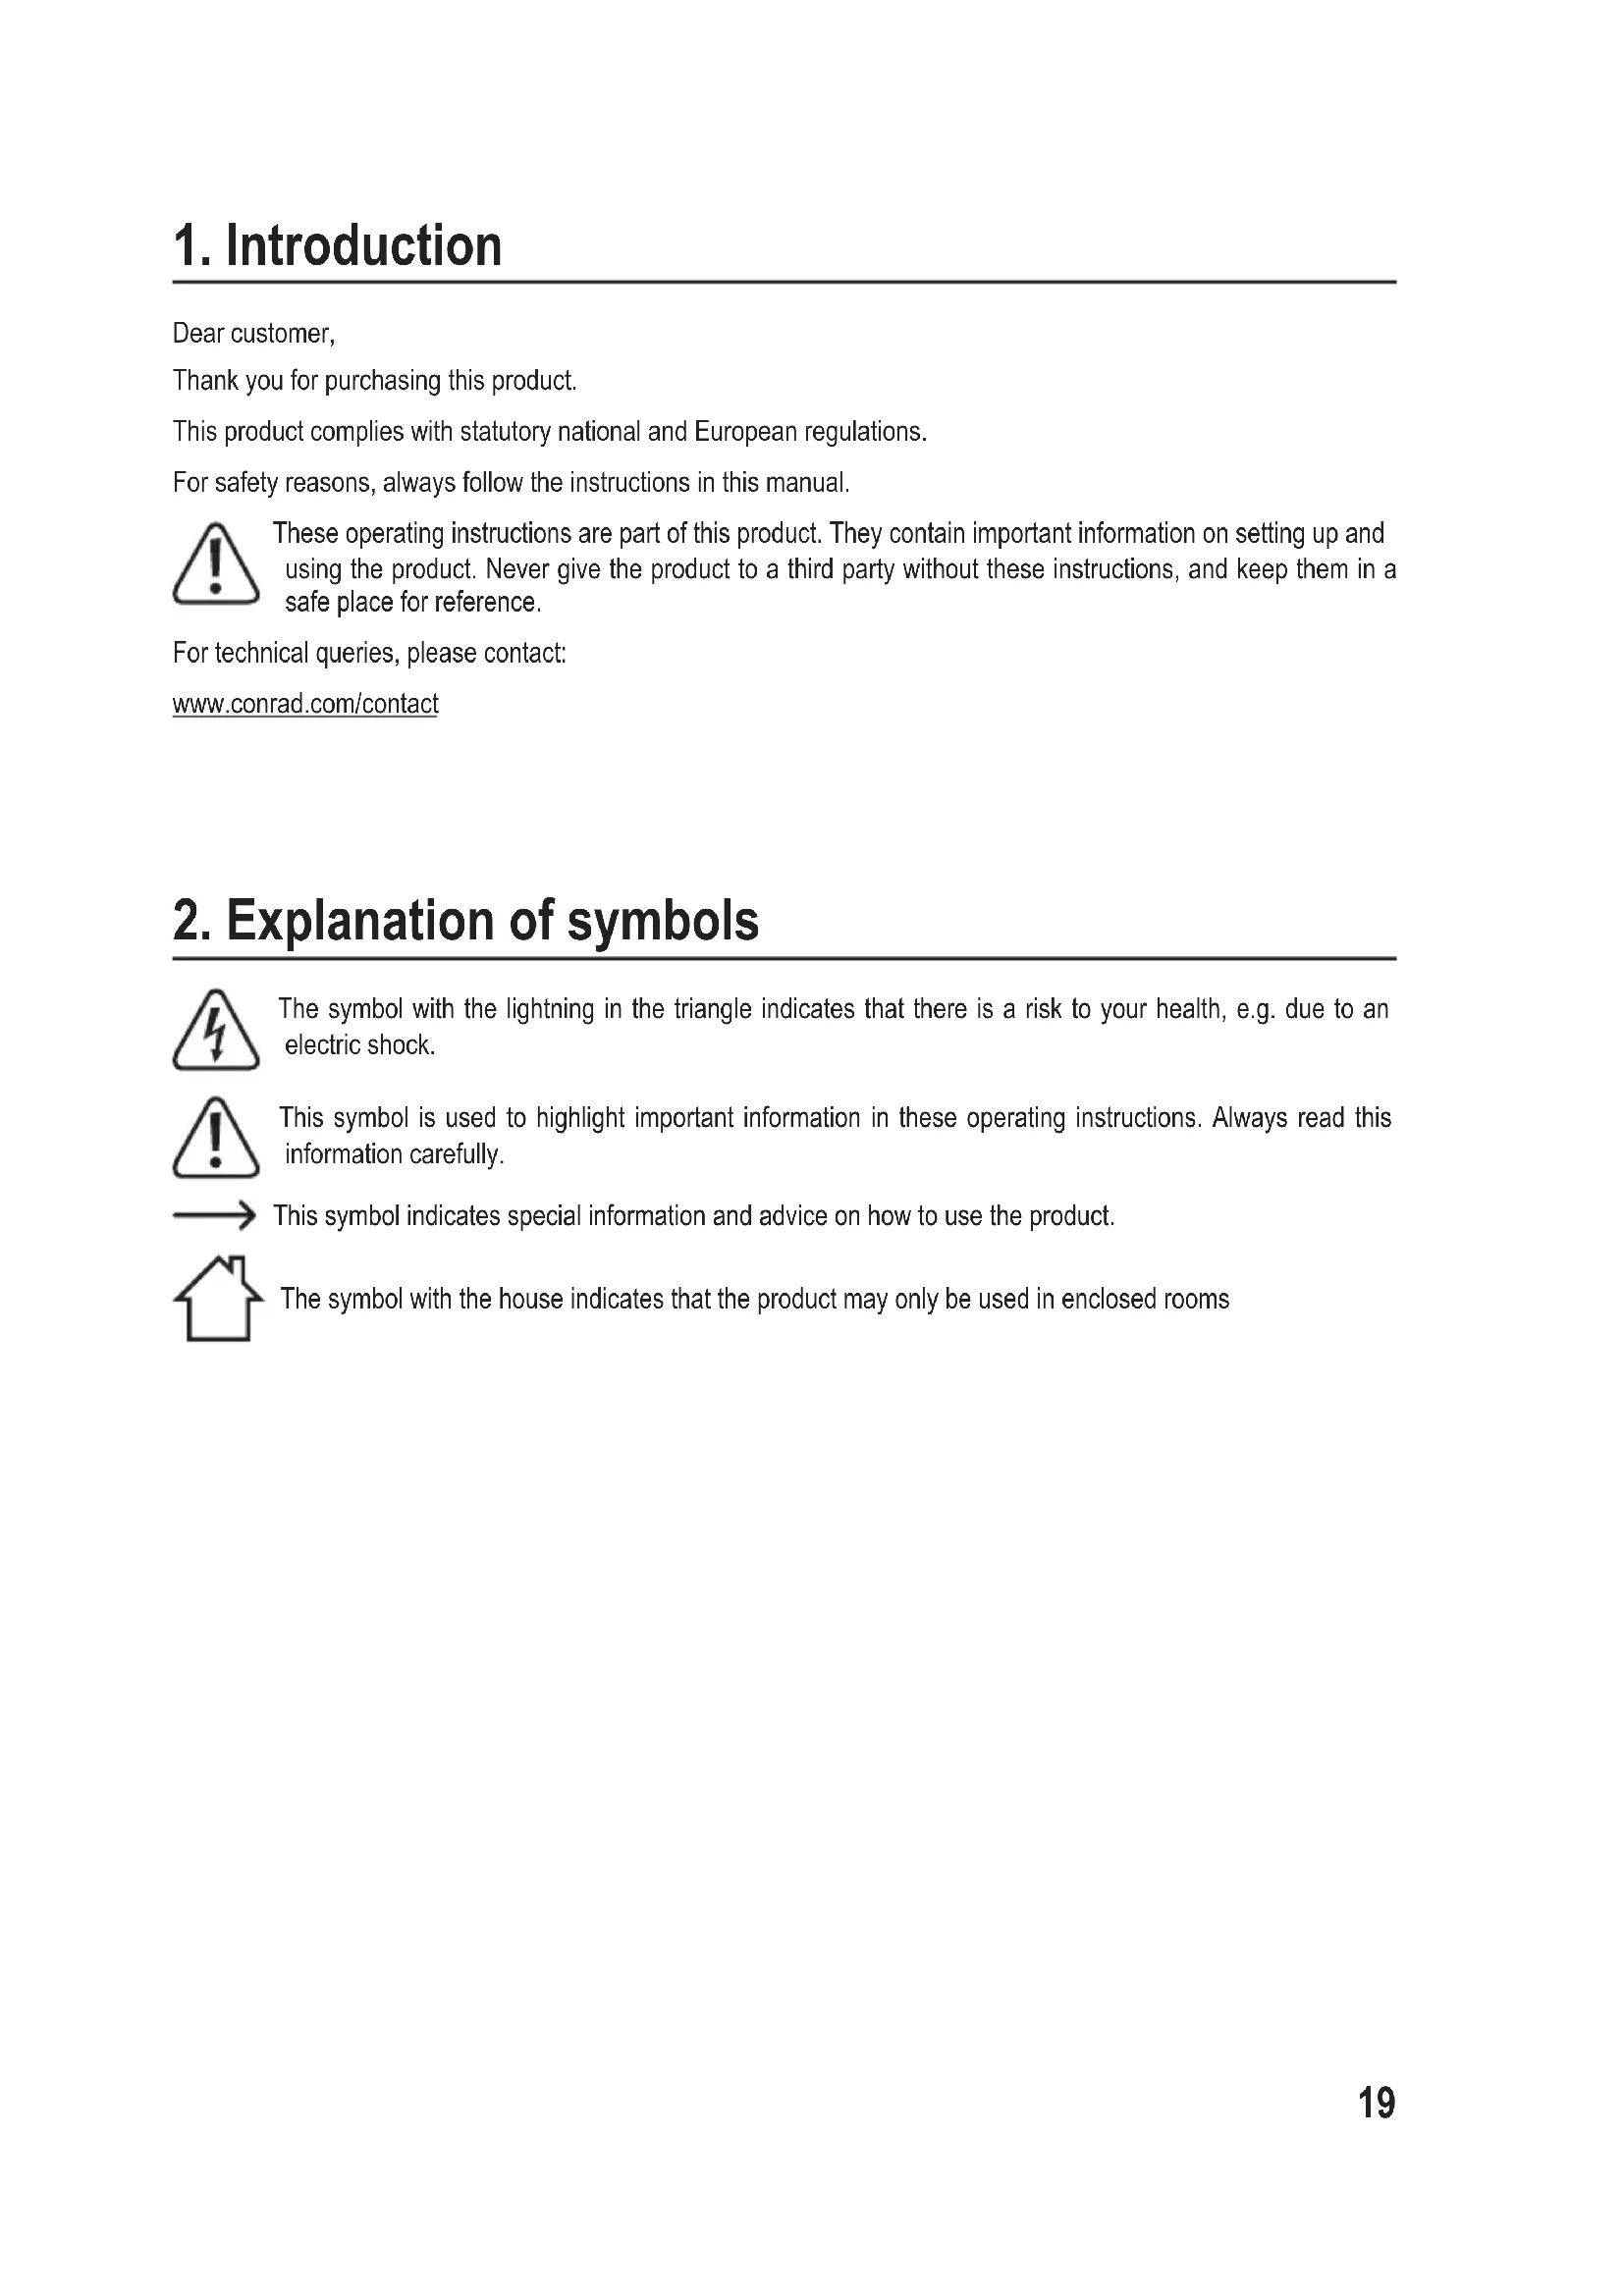
1. Introduction
Dear customer,
Thank you for purchasing this product.
This product complies with statutory national and European regulations.
For safety reasons, always follow the instructions in this manual.

These operating instructions are part of this product. They contain important information on setting up and using the product. Never give the product to a third party without these instructions, and keep them in a safe place for reference.
For technical queries, please contact:
www.conrad.com/contact
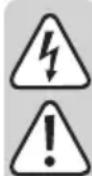
2. Explanation of symbols

The symbol with the lightning in the triangle indicates that there is a risk to your health, e.g. due to an electric shock.

This symbol is used to highlight important information in these operating instructions. Always read this information carefully.

This symbol indicates special information and advice on how to use the product.

The symbol with the house indicates that the product may only be used in enclosed rooms
3. Intended use
This mini Hi-Fi amplifier is designed to amplify low-level audio signals from home audio systems. It connects to an audio playback device and a set of speakers. You can play music from Bluetooth and USB storage devices.
The amplifier must only be connected to an earthed mains socket with a 230 V/AC, 50 Hz alternating current.
It is intended for indoor use only. Do not use it outdoors. Contact with moisture, e.g. in bathrooms, must be avoided under all circumstances.
For safety and approval purposes, you must not rebuild and/or modify this product. Using the product for purposes other than those described above may damage the product. In addition, improper use can cause hazards such as short circuits, fire and electric shocks. Read the instructions carefully and store them in a safe place. Make this product available to third parties only together with its operating instructions.
All company and product names are trademarks of their respective owners. All rights reserved.
4. Package contents
- Mini amplifier
- Mains cable
- IR remote control
- Operating instructions
Up-to-date operating instructions
Download the latest operating instructions via the link www.conrad.com/downloads or scan the QR code. Follow the instructions on the website.

5. Safety instructions
Read the operating instructions and safety information carefully. If you do not follow the safety instructions and information on proper handling in this manual, we assume no liability for any resulting personal injury or damage to property. Such cases will invalidate the warranty/guarantee.
- This product is not a toy. Keep it out of the reach of children and pets.
- Do not leave packaging material unattended, as it may become dangerous playing material for children.
- Protect the product from extreme temperatures, direct sunlight, strong jolts, high humidity, moisture, flammable gases, vapours and solvents.
- Do not place the product under any mechanical stress.
-
If it is no longer possible to operate the product safely, stop using it and prevent unauthorized use. Safe operation can no longer be guaranteed if the product:
-
is visibly damaged,
- is no longer working properly,
- has been stored for extended periods in poor ambient conditions or
- has been subjected to any serious transport-related stress.
- Always handle the product carefully. Jolts, impacts or a fall even from a low height may damage the product.
- Pay attention to all additional safety information in the individual sections of these instructions.
- Always observe the safety and operating instructions of any other devices which are connected to the product.
- Consult a technician if you are not sure how to use or connect the product.
- Maintenance, modifications and repairs must be done by a technician or an authorized repair centre.
- If you have questions which remain unanswered by these operating instructions, contact our technical support service or other technical personnel.
- The mains outlet must be close to the device and easily accessible.
- Never touch the mains plug with damp or wet hands, as this may cause a fatal electric shock!
- Ensure that the mains cable is not pinched, bent, damaged by sharp edges or otherwise subjected to mechanical stress. Avoid excessive thermal stress on the mains cable from extreme heat or cold. Do not modify the mains cable, as this may damage the interior components. A damaged mains cable can cause a fatal electric shock.
- Do not touch the mains cable if it is damaged. First, switch off the appropriate mains socket (e.g. via the respective circuit-breaker and the RCD), and then carefully pull the mains plug from the mains socket. Never use the product if the mains cable is damaged.
• Always read these operating instructions before using, installing, configuring or servicing this product. - Never place objects containing liquid (e.g. glasses, buckets, vases or plants) on or directly next to the device. Liquids may seep into the casing and impair the electrical safety of the device. There is also the risk of a fire or a fatal electric shock. Isolate the mains socket (e.g. switch off the circuit breaker and RCD), and then disconnect the mains plug from the mains socket. Discontinue use and take the product to a specialist repair centre.
- Make sure the device is adequately ventilated when in use. Do not cover ventilation holes with magazines, table cloths, curtains or other objects.
- Do not place open flames (such as burning candles) on or directly next to the device.
- Do not operate the device when it is unattended.
- Only use the product in temperate climates. It is not suitable for use in tropical climates.
6. Features and functions
- IR remote control
- Bluetooth interface for wireless music playback from your phone, tablet or computer
- USB interface for playback from a USB storage device
- Four gold-plated RCA inputs for connecting auxiliary audio devices
• High output power for crystal-clear sound
• Gold-plated speaker connections for speaker wires or banana plugs - 6.3 mm headphone socket
- Premium casing with thick aluminium front panel
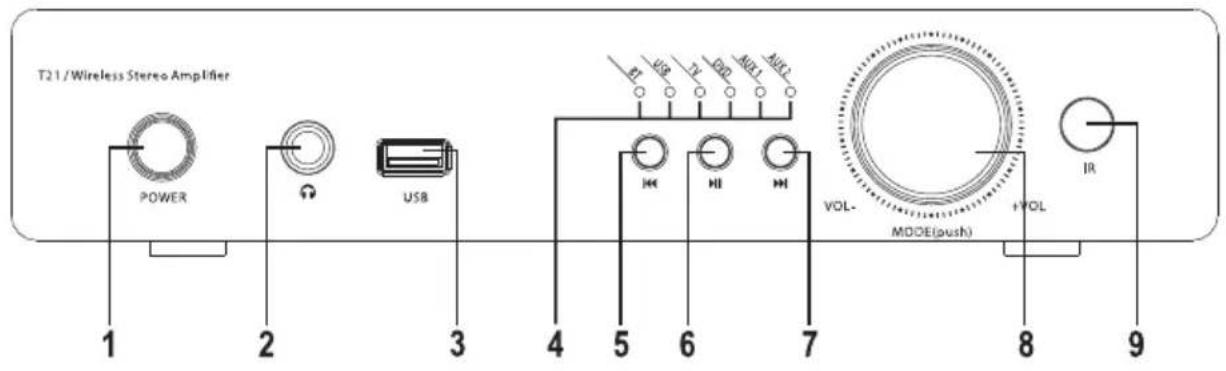
7. Components and buttons
text_image
T21 / Wireless Stereo Amplifier POWER USB 1 2 3 4 5 6 7 8 9 VOL- MODE(push) +VOL IR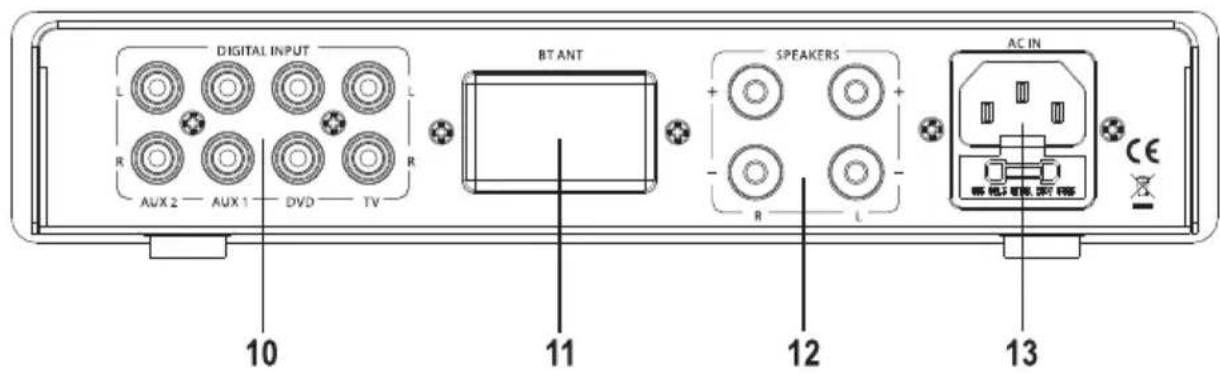
text_image
DIGITAL INPUT L R AUX 2 — AUX 1 — DVD — TV BT ANT SPEAKERS R L AC IN 10 11 12 13 CE1 POWER button
2 Headphone socket
3 USB interface
4 Audio input indicator
5 button
6 button
7 button
8 Volume control wheel
9 IR receiver
10 Digital inputs
11 Bluetooth antenna
12 Speaker connections
13 Power-in socket
14 MODE button
15 - button
16 + button
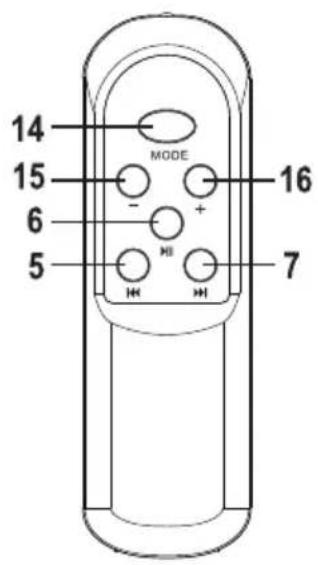
text_image
14 MODE 15 - + 16 6 HI 5 78. Installation
When selecting the setup location, take the room layout into consideration (e.g. location of the nearest socket).
Avoid proximity to direct sunlight, vibrations, dust, hot and cold temperatures and dampness. The device must not be placed next to powerful transformers or motors.

The device must be operated on a stable, level surface. There must be enough space around the device for air to circulate, otherwise heat will not dissipate properly. Only place the device on smooth, level surfaces (not carpets or other uneven surfaces). Do not cover the ventilation slots.
Failure to observe these instructions may damage the device.
Do not drill holes or screw extra screws into the device. This will damage the interior components and may cause a fatal electric shock.
Ensure that the device is placed on a stable surface to prevent it from falling off and causing injury.

The feet may leave marks on certain types of furniture.
Do not place the device on top of valuable furniture without appropriate protection.
9. Inserting the batteries into the remote control
The amplifier can be controlled wirelessly using the remote control.

Keep batteries out of the reach of children.
Batteries must not be placed in household waste.
Always ensure that batteries are inserted in the correct polarity.
Remove the batteries when you do not plan to use the remote control for a prolonged period.
Do not leave batteries lying around, as they constitute a choking hazard for children and pets. If swallowed, seek immediate medical advice.
Batteries must not be short-circuited or thrown into open flames. Do not attempt to recharge non-rechargeable batteries, as this may cause an explosion.
When handling leaking or damaged batteries, always use suitable protective gloves to avoid burning your skin.
- Slide the battery compartment cover off the remote control.
- Insert two new 1.5 V AAA batteries into the battery compartment. Pay attention to the polarity markings on the bottom of the compartment.
- Slide the cover back onto the remote control.
- Replace the batteries when the range of the remote control deteriorates or the remote control ceases to function properly.
- Use alkaline batteries to ensure a longer battery life.
- Never mix old and new batteries or batteries from different manufacturers. Do not mix non-rechargeable batteries with rechargeable batteries.
Ensure that the mains plug is disconnected before connecting the amplifier.
e connecting, turn off all devices that you want to connect to the amplifier.
a) Connecting the RCA inputs

Only connect shielded RCA cables to the RCA inputs. Other cables may cause interference.
void distortion or mismatching, only connect devices with an RCA output. Connecting other types of device may damage the amplifier.
Suitable devices include DVD players, CD players, and other playback devices with a line-out connection.
Do not connect a record player to the RCA inputs without using a phono preamplifier.
- There are four RCA inputs for connecting audio devices.
- Connect the RCA outputs on your playback device (e.g. DVD player, CD player or tuner) to the DIGITAL INPUT sockets (10).
The white RCA socket ("L") should be connected to the left RCA output on the playback device (e.g. CD player).
The red RCA socket ("R") should be connected to the right RCA output on the playback device (e.g. CD player).
b) Connecting speakers

Two cables are required to connect each speaker. Ensure there are no sharp edges that may damage the cables.
Ensure that your speakers have a sufficiently high power rating (see "Technical data").
Connect the speakers directly to the amplifier. Do not use headphone adapters or distribution boxes. If you are not sure how to connect your speakers, contact a specialist.
Check that all speakers are connected in the correct polarity (observe the plus and minus markings).
This amplifier has been designed for speakers with an impedance of 4-8 Ohms. Only connect one speaker to each output.
- You can connect banana plugs or stripped speaker wires (max. 2.5 mm in diameter).
- If your speakers come with banana plugs, insert the plugs into the speaker connections on the amplifier.
- To attach speaker wires, unscrew the clamps slightly and insert the stripped ends of each wire. Tighten the clamps to secure the wires in place. To prevent a short circuit, ensure that the strands on the speaker wires are fully inserted into the clamps.
- Connect the right speaker to the "R" connection (12):
Connect the positive pole of the right speaker to the “+” clamp.
Connect the negative pole of the right speaker to the “-” clamp. - Connect the left speaker to the "L" connection (12):
Connect the positive pole of the left speaker to the “+” clamp.
Connect the negative pole of the left speaker to the “-” clamp.
c) Connecting headphones
The amplifier features a headphone socket (2) for connecting headphones.
- Insert the jack plug on your headphones into the headphone socket (2).
- If the jack plug does not fit into the socket, use an adapter.
→ The speakers are automatically disabled when headphones are connected.
11. Connecting the amplifier to the mains

The mains socket must be easily accessible so that the amplifier can be easily disconnected from the mains in the event of a fault.
Make sure that the voltage indicated on the amplifier corresponds with your household mains voltage. Never attempt to operate the device with any other type of voltage.
Do not let the mains cable come into contact with other cables.
Exercise caution when handling mains cables and mains connections. Mains voltages can cause fatal electric shocks.
Do not leave cables lying around; ask an electrician to lay them properly to prevent the risk of an accident.
- Insert the mains cable into the power-in socket (13) on the amplifier.
- Insert the mains plug into a grounded mains socket.
12. Using the amplifier
a) Basic operations
- Press the POWER button (1) to switch the amplifier on or off.
- To increase the volume, turn the volume control wheel (8) clockwise or press the + button (16) on the remote control.
- To decrease the volume, turn the volume control wheel (8) anticlockwise or press the - button (15) on the remote control.
- To select the audio source, press the volume control wheel (8) or the MODE button (14) on the remote control. The selected audio source will be shown on the input indicator (4).

When using the remote control, point the front of the remote control at the IR receiver (9) on the amplifier.
b) Playing music from a USB storage device
The amplifier features a USB interface (3) that can play audio files on USB storage devices (see "Technical data" for details on supported file formats).

Do not connect battery-operated MP3 players to the USB interface (3). The power provided by the USB interface (3) may charge the batteries and cause them to overheat or even explode.
The USB interface supports USB storage devices with a capacity of up to 32 GB.
The USB interface (3) only supports USB storage devices. Most MP3 players with a USB connection automatically switch to PC mode when they are connected to the amplifier. Music playback is not possible in this mode.
Some USB storage devices may not be recognized by the amplifier.
If your USB storage device is not recognized, try reconnecting it to the amplifier.
- Insert your USB storage device into the USB interface (3).
- The amplifier will automatically switch to USB input and start playback.
- Press the button (6) on the amplifier or remote control to start or stop playback.
- Press the Button (5) on the amplifier or remote control to skip to the previous song.
- Hold down the I button (5) on the remote control to rewind the current song.
- Press the button (7) on the amplifier or remote control to skip to the next song.
- Hold down the button (7) on the remote control to fast-forward the current song.
c) Bluetooth playback

The amplifier supports Bluetooth, allowing you to stream audio from a Bluetooth device. Before streaming audio, follow the instructions below to pair your audio device with the amplifier.
Pairing
- Switch the amplifier on.
- Press the volume control wheel (8) or the MODE button (14) on the remote control and set the audio input to BT.
- The BT LED on the audio input indicator (4) will flash quickly, indicating that the amplifier is not paired with a Bluetooth device.
- Turn on your Bluetooth device and enable Bluetooth (refer to your device's instruction manual for details).
• Search for nearby Bluetooth devices. - Select "BT Speaker" from the list of available devices.
- Connect your device to the amplifier.
- If you are prompted to enter a password, enter 0000.
- Once the devices have been paired, the BT LED (4) on the audio input indicator will stay constant/flash slowly.
- If the devices failed to pair, repeat the above steps. You may need to delete the amplifier from the list of Bluetooth devices (refer to your device's instruction manual for details).

You can only pair one Bluetooth with the amplifier at any one time. If the amplifier is already paired with another Bluetooth device, the existing connection must be disabled via the device's Bluetooth menu.
The Bluetooth connection will be interrupted if the devices move out of range, or if you switch off the amplifier and/or Bluetooth device. The connection will be automatically re-established when the devices are switched on and within range.
Ensure that you enable the automatic reconnection feature on your Bluetooth device, otherwise the Bluetooth connection will not be automatically re-established (refer to your device's instruction manual for details).
Playback
- Press the button (6) on the amplifier or remote control to start or stop playback.
- Press the button (5) on the amplifier or remote control to skip to the previous song.
- Press the button (7) on the amplifier or remote control to skip to the next song.
13. Maintenance and cleaning
Always observe the following safety information before cleaning or servicing the amplifier:

Live components may be exposed when the case is opened or components are removed.
The device must be disconnected from all power supplies before carrying out any servicing or repair work.
Capacitors inside the device may still carry a voltage when they have been disconnected from the power supply.
Repair work must only be done by qualified technicians who are familiar with the potential hazards and the relevant regulations.
a) Cleaning

Never use aggressive detergents, rubbing alcohol or other chemical solutions, as these could damage the housing or even impair the functioning of the product.
• Always disconnect the product from the power supply before cleaning it.
- Use a dry, lint-free cloth to clean the product.
b) Replacing the fuse
If you need to replace the fuse, only use fuses of the specified type and rated current (see "Technical data" for details).

Never attempt to bridge or repair the fuse holder.
- Unplug the mains plug from the mains socket and disconnect the mains cable from the power-in socket (13).
- Carefully remove the fuse holder and the defective fuse from the power-in socket (13) using a suitable screwdriver.
- Remove the defective fuse and replace it with a new fuse of the specified type.
- Carefully push the fuse holder with the new fuse back into its position in the power-in socket (13).
- Once you have installed the new fuse, reconnect the device to the mains.
14. Handling
- Never insert the mains plug into a mains socket immediately after the device has been moved from a cold to a warm environment. Condensation may form and damage the device. Allow the device to reach room temperature before connecting it. Wait until the condensation has evaporated.
- Never unplug the mains plug by pulling on the cable; always use the grips on the plug.
- Unplug the mains plug from the mains socket if you do not plan to use the device for an extended period of time.
- For safety reasons, unplug the mains plug from the mains socket during thunderstorms.
- To ensure sufficient ventilation, do not cover the device. In addition, air circulation must not be impaired by objects such as magazines, table clothes and curtains.
15. Troubleshooting
This amplifier is built using the latest technology and is safe to use. If you encounter any issues, follow the trouble-shooting steps below.

Always follow the safety instructions!
The amplifier does not switch on
- The mains plug is not plugged into the mains socket.
- The mains cable is not connected to the power-in socket (13).
- The mains socket is switched off.
- The fuse is defective.
There is no sound
- Your audio playback device is switched off.
- The wrong input was selected.
• The volume is set to minimum.
There is no sound from one of the channels
- An RCA cable was disconnected from the source device (e.g. DVD player) or the amplifier input.
• One of the speaker wires has become loose.
There is a humming sound
• One of the RCA cables is defective.
The sound is distorted
- The signal received by the amplifier is too strong.
• The volume is too high.
There is no bass
• One of the speakers is connected in the reverse polarity.
Bluetooth playback is interrupted
- The devices are not within range (max. 30 m).
- Other devices are interfering with Bluetooth transmission. Move away from other wireless devices and devices that may cause interference (e.g. powerful electric motors, fluorescent lamps and microwaves).
No Bluetooth playback
- The volume on your Bluetooth device is set to minimum.
- The Bluetooth connection was interrupted. Re-establish the connection and try again.
• The devices are not within range (max. 30 m).

Any repair work other than that described above must be carried out by an authorized specialist.
16. Disposal
a) Product

Electronic devices are recyclable waste and must not be disposed of in household waste. Always dispose of the product according to the relevant statutory regulations.
e any inserted batteries from the remote control and dispose of them separately from the product.
b) Batteries

You as the end user are required by law to return all used batteries. They must not be placed in household waste.
Batteries that contain hazardous substances are labelled with this symbol to indicate that disposal in domestic waste is forbidden. The abbreviations for heavy metals in batteries are: Cd = Cadmium, Hg = Mercury, Pb = Lead (shown on batteries, e.g. below the trash icon on the left).
Used batteries can be returned to local collection points, our stores or battery retailers.
You thus fulfil your statutory obligations and contribute to the protection of the environment.
17. Technical data
Operating voltage 230 V/AC 50 Hz
Fuse.....F1.5 AL/250 V (5 x 20 mm)
Batteries (remote control)....2 x 1.5 V AAA
Output power....2 x 50 W (RMS)
Frequency range 20 - 20000 Hz
Input impedance ....>10 kOhm
Input sensitivity ....<500 mV
S/N ratio.....>86 dB
Harmonic distortion....<0.1 % (@1 kHz)
Output impedance 4 Ohms
Amplifier class ....Class D
USB storage device capacity......Max. 32 GB
Supported file formats ....MP3, WAV, APE, FLAC
Bluetooth version....5
Transmission frequency....2.402 - 2.480 GHz
Transmission power....2.37 dBm
Transmission distance....max. 30 m (line of sight)
Dimensions....240 x 140 x 46 mm
Weight 3.2 kg
Operating conditions....0 to +40 °C / <85 % rel. humidity
Storage conditions....-40 to +55 °C / <93 % rel. humidity
18. Declaration of conformity (DOC)
Conrad Electronic SE, Klaus-Conrad-Straße 1, D-92240 Hirschau hereby declares that this product conforms to the 2014/53/EU directive.

Click on the following link to read the full text of the EU declaration of conformity: www.conrad.com/downloads
Select a language by clicking on a flag symbol, and then enter the product order number in the search box. The EU Declaration of Conformity is available for download in PDF format.
Page
France (email): technique@conrad-france.fr
Suisse:
www.conrad.ch
2. Explication des symboles
text_image
DIGITAL INPUT L R AUX 2 AUX 1 DVD TV BT ANT SPEAKERS R L AC IN WBS SET TEL. RMT RMS CE 10 11 12 13Apparition de distorsions
c) Bluetooth-weergave

Geen Bluetooth-weergave
GB This is a publication by Conrad Electronic SE, Klaus-Conrad-Str. 1, D-92240 Hirschau (www.conrad.com).
All rights including translation reserved. Reproduction by any method, e.g. photocopy, microfilming, or the capture in electronic data processing systems require the prior written approval by the editor. Reprinting, also in part, is prohibited. This publication represents the technical status at the time of printing.
Copyright 2020 by Conrad Electronic SE.
Copyright 2020 by Conrad Electronic SE.
Copyright 2020 by Conrad Electronic SE.