01504 - Indoor bike trainer VitalMaxx - Free user manual and instructions
Find the device manual for free 01504 VitalMaxx in PDF.

| Product type | Indoor cycling trainer |
| Brand | VitalMaxx |
| Model | 01504 |
| Category | HC (home use) |
| Maximum load capacity | 100 kg |
| Power supply | 3 V (2 AA 1.5 V batteries) |
| Adjustable resistance | 8 levels (knob) |
| Display functions | Time, speed, distance, calories, auto scan |
| Heart rate monitor | Integrated with MODE and CLEAR buttons |
| Assembly type | Foldable with safety pin |
| Adjustments | Seat height and resistance |
| Pedals | With L/R markings, reverse thread |
| Safety | Anti-slip protective caps, automatic stop after 3 minutes of inactivity |
| Maintenance | Soft cloth and mild detergent |
| Storage | Clean, dry place, protected from frost and sunlight |
| Standards | DIN EN ISO 20957-1 and 20957-5 |
| After-sales service | DS Produkte GmbH, phone +49 38851 314650 |
| Spare parts | Available via the exploded view (handlebar, seat, pedals, etc.) |
Frequently Asked Questions - 01504 VitalMaxx
User questions about 01504 VitalMaxx
0 question about this device. Answer the ones you know or ask your own.
Ask a new question about this device
Download the instructions for your Indoor bike trainer in PDF format for free! Find your manual 01504 - VitalMaxx and take your electronic device back in hand. On this page are published all the documents necessary for the use of your device. 01504 by VitalMaxx.
USER MANUAL 01504 VitalMaxx
natural_image
Exterior view of a modern exercise bike with black arms and white frame (no text or symbols visible)01504
DE
Gebrauchsanleitung
ab Seite 3
EN
Operating instructions
starting on page 13
FR
Mode d'emploi
natural_image
Technical line drawing of a mechanical assembly with gears and mounting points (no text or symbols)natural_image
Technical line drawing of a mechanical component with no visible text or symbolsnatural_image
Technical line drawing of a mechanical assembly with no visible text or symbolsnatural_image
Technical line drawing of a mechanical or fluidic device with curved pipes and a cylindrical base (no text or symbols)natural_image
Technical line drawing of a mechanical device with attached components and a separate schematic view (no text or symbols)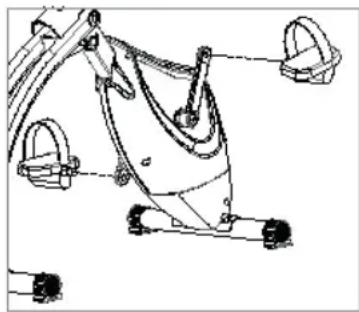
natural_image
Technical line drawing of a mechanical device with levers and wheels (no text or symbols)natural_image
Exterior view of a modern exercise bike with curved arm and seat (no text or symbols visible)
text_image
Technical diagram of a stationary exercise machine with numbered components and labeled partsSafety Instructions 14
Items Supplied 15
Device Overview 16
Before Initial Use 16
Assembling the Training Device 17
Inserting the Batteries into the Training Computer 18
Use 18
After Training 19
Cleaning and Storage 20
Technical Data 20
Disposal 20
Exploded Drawing 21
Explanation of the Symbols

Danger symbols: This symbol indicates dangers of injury.
Read through the associated safety notices carefully and follow them.

Circuit symbol for direct current

Supplementary information

Read operating instructions before use!
Explanation of the Signal Words
WARNING warns of possible serious injuries and danger to life
NOTICE warns of material damage
Dear Customer,
We are delighted that you have chosen this training device.
Before using the device for the first time, please read through these operating instructions carefully and keep them for future reference and other users. They form an integral part of the device.
The manufacturer and importer do not accept any liability if the information in these operating instructions is not complied with.
If you have any questions about the device and about spare parts / accessories, please contact the customer service department via our website:
- This device is intended to be used for fitness training and a workout. It is suitable exclusively for use while sitting down.
- Only one person may train on the training device at any one time.
- The device is able to withstand a maximum weight of 100 kg.
- Please Note – The training data of this device has a low level of accuracy.
- This device is designed exclusively for use at home.
- The device is not suitable for use outdoors and in rooms with a high atmospheric humidity (e.g. bathrooms).
- This device is not suitable for therapeutic purposes.
- The device is for personal use only and is not intended for commercial applications.
- Use the device only as described in the operating instructions. Any other use is deemed to be improper.
- The following are excluded from the warranty: all defects caused by improper handling, damage or unauthorised attempts at repair. This also applies to normal wear and tear.
Safety Instructions
The safety level of the training device can only be maintained if it is regularly checked for damage. Therefore, in the interest of your own safety, inspect the training device for damage each time before you use it (look for cracks, holes, loose screws etc.). If while using the training device you hear unusual noises from the device, stop training immediately. If there are any defects, the training device may no longer be used until it has been repaired.
The training device must no longer be used if it is damaged. In this case, contact the customer service department or a specialist workshop.

WARNING – Danger of Injury
- Danger of suffocation! Keep the accessories and the packaging material away from children and animals.
This device should not be used by people (including children) with impaired sensory or mental faculties or who do not have adequate experience and/or knowledge of such devices, unless they are supervised by a person responsible for their safety, or have received instructions from such a person on how to use the device.
■ Pregnant women should not use the training device or should use it only after consultation with their doctor.
If you have any health concerns (risk group), after not doing any sport for a long time, or if you have any cardiovascular or orthopaedic problems, always consult a doctor before using the training device. Agree the training programme with the doctor if necessary.
The training device is not a toy! Parents and other people in supervisory capacities should be aware of their responsibility because, due to children's natural instinct for play and desire to experiment, it is foreseeable that situations and behaviour will occur for which the training device is not constructed.

WARNING – Danger of Burns from Battery Acid!
- Batteries can be deadly if swallowed. Keep the battery and the device out of the reach of children and animals. If a battery is swallowed, seek medical assistance immediately.
If the battery has leaked, do not allow your skin, eyes and mucous membranes to come into contact with the battery acid. Wear protective gloves if necessary. If you touch battery acid, rinse the affected area with abundant fresh water immediately and contact a doctor as soon as possible.
NOTICE – Risk of Damage to Material and Property
- Do not expose the training device to extreme temperatures, strong temperature fluctuations, persistent moisture or wet conditions, direct sunlight or impacts.
■ Always replace all batteries together. Do not use batteries of different types or brands, or batteries with different capacities.
text_image
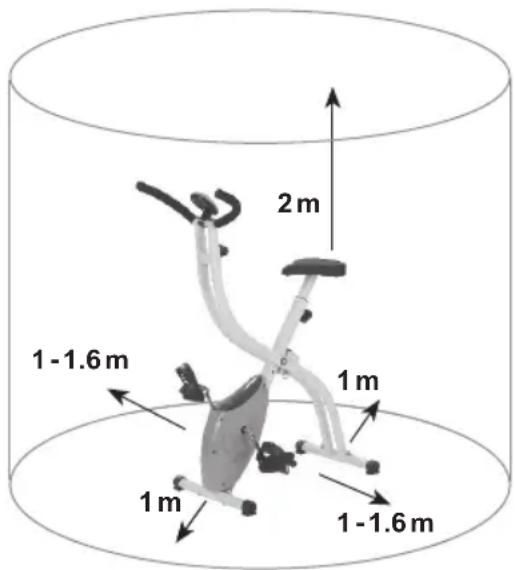
2m 1-1.6m 1m 1m 1-1.6mDepending on your body size, leave plenty of space on all sides of the training device (at least 1 metre to the sides, 2 metres above) so that you have enough room to move about in during a workout. Furthermore, the free area in the direction from which you access the training device must be at least 0.6 m greater than the exercise area. The free area must include the space required for an emergency dismount. If training devices are set up in the immediate vicinity of one another, they can share one free area.
Items Supplied
- 1 x bicycle frame
• 2 x feet - 1 x saddle
- 1 x saddle holder
- 1 x handlebar
- 1 x training computer
- 1 x computer holder
• 2 x pedal - 2 x 1.5 V battery, AA type
• 2 x hexagon socket bolt (M8) - 4 x square-head bolt (M8)
• 1 x cross-head bolt (M4) - 6 x washer, curved
- 3 x washer, straight
- 2 x spring washer
- 3 x self-locking nut
- 4 x cap nut
- 1 x spanner (13 - 15)
- 1 x hex key (5 mm)
• 1 x operating instructions
Check the items supplied for completeness and transport damage. If you find any damage to the components, do not use them (!), but contact our customer service department.
Device Overview
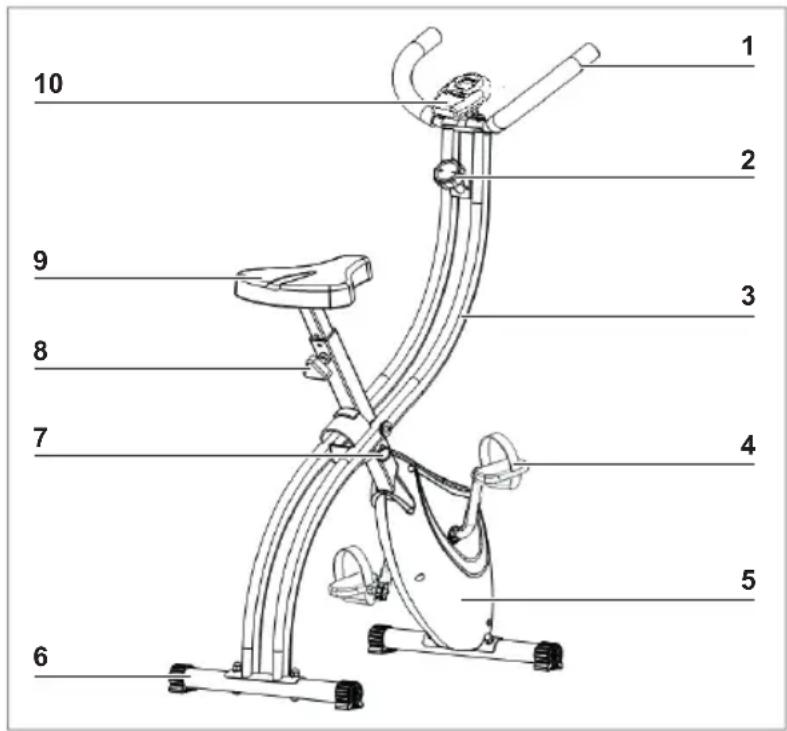
text_image
1 2 3 4 5 6 7 8 9 101 Handlebar
2 Adjusting knob 1–8 (torque resistance)
3 Bicycle frame
4 Pedals
5 Main device
6 Feet with protective caps
7 Locking pin
8 Adjusting knob (saddle height)
9 Saddle
10 Training computer
Functions of the Computer
- The training computer is switched on by turning the pedals or pressing the MODE button.
- To switch between the displays, press the MODE button.

text_image
TWO OUT SOFT MEAN 0.13 MOCK CLEARTIME Training time in minutes and seconds
SPEED Speed in km/h
DISTANCE The distance covered in km
CALORIES The rough number of calories used up
SCAN All data is displayed in succession
MODE Menu button for setting the desired display
CLEAR Button for resetting the units
- Press the MODE button several times to switch between the displays.
- When you press the CLEAR button on a display, the respective data is reset to zero.
• If no action takes place for around 3 minutes, the computer switches off automatically.
Before Initial Use
- Remove all packaging materials and any possible protection during transportation. Never remove the rating plate and any possible warnings!
- Assemble the training device (see the "Assembling the Training Device" chapter).
- Insert batteries into the training computer (see the "Inserting Batteries into the Training Computer" chapter).
Assembling the Training Device

Read through the assembly instructions carefully before assembling the training device. The sequence of working steps described must be followed exactly.
-
Carefully open up the training device, and release the locking pin to do this if necessary.
-
Lay out all individual parts carefully on a flat floor.
PLEASE NOTE: Protect the floor, carpet etc. with a mat or something similar before the component parts are removed from the box and also during set-up and training.

natural_image
Technical line drawing of a mechanical assembly with gears and rods (no text or symbols)- Screw the feet onto the bottom of the bicycle frame. Use the corresponding bolts, washers and nuts to do this.
Make sure that the feet are placed in the correct position! The cap nuts must not be attached from below as otherwise the training device is not able to stand securely on the floor.
Notice: The protective caps can be turned so that you can adjust the training device to a stable position.
natural_image
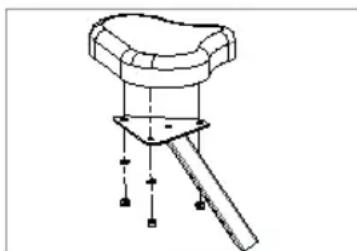
Technical line drawing of a mechanical component with no visible text or symbols- Place the saddle onto the saddle holder and screw it on tight using the washers and the self-locking nuts. When you do this, make sure that they can only be tightened and undone again using a tool.
natural_image
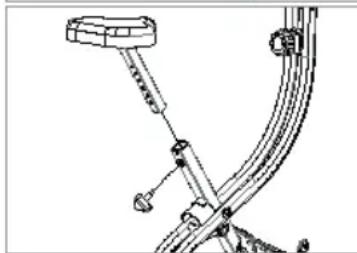
Technical line drawing of a mechanical linkage or cable assembly (no text or symbols)- Place the saddle holder into the receiving socket on the bicycle frame. Secure it in place using the adjusting knob: Align the holes on the frame and the holder with one another and turn the adjusting knob clockwise to tighten it.
Notice: The saddle can be adjusted to the correct height after assembly.
natural_image
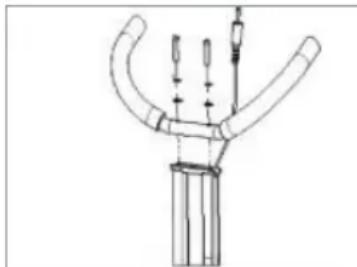
Technical line drawing of a mechanical component with curved and straight sections (no text or symbols)- Screw the handlebar onto the bicycle frame. Use the corresponding hexagon bolts and washers to do this.
natural_image
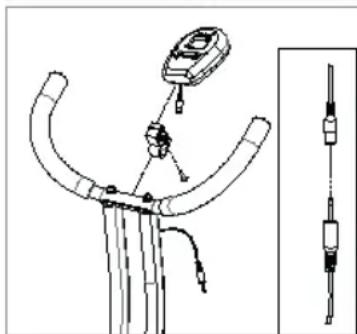
Technical line drawing of a mechanical device with attached components and a separate schematic view (no text or symbols)-
Secure the computer holder to the handlebar by placing it on the handlebar and securing it on tight with the corresponding bolts and washers.
-
Slide the training computer onto the computer holder.
-
Insert the jack plug from the bicycle frame into the connecting socket on the training computer. This connects the computer sensor to the pedals.
natural_image
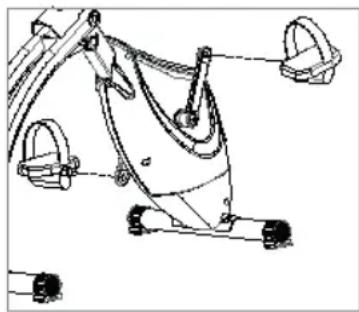
Technical line drawing of a mechanical device with levers and wheels (no text or symbols)- Turn the pedals tight on the pedal mounts using the spanner. Make sure that the markings L (left) and R (right) on the pedals and mounts match.
PLEASE NOTE: The pedals must be tightened in the direction of travel. This means:
- the right pedal (right-hand thread) is tightened in the clockwise direction,
- the left pedal (left-hand thread) is tightened in the anticlockwise direction.
Inserting the Batteries into the Training Computer

PLEASE NOTE!
- Use only the battery type specified in the “Technical Data”.
Take the batteries out of the training computer when they are dead or if you will not be using the device for a prolonged period. This avoids damage from leaking.
■ Remove dead batteries from the training computer immediately.
Non-rechargeable batteries must not be recharged or reactivated by other means, dismantled, thrown into a fire, immersed in fluids, or short-circuited.
Before inserting the batteries, check whether the contacts in the training computer and on the batteries are clean, and clean them if necessary.
- Pull the training computer carefully out of the holder if necessary.
- Grip and press down the locking lug on the battery compartment cover. Flip open the cover at the same time.
- Insert the supplied batteries or new batteries into the battery compartment. Pay attention to the correct polarity (+/-).
- Close the battery compartment. When you do this, make sure that the locking lugs sit in the recesses which are provided for them. The battery compartment cover must be heard to engage in place.
- Insert the training computer back into the holder.
If the training computer stops working, the battery needs to be replaced.
Use

PLEASE NOTE!
- When doing the exercises, wear loose, comfortable clothing and non-slip trainers.
■ Ensure that you are properly warmed up before you use the training device.
■ Never stand on the training device. -
Do not leave the training device unsupervised in the presence of children and animals.
We explicitly point out that improper use of the training device and excessive training can be detrimental to your health. -
Fold open the training device and place it on a solid, even and non-slip surface. Make sure that there is sufficient clearance around the training device so that you cannot bump into walls, furniture, etc. during training.
- Make sure that the training device is upright. The stability can be varied slightly using the protective caps on the feet.
- Make sure that all parts are properly secured to the training device.
- Adjust the seat to the correct height using the adjusting knob.
- Sit on the training device and place your feet on the pedals. Adjust the foot loops to the correct size if necessary.
- As soon as the pedals are moved, the training computer switches on. Adjust the display to the setting you want (see the "Device Overview" chapter – "Functions of the Training Computer").
- The torque resistance can be adjusted to 8 levels using the adjusting knob: Begin the training slowly with a low torque resistance after a warm-up phase and increase the intensity gradually until you reach the desired performance level that you are still capable of maintaining.
- Allow the training to fade out with a slow pace and low torque resistance. Finish off with a few stretching exercises.
After Training
We recommend always performing a few stretching exercises in order to slowly restore your circulation to a normal level:
Upper body: Stand upright, cross your arms over your head and pull your left elbow to the right with your right hand. The upper body moves gently as you do this. Stay in this position for around 15 – 20 seconds. Change sides.
Calves: Stand up. Place your right leg in front of you and bend it slightly while your left leg remains stretched. Push your left heel down onto the floor. Stay in this position for around 15 – 20 seconds. Change sides.
Thighs: Stand on one leg, bend the other one and grab your foot with your hand. Pull it up to your buttocks and hold this position for approx. 5 – 20 seconds. Change sides.
Sit down on the floor, turn your knees to face outwards, place the soles of your feet together and pull towards your body. Place your hands around your ankles and press your knees gently down to the floor with your elbows. Keep your back straight. Maintain for approx. 5 – 20 seconds.
Back: Lie down flat on your back, bend your right leg and place it over your left leg, your hip twists but both shoulders remain on the floor. Maintain for approx. 5 – 20 seconds. Change sides.
Shoulders / back: Sit down cross-legged with a straight back, fold / clasp together your hands and stretch your arms out above your head. Stretch your back. Stay in this position for around 15 – 20 seconds.
Cleaning and Storage

PLEASE NOTE!!
■ After each use, store the training device in a place where children cannot use it.
Do not use any caustic or abrasive cleaning agents or pads to clean the training device. These may damage the surfaces.
- Only clean the training device with a damp, soft cloth and mild detergent if necessary. Then dry all parts with a dry, soft cloth.
- Keep the training device out of the reach of children and animals in a clean, dry, frost-free place which is protected from direct sunlight.
natural_image
Exterior view of a modern exercise bike (no text or symbols visible)
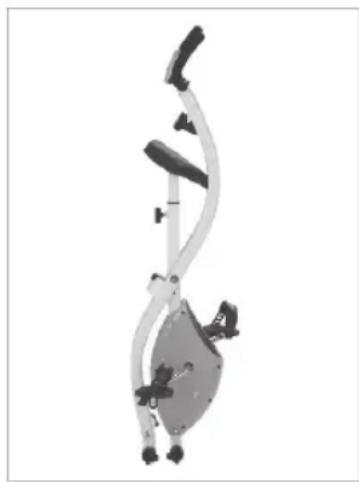
The training device can be folded up to make it easier to store. To do this, pull the training device up by the saddle and handlebar. In addition, use the locking pin to prevent any injuries or damage.
Technical Data
Article number: 01504
Class: HC (home use)
Model number: JTF-718E-2
Computer model: XT-1027
Voltage supply: 3V (2 x 1.5 V battery, AA type)
Max. loading capacity: 100 kg
ID operating instructions: Z 01504 M DS V6 1020 uh
The device conforms to DIN EN ISO 20957-1 and DIN EN ISO 20957-5.

Disposal

Dispose of the packaging material in an environmentally friendly manner so that it can be recycled.
Batteries should be removed prior to disposal of the device and disposed of separately from the device at suitable collection points.
This article is governed by the European Directive 2012/19/EU on waste electrical and electronic equipment (WEEE). Do not dispose of this device as normal domestic waste, but rather in an environmentally friendly manner via an officially approved waste disposal company.
Exploded Drawing
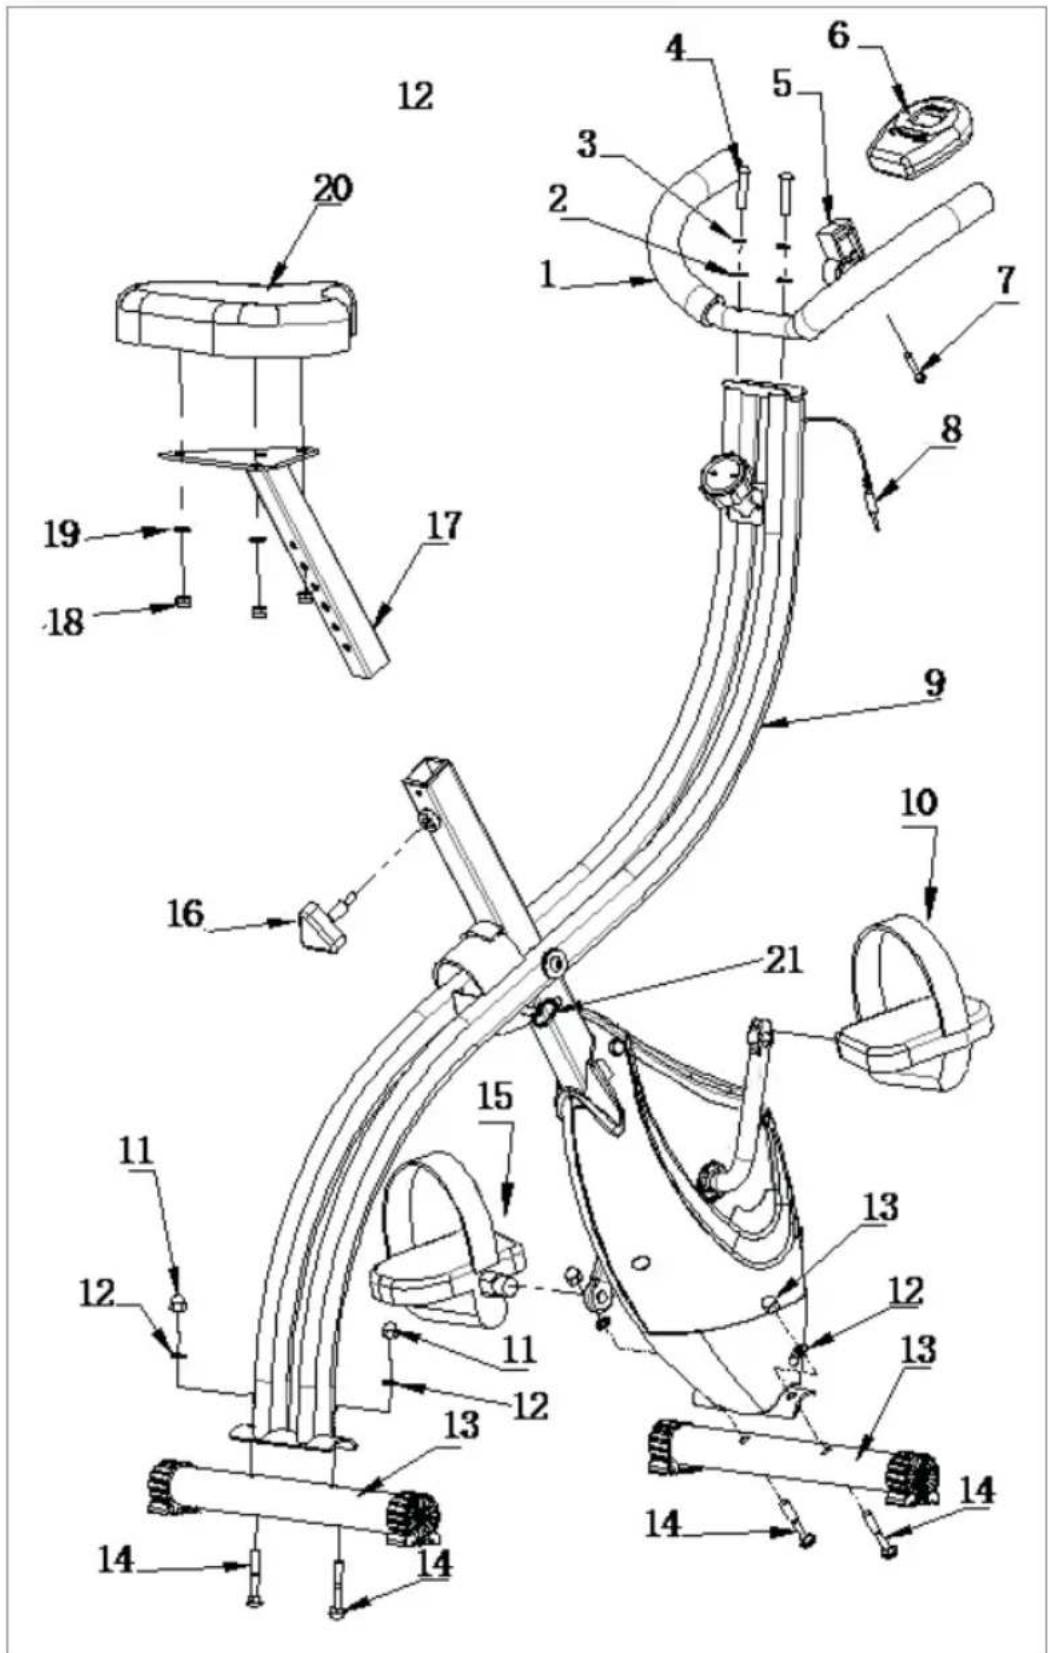
text_image
Technical diagram of a stationary exercise machine with numbered components and labeled partsNot shown:
2 x tool
Parts List
| Part No. | Description Num- | ber | Dimensions |
| 1 Handlebar 1 | |||
| 2 Washer, curved 2 ∅ 16 (∅ 8.3) x 1.5 mm | |||
| 3 Spring washer 2 | |||
| 4 Hexagon socket bolt 2 M8 x 35 mm | |||
| 5 Computer holder 1 | |||
| 6 Training computer 1 | |||
| 7 Cross-head bolt 1 M4 x 12 mm | |||
| 8 Jack plug 1 | |||
| 9 Bicycle frame 1 | |||
| 10 Right pedal 1 | |||
| 11 Cap nut | 4 M8 | ||
| 12 Washer, curved 4 ∅ 16 (∅ 8.3) x 1.5 mm | |||
| 13 Foot | 2 | ||
| 14 Square-head bolt | 4 M8 x | 50 mm | |
| 15 Left pedal | 1 | ||
| 16 Adjusting knob | 1 | ||
| 17 Seat holder | 1 | ||
| 18 Self-locking nut | 3 | ||
| 19 Washer, straight | 3 | ||
| 20 Seat | 1 | ||
| 21 Locking pin 1 | |||
Customer Service/Importer:
DS Produkte GmbH
Am Heisterbusch 1, 19258 Gallin, Germany
Tel.: +49 38851 314650 *) Calls to German landlines are subject to your provider's charges.
All rights reserved.
Contenu
text_image
TWO OUT SPOCK 0.13 MOOA CLEARnatural_image
Technical line drawing of a mechanical assembly with rollers and supports (no text or symbols)natural_image
Technical line drawing of a mechanical component with mounting holes and a shaft (no text or symbols)natural_image
Technical line drawing of a mechanical linkage or support system (no text or symbols)natural_image
Technical line drawing of a mechanical or fluidic device with curved pipes and a central column (no text or symbols)natural_image
Technical line drawing of a mechanical device with attached components and a separate view of its internal structure (no text or symbols)natural_image
Technical line drawing of a mechanical device with levers and wheels (no text or symbols)natural_image
Exterior view of a modern exercise bike with curved arm and seat (no text or symbols visible)
text_image
Technical diagram of a stationary exercise machine with numbered components and labeled partsSans illustration :
2 x outil
Liste des pièces
natural_image
Technical line drawing of a mechanical assembly with rollers and mounting fixtures (no text or symbols)natural_image
Technical line drawing of a mechanical component with no visible text or symbolsnatural_image
Technical line drawing of a mechanical linkage or cable assembly (no text or symbols)natural_image
Technical line drawing of a mechanical device with curved pipes and a cylindrical base (no text or symbols)natural_image
Technical line drawing of a mechanical device with attached components and a separate schematic view (no text or symbols)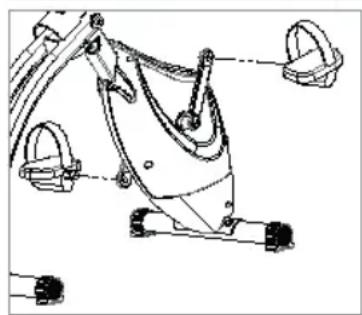
natural_image
Technical line drawing of a mechanical device with levers and wheels (no text or symbols)natural_image
Exterior view of a modern exercise bike with curved arm and seat (no text or symbols visible)
Model computer: XT-1027