07389 - Sports accessory VitalMaxx - Free user manual and instructions
Find the device manual for free 07389 VitalMaxx in PDF.
| Brand | VitalMaxx |
| Model | 07389 |
| Product type | Wireless jump rope with digital screen |
| Power supply | 1 LR44 button cell battery (1.5 V) |
| Battery type | Lithium button cell, type LR44 |
| Main functions | Jump counter, adjustable timer, calorie and fat burn indicator, clock with AM/PM format, weight setting |
| Display | Digital liquid crystal display (LCD) |
| Timer | Adjustable in minutes and seconds, with audible signal at the end of the count |
| Jump counter | Counts up to 9999 jumps, target setting with audible signal |
| Calorie indicator | Estimation of burned calories based on weight and number of jumps |
| Fat burn indicator | Estimation of burned fat in grams |
| Clock | Time display in 12-hour format (AM/PM) |
| Weight setting | From 1 to 999 kg, used for calorie and fat calculations |
| Audible signal | Yes, at the end of the timer or after a set number of jumps |
| Usage | Private, indoor or outdoor on a flat surface |
| Safety | Do not immerse, keep out of reach of children, check condition before each use, do not repair yourself |
| Cleaning | Soft slightly damp cloth, no aggressive detergent |
| Storage | Dry, clean place, away from sunlight, out of reach of children and animals |
| Spare parts | LR44 button cell battery |
| Repairability | Do not repair yourself, contact after-sales service |
| Package contents | 1 wireless jump rope, 1 LR44 battery (preinstalled with transport protection), instruction manual |
| After-sales service | DS Produkte GmbH, Am Heisterbusch 1, 19258 Gallin, Germany |
Frequently Asked Questions - 07389 VitalMaxx
User questions about 07389 VitalMaxx
0 question about this device. Answer the ones you know or ask your own.
Ask a new question about this device
Download the instructions for your Sports accessory in PDF format for free! Find your manual 07389 - VitalMaxx and take your electronic device back in hand. On this page are published all the documents necessary for the use of your device. 07389 by VitalMaxx.
USER MANUAL 07389 VitalMaxx
natural_image
Two medical electrophysiological devices with black tubing and digital display (no visible text or symbols)Gebrauchsanleitung
ab Seite 3
Instruction Manual
starting on page 15
Mode d'emploi
natural_image
Technical line drawing of a mechanical component with a cylindrical base and mounting bracket (no text or symbols)text_image
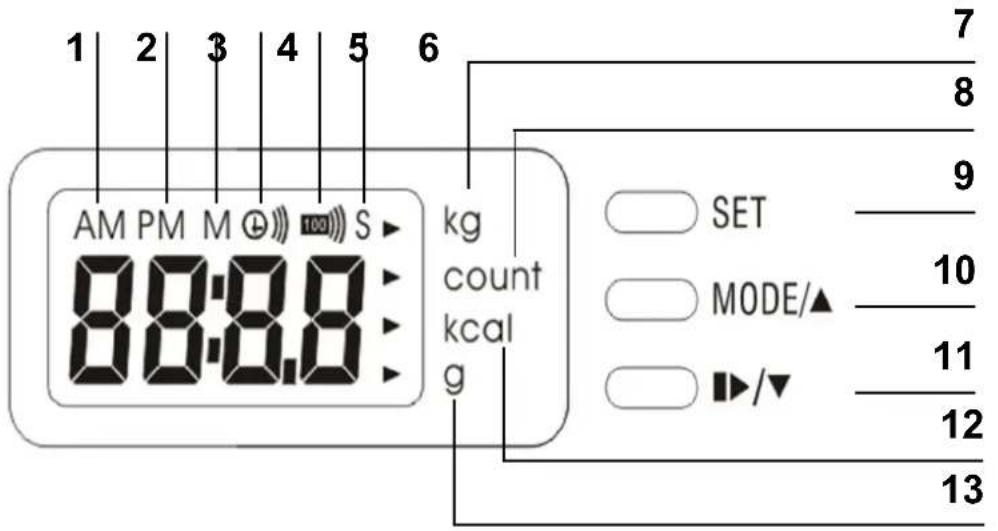
1 2 3 4 5 6 AM PM M 100 S kg 88:8.8 count kcal g 7 8 9 SET MODE/▲ 10 11 ▶/▼ 12 13text_image
M @ S 0000 kg count kcal gMeaning of symbols 16
Proper use ____ 16
Safety instructions 17
Risks of injury 17
Proper handling of batteries 17
Handling the product properly 18
Product overview and scope of delivery ____ 19
Before first use 19
Changing the battery 19
Functions and settings 20
Setting the time 20
Setting the timer 21
Count menu (jump counter menu) 22
Calorie consumption indicator 23
Fat burning indicator 23
Weight setting 24
Troubleshooting and error messages ____ 24
Cleaning and storage 25
Technical data 25
Disposal 26
Dear customer,
We are delighted that you have decided to purchase this cordless skipping rope. Please carefully read through the operating instructions prior to using the product for the first time and store these instructions in a safe place. These instructions are to accompany the product when it is passed on to others. The manufacturer and importer assume no liability in the event the data in these instructions have not been observed!
As part of ongoing development, we reserve the right to alter the product, packaging or enclosed documentation at any time. Please keep in mind that the images may vary slightly from the actual product!
If you have any questions, please contact customer service via our website: www.service-shopping.de
Meaning of symbols

All safety notices are marked with this symbol. Please read through and obey the safety notices in order to avoid injury to persons and damage to property.

Tips and recommendations.
Proper use
☐ The product is suitable for a skipping rope workout.
☐ The product is designed for private use and is not intended for commercial or medical use.
☐ Only use the product as instructed. Any other use is deemed improper.
☐ Defects arising due to improper handling, damage or attempts at repair are excluded from the warranty. This also applies to normal wear and tear.
Safety instructions

Risks of injury
☐ Risk of suffocation! Keep the packaging material away from children and animals.
☐ This product is not suitable for use by persons (including children) with restricted sensory or intellectual abilities or with a lack of experience and/or knowledge unless they are supervised by a person responsible for their safety or have received instructions from that person as to how to use the product. Children must be under supervision to ensure that they do not play with the product.
☐ Batteries may be life threatening if swallowed. Therefore keep the batteries and product out of the reach of children and animals. If a battery has been swallowed, you must seek immediate medical attention.
☐ If a battery has leaked, avoid contact between your skin, eyes and mucous membranes and the battery acid. In the event of contact with the battery acid, rinse the affected areas instantly with plenty of clean water and immediately consult a physician.

Proper handling of batteries
Before inserting the batteries, check whether the contacts in the battery compartment and on the batteries are clean and, if necessary, clean them.
☐ Only use the battery type specified in the technical data.
□ Always replace all batteries. Do not use different battery types, brands or batteries of different capa. When changing batteries ensure correct polarity (+/-).
☐ Remove batteries from the product if they are empty or if you are not using the product for an extended period. This way, you can avoid damages attributed to leaking.
☐ Remove any leaking batteries from the battery compartment. Clean the contacts before inserting a new battery.
☐ The batteries may not be charged or reactivated using other means, they may not be disassembled, disposed of in fire, immersed in liquids or be short circuited.

Handling the product properly
☐ Check the product for damage prior to each use. Do not use the product if it exhibits visible damages.
☐ If the product is defective, do not attempt to repair it yourself. Repairs may only be performed by qualified professionals. For this reason, contact a local qualified professional or customer service in case of damage.
☐ Keep the product away from heat sources (e.g. ovens).
☐ Do not subject the product to extreme temperatures, severe changes in temperature moisture.
☐ Do not allow the product to fall and do not subject it to severe percussions.
☐ Never submerge the product in water or other liquids.
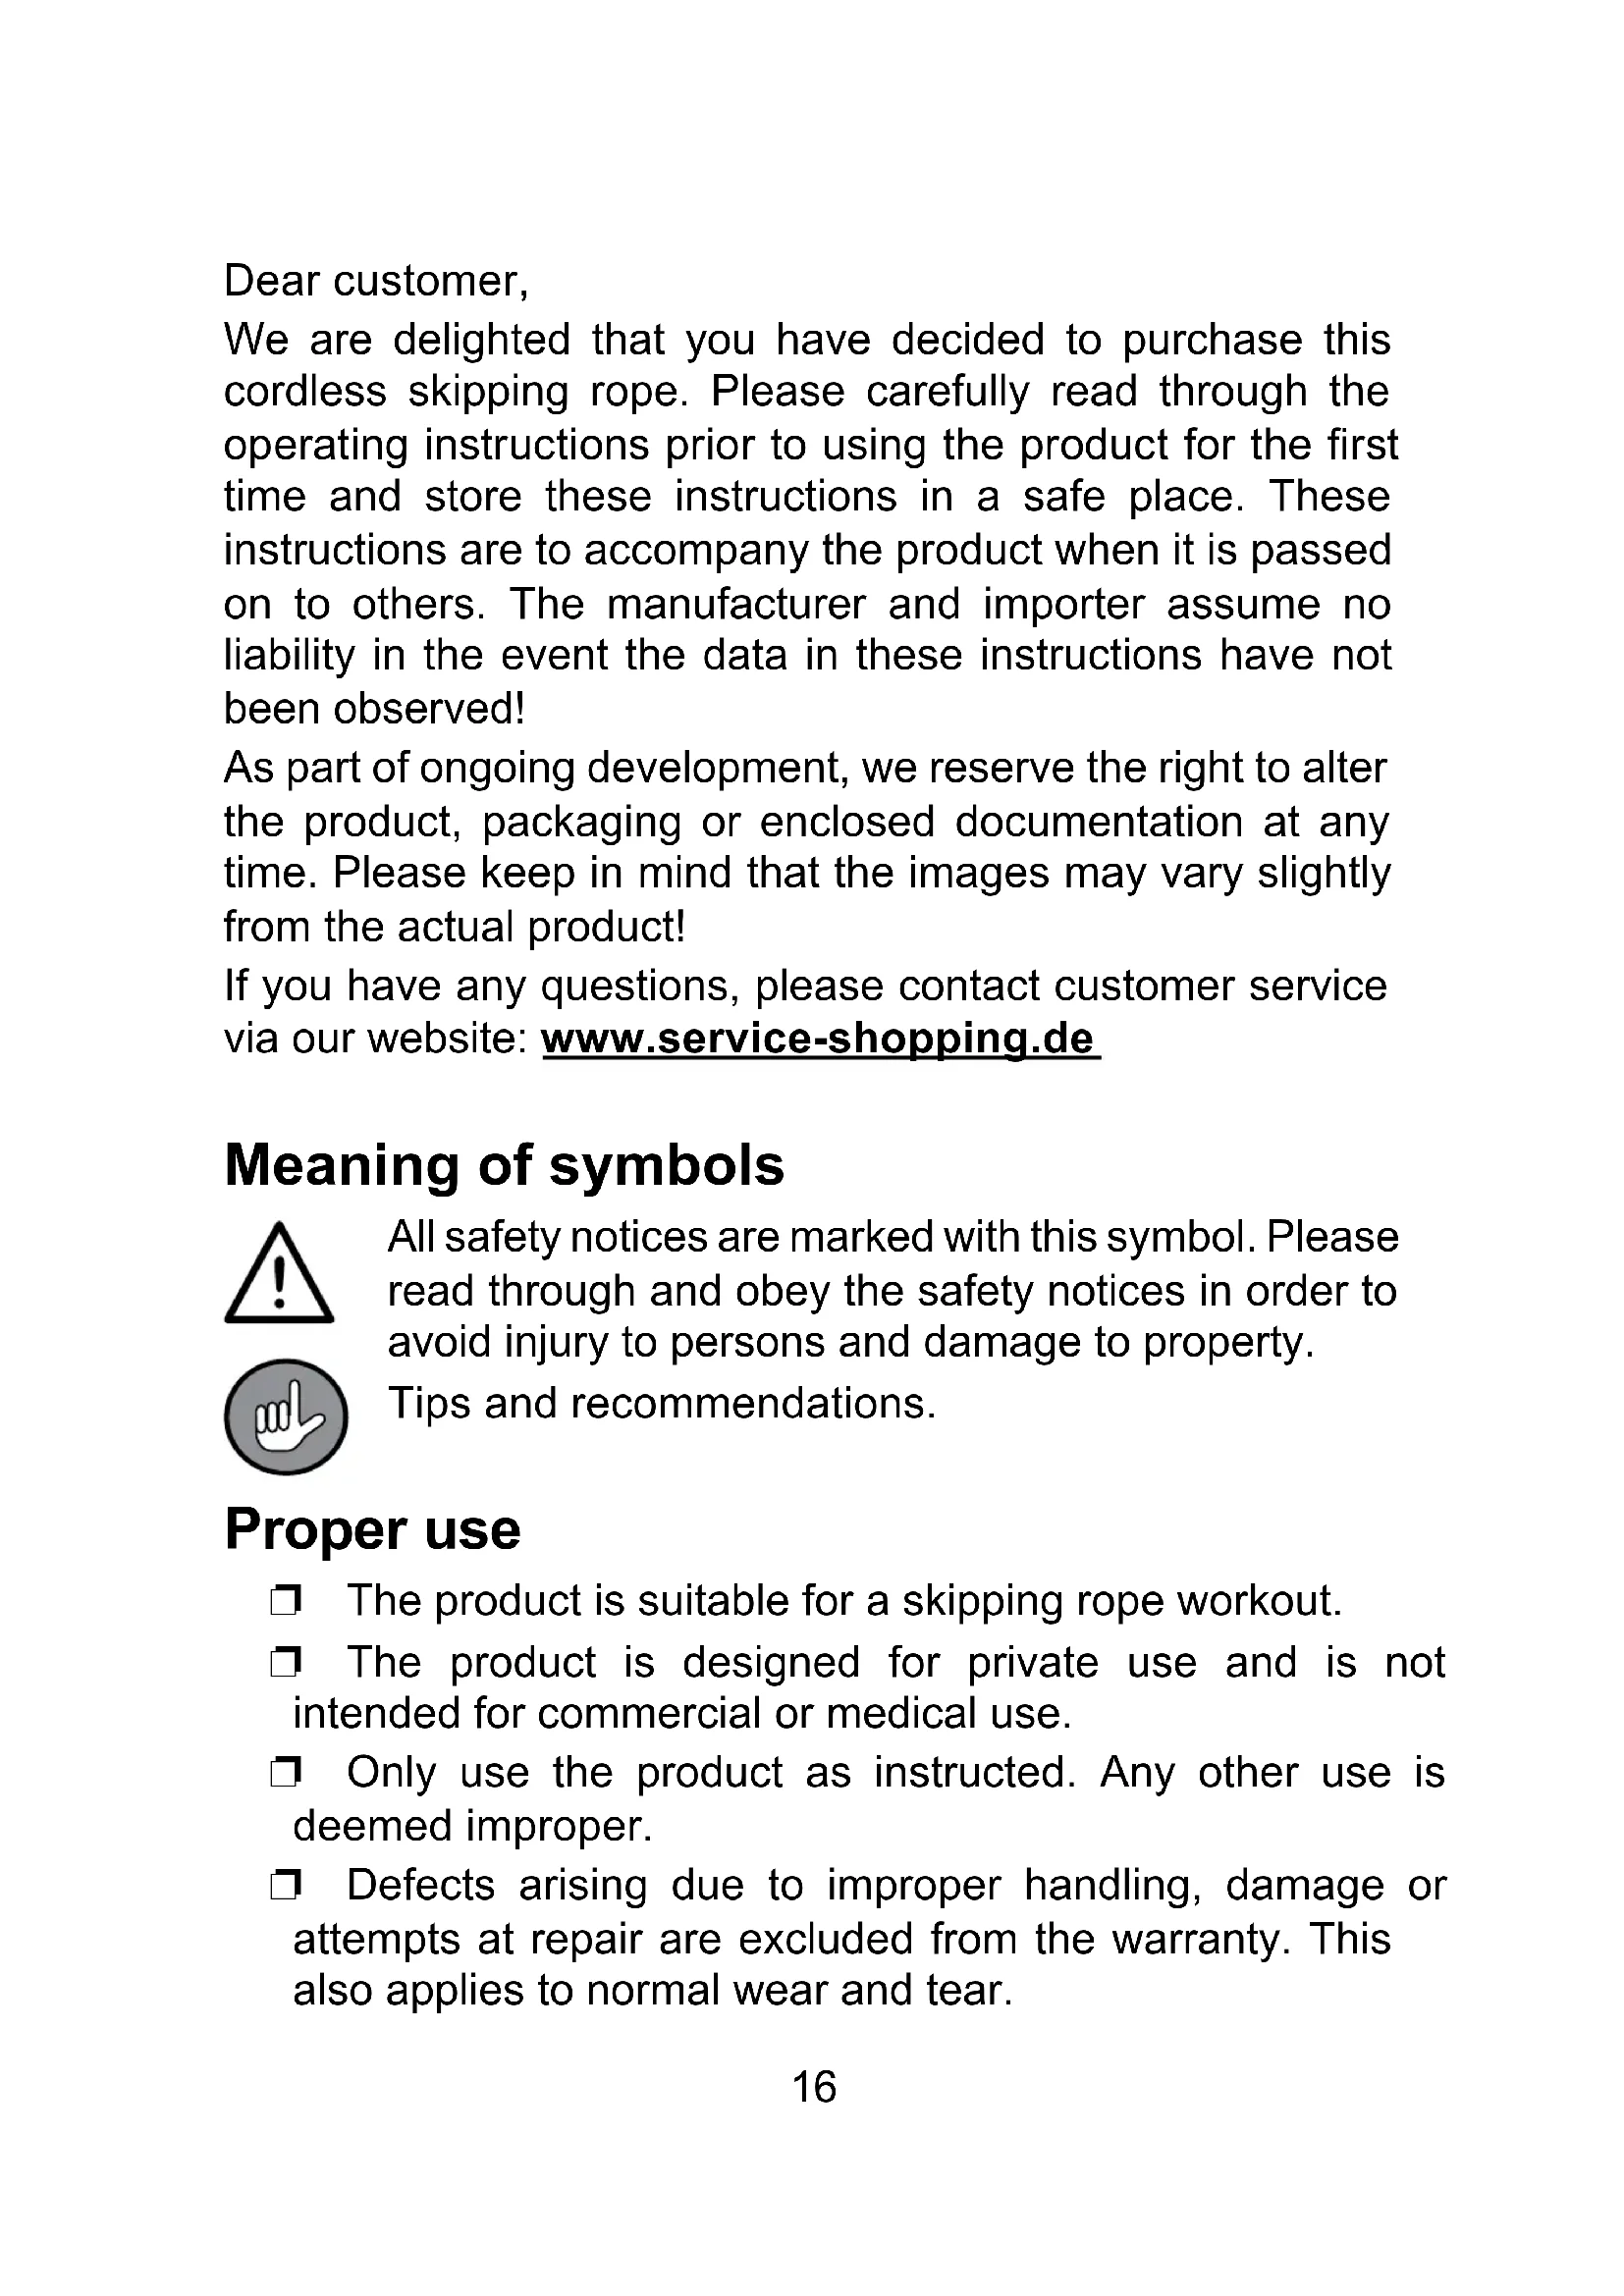
Product overview and scope of delivery
text_image
1 2 31 Display and control panel
2 Handles
3 Weights
Not shown:
LR44-type 1.5
volt button cell
Before fi rst use
- Remove the product from the packaging and check it for transport damages. If you identify damages, do not use the product (!), instead contact the customer service centre.
- The batteries have already been inserted upon delivery and have been secured with a transport guard. Open the battery compartment and remove the plastic strip.
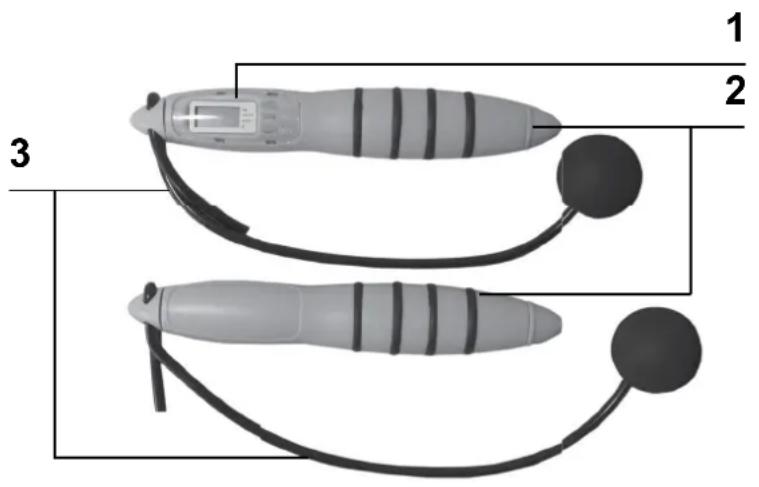
Changing the battery
natural_image
Technical line drawing of a mechanical component with a cylindrical base and mounting bracket (no text or symbols)- Open the battery compartment by removing the screws.
- Remove the empty battery.
- Insert a new 1.5 volt LR44-type button cell. Make sure the polarity is correct (+/-).
- Place the battery compartment cover on the battery compartment and turn the screw until tight.
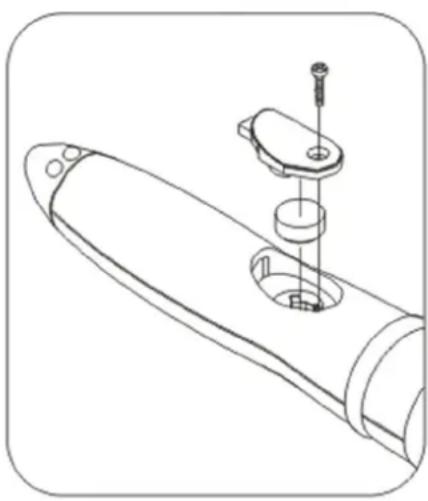
Functions and settings
text_image
1 2 3 4 5 6 AM PM M (100) S kg 88:8.8 count kcal g 7 8 9 10 11 12 131 Time display morning
2 Time display afternoon
3 Countdown minutes indicator (timer function)
4 Timer symbol
5 Counter countdown symbol
6 Countdown seconds indicator (timer function)
7 Weight setting
8 Count menu (jump counter)
9 SET button
10 MODE button
11 Start/Stop button
12 Calorie consumption indicator
13 Fat burning indicator
Setting the time
- In standby mode, push the SET button (9). The display for setting the hours will blink.
- Push the MODE button (10) to increase the indicator value or the Start/Stop button (11) to decrease the indicator value. NOTICE: If AM (1) appears on the display, the time shown is in the morning (example: 4:00 AM corresponds to four in the morning). If PM (2) appears on the display, the time shown is in the afternoon (example: 4:00 PM corresponds to four in the afternoon).
- Push the SET button (9) again. The indicator for setting the minutes will blink. Push the MODE button (10) to in-
crease the indicator value or the Start/Stop button (11) to decrease the indicator value.
- Push the SET button (9) again to confirm your entries.
Setting the timer
Please note: You can either work out with the timer count-down or with the jump counter countdown. The function you have activated is indicated by the symbol that appears on the display. The timer symbol (4) appears if a timer has been set and the countdown symbol (5) appears if the jump counter has been activated.
- If the time appears on the display, push the MODE button (1) once to enter the timer menu.
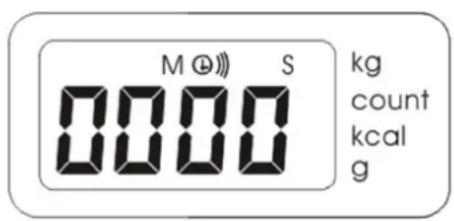
text_image
M @ S 0000 kg count kcal g-
The timer menu will appear on the display.
-
Set the timer by pushing the SET button (9) once. The first two digits (minutes indicator) will begin to blink on the display. Use the MODE button (10) or the Start/Stop button (11) to set the minutes. Push the SET button to confirm your entry.
-
Once you have confirmed your entry, the next two digits (seconds indicator) will begin to blink. Use the MODE button (10) and the Start/Stop button (11) to set the seconds. Push the SET button (9) to confirm your entry.
-
Push the Start/Stop button (11) to start the timer count-down. A signal will sound once the timer has elapsed. Push any button to deactivate the acoustic signal. You can interrupt and resume the countdown at any time with the Start/Stop button (11).
Count menu (jump counter menu)
Please note: You can either work out with the timer count-down or with the jump counter countdown. The function you have activated is indicated by a symbol on the display. The timer symbol (4) appears if a timer has been set and the countdown symbol (5) appears if the jump counter has been activated.
- If the time appears on the display, push the MODE button (10) twice to enter the count menu (8). All the jumps counted so far will appear on the display. To reset the counter reading indicator to "0", hold the SET button (9) down for at least 3 seconds. ATTENTION: Resetting the jump counter reading to zero automatically resets the calorie consumption indicator and the fat burning indicator!
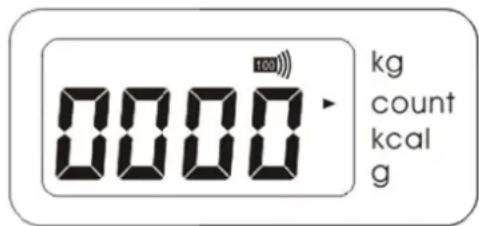
text_image
0000 kg count kcal g-
Briefly push the SET button on the count menu (8) to enter the settings menu for the jump counter countdown. Here you can enter the number of jumps, after which a signal will sound.
-
A four-digit number will appear. The first digit will blink. Use the MODE button (10) or the Start/Stop button (11) to set a digit. Push the SET button (9) to confirm your entry.
- The next digit will start blinking once you have confirmed your entry. Use the MODE button (10) or the Start/Stop button (11) to set the digit. Push the SET button (9) to confirm your entry.
-
Then, the third digit will start to blink. Use the MODE button (10) and the Start/Stop button (11) to set the digit. Push the SET button (9) to confirm your entry.
-
Then, the fourth digit will start to blink. Use the MODE button (10) and the Start/Stop button (11) to set the digit. Push the SET button (9) to confirm your entry.
-
The display will switch back to the count menu (8) and will show you the number of jumps counted again.
-
Start your workout. The count menu will count your jumps and a signal will sound once the set number of jumps has been reached. Push any button to deactivate the signal.

Once you have deactivated the acoustic signal and continue your workout, the signal will sound again once you reach the set number of jumps. Example: You have set the acoustic signal to sound after 100 jumps. The signal will now sound after every 100 jumps, that is, after 100, 200, 300... jumps.
Calorie consumption indicator
-
If the time appears on the display, push the MODE button (10) four times until the calorie consumption indicator (12) appears.
-
To reset the counter reading indicator to "0", hold the SET button (9) down for at least 3 seconds. ATTENTION: Resetting the counter reading to zero automatically resets the jump counter reading and the fat burning indicator!
Fat burning indicator
-
If the time appears on the display, push the MODE button (10) four times to access the fat burning indicator (13).
-
To reset the counter reading indicator to "0", hold the SET button (9) down for at least 3 seconds. ATTENTION: Resetting the counter reading to zero automatically resets the jump counter reading and fat burning indicator!
Weight setting
Specify your weight to determine the calorie consumption and fat burning:
- Use the MODE button (10) to access the calorie consumption indicator (12) or the fat burning indicator (13) (see the section “Calorie consumption indicator” or the section “Fat burning indicator”).
- Briefly push the Set button (9) to access the weight setting menu (7).
- Use the MODE button (10) or the Start/Stop button (11) to enter your weight.
- Push the SET button (9) to confirm your entry.
Troubleshooting and error messages
If the product is not working properly, please check whether you are able to rectify the problem yourself first. Do not attempt to repair a defective product yourself!
| Problem Solution | |
| The signal sounds for the jump countdown / for the timer does not work. | You can either work out with the timer count-down or with the jump counter countdown. The function you have activated is indicated by a symbol on the display. The timer symbol (4) appears if a timer has been set and the countdown symbol (5) appears if the jump counter has been activated. |
Cleaning and storage

ATTENTION!
☐ Never submerge the product in water or other liquids.
☐ Do not use corrosive or abrasive cleaning products or cleaning pads for cleaning the product. They could damage the surface.
- Clean the product with a slightly damp, soft cloth and a small amount of mild detergent if necessary.
- If you will not be using the product, remove the battery (see chapter “Changing the battery”) and store the product in a dry, clean location that is protected from direct sunlight and out of the reach of children and animals.
Technical data
Product number: Z 07389
Model number: JPR-2103B
Voltage supply: 1.5 volt type LR44 button cell

Disposal

The packaging material is recyclable. Dispose of the packaging in an environmentally-friendly manner and make it available to the collection service for recyclable materials.

Dispose of the product in an environmentally-friendly manner. Dispose of it at a recycling centre for old electrical and electronic products. For more information, contact the administration in your community.
Batteries must be removed and disposed of separately before disposing of the product. To protect the environment, batteries and rechargeable batteries may not be disposed of together with normal household waste. Instead they must be turned in at appropriate collection points. Please also observe applicable statutory provisions regulating the disposal of batteries.
Customer service/importer:
All rights reserved.
Contenu
Explication des symboles ____ 28
www.service-shopping.de