
POWEG9020 - Blower PowerPlus - Free user manual and instructions
Find the device manual for free POWEG9020 PowerPlus in PDF.
| Product type | Backpack leaf blower |
| Brand | PowerPlus |
| Model | POWEG9020 |
| Power source | Petrol (2-stroke mix) |
| Displacement | 26 cc |
| Engine power | 0.7 kW (0.95 hp) |
| Fuel tank capacity | 0.5 L |
| Max air volume | 8 m³/min |
| Rotation speed (idle/full) | 3500 / 9000 rpm |
| Weight | 5 kg |
| Sound pressure level (LpA) | 94 dB(A) |
| Sound power level (LwA) | 107 dB(A) |
| Vibrations (aw) | 2.2 m/s² (K=1.5 m/s²) |
| Fuel mixture ratio | 30:1 (unleaded petrol/2T oil) |
| Ignition | Torch spark plug (gap 0.635 mm) |
| Carburetor | Huayi (pre-set) |
| Housing material | PA6 (polyamide) |
| Intended use | Blowing leaves, grass, small garden debris |
| Included accessories | Blower tube, extension tube, 56 mm and 45 mm nozzles, harness, handle |
| Routine maintenance | Cleaning air filter, spark plug, fuel filter, draining |
| Warranty | 24 months (private use) |
| Spare parts | Available via authorized after-sales service |
Frequently Asked Questions - POWEG9020 PowerPlus
User questions about POWEG9020 PowerPlus
0 question about this device. Answer the ones you know or ask your own.
Ask a new question about this device
Download the instructions for your Blower in PDF format for free! Find your manual POWEG9020 - PowerPlus and take your electronic device back in hand. On this page are published all the documents necessary for the use of your device. POWEG9020 by PowerPlus.
USER MANUAL POWEG9020 PowerPlus
2 BESCHRIJVING (FIG. A)
16 PROBLEEMOPLOSSING
02/08/21, Lier - Belgium
POWERPLUS POWEG9020 FR
02/08/21, Lier - Belgium
POWERPLUS POWEG9020 EN
1 INTENDED USE 3
2 DESCRIPTION (FIG. A) 3
3 PACKAGE CONTENT LIST 3
4 SYMBOLS 4
5 GENERAL POWER TOOL SAFETY WARNINGS 4
6 MACHINE-SPECIFIC SAFETY WARNINGS. 5
7 SAFETYWARNINGS GASOLINE 5
8 ASSEMBLY 6
8.1 Attaching the flex tube (Fig.1 & 2) 6
8.2 Attaching the blower tube (Fig.3,4 & 5) 6
8.3 Attaching the extension tube and air nozzles (Fig.6) 6
8.4 Adjust the back pack and harness and control handle (Fig.7) 6
9 FUEL AND LUBRICATION 6
9.1 Fuel 6
9.2 Mixing fuel 8
9.2.1 Fuel and lubrication symbols 8
9.2.2 Fuel and lubrication symbols 8
9.2.3 Recommended fuels 8
10 OPERATING INSTRUCTIONS 8
10.1 Starting a cold engine (Fig.8,9 & 10)
10.2 Stopping the engine (Fig. 11) 9
10.2.1 Emergency STOPPING Procedure 9
10.2.2 Normal Stopping Method 9
10.3 Starting a warm engine (Engine stopped for no more than 15-20minutes) (Fig.8 &10) ....9
10.4 Blower operations 9
10.5 Operation instructions 10
11 MAINTENANCE 10
11.1 Air filter (Fig.12 & 13) 10
11.2 Fuel cap / fuel filter (Fig.14, 15 & 16) 10
11.3 Carburetor adjustment 11
11.4 Spark plug (Fig.17) 11
POWERPLUS
POWEG9020 EN
12 TECHNICAL DETAILS 11
13 NOISE 11
14 STORAGE 12
15 REMOVING A UNIT FROM STORAGE 12
16 TROUBLE SHOOTING 12
17 WARRANTY 13
18 ENVIRONMENT 14
19 DECLARATION OF CONFORMITY 14
POWERPLUS POWEG9020 EN LEAF BLOWER 26CC (BACKPACK) POWEG9020
1 INTENDED USE
The blower is designed to blow leaves as well as lawn debris such as grass clippings and small twigs. It is not to be used for any other purpose. The device is only to be used on dry surfaces. The device is intended for non-commercial use in private home* and gardens. Under no circumstances is it to be used in public outdoor areas, sports stadiums or in agricultural or forestry settings. Not suitable for professional use.

WARNING! For your own safety, read this manual and the general safety instructions carefully before using the appliance. Your power tool should only be given to other users together with these instructions.
2 DESCRIPTION (FIG. A)
- Throttle trigger
- Lock-off button
- On/off iginition switch
- Carrier handle
- Starter handle
- Spark plug wire / spark plug
- Air cleaner cover
- Choke lever
- Fuel tank
- Fuel cap
- Harness shoulder strap
-
Primer bulb
-
Control handle
- Blower tube
- Throttle cable clips
- Flex tube
- Hose clamp
- Muffler cover
- Spark arrester screen
- Vented back pad
- Extension tube
- 56mm nozzle
- 45mm concentrator nozzle
- Throttle cable
3 PACKAGE CONTENT LIST
- Remove all packaging materials.
- Remove remaining packaging and packing inserts (if included).
- Check that the package contents are complete.
- Check the appliance, the power cord, the power plug and all accessories for transportation damage.
- Keep the packaging materials as far as possible until the end of the warranty period. Then take it to your local waste disposal system.

WARNING: Packaging materials are not toys! Children must not play with plastic bags! There is a danger of suffocation!
1xblower
1x Manual
1x spark plug wrench
1x empty bottle
3x piece tube
1x flexible tube

If any parts are missing or damaged, please contact your dealer.
POWERPLUS POWEG9020 EN 4 SYMBOLS
The following symbols are used in this manual and/or on the machine:
| ! | Denotes risk of personal injury or damage to the tool. | There is a risk that stones and other objects could be thrown out by the appliance. Keep other people and domestic animals at a safe distance. | |
| Read manual before use. | Warning: the fan is still rotating when open or close the cover, be careful, especially the inlet cover. | ||
| Warning: Wear eye protection. | |||
| Always disconnect the machine from the power mains before cleaning inspecting, repairing or when it is damaged or tangled. | Never operate or leave the machine in the rain or in damp or wet conditions. Moisture is an electrical shock hazard. | ||
| Remove plug from the mains immediately if cable is damaged or cut. | CE | In accordance with essential applicable safety standards of European directives. | |
| Wear dust mask. | Wear hearing protection. | ||
5 GENERAL POWER TOOL SAFETY WARNINGS
WARNING! When using power driven gardening appliances, basic safety precautions should always be followed to reduce the risk of fire, electric shock and personal injury, including the following:
- Be familiar with the controls and proper use of the product.
- Clear the work area before each use. Remove all objects, such as rocks, broken glass, nails, wire or string that can be thrown or become entangled in the cutting line.
- Wear heavy, long trousers, boots and gloves. Do not wear loose fitting clothing, shorts or go bare foot.
- Do not wear jewellery of any kind.
- Secure hair above shoulder level to prevent entanglement in moving parts.
- Do not allow children or untrained individuals to use this product.
- Keep all bystanders, especially children and pets, at least 15m from the operating area.
- Do not operate this product when you are tired, ill or under the influence of alcohol, drugs or medication.
- Do not operate in poor lighting. Use the unit only in daylight or good artificial light.
- Keep firm footing and balance. Do not overreach.
Overreaching can result in loss of balance or exposure to hazards. - Keep all parts of your body away from moving parts.
- Inspect the product before use. Replace any damaged parts before use.
POWERPLUS POWEG9020 EN
- Do not operate the product in damp or wet locations.
- Do not use the product in the rain.
- Wear safety glasses or goggles when operating this product.
- Use the right product. Use the product for the intended purpose only.
- Do not use the product if the switch does not turn the product on or off. A product that cannot be controlled with the switch is dangerous and must be repaired.
- Avoid accidental starting.
- Use common sense when using this product.
- Stay alert and pay attention to what you are doing.
- Do not force the product. It will do a better job with less likelihood of a risk of injury when you operate it at the rate for which it was designed.
- Pull the plug out immediately if the mains or extension lead is damaged or severed.
- Disconnect the product from the power supply when it is not in use, before servicing and when changing accessories.
- The appliance is not intended for use by young children or infirm persons.
- Young children should be supervised to ensure that they do not play with the appliance.
- Disconnect blower if you notice unusual vibrations.
- Do not blow vegetal pieces towards bystanders.
- Store the blower in a dry place.
Try to keep exposure to vibrations as low as possible. Exemplary measures to reduce exposure to vibration are wearing gloves during use of the tool and the limitation of working hours.

Warning! Do not work near open windows, etc.
It is recommended:
to operate the machine only at reasonable hours – not early in the morning or late at the evening when others might be disturbed.
- that before blowing you first loosen the debris with a rake or broom.
that in dusty conditions you lightly moisturize the surface.
6 MACHINE-SPECIFIC SAFETY WARNINGS
Always hold the blower in your right hand, refer to the Operation Instructions in this manual.
To reduce the risk of hearing loss associated with sound level, hearing protection is required.
- To reduce the risk of injury associated with contacting rotating parts, stop the engine before installing or removing attachments. Always disconnect the spark plug before performing maintenance or accessing any movable parts.
- Do not point the blower nozzle in the direction of people or pets.
- Never run the unit without the proper equipment attached. When used as a blower, always install the blower tubes.
7 SAFETY WARNINGS GASOLINE

WARNING: Use extra care in handling fuels. They are flammable and the vapours are explosive. The following points must be observed.
- Use only an approved container.
- Never remove the fuel cap or add fuel with the power source running. Allow engine exhaust components to cool before refuelling.
- Do not smoke.
- Never refuel the machine indoors.
- Never store the machine or fuel containers inside, where is an open flame, such as a water heater.
POWERPLUS POWEG9020 EN
If fuel is spilled, do not attempt to start the power source, but move the machine away from the area of spillage before starting.
- Always replace and securely tighten the fuel cap after refuelling.
If the tank is drained, this should be done outdoors.
8 ASSEMBLY
8.1 Attaching the flex tube (Fig.1 & 2)
Put the hose clamp (17) on the flex tube (16) before connecting the flex tube (16) and the fan's air outlet (25) together. Connect the flex tube (16) to the air outlet (25) with a hose clamp (17) and tighten securely.
Before connecting the flex tube (16) put some grease on inner sides of the flex tube!
8.2 Attaching the blower tube (Fig.3,4 & 5)

NOTE: keep the throttle cable as straight as possible when connecting the blower tube.
- Place the unit on flat surface during assembly. Insure the screw mechanism of clamp (17) is positioned away from the operator.
- Put the hose clamp (17) on the flex tube (16).
- Insert the blower tube (14) into the flex tube (16) and then tighten securely with the hose clamp (17).
- Attach the throttle cable clips (15) to both ends of the flex tube (16) to secure the throttle cable (24).
8.3 Attaching the extension tube and air nozzles (Fig.6)
Connect the extension tube (21) to the blower tube (14), and the 56mm nozzle (22) or the 45mm concentrator (23) nozzle to the extension tube (21) depending on the application. Push the tubes together and turn them clockwise so that they lock together.
8.4 Adjust the back pack and harness and control handle (Fig.7)
- Place blower on your back by slipping arms through the shoulder straps (11) as if you were putting on a jacket.
- Once adjustments have been made, to the straps for user comfort, remove the blower from your back and place on level ground in an upright position.
- Adjust backpack harness (11) and control handle (13).
9 FUEL AND LUBRICATION
9.1 Fuel
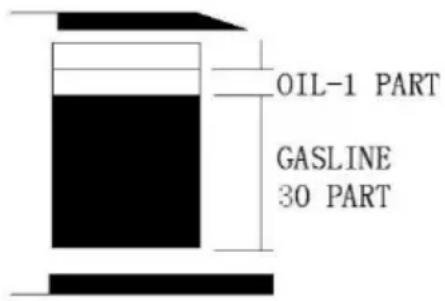
Use regular grade unleaded gasoline mixed with 30:1 custom 2-cycle engine oil for best results. Use mixing ratios in Section FUEL MIXING TABLE below.

WARNING: Never use straight gasoline in your unit. This will cause permanent engine damage and void the manufacturer's warranty for that product. Never use a fuel mixture that has been stored for over 90 days.

WARNING: If 2-cycle lubricant other than Talon Custom Lubricant is to be used, it must be a premium grade oil for 2-cycle air cooled engines mixed at a 30:1 ratio. Do not use any 2-cycle oil product with a recommended mixing ratio of 100:1.If insufficient lubrication is the cause of engine damage, it voids the manufacturer's engine warranty.
POWERPLUS POWEG9020 EN
9.2 Mixing fuel
Add oil to an approved fuel container followed by the gasoline to allow incoming gasoline to mix with oil. Shake container to ensure thorough mix.

Warning: Lack of lubrication voids engine warranty. Gasoline and oil must be mixed at 30:1.
9.2.1 Fuel and lubrication symbols

9.2.2 Fuel and lubrication symbols
| GASOLINE | 30:1 |
| Mixing Ratio | 30 parts Gasoline to 1 Part Lubricant |
9.2.3 Recommended fuels
Some conventional gasolines are being blended with oxygenates such as alcohol or an ether compound to meet clean air standards. The engine is designed to operate satisfactorily on any gasoline for automotive use including oxygenated gasolines.
10 OPERATING INSTRUCTIONS
10.1 Starting a cold engine (Fig.8,9 & 10)
- Make sure ignition switch (3) is in the ON (I) position.
-
Pump primer bulb (12) 6 times by pressing up on the bulb (12).
-
Your unit is designed with a 2 position choke (8) : FULL CHOKE ,and RUN
- With the unit on the ground, hold the top assist handle (4) and step on the top of the frame with your foot.
Position the choke lever (8) to full choke and pull starter handle (5) 2-3 times until you hear the engine turn over to begin to start, than position choke to Run and pull 3-4 more times until the unit starts.
POWERPLUS POWEG9020 EN
- Push the Lock-Off (2) button and press throttle trigger (1) to run.

NOTE: If engine fails to start after repeated attempts, refer to Troubleshooting section.

NOTE: Always pull starter rope straight out. Pulling starter at an angle will cause rope to rub against the eyelet. This friction will cause the rope to fray and wear more quickly. Always hold starter handle when rope retracts. Never let a rope snap back from extended position. This could cause rope to snag or fray and also damage the starter assembly.
10.2 Stopping the engine (Fig. 11)
10.2.1 Emergency STOPPING Procedure
When it is necessary to stop blower engine immediately, PRESS the OFF"STOP STOP switch(3).
10.2.2 Normal Stopping Method.
For normal stopping, release trigger (1) and allow engine to return to idle speed. Then PRESS the OFF "STOP switch (3).
10.3 Starting a warm engine (Engine stopped for no more than 15-20minutes) (Fig.8 &10)
- Make sure ignition switch (3) is in the ON (1) position, pull the starter rope (5) briskly.
If engine does not start, or starts and then stops after 5 rope pulls, follow procedure "STARTING A COLD-engine".
10.4 Blower operations
- Use the blower for trees, shrubs, flower beds, and hard-to-clean areas.
- Use the unit around buildings and for other normal cleaning procedures.
- Use the blower around walls, overhangs, fences, and screens.

WARING: Wear clothes fitting, tough work clothing that will provide protection. Such as heavy long pants, safety work shoes, heavy duty work gloves, hard hat, a safety face shield, or safety glasses for eyes protection and ear plugs for hearing protection.

WARNING: Keep children, bystander, and animals 50 feet (15m) away. If approached stop unit immediately.
WARNING: When using the unit, basic safety precaution, should always be followed to reduce the risk or serious personal injury and damage to the unit.
- We recommend that a face mask be worn when operating blower in dusty areas.
- Stand away from the debris, at a distance that will easily allow you to control the direction of blown debris. Never blow debris in direction of bystanders.
- To control velocity of air stream, blower can be operated at any speed between idle and full throttle.
- experience with the unit will help you determine the amount of airflow necessary for each application.
- To reduce sound levels, limit the number of pieces of equipment used at any one time.
- Check your equipment before operation, especially the muffler, air intakes and air filters.
POWERPLUS POWEG9020 EN
- Use rakes and brooms to loosen debris before blowing. In dusty conditions, slightly dampen surfaces when water is available.
- Conserve water by using power blowers instead of hoses for many lawn and garden applications, including areas such as gutters, screens, patios, grills, porches and gardens.
Use intermediate tube plus nozzle of your choice so the air stream can work close to the ground.
After using blowers and other equipment, CLEAN UP! Dispos of debris in trash receptacles.
10.5 Operation instructions
- Follow the instructions "STARTING A COLD ENGINE".
- once unit is running, place unit on your back by slipping arms through the shoulder straps as if you were putting on a jacket
- When preparing to clear an area of debris, always position yourself so that you can control the direction debris will be blown.
- The control handle and the flexibility of the blower tube assembly will allow you to clear the most hard-to-reach areas.
The hand grip, throttle trigger, throttle lock and ignition on/off switch(B)are all mounted on a swivel handle that offers a wide range of operating positions and comfort
11 MAINTENANCE
11.1 Air filter (Fig.12 & 13)

CAUTION: NEVER operate blower without the air filter or dust and dirt will be sucked into the engine and damage it. The air filter must be kept clean. If it becomes damaged, install a new filter.
TO Clean Air Filter:
- Turn the knob holding the air filter cover (7) in place counter clockwise, remove, cover (7) and lift filter (C) from air box.
- Wash filter in soap and water. DO NOT USE GASOLINE!
Air dry filter. - Reinstall air filter and air filter cover.

NOTE: Replace filter if frayed, torn, damaged or unable to be cleaned.
11.2 Fuel cap / fuel filter (Fig.14, 15 & 16)

CAUTION: Remove fuel from unit and store in approved container before starting this procedure. Open fuel cap slowly to release any pressure which may have formed in fuel tank

NOTE: Keep vent (A) on fuel cap (10) clean of debris(Fig. 14).
Fuel filter.
- Completely remove fuel cap (10) from fuel tank (9) to be able to remove fuel filter (C) from tank. Use a piece of wire with a hook formed at the end to pull filter out of tank.
Pull off fuel filter (C) with a twisting motion. - Replace fuel filter.

NOTE: Never operate the blower without the fuel filter. Internal engine damage could result!
11.3 Carburetor adjustment
The carburetor was pre-set at the factory for optimum performance. If further adjustments are necessary take your blower to a qualified service dealer.
11.4 Spark plug (Fig.17)
- To remove spark plug (6) for cleaning or replacement: make sure engine is off, spark plug (6) is cool, then grasp spark plug boot firmly and remove from spark plug. Remove spark plug with correct spark plug tool. Inspect, clean or replace as needed.
- Spark plug gap = .025 in (.635mm).
- Torque to 105 to 130 inch pounds (12 to 15 Nm). Connect spark plug boot.
12 TECHNICAL DETAILS
| Model nr. | POWEG9020 |
| Power source | Gasoline |
| Cylinder capacity | 26cc |
| Engine Power | 0.7kW |
| Fuel tank capacity | 0.5L |
| Choke type | Manual |
| Horse power | 0.95hp |
| Fuel mixing ratio | 30:1 |
| Carburetor type | Huayi |
| Spark plug type | Torch |
| Max. air volume | 8m³/min |
| Rotation speed (n) min | 3500min-1 |
| Rotation speed (n) max | 9000min-1 |
| Engine model no | SPK34F |
| ED approval number | 24*2016/1628*2018/989SHA1/P*0189*00 |
| Fuel level indicator | Yes |
| Vibration reduction system | Yes |
| Weight | 5kg |
| Starter rope length | 76cm |
| Material housing: | PA6 |
13 NOISE
Noise values measured according to relevant standard. (K = 3)
| Acoustic pressure level LpA | 94dB(A) |
| Acoustic power level LwA | 107dB(A) |

ATTENTION! The sound power level may exceed 85 dB(A), in this case individual hearing protection shall be worn.
aw (Vibration)
2.2m/s²
K = 1,5 m/s²

WARNING: Failure to follow these steps may cause varnish to form in the carburetor and difficult starting or permanent damage following storage.
- Perform all the general maintenance recommended in the Maintenance Section of your User Manual.
Clean outside surface of unit. - Drain fuel from the fuel tank (9).
After fuel is drained, start engine. - Run engine at idle until unit stops. This will purge the carburetor of fuel.
- Allow engine to cool (approx. 5 minutes).
- Using a spark plug wrench, remove the spark plug (6).
- Pour 1 teaspoon of clean 2-cycle oil into the combustion chamber. Pull starter rope slowly several times to coat internal components. Replace spark plug.
- Store unit in a cool, dry place away from any source of ignition such as an oil burner, water heater, etc.
15 REMOVING A UNIT FROM STORAGE
- Remove spark plug.
Pull starter rope briskly to clear excess oil from combustion chamber. - Clean and gap spark plug or install a new spark plug with proper gap.(Fig. 16)
Prepare unit for operation. - Fill fuel tank with proper fuel/oil mixture. See Fuel and Lubrication Section.
16 TROUBLE SHOOTING
| PROBLEM | PROBABLE CAUSE | CORRECTIVE ACTION |
| Unit won't start or starts but will not run. | Incorrect starting procedures. | Follow instructions in the user Manual. |
| Incorrect carburetor mixture adjustment setting. | Have carburetor adjusted by Authorized Service Center | |
| Fouled spark plug. | Clean/gap or replace plug. | |
| Empty fuel tank. | Fill fuel tank with properly mixed fuel. | |
| Primer bulb was not pressed enough | Press primer bulb fully and slowly 10 times. | |
| Unit starts, but engine has low power | Fuel filter is plugged | Replace spark arrestor screen |
| Incorrect lever position | Move to RUN position | |
| Dirty spark arrestor screen | Replace spark arrestor screen | |
| Dirty air filter | Remove, clean and reinstall filter. | |
| Incorrect carburetor mixture adjustment setting service dealer | Have carburetor adjusted by an Authorized Service Center. |
POWERPLUS POWEG9020 EN
| Engine hesitates | Incorrect carburetor mixture adjustment setting | Have carburetor adjusted by an Authorized Service Center. |
| Air filter is plugged | Replace or clean the air filter. | |
| Old or improperly mixed fuel | Drain gas tank/add fresh fuel mixture | |
| No power under load | Incorrect carburetor mixture adjustment setting | Have carburetor adjusted by an Authorized Service Center. |
| Air filter is plugged | Replace or clean the air filter. | |
| Old or improperly mixed fuel | Drain gas tank (see storage) add fresh fuel mixture | |
| Fouled spark plug | Replace or clean the spark plug | |
| Runs erratically. | Incorrectly gapped spark plug. | Clean/gag or replace plug. |
| Plugged spark arrestor. | Clean or replace spark arrestor. | |
| Dirty air filter. | Clean or replace air filter. | |
| Smokes excessively | Incorrect carburetor mixture adjustment setting. | Have carburetor adjusted by an Authorized Service Center. |
| Incorrect fuel mixture | Use properly mixed fuel (30:1mixture). |
17 WARRANTY
This product is warranted as provided by law for a 24-month period effective from the date of purchase by the first user.
- This warranty covers all material or production flaws excluding : batteries, chargers, defective parts subject to normal wear & tear such as bearings, brushes, cables, and plugs, or accessories such as drills, drill bits, saw blades, etc. ; damage or defects resulting from maltreatment, accidents or alterations; nor the cost of transportation.
- Damage and/or defects resulting from inappropriate use also do not fall under the warranty provisions.
We also disclaim all liability for any bodily injury resulting from inappropriate use of the tool.
- Repairs may only be carried out by an authorised customer service centre for Powerplus tools.
- You can always obtain more information at the number 00 32 3 292 92 90.
- Any transportation costs shall always be borne by the customer, unless agreed otherwise in writing.
- At the same time, no claim can be made on the warranty if the damage of the device is the result of negligent maintenance or overload.
- Definitely excluded from the warranty is damage resulting from fluid permeation, excessive dust penetration, intentional damage (on purpose or by gross carelessness), inappropriate usage (use for purposes for which the device is not suitable), incompetent usage (e.g. not following the instructions given in the manual), inexpert assembly, lightning strike, erroneous net voltage. This list is not exhaustive.
- Acceptance of claims under warranty can never lead to the prolongation of the warranty period nor commencement of a new warranty period in case of a device replacement.
Devices or parts which are replaced under the warranty therefore remain the property of Varo NV.
We reserve the right to reject a claim whenever the purchase cannot be verified or when it is clear that the product has not been properly maintained. (Clean ventilation slots, carbon brushes serviced regularly, etc.).
POWERPLUS POWEG9020 EN
- Your purchase receipt must be kept as proof of date of purchase.
- Your appliance must be returned undismantled to your dealer in an acceptably clean state, (in its original blow-moulded case if applicable to the unit), accompanied by proof of purchase.
18 ENVIRONMENT

Should your appliance need replacement after extended use, do not dispose of it with the household refuse, but in an environmentally safe way.
Waste electrical products should not be disposed of with household waste. Please recycle where facilities exist. Check with your Local Authority or retailer for recycling advice.
19 DECLARATION OF CONFORMITY


VARO - Vic. Van Rompuy N.V. - Joseph Van Instraat 9 - BE2500 Lier - BELGIUM, declares that, product: LEAF BLOWER 26CC (backpack)
trade mark: PowerPlus
model:POWEG9020
is in conformity with the essential requirements and other relevant provisions of the applicable European Directives, based on the application of European harmonized standards. Any unauthorized modification of the apparatus voids this declaration.
European Directives (including, if applicable, their amendments up to the date of signature):
2006/42/EC
2014/30/EU
2000/14/EC Annex V LwA
Measured 106dB(A)
Guaranteed 107dB(A)
European harmonized standards (including, if applicable, their amendments up to the date of signature):
EN15503:2009-A2
EN ISO 14982 : 2009
Keeper of the Technical Documentation: Philippe Vankerkhove, VARO - Vic. Van Rompuy N.V.
The undersigned acts on behalf of the company CEO,

Philippe Vankerkhove
Regulatory Affairs - Compliance Manager
02/08/21, Lier - Belgium
POWERPLUS POWEG9020 DE
02/08/21, Lier - Belgium
POWERPLUS POWEG9020 ES
02/08/21, Lier - Belgium
POWERPLUS POWEG9020 IT
Regulatory Affairs - Compliance Manager
02/08/21, Lier - Belgium
POWERPLUS POWEG9020 PT
02/08/21, Lier - Belgium
POWERPLUS POWEG9020 NO
10.2.1 N°DSTOPP Prosedyre
Hvis det oppstár en situasjon der det er nødvendig á stoppe Iøvblåseren umiddelbart, TRYKK pa
tenningsbryteren OFF"STOP AV/STOPP)3.
10.2.2 Normal stopp-prosedyre
11.4 Tennplugg (Fig.17)
02/08/21, Lier - Belgium
POWERPLUS POWEG9020 DA
2 MEDFØLGENDE INDHOLD (FIG. A)
10.2.1 Procedure for NODSTOP
02/08/21, Lier - Belgium
POWERPLUS POWEG9020 CS
02/08/21, Lier - Belgium
POWERPLUS POWEG9020 BG
1 IPEdHA3HauEHNHe HA yNOTpeBATA. 3
2 OINCAHNE (ΦIΓ. A) 3
3 CnncbK HA CbIbPjKHNETo HA ONAKOBKATA. 3
4 CnMBOJIH 4
5OBuIN PEPdUYPExKDeHnA 3A B6E3OJACHOCT INN3IOJ3BAHE HA MOUHN HNCTPYMEHTN
6 CNEUΦHn HNCTPYKlM 3A BE3OJACHOCT. 5
7 IPEyIpeXJdEHn 3A B3OpACHOCT PnP PAbOTA C BEH3INH...6
8 MOHTAXEH Bb3EJI 6
8.1 PpuKpeVeHa ha 2bKaaba mpb6a (Uz. 1 u 2). 6
8.2 PpuKpEnIe Ha mpb6ama Ha u3dyx6a7a (Fuz. 3,4u 5) 6
8.3 PpukpeaneHa ydbjxumenHama mpb6a u eb3dyuHume dio3u (Fua. 6)
8.4 Hacmpoime paHucama u npespamkume, pkoexamkama 3a ynpaeJeHeue (Uz.7) ....6
9 TOpNBO N CMA3BAHE 7
9.1 TOpueo 7
9.2 CmecBaHe Ha zoPueo 7
9.2.1 CmB0JI 3a roPbBO n Cma3BaIO BeIeCTBO
9.2.2 CmboJn 3a roPbBO n Cma3BaUo BeueCTBO 7
9.2.3 IpnopbunTeHn ropuBa 7
10 INHCTPYKUN 3A PABOTA 8
10.1 CmapmupaHe Ha cmydeH deuzamen (Fue. 8, 9 u 10) 8
10.2 CnupaHe Ha deuaamena (Fue. 11) 8
10.2.1 IpoeDypa no abapnHo CnIPAHE 8
10.2.2 MetoI 3a HopMaIIHo cIIpaHe.. 8
10.3 Cmapupahe Ha monbI 3aepn (Deusamem e cnpn 3a Henoeeye om 15-20 Muhymu) (Fue. 8 u 10)
10.4 Onepauu Ha u3dyxea.. 8
10.5 Hcmpykuu 3a pa6oma 9
11 POnPbXkA 10
11.1 Bb3dyuen pfunmbp (Fue. 12 u 13) 10
11.2 Kanayka 3a 2opuio / 2opueh fumpb (Fua. 14, 15 u 16) 10
POWERPLUS
POWEG9020 BG
11.3 Pezynupahe Ha Kapbypamopa 10
11.4 3anaumenha ceeu (Fua. 17). 10
12 TEXHnueCKn DAHHN 11
13 11
14 CbXPAHEHNE 11
15 N3BEXDAHE HA YPED OT CbXPAHEHNE 12
16 OTCTPAHRAHE HA IPOBJEMN 12
17 TAPAHUN 14
18 OKOJIHACPEDA 14
19 DEKJIAPAUJRA 3ACbOTBETCTBNE 15
POWERPLUS POWEG9020 BG
ИЗДУХВАЧ HA ЛИСТА 26КУБ. CM (PAHицА) POWEG9020
1 ПЕДHA3HAUHNE HA YNOTPEBATA
YcTPOINCTBOTO 3a N3dyXbaHe/BCMkyBaHe e npEHa3NaYeHO 3a N3dyXbaHe/BCMkyBaHe Ha JnCTa IN TpeBHN OCTaTbCn KaTO OKOceHa TpeBa n MaJKN KIOHcyTe. He Tp86Ba Da ce N3noJ3Ba 3a HnKaKBN DpyrN CEJI. YpeBbT Tp86Ba Da ce N3noJ3Ba cAmO 3a cyxN NOBbpxHocTn, Toi He e npEHa3NaeH 3a TbProBcKa yNoTpe6a, a 3a N3noJ3BaHe B YacTHn DOMOBe* n rpaDHH. Ppr HnKaKBn O6ctOraTeIcTBa He Tp86Ba Da ce N3noJ3Ba B O6IeCTBeHn 30Hn Ha OTkpHTo, Ha CtaDnOHn, B 3eMeDeJcKn IROPckn PnlouN. HenoDxoJaA 3a npoPecsOnHaHa yNoTpe6a.

IpeynpexdHe! Ipei Da n3no3BaTe HnctpyMeHTa, IpOyeTe BHNMaTeHToBa pkoBODCTBO n 06uNTe HnctpyKcN 3a 6e3oNaChocT, 3apAn BaWata Co6CTBeHa cnypHocT. BaWNr T eJektpOnHcTpyMeHT Tpr6Ba Da ce npedAba Ha dpyr cAmo 3aeDHO c HactoUHTe HnctpyKcN.
2 ONICAHNE (ONR.A)
- CnycbKaHa DpocenHaTa Kna
- ByToH 3a 3aKJIIOUBAHe
- Ппевклювateл 3а Bкн./ИЗКЛ.На 3аразалBaHeTo
- PbkoxBaTkHa Hocaya
- PboKoXBaTKa Ha cTapTepa
- Побовский на залипелна с蜱с / залипелна с蜱с
- Kanak Ha Bb3DyHnna qnIITbp
- loct ha npocela
- Pe3epBoap 3a ropuBO
-
Kanayka 3a ropuBoto
11.Претамки -
TopnbonodkauBauna nomna
- Pbkoxbatka 3a ynpabJIeHne
- Tpb6a Ha n3duybcaa
- Ka6eHn cko6n Ha dpoceHnHaTa KJana
- _b b k a b a T p b 6 a
- Cko6a Ha Mapkyua
- Kanak ha yymo3aIyIuIteIa
- Ekpan Ha nckporacnteJia
- BeHTnIupaHa 3aDHa nOJIOXka
- YdblnxkntenHa Tpb6a
22.Дюза56MM
23.ДюзаЗаКонцentpaTop 45 MM - Ka6eI Ha dpoecHaTa KlaIa
3 CnncbK HA CbIbPjAHNETO HA ONAKOBKATA
- OtctpaheTe BCNUKn ONAKOVBuHn MaTePnaJI.
OTCTpaHeTe octaHaNTe onaKOBbUHN bPemeHHN NOCTaBKN (ako IMa TaKnBa).
PpOBepeTe daHn naKeTbT cbDbpxk BCNUK KOMNoHeHTN. - Повере ТдпурдТ,Зханьшгт Кбел,цencelT n akcecoapTe He ca 6nIn noBpeHEn np TrpaHcnpTupaHe.
- Na3ete onakOBbHnTe MaTePnAn NoTn Do KpaHa rapaHcNoHHn nepnoD. Cnei ToBa n3XBpIeTe B nyKt 3a cb6npaHe Ha OTnaDbu.

BHIMAHHE! OnaKOBbYHnTe MaTePnaIh He ca nrgaKn! He no3BOLBaIe Ha deca da nrgaT c HauNoHOBn Top6nUKN! Pnck OT 3aDywaBaHe!
1x n3duyxbau
1xpbkoBOcTBO
1x raeuehen KJIOU 3a 3anaJIteJIHaTa CBeu
1x npa3Ha 6yTnIka
3x yactn Tpb6a
1x rBkBa Tpb6a

B cnya, ye hakoun qactn IunCBat nnn ca noBpeHn, CBbpxeTe ce c MeCTHna dnctpn6byTop.
4 CnMBOJN
B HacToaHnHaPbUHNK n/nnBbpxy MaunHaTa ca N3NoJ3BaHn CNeHInTe CmBOJN:
| Овозанова обасноct от нараявае яйп пореда на инструмени. | Съшесъва рись OT ИЗХВьрлени на камьни и дуги поедmetи OT уреда. Дръжte дуглenteхори ДомашинITE жИВOTНИ Бeзогано разостяни. 6бзогано разостяни. | ||
| Прedesда ИЗюлбате maшината, поочтete ръковodeево. | Праздуржdenе: В entилалогьт Вся оше сърту, korato OTваряты яйп за варяты калaka, бъдerte Вимателни, осobеньо с BXODня калak. | ||
| Прedes拏ождени: Нoscete 3aшита 3a оочte. | |||
| Винаги ИЗлочьaite maшинATA OT еLEКтpoЗaxpaHванeto п徴и почиствае, пооверka, поправka яйп korato e пов徕да на яйп korato ce e Заллеса. | Te pa6otete и не OCTавайte maшинata на дьжд яйп ( MOKри яйп валжн усювя. Влага тсьдаба onacnoct 3a ТOKOB удap. | ||
| Изва对接е щениета OT Контактабанho, akо Кабельт e по徕да яйп срязан. | CE | В сьотьтCTВе с Вaxн: приложимп STандарту по бизоганочост наЕврочьк Диpektibn. | |
| Носи ekини探测ка 3a PECNIPAТOPна 3aшита. | ИзразьвETCTВе с Вaxн: приложимп STандарту: Бизоганочost наЕврочьк Диpektibn. | ||
5 OБци ПЕДУПЕЖDEHЯ 3A BE3ОПACHOCT ПРИ N3ПОЛ3BAHE HA MOцн ИНСТРУМЕNTN
ПРЕДУПЕЖДEHNE! Ри уnotpe6а Н граинckу урdi, 3a да ce оранчп рисka OT поар, eNeKtpnueckn ydapи наразнваня, Trpa6Ba BnHAn Da 6bdaT cna3BaHn, OCHOBHNTe Меркn 3a 6e3OnaCHOCT, BKJIQUHTeJHNo cIeHNTE:
BbTeTe 3aNo3HaT c KOHTpOJa n npabnHTo n3no3BaHe Ha npodykTa.
IOnuHCTePa6oTHOToNoJe IpeDNBCa ynoTpe6a.IpeMaxHeTe BCnUKN OBeKTN,KAto KaMbHN, CUYNeHN CTbKnA,ΓBO3dE,TeJ NIN BpB,B,KoYTO MOKe Da Ce N3XBpN INN 3aJIpeTe B INHCTpyMeHTa.
Hocete rpyb, dbln nantalohn, 60tyu npkabun. He hocete otnychaTo o6JeKnO, woptn He xoTe c bocn kpaKa.
He Hocete CkboeHHoCTOn OT KaKbBTO n da e BnD.
IodcHpyte Kocata cn HaN HbOTo Ha pameHa, 3a da npeDToBpaTne 3aJIHTaHTo n DnKxnte ce yactn.
He donyckaTe deca uHn Heo6yuEn da n3noN3BaT To3n ypei.
- Na3ete BCnUKN CToRiHn HaOKOJI, OCO6EHO Deua N DoMaUHN JIO6mUHn, Ha Hau-MaJIKO 15 M oT pa60THata 30Ha.
POWERPLUS POWEG9020 BG
He pa6oTeTe c To3n npOdyKT kOraTo cTe yMopeH, 60JeH nn noD BnnaHneTo Ha aNkoXoJ, HapKOTuN nn JleHeHne.
He pa6oTe Te npn OCKbDHa CBETJIHa. N3noJ3BaIe ypea cMo Ha dHeBHa CBeTJIHa IIN do6po N3KycTBHeO OCBetJIeHne.
- PoiDbPxaIte cta6nHn KpaKu n 6aIaHc. He ce npceraIte.
- IpecaRaHeTo MoKe Da DoBeNe Do 3aYbHa Ha bAnaHc NIn N3JaRaHe Ha OnaCHOCT.
-ДрькTe BCnчКиЧаCTN Ha TЯЛоTO cN ДaJIeU OТ ДВИЖЕЦHTe ceЧаСТN.
- IpoBepTe npoDyKta npeDi ynoTpe6a. NpOMeHeTe BCnUKN NOBpeHEn uactn npeDi ynoTpe6a.
He pa6oTeTe c npOdykTa B MOKpa NJIbN BnJxHa o6CTaHOBka.
He n3noJ3BaIte npOdyKta noI dIbXka.
Hocete npedna3Ha cnIOna nnOuJa, KOrato pa6oTnte CTo3n npOdyKT.
- 3no3BaIte npabnHnna npOyKT. 3no3BaIte npOyKta camo no npedHa3NaueHne.
He n3noI3BaIte npOyKta, aKo npEeKnIOUbaTeJIaT He BkIoUBa IIN He n3KIOUBa npOyKta. PpOyKT, KOTo He MoKe Da 6bJe KOHTPOInpaH C npEeKnIOUbaTeJIa e OnaceH IN TpA6Ba Da 6bJe nonpaBeH.
- Ппсдтбразе CTартуран e no HeBHMaHne.
Cna3BaTe 6Iaropa3yMne KOrato nIIN3BaTe TO3n npOdyKT.
БьдeteHaUpeKINBHMaBaTeBTOBAKOeTIpabNTe.
He hacunbaite npodykta. lce cbbpnn no-do6pa pa60ta c no-maJIka BepoRTHOCT OT yBpeKdAnH, kOrato pa60ntte C Hero B 06Xbata, 3a KoIToe npoeKTnpaH.
- ПиножениTo He e npedBndeHo 3a ynoTpe6a ot Deua nHemouHn HnDnBnN 6e3 Na6IIODeHne.
- Deuata Tp6Ba da 6bDat Ha6JIIODaBAHn 3a da ce ocNpyn, Ye He cn irpaT c npINOxHeNoTo.
- 13KJIHcTe H3dYbTaTeJRA, ako 3a6eJekTe Heo6nauHN Bn6paun.
He n3dyxbaiTe qactn OT paCTeHnKbM OKONHnTe.
CbxaHraBaeTe n3dyXBaHa Ha cyxo MRCTo.
OnitaiTe ce da noDbpxaTe KOIKOTc Ce MoKe No-MaIKo N3nraHTo Ha Bn6paun. PnpMepn MepK 3a NOHxabaHe N3naRaHTo Ha Bn6paun Ca HocHeTo Ha pbKaBUNI NO BpeMe Ha ynotpeBa Ha NHCTpymEnTa n OpArHnUaHaHTo Ha pa6OTnTe YacOBe.

Ipeynpexdene! He pa6oTeB 6n3ocT do OTbOpen npo3opeu, n T.H.
- PpenopbUba ce;
- da pa6oTnte c MaunHaTa cAmO B npHemnBn YacObe - He paHO cyTpH NIN KbCHO CJIeD BeuepTa, Korato dpyrnte Morat Da 6bDaT CMyTeH.
- npdeHn3dyXbaHe/BakyyMnpaHe nbpBO da pa3poXkate OCTaTbCtte C rpe6JNo nn MeTla.
Pn npaHn ycIOBna Jeko Da HABJAXHIne NOBbpxHOCTTa.
6 CNEUΦNCH INHCTPYKUN 3A BE3ONACHOCT
BnHaN npbXTe Bb3dyXoYbKaTc BaWata Ta JraCha pka, BxKTe INHCTpyKunTe 3a pa6ota B TOBa pkoBOdCTBO.
3a da ce HamaHn pncKa OT 3ary6a Ha cnYx, CBbp3aH C HNBOTo Ha 3Byka, e Heo6xoDIma 3BykoBa 3aunTa.
BbptaIte ce nepkn Ha potopa Morat da npuHrt cepno3Ho HapaHbaHe. Cnpete Dnurata, npedn Da OTBOpTE BakyMHaTbPaTa nn da MOHTnPate / cMeHrTe Tpb6n. He nocTabyTe pueTe CNnn HkaKBN dpyn PpeDMeTN Bbb BakyMHNTe Tpb6n, Dokato Ce MOHTnPAT BycToCTBOTo.
3a da ce haamn pncs oT hapaHbAHe CbBp3aHO C KOHTaKT Do Bbptaun qactn, cnpete Dbratena nped n da nHctanipate nn 13BaNTe npnkpenbaun enemeHTn. He pa6oTe 6e3 npedna3nteJ da e Ha mCTOTO My. BnHa n pa3eHHaBte 3anaNTeJIHaTa CBeU npedn 13BbPwBaHe Na NDpBxKka Nn NOnyabAHe Ha DOCTbN DO HKarO NOdBxKha qact.
He hacouBaIe IIO3aTa Ha Bb3dyXOyBkata No Nocoka Ha Xopa NIN JKNIBOTHn.
POWERPLUS POWEG9020 BG
7 PPEyPExEHN 3A B3OpACHOCT PPN PABOTA C BEH3INH

BHIMAHHE: BbTe H3BbHpeIHO BHIMATEIHN npn pa6oTa c ropNBa. Te ca IecHO 3anaJIIMN, a napTE ca B3pNUBOONacNI. Tp6Ba da ce cna3BaT cIeDNITE npabUNa
- I3noJ3BaIte cAmO oDo6peHn KOHTeHepn.
Hnkora He cBaanTe kanaqkaTa Ha rOpIBOTo H He doabAaIe rOpIBO npn pa6oTeu n3ToUHK Ha 3axpaHbAhe. OctabeTe u3nyckateJHHTe KOMnoHeHTn Ha DBnraTeJna u3CTnHaT ppei da Haaneete rOpIBO.
He nywete.
Hikora He HanibaTe rOpINBO yCTpOInCTBOTO, KOraTO cTe Ha 3AkPnTo.
Hikora He cbxpaHraBaTe yCTpoNcTBOTo nIN KOHTeHepnTe C rOpNBO Ha MeCTa, KbDeTO mAOTKpNT nnambK, HAnpImep Do 6oInepi.
Ako pa3neeTe rOpNBO, He ce ONITBaIte Da BKNIOHTe 3axpaHbAuINa N3TOUHNK, a npemecTeYcTPOIcTBOTOBCTpAHn OT pa3JrTOTo, npei Da ro BKNIOHTe.
BnHaHn nocTabraIte Ha MrcTo n 3aTgAraTe 3dpabo Kaanaykata Ha rOpNBTO, CneK aTO ro DoneeTe.
Ako nckate da n3TOuHTe pe3epBoapa, Tp6Ba da ro HappaBte Ha OTKpntO.
8 MOHTAXEHB3EJI
8.1 IpuKpeneHa Ha 2bKaagama mp6a (Fue. 1 u 2)
Iocabete cko6ata Ha Mapkya (17) Ha rBkabaTatp6a (16) npedn Cbbp3BaHe Ha rBkabaTa Tpb6a (16) n B3dyuHnHa BeHTnAtopa (25). CbpxTe rBkabaTa Tpb6a (16) KbM B3duHnHa 3BOd (25) cbc cko6a 3a Mapky (17) n do6pe 3aterhe.
Ipei n Cbbp3BaHe Ha rBkabata Tpb6a (16) noctabeTe manko rpec no BbTpueHnTe cTpaHn Ha rBkabata Tpb6a!
8.2 IpuKpenHa mpb6ama Ha u3dyxea4a (Ua. 3,4u5)

3A6EJEXKA:ДрькTe Ka6ena Ha ДрocenHaTа Klna KonkoTo ce MoKe no npaB, Korato CBbp3BaTe Tpb6aTa Ha n3dYXbaua.
IocTabete ypea Bbpxy nlocka noBbpxHocT no Bpeme Ha crno6BaHeTo. Ocnypete BnHTOBmexAHn3bMa HcKo6ata (17) da e pa3noJoxeH hActpaHa ot onepaTopa.
- IocTabete cko6aTa Ha Mapkya (17) Bbpxy TbBkAbata Tpb6a (16).
BbBeTe Tpb6aTa Ha n3dyXbAa (14) B TbBkAbata Tpb6a (16) n cIeT TOBa Do6pe CterHete cbc ckobata Ha Mapkyua (17).
- Пикpenete сковпente Ha Kaheа Ha ДрocenHaТа Клana (15) KBM DBaTa KpaHа ГвКaBaTApb6a (16), 3a Da ocHrypnte Kaheа Ha ДрocenHaTа Клana (24).
8.3 IpuKpeneHa Ha ydbJnxumenHama mpb6a u 6b3dyuHume d03u (Fua. 6)
Cbpxte YeIbJnxTeHnHaTa Tpb6a (21) KbM Tpb6aTa Ha n3dyXbaa (14) n 56 MM d03a (22) nn 45 MM KOHeKToPHa IIO3a (23) KbM yIbJnxTeHnHaTa Tpb6a (21) B 3abNCIMoCT OT npInIOxKeHneTO.
HaTnCHeTe Tpb6nte 3aeHNO n IIN 3aBbPTeTe NO YacOBHnKOBaTa CTrpeNka, TaKa Ye da Ce 3aknOuata 3aeHNo.
8.4 Hacmpoume paHucaama u npespaMkume, pbkoXgamkama 3a ynpasJeHue (Fua.7)
IocTabete n3dyxbauHa rbp6a cn ype3 npOBnpaHe Ha pbcTe npe3npe3pamKnte (11) BCE eHcN o6nuaTe rke.
- Ⅲom hactpoinkte cnpraMo npespaKnte 6bDat n3BbPseHn 3a kOMΦopTa Ha notpe6nte, CHEMeTe n3dyXbauoT bpb6a cn I rO NOCTaBeTe Bbpxy paBHa NOBbPxHOCT B n3papBaHa n03u.
HactpoTe npespaMKnte Ha paHncaTa (11) npbkoXbaTkaTa 3a ynpabJeHne (13).
9.1 Fopueo
Изпольвайт otherwise can be 6e3oJIOBHO roPnBO cmeceHo c 30:1 nepcoHaJIIN3IpaHOb 2-TaKTOBO MOTOPHO macNo 3a NaH-do6pn pe3yJITaTn. Изпольвайт сьOTHOseHnra Ta Ha cMEcBaHe B pa3deJI TABJIILCA 3A CMECBAHE HA TROPINO dony.

ПРЕДУПЕХДECHNE: НкORA He n3noJ3BaIte YIcT 6eH3IN BbB BaIyЯ ypeI. TOba ье npedn3Bnka Heo6paTUMN IeTN NO DBnraTeJI N Ie aHyInpa rapaHcIyra Ha npOIN3BOdnteJI 3a To3n npOdyKT. HnkORA He n3noJ3BaIte rOpNBHa cMec, KOrTo e cbxpaHЯBaHa Na90 dHI.

ПЕДУПЕЖDEHNE: Ако ще се ИЗнолзВа 2-TaKTOBO cma3Baaso BeшесТВО pa3JNUHO ot Talon Custom Lubricant, ТразбWAд e MacNo Класnpemnym 3a 2-TaKTOBn DBuRaTeN C Bb3dUshO OxJaXdAne CmeceHo ПрсьOTHOseHne 30:1. He I3noI3BaIte KaKBOTo Ида e 2-TaKTOBO MacNo c npenOpbUHTeNHO cbOTHOseHne Ha CmecBaHe ot 100:1. Ако пчИнATA 3a NOBpeDa no DBuRaTeЯ e HeDocTaTbUHO MacNo, TOBa aHyInpa rapaHcYraTa Ha npOn3BOdnteЯ Na DBuRaTeЯ.
9.2 CmeceaHa zopueo
Iodabete Macno KbM OdoobpeH KOHTeHep c rOpNBO CneBaHO OT 6eH3nH, 3a da N03BOJNTe IocTbIbauuia 6eH3nH da ce cmecn C macnoTo. Pa3tpbckaIte KOHTeHepa, 3a da ocNrypnte o6NJHO CMEcBaHe.

9.2.1
ПЕДУПЕХДЕНЕ: ЛинcaТа Н смаЗБацо BeцecТВО anулпа rapaHцяТа на ДвигаTeЯ. Бeнзиньт И MacLoTO Tpr6Ba Да ce cMecВaT npn 30:1.
CNMBOJI 3a TOpINBO N Cma3BaIIO BeIeCTBO
CIMBOJN 3a TOpINBO N Cma3BaIIO BELIECTBO
9.2.2
| БECH3IN | 30:1 |
| СъOTношени на смecванe | 30 части бECH3IN КьМ 1 част смаЗва之所 BeшесТВО |
9.2.3 IpenopbunenHnropBa
HЯкои KoHBeHcNoHaJIHn 6eH3HH Ca CmecEH n C OKCInTeJIN, KaTO aIkoXoJHn IIN eTePHN cbeHHeHn, 3a Da IOCTnIHat CTaHdApTtte 3a YnCT Bb3dyx. IBnIaTeJIr T epKToPAH da pa6OTn 3aIOBOJNTeJHO Ha BCaKaBb 6eH3HH 3a ABTomO6NJHa yNOTpe6a BKIOuHTeJHO O6OraTeHn Ha KNCLOpOd 6eH3HH.
10 INHCTPYKUIN 3A PABOTA
10.1 CmapmupaHe Ha cmydeH deuameI (Fua. 8, 9 u 10)
- YBepete ce, Ye npebKnHouBaTeJr3a 3anaJIbaHe (3) e B no3nua BKJI. (I).
- Hanomnaite ropuBOnOkaUbaaTa nomna (12) 6 nbTupe3 haTnckaHe Ha cfepaTa (12).
BaunaypeeepoeeknpaHcdpocenc2no3n(8):IbJIHO DPOCEINPAHE IyCK
C ypeIa Ha 3emrTa, 3aIpbkTe rOpHaTa CnOMaIaTeJIHa pbKOXBaTKa (4) n CTbIeTe Ha BbpXHa paMaTcBaunKpak.
Pa3noJoxTe IocTa Ha npocela (8) KbM pblHOpDpoceInpaHe n 3TerIepe pbKoXbaTkaTa Ha cTapTepa (5) 2-3 nbTu,doKaTo He yyeTe pa3BbPtaHeTo Ha Dnuratela da 3anoHc STapTnpaHe, cIeTd TOBa pa3noJoxTe npocela KbM Pnyck n 3TerIeTe oue 3-4 nbTu, dOKaTO ypeDbT He cTapTnpa.
- 136yTaTe 6yToHa 3a 3akNHOuBaHe (2) n HATnCHeTe cnYcbKa Ha npocenHaTa KJIana (1) 3a nyck.

3A6EJIEXKKA: Ako DnuratetaT He cTapTnpa Cnei NOBTapaun ce ONHT, BuxTe pa3deI OTCpaHraBaHe Ha npo6Jemn.

3A5EJEXKKA: BnHaH n3TeJnIe BbXeTo Ha cTApTepa HnPaBO HaBbN. N3TeJnHeTo Ha cTApTepa nOd bIbn Ie Hacapa BbXeTo Da ce TbpKa cnpaMo yxOTo. TOBa TpneHe Ie Hacapa BbXeTo Da ce npoTpne n 3Hocn no-6bp3o. BnHaH npbXte pBkoXBaTkata Ha cTapTepa, KORAto BbXeTo Ce OTdpbNBA. Hnkora He n03BoJnBaIte Ha BbXe Da OTCKOu HA3aD OT yDblXeHTo nOLOXeHne. TOBa MoKe da Hacapa BbXeTo Da ce pa3HnIu IIn IpOtpne n CbIo Da nOBpeDN MOHTaXHn BA3eN Ha cTapTepa.
10.2 Cnupahe Ha deuamea (Fua. 11)
10.2.1 Поцетура no abapиHo CПИРАЕ
Korato e Heo6xOIMO da cnpTe He3a6abHb DnurTaTeJHa n3dyXBaay, HATNCHETE
npeBknIOuBaTeIaN3KJI."CINPAHE (3).
10.2.2 MToI3a HOpMaIIHo cInpaHe.
3a HopMaHNo cnnpaHe, ocB6oTe cnycbka (1) nno3BoJeTe Ha DnBraTeJna Ce BbpHe KbM
obopoTn ha npa3eH xoI. CneI TOBa HATNCHETE npebknIOyBaTeJI N3KJI. "CINPAHE (3).
10.3 Cmapupahe Ha monbI 3aepn (DeuameJe cnpn 3a Henooeye om 15-20 Muhymu) (Ue. 8 u 10)
- YBepete ce, Ye npEbnuBateJr3a 3anaBHeTo (3) e B no3nua BKJI. (I), 6bp3o n3TeJrTe BbxKeTo Ha cTapTepa (5).
Ako DnurataIeT He cIaptnpa IIN nCTaptnpa n CneI TOBa cnnpa CneI 5 n3TeIyHna BbxKeTo, CneDbai Te npoueDypata "CTAPNTPAHE HA CTUDEH dBnuraTeI".
10.4 Onpauu Ha u3dyxea4a
- 3no3BaIte n3dYbBa4a 3a IbpBeta, Xpactn, LBeTHN Jexn TpydHn 3a NOuchTbaHe 30Hn.
- I3noI3BaIte ypeDa OKoIOn crpaIи 3a npUIn npOeDpyn 3a HOpMaJIHO NOuHCTBaHe.
- 3no3BaIte n3dyXbau OKOIO CTeHN, HaNBeCN, orpaN i nperepaN.
POWERPLUS POWEG9020 BG

ПРЕДУПЕХДЕHИЕ: Hocete похоридрени, obneknO 3a TeKka pa6oTa, Koeto ue ocHrypn 3aunTa. Kato TeKKn Dbln NaHTaNoH, 3aunTHn pa6oTHn obyBkn, pa6oTHn pKaBnI 3a TeKka pa6oTa, kacka, 3aunTeH uNT 3a JIne nJN 3aunTHn OCHJa n aHTufoHn 3a clyXOba 3aunTa.
ПЕДУПЕЖДEHNE: Дръжте дeca, okоли и кИВOTи Ha 50 ФуТa (15 M) HabТран. Пп пьбл nxьаанe спгетe He3a6abHо урда.
ПЕДУПЕЖДEHNE: Korato n3non3BaTe ypeda, ochOBHnTe npedna3Hm Мерк 3a 6e3onacnoct Tp86Ba BnHar Da ce CJIeDbaT, 3a Da ce HamaJn PnCKa OT TeKko HapaHbAhe I NOBpeDa no ypeda.
- IpnopbVbame da ce Hocn liueBa macka, KOraTo pa6oTnte c n3dyXbau B npaunH 30Hn.
CToIte HactpaHa OT OCTaTbUHa Ha pa3CTOAHHe, KOeTO IecHO Ue BN IO3BOJIN Da KOHTPOJIpaTe NOCOKaTa Ha n3dYxAHnTe OCTaTbUH. HnKOra He n3dYXBaIte OCTaTbUH NO NOCOKa Ha OKOJHnTe.
3a da KOHTpOInpuTe CKOpocTtHa Bb3dyuHnI NOToK, n3dyXBauchT MoKe Da ce ekCnIooAtnpa npB CBAKBA CKOpocT MExdy o6OpOTn Ha npa3eH XoN IpbJNaCKOpocT.
OHTbT cypeDa ige Bn NOMORHe da ONpeJeNITE KOINueCTBOTO Ha Bb3dyuH NOTOK Heo6xOIMO 3a BCaKO npInIOXeHne.
3a da HamaJIte 3ByKOBInTe HnBa, orpaHnUaBaIe 6poaCTn OT obOpyDbaHeTo, KoEtO n3PON3BaTe no eJHO n CbIo BpeMe. - IpoBepaIte BaWeTo o6OpyDbaHe npEi pa6Ota, ocObeHo yMOn3aRnyuHInTeIe, Bb3dyXo3a6OpHnUte n Bb3dyuHnTe fHnTpn.
- 3no3BaTe rpe6na n MeTn 3a da OTdeJnte octTaBcHte npEyn3dyXbaHe. Pnp npaHn ycNoBn, neKo HABNaXHeTe NOBbPxHOCTne, KOrato e HAnuHa BOda.
CbxaHraBaTe BODaTa KaTo n3NoI3BaTe n3DyXBaU BMeCTO MapKyu 3a MHOro npuLoKeHn no IINBaDaTa n rpaHaTa, BKJIQUHTeNHO 30Hn, KaTo BaDu, IppePaDu, NaBaxu, Ckapu, BepaHn u rpaHH. - 3no3BaTe cpeHa Tpb6a nnoc IIO3a no Baun36Op, Taka ye Bb3dyuHnT NOTOK da MoKe da pa60Tu 6IIN3O do 3emra.
CneI ynoTe6aTa Ha n3dyXBaun I pyro o6opydBaHe, IOUHCTETE! N3xBpIyIe ocTaTbIte B cBDOBe 3a OTnAdbu.
10.5 Hcmpykuuu 3a pa6oma
CneBaIe HNctpyKuHTe "CTAPTIPAHE HA CTUDEH DBNIGATEJ".
UOM ypeBt pa60tn, noCTaBeTe ro Ha rbp6a cn Upe3 nIb3BaHe Ha pIbIeTe npe3 npe3paMKnTe KaKTo BCE eEDHO cn O6NIuHaTe JKe.
Korato noIrotBATE NOUCTBaHETO Ha 3OHa C OCTaTbC, BnHArN Ce no3uOHOpaIte Taka, ye da MoKeTe Da ynpablaBaTe NOCOKATA OCTaTbCtE, KOITo Ue CE N3dyXaT.
PbkoBtKaTa 3a ynpabHeHne n BkBaOCTT ha MOHTaxHnB3eHa Tpb6aTa Ha n3dyXBaY aIe BN no3BOJn Da NOHCNTe Hai-TPyDHNTe 3a DOCTnraHe 30HN.
Pbkoxbkata, cnycbka Ha npocenHaTa Klaana, 3aknoubaHeTo Ha npocenHaTa Klaana n npebknIOyBaTeJra 3a BKn./n3Kn. Ha 3anaJIbaHeTo (B) ca MOHTnpaHn Ha BbpTja ce pkoxbtka, KOrTO OcInpyraBa WnPOK o6xBaT OT N03uIN 3a paBoTa N KOMΦopT
11 NOIDPbXkKA
11.1 Bb3dyweH qunmbp (Ua. 12 u 13)

BHIMAHHE: HNKORA He pa6oTeTe c 3dUxbauch 6e3 Bb3dyweh fHNTbp nI npax, 3aOTo 3ambpcraBaHnue 6bDat 3acmykahn B dBnraTeJn ue ro nobpeT. Bb3dyuHnrtfHnTp6Ba da ce noDtbpka uNCT. Ako ce nobpeM, MOHTnpaTe HOB fHNTbp.
3A nouHCTBaHe Ha Bb3dyWeH qnITbp:
3aBbptete cfepeuHn6ytoH, KOITo DbpKn Kanaka Ha Bb3dyuHnA fntbp (7) B no3nua
6paTHo Ha yacOBHKOBata CTpeNka, CHEMeTe KanaKa (7) n NobdInrHeTe fntbpa (C) ot
Bb3duHaTaNy.
- 3MnIeФJIbpaBcanyHIOBa. HE I3IPOJ3BAIte BEH3NH!
- POnCywTeΦnITbpa C Bb3dYx.
- MoHTnpaIte OTHOBO Bb3dUshnna QnIITbp n KaNaKa Ha Bb3dUshnna QnIITbp.

3A6EJIEXKKA: IopmeHeTe fHITbpa, ako e pa3HNuEeH, pa3KbcaH, NOBpeDeH nIi He MoKe da ce nouchTn.
CTOnHOCTn Ha 3ByKOBOTo HAnIraHe N3MepeHn B CbOTBeTcTBne C npJIOXIMMna CTaHdapt. (K=3)
HnBO Ha 3ByKOBoTo HnIraHe LpA 94d6(A)
HnBO Ha 3BykoBaTa MoUHOCT LwA 107d6(A)

BHIMAHHE! HocTe INHINBnDyAaHN npEa3HN cpeCTBa 3a cnYxa (aHTnfoH), aKO 3BykoBTo HaJraHe npEbnu85d(A).
aw (Bn6paun)
2.2M/c² K=1,5M/c²
14 CbXPAHEHNE

ПЕДУПЕХДEHNE: HeCna3BaHeTo Ha Te3n CTbKN MoKe Da npEduN3BnKa 6pa3yBaHTo Ha NOKpHTne B Kap6ypaTopa I Da 3aTpPydHn CTAtpHaHTo nIi Da ro NOBpeDn Heo6paTmO npn NocJeDbANoTO cbXpaHeHne.
I3Bbpuete cyaata o6a noDpBXka npenopbuaHa B pa3dEe IooDpBXka Ha BaWETo notpe6nteNcKO pkoBOOCTBO.
- NoyncTeBbHnHaTa NOBbpxHOCT Ha ypeJa.
- I3toyeTo ropBOTo OT pe3epBoapa 3a ropBO (9).
Cnei n3ToBaHeTo Ha rOpNBoto, CTapTnpaIte DnBraTeJ.
Iynche Te Dniratena npn o6opotn Ha npa3eH xo,doKaTo ypeBt He cnpe. Toba ue nouictn Kap6ypatopa ot ropno.
POWERPLUS POWEG9020 BG
- Πο3BoJTe Ha dBVraTeTЯ da ce oxlaɪn (πριδJI. 5 MInHyTu).
- KaTo n3non3BaTe raeueH KJIIOU 3a 3anaIInTeIIHa CBeu, OTCpaHete 3anaIInTeIIHaTa CBeu (6).
- ⅢπeηTe 1 cyneHa IbXnua qHcTo 2-TaKTOB MaCNo B rOpNBaTa KaMepa. N3TerIe Te BbxKeTo Ha cTapTepa HЯKOJIko IbTn, 3a Da nOKpneTe BbTpEshHnte KOMNOHeHTn. POndMeHete 3anaJNTeJIHaTa CBeu.
CbxpaHraBaIte Ha cTydeHO, cyxO mAcTo HacTpaHa OT BCaKbB N3TOUHN K HA Bb3nJaMeHraBaHe, KaTO MacJeHr IopeJIKN, BOHN HArpeBaTeJI N T.H.
15 N3BEXDAHE HA YPEI OT CbXPAHEHNE
- Chemete Ha 3anaJInteHaTa CBeU.
- Ⅰ3TerIeTe 6bp30 BbXeTo Ha cTapTepa 3a Da nouchTe I3JIuHOTo MacNo OT 3aNaJIHTHaTa KaMepa.
- 彼用指定的名称,即在指定的名称中使用。
- 指明指定的名称,即在指定的名称中使用。
- PórdTBeTe ypeDa 3a ekCnIIOaTaun.
3apeTe pe3epBoapa 3a rOpBO C noDxOJaMa cMec OT rOpBO/MacNo. Bux pa3dEe TOpBO m Cma3BaHe.
16 OTCTPAHRAHE HA IPOBJEMN
02/08/21, Lier - Belgium

Vario
WWW.VARO.COM
DESIGNED AND MARKETED BY VARO
Copyright by varo
VARO - VIC. VAN ROMPUY nv
JOSEPH VAN INSTRAAT 9 - 2500 LIER - BELGIUM
OFFICES:
IBERICA BRICOLAGE S.L. - ESPANA
ASIA PACIFIC HONG KONG Ltd / SHANGHAI PRC
AUSTRALIA Pty Ltd


- BESCHRIJVING (FIG. A)
- PROBLEEMOPLOSSING
- POWERPLUS POWEG9020 FR
- POWERPLUS POWEG9020 EN
- POWERPLUS
- POWEG9020 EN
- POWERPLUS POWEG9020 EN LEAF BLOWER 26CC (BACKPACK) POWEG9020
- INTENDED USE
- DESCRIPTION (FIG. A)
- PACKAGE CONTENT LIST
- POWERPLUS POWEG9020 EN 4 SYMBOLS
- GENERAL POWER TOOL SAFETY WARNINGS
- MACHINE-SPECIFIC SAFETY WARNINGS
- SAFETY WARNINGS GASOLINE
- ASSEMBLY
- Attaching the flex tube (Fig.1 & 2)
- Attaching the blower tube (Fig.3,4 & 5)
- Attaching the extension tube and air nozzles (Fig.6)
- Adjust the back pack and harness and control handle (Fig.7)
- FUEL AND LUBRICATION
- Fuel
- Mixing fuel
- Fuel and lubrication symbols
- Fuel and lubrication symbols
- Recommended fuels
- OPERATING INSTRUCTIONS
- Starting a cold engine (Fig.8,9 & 10)
- Stopping the engine (Fig. 11)
- Blower operations
- Operation instructions
- MAINTENANCE
- Air filter (Fig.12 & 13)
- Fuel cap / fuel filter (Fig.14, 15 & 16)
- Carburetor adjustment
- Spark plug (Fig.17)
- NOISE
- REMOVING A UNIT FROM STORAGE
- TROUBLE SHOOTING
- WARRANTY
- ENVIRONMENT
- DECLARATION OF CONFORMITY
- POWERPLUS POWEG9020 DE
- POWERPLUS POWEG9020 ES
- POWERPLUS POWEG9020 IT
- POWERPLUS POWEG9020 PT
- POWERPLUS POWEG9020 NO
- N°DSTOPP Prosedyre
- Normal stopp-prosedyre
- Tennplugg (Fig.17)
- POWERPLUS POWEG9020 DA
- MEDFØLGENDE INDHOLD (FIG. A)
- Procedure for NODSTOP
- POWERPLUS POWEG9020 CS
- POWERPLUS POWEG9020 BG
- POWEG9020 BG
- ИЗДУХВАЧ HA ЛИСТА 26КУБ. CM (PAHицА) POWEG9020
- ПЕДHA3HAUHNE HA YNOTPEBATA
- ONICAHNE (ONR.A)
- CnncbK HA CbIbPjAHNETO HA ONAKOBKATA
- CnMBOJN
- OБци ПЕДУПЕЖDEHЯ 3A BE3ОПACHOCT ПРИ N3ПОЛ3BAHE HA MOцн ИНСТРУМЕNTN
- Ipeynpexdene! He pa6oTeB 6n3ocT do OTbOpen npo3opeu, n T.H.
- CNEUΦNCH INHCTPYKUN 3A BE3ONACHOCT
- PPEyPExEHN 3A B3OpACHOCT PPN PABOTA C BEH3INH
- MOHTAXEHB3EJI
- IpuKpeneHa Ha 2bKaagama mp6a (Fue. 1 u 2)
- IpuKpenHa mpb6ama Ha u3dyxea4a (Ua. 3,4u5)
- IpuKpeneHa Ha ydbJnxumenHama mpb6a u 6b3dyuHume d03u (Fua. 6)
- Hacmpoume paHucaama u npespaMkume, pbkoXgamkama 3a ynpasJeHue (Fua.7)
- Fopueo
- CmeceaHa zopueo
- IpenopbunenHnropBa
- INHCTPYKUIN 3A PABOTA
- CmapmupaHe Ha cmydeH deuameI (Fua. 8, 9 u 10)
- Cnupahe Ha deuamea (Fua. 11)
- Поцетура no abapиHo CПИРАЕ
- MToI3a HOpMaIIHo cInpaHe.
- Cmapupahe Ha monbI 3aepn (DeuameJe cnpn 3a Henooeye om 15-20 Muhymu) (Ue. 8 u 10)
- Onpauu Ha u3dyxea4a
- Hcmpykuuu 3a pa6oma
- NOIDPbXkKA
- Bb3dyweH qunmbp (Ua. 12 u 13)
- CbXPAHEHNE
- N3BEXDAHE HA YPEI OT CbXPAHEHNE
- OTCTPAHRAHE HA IPOBJEMN
Brand : PowerPlus
Model : POWEG9020
Category : Blower