BPGIKLED11 - Pest control BLAUPUNKT - Free user manual and instructions
Find the device manual for free BPGIKLED11 BLAUPUNKT in PDF.
| Product type | LED and fan flying insect trap |
| Power supply | 12 V DC, 1000 mA power adapter |
| Power consumption | 6 W |
| LED wavelength | 365 - 395 nm |
| Operating modes | Automatic (light sensor), Timer (5h/8h/12h), Manual |
| Adjustments | LED light intensity, fan speed |
| Sticky plates | Included, replaceable |
| Use | Indoor only |
| Maintenance | Clean fan and container with dry cloth; rinse container and funnel with water if necessary |
| Safety | Do not open, no user-serviceable parts, non-replaceable LED |
| Warranty | Damage due to modifications or improper use not covered |
| Supplied accessories | Sticky plate, power adapter |
Frequently Asked Questions - BPGIKLED11 BLAUPUNKT
User questions about BPGIKLED11 BLAUPUNKT
0 question about this device. Answer the ones you know or ask your own.
Ask a new question about this device
Download the instructions for your Pest control in PDF format for free! Find your manual BPGIKLED11 - BLAUPUNKT and take your electronic device back in hand. On this page are published all the documents necessary for the use of your device. BPGIKLED11 by BLAUPUNKT.
USER MANUAL BPGIKLED11 BLAUPUNKT
To all residents of the European Union
Important environmental information about this product
This symbol on the device or the package indicates that disposal of the device after its lifecycle could harm the environment. Do not dispose of the unit (or batteries) as unsorted municipal waste; it should be taken to a specialized company for recycling. This device should be returned to your distributor or to a local recycling service. Respect the local environmental rules.
If in doubt, contact your local waste disposal authorities.
Please read the manual thoroughly before bringing this device into service. If the device was damaged in transit, do not install or use it and contact your dealer.
2. Safety Instructions

Read and understand this manual and all safety signs before using this appliance.

Indoor use only.

Power supply polarisation.
- This device can be used by children aged from 8 years and above, and persons with reduced physical, sensory or mental capabilities or lack of experience and knowledge if they have been given supervision or instruction concerning the use of the device in a safe way and understand the hazards involved. Children shall not play with the device. Cleaning and user maintenance shall not be made by children without supervision.
- Keep this device away from rain, moisture, splashing and dripping liquids. Never put objects filled with liquids on top of or close to the device.
• Always disconnect mains power when the device is not in use or when servicing or maintenance activities are performed. Handle the power cord by the plug only. - All cords and cables should be routed so that they will not be walked on or pinched by items placed upon or against them. Pay particular attention to the point where they exit the unit.
- Remove all flammable materials close to the device before switching on.
- Do not install the device on a flammable surface (linoleum, carpet, wood, paper, cardboard, plastic, etc.).
-
Protect this device from heat sources such as radiators, heat registers, stoves, or other appliances (including amplifiers) that produce heat.
-
Do not remove the cover under any conditions. There are no user-serviceable parts inside. Never operate this device when its cover is removed.
- Do not operate a visibly damaged device. Do not attempt to operate this device if the power cord has been frayed or broken.
- Always mount this device in a safe and stable manner. Mount this device in an area that will allow proper ventilation. Allow about 15cm between this device and a wall.
- This device should only be serviced by qualified service personnel.
- Familiarise yourself with the functions of the device before actually using it.
- Always install the device in a well-ventilated location.
- Keep this device away from dust and extreme temperatures. Make sure the ventilation openings are clear at all times. For sufficient air circulation, leave at least 2.5 cm in front of the openings.
- Never carry or move the device from the power cord or any other moving part. Always use the bracket.
• In the event of an operating problem, stop using the device immediately. - Never try to repair the device. There are no user-serviceable parts inside the device. Refer to an authorized dealer for service and/or spare parts.
- This device is not designed for permanent operation: regular operation breaks will prolong its live.
Warnings Regarding Servicing

No user-serviceable parts inside. The light source in this appliance cannot be replaced. Scrap the appliance when the lamps cease to operate.
- Disconnect from the power supply before servicing, cleaning and opening.
- Keep this appliance away from children and unauthorized users.
- The appliance is not to be used in locations where flammable vapour or explosive dust is likely to exist.
Sticky Pads

May be fatal if swallowed and enters airways.

Wear tight-fitting safety goggles.

Wear chemical protective clothing.

Wear protective gloves.
3. General Guidelines
- All modifications of the device are forbidden for safety reasons. Damage caused by user modifications to the device is not covered by the warranty.
- Only use the device for its intended purpose. Using the device in an unauthorised way will void the warranty.
- Damage caused by disregard of certain guidelines in this manual is not covered by the warranty and the dealer will not accept responsibility for any ensuing defects or problems.
- Not the importer nor its dealers can be held responsible for any damage (extraordinary, incidental or indirect) – of any nature (financial, physical...) arising from the possession, use or failure of this product.
- Keep this manual for future reference.
4. Overview
General
| 1 front cover 7 container |
| 2 air inlet 8 air outlet |
| 3 fan 9 back cover (1) |
| 4 power input 10 fan box |
| 5 control panel 11 back cover (2) |
| 6 base plate 12 trap |

text_image
Exploded view diagram of a device with numbered parts for identificationControl Panel
| 1 power indicator 5 on-off |
| 2 light intensity/fan speed 6 indicator light |
| 3 timer 7 button |
| 4 auto mode |

text_image
1 2 3 4 5 6 75. Operation
5.1. Introduction
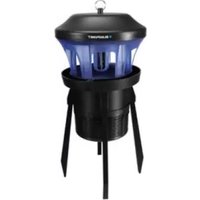
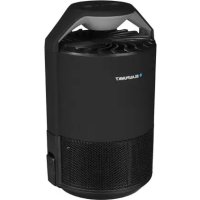
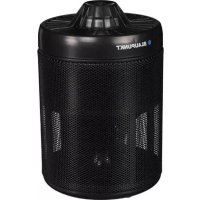
This insect killer uses an LED to attract flying insects. The fan will suck these insects into the container and dry them. This insect killer does not produce any noisy electric shocks nor does it emit any toxins, smoke, scent or radiation.
This insect killer is designed to be used indoors (bedroom, living room).
Keep the insect killer working for more than 48 hours at first use. Do not open the container during use. Make sure the insects are dried to death to prevent them from escaping.
Keep the insect killer working for 3 hours before going to sleep. Make sure to keep windows and doors closed.
5.2. How to Use
- Connect the insect killer to the power source. Install the insect killer in a dry location on a stable and non-slippery surface.
- Press the on-off button to switch on the appliance.
- Press AUTO to switch on the automatic mode. The appliance will automatically switch on or off according to the daylight condition.
- Press the timer button to set the timer.
$$ 5 \mathrm{h} \rightarrow 8 \mathrm{h} \rightarrow 1 2 \mathrm{h} \rightarrow \text { timer off } \rightarrow 5 \mathrm{h} $$
-
Adjust the brightness of the LED and the fan speed with the light intensity button.
-
Press the on-off button to switch off the insect killer. Disconnect from the power supply after use.

Choose either the auto or timer mode as you cannot use them simultaneously.

For best results, turn off other light sources and prevent from installing the appliance in the draught.
5.3. Sticky Pads
- Switch of the appliance and disconnect from the mains.
- Remove the protective layer of the sticky pad.
- Apply it at the bottom of the storage tray. Replace when covered with bugs.
- Close the tray and reconnect the appliance to the mains.
6. Troubleshooting
| Problem Reason Possible solution | ||
| Appliance does not start | Power supply not connected well Reconnect the power supply | |
| On-off button not pressed Press the on-off button | ||
| Appliance does not light | Power supply not connected well Reconnect the power supply | |
| Light is damaged | Light source cannot be replaced;scrap the appliance | |
| PCB board is damaged | PCB Board cannot be replaced;scrap the appliance | |
| Noisy fan Foreign objects in the fan Clean the fan | ||
7. Care and Maintenance
Storage
Store the appliance and its accessories in a clean and dry area.
Cleaning
The cleaning frequency depends on the intensity of use. Check the tray of the device at least once a week. Clean more often if necessary.
Before starting any cleaning or maintenance activities, unplug the appliance from its power source and let it cool down.
Wipe all exterior surfaces of the appliance clean with a soft cloth dampened with a soap and water solution. Do not immerse or submerge any part of the appliance in water or any other liquid. Never use solvents or cleaning agents containing petroleum (petrol, kerosene, oil), paint thinner, turpentine, alcohol, or ammonia.
- Switch off the device and disconnect from the power supply.
- Take out the fan and clean with a dry cloth.
-
Clean the container and trap – rinse with water if necessary.
-
Remove and clean the funnel – rinse with water if necessary.
- Re-assemble by proceeding in reverse order.
| 1 container 3 fan |
| 2 trap 4 funnel |

text_image
Exploded view diagram of a smart air conditioner with numbered parts labeled 1 to 4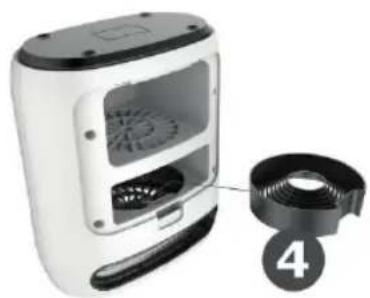
natural_image
White portable food blender with digital display and a black cord, labeled with number 4 (no text or symbols on device)Maintenance
All repairs should only be carried out by qualified service personnel. Do not open exterior casing of the appliance. There are no user-serviceable parts inside. Opening or visible attempts to open or repair the appliance may void any guarantee and/or cause damage to the product or personal injury.
8. Technical Specifications
adaptor....12 VDC, 1000 mA, 50/60 Hz, 0.4 A max.
power consumption....6 W
wavelength....365-395 nm (+/- 5 nm)
material....PC-ABS
effective area....60 m²
lamp....UV LED
dimensions 225 x 250 x 130 mm
weight....1240 g
Use this device with original accessories only. The importer cannot be held responsible in the event of damage or injury resulting from (incorrect) use of this device. The information in this manual is subject to change without prior notice.
© COPYRIGHT NOTICE
All worldwide rights reserved. No part of this manual may be copied, reproduced, translated or reduced to any electronic medium or otherwise without the prior written consent of the copyright holder.
HANDLEIDING
1. Inleiding
text_image
Exploded view diagram of a device with numbered parts for identificationBedieningspaneel
text_image
Exploded view diagram of a smart air conditioner with numbered parts labeled 1 to 4
natural_image
White portable food graser with digital display and a black circular component labeled '4' (no text or symbols on device)Onderhoud
text_image
Exploded view diagram of a device with numbered parts for identificationPanneau de contrôle
text_image
Exploded view diagram of a smart air conditioner with numbered parts labeled 1 to 4
natural_image
White portable coffee maker with digital display and a black spool of contents, labeled with number 4 (no text or symbols on device)Entretien
text_image
Exploded view diagram of a device with numbered parts for identificationPanel de control
text_image
Exploded view diagram of a smart air conditioner with numbered parts labeled 1 to 4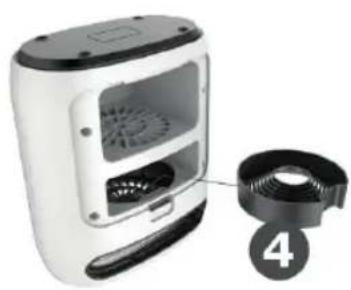
natural_image
White portable food oven with digital display and a black-and-white rack attached to the right (no visible text or symbols)Mantenimiento
text_image
Exploded view diagram of a device with numbered parts for identificationBedienfeld
text_image
Exploded view diagram of a smart air conditioner with numbered parts labeled 1 to 4
natural_image
White portable coffee maker with digital display and fan, partially connected to a circular component labeled '4' (no text or symbols on device)Wartung
text_image
Exploded view diagram of a device with numbered parts for identificationPanel sterowania
text_image
Exploded view diagram of a smart air conditioner with numbered parts labeled 1 to 4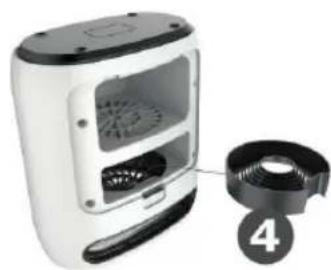
natural_image
White portable coffee maker with a side panel showing its interior and front view, plus a numbered label '4' pointing to the side (no text or symbols on device)Konserwacja
text_image
Exploded view diagram of a device with numbered parts for identificationPainel de Controlo
text_image
Diagram showing exploded view of a smart air conditioner unit with numbered parts labeled 1 to 4Manutenção
text_image
Exploded view diagram of a device with numbered parts for identificationtext_image
Exploded view diagram of a portable air conditioner with numbered parts labeled 1 to 4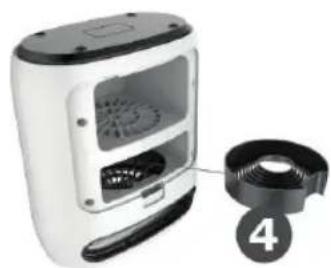
natural_image
White portable coffee maker with a black-and-white lid and label '4' pointing to its side (no text or symbols on device)Manutenzione
text_image
Exploded view diagram of a device with numbered parts for identificationKontrolpanel
text_image
Exploded view diagram of a smart air conditioner unit with numbered parts labeled 1 to 4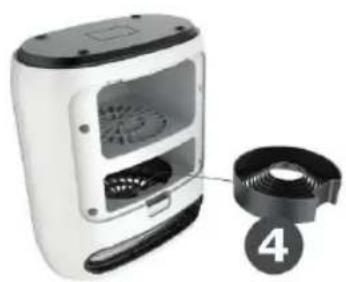
natural_image
White portable coffee maker with digital display and a black circular inset showing a numbered label (4), no visible text or symbols on the device itself.Vedligeholdelse
text_image
Exploded view diagram of a device with numbered parts for identificationKontrollpanel
text_image
Exploded view diagram of a hair dryer with numbered parts labeled 1 to 4