
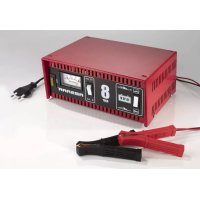
ABSLS 60 - Battery charger Absaar - Free user manual and instructions
Find the device manual for free ABSLS 60 Absaar in PDF.
| Product type | Professional battery charger with jump start assistance |
| Brand | Absaar |
| Model | ABSLS 60 |
| Max charging current | 60 Amperes |
| Max starting current | 540 Amperes |
| Charging voltages | 6 V, 12 V, 24 V selectable |
| Compatible battery types | Lead-acid, AGM |
| Digital display | Charging voltage and current |
| Integrated timer | Yes, adjustable in hours (SLS model) |
| Wired remote control | For jump start assistance |
| Protection | Circuit breaker, thermal protection, polarity reversal fuse |
| Power supply | 230 V AC, 50 Hz |
| Housing | Robust metal with spray coating |
| Included accessories | Handle, stand, two wheels, cables with clamps, spare fuses |
| Maintenance | Check electrolyte level, clean terminals, apply grease |
| Safety | Do not use indoors without ventilation, avoid flames and sparks, keep away from children |
| Warranty | 2 years against manufacturing or material defects |
Frequently Asked Questions - ABSLS 60 Absaar
User questions about ABSLS 60 Absaar
0 question about this device. Answer the ones you know or ask your own.
Ask a new question about this device
Download the instructions for your Battery charger in PDF format for free! Find your manual ABSLS 60 - Absaar and take your electronic device back in hand. On this page are published all the documents necessary for the use of your device. ABSLS 60 by Absaar.
USER MANUAL ABSLS 60 Absaar
Directions of Use | Professional Battery Charger with Jump Start
Read these instructions before using the charger.
ES
Importante:
EN Explanation of Warnings:
EN For indoor use; do not expose to rain!
WARNING: Explosive gases. Prevent flames and sparks!

ES
Provide adequate ventilation during charging!
ES
Disconnect the supply before making or breaking the connections to the battery.
ES
natural_image
Close-up of a black tire and four small mechanical components (no text or symbols visible)SAFEty WArningS And PrEPArAtion:
Caution: Batteries contain abrasive acids and explosive gases can escape.
No smoking! No naked flames or sources of sparks may be located nearby.
If any part of the body comes into contact with the battery electrolyte, clean the area immediately with plenty of cold water. If acid enters the eyes, immediately rinse with plenty of water and immediately consult a doctor.
Keep children and pets away from the battery charging process.
Should the battery or charger become hot during the charging process, stop the process and have the battery professionally checked.
We recommend that you remove the battery from the vehicle prior to starting the charging process. If this is not possible, disconnect the negative battery clamp that connects the battery to the bodywork during charging. Before you disconnect the battery, make sure that you have the PIN codes for the car radio etc. that are required to power on any devices that are code-secured. Consult the vehicle User's Manual to check if there are any other vehicle systems that are reset or erased when disconnecting the battery. In case of doubt, contact your vehicle dealer.
Caution: Batteries that have not been used for a long time may be defective due to self-discharge or sulfation.
These batteries can not be charged correctly. Do not use this charger for this type of battery.
The battery charger must not be used as a power supply.
The battery charger must not be installed in a vehicle.
During the battery charging process, the vehicle engine must not be started.
SAFEty noticeE:
Do not attempt to recharge any non-rechargeable primary batteries!
Do not expose the battery to direct sunlight!
When using the charger, do not smoke and avoid any naked flames!
Avoid any contact with the electrolyte – it is very abrasive!
To allow a rapid dissipation of gases generated during the charging process, open the battery cell covers and avoid any naked flames or sparks. The dissipated gases are explosive. Some chargers contain components such as switches and relays which can produce sparks. Make sure that you use the charger in a suitable location.
Dispose of any defective batteries at public collection points or garages. When disposing of a battery charger, remember the following: Do not dispose of any metal or plastic parts in the domestic waste!
Dispose of all parts at the public collection points!

Correct disposal of the product – the crossed-out trash bin symbol on the product means that it is subject to the European Directive 2002/96/EC.
If the power cord of this device is damaged, it must be replaced by the manufacturer, its authorised service centres or a similarly qualified person. To avoid accidents and damage, do not make any modifications to the power cord yourself!
Persons (including children) who have insufficient knowledge or experience in using the device or who are physically, sensorially or mentally handicapped may only use the device under the supervision of a person responsible for their safety. Children must be kept under supervision and may not play with the device.
11
EN
WArrAnty tErmS:
1) The warranty covers all manufacturing or material faults. The manufacturer offers a free-of-charge replacement (parts or the entire product) for two years from the date of purchase. Only freight charges are the responsibility of the customer.
2) Warranty claims will only be accepted when accompanied by proof of purchase (invoice or coupon).
3) The warranty does not cover necessary repairs as a result of an accident, improper dismantling, damage due to dropping or shocks, improper use, or connection to a higher mains voltage than specified.
4) Under no condition does the warranty include a right of compensation and/or refund.
in cASE of dAmAgE:
Please contact your dealer.
1. dEVicES oVErViEW
Type SL 30 Max. charging current 30 Amp. Jump-start 330 Amp.
Type SL 40 Max. charging current 40 Amp. Jump-start 500 Amp.
Type SLS 60 Max. charging current 60 Amp. Jump-start 540 Amp.
Type SLS 80 Max. charging current 80 Amp. Jump-start 600 Amp.
SI And SIS SEriES FEAtUrES
• Charging of 6, 12 and 24 V batteries selectable.
• Jump-start function up to 600 A.
• Digital charging voltage and current indication.
• Wired remote control for engine jump-start.
- SLS chargers allow the duration of the charging process to be set via a timer, meaning that the charger must not be disconnected from the battery after the charging process is complete.
• Solid, powder-coated metal housing.
• Suitable for charging lead-acid and AGM batteries.
2. VoltAgE SEIEctor SWitch: 6V / 12V / 24V
The 6V/12 Volt / 24 Volt selector switch allows you to charge 6 Volt, 12 Volt or 24 Volt batteries. The voltage of the battery that you want to charge must correspond to the battery charger's voltage: only then can the charger be connected to the battery. Connecting the battery to the charger when the voltages do not match will cause battery damage. Check the battery voltage before starting the charging process. 3-cell batteries typically have a nominal voltage of 6 V; 6-cell batteries typically have a nominal voltage of 12 V; 12-cell batteries typically have a nominal voltage of 24 V.
3. cUrrEnt SEIEctor SWitch:

Set the current selector switch so that the charging current is compatible for the battery you want to charge. The following recommended maximum battery capacities should not be exceeded (recommended values).
MAXIMUM CHARGING CURRENT (AMPERE RMS) – RECOMMENDED BATTERY CAPACITY
| Type Amp | SL 30 C(Ah) | SL 40 Amp | SL 60 C(Ah) | SL 80 Amp | SL 80 C(Ah) | SL 80 Amp | SL 80 C(Ah) | |
 | Setting | 1 2,5 | <25 | 1 | <10 | 1 | <10 | 0,5 <5 |
| 2 10 | <100 | 7 | <70 | 4 | <40 | 0,7 | <7 | |
| 3 20 | <200 | 25 | <250 | 9 | <90 | 1 | <10 | |
| 4 30 | <320 | 40 | <380 | 20 | <200 | 4 | <40 | |
| 5 | 33 | <330 | 20 | <200 | ||||
| 6 | 60 | <620 | 80 | <850 | ||||
 | Setting | 1 2,5 | <25 | 1 | <10 | 2 | <20 | 2 <20 |
| 2 8 | <80 | 7 | <70 | 6 | <60 | 7 | <70 | |
| 3 18 | <180 | 21 | <210 | 12 | <120 | 14 | <140 | |
| 4 30 | <320 | 35 | <380 | 22 | <220 | 28 | <280 | |
| 5 | 33 | <330 | 42 | <420 | ||||
| 6 | 60 | <620 | 80 | <850 | ||||
 | Setting | 1 7 | <70 | 2 | <20 | 4 | <40 | 14 <140 |
| 2 14 | <140 | 9 | <90 | 9 | <90 | 21 | <210 | |
| 3 21 | <210 | 19 | <190 | 14 | <140 | 26 | <260 | |
| 4 28 | <300 | 28 | <320 | 19 | <190 | 34 | <340 | |
| 5 | 26 | <260 | 40 | <400 | ||||
| 6 | 43 | <500 | 53 | <600 |
4. OPERATING MODE SELECTOR
SL Series

Caution: Prior to starting any charging process, make sure to set the proper charging voltage for your battery. Set the operating mode switch to the desired position before starting the charging process. For the SL series, the operating mode switch corresponds to the current selector switch.
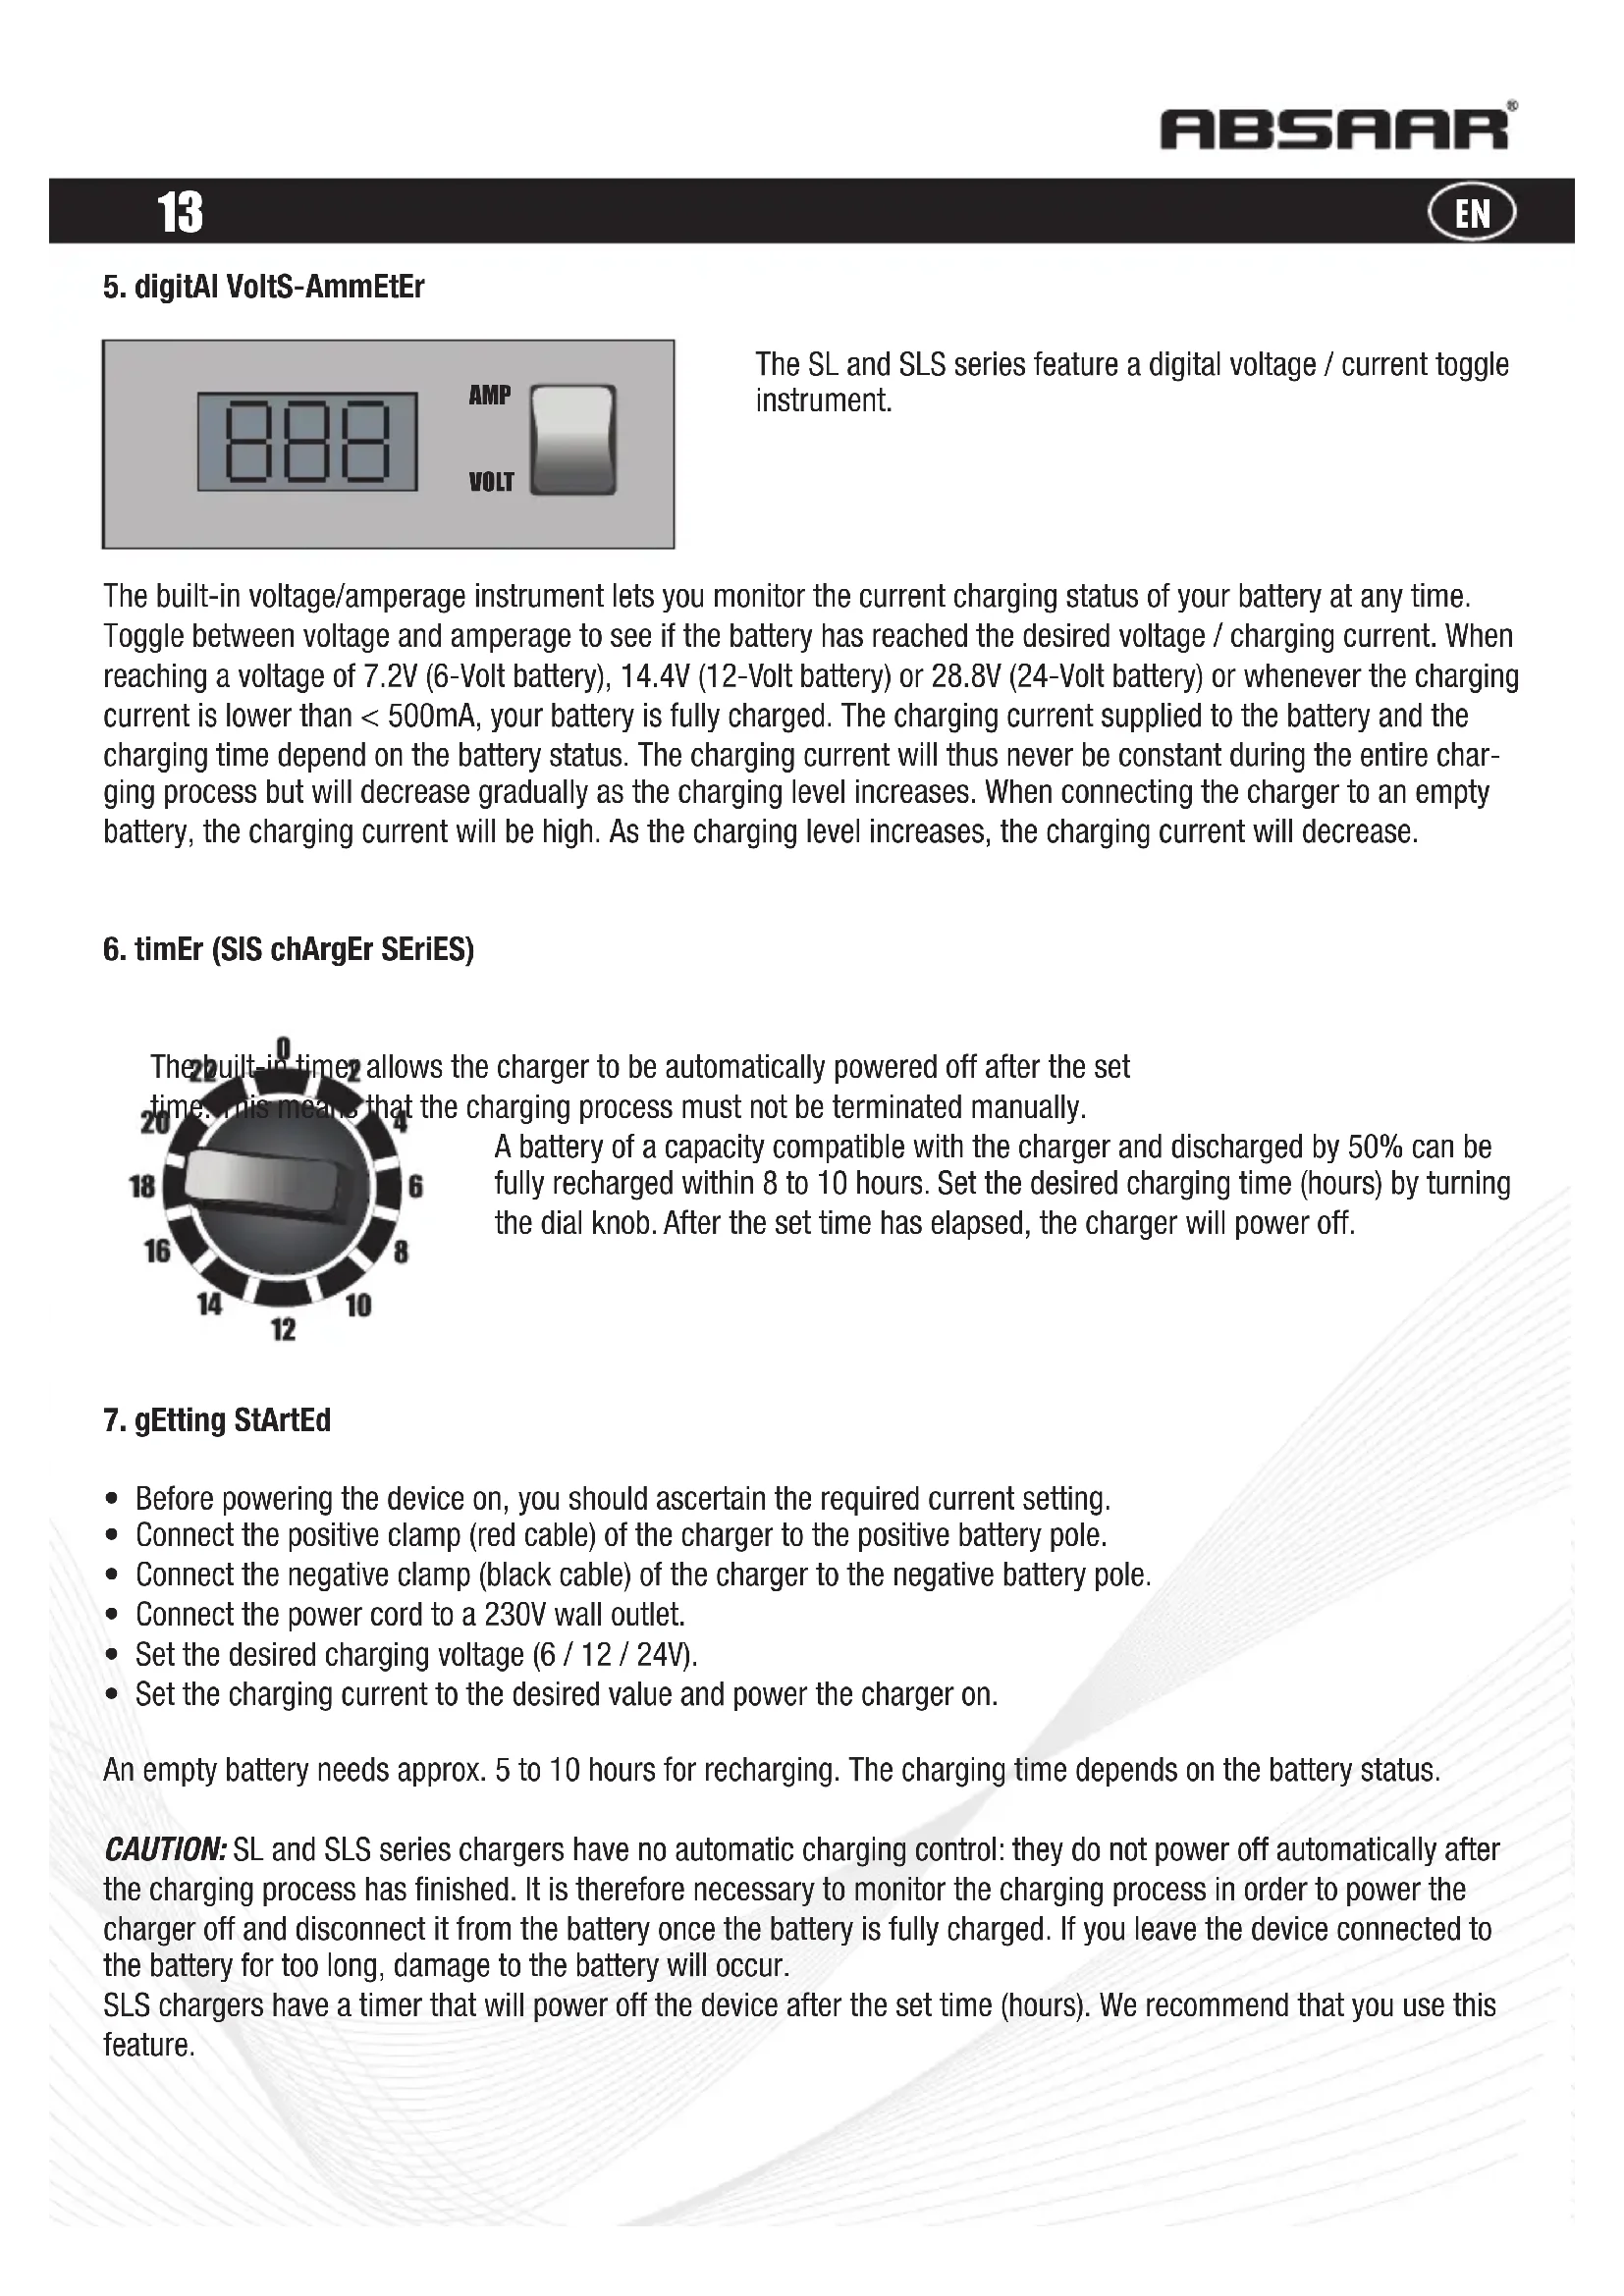
5. digitAI VoltS-AmmEtEr

The SL and SLS series feature a digital voltage / current toggle instrument.
The built-in voltage/amperage instrument lets you monitor the current charging status of your battery at any time. Toggle between voltage and amperage to see if the battery has reached the desired voltage / charging current. When reaching a voltage of 7.2V (6-Volt battery), 14.4V (12-Volt battery) or 28.8V (24-Volt battery) or whenever the charging current is lower than < 500mA, your battery is fully charged. The charging current supplied to the battery and the charging time depend on the battery status. The charging current will thus never be constant during the entire charging process but will decrease gradually as the charging level increases. When connecting the charger to an empty battery, the charging current will be high. As the charging level increases, the charging current will decrease.
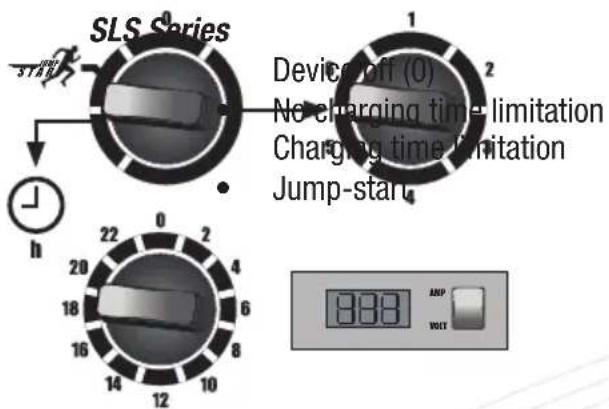
6. timEr (SIS chArgEr SEriES)

e charger to be automatically powered off after the set charging process must not be terminated manually.
A battery of a capacity compatible with the charger and discharged by 50% can be fully recharged within 8 to 10 hours. Set the desired charging time (hours) by turning the dial knob. After the set time has elapsed, the charger will power off.
7. gEtting StArtEd
- Before powering the device on, you should ascertain the required current setting.
- Connect the positive clamp (red cable) of the charger to the positive battery pole.
- Connect the negative clamp (black cable) of the charger to the negative battery pole.
- Connect the power cord to a 230V wall outlet.
- Set the desired charging voltage (6 / 12 / 24V).
- Set the charging current to the desired value and power the charger on.
An empty battery needs approx. 5 to 10 hours for recharging. The charging time depends on the battery status.
CAUTION: SL and SLS series chargers have no automatic charging control: they do not power off automatically after the charging process has finished. It is therefore necessary to monitor the charging process in order to power the charger off and disconnect it from the battery once the battery is fully charged. If you leave the device connected to the battery for too long, damage to the battery will occur.
SLS chargers have a timer that will power off the device after the set time (hours). We recommend that you use this feature.
DIRECTIONS OF USE
After the charging process is completed:
• Power the charger off.
• Unplug the power cord from the wall outlet.
- Disconnect the negative clamp (black cable) of the charger from the negative battery pole.
- Disconnect the positive clamp (red cable) of the charger from the positive battery pole.
8. JUmP-StArt
SL and SLS series chargers feature a jump-start function. If your vehicle engine does not start, you can use this function to jump-start the engine in order to get back on the road quickly. To jump-start your engine:
- Connect the charger clamps to the poles of the installed vehicle battery respecting the polarity. Make sure that they have a good electrical contact.
- Set the voltage selector switch according to the battery's nominal voltage.
- Connect the device to the wall outlet and set the mode selector switch to the „Jump Start“ position.
- Set the current selector switch to level 6 (for the SLS series only).
- To jump-start the vehicle engine, press the wired remote control button and start the engine at the same time.
• Once the vehicle engine has started, release the remote control button. - If the engine jump-start fails, the built-in breaker will release after approx. 30 seconds.
- After cooling down for 3 to 5 minutes, the breaker can be pushed in again and you can repeat the above procedure. If necessary, check the vehicle ignition system and electrical systems.
- Also check the User's Manual for your vehicle.
• We recommend that you first pre-charge the battery for approx. 5 to 10 minutes.
9. inStAlling thE hAndIE, StAnd And WhEEIS
A handle, a stand and two wheels are supplied with the charger. Please make sure you mount them properly when assembling these accessories.
- Pull the handle up to the fixation hole.
sides by using 2 sheet metal screws.
- Install the stand at the bottom of the device by using 2 sheet metal screws.

- Fix the handle on the left and right
Installing the Wheels:

natural_image
Close-up of a black tire and four small mechanical components (no text or symbols visible)Insert the screw through the wheel. Place the 10mm washer over the screw.
Insert the screw with the wheel into the housing and fix it with the star washer and nut.
10. FUSES
If the breaker releases upon overload, push the breaker back in until it clicks into place.
Note: please wait at least 2 minutes before attempting to reset the breaker (required cooling time).
All chargers feature an additional thermal safety circuit. This thermal safety circuit protects the charger from extreme overload and overheating resulting from improper operation. In such cases, the charger will power off automatically and then back on again after cooling down for approx. 10 to 15 minutes.
If the polarity is reversed, the fuse will blow and will need to be replaced. You can find it behind the black fuse holder cover on the back panel of the device. Spare fuses are supplied with the device.
The charger can also power off if the battery is exceptionally discharged and demands a very high charging current. If your device features a current selector switch, please start the charging process on level 1 or 2. After approx. half an hour you can increase the charging current.
11. kEEP yoUr bAttEry in good condition
You can significantly extend the battery life by following these tips:
Check the electrolyte level monthly and, if necessary, add distilled water. The charging status can be controlled with a densitometer. Do not allow the battery poles to become sulphatised. Clean the poles regularly and apply a little grease. If you only drive short distances or in town, your battery becomes extremely loaded. If you use your vehicle rarely, the battery is subject to self-discharge. You should therefore regularly check the optimum charging status of your battery to assure a long battery life. Regular maintenance translates into cost-effectiveness.
AdVErtEnciAS dE SEgUridAd y PrEPArAción:
natural_image
Close-up of a black tire and four small mechanical components (no text or symbols visible)natural_image
Close-up of a black tire and four small mechanical components (no text or symbols visible)natural_image
Close-up of a black tire and four small mechanical components (no text or symbols visible)natural_image
Close-up of a black tire and four small mechanical components (no text or symbols visible)Following the provisions of Directive(s):
Conformément aux dispositions de(s) Directive(s):
2006/95/EC, 2004/108/EC

- SAFEty WArningS And PrEPArAtion:
- SAFEty noticeE:
- 11
- EN
- WArrAnty tErmS:
- in cASE of dAmAgE:
- dEVicES oVErViEW
- SI And SIS SEriES FEAtUrES
- VoltAgE SEIEctor SWitch: 6V / 12V / 24V
- cUrrEnt SEIEctor SWitch:
- OPERATING MODE SELECTOR
- SL Series
- digitAI VoltS-AmmEtEr
- timEr (SIS chArgEr SEriES)
- gEtting StArtEd
- DIRECTIONS OF USE
- JUmP-StArt
- inStAlling thE hAndIE, StAnd And WhEEIS
- FUSES
- kEEP yoUr bAttEry in good condition
- AdVErtEnciAS dE SEgUridAd y PrEPArAción:
Brand : Absaar
Model : ABSLS 60
Category : Battery charger