
OHT 203 - Lawn mower OK - Free user manual and instructions
Find the device manual for free OHT 203 OK in PDF.
| Product type | Hair and beard clipper |
| Brand | OK |
| Model | OHT 203 |
| Power supply | AC adapter 100-240 V~, 50/60 Hz, built-in battery 3.6 V |
| Charging time | Approximately 8 hours |
| Battery life | Approximately 30 minutes |
| Adjustable cutting lengths | 6, 9, 12, 15 mm |
| Included accessories | Lubricating oil, cleaning brush, scissors, comb, attachment comb |
| Main functions | Hair and beard cutting, cordless clipping, charging stand |
| Safety | Sharp blades, do not use in water, do not leave unattended |
| Cleaning | Clean with a damp cloth, lubricate blades with oil, use brush |
| Maintenance | Regular lubrication, cleaning after each use |
| Disposal | WEEE, built-in battery to be removed before disposal |
Frequently Asked Questions - OHT 203 OK
User questions about OHT 203 OK
0 question about this device. Answer the ones you know or ask your own.
Ask a new question about this device
Download the instructions for your Lawn mower in PDF format for free! Find your manual OHT 203 - OK and take your electronic device back in hand. On this page are published all the documents necessary for the use of your device. OHT 203 by OK.
USER MANUAL OHT 203 OK
natural_image
Product photo of hair styling tools including a comb, scissors, and comb (no text or symbols visible)DE SERRAUCHSANADISUNG
EL: DANIEL 0210109
EN 1987 MANUL 15
ES MANUAL DE INSTRUCIONES 21
FR MODE DEVELOP 27
HU FELHAEZNAŁÓKÉZIKŐKYV 53
IT MANALE DELL'UTENTE
NL G. SHUKSAWJING AS
PL INSTRURE ACOSPHOIS
PT MANUAL DE UTILIZAÇÃO 57
SV BELKSWNSING 63
TR KILLANMELNAZU 60

2016年5月1日
EPLCH1201_170825_V26.rdb 5-8
2016年5月1日
Thanks for your purchase of this ok. product.
IMPORTANT SAFETY INSTRUCTIONS. READ CAREFULLY AND KEEP FOR FUTURE REFERENCE.
- This appliance can be used by children aged from 8 years and above and persons with reduced physical, sensory or mental capabilities or lack of experience and knowledge if they have given supervision or instruction concerning use of the appliance in a safe way and understand the hazards involved.
- Children shall not play with the appliance.
- Cleaning and user maintenance shall not be made by children without supervision.
- Regularly check the power plug and power cord for damage. If the supply cord is damaged, it must be replaced by the manufacturer, its service agent or similarly qualified persons in order to avoid a danger or injury.
- When the appliance is used in a bathroom, unplug it after every use as the proximity of water presents a hazard even when the appliance is switched off.
- Warning! Do not immerse the electrical parts of the appliance in water or other liquids. Never hold the appliance under running water.

EN
-
Warning! The cutting head is extremely sharp. Be careful when handling the appliance. Risk of injury!
-
Warning! Do not touch the blades while the appliance is switched on.
-
Warning! Keep the appliance dry.
-
Only use this appliance with the supplied power adaptor.
-
Observe all safety instructions to avoid damage through improper use! Follow all safety warnings on the appliance and in this instruction manual.
-
Keep this instruction manual for future use. Should this appliance be passed on to a third party, then this instruction manual must be included.
-
No liability will be accepted for damage resulting from improper use or non-compliance with these instructions.
-
Only use this appliance for its intended use. The appliance is not suitable for commercial use. This appliance is only suitable for indoor and household use.
-
Before connecting the appliance to the power supply, check that the power supply voltage and current rating corresponds with the power supply details shown on the appliance rating label.
-
Never use a damaged appliance! Disconnect the appliance from the electrical outlet and contact your supplier if it is damaged.
-
To avoid damaging to the power cord, do not squeeze, bend or rub it on sharp edges. Keep it away from hot surfaces and open flames as well.
-
Place the cord in such a way that no unintentional pulling or tripping over it is possible. Keep the appliance and its cord out of reach of children.
-
If an extension cord is used, its capacity needs to be suitable for the power consumed by the appliance.
-
Do not operate the appliance with wet hands or while standing on a wet floor. Do not touch the power adaptor with wet hands.
-
Do not open the appliance casing under any circumstances. Do not insert any foreign objects into the inside of the casing.
-
Never use accessories which are not recommended by the manufacturer. They could present a safety risk to the user and might damage the appliance. Only use original parts and accessories.
-
Do not place heavy objects on top of the appliance. Do not place objects with open flames (e.g. candles) beside the appliance. Do not place objects filled with water (e.g. vases) near the appliance.
-
Keep the appliance away from any hot surfaces and open flames. Protect the appliance against heat and cold, dust, direct sunlight, moisture, dripping and splashing water.
-
Do not pull the power adaptor out of the electrical outlet by the connection cord and do not wrap the connection cord around the appliance.
- Connect the power adaptor to an easily reachable electrical outlet so that in case of an emergency the appliance can be unplugged immediately. Pull the power adaptor out of the electrical outlet to completely switch off the appliance. Use the power adaptor as the disconnection device.
- Disconnect the power adaptor from the electrical outlet when not in use and before cleaning.
- Always turn the appliance off before disconnecting the power adaptor.
- Should the appliance fall into water, unplug the power adapotr first before reaching into the water.
- Danger to life! Make sure that no objects like hair clips or hair pins are inserted into the appliance. These can cause a short-circuit.
- Do not use the appliance barefoot.
- Do not leave the appliance unattended, if it is in use or the power adaptor is connected to an electrical outlet.
- During use, do not use hairspray, water vaporisers or other vaporisers close to the appliance. Only use them when the appliance is switched off and the power adaptor is disconnected.
- Do not use the appliance if you are sleepy or if there is a possibility that you will fall asleep.
- Store the lubricating oil in a place that is inaccessible to children. Nevertheless, should a child swallow the oil, contact a doctor immediately.
- The small parts can be extremely dangerous if swallowed. Therefore, keep the appliance and its accessories out of the reach of infants.
- Turn the appliance off before placing it on the charging base.
INTENDED USE
The appliance is only intended for shaving and trimming natural head hair and beards of humans. Every other type of use can lead to damage to the product or injury. Do not use it to trim pet fur.
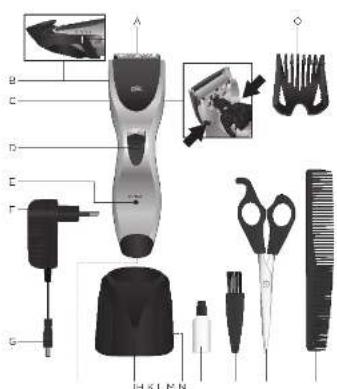
COMPONENTS
Fold out front and rear page for product illustrations.
A. Blades
B. Cutting length gauge (6, 9, 12, 15 mm)
C. Blade lock release buttons
D. ON/OFF switch
E. Indicator light CHARGE
F. Power adaptor
G. Power cord with jack plug
H. Charging socket (appliance)
I. Charging base
J. Charging socket (base)
Accessories
K. Lubricating oil
L. Cleaning brush
M. Scissors
N. Comb
O. Attachment comb
EN
BEFORE FIRST TIME USE
• After unpacking, clean the product (−cleaning and care).
- Run the product 2 or 3 times. Then switch off the product and let it cool completely.
Charging the built-in battery
Caution!
- Charge the built-in battery before the first use. Charge the appliance at room temperature.
• Make sure to switch off the appliance before charging. - Do not use the appliance whilst it is being charged.
- If the appliance is not in use for a long time, the battery discharge on its own. Charge the battery at least monthly.
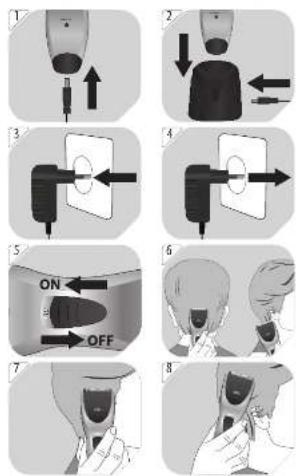
1 Charging the appliance: Connect the jack plug to the charging socket of the appliance.
OR
2 Charging the appliance via the charging base: Connect the jack plug to the charging socket of the base. Insert the appliance into the base.
3 Connecting to power: Connect the power adaptor to a suitable electrical outlet. The indicator light goes on and stays lit while the appliance is being charged.
4 After charging: Disconnect the power adaptor from the outlet and appliance.
- For first time use, charge the appliance for at least 8 hours. The general charging time is about 8 hours which also depends on the condition of the battery.
- When the battery is fully charged, the appliance can be used for 30 minutes. The time may vary (depending on the battery condition).
OPERATION
5 Switching appliance on: Slide the ON/OFF switch to the ON position. Switching appliance off: Slide the ON/OFF switch to the OFF position.
After use: Place the appliance on a heat-resistant surface to let it cool OR place it back onto the charging base.
Hints for cutting hair
6 Hold the appliance with the cutting edge facing upwards. Start on the bottom of the neck and work towards the middle of the head. Gently put the appliance on the skin and move it in an up and outwards direction. Repeatedly lift the appliance away from the head. Cut only a small amount of hair each time.
7 Hold the appliance at the desired angle to trim the hair on the sides.
8 Move the appliance around the side hair in the angle desired to finish side cutting.
9 With the blade teeth of the appliance flat against the hair on top of the head, slowly cut the hair against the direction of hair growth.
10 Trim the hair on the neck, sides and around the ears to outline the hair.
Trimming longer hair or beards
11 Push the attachment comb onto the appliance.
12 Position the attachment comb to the desired cutting length setting (6, 9, 12, 15 mm).
13 Slide the comb lock switch 0/I to I (ON position).
CLEANING AND CARE
Warning! Before cleaning, switch off the appliance and disconnect it from the electrical outlet. Let it cool completely.
14 Warning! Never wash the electrical parts under a running tap.
- Clean the appliance with a soft, slightly damp cloth. Make sure that no moisture is entering the appliance during cleaning.
- Never use corrosive detergents, wire brushes, abrasive scourers, metal or sharp implements to clean your appliance.
• Dry the appliance thoroughly after cleaning.
• Store the appliance in a cool, dry location, away from children and pets.
Cleaning and lubricating the blades
15 Press the blade lock release buttons. Put 1 to 2 drops of lubricating oil onto the blades.
Allow the appliance to run for a few seconds to distribute the oil.
Switch off the appliance again and wipe off the excess oil with a cloth.
16 Use the cleaning brush to wipe away accumulated hair particles.
TECHNICAL DATA
Power adaptor
Input: 100-240 V\~, 50/60 Hz, 0,2 A
Output: 3.6 V, 200 mA
Protection class: Class II
Appliance
Rated input: 3.6 V, 200 mA
DISPOSAL

The crossed-out wheeled bin logo requires the separate collection of waste electric and electronic equipment (WEEE). Electric and electronic equipment may contain dangerous and hazardous substances. Do not dispose of this appliance as unsorted municipal waste. Return it to a designated collection point for the recycling of WEEE. By doing so, you will help to conserve resources and protect the environment. Contact your retailer or local authorities for more information.
Do not dispose of in the household waste, as the appliance contains a built-in battery.
Removing the built-in battery for disposal
Caution!
- If the built-in rechargeable battery should leak, it must be removed from the appliance before it is disposed of according to the local applicable regulations.
• The battery must be removed from the appliance before it is scrapped.
• The appliance must be disconnected from the supply mains before removing the battery.
• The battery is to be disposed of safely.
17 Remove the screw on the appliance back.
18 Slide the comb lock switch 0/I to 0 (OFF position). Press the blade lock release buttons to release the cutting head.
19 Remove the two screws on the cutting head.
20 Dismantle the appliance. Remove all connected cables to the battery with a pair of pliers. Now you can remove the battery for disposal.
ENHORABUENA
Limpar e lubrificar as lâminas

- EN
- INTENDED USE
- COMPONENTS
- BEFORE FIRST TIME USE
- Charging the built-in battery
- Caution!
- OR
- OPERATION
- Hints for cutting hair
- Trimming longer hair or beards
- CLEANING AND CARE
- Cleaning and lubricating the blades
- TECHNICAL DATA
- Power adaptor
- Appliance
- DISPOSAL
- Removing the built-in battery for disposal
- ENHORABUENA
- Limpar e lubrificar as lâminas
Brand : OK
Model : OHT 203
Category : Lawn mower