Decklink SDI 4K - TV Blackmagic Design - Free user manual and instructions
Find the device manual for free Decklink SDI 4K Blackmagic Design in PDF.

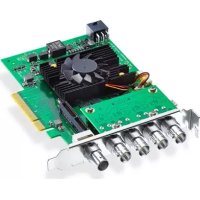
| Product Type | PCI Express Video Capture and Playback Card |
| Connectivity | SDI input/output (up to 4K), optional HDMI bracket |
| Supported Resolutions | SD, HD, Ultra HD 4K (up to 2160p) |
| Video Formats | Uncompressed 10-bit, ProRes, DNxHD, etc. |
| Expansion Connector | PCIe (x1 or x4 depending on model) |
| Power | Via PCIe bus (no external power) |
| Dimensions (card) | Approximately 167 x 68 mm (standard low-profile card) |
| Weight | Approximately 110 g |
| Supported Operating Systems | Mac OS X, Windows (64-bit), Linux |
| Included Software | Desktop Video (drivers, Media Express, Disk Speed Test) |
| Main Features | Video/audio capture and playback, broadcast monitoring, down/up conversion, stereoscopic 3D support |
| Audio | Up to 16 channels embedded SDI, analog and AES/EBU inputs/outputs via breakout cable |
| Device Control | RS-422 for VTRs |
| Reference (genlock) | Reference input (bi-level/tri-level) |
| Safety | Do not open the housing (risk of electric shock). All repairs should be carried out by an authorized service center. |
| Maintenance and Cleaning | Disconnect before cleaning. Use a soft, dry cloth. Avoid liquids. |
| Warranty | 36 months for hardware, 12 months for connectors/cables/fans |
| Repairability | Repair only by Blackmagic Design or authorized center. No spare parts provided. |
| Operating Temperature | 0°C to 40°C |
| Humidity | 20% to 80% non-condensing |
Frequently Asked Questions - Decklink SDI 4K Blackmagic Design
User questions about Decklink SDI 4K Blackmagic Design
0 question about this device. Answer the ones you know or ask your own.
Ask a new question about this device
Download the instructions for your TV in PDF format for free! Find your manual Decklink SDI 4K - Blackmagic Design and take your electronic device back in hand. On this page are published all the documents necessary for the use of your device. Decklink SDI 4K by Blackmagic Design.
USER MANUAL Decklink SDI 4K Blackmagic Design
natural_image
View of a freight train at sunset with a railway crossing over rocky shore (no visible text or symbols)English, 日本語, Français, Deutsch, Español and 中文
Mac OS X ^TM
Windows™
Linux™
June 2014
Desktop Video
Blackmagicdesign

English 3
日本語 51
Français 100
Deutsch 149
Español 198
中文 247

natural_image
Portrait of a man in a black polo shirt against a brick wall background (no text or symbols visible)Welcome to Desktop Video!
We hope you share our dream for the television industry to become a truly creative industry by allowing anyone to have access to the highest quality video.
Previously high end television and post production required investment in millions of dollars of hardware, however with Blackmagic video hardware, even 10 bit uncompressed is now easily affordable. We hope you get years of use from your new UltraStudio, DeckLink or Intensity and have fun working with some of the world's hottest television and design software!
This instruction manual should contain all the information you'll need on installing your Blackmagic video hardware. If you're installing a PCI Express card, it's always a good idea to ask a technical assistant for help if you have not installed hardware cards into computers before. As Blackmagic video hardware uses uncompressed video and the data rates are quite high, you'll need fast disk storage and a high-end computer.
We think it should take you approximately 10 minutes to complete installation. Before you install Blackmagic video hardware, please check our website at www.blackmagicdesign.com and click the support page to download the latest updates to this manual and Desktop Video driver software. Lastly, please register your Blackmagic video hardware when downloading software updates. We would love to keep you updated on new software updates and new features. Perhaps you can even send us your latest show reel of work completed on your Blackmagic video hardware and any suggestions for improvements to the software. We are constantly working on new features and improvements, so we would love to hear from you!
Grant Petty
Grant Petty
CEO Blackmagic Design
5 Getting Started
Introducing Desktop Video 5
System Requirements 5
Installing your Blackmagic Video Hardware 6
Installing a Blackmagic PCIe Card 6
Connecting Blackmagic Video Hardware with Thunderbolt 7
Connecting Blackmagic Video Hardware with USB 3.0 7
Installing the Blackmagic Design Software 8
Applications, Plugins and Drivers 8
Mac OS X Installation 9
Windows Installation 9
Linux Installation 10
Capturing and Playing back Video 11
12 Using Blackmagic System Preferences
Launching Blackmagic System Preferences 12
The Settings Tab 13
The Processing Tab 16
18 Using your Favorite 3rd Party Software
After Effects ^38 CC 18
Photoshop ^® CC 19
Adobe ^® Premiere Pro ^® CC 20
Apple Final Cut Pro X 22
Avid Media Composer 24
Autodesk Smoke 2013 Extension 1 28
DaVinci Resolve 10 and Live Grading 33
34 Blackmagic Media Express
What is Blackmagic Media Express? 34
Capturing Video and Audio files 34
Playing back Video and Audio Files 40
Browsing Media 41
Editing Video and Audio Files to Tape 44
45 Blackmagic Disk Speed Test
47 Help
48 Developer Information
49 Warnings
50 Warranty
Getting Started

Introducing Desktop Video
Blackmagic Design's Desktop Video software works in conjunction with your UltraStudio, DeckLink, Intensity or Teranex hardware. The Desktop Video software includes drivers, plugins and applications like Blackmagic Media Express. Desktop Video also integrates seamlessly with your favorite Adobe, Apple, Autodesk and Avid software!
This manual takes you through computer system requirements, installing hardware and software and using your favorite third party software.
System Requirements
The computer requires at least 4 GB of RAM. PCIe x1 lane cards should work in any slot. PCIe x4 lane cards require a x4 lane or faster slot.
Mac OS X
Desktop Video software runs on the latest Mountain Lion and Mavericks versions of Mac OS X.
If your Blackmagic video hardware connects to your computer via a PCI Express slot, then an Intel-based Mac Pro is required.
If your Blackmagic video hardware connects to your computer via Thunderbolt, then an Intel-based Mac with a Thunderbolt ^™ port is required.
Windows
Desktop Video runs exclusively on 64-bit versions of Windows, with the latest service pack installed. Both Windows 7 and Windows 8 are supported.
If your Blackmagic video hardware connects to your computer via Thunderbolt, an Intel-based PC with a Thunderbolt port is required.
If your Blackmagic video hardware connects to your computer via USB 3.0, a USB 3.0 port using a Renesas chipset is required.
Linux
Desktop Video runs on 32-bit and 64-bit x86 computers running Linux 2.6.23 or higher. Please refer to the release notes for the latest list of supported Linux distributions, package formats and software dependencies.
Getting Started
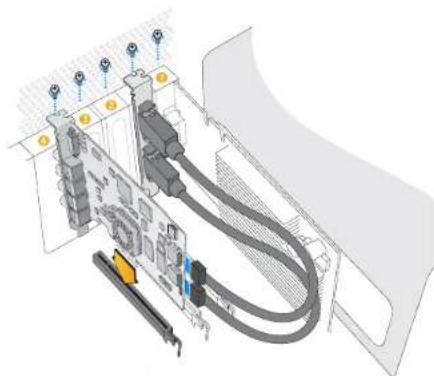
natural_image
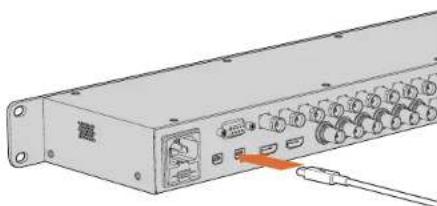
Technical diagram of a server rack with connected cables and ports (no text or symbols visible)Install a Blackmagic PCIe card in a spare slot. A HDMI bracket can be installed in any spare port and connects to the rear of the card with the supplied HDMI cables.
natural_image
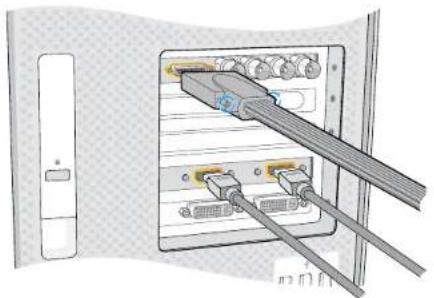
Diagram of a computer interface showing two connected USB cables with ports and connectors (no text or symbols visible)Connect the breakout cable if one is supplied with your Blackmagic card. Some models also include a HDMI bracket as pictured above.
Installing your Blackmagic Video Hardware
If your Blackmagic video hardware connects via Thunderbolt, go straight to the Thunderbolt section. Thunderbolt ports are found on the latest Mac OS X and Windows computers.
If your Blackmagic video hardware connects via USB 3.0, go straight to the USB 3.0 section. Blackmagic's USB 3.0 video products require a compatible Windows PC.
Installing a Blackmagic PCIe Card
Step 1. Remove the power plug from your computer and ensure that you are statically discharged.
Step 2. Insert your Blackmagic PCIe card into an appropriate slot in your computer and push it firmly into place. If you have a DeckLink Optical Fiber card, the fiber optic module needs to be removed prior to insertion.
Step 3. If your Blackmagic PCIe card includes a HDMI bracket, insert the bracket into a spare slot. Secure the PCIe card and HDMI bracket with screws and loop the HDMI cables around any other installed cards and plug them into the rear of the DeckLink card.
Step 4. Replace the cover of your computer and connect any supplied breakout cables. If you have a DeckLink Optical Fiber card, reinsert the fiber optic module. Reconnect the power and start up the computer.
Getting Started
natural_image
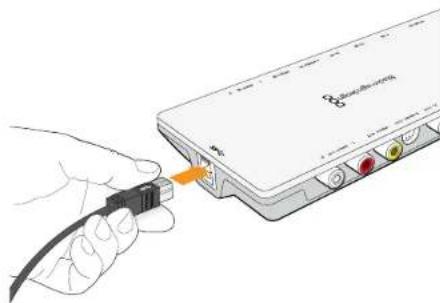
Illustration of a hand inserting a USB into a device labeled 'Risikosoftwork' (no text or symbols on the device itself)Thunderbolt™ and USB 3.0 products connect to your computer with a single Thunderbolt or USB 3.0 cable.
natural_image
Illustration of a server rack with ports and connectors, no visible text or symbolsThe UltraStudio 4K features two Thunderbolt 2" ports so if your computer only has a single Thunderbolt" port, you can use the additional port to attach a RAID or other device.
Connecting Blackmagic Video Hardware with Thunderbolt
Step 1. If your Blackmagic video hardware includes an external power supply, connect it to the unit and switch on the power.
Step 2. Connect a Thunderbolt cable between the unit and a Thunderbolt port on your computer. Alternatively, you can connect to your computer's Thunderbolt disk array.
Step 3. If Desktop Video software has previously been installed and offers to update the internal software, click Update and follow any onscreen instructions.
Step 4. If a breakout cable is supplied, connect it to the Blackmagic video hardware and plug the connectors into your video equipment.
Connecting Blackmagic Video Hardware with USB 3.0
Step 1. If your Blackmagic video hardware includes an external power supply, connect it to the unit and switch on the power.
Step 2. Connect a SuperSpeed USB 3.0 cable between the unit and a dedicated USB 3.0 port on your computer.
Step 3. If Desktop Video software has previously been installed and offers to update the internal software, click Update and follow any onscreen instructions.
Step 4. If a breakout cable is supplied, connect it to the Blackmagic video hardware and plug the connectors into your video equipment.
Installing the Blackmagic Design Software
Applications, Plugins and Drivers
The table below lists the applications, plugins and drivers that are included when you install the desktop video software.
| Mac OS X Windows Linux | ||
| Blackmagic Desktop Videodrivers | Blackmagic Desktop Videodrivers | Blackmagic Desktop Videodrivers |
| Blackmagic Design systempreference | Blackmagic Design Control Panel | Blackmagic Design Control Panel |
| Blackmagic Design LiveKey Blackmagic Design LiveKey Blackmagic Media Express | ||
| Blackmagic Media Express Blackmagic Media Express Blackmagic AVI codecs | ||
| Blackmagic QuickTime " codecs Blackmagic AVI and QuickTime " codecs | ||
| Blackmagic Disk Speed Test Blackmagic Disk Speed Test | ||
| Adobe®Premiere Pro® CC, AfterEffects® CC, Photoshop® CCpresets and plug-ins | Adobe®Premiere Pro® CC, AfterEffects® CC, Photoshop® CCpresets and plug-ins | |
| Apple Final Cut ProTM X plug-ins Avid Media Composer plug-in | ||
| Avid Media Composer plug-in eyeon Fusion plug-ins | ||
Getting Started
text_image
Important Information About Desktop Video Software Microsoft OS X Microsoft Windows 8.2 • Microsoft Windows 8.2 • Microsoft Windows 8.2 • Microsoft Windows 8.2 • Microsoft Windows 8.2 • Microsoft Windows 8.2 • Microsoft Windows 8.2 • Microsoft Windows 8.2 • Microsoft Windows 8.2 • Microsoft Windows 8.2 • Microsoft Windows 8.2 • Microsoft Windows 8.2 • Microsoft Windows 8.2 • Microsoft Windows 8. • Microsoft Windows 8.2 • Microsoft Windows 8.2 • Microsoft Windows 8.2 • Microsoft Windows 8.2 • Microsoft Windows 8.2 • Microsoft Windows 8.2 • Microsoft Windows 8.2 • Microsoft Windows 8.2 • Microsoft Windows 8.2 • Microsoft Windows 8.2 • Microsoft Windows 8.2 • Microsoft Windows 8.2 • Microsoft Windows • Microsoft Windows 8.2 • Microsoft Windows 8.2 • Microsoft Windows 8.2 • Microsoft Windows 8.2 • Microsoft Windows 8.2 • Microsoft Windows 8.2 • Microsoft Windows 8.2 • Microsoft Windows 8.2 • Microsoft Windows 8.2 • Microsoft Windows 8.2 • Microsoft Windows 8.2 • Microsoft Windows 8.2 • Microsoft OS X • Microsoft OS X • Microsoft OS X • Microsoft OS X • Microsoft OS X • Microsoft OS X • Microsoft OS X • Microsoft OS X • Microsoft OS X • Microsoft OS X • Microsoft OS X • Microsoft OS X • Microsoft OS X • Microsoft OS X • Microsoft OS X • Microsoft OS X • Microsoft OS X • Microsoft OS X • Microsoft OS X • Microsoft OS X • Microsoft OSX • Microsoft OSX • Microsoft OSX • Microsoft OSX • Microsoft OSX • Microsoft OSX • Microsoft OSX • Microsoft OSX • Microsoft OSX • Microsoft OSX • Microsoft OSX • Microsoft OSX • Microsoft OSX • Microsoft OSX • Microsoft OSX • Microsoft OSX • Microsoft OSX • Microsoft OSX • Microsoft OSX • Microsoft OSX • Microsoft OSO • Microsoft OSO • Microsoft OSO • Microsoft OSO • Microsoft OSO • Microsoft OSO • Microsoft OSO • Microsoft OSO • Microsoft OSO • Microsoft OSO • Microsoft OSO • Microsoft OSO • Microsoft OSO • Microsoft OSO • Microsoft OSO • Microsoft OSO • Microsoft OSODesktop Video Installer for Mac
text_image
Blackmagic Design Desktop Video Setup Welcome to the Blackmagic Design Desktop Video Setup Wizard The Setup Wizard will install Blackmagic Design Desktop Video on your computer. Click Next to continue or Cancel to exit the Setup Wizard. Back Next CancelDesktop Video Installer for Windows
Mac OS X Installation
Make sure you have administrator privileges before installing any software.
Step 1. Ensure you have the very latest driver. Visit www.blackmagicdesign.com/support
Step 2. Open the "Desktop Video Installer" folder from the disc or downloaded disk image and launch the "Desktop Video Installer" installer.
Step 3. Click the Continue, Agree and Install buttons to install the software.
Step 4. Restart your computer to enable the new software drivers.
Automatic Updates
When your Mac restarts the software will check the internal software version of your hardware. If the internal software version does not match the driver version, you will be prompted to update the internal software. Click OK to start the update and restart your Mac to complete the process.
Windows Installation
Step 1. Ensure you have the very latest driver. Visit www.blackmagicdesign.com/support
Step 2. Open the "Desktop Video" folder and launch the "Desktop Video" installer.
Step 3. The drivers will now be installed on your system. An alert will appear: "Do you want to allow the following program to install software on this computer?" Click Yes to continue.
Step 4. You will see a dialog bubble saying "found new hardware" and the hardware wizard will appear. Select "install automatically" and the system will find the required Desktop Video drivers. Another dialog bubble will appear saying "your new hardware is ready for use."
Step 5. Restart your computer to enable the new software drivers.
Automatic Updates
When your computer restarts the software will check the internal software version of your hardware. If the internal software version does not match the driver version, you will be prompted to update the internal software. Click OK to start the update and restart your computer to complete the process.
Getting Started
text_image
VMware Software Control File Edit View Help Get Tools... Help Desktopvideo Internet: https://localhost/1832v2000/ My device will file your own website. Add RemoveDesktop Video software ready to be installed from the Ubuntu Software Center.
Linux Installation
Step 1. Download the latest Desktop Video software for Linux from www.blackmagicdesign.com/support
Step 2. Open the "Desktop Video" folder and locate and open the "Desktop Video" package for your Linux distribution.
Step 3. Click the "Install" button and wait for the progress bar to complete.
Step 4. If there are messages about missing dependencies, ensure they are installed first and then rerun the Desktop Video installer.
Step 5. When finished, the installer will return to the same screen.
Step 6. Restart the computer to enable the drivers or type the following command:
# modprobe blackmagic
If you cannot find a native Desktop Video package for your Linux distribution, or if you prefer to install from a command line, refer to the ReadMe file for detailed installation instructions.
Updates
After your computer has restarted, the drivers will check the Blackmagic video hardware to see what internal software the hardware contains. If the internal software version does not match the driver version, Desktop Video will prompt you to update. To find out the card ID of any cards that need updating, open the terminal and type the following command:
# BlackmagicFirmwareUpdater status
A message similar to the following will appear:
/dev/blackmagic/card0 [DeckLink HD Extreme 3] UPDATED
/dev/blackmagic/card1 [DeckLink HD Extreme 3] NEEDS_UPDATE
Note the ID of the card that needs to be updated and then update the firmware by typing:
# BlackmagicFirmwareUpdater update
Getting Started
flowchart
graph TD
    A["Device"] --> B["Camera Computer"]
    B --> C["UTV Monitor"]
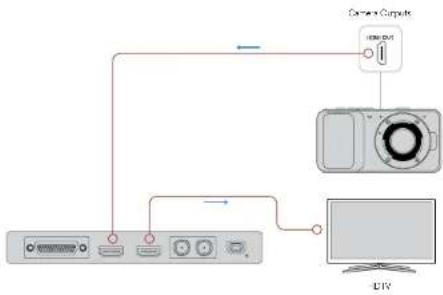
Connect a video monitor and source to your Blackmagic video hardware.
text_image
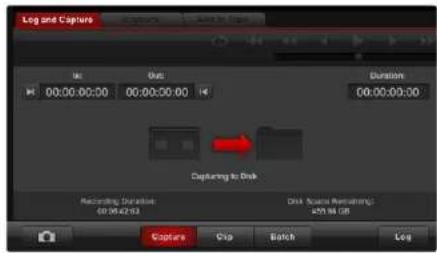
Log and Capture 00:00:00:00 Out Duration 00:00:00:00 Capturing to Disk Recording Duration 40:00:02:03 Disk (name Remaining) 2019.08.05 Capture Clip Batch LogClick the "Capture" button to commence recording.
Capturing and Playing back Video
It's a good idea to run a quick test to ensure you can successfully capture and play back video.
Setting-Up
Step 1. Connect a video monitor or TV to the video output of your Blackmagic video hardware.
Step 2. Connect a video source to the video input of your Blackmagic video hardware.
Step 3. Use the Blackmagic system preferences to set your video and audio connections for input and output. See the "Using Blackmagic System Preferences" section for details.
Testing Video Capture
Step 1. Go to Media Express>Preferences on Mac OS X or Edit>Preferences on Windows or Linux and select a project format that matches your video source. Also choose a capture file format and storage location.
Step 2. Close the Preferences and click on the Log and Capture tab. Your video source will appear in the preview pane of Media Express.
Step 3. Click Capture to perform the capture test. Click Capture again to finish the test.
Testing Video Playback
Step 1. Click on the Playback tab.
Step 2. Double-click the test clip and the video will appear on the monitor connected to the output of your Blackmagic video hardware. Audio output can also be monitored.
Using Blackmagic System Preferences
Launching Blackmagic System Preferences
Blackmagic system preferences provide a central location for configuration settings.
- On Mac OS X, open the System Preferences and click the Blackmagic Design icon.
- On Windows 7 and Windows 8, open the Control Panel and click on the "Hardware and Sound" category and then click the Blackmagic Design Control Panel.
- On Linux, go to "Applications" and then "Sound and Video" and double-click the Blackmagic Control Panel.
Different Blackmagic video hardware models have different features. Only those system preferences supported by your hardware model will be active.
The following section guides you on adjusting the Blackmagic system preferences.
text_image
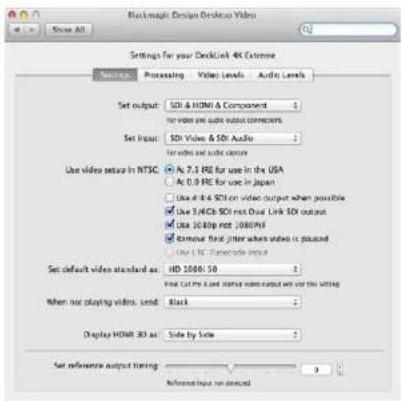
BlackRock Design Desktop Video Settings for your DeckLink 4K Extreme Settings Processing Video Levels Audio Levels Set output: SDI & HDMI & Component for video pre audio output connections Set Input: SDI Video & SDI Audio for video and audio capture Use video output in NTSC ● As 7.3 RF for use in the USA ○ As 0.9 RF for use in Japan □ Use 8.4 RF SDI on video output when possible ✓ Use 3.4GB SDI max Dual Link SDI output ■ Use 10.0pp not :1000pH ✓ External final jitter when video is placed □ Use IDC: Syncode input Set default video standard as: HD 1000:50 When not playing videos, send: Black Display HDMI 3D as: Side by Side Set reference output timing: 0 Referenced input on dashedBlackmagic Design system preferences in Mac OS X

text_image
Backmagic Design Desktop Video Settings for your Becklink 4G Extreme Settings Processing Media Levels Audio Levels Set values: 100.0 MHz (at 250000000000000000000000000000000000000000000000000000000000000000000000000000000 Set input: 150 kHz & 95 dBm For video and audio/Video User video setup in NTSC: AT 1.5 MHz for use in the UIA A16.2 MHz for use in 32ppm Use 4.84 MHz on video output when possible Use 124.6 MHz non-Dual unit (32.1 ppm) Use 188.8 MHz (32.1 ppm) Remove Solid Media when video is unused Use 1.5 MHz Inverse Input Set default video standard as: HRC When not playing videos, send: Black To all the video outputs. Display HRC to: size by size Set reference output timing: 0 Referential input not detected OK Cancel ApplyBlackmagic Design Control Panel in Windows

text_image
Blackmagic Control Panel Settings for: DeckLink Settings Set output: All Outputs Active For video and audio output connections Set input: SDK Video & SDK Audio For video and audio capture Use video setup in MTSC: ● Alt 7.5 IRE for use in the USA ○ Alt 0.0 IRE for use in Japan ✓ Remove field jitter when video is parsed □ Set black ref on SDK video output in capture When not playing video, send: Block OKBlackmagic Design Control Panel in Ubuntu Linux
Using Blackmagic System Preferences
text_image
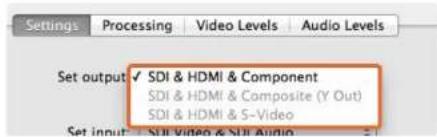
Settings Processing Video Levels Audio Levels Set output ✓ SDI & HDMI & Component SDI & HDMI & Composite (Y Out) SDI & HDMI & S-Video Set input ✓ SUI Video & SUI AudioVideo and Audio output connections.
text_image
Settings Processing Video Levels Audio Levels Set output: SDI & HDMI & Component For video and audio output connections Set input ✓ SDI Video & SDI Audio SDI Video & AES/EBU Audio SDI Video & Analog XLR Audio HDMI Video & HDMI Audio HDMI Video & AES/EBU Audio HDMI Video & Analog XLR Audio Component Video & AES/EBU Audio Component Video & Analog XLR Audio Composite Video (Y In) & AES/EBU Audio Composite Video (Y In) & Analog XLR Audio S-Video & AES/EBU Audio S-Video & Analog XLR Audio standard as: HD 10804.36Video and Audio input connections.
text_image
Set input: SDI Video & SDI Audio For video and audio capture Use video setup in NTSC ● At 7.5 IRE for use in the USA ○ At 0.0 IRE for use in Japan □ Use 4:4:4 SDI on video output when possibleSelect either 7.5 IRE or 0 IRE setup for NTSC composite video.
The Settings Tab
Set output
Set the video and audio output connections for your Blackmagic video hardware. Some models allow you to choose between component analog video, S-Video or composite analog video. And some models feature switchable audio outputs which allow you to choose between analog and AES/EBU.
Set input
Set the video and audio input connections for your Blackmagic video hardware. Your hardware may support some or all of the following combinations:
• SDI Video & SDI Audio
• SDI Video & AES/EBU Audio
• SDI Video & Analog XLR Audio
• Optical SDI Video & Optical SDI Audio
• HDMI Video & HDMI Audio
• HDMI Video & AES/EBU Audio
• HDMI Video & Analog XLR Audio
• Component Video & AES/EBU Audio
• Component Video & Analog XLR Audio
• Composite & AES/EBU Audio
• Composite & Analog XLR Audio
• S-Video & AES/EBU Audio
• S-Video & Analog XLR Audio
Use video setup in NTSC
Select the 7.5 IRE setup for the NTSC composite video used in the USA and some other countries. Select the 0 IRE setup if you're working in Japan or other countries that don't use the 7.5 IRE setup. PAL and high definition formats do not use this setting.
Using Blackmagic System Preferences
text_image
Use video setup in NTSC: At 7.5 IRE for use in the USA At 0.0 IRE for use in Japan ✓ Use 4/4 SDI on video output when possible Use 3/6Gb SOI not Dual Link SDI output Use 1080p not 1080PsF Remove field jitter when video is pausedTick the checkbox to output 4:4:4 video.
text_image
At 0.0 IRE for use in Japan Use 4.4.4 SDI on video output when possible ✓ Use 3/6Cb SDI not Dual Link SDI output Use 1080p not 1080PsF Remove field jitter when video is paused Use LTC Timecode InputTick the checkbox to use single link 3G or 6G SDI.
text_image
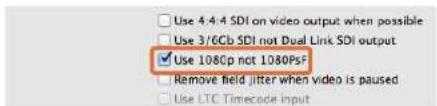
Use 4:4:4 SDI on video output when possible Use 3/6Cb SDI not Dual Link SDI output ✓ Use 108Cp not 1080PSF Remove field jitter when video is paused Use LTC Timecode inputTick the checkbox to output true 1080 progressive frame video.
text_image
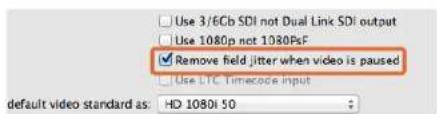
Use 3/6Cb SDI not Dual Link SDI output Use 1080p not 1080pF ✓ Remove field jitter when video is paused Use LTC Timecode input default video standard as: HD 1080i 50Tick the checkbox to eliminate field flicker from CRT monitors.
text_image
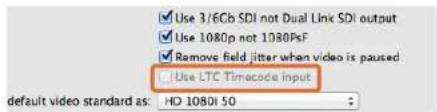
Use 3/6Cb SDI not Dual Link SDI output Use 1080p not 1080pF Remove field jitter when video is paused Use LTC Timacode input default video standard as: HD 1080I 50Tick the checkbox to read timecode from the LTC input.
Use 4:4:4 SDI on video output when possible
Select this setting when outputting 4:4:4 video. 1080p50/60 video will always be output as 4:2:2. When 4:4:4 video output is enabled, the following features are not available:
- simultaneous HD and down converted SD video output
• down converted analog video output
Use 3/6Gb SDI not Dual Link SDI output
Select this setting to use single link 3G or 6G SDI when using high bandwidth formats such as 1080p60, 4:4:4 or when using 4K formats.
Use 1080p not 1080PsF
Select this setting to output true progressive frame video instead of progressive segmented frame.
Remove field jitter when video is paused
Select this setting to eliminate field flicker when interlaced video is paused on old CRT monitors by displaying a single field. This option is not recommended for modern flat screens.
Use LTC Timecode input
Select this setting to read timecode from the LTC input instead of the SDI stream.
Using Blackmagic System Preferences
text_image
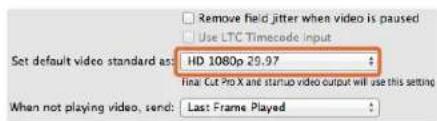
Remove field jitter when video is paused Use LTC Timecode input Set default video standard as: HD 1080p 29.97 $ Final Cut Pro X and startup video output will use this setting When not playing video, send: Last Frame Played >Set the default video standard to match your Final Cut Pro X project or to capture with your WDM program.

text_image
Set default video standard as: NTSC Final Cut Pro X and startup video output will use this setting When not playing video, send Last Frame Played Black Display HDMI 3D as: Side by SideWhen not playing video you have the option of sending the Last Frame Played or Black.
text_image
Display HDMI 3D as √ Frame Packing Side by Side Line by Line Top and Bottom Left Eye Right EyeSelect the 3D format of your HDMI monitoring.

Adjust the Reference timing slider until the picture locks.
Set default video standard as
To use broadcast monitoring with Final Cut Pro X, set the video standard to match your Final Cut Pro X project.
To capture video on Windows with a program supporting Windows Driver Model (WDM), set the default video standard to match the capture standard. You usually set the video standard within the preferences of the WDM program, however, try using the Blackmagic Design Control Panel if you encounter problems.
When not playing video, send
This setting determines whether your hardware will output the Last Frame Played or Black when you switch out of an application and video is no longer being played.
Some Blackmagic models include Look Up Tables (LUTs) and you can use the Last Played Frame option to observe the effect of any changes to the LUT. Enabling or disabling the feature requires a restart of the computer.
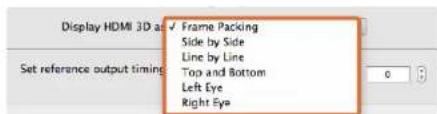
Display HDMI 3D as
This setting determines the 3D format of your HDMI monitoring. The selections include: Frame Packing, Side by Side, Line by Line, Top and Bottom, Left Eye or Right Eye.
Set Reference output timing
If you have reference connected but your picture is rolling, adjust the slider until the picture locks. A reference signal may also known as genlock, black burst, house sync or tri-sync.
Using Blackmagic System Preferences
text_image
Settings PICKING Video Levels Audio Levels Select output processing / Off Simultaneous HD and SD Output HD 16 HD and SD Letterbox HD to HD and SD Anamorphic HD to HD and SD Center Cut Simultaneous 2K and SD Output 2K to 2K and SD Simultaneous SD and - ID 720p Output SD and 220p HD 8.9 W/Box SD and 720p HD 16:9 Zoom SD and 740p HD 14:9 Zoom Simultaneous SD and - ID 1600k Output SD and 3600k HD 4.3 W/Box SD and 3600k HD 16:5 Zoom SD and 3600k HD 14:5 Zoom Simultaneous HD and Cross Converted HD HD and Cross Converted HD Enable Conversion on Analog OutputSelect the output processing from the menu.
text_image
Settings Processing Video Levels Audio Levels Select output processing: Off Output HD 23.98p as HD 59.94 When playing back to video outputs Select input processing: Off When capturing from video inputsTick the checkbox to output HD 23.98PsF at HD 59.94i

text_image
When capturing from video input Set A-frame VITC reference: Frame 00 In 23.08 fps capture from NTSC using 3.2 pulldown Capture VANC input line: 15 Capture to movie file line 1Set the A-Frame VITC Reference when performing 3:2 pulldown.
text_image
Capture VANC input line: 18 Capture to movie file line 1 19 Capture to movie file line 2 20 Capture to movie file line 3 To video lines 1, 2 or 3 in the captured movie fileTick the checkboxes to capture lines of VANC data.
The Processing Tab
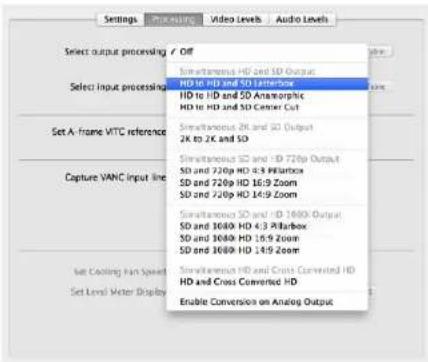
Select output processing
This setting allows real time down conversion during playback. Select the desired option from the menu.
Some hardware models support simultaneous down conversion on output such as HD & SD or 2K & SD. Simultaneous down conversion introduces a 2 frame delay on the SD-SDI output. Adjust your editing software's timecode offset to ensure frame accuracy when inserting or assembling to tape.
Analog video outputs are also down converted. Component analog video can be switched between HD or SD output. To view component analog SD video, select "Enable Conversion on Analog Output", when "Simultaneous HD and SD Output" is also selected.
Select input processing
This setting allows real time down conversion and up conversion during capture. Select the desired option from the menu.
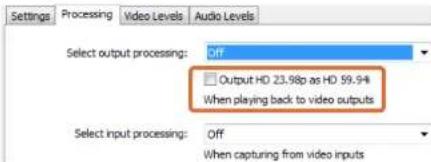
Output HD 23.98PsF at HD 59.94i (Windows only)
This setting will apply a 3:2 pulldown sequence so that HD 23.98 PsF video is output as HD 59.94i. The film frame rate of 23.98 fps is quite common but support in SDI and analog monitors is rare, while almost all HD monitors support HD 59.94i.
Set A-frame VITC reference
This setting allows you to enter the A-frame number when removing 3:2 pulldown from NTSC video while capturing at 23.98fps. The wrong A-frame will produce an incorrect presentation of fields and frames.
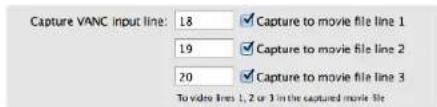
Capture VANC input line
These settings allow 3 line timecode, VITC subtitle info or any other VANC data to be preserved during capture. To preserve VANC data, tick the check box for video line you wish to capture. Line 1 needs to be enabled for lines 2 and 3 to function.
Using Blackmagic System Preferences
text_image
Settings Processing Video Levels Audio Levels Calibrate Analog Video in Video 0.00 Chroma 0.00 Adjust Cu and Cr independently 0.00 0.00 Calibrate Analog Video Out Video 0.00 Chroma 0.00 Adjust Cu and Cr independently 0.00 0.00 Use Betacam YUV Levels Reset GainThe sliders adjust Video and Chroma levels for analog video.
text_image
Settings Processing Video Levels Audio Levels Set Analog Audio Input Levels On 1: 0.00 dB On 2: 0.00 dB On 3: 0.00 dB On 4: 0.00 dB Set Analog Audio Output Levels On 1: 0.00 dB On 2: 0.00 dB On 3: 0.00 dB On 4: 0.00 dB Set AES/EBJ Input Ref Level AIT AES Ch: 0.00 dB Set AES/EBJ Output Ref Level AIT AES Ch: 0.00 dB Reset GainThe sliders adjust the gain for analog and AES/EBU audio.
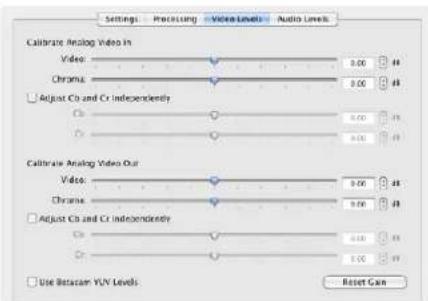
The Video Levels Tab
Calibrate Analog Video In
These settings adjust the analog video input. Use the sliders to adjust Video, Chroma, Cb and Cr levels. Ideally you would adjust these settings in conjunction with Blackmagic Ultrascope. The Calibrate Analog Video In settings are only available if the "Set input" option in the Settings tab is set to analog video input.
Calibrate Analog Video Out
These settings adjust the analog video output. Use the sliders to adjust Video, Chroma, Cb and Cr levels. Ideally you would adjust these settings in conjunction with Blackmagic Ultrascope.
Use Betacam YUV Levels
Blackmagic products use SMPTE component analog levels by default as almost all modem video equipment use SMPTE levels. Enable the checkbox "Use Betacam YUV Levels" if working with Sony Betacam SP decks.
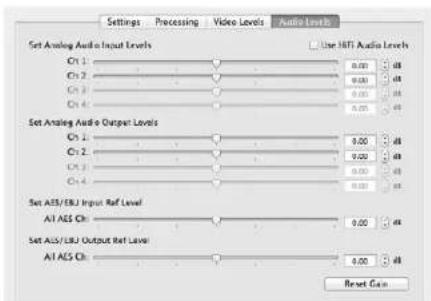
The Audio Levels Tab
Set Analog Audio Input Levels
These settings adjust the gain for the analog audio inputs.
Set Analog Audio Output Levels
These settings adjust the gain for the analog audio outputs.
Set AES/EBU Input Ref Level
These settings adjust the gain for the AES/EBU audio inputs. While analog audio channels can be adjusted independently, AES/EBU audio channels are adjusted simultaneously.
Set AES/EBU Output Ref Level
These settings adjust the gain for the AES/EBU audio outputs. While analog audio channels can be adjusted independently, AES/EBU audio channels are adjusted simultaneously.
Use HiFi Audio Levels
Professional analog audio levels with XLR connectors are standard on UltraStudio and DeckLink models. To connect consumer audio equipment, enable "Use HiFi Audio Levels" and use an XLR to RCA adapter.
Using your Favorite 3rd Party Software

text_image
Ae After Effects CCAfter Effects ^® CC

text_image
Preferences Output Options: Output Mode: Output Quality: Output Rating: Output Settings: Audio Output Mapping: Audio Output Mapping: Audio Output Mapping: Audio Output Mapping: Audio Output Mapping: Audio Output Mapping: Audio Output Mapping: Audio Output Mapping: Audio Output Mapping: Audio Output Mapping: Audio Output Mapping: Audio Output Mapping: Audio Output Mapping: Audio Output Mapping: Audio Output Mapping: Audio Output Mapping: Audio Output Mapping: Audio Output Mapping: Audio Output Mapping: Audio Output Mapping: Audio Output Mapping: Audio Output Mapping: Audio Output Mapping: Audio Output Mapping: Audio Output Mapping: Audio Output mapping: Audio Output mapping: Audio Output mapping: Audio Output mapping: Audio Output mapping: Audio Output mapping: Audio Output mapping: Audio Output mapping: Audio Output mapping: Audio Output mapping: Audio Output mapping: Audio Output mapping: Audio Output mapping: Audio Output mapping: Audio Output mapping: Audio Output mapping: Audio Output mapping: Audio Output mapping: Audio Output mapping: Audio Output mapping: Audio Output mapping: Audio Output mapping: Audio Output mapping: Audio Output mapping: Audio Output mapping: Audio Output maps: Audio Output maps: Audio Output maps: Audio Output maps: Audio Output maps: Audio Output maps: Audio Output maps: Audio Output maps: Audio Output maps: Audio Output maps: Audio Output maps: Audio Output maps: Audio Output maps: Audio Output maps: Audio Output maps: Audio Output maps: Audio Output maps: Audio Output maps: Audio Output maps: Audio Output maps: Audio Output maps: Audio Output maps: Audio Output maps: Audio Output maps: Audio Output maps: Audio Output map: 100% Audio: 100% Audio: 100% Audio: 100% Audio: 100% Audio: 100% Audio: 100% Audio: 100% Audio: 100% Audio: 100% Audio: 100% Audio: 100% Audio: 100% Audio: 100% Audio: 100% Audio: Audio: Audio: Audio: Audio: Audio: Audio: Audio: Audio: Audio: Audio: Audio: Audio: Audio: Audio: Audio: Audio: Audio: Audio: Audio: Audio: Audio: Audio: Audio: Audio: Audio: Audio: Audio: Audio: Audio: Audio: Audio: Audio: Audio: Video and Textation Outputs to the FV Water Map Video and Textation Outputs to the image format, press the forward dB* on the screen, logo"Video Preview" preferences
text_image
Pixel Method Settings AutoCAD Parameters AutoCAD Active Size Pixel Options Width: 100% Height: 50% Color: RGB/RGB (RGB) Opacity: 75% Angle: 30° Balance: -100% -20% -30% -40% -50% -60% -70% -80% -90% -100% -110% -120% -130% -140% -150% -160% -170% -180% -190% -200% -210% -220% -230% -240% -250% -260% -270% -280% -290% -300% -310% -320% -330% -340% -350% -360% -370% -380% -390% -400% -410% -420% -430% -440% -450% -460% -470% -480% -490% -500% -510% -520% -530% -540% -550% -560% -570% -580% -590% -600% -610% -620% -630% -640% -650% -660% -670% -680% -690% -700% -710% -720% -730% -740% -750% -760% -770% -780% -790% -800% -810% -820% -830% -840% -850% -860% -870% -880% -890% -900% -910% -920% -930% -940% -950% -960% -970% -980% -990% -100"Output Module Settings" rendering options
After Effects® CC
How to Preview Video
To display your After Effects® CC composition in real-time through your Blackmagic hardware, go to Preferences > Video Preview. Select Blackmagic Video Output and the appropriate Output Mode. You can now use a broadcast monitor to view your After Effects compositions in the correct video colorspace.
To listen to audio through your Blackmagic hardware, go to System Preferences in Mac OS X or Control Panel in Windows and set Blackmagic Audio as your default sound output device. In After Effects, go to Preferences>Audio Hardware and make sure your audio output is now set to System Default Input/Output on Mac OS X or Blackmagic Audio on Windows.
Rendering
When you have completed your composition, you will need to render to a codec supported by your Blackmagic video hardware. You can render a DPX image sequence or any of the following codecs:
QuickTime codecs on Mac OS X
- Blackmagic RGB 10 bit (uncompressed)
• Apple Uncompressed YUV 10 bit 4:2:2
• Apple Uncompressed YUV 8 bit 4:2:2
• Apple Photo - JPEG (compressed)
• Apple DV - NTSC (compressed)
• Apple DV - PAL (compressed)
Other codecs including ProRes and DVCPRO HD will be available if you have Final Cut Pro installed.
AVI codecs on Windows
- Blackmagic 10 bit 4:4:4 (uncompressed)
- Blackmagic 10 bit 4:2:2 (uncompressed)
-
Blackmagic HD 8 bit 4:2:2 (uncompressed)
-
Blackmagic SD 8 bit 4:2:2 (uncompressed)
- Blackmagic 8 bit MJPEG (compressed)
Other codecs including DVCPRO HD and DVCPRO50 will be available if you have Adobe® Premiere Pro® CC installed.
QuickTime codecs on Windows
- Blackmagic RGB 10 bit (uncompressed)
- Blackmagic 10 bit (uncompressed)
- Blackmagic 8 bit (uncompressed)
• Apple Photo-JPEG (compressed)
• Apple DV - NTSC (compressed)
• Apple DV - PAL (compressed)
Using your Favorite 3rd Party Software
text_image
PS © 2000 Adobe Photoshop CS: 2000 © 2000 Adobe Photoshop CS: 2000Photoshop ^® CC

text_image
Blackmagic Image Import Image Import Settings Video Input Format: YUV 4:2:2 HD 1080i 59.94 Image Bit Depth: Photoshop RGB 16 Bits/Channel Cancel Import ImageImport Image

text_image
Blackmagic Image Export Image Export Settings Video Output Format: YUV+K 4 2:2 HD 1080i 59.94 Cancel Export ImageExport Image
Photoshop® CC
How to Import and Export Video Frames
Import an image into Photoshop ^® CC
Step 1. From Photoshop ^ CC select File > Import > Blackmagic Image Capture.
Step 2. Select the "Video Input Format" and the "Image Bit Depth" and then click Image Import.
Export an image from Photoshop®CC
Step 1. Select File > Export > Blackmagic Image Export.
Step 2. Select Video Output Format and then click Export Image.
Once you have set the "Import" or "Export" options, subsequent Imports and Exports will not display the settings window. However, you can still change your settings, by holding the Option [Mac] or Ctrl [Win] key, when selecting import or export.
Using your Favorite 3rd Party Software

text_image
Pr Premiere® Pro CCAdobe® Premiere Pro® CC
text_image
Name: Myrtica File Edit View Help Add View Help Edit View Help Edit View Help Edit View Help Edit View Help Edit View Help Edit View Help Edit View Help Edit View Help Edit View Help Edit View Help Edit View Help Edit View Help Edit View Help Edit View Help Edit View Help Edit View Help Edit View Help Edit View Help Edit View Help Edit View Help Edit View Help Edit View Help Edit View Help Edit View Help Edit View Help File Edit View Help File Edit View Help File Edit View Help File Edit View Help File Edit View Help File Edit View Help File Edit View Help File Edit View Help File Edit View Help File Edit View Help File Edit View Help File Edit View Help File Edit View Help File Edit View Help File Edit View Help File Edit View Help File Edit View Help File Edit View Help File Edit View Help File Edit View Help File Use Open File... File Use Open File... File Use Open File... File Use Open File... File Use Open File... File Use Open File... File Use Open File... File Use Open File... File Use Open File... File Use Open File... File Use Open File... File Use Open File... File Use Open File... File Use Open File... File Use Open File... File Use Open File... File Use Open File... File Use Open File... File Use Open File... File Use Open File... File Use Open File...New Sequence
Adobe® Premiere Pro® CC
Setting Up a Blackmagic Design Project
Step 1. Create a New Project and click on the Scratch Disks tab and set the desired Location and Name for your project.
Step 2. Set the locations for your captured video, captured audio, video previews and audio previews.
Step 3. If your graphics card is supported by Adobe ^ Premiere Pro ^ CC's Mercury Playback Engine, the Renderer option will be available and you should switch it to "Mercury Playback Engine GPU Acceleration".
Step 4. Set the Capture Format to Blackmagic Capture and click on the Settings [Mac] or Properties [Win] button to reveal the Blackmagic Capture Settings for your project. Set the desired Video Standard and Video Format and click OK.
Step 5. The New Sequence window will appear. Select the desired Blackmagic preset, give the sequence a name and then click OK.
Device Control
Many Blackmagic Design capture and playback models feature RS-422 device control for controlling decks. Blackmagic Device Control needs to be selected each time a new project is created. Go to Preferences >Device Control and select "Blackmagic Device Control".
Playback
Playback settings need to be selected each time a new project is created by going to Preferences > Playback. The default player is Adobe Player but the Audio Device needs to be switched to "Blackmagic Playback".
Under "Video Device," enable the checkbox for "Blackmagic Playback" and ensure the other checkboxes are cleared and click OK.
Using your Favorite 3rd Party Software
text_image
Auto Settings Custom Settings Auto Tools Auto Tools Auto Tools Auto Tools Auto Tools Auto Tools Auto Tools Auto Tools Auto Tools Auto Tools Auto Tools Auto Tools Auto Tools Auto Tools Auto Tools Auto Tools Auto Tools Auto Tools Auto Tools Auto Tools Auto Tools Auto Tools Auto Tools Auto Tools Auto Tools Auto Tools Auto Tools Auto Tools Auto Tools Auto Tools Auto Tools Auto Tools Auto Tools Auto ToolsCapture

text_image
Sound Values 00:00:00:00 00:00:05:00 Audio Settings Multi-Noise Settings Audio 100% 20% 30% 40% 50% 60% 70% 80% 90% 100% 110% 120% 130% 140% 150% 160% 170% 180% 190% 200% 210% 220% 230% 240% 250% 260% 270% 280% 290% 300% 310% 320% 330% 340% 350% 360% 370% 380% 390% 400% 410% 420% 430% 440% 450% 460% 470% 480% 490% 500% 510% 520% 530% 540% 550% 560% 570% 580% 590% 600% 610% 620% 630% 640% 650% 660% 670% 680% 690% 700% 710% 720% 730% 740% 750% 760% 770% 780% 790% 800% 810% 820% 830% 840% 850% 860% 870% 880% 890% 900% 910% 920% 930% 940% 950% 960% 970% 980% 990% 100 Audio Settings Multi-Noise Settings Audio 1. 1. 1. 1. 1. 1. 1. 1. 1. 1. 1. 1. 1. 1. 1. 1. 1. 1. 1. 1. 1. 1. 1. 1. 1. 1. 1. 1. 1. 1. 1. 1. 1. 1. 2 Audio Audio Audio Audio Audio Audio Audio Audio Audio Audio Audio Audio Audio Audio Audio Audio Audio Audio Audio Audio Audio Audio Audio Audio Audio Audio Audio Audio Audio Audio Audio Audio Audio Audio Audio Audio Audio Audio Audio Audio Audio Audio Audio Audio Audio Audio Audio Audio Audio Audio RadioExport to Tape
Capture
To capture choose: File > Capture [F5]
To immediately capture, or to capture from a non-controllable device, click the red record button [G].
If you wish to log the clip using RS-422 deck control, enter the desired In and Out points using either the Set In and Set Out buttons, or manually by typing the timecode and clicking Log Clip. The empty clip will now appear in the Project window. Repeat this until you have logged all of the clips you wish to batch capture. Then choose: File > Batch Capture [F6]. To set handles on the clips, enable the option to Capture with handles and type the number of additional frames you require at the start and end of each clip.
Export to Tape
To export to tape via RS-422 deck control, select the sequence you require and then choose File > Export > Tape
Insert editing requires unbroken timecode over the full length of the project which is to be laid to tape.
In assemble mode the tape needs only to be "blacked" until a point just beyond the start time of the project. As assemble editing erases the tape ahead of the record heads, it should not be used where other projects already exist on the tape after the out point of your edit.
When editing to tape, the software waits at the first frame of your project for the deck to drop into record at the predetermined timecode. Should you find that either the first frame of your program is repeated or lost, during the edit to tape procedure, you will need to adjust the playback offset to bring the deck and computer in sync. You should only need to do this once with any combination of deck and computer and the correct setting will be retained.
Now, simply enter the desired in point and offsets if required, and click OK [Mac] or Export [Win].
Using your Favorite 3rd Party Software
text_image
Final Cut Pro X Version 10.0 Loading Compressor support © 2001-2011 Apple Inc., All rights reserved. Apple, the Apple logo, and Final Cut Pro are trademarks of Apple Inc., registered in the U.S. and other countries.Apple Final Cut Pro X

text_image
Use 1080p not 1080PsF Remove field jitter when video is paused Set default video standard as: HD 1080p 24 Final Cat for X and startup video output will use this setting When not playing video, send: Extended Desktop Choosing this option requires a reset!Step 2. Set the default video standard in the System Preferences to match your Final Cut Pro X project.
text_image
Name: First Project Default Event: New Event 0-22-11 Video Properties: Customs 1080x1080 Format Resolution Rate Timecode Display: Non-Drop Frame Drop Frame Audio and Render Properties: Use default settings (Surround, 48kHz, FreeRico 422) Custom Audio Channels: stereo Audio Sample Rate: 48kHz Render Format: Uncompressed 10-bit Cancel OKStep 6. Set the Audio and Render Properties to Custom.
Apple Final Cut Pro X
You can use the broadcast monitoring feature of Final Cut Pro X 10.0.4 and later to output your video through Blackmagic video hardware. You can also use two computer monitors for the Final Cut Pro X interface.
Setting Up Final Cut Pro X
Step 1. Ensure you are running Final Cut Pro X 10.0.4 or later with the latest version of Mac OS X Mountain Lion or Mavericks.
Step 2. Open the System Preferences and click on Blackmagic Design. Go to the setting, "Set default video standard as" and then set the same standard that you will use in your Final Cut Pro X project, e.g. HD 1080i59.94. The standard should be the same as the video format of your clips.
Step 3. Launch Final Cut Pro X and create a new project.
Step 4. Type a name and choose a location for the new project.
Step 5. Set the Video Properties to Custom and then set the format, resolution and frame rate to match the default video standard set in the Blackmagic Design Desktop Video system preferences.
Step 6. Set the Audio and Render Properties to Custom. Set the audio channels to Stereo or else you can choose Surround for 6 audio channels. Set the audio sample rate to the television rate of 48kHz. Set the render format to the same format as your video clips. Final Cut Pro X defaults to using ProRes compression but you can switch this to Uncompressed 10-bit 4:2:2 for an uncompressed workflow. Click OK to complete the creation of your new project.
Step 7. Go to the Final Cut Pro menu, choose Preferences and then click the Playback tab. Ensure the A/V Output menu has selected "Blackmagic" and the same video standard as your project and then close the Preferences.
Step 8. Go to the Window menu and select A/V Output to enable video output via your Blackmagic video hardware.
If you wish to monitor audio via your Blackmagic video hardware, open the System Preferences, click the Sound icon, click the Output tab and then select "Blackmagic Audio" for the sound output.
Using your Favorite 3rd Party Software
text_image
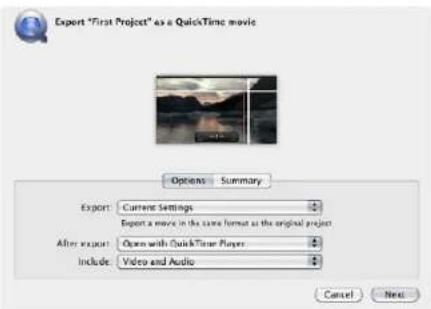
Export "First Project" as a QuickTime movie Options Summary Export: Current Settings Export a movie in the same format at the original project After export: Open with QuickTimer Players Include: Video and Audio Cancel NextStep 3. In the Export Movie window, leave Export on "Current Settings" and also set Include to "Video and Audio".
Playback
Step 1. Import some clips in to your new project.
Step 2. You can now use the Final Cut Pro X timeline on your computer monitor and view the video preview on the monitor or TV connected to the output of your Blackmagic Design video hardware.
Capturing Video and Audio
You can use Blackmagic Media Express to capture video and audio with your Blackmagic Design video hardware. Once you have captured the clips, you can import them in to Final Cut Pro X for editing.
When capturing clips with Media Express, make sure you choose one of the video formats which is also supported by Final Cut Pro X, i.e.: Apple ProRes 4444, Apple ProRes 422 (HQ), Apple ProRes 422 or Uncompressed 10-bit 4:2:2.
Editing to Tape
Once you have completed a project in Final Cut Pro X, you can render the project to a movie file and then use Blackmagic Media Express to master the movie to tape with your Blackmagic Design video hardware.
Step 1. Select your clips from the timeline in Final Cut Pro X.
Step 2. Go to the Share menu and choose Export Movie.
Step 3. In the Export Movie window, leave Export on "Current Settings" and also set Include to "Video and Audio". Click "Next".
Step 4. Open Media Express and import the clip that was exported from Final Cut Pro X.
Step 5. Refer to the Blackmagic Media Express section of this manual for "Editing video and audio files to tape".
Using your Favorite 3rd Party Software
text_image
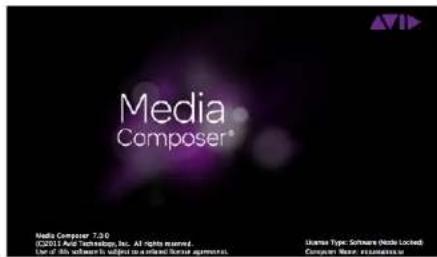
Media Composer® Media Composer 7.30 ©2015 A&C Marketing, Inc. All rights reserved. Use of this software in subject to a related license agreement. Ukraine Type: Software (Note Locked) Computer Name: InstrumentsAvid Media Composer

text_image
Use 1080p not 1080PsF Set black left on SDK video output in capture Extended Desktop Last Frame Played When not playing video, send ✓ Black Display HDMI 3D as: Side by SideIf using a single computer monitor, open the Blackmagic Design system preferences and send Black when not playing video.
text_image
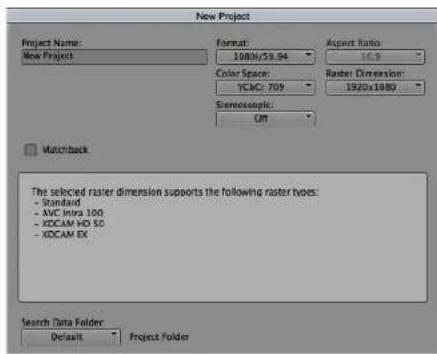
New Project Project Name: New Project Format: 1080x/59.94 Color Space: YC&C: 709 Raster Dimension: 1920x1080 Stereoscopic: OUT Aspect Ratio: 16.3 Match-back The selected raster dimension supports the following raster types: - Standard - AMC Intra 100 - XDCAM HD 50 - XDCAM EX Search Data Folder Default Project FolderStep 5. Type a project name and set the project options.
Avid Media Composer
Avid Media Composer captures and plays back standard definition and high definition video and audio with Blackmagic video hardware and also supports RS-422 deck control. Blackmagic plug-ins for Media Composer are automatically installed if Media Composer is installed before the Desktop Video software.
Setting Up
Step 1. Launch Media Composer and the Select Project dialog box will appear.
Step 2. Choose your preferred User Profile if you have previously created one.
Step 3. Select the folder in which you want to create the project: Private, Shared or External.
Step 4. Click the New Project button.
Step 5. Type a project name and set the project options including Format, Color Space and Stereoscopic. Click OK. The color space and stereoscopic settings can be changed later in the Format tab of the project.
Step 6. Double-click the project name in the Select Project dialog box. The Media Composer interface will appear along with the project window for your new project. You have completed setting up your project.
Playback
As a quick test to make sure everything is connected correctly, go to the Media Composer Editing Guide and follow the section entitled "Importing Color Bars and Other Test Patterns". Double-click the imported file to play it in a pop-up monitor. You should now see the image on both your computer monitor and your Blackmagic output.
If you can't see any video on your Blackmagic output, check the connections again and ensure you have the correct output settings configured within the Blackmagic Design system preferences by choosing Tools > Hardware Setup from within Media Composer.
Using your Favorite 3rd Party Software

text_image
Capture Tool Capture Tool V A1 A2 A3 A4 A5 A6 A7 A8 A9 A10 A11 A12 A13 A14 A15 A16 TC Video: Blackmagic Audio: Blackmagic Capture Name: NTSC Capture Project Cmnt: Bin: NTSC Bin S3D Bin: NTSC Bin Res: 1:1 MXF RAID Disk (20:25:55:00) Delay audio: 0 frames 01:00:01:22 Timecode Source Sony DVW-500 DigitalCut TapeStep 2. Set up the Capture Tool to capture video without deck control by clicking the Toggle Source button.
Capture from Non-Controllable devices
Many video sources including all kinds of modern cameras and disk recorders, as well as old cameras and VHS tape players, do not have any device control. To capture video without deck control:
Step 1. Choose Tools > Capture to open the Capture Tool.
Step 2. Click the Toggle Source button so that the button's icon of a deck shows a red circle-slash symbol. This symbol indicates that deck control has been disabled.
Step 3. Set the Video and Audio input menus to "Blackmagic".
Step 4. Select the video source track (V) and the audio source tracks (A1, A2, ...) you wish to capture.
Step 5. Use the Bin menu to select a Target Bin from the list of open bins.
Step 6. From the Res (resolution) menu, choose which compressed or uncompressed codec you wish to use for your captured clips. For uncompressed 8-bit video, select "1:1" or "1:1 10b" for 10-bit.
Step 7. Select the disk storage for your captured video and audio. Use the Single/Dual Drive Mode button to choose if video and audio will be stored together on a single drive or on separate drives. Select the target drive(s) for your captured media from the Target Drives menu(s).
Step 8. Click the "Tape Name?" button at the bottom of the window to open the Select Tape dialog box. Select the desired tape, or alternatively add a new one and click OK.
Step 9. Ensure your video and audio source is ready or playing and then click the Capture button. The Capture button will flash red while recording. Click the Capture button again to end the capture.
Using your Favorite 3rd Party Software
text_image
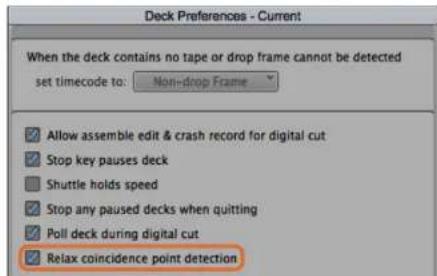
Deck Preferences - Current When the deck contains no tape or drop frame cannot be detected set timecode to: Non-drop Frame ✓ Allow assemble edit & crash record for digital cut ✓ Stop key pauses deck Shuttle holds speed ✓ Stop any paused decks when quitting ✓ Poll deck during digital cut ✓ Relax coincidence point detectionStep 6. In the Deck Preferences, enable the option to "Relax coincidence point detection".
text_image
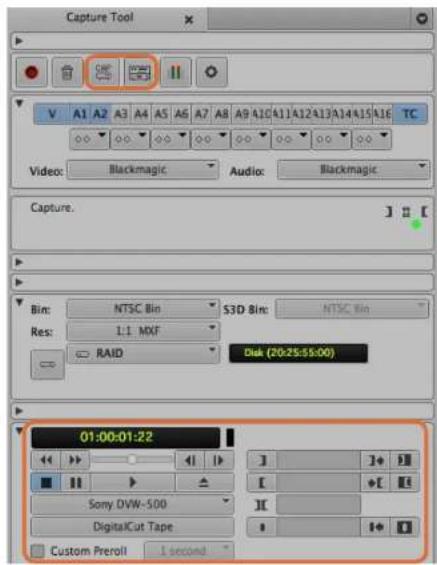
Capture Tool V A1 A2 A3 A4 A5 A6 A7 A8 A9 420 411 412 413 414 415 416 TC Video: Blackmagic Audio: Blackmagic Capture. Bin: NTSC Bin S3D Bin: NTSC Bin Res: 1:1 MXF RAID Disk (20:25:65:00) 01:00:01:22 Sony DVW-500 DigitalCut Tape Custom Preroll 1 secondSet the CAP and Toggle Source buttons to use deck control. Use the Deck Controller Window to cue the tape and start playing.
Capture from Controllable Devices with UltraStudio, DeckLink and Teranex
If you have a deck that connects via RS-422, you will need to configure the deck settings before performing a capture with deck control.
Step 1. From your project window, click the Settings tab and double-click on Deck Configuration.
Step 2. In the Deck Configuration dialog box, click Add Channel and then set the Channel Type to Direct and the Port to RS-422 Deck Control. Click OK and choose "No" when asked, "Do you want to autoconfigure the channel now?"
Step 3. Click Add Deck and then select your brand and model of deck from the Device menus and also set the desired preroll. Click OK and then Apply.
Step 4. Under the Settings tab, double-click on Deck Preferences.
Step 5. If you plan to make assemble edits to tape, enable the option to "Allow assemble edit & crash record for digital cut". If this option is left unchecked, you will only be able to perform insert edits.
Step 6. Enable the option to "Relax coincidence point detection" and set other settings as needed. Click OK. You have completed setting up the RS-422 connection to your deck.
To test the remote connection ensure an RS-422 serial cable is connected between your Blackmagic video hardware and the deck. Set the deck to Remote. Open the Capture Tool and use the standard J, K, L shortcut keys to control the deck. If a deck name appears in italics or "NO DECK" is displayed, click the menu and select Check Decks until the deck is listed without italics and deck control is re-established.
To capture with deck control on-the-fly:
Step 1. Choose Tools > Capture to open the Capture Tool.
Step 2. The Capture/Log Mode button should show the CAP icon. If this button displays a LOG icon, click the button to switch to capture mode and the CAP icon should appear.
Step 3. The Toggle Source button should show the icon of a deck. If a red circle-slash symbol is present, click the button to enable deck control and make the red symbol disappear.
Step 4. Configure video and audio input, video and audio source tracks, target bin, res, target drive and tape name the same way as in "Capture from non-controllable devices".
Step 5. Use the Deck Controller Window in the Capture Tool to cue the tape and start playing.
Step 6. Click the Capture button. The Capture button will flash red while recording. Click the Capture button again to end the capture.
Using your Favorite 3rd Party Software
text_image
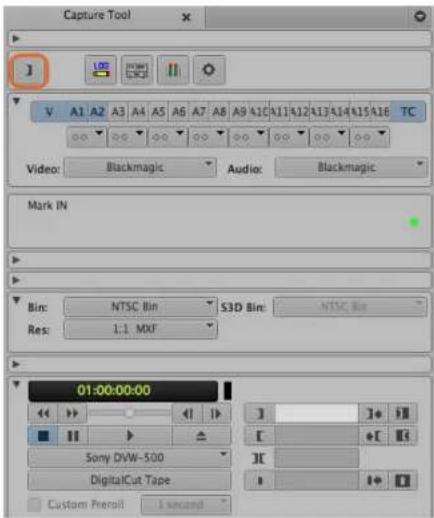
Capture Tool V A1 A2 A3 A4 A5 A6 A7 A8 A9 410 411 412 413 414 415 416 TC Video: Blackmagic Audio: Blackmagic Mark IN Bin: NTSC Bin S3D Bin: NTSC Bin Res: 1.1 MXF 01:00:00:00 Sony DVW-500 DigitalCut Tape Custom Preview 1 secondStep 5. Click on the Mark IN/OUT button or use the "i" and "o" keys on the keyboard to mark in and out points.
text_image
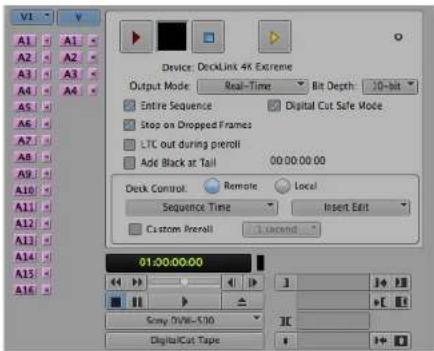
Device: DeckLink 4K Extreme Output Mode Real-Time Bit Depth: 10-bit Entire Sequence Digital Cut Safe Mode Stop on Dropped Frames LTC out during preroll Add Black at Tail 00:00:00:00 Deck Control Remote Local Sequence Time Insert Edit Custom Alert Record 01:00:00:00 Grey IV/8-500 Digital/Cut TapeThe Digital Cut Tool is used for recording to tape.
Batch Capture with UltraStudio and DeckLink
To log clips for batch capture:
Step 1. Choose Tools > Capture to open the Capture Tool.
Step 2. Click on the Capture/Log Mode button so it displays the LOG icon.
Step 3. Configure video and audio input, video and audio source tracks, target bin, res, target drive and tape name the same way as in "Capture from non-controllable devices".
Step 4. Use the Deck Controller Window, or use the standard j, k, I shortcut keys, to shuttle backwards, pause and shuttle forwards on the deck and locate the video you want to capture.
Step 5. Click the Mark IN/OUT button, to the left of the LOG button. The icon will alternate between IN and OUT so you only have to click the one button to mark all your in and out points. This can be more convenient that using the separate Mark IN and Mark OUT buttons in the Deck Controller Window. Alternatively use the "i" and "o" keys on the keyboard to mark in and out points.
Step 6. When you have finished logging in and out points, open the logging bin, select the clips you want to capture.
Step 7. Choose Clip > Batch Capture, select the desired options in the resulting dialog box and click OK.
Recording to Tape with UltraStudio and DeckLink
Once you have captured your clips, dragged them in to the timeline, edited them and applied and rendered any effects, you will want to record the completed project to tape.
Step 1. Double-click on a sequence, in your project bin, to open it into the Timeline window.
Step 2. Choose Output > Digital Cut to open the Digital Cut Tool.
Step 3. Set Output Mode to Real-Time, Bit Depth to 10-bit, and Deck Control to Remote.
Step 4. From the Edit Menu, choose to Insert Edit or Assemble Edit for precise edits onto a timecode striped tape. Alternatively choose Crash Record for an easy way to record. If Insert Edit is the only option, go to the Settings tab in your project, double-click on Deck Preferences and enable "Allow assemble edit & crash record for digital cut".
Step 5. If a deck name appears in italics or "NO DECK" is displayed, click the menu and select Check Decks until the deck is listed without italics and deck control is re-established.
Step 6. Press the Play Digital Cut button (red triangle icon) to record your sequence to tape.
Using your Favorite 3rd Party Software
text_image
Autodesk® Smoke® 2013Autodesk Smoke
text_image
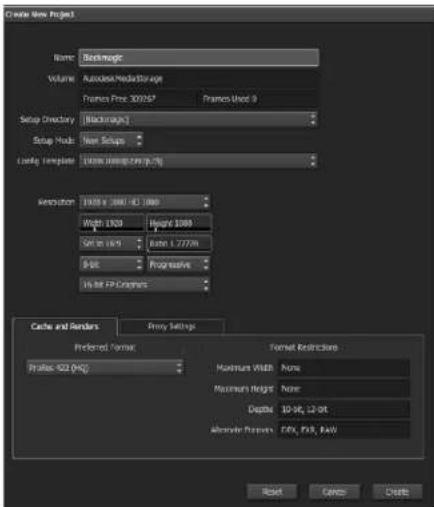
Create New Project Name: Backlogic Volume: AutoDriveStorage Frames Pure 300157 Frames Pure 9 Setup Directory: Backlogic Setup Mode: New Settings Locking Template: 2000.000.000.000 Settings: 1900.0 200.0 42.000 Width: 1500 Height: 1800 Size: 1.777M Edit: Progressive In All FP Options Cache and Render: Proxy Settings Preferred Format: Format Restrictions Profile: 522 (HG): Maximum Width: None Maximum Height: None Depth: 10-96, 12-97, Alternate Properties: DEX, FDX, RAW Reset Cancel DeleteType a project name and set the project options.
Autodesk Smoke 2013 Extension 1
Autodesk Smoke brings together editing, compositing and 3D effects into a single workspace. Smoke captures and plays back standard definition and high definition video and audio with Blackmagic video hardware and also supports RS-422 deck control. Before installing Autodesk Smoke, make sure that both the Blackmagic Design drivers and your video device are properly installed.
Smoke's broadcast monitoring allows you to output video through Blackmagic hardware.
Installation
Step 1. Launch Smoke and the Project and User Settings window will appear. Choose your Project and User if you have previously created them. Otherwise, create a new project and/or user.
Step 2. Set the project settings to match your delivery settings, i.e., 1080HD. Most of these settings can be changed later during your session.
Step 3. Choose your intermediate format, such as ProRes 422 or even Uncompressed for your project generated media. Remember to choose a format that your storage can handle.
Step 4. Click the Create button.
Setting Up Hardware
It's a good idea to follow the steps below when you are preparing for a VTR session.
Step 1. Connect the outputs of your VTR to the inputs of your Blackmagic capture and playback device. Connect the outputs of your Blackmagic capture and playback device to the inputs of your VTR.
Step 2. Connect an RS-422 deck control cable from the serial port on your VTR to the remote control port of your Blackmagic Design capture and playback device.
Step 3. Set your VTR to remote.
Step 4. Connect a sync generator to the sync input of the VTR to ensure frame-accurate capture. If you have a separate audio device, an audio sync signal must be connected to it as well.
Using your Favorite 3rd Party Software
text_image
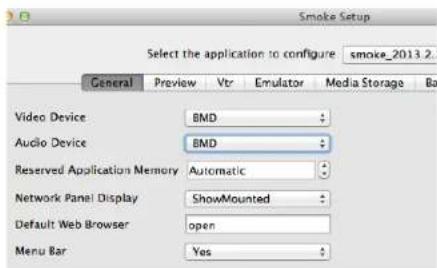
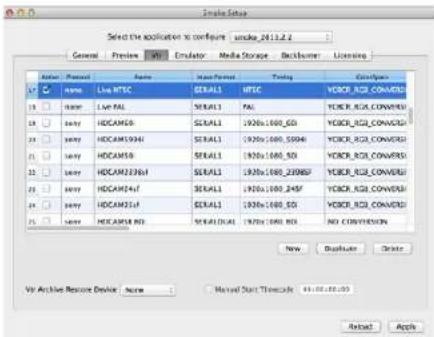
Smoke Setup Select the application to configure smoke_2013.2. General Preview Vtr Emulator Media Storage Ba Video Device BMD Audio Device BMD Reserved Application Memory Automatic Network Panel Display ShowMounted Default Web Browser open Menu Bar YesEnsure Video Device and Audio Device are set to BMD in the Smoke Setup utility.
| Active | Protocol | Name | Input Format | Timing |
| √ | sony | HD DS 1080 60i | SERIAL1 | 1920x1080_60i |
| √ | sony | HD DS 720 59.94p | SERIAL1 | 1280x720_5994P |
| √ | sony | HD DS 720 60p | SERIAL1 | 1280x720_60P |
| √ | sony | HD DS 24sf | SERIAL1 | 1920x1080_245F |
| √ | sony | HD DS 24p | SERIAL1 | 1920x1080_24P |
| √ | sony | HD DS 2398sf | SERIAL1 | 1920x1080_2398SF |
| √ | sony | HD DS 2398p | SERIAL1 | 1920x1080_2398P |
| □ | sony | HD DS 25p | SERIAL1 | 1920x1080_25P |
Select timing settings for your VTR using the VTR tab in the Smoke Setup utility.
text_image
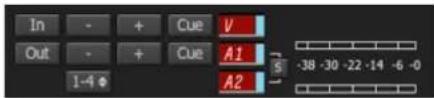
In Out 1-4 + - + - + - Cue V A1 A2 S -38 -30 -22 -14 -6 -0Video and audio tracks turn red when enabled for capture from your VTR.
Setting Up a VTR
Before starting Autodesk Smoke, you must use a utility called Smoke Setup to select the model of the VTR(s) in your facility and its appropriate timing settings.
Step 1. Go to Applications>Autodesk>Smoke>Utilities and open Smoke Setup.
Step 2. In the General tab, make sure that Video Device and Audio Device are set to BMD.
Step 3. In the VTR tab, enable the VTR model and the timings you want to use with Autodesk Smoke. Enable the rows with live NTSC or live PAL to enable crash-record or live output.
Step 4. Click Apply and close Smoke Setup.
Capture from Controllable Devices with UltraStudio and DeckLink
Autodesk Smoke can be configured to capture from controllable VTRs with RS-422 deck control.
Step 1. Select a folder in the Media Library where you want the captured clip to be created.
Step 2. Select File>Capture from VTR. The VTR Capture module appears.
Step 3. Cue the tape to the start frame of the clip you want to capture.
Step 4. Select the video and audio channels you wish to record. The buttons will turn red to let you know which tracks are enabled.
Step 5. Enter In and Out points in the In and Out fields.
Step 6. Click Capture to start the capture. The timecode field will turn green to indicate that capture is in progress.
Step 7. End the capture at any time by clicking anywhere over the Preview window. The clip will automatically be saved to the location that you selected before entering the VTR Input module.
Using your Favorite 3rd Party Software
text_image
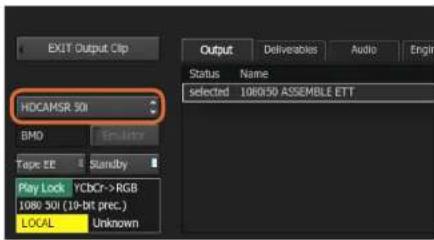
EXIT Output Clip HDCAMSR 50 BMO Tape EE Standby Play Lock YCbCr->RGB 1080 30I (10-bit prec.) LOCAL Unknown Output Deliverables Audio Engin Status Name selected 106050 ASSEMBLE ETT Name SelectedStep 3. Your VTR should be selectable in the drop down list.
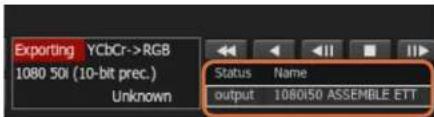
text_image
Exporting YCbCr->RGB 1080 50i (10-bit prec.) Unknown Status Name output 1080150 ASSEMBLE ETTClips you have selected to output appear in a list with their current status.
text_image
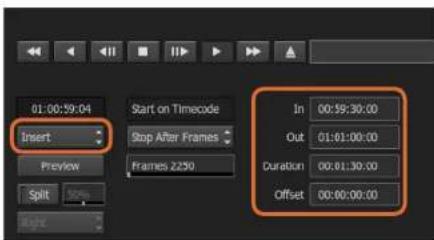
01:00:59:04 Insert Start on Timecode Stop After Frames Frames 2250 In 00:59:30:00 Out 01:01:00:00 Duration 00:01:30:00 Offset 00:00:00:00Set your In and Out points, then select Insert from the Output dropdown menu.
Recording to Tape with UltraStudio and DeckLink
Load a clip into the VTR Output module and set the In and Out points for the output clip. If needed, you can also enable the options to offset the start frame for output and to apply a letterbox overlay.
Step 1. Select File>Output to VTR.
Step 2. Choose the clip(s) to output from the Media Library. You can also select a folder if you wish to output its contents in one session. The VTR Output module appears.
Step 3. Select the VTR in the Device Name box. The preview window displays the video from the tape in the selected VTR.
Step 4. Make sure that the correct video track and audio channel buttons are enabled so that the corresponding video track and audio channels are output to tape.
Step 5. Enable or disable All Audio in the Clip Output menu. When All Audio is enabled, every audio channel will be converted to the format on your tape, not just the ones you enabled.
Step 6. Click preview to watch the clip before outputting.
Step 7. To output the selected clip starting at any frame other than the first one, enter the start timecode in the Start Offset field.
Step 8. Set the In and Out points for clip output.
Step 9. To output the clip to the VTR, select Insert from the Output box. The clips with Status selected will be output to tape. During output, the status of each clip will be updated to Pending, Output, and then Done.
Step 10. Cue to the In timecode and then select Play to check that the transfer was successful.
Step 11. When you are finished, click EXIT Output Clip to close the module.
Using your Favorite 3rd Party Software
text_image
Select the application to configure 2013.2.2> General Preview Tools Simulator Media Storage Backhaul Licensing Name Format 名称 Material Format Testing Configur Name Live MISC SISA/LI,MISC VOCER_ISC_CONVERE user Local ISA/LI VAL.YOCER_ISC_CONVERE user:HDCAM5B ISA/LI 1920x1600_SD.VOCER_ISC_CONVERE user:HDCAM594H ISA/LI 1920x1600_S5044.VOCER_ISC_CONVERE user:HDCAM5B ISA/LI 1920x1600_SD.VOCER_ISC_CONVERE user:HDCAM236M ISA/LI 1920x1600_21886V.VOCER_ISC_CONVERE user:HDCAM247 ISA/LI 1920x1600_2345V.VOCER_ISC_CONVERE user:HDCAM25F ISA/LI 1920x1600_SD.VOCER_ISC_CONVERE user:HDCAM38D ISA/LI,DUAL 1920x1600_SD.NO.CONVERSION New Duplicate Delete VR Archive Resource Device New Manual Start Timescale 01:00:00:00 Next ApplyEnable the rows with live NTSC or live PAL to enable crash-record or live output.
Crash-Record and Live Output
Autodesk Smoke allows you to capture a live video signal or crash-record a clip by using a tablet pen or a mouse to start and stop the clip input or output process. When you choose this form of capture, Autodesk Smoke checks the available space on your Autodesk Media Storage device to determine the available space, which varies depending on your preferred intermediate format.
Also, if you are using a device that does not support remote control via RS 422, such as a camera, VCR, or any other device, use the Live NTSC or PAL option to capture, and the Live Video option to output clips.
To crash-record a live video signal:
Step 1. Choose a folder from the Media Library where you would like the captured clip to be created.
Step 2. Select File>Capture from VTR. The VTR Capture module appears.
Step 3. From the VTR Device box, select Live NTSC or Live PAL. The incoming live video signal appears in the preview window.
Step 4. Select the Start On Pen mode. End the capture by using Stop On Pen or Stop On Frames. Traditionally, Autodesk Smoke was operated with a tablet and pen, hence the Start On Pen terminology.
When Stop On Pen is selected for capture stop mode, the out point and the duration timecode fields will be updated to show the longest possible clip that can be recorded on your Autodesk Media Storage device. The capture will either end when you click anywhere on the screen or when your storage fills up.
Step 5. Enter the clip name and enable the video tracks and audio channels that you want to capture.
Step 6. Make sure you are receiving the live video signal.
Step 7. Press Play on the video device.
Step 8. Select Process to begin capturing.
Step 9. Click anywhere on the screen to end capturing in Stop On Pen mode.
Using your Favorite 3rd Party Software
text_image
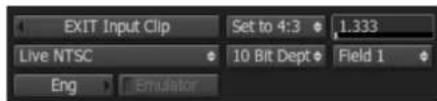
EXIT Input Clip Set to 4:3 1.333 Live NTSC 10 Bit Dept Field 1 Eng EmulatorSelect Live PAL or Live NTSC when outputting a live video signal.
text_image
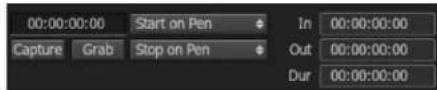
00:00:00:00 Start on Pen Capture Grab Stop on Pen In 00:00:00:00 Out 00:00:00:00 Dur 00:00:00:00Use Start On Pen mode when outputting live video.
To output a live video signal:
Step 1. Select File>Output to VTR.
Step 2. Select the clip(s) to output from the Media Library. You can also select a folder to output its contents. The VTR Output module appears.
Step 3. From the VTR Device box, select Live NTSC or Live PAL.
The Start Mode box is unavailable. With Live Video output, you must use Start On Pen mode. You can use Stop On Pen or Stop On Frames to end the output.
Step 4. Set output options. For example, enter the clip name and enable the video tracks and audio channels that you want to capture.
Step 5. On the device receiving the signal, start the recording, or take any action required to enable the reception of the signal from Autodesk Smoke.
Step 6. Select Process to begin the output on Autodesk Smoke.
Step 7. Click anywhere on the screen to end the output in Stop On Pen mode.
Using your Favorite 3rd Party Software
text_image
Blackmagiclosure DaVinci Resolve 10 Version 18:26.678DaVinci Resolve 10
text_image
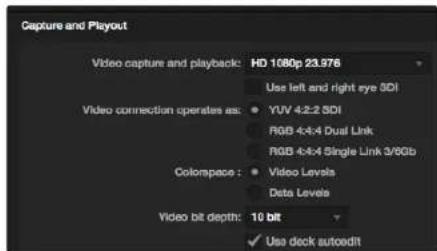
Capture and Playout Video capture and playback: HD 1080p 23.976 Use left and right eye SDI Video connection operates as: YUV 4-2-2 SDI RGB 4-4-4 Dual Link RGB 4-4-4 Single Link 3/6Gb Colorspace: Video Levels Data Levels Video bit depth: 10 bit ✓ Use deck autoeditSelect your desired format from the "Video capture and playback" menu.
DaVinci Resolve 10 and Live Grading
Desktop Video 10 allows simultaneous capture and playback on the UltraStudio 4K and DeckLink 4K Extreme. This is great for users who want to use the Live Grading feature within DaVinci Resolve 10, as it means you don't require two separate devices for input and output.
When using live grading on-set, simply connect the output of the camera to the input of your Blackmagic hardware. Then connect the hardware's output to an on-set monitor for grading evaluation and viewing.
Setting Up
Step 1. Launch Resolve and from the Preferences menu, select the "Video I/O and GPU" tab and select your hardware from the "For Resolve Live use" option. Save your preferences and restart Resolve to apply your changes.
Step 2. Start a project and from within the Project Settings window, set the resolution and frame rate to match your camera.
Step 3. In the Project Settings window, go to the "Deck Capture and Playback" tab and select your desired format from the "Video capture and playback" menu.
Step 4. Go to the Edit page and right click in the Timeline window and select "Create New Timeline".
Step 5. From the Color menu, select "Resolve Live On/Off". You should now see live video within the Viewer and a bright red "Resolve Live" button will appear above the video.
Using Resolve Live
Step 1. In Resolve Live mode, the Freeze button (snowflake icon) freezes the current incoming video frame, so you can grade it without being distracted by motion occurring during the shoot. When you've made the adjustment, you can unfreeze playback in preparation for grabbing a snapshot.
Step 2. Once you're happy with a grade, clicking the Snapshot button (camera icon) saves a snapshot of the current still in the Viewer, the incoming timecode value, and your grade into the Timeline. Snapshots are simply one-frame clips.
You can refer to the DaVinci Resolve 10 manual for more information on Resolve Live.
Blackmagic Media Express
text_image
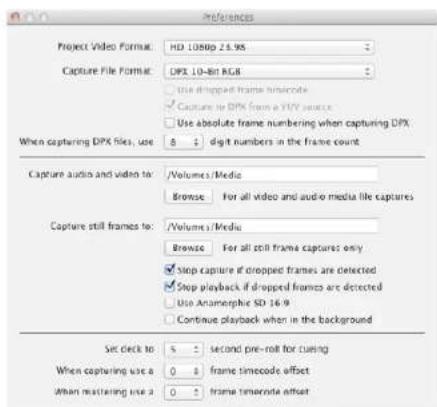
Preferences Project Video Format: HD 1080p 25.95 Capture File Format: DPX 10-8bit RGB Use dropped frame timeoutcode Capture to DPX from a VYY source Use absolute frame numbering when capturing DPX When capturing DPX files, use 8 1 digit numbers in the frame count Capture audio and video to: /Volumes/Media Browse For all video and audio media file captures Capture still frames to: /Volumes/Media Browse For all cell frame captures only Stop capture if dropped frames are detected Stop playback if dropped frames are detected Use Anamorphic SD 16.9 Continue playback when in the background Set click to: 5 second pre-roll for curing When capturing use a 0 frame timeoutcode offset When mastering use a 0 frame timeoutcode offsetUse the Preferences window to set video format, file format, storage location and other settings.
What is Blackmagic Media Express?
Blackmagic Media Express software is included with every UltraStudio, DeckLink and Intensity as well as every ATEM Switcher, Blackmagic Camera, H.264 Pro Recorder, Teranex Processor and Universal Videohub. Media Express 3 is a great tool when you don't need the complexity of NLE software but simply want to capture, play back and output clips to tape.
Capturing Video and Audio files
Setting Up a Project
Before capturing any clips in Media Express, you will need to select the settings for your project.
Step 1. Go to Media Express>Preferences or Edit>Preferences on Windows or Linux. The project formats listed will vary depending upon whether your Blackmagic video hardware supports features such as Ultra HD 4K video or stereoscopic 3D video.
Step 2. Select from a range of compressed and uncompressed capture formats or even a DPX image sequence from the Capture File Format drop down menu. Video will be captured in the chosen format and saved as a QuickTime movie.
Step 3. Set the storage location for your captured video and audio.
Step 4. Choose whether to stop capture or playback if dropped frames are detected.
Standard definition projects use the 4:3 aspect ratio unless you enable the Anamorphic SD 16:9 checkbox.
Applications will normally stop playing video if you send them to the background. Tick the checkbox "Continue playback when in the background" if you want Media Express to keep playing video when you open another application in the foreground.
The final options relate to tape decks with RS-422 deck control and include pre-roll and timecode offsets.
Blackmagic Media Express
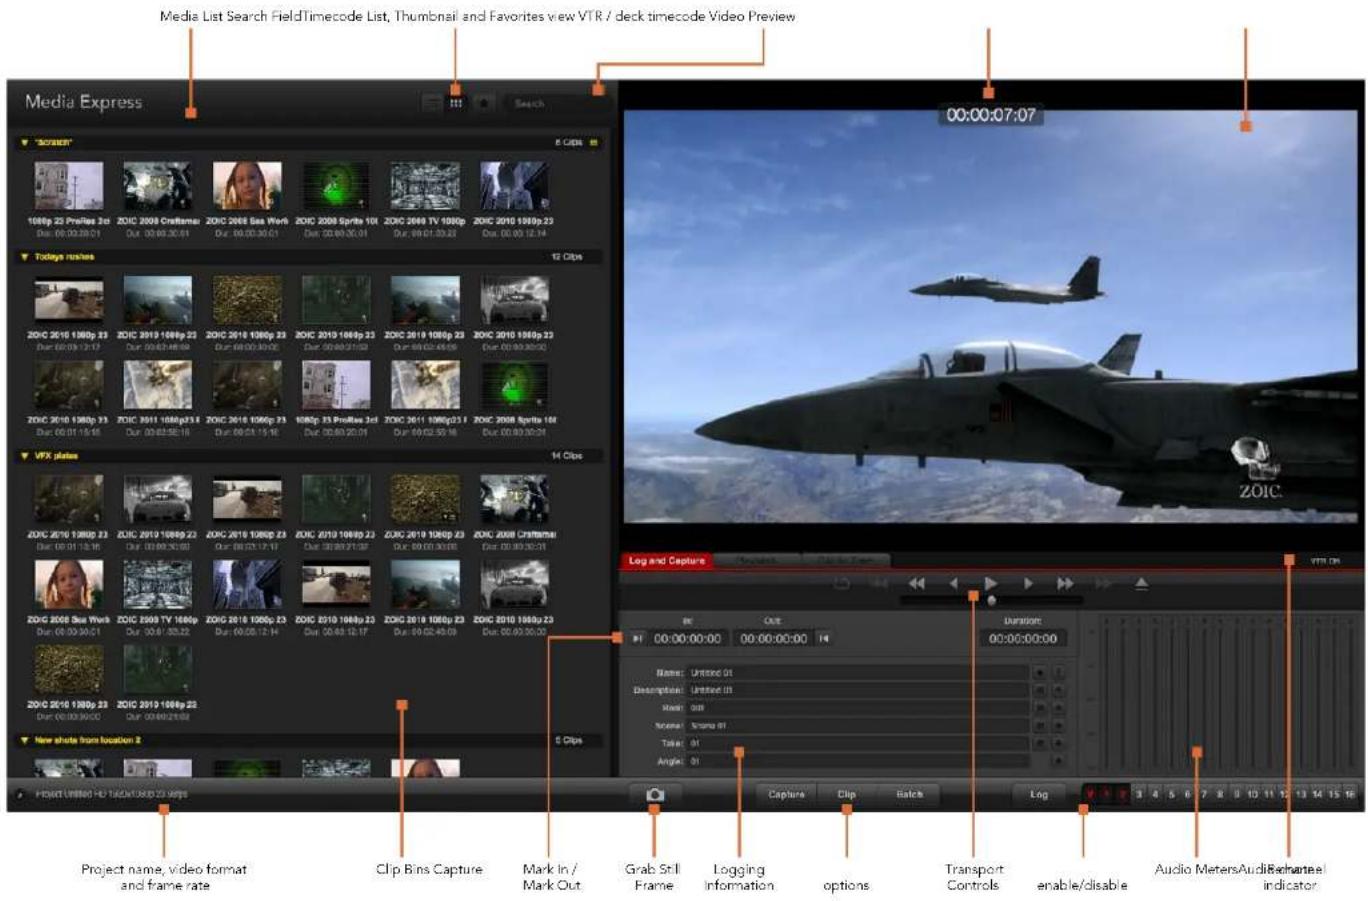
text_image
Media List Search FieldTimecode List, Thumbnail and Favorites view VTR / deck timecode Video Preview Media Express 00:00:07:07 1086p 23 Profile 2d ZOIC 2008 Craftamer ZOIC 2008 Sea Work ZOIC 2008 Sprite 10i ZOIC 2008 TV 1086p ZOIC 2010 1086p 23 Dur: 00:00:30:01 Dur: 00:00:30:01 Dur: 00:00:30:01 Dur: 00:00:30:25 Dur: 00:00:12:14 Today's stars 12 Clips ZOIC 2010 1380p 23 ZOIC 2019 1386p 23 ZOIC 2019 1386p 23 ZOIC 2019 1386p 23 ZOIC 2019 1386p 23 ZOIC 2019 1386p 23 ZOIC 2019 1386p 23 ZOIC 2019 1086p 23 ZOIC 2019 1086p 23 ZOIC 2019 1086p 23 ZOIC 2019 1086p 23 ZOIC 2019 1086p 23 ZOIC 2019 1086p 23 ZOIC 2019 Dur: 00:00:30:17 Dur: 00:00:30:17 Dur: 00:00:30:17 Dur: 00:00:30:17 VFX status 14 Clips ZOIC 2019 1386p 23 ZOIC 2019 1386p 23 ZOIC 2019 1386p 23 ZOIC 2019 1386p 23 ZOIC 2019 1386p 23 ZOIC 2019 Dur: 00:00:30:16 Dur: 00:00:30:16 Dur: 00:00:30:16 ZOIC 2019 Sea Work ZOIC 2019 TV 1686p ZOIC 2019 TV 1686p ZOIC 2019 TV 1686p ZOIC 2019 TV 1686p ZOIC 2019 TV Dur: 00:00:30:14 Dur: 00:00:30:14 Dur: 00:00:30:14 ZOIC 2019 1386p 23 ZOIC 2019 1386p 23 ZOIC 2019 1386p 23 ZOIC 2019 1386p 23 ZOIC 2019 Dur: 00:00:30:13 Dur: 00:00:30:13 Dur: 00:00:30:13 New shots from location 2 Project United HD Flashbox-23.jpg Log and Capture VTR ON RE CCT Duration: QI QI QI QI QI QI QI QI QI QI QI QI QI QI QI QI QI QI QI QI QI QI QI QI QI QI QI QI QI QI QI QI QI QI Capture Clip Balance Log Audio Meters Audi&Rechartee indicator Project name, video format and frame rate Clip Bins Capture Mark In/ Mark Out Grab Still Frame Logging Information options Transport Controls enable/disable Audio Meters Audi&Rechartee indicatorBlackmagic Media Express
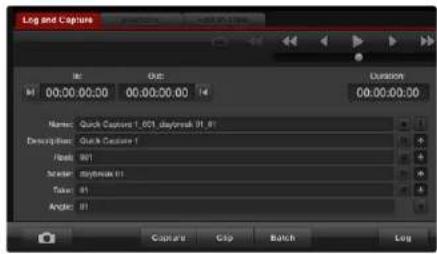
text_image
Log and Capture M 00:00:00:00 00:00:00:00 Duration 00:00:00:00 Names: Quick Capture 1.001 day/week 01.01 Description: Quick Capture 1 Flash: 01 Scaler: day/week 01 Token: 01 Angular: 01 Capture Copy Batch LogEnter a description for your video.

Set the desired number of audio channels to be captured.
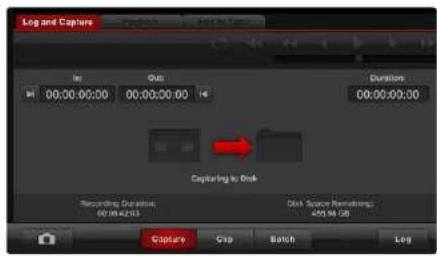
text_image
Log and Capture Add to Capture No Out: 00:00:00:00 00:00:00:00 Dimensions 00:00:00:00 Capturing to Disk Recording, Duration: 400.00±25.53 Disk Source Remodeling: 400.00 GB Capture Crop Batch LogClick the "Capture" button to begin capturing.
Capture
Capturing video is easy and all you need to do is connect a video source, set the Media Express preferences and press the Capture button.
Step 1. Start by connecting your video source to an input of your Blackmagic video hardware and check that the Blackmagic system preferences are set to the same video input, e.g. SDI, HDMI or analog.
Step 2. Open Media Express and set its preferences to the project video format and capture file format.
Step 3. Click the red Log and Capture tab and enter a description into the Description field.
Step 4. Click the "+" button next to the Description to add it to the automatic Name field. Click the "+" button next to any of the other fields that you wish to add to the Name field.
- To increment the value in each of these fields, click the corresponding clapper board icon. Alternatively, type directly into any field to customize its name and number.
- The text in the automatic Name field will be applied to the clip(s) which are about to be captured.
- To log the clip as a favourite, click the "star" icon next to the Name field.
- For a clip name confirmation prompt to appear before every capture, click the "!" icon next to the Name field.
Step 5. Set the desired number of audio channels to be captured.
Step 6. Click the "Capture" button to start recording. To stop the capture and keep the clip, click the "Capture" button again. Alternatively, press esc to be prompted to delete or save the clip. The captured clips are added to the Media List.
Logging clips
Ensure an RS-422 serial cable is connected between your Blackmagic video hardware and the deck. Ensure the deck's Remote/Local switch is set to Remote. Use the standard j, k, l shortcut keys to shuttle backwards, pause and shuttle forwards.
Click the Mark In button to mark the In point, or use the shortcut key i.
Click the Mark Out button to mark the Out point, or use the shortcut key o.
Click the Log Clip button to log the clip, or use the shortcut key p. The entry should now appear in the Media List with a red X in its icon to indicate the media is offline.
Blackmagic Media Express
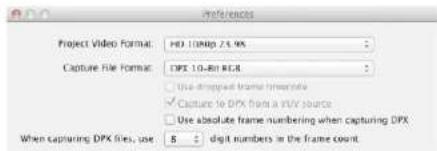
text_image
Project Video Format: HD 10Map 2.5 MP Capture File Format: DPX 10-RH RER ✓ Capture to DPX from a t/V source ☐ Use absolute frame numbering when capturing DPX When capturing DPX files, use 8 - digit numbers in the frame countDPX capture preferences
Batch Capture
After logging a clip, you can click the Clip button to capture a single clip.
To capture multiple clips, continue logging the clips for batch capture.
Select the logged clips in the Media List and do one of the following:
- Click the Batch button.
• Right-click on the selection and select Batch Capture. - Go to the File menu and choose Batch Capture.
Media Express will capture the clip from the In to the Out timecode.
DPX Capture
If you want to capture a DPX image sequence rather than a movie file, open the Media Express preferences and set the Capture File Format to DPX 10-Bit RGB.
• Create a DPX project by setting the capture file format to DPX.
- Capture.
When the capture has been completed, a single thumbnail will appear in the Media List representing the entire frame sequence. The sequence of DPX frames will be stored in its own folder in your disk storage. Audio will be stored in a .wav file in the same folder.
By default, DPX captures are assumed to be from YUV sources. If you need to capture from an RGB source, disable the "Capture to DPX from a YUV source".
If you want the DPX frame numbers to be based on the timecode of the captured video, rather than just starting from zero, enable the option to "Use absolute frame numbering when capturing DPX".
If you aren't performing long DPX captures, you may wish to reduce the number of zeroes in the frame numbers by changing the option, "When capturing DPX files, use (2-8) digit numbers in the frame count".
Blackmagic Media Express

text_image
Preferences Project Video Format: HD 104p 10.01 Capture File Format: QuickTime Uncompressed 30-bit YUV Use dropped frame decode Capture to DPK from a yUV source Use absolute frame numbering when capturing DPK When capturing DPK files, use 5 Digit numbers in the frame countSelect a project video format with '3D' in its name to capture dual-stream stereoscopic 3D video clips.
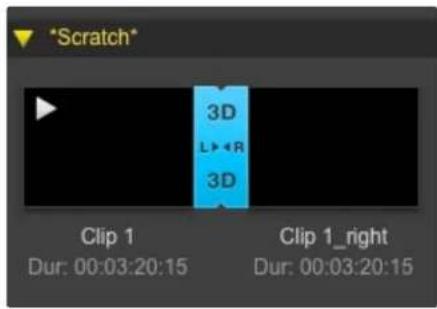
text_image
*Scratch* 3D L▶◀R 3D Clip 1 Dur: 00:03:20:15 Clip 1_right Dur: 00:03:20:15In Thumbnail view, the left and right eye clips are connected by a 3D indicator and presented as a single, large icon.
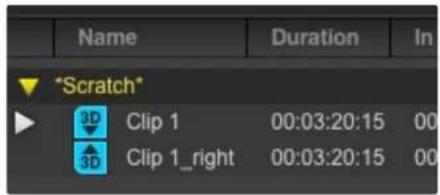
text_image
Name Duration In *Scratch* 3D Clip 1 00:03:20:15 00 3D Clip 1_right 00:03:20:15 00In Timecode List view, the left and right eye clips are listed on two lines and linked together by a 3D indicator.
3D Capture
When Media Express is used with a Blackmagic video hardware model that supports dual-stream 3D, you can create left and right eye 3D video clips by capturing 2 streams of HD-SDI video simultaneously.
- Create a 3D project which matches the frame rate of your dual stream 3D video source.
- Ensure you have 2 discrete HD-SDI video inputs to the Blackmagic video hardware.
- Capture.
When capturing and logging dual stream 3D in Media Express, the clip name will be applied to the left eye video. The right eye video will be appended with '_right' text. For example, if you name the stereo clip "Clip 1", the left eye clip will be called "Clip 1.mov" and the right eye clip will be called "Clip 1_right.mov".
The Media List presents an eye-catching indication that the captured clip is a 3D clip:
- In Thumbnail view, the left and right eye clips are connected by a 3D indicator and presented as a single, large icon.
- In Timecode List view, the left and right eye clips are listed on two lines and linked together by a 3D indicator.
Blackmagic Media Express
text_image
Media List Search FieldTimecode List, Thumbnail and Favorites view VTR / deck timecode Video Preview Media Express 00:00:07:07 1086p 23 PreRes 2d ZOIC 2009 Craftman ZOIC 2008 Gas Work ZOIC 2008 Sprite 10i ZOIC 2009 TV 1086p ZOIC 2010 1089p 23 Dur: 00:00:30:01 Dur: 00:00:30:01 Dur: 00:00:30:01 Dur: 00:01:30:23 Today's stars 12 Clips ZOIC 2010 1086p 23 ZOIC 2010 1086p 23 ZOIC 2010 1086p 23 ZOIC 2010 1086p 23 ZOIC 2010 1086p 23 ZOIC 2010 1086p 23 ZOIC 2010 1086p 14 Dur: 00:01:12:17 Dur: 00:01:45:59 Dur: 00:01:45:59 Dur: 00:01:45:59 Dur: 00:01:45:59 ZOIC 2010 1086p 23 ZOIC 2010 1086p 23 ZOIC 2010 1086p 23 ZOIC 2010 1086p 23 ZOIC 2010 1086p 23 ZOIC 2010 1086q Dur: 00:01:14:18 Dur: 00:01:45:59 Dur: 00:01:45:59 Dur: 00:01:45:59 VFX plates 14 Clips ZOIC 2010 1286p 23 ZOIC 2010 1286p 23 ZOIC 2010 1286p 23 ZOIC 2010 1286p 23 ZOIC 2010 1286p 23 ZOIC 2010 1286p 23 ZOIC 2010 1286p 14 Dur: 00:01:15:16 Dur: 00:01:45:59 Dur: 00:01:45:59 Dur: 00:01:45:59 ZOIC 2008 Sua Yunk ZOIC 2569 TV 1686p ZOIC 2019 1286p ZOIC 2019 1286p ZOIC 2019 1286p ZOIC 2019 1286p ZOIC 2019 1286p ZOIC Dur: 00:03:36:51 Dur: 00:13:52:52 Dur: 00:23:52:53 Dur: 00:33:53:54 ZOIC 2019 1986p ZOIC 2569 TV 1686p ZOIC 2019 1986p ZOIC 2019 1986p ZOIC Dur: 00:33:56:55 New shots from location Z 5 Clips Project Limited HD Flash/USB/USB/USB and frame rate Clip BinsProject name, Masterformat Mark Out Clip Information Grab Still Frame Favorites Selection Transport Controls Audio channel enable/disable Audio Meters Remote indicatorBlackmagic Media Express
text_image
Media Express The video format of the selected clip does not match the project settings. Would you like to save this project and start a new one based on the video format of the selected clip? Save Don't Save Cancel
text_image
New Open... Open Recent Save Save As... Import Grab Still Frame Capture Now Batch Capture N O S S Media Files... Final Cut Pro XML... CMX EDL...You can import media directly, or import with an XML or EDL

You can use the transport controls to play, stop, jump to the next or previous clip and loop playback.
Playing back Video and Audio Files
Importing clips
You can play back your video and audio files after importing media into Media Express in any of the following ways:
• Double-click an empty area of the Media List.
- Right-click an empty area of the Media List and select Import Clip from the contextual menu.
- Go to the File menu, select Import and then Media Files.
Select the video and audio clip(s) you wish to import from the Open Video Clip dialog box. The clips will appear in the Scratch area of the Media List. If you have created your own bins in the Media List, you can drag the clips into the desired bin.
To import directly to a bin, right-click within the desired bin and select Import Clip from the contextual menu. If the files being imported do not match the frame rate and size of existing clips in the Media List, you will be prompted to create a new project and to save the current project.
Media Express also supports the import of multichannel audio-only files recorded at 48kHz in the uncompressed WAVE (.wav) and AIFF (.aif) formats.
Another way to import media is to use an XML file exported from Final Cut Pro. Go to the File menu, select Import and then Final Cut Pro XML. Open the desired XML and all the bins and media from the Final Cut Pro project will appear in the Media List.
Media Express also supports the import of CMX EDL files to batch capture clips using EDL files from other video software. Go to the File menu, select Import and then CMX EDL. Select the EDL and open it. The logging information will appear in the Media List. Select the logged clips and perform a batch capture to import the clips from your deck.
Playing back single and multiple clips
To play back a single clip, double-click the clip in the Media List. Alternatively, select the clip in the Media List and press the space bar on your keyboard or the play button in the transport controls.
To play back multiple clips, select the clips in the Media List and then press the space bar on your keyboard or the play button in the transport controls.
Your video will play back in the video preview pane of Media Express and on all the video outputs of your Blackmagic video hardware. During playback, the audio channels being monitored can be switched on or off via the track enable/disable buttons.
Blackmagic Media Express

In the Media List, choose to view your clips in Timecode List view or Thumbnail view. Click the Favorites button to show only your favorite clips. Type in the Search field to find your favorite clips.
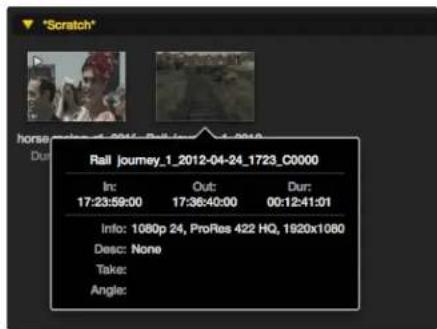
text_image
"Scratch" horse: 2012-04-24 1723_C0000 In: 17:23:59:00 Out: 17:36:40:00 Dur: 00:12:41:01 Info: 1080p 24, ProRes 422 HQ, 1920x1080 Desc: None Take: Angle:Click a thumbnail's popup info icon to view the info bubble.
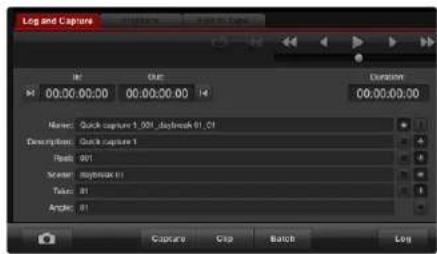
text_image
Log and Capture Name: Quick capture 1,001,diabreak 01.01 Description: Quick capture 1 Position: 001 Marker: Diabreak 01 Takes: 01 Angles: 01 Capture Clip Batch LogIn the Log and Capture tab, click the "star" icon next to the Name field if you want to log the clip as a favorite.
Browsing Media
Thumbnail view
Thumbnails are the most intuitive way to display your clips. Hover your mouse over the clip's thumbnail and then click on the popup info icon at the bottom-right of the thumbnail. Click the info bubble to hide it.
List view
You can view your clips in Timecode List view by clicking on the Timecode List button at the top-right of the Media List. Use the horizontal scroll bar to view all the columns of information for your clips.
Creating and using bins
To create a bin, right click an empty spot in the Media List and select "Create Bin". Name the new bin.
You can move clips around by dragging the clip icons to the desired bin. If you want a clip to appear in more than one bin, import the same clip again by right-clicking on the bin and choosing "Import Clip".
By default, logged clips appear in the Scratch. If you want to log clips and have them appear in a new bin, right-click the new bin and choose "Select As Log Bin".
Creating and using favorites
In the Log and Capture tab, click the "star" icon next to the Name field if you want to log a clip as a favorite. In the Playback tab, clicking the "star" icon will make the clip a favorite if it is selected in the Media List. Click the "star" icon again to deselect it as a favorite.
Clips marked as favorites will show a yellow star in their icon in Timecode List view and Thumbnail view.
Once you have marked clips as favorites, click on the "Show only favorites" button at the top of the Media list. The star icon will turn yellow. All clips will be hidden except for those marked as favorites.
Linking an audio clip to a video clip
To link an audio clip to a video clip in the Media List:
- Select a video clip which contains no audio channels.
- Right-click on the video clip and select 'Link Audio File' from the contextual menu.
You can now play back the combined clip or master it to tape.
Blackmagic Media Express
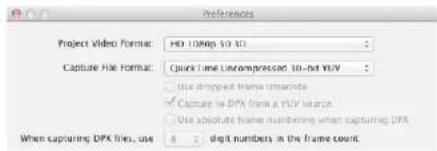
text_image
Project Video Format: HD 100p 50.0 Capture File Format: Quick Time Uncompressed, 10-bit YUV Use dropped frame thumbnails Capture to DFX from a YUV source. Use absolute frame numbering when capturing DFX When capturing DFX files, use 8 2 digit numbers in the frame countSelect a 3D project video format.
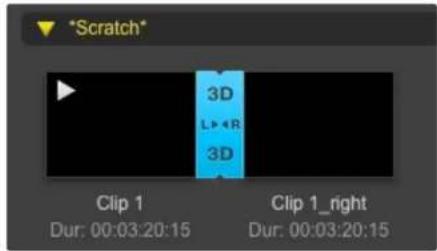
text_image
*Scratch* 3D L••R 3D Clip 1 Dur: 00:03:20:15 Clip 1_right Dur: 00:03:20:15The Media List presents a highly visible indication that the imported clip is a 3D clip.
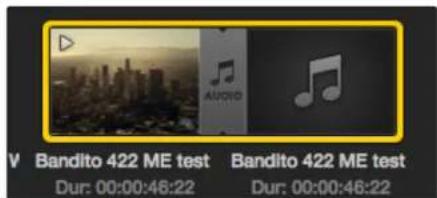
text_image
V Bandito 422 ME test Dur: 00:00:46:22 Bandito 422 ME test Dur: 00:00:46:22The Media List presents a highly visible indication that the video and audio clips are linked.

Type in the Search field to find clips.
Deleting clips and bins
To delete clips, select the unwanted clips and press the forward delete button on your keyboard. This will only delete the clips from the Media List and they will safely remain on your disk storage.
To delete bins, right-click within a bin and choose "Delete Bin". This action will delete the bin and any clips it contained. This will only delete the clips from the Media List and they will safely remain on your disk storage.
Creating a 3D clip
To add a stereoscopic 3D clip to the Media List:
- Select a 3D project video format that is the same frame rate as your 3D media.
- Import the 'left eye' file into the Media List.
- Right-click on the left eye file and select "Set Right Eye Clip" from the contextual menu. If the right eye clip was previously captured by Media Express, the right eye video will be appended with '_right' text.
The Media List presents a highly visible indication that the imported clip is a 3D clip. The left and right eye clips are displayed side by side in the Video Preview window, indicating a 3D video project.
If you find the left and right eyes of a 3D stereo clip have been loaded the wrong way around:
- Right-click the 3D clip in the Media List.
- Select 'Swap Eyes' from the contextual menu.
Searching the Media List
Clips can easily be found in a project by typing the name of your clips in the Search field at the top of the Media List. When used in conjunction with the favorites feature, the search will be confined to your favorite clips so you will see a shorter list of found clips.
Blackmagic Media Express
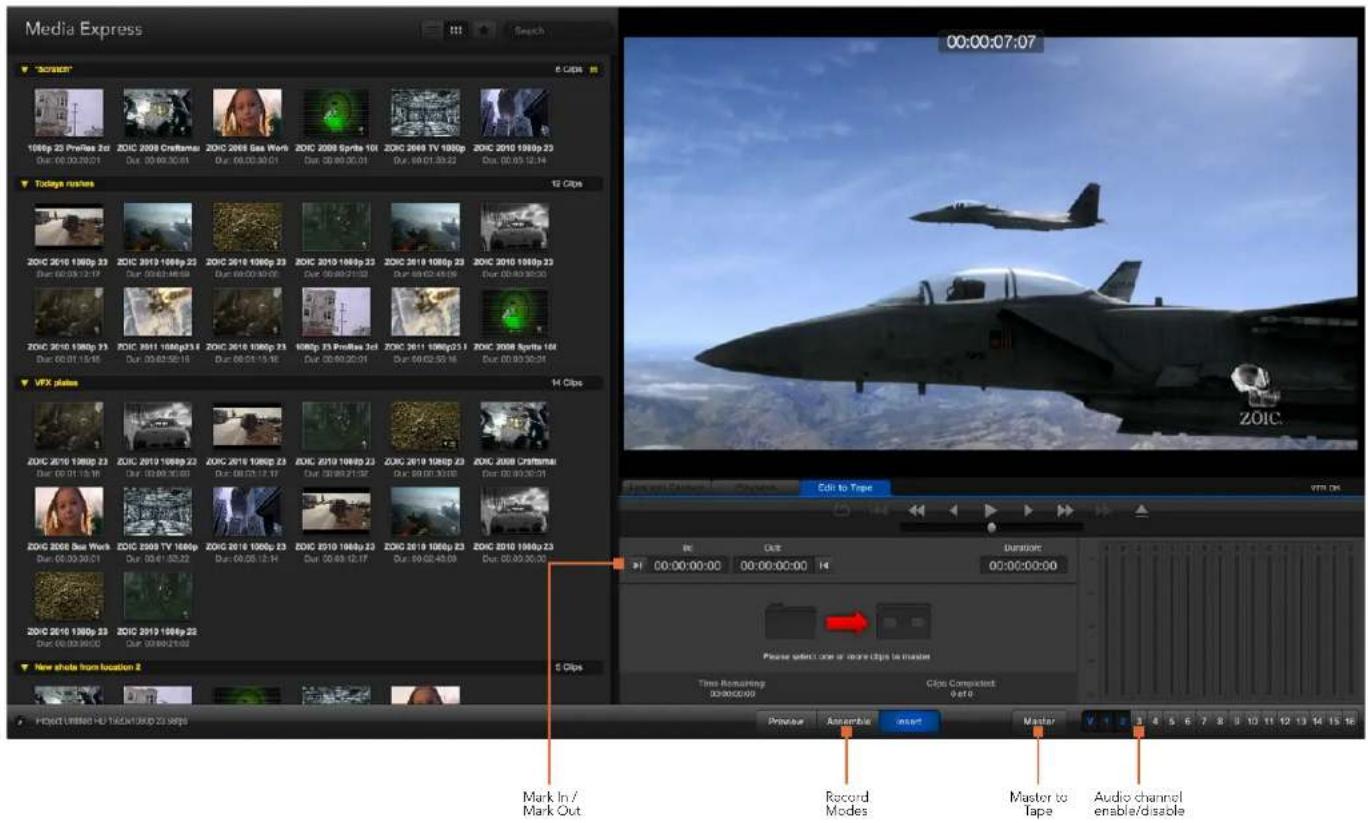
text_image
Media Express 00:00:07:07 00:00:07:07 100bp 23 Profiles Zer ZOC 2008 Craftman ZOC 2008 Gas Work ZOC 2008 Sprite 101 ZOC 2009 TV 100bp ZOC 2010 198bp 23 Dut: 00.00.30.01 Dut: 00.00.30.01 Dut: 00.00.30.01 Dut: 00.00.30.22 Dut: 00.05.12.14 Todings rashes 12 Clips ZOC 2010 198bp 23 ZOC 2019 198bp 23 ZOC 2019 198bp 23 ZOC 2019 198bp 23 ZOC 2019 198bp 23 ZOC 2019 198bp 23 ZOC 2019 198bp 23 ZOC 2019 196bp 23 ZOC 2019 196bp 23 ZOC 2019 196bp 23 ZOC 2019 196bp 23 ZOC 2019 196bp 23 ZOC 2019 196bp 23 ZOC 2019 196bp 24 ZOC 2019 196bp 23 ZOC 2019 196bp 23 ZOC 2019 196bp 23 ZOC 2019 196bp 23 ZOC 2019 196bp 23 VFX plates 14 Clips ZOC 2019 198bp 23 ZOC 2019 198bp 23 ZOC 2019 198bp 23 ZOC 2019 198bp 23 ZOC 2019 198bp 23 ZOC 2019 198bp 23 ZOC BOSB Sea Work ZOC BOSB TV 166p ZOC BOSB TV 166p ZOC BOSB TV 166p ZOC BOSB TV 166p ZOC BOSB TV 166p ZOC BOSB TV 166p ZOC BOSB TV 166p ZOC BOSB TV 166p ZOC BOSB TV 166p ZOCBOSB Cramternai ZOC BOSB Cramternai Dut: DUT: DUT: DUT: DUT: DUT: DUT: DUT: DUT: DUT: DUT: DUT: DUT: DUT: DUT: DUT: DUT: DUT: DUT: DUT: DUT: DUT: DUT: DUT: DUT: DUT: DUT: DUT: DUT: DUT: DUT: DUT: DUT: DUT: DUT: VFX Plate Edit to Tape VTR OK Mark In / Mark Out. Record Modes Master to Tape Audio channel enable/disableBlackmagic Media Express

Click the favorite (star) icon at the top of the Media List to show only your favorites.
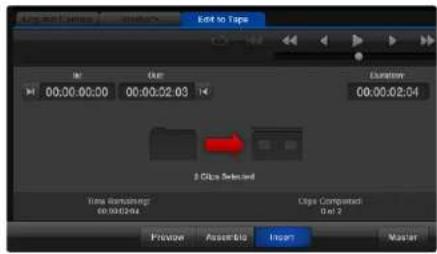
text_image
Edit to Tape 00:00:00:00 00:00:52.03 Duration 00:00:02:04 2 Bits Selected Time Selecting: 00:00:00 Cips Computed set 2 Preview AsstBio Insert MasterTwo clips have been selected for output to tape.

Set the desired number of audio channels to be mastered.
Editing Video and Audio Files to Tape
While we usually talk about mastering or editing to "tape", it doesn't matter if your deck uses tapes or disks. To master your clips:
- Select the clips you want to send to tape.
- Click the blue Edit to Tape tab.
- Set the In point and type of edit.
- Master to tape.
Selecting clips to master
From the Media List, select the clips you wish to master to tape. You can even insert multichannel audio-only clips to replace the master audio track on a master tape. If you only want to send your favorite clips to tape, click the favorite (star) icon at the top of the Media List to show your favorites and hide all other clips. Then select the favorite clips you wish to send to tape.
Insert and Assemble to tape
Click the blue Edit to Tape tab. Enter the In point of the tape by entering timecode into the In point field, or by cueing the tape to the desired point via the transport control and then clicking the Mark In button.
If no Out point is entered, Media Express will set the duration of the edit to the total length of the clips in the Media List. If an out point is defined, Media Express will stop recording once the Out point timecode is reached, even if some clips have not been output.
Choose to master to tape using Assemble or Insert edit. Then press the Master button.
Preview mode mimics the edit process but does not record to tape. This mode lets you check the edit point. Preview edit operations should always be checked on monitors connected directly to the output of the deck. This lets you view the video already on tape in conjunction with the new video.
If Record Inhibit is enabled either on the deck or on the tape, Media Express will report this when you click the Master button. Disable Record Inhibit before trying again.
Select the video and audio channels you wish to output via the track enable/disable buttons. Deselect the video channel if you only want to output audio.
Blackmagic Disk Speed Test
gauge
| Metric | Value | |--------|-------| | Current | 432.5 | | Peak | 100 |Select Target Drive... Save Screenshot...
| Stress |
| 1 GB |
| 2 GB |
| 3 GB |
| 4 GB |
| √ 5 GB |
| Disk Speed Test HelpAbout Disk Speed Test |
| Quit |
Open the Settings menu by clicking the gear icon.
What is Blackmagic Design Disk Speed Test?
Blackmagic Disk Speed Test measures the read and write performance of storage media in video frame sizes. Disk Speed Test is included free with any Blackmagic Design product installation on Mac OS X and Windows or can be downloaded free from our website. Access the Disk Speed Test settings by clicking on the Settings button (the gear icon), located just above the Start button.
Select Target Drive
Click Select Target Drive and ensure you have Read and Write permissions.
Save Screenshot
Click Save Screenshot to save a screenshot of the results.
Stress
The stress level can be set between 1GB and 5GB in 1GB increments. 5GB is the default setting and will provide the most accurate results.
Disk Speed Test Help
Click Disk Speed Test Help to launch the PDF manual for Disk Speed Test.
About Disk Speed Test
About Disk Speed Test displays which version of the Disk Speed Test you are running.
Start
Click the Start button to commence the disk speed test. Disk Speed Test will write and then read a temporary file to the selected target drive. Disk Speed Test will continue writing and reading until you stop the test by clicking the Start button again.
Will it Work?
The "Will it Work?" panel shows common video formats and displays a check mark or cross to indicate if disk performance is adequate. Be sure to do several test cycles to reveal any video formats for which the disk performance might be marginal. If a video format exhibits a check mark switching between a cross, it indicates that the disk storage cannot reliably support the video format.
How Fast?
The "How Fast?" results panel shows the frame rates your drive can achieve and should be read in conjunction with the "Will it Work?" panel. If the "Will it Work?" panel shows a green check mark for 2K 1556@25fps in 10 Bit YUV 4:2:2, but the "How Fast?" panel shows that a maximum of 25fps will be supported, the disk storage performance is too marginal to be reliable.
Blackmagic Disk Speed Test
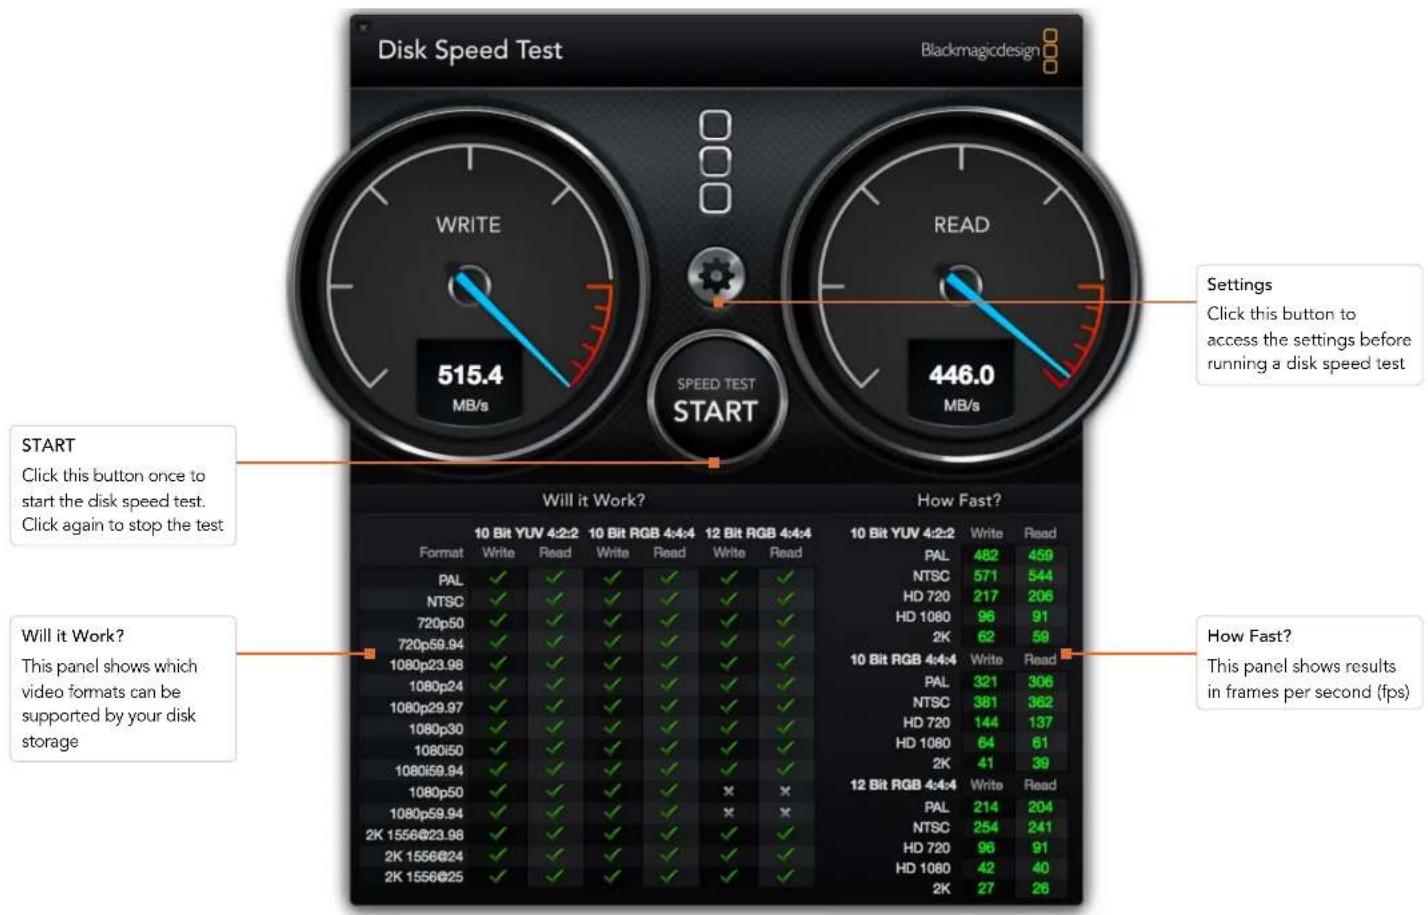
text_image
Disk Speed Test Blackmagicdesign WRITE 515.4 MB/s READ 446.0 MB/s SPEED TEST START Click this button once to start the disk speed test. Click again to stop the test Will it Work? How Fast? 10 Bit YUV 4:2:2 Write Read 10 Bit RGB 4:4:4 Write Read 12 Bit RGB 4:4:4 Write Read 10 Bit YUV 4:2:2 Write Read PAL 482 459 NTSC 571 544 HD 720 217 206 HD 1080 96 91 2K 62 59 10 Bit RGB 4:4:4 Write Read PAL 321 306 NTSC 381 362 HD 720 144 137 HD 1080 64 61 2K 41 39 12 Bit RGB 4:4:4 Write Read PAL 214 204 NTSC 254 241 HD 720 96 91 HD 1080 42 40 2K 27 26 Will it Work? This panel shows which video formats can be supported by your disk storageGetting Help
The quickest way to obtain help is to check the latest support material for your specific hardware at the Blackmagic Design online support pages.
Blackmagic Design Online Support Pages
The latest manual, software and support notes can be found at: www.blackmagicdesign.com/support
Contacting Blackmagic Design Support
If you can't find the help you need in our support material, you can email us by using the "Send request" button on the support page of your specific hardware. Alternatively, you can call your nearest Blackmagic Design support office at: www.blackmagicdesign.com/company
Checking the Version Currently Installed
To check which version of Desktop Video software is installed on your computer, open the Blackmagic Design Desktop Video system preferences. The version number appears in the title bar.
- On Mac OS X, open the System Preferences to locate the Blackmagic Design icon. Click the Blackmagic Design icon to reveal the version number.
- On Windows 7 and Windows 8, open the Control Panel and click on the "Hardware and Sound" category to reveal the Blackmagic Design Control Panel. Click the Blackmagic Design Control Panel to reveal the version number.
- On Linux, go to "Applications" and then "Sound and Video" to locate the Blackmagic Control Panel. Open the control panel to reveal the version number.
How to Get the Latest Updates
After checking the version of Desktop Video installed on your computer, please visit the Blackmagic Support Center at www.blackmagicdesign.com/support to check for the latest updates. While it is advisable to run the latest updates, you should avoid updating software when in the middle of an important project.
Developer Information

natural_image
Red office desk with a pen and paper labeled 'C++', no readable text or symbols on the objects themselves.Developing Custom Software using Blackmagic Design Hardware
The DeckLink SDK is available for developers to control Blackmagic video hardware with their own custom software. The DeckLink SDK supports the UltraStudio, DeckLink, Multibridge and Intensity products.
The DeckLink SDK provides both low-level control of hardware and high-level interfaces to allow developers to easily perform common tasks. The DeckLink SDK supports technologies including:
- Apple QuickTime
- Microsoft DirectShow
- Apple Core Media
- DeckLink API
Downloading the Free Blackmagic Design SDK
The DeckLink SDK can be downloaded at: www.blackmagicdesign.com/support/sdks/
Joining the Blackmagic Design Developer List
The Blackmagic Developer mailing list is designed for technical questions regarding technologies used by Blackmagic Design, such as QuickTime, Core Media, DirectShow, codecs, APIs and SDKs. The free mailing list is a forum where developers can discuss ideas and problems with other developers. Any subscriber may reply and the Blackmagic Design engineers will also respond when appropriate. You can subscribe to the mailing list at: http://lists.blackmagicdesign.com/mailman/listinfo/bmd-developer
If it is not obvious from your domain name that you are a developer, we may request a brief outline of your software. As the list is designed solely for developers, we endeavor to keep it free of spam and viruses, non-development questions and employment agents or sales people promoting products.
Contacting Blackmagic Design Developer Assistance
If you wish to ask questions off the list, please contact us at: developer@blackmagicdesign.com

CAUTION! RISK OF ELECTRIC SHOCK- DO NOT OPEN!
100-240V 1.7A 50-60Hz Fuse T5AL
Caution label
Wametikett
Avertissement
Caution: Risk of Electric Shock
On the UltraStudio 4K enclosure you will see a yellow warning label marked 'Caution: Risk of Electric Shock'. This is intended to warn users that there may be the presence of uninsulated "dangerous" voltage within the UltraStudio 4K enclosure which may be of sufficient magnitude to constitute a risk of electric shock to the user. Blackmagic Design advises you not to open the UltraStudio 4K unit, but rather contact your nearest Blackmagic Design service center should assistance be required.
Blackmagic Design warrants that UltraStudio, DeckLink and Multibridge family products will be free from defects in materials and workmanship for a period of 36 months from the date of purchase excluding connectors, cables, cooling fans, fiber optic modules, fuses, keyboards and batteries which will be free from defects in materials and workmanship for a period of 12 months from the date of purchase. Blackmagic Design warrants that Intensity family products will be free from defects in materials and workmanship for a period of 12 months from the date of purchase. If a product proves to be defective during this warranty period, Blackmagic Design, at its option, either will repair the defective product without charge for parts and labor, or will provide a replacement in exchange for the defective product.
In order to obtain service under this warranty, you the Customer, must notify Blackmagic Design of the defect before the expiration of the warranty period and make suitable arrangements for the performance of service. The Customer shall be responsible for packaging and shipping the defective product to a designated service center nominated by Blackmagic Design, with shipping charges pre paid. Customer shall be responsible for paying all shipping changes, insurance, duties, taxes, and any other charges for products returned to us for any reason.
This warranty shall not apply to any defect, failure or damage caused by improper use or improper or inadequate maintenance and care. Blackmagic Design shall not be obligated to furnish service under this warranty: a) to repair damage resulting from attempts by personnel other than Blackmagic Design representatives to install, repair or service the product, b) to repair damage resulting from improper use or connection to incompatible equipment, c) to repair any damage or malfunction caused by the use of non Blackmagic Design parts or supplies, or d) to service a product that has been modified or integrated with other products when the effect of such a modification or integration increases the time or difficulty of servicing the product. THIS WARRANTY IS GIVEN BY BLACKMAGIC DESIGN IN LIEU OF ANY OTHER WARRANTIES, EXPRESS OR IMPLIED. BLACKMAGIC DESIGN AND ITS VENDORS DISCLAIM ANY IMPLIED WARRANTIES OF MERCHANTABILITY OR FITNESS FOR A PARTICULAR PURPOSE. BLACKMAGIC DESIGN'S RESPONSIBILITY TO REPAIR OR REPLACE DEFECTIVE PRODUCTS IS THE WHOLE AND EXCLUSIVE REMEDY PROVIDED TO THE CUSTOMER FOR ANY INDIRECT, SPECIAL, INCIDENTAL OR CONSEQUENTIAL DAMAGES IRRESPECTIVE OF WHETHER BLACKMAGIC DESIGN OR THE VENDOR HAS ADVANCE NOTICE OF THE POSSIBILITY OF SUCH DAMAGES. BLACKMAGIC DESIGN IS NOT LIABLE FOR ANY ILLEGAL USE OF EQUIPMENT BY CUSTOMER. BLACKMAGIC IS NOT LIABLE FOR ANY DAMAGES RESULTING FROM USE OF THIS PRODUCT. USER OPERATES THIS PRODUCT AT OWN RISK.
© Copyright 2014 Blackmagic Design. All rights reserved. 'Blackmagic Design', 'DeckLink', 'HDLink', 'Workgroup Videohub', 'Videohub', 'DeckLink', 'Intensity' and 'Leading the creative video revolution' are registered trademarks in the US and other countries. All other company and product names may be trade marks of their respective companies with which they are associated.
Thunderbolt and the Thunderbolt logo are trademarks of Intel Corporation in the U.S. and/or other countries.
オペレーション マニュアル
Desktop Video
Blackmagicdesign

natural_image
Black-and-white photo of a freight train traveling on a riverbank at sunset, with no visible text or symbols.日本語
Mac OS X ^TM
Windows™
Linux™
2014年6月

natural_image
Portrait of a man in a black polo shirt against a brick wall background (no text or symbols visible)ようこそ!
Blackmagic Design CEO
54 はじめに
DaVinci Resolve 10とLive Grading 82
83 Blackmagic Media Express
Blackmagic Media Expressとは 83
natural_image
Diagram of a computer motherboard showing cable routing and connectors (no text or labels)natural_image
Illustration of a computer interface showing two cables connected to a rack-mounted network (no text or symbols visible)natural_image
Illustration of a hand inserting a USB into a device labeled '8.000000000000000000000000000000000000000000000000000000000000000000000000000000000000000' (no text or symbols on the device itself)natural_image
Illustration of a server rack with ports and connectors, no visible text or symbolstext_image
Blackmagic Design Desktop Video Setup Welcome to the Blackmagic Design Desktop Video Setup Wizard The Setup Wizard will install Blackmagic Design Desktop Video on your computer. Click Next to continue or Cancel to exit the Setup Wizard. Back Next CancelWindowsのDesktop Video Installer
Mac OS Xにインストール
text_image
VMware Software Control File Edit View Help Get Tools... Help Desktopvideo Internet: https://localhost/1832v2000/ My device will file your own website. Add Remove/dev/blackmagic/card0 [DeckLink HD Extreme 3] UPDATED
/dev/blackmagic/card1 [DeckLink HD Extreme 3] NEEDS_UPDATE
text_image
Log and Capture 00:00:00:00 Out Duration 00:00:00:00 Capturing to Disk Recording Duration 40:00:02:03 Disk (name Remaining) 2019.08.05 Capture Clip Batch Logtext_image
BlackMatic Design Desktop Video Settings for your Decklink 4K Extreme Settings Processing Video Levels Audio Levels Set output: SDI & HDMI & Component for video pre audio output connectors Set Input: SDI Video & SDI Audio for video and audio capture Use video output in NTSC: □ A: 7.5 RFE for use in the USA □ A: 0.9 RFE for use in Japan □ Use 8-RD SDI on video output when possible ✓ Use 3-RDS SDI max Dual Link SDI output ✓ Use 10.0pp net :1000Pul ✓ External find jitter when video is placed □ Use 10000000000000000000000000000000000000000000000000000000000000000000000000000000000000 Set default video standard as: HD 18861.50 First Cut Pre Load Initial output was set this setting When not playing video, send: Black Display HDMI 3D as: Side by Side Set reference output timing: Referenced input on dashed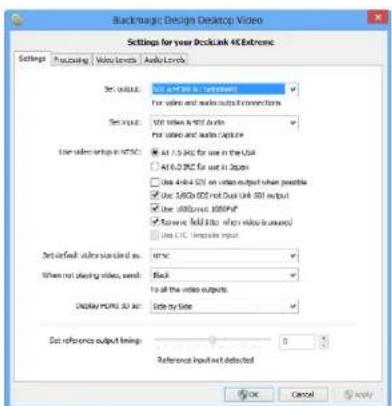
text_image
Screenshot of Backmagic Design Desktop Video settings dialog showing video format options and display controls
text_image
Blackmagic Control Panel Settings for: DeckLink Settings Set output: All Outputs Active For video and audio output connections Set input: SUI Video & SUI Audio For video and audio capture Use video setup in MTSC: • Alt 7.5 IRE for use in the USA • Alt 0.0 IRE for use in Japan ✓ Remove field jitter when video is paused □ Set black ref on SUI video output in capture When not playing video, send: BlackMac OS XのBlackmagic Designシステム環境設定 WindowsのBlackmagic Design Control Panel Ubuntu LinuxのBlackmagic Design Control Panel
text_image
Set input: SDI Video & SDI Audio For video and audio capture Use video setup in NTSC ● At 7.5 IRE for use in the USA ○ At 0.0 IRE for use in Japan □ Use 4:4:4 SDI on video output when possibletext_image
Use video setup in NTSC: At 7.5 IRE for use in the USA At 0.0 IRE for use in Japan ✓ Use 4/4/4 SDI on video output when possible Use 3/6Cb SDI not Dual Link SDI output Use 1080p not 1080PsF Remove field jitter when video is pausedtext_image
At 0.0 IRE for use in Japan Use 4:4:4 SDI on video output when possible ✓ Use 3/6Cb SDI not Dual Link SDI output Use 1080p not 1080PsF Remove field jitter when video is paused Use LTC Timecode Inputtext_image
Use 4:4:4 SDI on video output when possible Use 3/6Cb SDI not Dual Link SDI output ✓ Use 1080p not 1080Ps Remove held jitter when video is paused Use LTC Timecode inputtext_image
Remove field jitter when video is paused Use LTC Timecode input Set default video standard as: HD 1080p 29.97 $ Final Cut Pro X and startup video output will use this setting When not playing video, send: Last Frame Played >text_image
Set default video standard as: NTSC Final Cut Pro II and startup video output will use this setting. When not playing video, send ✓ Last Frame Played Black Display HDMI 3D as: Side by Sidetext_image
Display HDMI 3D as √ Frame Packing Side by Side Line by Line Top and Bottom Left Eye Right Eyetext_image
Settings PICKING Video Levels Audio Levels Select output processing / Off Simultaneous HD and SD Output HD 16 HD and SD Letterbox HD to HD and SD Anamorphic HD to HD and SD Center Cut Simultaneous 2K and SD Output 2K to 2K and SD Simultaneous 5D and -10 720p Output SD and 210p HD 4.3 P/Box SD and 720p HD 16:9 Zoom SD and 740p HD 14:9 Zoom Simultaneous 5D and -10 1600k Output SD and 3600k HD 4.3 P/Box SD and 3600k HD 16:9 Zoom SD and 3600k HD 14:9 Zoom Simultaneous HD and Cross Converted HD HD and Cross Converted HD Enable Conversion on Analog Outputメニューから出力処理を選択

text_image
Settings Processing Video Levels Audio Levels Select output processing: Off Output HD 23.98p as HD 59.94 When playing back to video outputs Select input processing: Off When capturing from video inputstext_image
When capturing from video inputs Set A-frame VITC reference: Frame 00 5 In 23.08 fps capture from NTSC using 3/2 pulldown Capture VANIC input line: 16 Capture to movie file line 1text_image
Capture VANC Input line: 18 Capture to movie file line 1 19 Capture to movie file line 2 20 Capture to movie file line 3 To video lines 1, 2 or 3 in the captured movie fileHD 23.98PsFをHD 59.94iで出力(Output HD 23.98PsF as HD 59.94i):Windowsのみ
text_image
Settings Processing Video Levels Audio Levels Calibrate Analog Video in Video 0.00 48 Chroma 0.00 48 Adjust Cu and Cr Independently 0.00 48 Use Betacam YUV Levels: Calibrate Analog Video Out Video 0.00 48 Chroma 0.00 48 Adjust Cu and Cr Independently 0.00 48 Use Betacam YUV Levels: Reset Cantext_image
Ae After Effects CC After Effects CCAfter Effects® CC

text_image
Preferences Output Options: Output Mode: Output Quality: Output Rating: Output Size: 100% Output Time: 100% Output Duration: 100% Output Output: 100% Audio Output Mapping: Audio Output Mask Audio Output Mask Audio Output Mask Audio Output Mask Audio Output Mask Audio Output Mask Audio Output Mask Audio Output Mask Audio Output Mask Audio Output Mask Audio Output Mask Audio Output Mask Audio Output Mask Audio Output Mask Audio Output Mask Audio Output Mask Audio Output Mask Audio Output Mask Audio Output Mask Audio Output Mask Audio Output Mask Audio Output Mask Audio Output Mask Audio Output Mask Audio Output Mask Audio Output Mask環境設定の「ビデオプレビュー」画面

text_image
Pixel Method Settings AutoCAD Parameters AutoCAD Active Size Pixel Options Width: 100% Height: 50% Color: RGB/RGB (RGB) Opacity: 75% Angle: 30° Balance: -100% -20% -30% -40% -50% -60% -70% -80% -90% -100% -110% -120% -130% -140% -150% -160% -170% -180% -190% -200% -210% -220% -230% -240% -250% -260% -270% -280% -290% -300% -310% -320% -330% -340% -350% -360% -370% -380% -390% -400% -410% -420% -430% -440% -450% -460% -470% -480% -490% -500% -510% -520% -530% -540% -550% -560% -570% -580% -590% -600% -610% -620% -630% -640% -650% -660% -670% -680% -690% -700% -710% -720% -730% -740% -750% -760% -770% -780% -790% -800% -810% -820% -830% -840% -850% -860% -870% -880% -890% -900% -910% -920% -930% -940% -950% -960% -970% -980% -990% -100text_image
PS Photoshop CS © 2003 Adobe Photoshop CSPhotoshop® CC
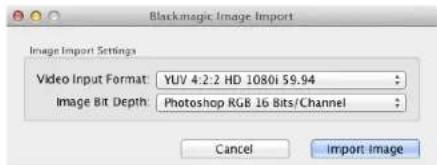
text_image
Blackmagic Image Import Image Import Settings Video Input Format: YUV 4:2:2 HD 1080i 59.94 Image Bit Depth: Photoshop RGB 16 Bits/Channel Cancel Import Imagetext_image
Final Cut Pro X Version 10.0 Loading Compressor support © 2001-2011 Apple Inc., All rights reserved. Apple, the Apple logo, and Final Cut Pro are trademarks of Apple Inc., registered in the U.S. and other countries.Apple Final Cut Pro X

text_image
Use 1080p not 1080PsF Remove field jitter when video is paused Set default video standard as: HD 1080p 24 Final Cut Pro X and startup video output will use this setting When not playing video, send: Extended Desktop Choosing this option requires a restarttext_image
Name: First Project Default Event: New Event 0-22-11 Video Properties: Customs 1080x1080 Format Resolution Rate Timecode Display: Non-Drop Frame Drop Frame Audio and Render Properties: Use default settings (Surround, 48kHz, PreRico 422) Custom Audio Channels: stereo Audio Sample Rate: 48kHz Render Format: Uncompressed 10-bit Cancel OKApple Final Cut Pro X
text_image
Export "First Project" as a QuickTime movie Options Summary Export: Current Settings Export a movie in the same format as the original project After export: Open with QuickTimer Player Include: Video and Audio Cancel Nexttext_image
Media Composer® Media Composer 7.30 ©2015 A.O. Publishing, Inc. All rights reserved. Use of this software in your use to install license agreements. Username Type: Software (Note Locked) Copyright Name: anniversaryAvid Media Composer

text_image
Use 1080p not 1080PsF Set black left on SDK video output in capture Extended Desktop Last Frame Played When not playing video, send ✓ Black Display HDMI 3D as: Side by Sidetext_image
New Project Project Name: New Project Format: 1080x/59.94 Color Space: YC&C: 709 Raster Dimension: 1920x1080 Stereoscopic: OUT Aspect Ratio: 16.3 Match-back The selected raster dimension supports the following raster types: - Standard - AVC Intra 100 - XDCAM HD 50 - XDCAM EX Search Data Folder Default Project Foldertext_image
Deck Preferences - Current When the deck contains no tape or drop frame cannot be detected set timecode to: Non-drop Frame ✓ Allow assemble edit & crash record for digital cut ✓ Stop key pauses deck Shuttle holds speed ✓ Stop any paused decks when quitting ✓ Poll deck during digital cut ✓ Relax coincidence point detectiontext_image
Device: DeckLink 4K Extreme Output Mode: Real-Time Bit Depth: 10-bit Entire Sequence Digital Cut Safe Mode Stop on Dropped Frames LTC out during preroll Add Black at Tail 00:00:00:00 Deck Conrot: Remote Local Sequence Time Insert Edit Custom Rearoll 1 second 01:00:00:00 Copy /WV6-500 Digital/Cut Tapetext_image
Adobe Dream Project Name: Backmagic Volume: Autodesk Media Storage Frames Free: 300K7 Frames Used: 9 Setup Directory: Backmagic Setup Mode: New Scapes Loading template: 10000000000000000000000000000000000000000000000000000000000000000000000000000000000000 Description: 1988 x 2688 x 43 1988 Width: 1528 Height: 1588 Shift to 1679 Size: 1.2727m Split: Progressive: 16-bit FP Drawers Cache and Render Proxy Settings Preferred /Arrow: Profile: 432 (RGB) Format Restrictions Maximum Width: None Maximum Height: None Depth: 10-36, 22-66 Allowable Preserv: FAX, FAX, RAW Reset Cancel Deletetext_image
Smoke Setup Select the application to configure smoke_2013.2. General Preview Vtr Emulator Media Storage Ba Video Device BMD Audio Device BMD Reserved Application Memory Automatic Network Panel Display ShowMounted Default Web Browser open Menu Bar Yestext_image
01:00:59:04 Insert Start on Timecode Stop After Frames Frames 2250 In 00:59:30:00 Out 01:01:00:00 Duration 00:01:30:00 Offset 00:00:00:00 Preview Split Righttext_image
Select the application to configure 2013.2.2> General Preview Tools Simulator Media Storage Backhaul Licensing Name Format 名称 Material Format Testing Configur Name Live MISC SISA/LI,MISC VOCER_ISC_CONVERE user Local ISA/LI VAL.YOCER_ISC_CONVERE user:HDCAM5B ISA/LI 1920x1600_SD.VOCER_ISC_CONVERE user:HDCAM594H ISA/LI 1920x1600_S5044.VOCER_ISC_CONVERE user:HDCAM5B ISA/LI 1920x1600_SD.VOCER_ISC_CONVERE user:HDCAM236M ISA/LI 1920x1600_21886V.VOCER_ISC_CONVERE user:HDCAM247 ISA/LI 1920x1600_2345V.VOCER_ISC_CONVERE user:HDCAM25F ISA/LI 1920x1600_SD.VOCER_ISC_CONVERE user:HDCAM38D ISA/LI,DUAL 1920x1600_SD.NO.CONVERSION New Duplicate Delete VR Archive Resource Device New Manual Start Timescale 01:00:00:00 Next Applytext_image
00:00:00:00 Start on Pen In 00:00:00:00 Capture Grab Stop on Pen Out 00:00:00:00 Dur 00:00:00:00text_image
Blackmagiclosure DaVinci Resolve 10 Version: 10.00.073DaVinci Resolve 10

text_image
Capture and Playout Video capture and playback: HD 1080p 23.976 Use left and right eye SDI Video connection operates as: YUV 4-2-2 SDI RGB 4-4-4 Dual Link RGB 4-4-4 Single Link 3/8Gb Colompace: Video Levels Data Levels Video bit depth: 10 bit ✓ Use deck autoeditDaVinci Resolve 10とLive Grading
text_image
Preferences Project Video Format: HD 1086p 2.5.98 Capture File Format: DPX 10-Bit RGB Use dropped frame mscode Capture to DPX from a VYY source Use absolute frame numbering when capturing DPX When capturing DPX files, use 8 1 digit numbers in the frame count Capture audio and video to: /Volumes/Media Browse For all video and audio media file captures Capture still frames to: /Volumes/Media Browse For all still frame captures only Stop capture if dropped frames are detected Stop playback if dropped frames are detected Use Anamorphic SD 16:9 Continue playback when in the background Set clock to: second pre-roll for curing When capturing use a 0 frame mscode offset When mastering use a 0 frame mscode offsettext_image
Log and Capture Name: Quick Captors 1,001,daybreak 01, 01 Description: Quick Captors 1 Float: 01 Screen: Daybreak 01 Table: 01 Anchor: 01 Capture Copy Batch Logビデオに関する情報を入力
text_image
Log and Capture Capture Add to Capture 00:00:00:00 00:00:00:00 Dimensions 00:00:00:00 Capturing to Disk Recording Duration: 60.00x253 Disk Space Remapping: 455.9 GB Capture Crop Batch Logtext_image
Name Duration In *Scratch* 3D Clip 1 00:03:20:15 00 3D Clip 1_right 00:03:20:15 00text_image
Media Express The video format of the selected clip does not match the project settings. Would you like to save this project and start a new one based on the video format of the selected clip? Save Don't Save Cancel
text_image
New Open... Open Recent Save Save As... Import Grab Still Frame Capture Now Batch Capture N O S S Media Files... Final Cut Pro XML... CMX EDL...text_image
"Scratch" horse: 2012-04-24_1723_C0000 Inc: 17:23:59:00 Out: 17:36:40:00 Dur: 00:12:41:01 Info: 1080p 24, ProRes 422 HQ, 1920x1080 Desc: None Take: Angle:text_image
Project Video Format: HD 100p 50.0 Capture File Format: Quick Time Uncompressed, 10-bit YUV Use dropped frame thumbnails Capture to DFX from a YUV source. Use absolute frame numbering when capturing DFX When capturing DFX files, use 8 2 digit numbers in the frame counttext_image
Edit to Tape 00:00:00:00 00:00:22.03 Duration 00:00:22:04 2 Bits Selected Time Remapping: 00:00:00:00 Copy Computed Get 3 Preview Assembl Insert Mastergauge
| Metric | Value | |--------|-------| | Current | 432.5 | | Peak | 100 |Select Target Drive... Save Screenshot...
| Stress |
| 1 GB |
| 2 GB |
| 3 GB |
| 4 GB |
| √ 5 GB |
| Disk Speed Test HelpAbout Disk Speed Test |
| Quit |
What is Blackmagic Design Disk Speed Test?
natural_image
Red office desk with 'SDK' logo and a pen and paper, no visible text or symbols on the main objectsCaution: Risk of Electric Shock
On the UltraStudio 4K enclosure you will see a yellow warning label marked 'Caution: Risk of Electric Shock'. This is intended to warn users that there may be the presence of uninsulated "dangerous" voltage within the UltraStudio 4K enclosure which may be of sufficient magnitude to constitute a risk of electric shock to the user. Blackmagic Design advises you not to open the UltraStudio 4K unit, but rather contact your nearest Blackmagic Design service center should assistance be required.
natural_image
Black-and-white photo of a freight train traveling on a riverbank at sunset, with no visible text or symbols.Français
Mac OS X ^TM
Windows™
Linux™
juin 2014

natural_image
Portrait of a man in a black polo shirt against a brick wall background (no text or symbols visible)Bienvenue
CEO Blackmagic Design
54 Mise en route
Onglet Processing (traitement) 114
natural_image
Diagram of a computer motherboard showing cable connections and ports (no text or labels)natural_image
Diagram of a computer interface showing cable connections between ports (no text or symbols visible)natural_image
Illustration of a hand inserting a USB into a device labeled 'Risikosoftwork' (no text or symbols on the device itself)natural_image
Illustration of a rack-mounted server unit with ports and cables (no text or symbols visible)text_image
About Desktop Video Software Important Information About Desktop Video Software The software includes everything you need to call out your desktop. Booklets. Summary and TV Pro Software files, such as your body. What's new or Desktop Video 8.2 • Video Directs: 10000000000000000000000000000000000000000000000000000000000000000000000000000000000000000000000000000 • Video Directs: 1543676666666666666666666666666666666666666666666666666666666666666666666666666666666666666666666666666666 • Video Directs: 1543676677777777777777777777777777777777777777777777777777777777777 • Video Directs: 1543829999999999999999999999999999999999999999999999999999999999999999999999999999999999999999999999999999 • Video Directs: 15438288888888888888888888888888888888888888888888888888888888888888888888 • Video Directs: 1543828444444444444444444444444444444444444444444444444444 • Video Directs: 15438282222222222222222222222222222222222222222222222 • Video Directs: 154382811111111111111111111111111111111111111111 • Video Directs: 1543827985555555555555555555555555555555555555555555555555 • Video Directs: 15438277533333333333333333333333333333333333333333333333333 • Video Directs: 1543827511111111111111111111111111111111 • Video Directs: 15438273875555555555555555555555555555555555 • Video Directs: 1543827253333333333333333333333333333333 • Video Directs: 1543827121111111111111111111111111 • Video Directs: 15438270099999999999999999999999999999 • Video Directs: 15438268877777777777777777777777777777 • Video Directs: 1543826765533333333333333333333 • Video Directs: 15438266422222222222222222222222 • Video Directs: 154382641008a,b,c,d,e,f,g,h,i,j,k,l,m,n,o,r,s,t,v,w,x,y,z,k,l,m,u,v,w,x,y,z,k,l,m,u,v,w,x,y,z,k,l,m,u,v,w,x,y,z,k,l,m,u,v,w,x,y,z,k,l,m,u,v,w,x,y,z,k,l,m,u,v,w,x,y,z,k,l,m,u,v,w,x,y,z,k,l,m,u,v,w,x,y,z,k,l,m,u,v,w,x,y,z,k,l,m,u,v,w,x,y,z,k,l,m,u,v,w,x,y,z,k,l,m,u-v,w,x,y,z,k,l,m,u,v,w,x,y,z,k,l,m,u,v,w,x,y,z,k,l,m,u,v,w,x,y,z,k,l,m,u,v,w,x,y,z,k,l,m,u,v,w,x,y,z,k,l,m,u,v,w,x,y,z,k,l,m,u,v,w,x,y,z,k,l,m,u,v,w,x,y,z,k,l,m,u,v,w,x,y,z,k,l,m,u,v,w,x,y,z,k,l,m,u,v+w,x,y,z,k,l,m,u,v,w,x,y,z,k,l,m,u,v,w,x,y,z,k,l,m,u,v,w,x,y,z,k,l,m,u,v,w,x,y,z,k,l,m,u,v,w,x,y,z,k,l,m,u,v,w,x,y,z,k,l,m,u,v,w,x,y,z,k,l,m,u,v,w,x,y,z,k,l,m,u,v,w,x,y,z,k,l,m,u,v,w,x,y,z,k,l,m,u,v,w,w,x,y,z,k,l,m,u,v,w,x,y,z,k,l,m,u,v,w,x,y,z,k,l,m,u,v,w,x,y,z,k,l,m,u,v,w,x,y,z,k,l,m,u,v,w,x,y,z,k,l,m,u,v,w,x,y,z,k,l,m,u,v,w,x,y,z,k,l,m,u,v,w,x,y,z,k,l,m,u,v,w,x,y,z,k,l,m,u,v,w,x,y,z,k,l,m,u,v w,x,y,z,k,l,m,u,v,w,x,y,z,k,l,m,u,v,w,x,y,z,k,l,m,u,v,w,x,y,z,k,l,m,u,v,w,x,y,z,k,l,m,u,v,w,x,y,z,k,l,m,u,v,w,x,y,z,k,l,m,u,v,w,x,y,z,k,l,m,u,v,w,x,y,z,k,l,m,u,v,w,x,y,z,k,l,m,u,v,w,x,y,z,k,l,m,u,v,w x,y,z,k,l,m,u,v,w x,y,z,k,l,m,u,v,w x,y,z,k,l,m,u,v,w x,y,z,k,l,m,u,v,w x,y,z,k,l,m,u,v,w x,y,z,k,l,m,u,v,w x,y,z,k,l,m,u,v,w x,y,z,k,l,m,u,v,w x,y,z,k,l,m,u,v,w x,y,z,k,l,m,u,v,w x,y,z,k,l,m,u,v,w x y,z,k,l,m,u,v,w x y,z,k,l,m,u,v,w x y,z,k,l,m,u,v,w x y,z,k,l,m,u,v,w x y,z,k,l,m,u,v,w x y,z,k,l,m,u,v,w x y,z,k,l,m,u,v,w x y,z,k,l,m,u,v,w x y z,a,b,c,d,e,f,g,h,i,j,k,l,m,n,o,r,s,t,s,t,s,t,s,t,s,t,s,t,s,t,s,t,s,t,s,t,s,t,s,t,s,t,s,t,s,t,s,t,s,t,s,t,s,t,s,t,s,t,s,t,s,t,s,t,s,t,s,t,s,t,s,t,s,t,s,t,s,t,s,t,s,t,s,t,s,t,s,t,s,t,s,t,s,t,s,t,s,t,s,t,s,t,s,t,s,t,s,t,s,t,s,t,s,t,s,t,s, t,p,q,r,s,t,s,t,s,t,s,t,s,t,s,t,s,t,s,t,s,t,s,t,s,t,s,t,s,t,s,t,s,t,s,t,s,t,s,t,s,t,s,t,s,t,s,t,s,t,s,t,s,t,s,t,s,t,s,t,s,t,s,t,s,t,s,t,s,t,s,t,s,t,s,t,s,t,s,t,s,t,s,t,s,t,s,t,s,t,s,t,s,t,s,t,s,t,s,t,s,t, s,p,q,r,s,t-s-t,p,q,r,s,t-s-t,p,q,r,s,t-s-t,p,q,r,s,t-s-t,p,q,r,s,t-s-t,p,q,r,s,t-s-t,p,q,r,s,t-s-t,p,q,r,s,t-s-t,p,q,r,s,t-s-t,p,q,r,s,t-s-t,p,q,r,s,t-s-t,p,q,r,s,t-s-t,p,q,r,s,t-s-t,p,q,r,s,t-s-t,p,q,r,s,t-s-t,p, k,A,B,C,D,E,F,G,H,I,K,I,L,M,N,N,N,N,N,N,N,N,N,N,N,N,N,N,N,N,N,N,N,N,N,N,N,N,N,N,N,N,N,N,N,N,N,N,N,N,N,N,N,N,N,N,N,N,N,N,N,N,N,N,N,N,N,N,N,N,N,N,N,N,N,N,N,N,N,N,N,N,N,N,N,N,N,N,N,N,N,N,N,N,N,N,N,N,N,N,N,N,N,N,N,N,N,N,N,N,N,N,N,NN,R,R,R,R,R,R,R,R,R,R,R,R,R,R,R,R,R,R,R,R,R,R,R,R,R,R,R,R,R,R,R,R,R,R,R,R,R,R,R,R,R,R,R,R,R,R,R,R,R,R,R,R,R,R,R,R,R,R,R,R,R,R,R,R,R,R,R,R,R,R,R,R,R,R,R,R,R,R,R,R,R,R,R,R,R,R,R,R,R,R,R,R,R,R,R,R,R,R,R,R,S,U,V,U,V,U,V,U,V,U,V,U,V,U,V,U,V,U,V,U,V,U,V,U,V,U,V,U,V,U,V,U,V,U,V,U,V,U,V,U,V,U,V,U,V,U,V,U,V,U,V,U,V,U,V,U,V,U,V,U,V,U,V,U,V,U,V,U,V,U,V,U,V,U,V,U,V,U,V,U,V,U,V,U,V,U,V,U,V,U,V,U,V,U,V,U,V,U,V,U,V,U,\nK,A,B,C,D,E,F,G,H,I,K,I,L,M,N,N,N,N,N,N,N,N,N,N,N,N,N,N,N,N,N,N,N,N,N,N,N,N,N,N,N,N,N,N,N,N,N,N,N,N,N,N,N,N,N,N,N,N,N,N,N,N,N,N,N,N,N,N,N,N,N,N,N,N,N,N,N,N:N,K,A,B,C,D,E,F,G,H,I,K,I,L,M N,K,A,B,C,D,E,F,G,H,I,K,I,L,M N,K,A,B,C,D,E,F,G,H,I,K,I,L,M N,K,A,B,C,D,E,F,G,H,I,K,I,L,M N,K,A,B,C,D,E,F,G,H,I,K,I,L,M N,K,A,B,C,D,E,F,G,H,I,K,I,L,M N,K,A,B,C,D,E,F,G,H,I,K,I,L,M N,K,A,B,C,D,E,F,G,H-I,K,I,L,M N,K,A,B,C,D,E,F,G,H,I,K,I,L,M N,K,A,B,C,D,E,F,G,H,I,K,I,L,M N,K,A,B,C,D,E,F,G,H,I,K,I,L,M N,K,A,B,C,D,E,F,G,H,I,K,I,L,M N,K,A,B,C,D,E,F,G,H,I,K,I,L,M N,K,A,B,C,D,E,F,G,H,I,K,I,L,M N,K,A,B,C D,E,F,G,H,I,K,I,L,M N,K,A,B,C,D,E,F,G,H,I,K,I,L,M N,K,A,B,C,D,E,F,G,H,I,K,I,L,M N,K,A,B,C,D,E,F,G,H,I,K,I,L,M N,K,A,B,C,D,E,F,G,H,I,K,I,L,M N,K,A,B,C,D,E,F,G,H,I,K,I,L,M N,K,A,B,C,D,E,F,G,H,I,K,I,L,MN,K,A,B,C,D,E,F,G,H,I,K,I,L,M N,K,A,B,C,D,E,F,G,H,I,K,I,L,M N,K,A,B,C,D,E,F,G,H,I,K,I,L,M N,K,A,B,C,D,E,F,G,H,I,K,I,L,M N,K,A,B,C,D,E,F,G,H,I,K,I,L,M N,K,A,B,C,D,E,F,G,H,I,K,I,L,M N,K,A,B,C,D,E,F,G,H I,J,K,I,L,M N,K,A,B,C,D,E,F,G,H,I,K,I,L,M N,K,A,B,C,D,E,F,G,H,I,K,I,L,M N,K,A,B,C,D,E,F,G,H,I,K,I,L,M N,K,A,B,C,D,E,F,G,H,I,K,I,L,M N,K,A,B,C,D,E,F,G,H,I,K,I,L,M N,K,A,B,C,D,E,F,G,H,I,K,I,L,M N,K,A,B,C:D,E,F,G,H,I,K,I,L,M N,K,A,B,C,D,E,F,G,H,I,K,I,L,M N,K,A,B,C,D,E,F,G,H,I,K,I,L,M N,K,A,B,C,D,E,F,G,H,I,K,I,L,M N,K,A,B,C,D,E,F,G,H,I,K,I,L,M N,K,A,B,C,D,E,F,G,H,I,K,I,L,M N,K,A,B,C,D,E,F,G,H,I,K,I,L,M.N K,A,B,C,D,E,F,G,H,I,K,I,L,M N K,A,B,C,D,E,F,G,H,I,K,I,L,M N K,A,B,C,D,E,F,G,H,I,K,I,L,M N K,A,B,C,D,E,F,G,H,I,K,I,L,M N K,A,B,C,D,E,F,G,H,I,K,I,L,M N K,A,B,C,D,E,F,G,H,I,K,I,L,M N K,A,B,C,D,E,F,G,H,I,K,I,L,M N K,A,B,C,D,E,F,G,H-I,K,I,L,M N K,A,B,C,D,E,F,G,H,I,K,I,L,M N K,A,B,C,D,E,F,G,H,I,K,I,L,M N K,A,B,C,D,E,F,G,H,I,K,I,L,M N K,A,B,C,D,E,F,G,H,I,K,I,L,M N K,A,B,C,D,E,F,G,H,I,K,I,L,M N K,A,B,C,D,E,F,G,H,I,K,I,L,M N K,A,B,C D,E,F,G,H,I,K,I,L,M N K,A,B,C,D,E,F,G,H,I,K,I,L,M N K,A,B,C,D,E,F,G,H,I,K,I,L,M N K,A,B,C,D,E,F,G,H,I,K,I,L,M N K,A,B,C,D,E,F,G,H,I,K,I,L,M N K,A,B,C,D,E,F,G,H,I,K,I,L,M N K,A,B,C,D,E,F,G,H,I,K,I,L,MN K,A,B,C,D,E,F,G,H,I,K,I,L,M N K,A,B,C,D,E,F,G,H,I,K,I,L,M N K,A,B,C,D,E,F,G,H,I,K,I,L,M N K,A,B,C,D,E,F,G,H,I,K,I,L,M N K,A,B,C,D,E,F,G,H,I,K-I,L,M N K,A,B,C,D,E,F,G,H-I,K-I,L,M N K,A,B,C,D,E,F,G,H-I,K-I,L,M N K,A,B,C,D,E,F,G,H-I,K-I,L,M N K,A,B,C,D,E,F,G,H-I,K-I,L,M N K,A,B,C,D,E,F,G,H-I,K-I,L,M N K,A,B,C,D,E,F,G,H-I,K-I,L,M N K,A,B,C,D,E,F,G,H-I,K-I,L,M N K,A,B,C D,E,F,G,H-I,K-I,L,M N K,A,B,C,D,E,F,G,H-I,K-I,L,M N K,A,B,C,D,E,F,G,H-I,K-I,L,M N K,A,B,C,D,E,F,G,H-I,K-I,L,M N K,A,B,C,D,E,F,G,H-I,K-I,L,M N K,A,B,C,D,E,F,G,H-I,K-I,L,M N K,A,B,C,D,E,F,G,H-I,K-I,L,MN K:A,B,C,D,E,F,G,H-I,K-I,L,MN K:A,B,C,D,E,F,G,H-I,K-I,L,MN K:A,B,C,D,E,F,G,H-I,K-I,L,MN K:A,B,C,D,E,F,G,H-I,K-I,L,MN K:A,B,C,D,E,F,G,H-I,K-I,L,MN K:A,B,C,D,E,F,G,H-I,K-I,L,MN K:A,B,C,D,E,F,G,H-I,K- ,M ,M ,N ,P ,T ,S ,T ,T ,T ,T ,T ,T ,T ,T ,T ,T ,T ,T ,T ,T ,T ,T ,T ,T ,T ,T ,T ,T ,T ,T ,T ,T ,T ,T ,T ,T ,T ,T ,T ,T ,T ,T ,T ,T ,T ,T ,T ,T ,T ,T ,T ,T ,T ,T ,T ,T , T ,T ,T ,T ,T ,T ,T ,T ,T ,T ,T ,T ,T ,T ,T ,T ,T ,T ,T ,T ,T ,T ,T ,T ,T ,T ,T ,T ,T ,T ,T ,T ,T ,T ,T ,T ,T ,T ,T ,T ,T ,T ,T ,T ,T ,T ,T ,T , T,T |text_image
Blackmagic Design Desktop Video Setup Backmagic design Welcome to the Blackmagic Design Desktop Video Setup Wizard The Setup Wizard will install Blackmagic Design Desktop Video on your computer. Click Next to continue or Cancel to exit the Setup Wizard.text_image
VMware Software Control File Edit View Help Get Tools... Help Desktopvideo Internet: https://localhost/1234568/1234568 My device will file your own website (http://www.1234568/1234568) Add Removetext_image
Log and Capture 00:00:00:00 Out Duration 00:00:00:00 Capturing to Disk Recording Duration 40:00:02:03 Disk (name Remaining) 2019.08.05 Capture Clip Batch Logtext_image
BlackMatic Design Desktop Video Settings for your Decklink 4K Extreme Settings Processing Video Levels Audio Levels Set output: SDI & HDMI & Component for video pre audio output connectors Set Input: SDI Video & SDI Audio for audio and audio capture Use video output in NTSC: □ A: 7.5 RFE for use in the USA □ A: 0.9 RFE for use in Japan □ Use 8-RD SDI on video output when possible ✓ Use 3-RDS SDI max Dual Link SDI output ✓ Use 10.0pp net :1000Pul ✓ External find jitter when video is placed □ Use 10000000000000000000000000000000000000000000000000000000000000000000000000000000000000 Set default video standard as: HD 18861.50 First Cut Pre Load Initial output was set this setting When not playing video, send: Black Display HDMI 3D as: Side by Side Set reference output timing: Referred input on dashedtext_image
Blackmagic Control Panel Settings for: DeckLink Settings Set output: All Outputs Active For video and audio output connections Set input: SSI Video & SSI Audio For video and audio capture Use video setup in MTSC: • Alt 7.5 IRE for use in the USA • Alt 0.0 IRE for use in Japan ✓ Remove field jitter when video is passed □ Set black ref on SSI video output in capture When not playing video, send: Block OKtext_image
Set input: SDI Video & SDI Audio For video and audio capture Use video setup in NTSC ● At 7.5 IRE for use in the USA ○ At 0.0 IRE for use in Japan □ Use 4.4.4 SDI on video output when possibletext_image
Use video setup in NTSC: At 7.5 IRE for use in the USA At 0.0 IRE for use in Japan ✓ Use 4:4:4 SDI on video output when possible Use 3/6Cb SDI not Dual Link SDI output Use 1080p not 1080PsF Remove field jitter when video is pausedtext_image
At 0.0 IRE for use in Japan Use 4:4:4 SDI on video output when possible Use 3/6Cb SDI not Dual Link SDI output Use 108cP not 1080Ps* Remove field jitter when video is paused Use LTC Timecode Inputtext_image
Use 4:4:4 SDI on video output when possible Use 3/6Cb SDI not Dual Link SDI output ✓ Use 1080p not 1080Ps Remove field juster when video is paused Use LTC Timecode inputtext_image
Remove field jitter when video is paused Use LTC Timescode input Set default video standard as: HD 1080p 29.97 Final Cut P/O A and startup video output will use this setting When not playing video, send: Last Frame Playedtext_image
Set default video standard as: NTSC Final Cut Pro X and startup video output will use this setting. When not playing video, send Last Frame Played Black Display HDMI 3D as: Side by Sidetext_image
Display HDMI 3D and ✓ Frame Packing Side by Side Line by Line Top and Bottom Left Eye Right Eyetext_image
Settings PICKING Video Levels Audio Levels Select output processing / Off Simultaneous HD and SD Output HD 16 HD and SD Letterbox HD to HD and SD Anamorphic HD to HD and SD Center Cut Simultaneous 2K and SD Output 2K to 2K and SD Simultaneous SD and - HD 720p Output SD and 220p HD 8.9 W/Box SD and 720p HD 16:9 Zoom SD and 740p HD 14:9 Zoom Simultaneous SD and - HD 1600k Output SD and 3600k HD 4.3 W/Box SD and 3600k HD 16:5 Zoom SD and 3600k HD 14:5 Zoom Simultaneous HD and Cross Converted HD HD and Cross Converted HD Enable Conversion on Analog Outputtext_image
Settings Processing Video Levels Audio Levels Select output processing: Off Output HD 23,Step as HD 59.9% When playing back to video outputs Select input processing: Off When capturing from video inputstext_image
When capturing from video inputs Set A-frame VITC reference: Frame 00 In 23.09 fps capture from NTSC using 3/2 pulldown Capture VANC input line: 18 Capture to movie file line 1text_image
Capture VANC input line: 18 Capture to movie file line 1 19 Capture to movie file line 2 20 Capture to movie file line 3 To video lines 1, 2 or 3 in the captured movie fileOnglet Processing (traitement)
text_image
Settings Processing Video Levels Audio Levels Calibrate Analog Video in Video 0.00 Chroma 0.00 Adjust Cu and Cr independently 0.00 0.00 Calibrate Analog Video Out Video 0.00 Chroma 0.00 Adjust Cu and Cr independently 0.00 0.00 Use Betacam YUV Levels Reset Gaintext_image
Ae After Effects CCAfter Effects ^3 CC

text_image
Preferences Output Options: Output Mode: Output Quality: Output Rating: Output Settings: Audio Output Mapping: Audio Output Mapping: Audio Output Mapping: Audio Output Mapping: Audio Output Mapping: Audio Output Mapping: Audio Output Mapping: Audio Output Mapping: Audio Output Mapping: Audio Output Mapping: Audio Output Mapping: Audio Output Mapping: Audio Output Mapping: Audio Output Mapping: Audio Output Mapping: Audio Output Mapping: Audio Output Mapping: Audio Output Mapping: Audio Output Mapping: Audio Output Mapping: Audio Output Mapping: Audio Output Mapping: Audio Output Mapping: Audio Output Mapping: Audio Output Mapping: Audio Output mapping: Audio Output mapping: Audio Output mapping: Audio Output mapping: Audio Output mapping: Audio Output mapping: Audio Output mapping: Audio Output mapping: Audio Output mapping: Audio Output mapping: Audio Output mapping: Audio Output mapping: Audio Output mapping: Audio Output mapping: Audio Output mapping: Audio Output mapping: Audio Output mapping: Audio Output mapping: Audio Output mapping: Audio Output mapping: Audio Output mapping: Audio Output mapping: Audio Output mapping: Audio Output mapping: Audio Output mapping: Audio Output maps: Audio Output maps: Audio Output maps: Audio Output maps: Audio Output maps: Audio Output maps: Audio Output maps: Audio Output maps: Audio Output maps: Audio Output maps: Audio Output maps: Audio Output maps: Audio Output maps: Audio Output maps: Audio Output maps: Audio Output maps: Audio Output maps: Audio Output maps: Audio Output maps: Audio Output maps: Audio Output maps: Audio Output maps: Audio Output maps: Audio Output maps: Audio Output maps: Audio Output map: 100% Audio: 100% Audio: 100% Audio: 100% Audio: 100% Audio: 100% Audio: 100% Audio: 100% Audio: 100% Audio: 100% Audio: 100% Audio: 100% Audio: 100% Audio: 100% Audio: 100% Audio: Audio: Audio: Audio: Audio: Audio: Audio: Audio: Audio: Audio: Audio: Audio: Audio: Audio: Audio: Audio: Audio: Audio: Audio: Audio: Audio: Audio: Audio: Audio: Audio: Audio: Audio: Audio: Audio: Audio: Audio: Audio: Audio: Audio: Video and Textation Outputs to the FV Window Member Video and Textation Outputs to the image format, press the forward dB* on the screen, logotext_image
Particle Effects Settings Size: 100% Angle: 120° Distance: 5 px Size: 5 px Color: Red Opacity: 75% Angle: 30° Density: 100% Frequency: 100% Size: 100% Angle: 120° Color: Red Opacity: 75% Angle: 30° Density: 100% Frequency: 100% Size: 100% Angle: 120° Color: Red Opacity: 75% Angle: 30° Density: 100% Frequency: 100% Size: 100% Angle: 120° Color: Red Opacity: -100% Angle: 30° Density: 100% Frequency: 100% Size: 100% Angle: 120° Color: Red Opacity: -100% Angle: 30° Density: 100% Frequency: 100% Size: 100% Angle: 120° Color: Red Opacity: -100% Angle: 35° Density: 100% Frequency: 100% Size: 100% Angle: 120° Color: Red Opacity: -100% Angle: 35° Density: 100% Frequency: 100% Size: 100% Angle: 120° Color: Red Opacity: -100% Angle: 35° Density: 95% Frequency: 95% Size: 100% Angle: 120° Color: Red Opacity: -100% Angle: 35° Density: 95% Frequency: 95% Size: 100%text_image
Blackmagic Image Import Image Import Settings Video Input Format: YUV 4:2:2 HD 1080i 59.94 Image Bit Depth: Photoshop RGB 16 Bits/Channel Cancel Import ImageImporter une image

text_image
Blackmagic Image Export Image Export Settings Video Output Format: YUV+K 4 2:2 HD 1080i 59.94 Cancel Export ImageExporter une image
Photoshop® CC
text_image
Name: Myrtica File Edit View Help Add View Help Edit View Help Edit View Help Edit View Help Edit View Help Edit View Help Edit View Help Edit View Help Edit View Help Edit View Help Edit View Help Edit View Help Edit View Help Edit View Help Edit View Help Edit View Help Edit View Help Edit View Help Edit View Help Edit View Help Edit View Help Edit View Help Edit View Help Edit View Help Edit View Help Edit View Help File Edit View Help File Edit View Help File Edit View Help File Edit View Help File Edit View Help File Edit View Help File Edit View Help File Edit View Help File Edit View Help File Edit View Help File Edit View Help File Edit View Help File Edit View Help File Edit View Help File Edit View Help File Edit View Help File Edit View Help File Edit View Help File Edit View Help File Edit View Help File Use Case10000000000000000000000000000000000000000000000000000000000000000000000000000000000000000000000000000 Edit View Help Edit View Help Edit View Help Edit View Help Edit View Help Edit View Help Edit View Help Edit View Help Edit View Help Edit View Help Edit View Help Edit View Help Edit View Help Edit View Help Edit View Help Edit View Help Edit View Help Edit View Help Edit View Help Edit View Help Edit View Help Edit View Help Edit View Help Edit View Help Edit View help Edit view help Edit view help Edit view help Edit view help Edit view help Edit view help Edit view help Edit view help Edit view help Edit view help Edit view help Edit view help Edit view help Edit view help Edit view help Edit view help Edit view help Edit view help Edit view help Edit view help Edit view help Edit view help Edit view help Edit view help Edit view help Edit v2.1.1.1.1.1.1.1.1.1.1.1.1.1.1.1.1.1.1.1.1.1.1.1.1.1.1.1.1.1.1.1.1.1.1.1.1.1.1.1.1.1.1.1.1.1.1.1.1.1.1.2.1.2.2.2.2.2.2.2.2.2.2.2.2.2.2.2.2.2.2.2.2.2.2.2.2.2.2.2.2.2.2.2.2.2.2.2.2.2.2.2.2.2.2.2.2.2.2.2.2.2.2.3.3. Edit v3. Edit v4. Edit v5. Edit v6. Edit v7. Edit v8. Edit v9. Edit v10. Edit v11. Edit v12. Edit v13. Edit v14. Edit v15. Edit v16. Edit v17. Edit v18. Edit v19. Edit v20. Edit v21. Edit v22. Edit v23. Edit v24. Edit v25. Edit v26. Edit v27. Edit v28. Edit v29. Edit v30. Edit v31. Edit v32. Edit v33. Edit v34. Edit v35. Edit v36. Edit v37. Edit v38. Edit v39. Edit v40. Edit v41. Edit v42. Edit v43. Edit v44. Edit v45. Edit v46. Edit v47. Edit v48. Edit v49. Edit v50. Edit v51. Edit v52. Edit v53. Edit v54. Edit v55. Edit v56. Edit v57. Edit v58. Edit v59. Edit v60. Edit v61. Edit v62. Edit v63. Edit v64. Edit v65. Edit v66. Edit v67. Edit v68. Edit v69. Edit v70. Edit v71. Edit v72. Edit v73. Edit v74. Edit v75. Edit v76. Edit v77. Edit v78. Edit v79. Edit v80. Edit v81. Edit v82. Edit v83. Edit v84. Edit v85. Edit v86. Edit v87. Edit v88. Edit v89. Edit v90. Edit v91. Edit v92. Edit v93. Edit v94. Edit v95. Edit v96. Edit v97. Edit v98. Edit v99. Edit v100. File Edit View Help File Edit View Help File Edit View Help File Edit View Help File Edit View Help File Edit View Help File Edit View Help File Edit View Help File Edit View Help File Edit View Help File Edit View Help File Edit View Help File Edit View Help File Edit View Help File Edit View Help File Edit View Help File Edit View Help File Edit View Help File Edit View Help File Edit View Help File Edit View HelpNouvelle séquence
Adobe® Premiere Pro® CC
text_image
Final Cut Pro X Version 10.0 Loading Compressor support © 2001-2011 Apple Inc., All rights reserved. Apple, the Apple logo, and Final Cut Pro are trademarks of Apple Inc., registered in the U.S. and other countries.Apple Final Cut Pro X

text_image
Use 1080p not 1080PsF Remove field jitter when video is paused Set default video standard as: HD 1080p 24 Final Cat Pro X and startup video output will use this setting When not playing video, send: Extended Desktop Choosing this option requires a restarttext_image
Name: First Project Default Event: New Event 0-22-11 Video Properties: Customs 1080x1080 Format Resolution Rate Timecode Display: Non-Drop Frame Drop Frame Audio and Render Properties: Use default settings (Surround, 48kHz, PreRico 422) Custom Audio Channels: stereo Audio Sample Rate: 48kHz Render Format: Uncompressed 10-bit Cancel OKApple Final Cut Pro X
text_image
Export "First Project" as a QuickTime movie Options Summary Export: Current Settings $$ Export a movie in the same format as the original project After export: Open with QuickTimer Player $$ Include: Video and Audio $$ Cancel Nexttext_image
Media Composer® Media Composer 7.30 ©2015 A&C Marketing, Inc. All rights reserved. Use of this software in subject to a related license agreement. Ukraine Type: Software (Note Locked) Computer Name: InstrumentsAvid Media Composer

text_image
Use 1080p not 1080PsF Set black left on SDK video output in capture Extended Desktop Last Frame Played When not playing video, send ✓ Black Display HDMI 3D as: Side by Sidetext_image
New Project Project Name: New Project Format: 1000x19.94 Aspect Ratio: 16.9 Color Space: YCIC: 709 Raster Dimension: 1920x1980 Stereoscopic: OUT Match-back The selected raster dimension supports the following raster types: - Standard - AMC Intra 100 - XDCAM HD 50 - XDCAM EX Search Data Folder Default Project Foldertext_image
Deck Preferences - Current When the deck contains no tape or drop frame cannot be detected set timecode to: Non-drop Frame ✓ Allow assemble edit & crash record for digital cut ✓ Stop key pauses deck Shuttle holds speed ✓ Stop any paused decks when quitting ✓ Poll deck during digital cut ✓ Relax coincidence point detectiontext_image
Device: DeckLink 4K Extreme Output Mode: Real-Time Bit Depth: 10-bit Entire Sequence Digital Cut Safe Mode Stop on Dropped Frames LTC out during preroll Add Black at Tail 00:00:00:00 Deck Control: Remote Local Sequence Time Insert Edit Custom Preroll Legend 01:00:00:00 Sceny: DVW-5.00 Digital/Cut Tapetext_image
Create New Project Name: Backweight Volume: Autodesk/MediaStorage Features: Free 300367 Frames: Quick 8 Setup Directory: Backweight1 Setup Mode: New Settings Config Template: 1970x1000@2977p.c5 Resolution: 1929 x 1980 / HD 1980 Width: 1929 Height: 1000 Size: 1.0 x 1.0/1 Ratio: 1.27775 Bit: Progressive 15-bit FP Graphics Cache and Render: Preview Settings Normal Extinction Maximum Width None Maximum height None Display: 10-bit, 12-bit Alternate Periods: CFX, EFX, RAW Reset Cancel Createtext_image
Smoke Setup Select the application to configure smoke_2013.2. General Preview Vtr Emulator Media Storage Ba Video Device BMD Audio Device BMD Reserved Application Memory Automatic Network Panel Display ShowMounted Default Web Browser open Menu Bar Yestext_image
01:00:59:04 Insert Start on Timecode Stop After Frames Frames 2250 In 00:59:30:00 Out 01:01:00:00 Duration 00:01:30:00 Offset 00:00:00:00 Preview Split Righttext_image
Select the application to configure 2013.2.2> General Preview Tools Simulator Media Storage Backhaul Licensing Name Protocol Name Standard Testing Configure Name Live MISC SISA/LI HTSC VOICE/ShC/OVA/RES user Local ISA/LI VAL VOICE/ShC/OVA/RES server:HDCAM584 ISA/LI 1920x1600_SD VOICE/ShC/OVA/RES server:HDCAM5944 ISA/LI 1920x1600_S5046 VOICE/ShC/OVA/RES server:HDCAM598 ISA/LI 1920x1600_SD VOICE/ShC/OVA/RES server:HDCAM236A4 ISA/LI 1920x1600_21886P VOICE/ShC/OVA/RES server:HDCAM2474 ISA/LI 1920x1600_2185F VOICE/ShC/OVA/RES server:HDCAM2517 ISA/LI 1920x1600_SD VOICE/ShC/OVA/RES server:HDCAM3033 ISA/LI/DUAL 1920x1600_SD NO CONVERSION New Duplicate Cancel Vit Archive Resource Device: New Manual Start Timecode: 01:00:00:00 OK Applytext_image
Blackmagiclosure DaVinci Resolve 10 Version 18:26.678DaVinci Resolve 10

text_image
Capture and Payout Video capture and playback: HD 1080p 23.976 Use left and right eye SDI Video connection operates as: YUV 4:2:2 SDI RGB 4:4:4 Dual Link RGB 4:4:4 Single Link 3/6Gb Colompace: Video Levels Data Levels Video bit depth: 10 bit ✓ Use deck autoedittext_image
Preferences Project Video Format: HD 1080p 25.95 Capture File Format: DPX 10-8bit RGB Use dropped frame timeoutcode Capture to DPX from a VYY source Use absolute frame numbering when capturing DPX When capturing DPX files, use 8 1 digit numbers in the frame count Capture audio and video to: /Volumes/Media Browse For all video and audio media file captures Capture still frames to: /Volumes/Media Browse For all cell frame captures only Stop capture if dropped frames are detected Stop playback if dropped frames are detected Use Anamorphic SD 16.9 Continue playback when in the background Set click to: 5 second pre-roll for curing When capturing use a 0 frame timeoutcode offset When mastering use a 0 frame timeoutcode offsettext_image
Log and Capture Name: Quick Capture 1,001 day/week 01.01 Description: Quick Capture 1 Flash: 001 Shader: Daytime 01 Taxes: 01 Angles: 01 Capture Copy Batch Logtext_image
Log and Capture Capture Add to Image In Out Dimensions 00:00:00:00 00:00:00:00 00:00:00:00 Capturing to Disk Recording Duration: 60.00x253 Disk Space Remapping: 455.9 GB Capture Crop Batch Logtext_image
Preferences Project Video Format: HD 104p 10.01 Capture File Format: QuickTime Uncompressed 30-bit YUV Use dropped frame decode Capture to DPK from a yUV source Use absolute frame numbering when capturing DPK When capturing DPK files, use 5 Digit numbers in the frame counttext_image
Name Duration In *Scratch* 3D Clip 1 00:03:20:15 00 3D Clip 1_right 00:03:20:15 00text_image
Media Express The video format of the selected clip does not match the project settings. Would you like to save this project and start a new one based on the video format of the selected clip? Save Don't Save Cancel
text_image
New Open... Open Recent Save Save As... Import Grab Still Frame Capture Now Batch Capture N O S S Media Files... Final Cut Pro XML... CMX EDL...text_image
Project Video Format: HD 100p to 3D Capture File Format: Quick Time Uncompressed, 10-bit YUV Use dropped frame thumbnails Capture to DFX from a YUV source. Use absolute frame numbering when capturing DFX When capturing DFX files, use 8 - 2 digit numbers in the frame counttext_image
Edit to Tape 00:00:00:00 00:00:22.03 Duration 00:00:22:04 2 Bits Selected Time Remapping: 00:00:00:00 Copy Computed Get 3 Preview Assembl Insert MasterSelect Target Drive... Save Screenshot...
| Stress |
| 1 GB |
| 2 GB |
| 3 GB |
| 4 GB |
| √ 5 GB |
| Disk Speed Test HelpAbout Disk Speed Test |
| Quit |
natural_image
Red office desk with a pen and paper labeled 'C++', no visible text or symbols on the main objects.Caution: Risk of Electric Shock
On the UltraStudio 4K enclosure you will see a yellow warning label marked 'Caution: Risk of Electric Shock'. This is intended to warn users that there may be the presence of uninsulated "dangerous" voltage within the UltraStudio 4K enclosure which may be of sufficient magnitude to constitute a risk of electric shock to the user. Blackmagic Design advises you not to open the UltraStudio 4K unit, but rather contact your nearest Blackmagic Design service center should assistance be required.
natural_image
Black-and-white photo of a freight train traveling on a riverbank at sunset, with no visible text or symbols.Deutsch
Mac OS X ^TM
Windows™
Linux™
Juni 2014

natural_image
Portrait of a man in a black polo shirt against a brick wall background (no text or symbols visible)CEO Blackmagic Design
Erste Schritte
natural_image
Diagram of a computer motherboard showing cable routing and connectors (no text or labels)natural_image
Diagram of a computer interface showing two connected USB cables with ports and connectors (no text or symbols visible)natural_image
Illustration of a hand inserting a USB into a device labeled 'Risikosoftwork' (no text or symbols on the device itself)natural_image
Illustration of a server rack with ports and connectors, no visible text or symbolstext_image
About Desktop Video Software What's new Desktop Video 8.2 Microsoft Excel requirements for Mac OS X Microsoft Excel and Microsoft Excel product Mac OS X (8.2) Excel Product and Excel Tools 10 services Mac OS X (8.2) Excel Product and Excel Tools 14 services Mac OS X (8.2) Excel Product and Excel Tools 16 services Mac OS X (8.2) Excel Product and Excel Tools 18 services Mac OS X (8.2) Excel Product and Excel Tools 20 services Mac OS X (8.2) Excel Product and Excel Tools 22 services Mac OS X (8.2) Excel Product and Excel Tools 24 services Mac OS X (8.2) Excel Product and Excel Tools 26 services Mac OS X (8.2) Excel Product and Excel Tools 28 services Mac OS X (8.2) Excel Product and Excel Tools 30 services Mac OS X (8.2) Excel Product and Excel Tools 32 services Mac OS X (8.2) Excel Product and Excel Tools 34 services Mac OS X (8.2) Excel Product and Excel Tools 36 services Mac OS X (8.2) Excel Product and Excel Tools 38 services Mac OS X (8.2) Excel Product and Excel Tools 40 services Mac OS X (8.2) Excel Product and Excel Tools 42 services Mac OS X (8.2) Excel Product and Excel Tools 44 services Mac OS X (8.2) Excel Product and Excel Tools 46 services Mac OS X (8.2) Excel Product and Excel Tools 48 services Mac OS X (8.2) Excel Product and Excel Tools 50 services Mac OS X (8.2) Excel Product and Excel Tools 52 services Mac OS X (8.2) Excel Product and Excel Tools 54 services Mac OS X (8.2) Excel Product and Excel Tools 56 services Mac OS X (8.2) Excel Product and Excel Tools 58 services Mac OS X (8.2) Excel Product and Excel Tools 60 services Mac OS X (8.2) Excel Product and Excel Tools 62 services Mac OS X (8.2) Excel Product and Excel Tools 64 services Mac OS X (8.2) Excel Product and Excel Tools 66 services Mac OS X (8.2) Excel Product and Excel Tools 68 services Mac OS X (8.2) Excel Product and Excel Tools 70 services Mac OS X (8.2) Excel Product and Excel Tools 72 services Mac OS X (8.2) Excel Product and Excel Tools 74 services Mac OS X (8.2) Excel Product and Excel Tools 76 services Mac OS X (8.2) Excel Product and Excel Tools 78 services Mac OS X (8.2) Excel Product and Excel Tools 80 services Mac OS X (8.2) Excel Product and Excel Tools 82 services Mac OS X (8.2) Excel Product and Excel Tools 84 services Mac OS X (8.2) Excel Product and Excel Tools 86 services Mac OS X (8.2) Excel Product and Excel Tools 88 services Mac OS X (8.2) Excel Product and Excel Tools 90 services Mac OS X (8.2) Excel Product and Excel Tools 92 services Mac OS X (8.2) Excel Product and Excel Tools 94 services Mac OS X (8.2) Excel Product and Excel Tools 96 services Mac OS X (8.2) Excel Product and Excel Tools 98 services Mac OS X (8.2) Excel Product and Excel Tools 100 servicestext_image
Blackmagic Design Desktop Video Setup Welcome to the Blackmagic Design Desktop Video Setup Wizard The Setup Wizard will install Blackmagic Design Desktop Video on your computer. Click Next to continue or Next to exit the setup wizard. Next Next Canceltext_image
Veelex Software Online File Edit View Help Get Software Installed Software History Get Software DesktopProblems Desktopvideo RustTM3 (Hong) mbassvices cinder & edition aspvindxt this file if you need the origin Install/dev/blackmagic/card0 [DeckLink HD Extreme 3] UPDATED
/dev/blackmagic/card1 [DeckLink HD Extreme 3] NEEDS_UPDATE
text_image
Log and Capture 00:00:00:00 Out Duration 00:00:00:00 Capturing to Disk Recording Duration 40:00:02:03 Disk (name Remaining) 2019.08.05 Capture Clip Batch Logtext_image
BlackRock Design Desktop Audio Settings for your Desktop 4K Extreme Settings Processing Video Levels Audio Levels Set output: SDI & HDMI & Component for video pre audio output connections Set Input: SDI Video & SDI Audio for video and audio camera Use video output in NTSC ● As 7.3 RF for use in the USA ● As 0.9 RF for use in Japan ● Use 8.4 RF SDI on video output when possible ● Use 3.4GB SDI max Dual Link SDI output ● Use 10.8pp not .1000bit ● External final jitter when video is placed ● Use ITC Syncode input Set default video standard as: HD 10800.50 When not playing videos, send: Black Display HDMI 3D as: Side by Side Set reference output timing: Referred input on dashed 0text_image
Backmagic Design Desktop Video Settings for your Becklink 4G Extreme Settings Processing Media Levels Audio Levels Set values: 100.0 MHz (at 250000000000000000000000000000000000000000000000000000000000000000000000000000000 Set input: 150 kHz & 95 dBm For video and audio/Video User video setup in NTSC: AT 1.5 MHz for use in the UIA A16.2 MHz for use in 32ppm Use 4.84 MHz on video output when possible Use 124.6 MHz on dual unit 32.6 ppm Use 188.8 MHz 188.8MHz Remove Solid Media when video is unused Use 1.5 MHz Inverse Input Set default video standard as: HRC When not playing videos, send: Black To all the video outputs. Display HRC to: size by size Set reference output timing: 0 Referential input not detected OK Cancel ApplyBlackmagic Design Control Panel unter Windows
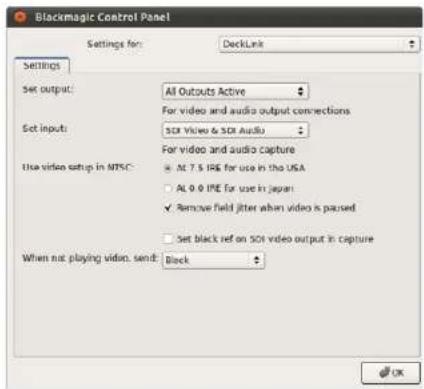
text_image
Blackmagic Control Panel Settings for: DeckLink Settings Set output: All Outputs Active For video and audio output connections Set input: SDK Video & SDK Audio For video and audio capture Use video setup in MTSC: ● Alt 7.5 IRE for use in the USA ○ Alt 0.0 IRE for use in Japan ✓ Remove field jitter when video is parsed □ Set black ref on SDK video output in capture When not playing video, send: Block OKBlackmagic Design Control Panel unter Ubuntu Linux
text_image
Set input: SDI Video & SDI Audio For video and audio capture Use video setup in NTSC: ● At 7.5 IRE for use in the USA ○ At 0.0 IRE for use in Japan □ Use 4:4:4 SDI on video output when possibleVideo-Setup in NTSC verwenden (Use video setup in NTSC)
text_image
Use video setup in NTSC: At 7.5 IRE for use in the USA At 0.0 IRE for use in Japan ✓ Use 4/4/4 SDI on video output when possible Use 3/6Gb SDI not Dual Link SDI output Use 1080p not 1080PsF Remove field jitter when video is pausedtext_image
At 0.0 IRE for use in Japan Use 4:4:4 SDI on video output when possible ✓ Use 3/6Cb SDI not Dual Link SDI output Use 1080p not 1080psf Remove field jitter when video is paused Use LTC Timecode Inputtext_image
Use 4:4:4 SDI on video output when possible Use 3/6Cb SDI not Dual Link SDI output ✓ Use 1080p not 1080PsF Remove field jitter when video is paused Use LTC Timecode Inputtext_image
Remove field jitter when video is paused Use LTC Timecode input Set default video standard as: HD 1080p 29.97 $ Final Cut Pro X and startup video output will use this setting When not playing video, send: Last Frame Played >text_image
Set default video standard as: NTSC Final Cut Pro X and startup video output will use this setting When not playing video, send Last Frame Played Black Display HDMI 3D as: Side by Sidetext_image
Display HDMI 3D as √ Frame Packing Side by Side Line by Line Top and Bottom Left Eye Right Eyetext_image
Settings PICKING Video Levels Audio Levels Select output processing / Off Select Input processing Set A-frame VITC reference Capture VANC input line Set Cooling Fan Speed Set Level Motor Display Simultaneous HD and SD Output HD to HD and SD Letterbox HD to HD and SD Anamorphic HD to HD and SD Center Cut Simultaneous 2K and SD Output 2K to 2K and SD Simultaneous SD and -10.726p Output SD and 216p HD 4.5 MHzBox SD and 726p HD 16:9 Zoom SD and 749p HD 14:9 Zoom Simultaneous SD and -10.168k Output SD and 368k HD 4.3 MHzBox SD and 368k HD 15:5 Zoom SD and 368k HD 1.95 Zoom Simultaneous HD and Cross Converted HD HD and Cross Converted HD Enable Conversion on Analog Outputtext_image
Settings Processing Video Levels Audio Levels Select output processing: Off Output HD 23.98p as HD 59.94 When playing back to video outputs Select input processing: Off When capturing from video inputstext_image
When capturing from video input Set A-frame VITC reference: Frame 00 In 22.0 fps capture from NTSC using 2.3 pulldown Capture VANC input line: 18 Capture to movie file line:text_image
Capture VANC input line: 18 Capture to movie file line 1 19 Capture to movie file line 2 20 Capture to movie file line 3 To video lines 1, 2 or 3 in the captured movie filetext_image
Settings Processing Video Levels Audio Levels Calibrate Analog Video in Video 0.00 48 Chroma 0.00 48 Adjust Cu and Cr independently 0.00 48 Use Betacam YUV Levels Calibrate Analog Video Our Video 0.00 48 Chroma 0.00 48 Adjust Cu and Cr independently 0.00 48 Use Betacam YUV Levels Reset Camtext_image
Ae After Effects CCAfter Effects® CC
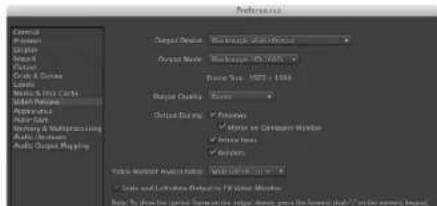
text_image
Preferences Output Options: Output Mode: Output Quality: Output Rating: Output Settings: Audio Output Mapping: Audio Output Mapping: Audio Output Mapping: Audio Output Mapping: Audio Output Mapping: Audio Output Mapping: Audio Output Mapping: Audio Output Mapping: Audio Output Mapping: Audio Output Mapping: Audio Output Mapping: Audio Output Mapping: Audio Output Mapping: Audio Output Mapping: Audio Output Mapping: Audio Output Mapping: Audio Output Mapping: Audio Output Mapping: Audio Output Mapping: Audio Output Mapping: Audio Output Mapping: Audio Output Mapping: Audio Output Mapping: Audio Output Mapping: Audio Output Mapping: Audio Output mapping: Audio Output mapping: Audio Output mapping: Audio Output mapping: Audio Output mapping: Audio Output mapping: Audio Output mapping: Audio Output mapping: Audio Output mapping: Audio Output mapping: Audio Output mapping: Audio Output mapping: Audio Output mapping: Audio Output mapping: Audio Output mapping: Audio Output mapping: Audio Output mapping: Audio Output mapping: Audio Output mapping: Audio Output mapping: Audio Output mapping: Audio Output mapping: Audio Output mapping: Audio Output mapping: Audio Output mapping: Audio Output maps: Audio Output maps: Audio Output maps: Audio Output maps: Audio Output maps: Audio Output maps: Audio Output maps: Audio Output maps: Audio Output maps: Audio Output maps: Audio Output maps: Audio Output maps: Audio Output maps: Audio Output maps: Audio Output maps: Audio Output maps: Audio Output maps: Audio Output maps: Audio Output maps: Audio Output maps: Audio Output maps: Audio Output maps: Audio Output maps: Audio Output maps: Audio Output maps: Audio Output map: 100% Audio: 100% Audio: 100% Audio: 100% Audio: 100% Audio: 100% Audio: 100% Audio: 100% Audio: 100% Audio: 100% Audio: 100% Audio: 100% Audio: 100% Audio: 100% Audio: 100% Audio: Audio: Audio: Audio: Audio: Audio: Audio: Audio: Audio: Audio: Audio: Audio: Audio: Audio: Audio: Audio: Audio: Audio: Audio: Audio: Audio: Audio: Audio: Audio: Audio: Audio: Audio: Audio: Audio: Audio: Audio: Audio: Audio: Audio: Video and Textation Outputs to the FV Window Member Video and Textation Outputs to the image format, press the forward dB* on the screen, logotext_image
Particle Effects Settings Size: 100% Angle: 120° Distance: 5 px Size: 5 px Color: Red Opacity: 75% Angle: 30° Density: 100% Frequency: 100% Size: 100% Angle: 120° Color: Red Opacity: 75% Angle: 30° Density: 100% Frequency: 100% Size: 100% Angle: 120° Color: Red Opacity: 75% Angle: 30° Density: 100% Frequency: 100% Size: 100% Angle: 120° Color: Red Opacity: -100% Angle: 30° Density: 100% Frequency: 100% Size: 100% Angle: 120° Color: Red Opacity: -100% Angle: 30° Density: 100% Frequency: 100% Size: 100% Angle: 120° Color: Red Opacity: -100% Angle: 35° Density: 100% Frequency: 100% Size: 100% Angle: 120° Color: Red Opacity: -100% Angle: 35° Density: 100% Frequency: 100% Size: 100% Angle: 120° Color: Red Opacity: -100% Angle: 35° Density: 95% Frequency: 95% Size: 100% Angle: 120° Color: Red Opacity: -100% Angle: 35° Density: 95% Frequency: 95% Size: 100%text_image
PS The Software Architect iPhotoShop® UC Copyright©.2000 © 2000 Copyright © © 2000 Copyright ©Photoshop ^® CC

text_image
Blackmagic Image Import Image Import Settings Video Input Format: YUV 4:2:2 HD 1080i 59.94 Image Bit Depth: Photoshop RGB 16 Bits/Channel Cancel Import ImageBild importieren

text_image
Blackmagic Image Export Image Export Settings Video Output Format: YUV+K 4 2:2 HD 1080i 59.94 Cancel Export ImageBild expertieren
Photoshop® CC
text_image
Sound Effects Noise 10.00 Audio Settings Multi-Noise Settings Aimana: 100% Pictal: 100% Gloss: 0% Current Image: Specialize 21.00 Power Value: "Product Audio" Sensitely: Raman Spectrum, Proportion, MWD Control, Multiscale 21.00 F5355.76, 100% (Image 100%, 100%) Unsupervised, 100% (Image 100%, 100%) Junctional Optics, Multiscale 21. Methode: 100% (Image 100%, 100%) 48888.99, 100% Video Noise Filter Noise Color: 100% Audio Settings One Master/Second Master: High Noise One Master/Second Master: Low Noisetext_image
Final Cut Pro X Version 10.0 Loading Compressor support © 2001-2011 Apple Inc., All rights reserved. Apple, the Apple logo, and Final Cut Pro are trademarks of Apple Inc., registered in the U.S. and other countries.Apple Final Cut Pro X

text_image
Use 1080p not 1080PsF Remove field jitter when video is paused Set default video standard as: HD 1080p 24 Final Cut Pro X and startup video output will use this setting When not playing video, send: Extended Desktop Choosing this option requires a restarttext_image
Name: First Project Default Event: New Event 8-22-11 Video Properties: Set automatically based on First video clip Custom 1080x1080 Format Resolution Rate Timecode Display Non-Drop Frame Drop Frame Audio and Render Properties: Use default settings (Surround, 48kHz, PreRca 422) Custom Audio Channels: stereo Audio Sample Rate: 48kHz Render Format: Uncompressed 10-bit Cancel OKApple Final Cut Pro X
text_image
Export "First Project" as a QuickTime movie Options Summary Export: Current Settings $$ Export a movie in the same format as the original project After export: Open with QuickTimer Player $$ Include: Video and Audio $$ Cancel Nexttext_image
Media Composer® Media Composer 7.30 ©2015 A.D. Marketing, Inc. All rights reserved. Use of this software in subject to a related license agreement. Ukraine Type: Software (Note Locked) Computer Name: InstrumentsAvid Media Composer

text_image
Use 1080p not 1080PsF Set black left on SDK video output in capture Extended Desktop Last Frame Played When not playing video, send ✓ Black Display HDMI 3D as: Side by Sidetext_image
New Project Project Name: New Project Format: 1080x/59.94 Color Space: YC&C: 709 Raster Dimension: 1920x1080 Stereoscopic: OUT Appoint Ratio: 16.3 Match-back The selected raster dimension supports the following raster types: - Standard - AMC Intra 100 - XDCAM HD 50 - XDCAM EX Search Data Folder Default Project Foldertext_image
Deck Preferences - Current When the deck contains no tape or drop frame cannot be detected set timecode to: Non-drop Frame ✓ Allow assemble edit & crash record for digital cut ✓ Stop key pauses deck Shuttle holds speed ✓ Stop any paused decks when quitting ✓ Poll deck during digital cut ✓ Relax coincidence point detectiontext_image
Device: DeckLink 4K Extreme Output Mode: Real-Time Bit Depth: 10-bit Entire Sequence Digital Cut Safe Mode Stop on Dropped Frames LTC out during preroll Add Black at Tail 00:00:00:00 Deck Comrot: Remote Local Sequence Time Insert Edit Custom Areal 01:00:00:00 Grey IV/8-500 Digital/Cut Tapetext_image
Adobe Dream Project Name: Backmagic Volume: Autodesk Media Storage Frames Pres: 300X7 Frames Used: 9 Setup Directory: Backmagic Setup Mode: New Scapes Loading template: 10000000000000000000000000000000000000000000000000000000000000000000000000000000000000000000 Description: 1988 x 2688 x 43 1988 Width: 1529 Height: 1589 Shift to 1679 Size: 1.2727m Split: Progressive: 16-bit FP Drawers Cache and Render Proxy Settings Preferred /Arrow: Profile: 432 (RGB) Format Restrictions Maximum Width: None Maximum Height: None Depth: 10-36, 22-66 Allowable Preserv: FAX, FAX, RAW Reset Cancel Deletetext_image
Smoke Setup Select the application to configure smoke_2013.2. General Preview Vtr Emulator Media Storage Ba Video Device BMD Audio Device BMD Reserved Application Memory Automatic Network Panel Display ShowMounted Default Web Browser open Menu Bar Yestext_image
01:00:59:04 Insert Start on Timecode Stop After Frames Frames 2250 In 00:59:30:00 Out 01:01:00:00 Duration 00:01:30:00 Offset 00:00:00:00 Preview Split Righttext_image
Select the application to configure 2013.2.2> General Preview Tools Simulator Media Storage Backhaul Licensing Name Protocol Name Standard Testing Configure Name Live MISC SISA/LI HTSC VOICE_RS5_CONVER/S user Local ISA/LI VAL VOICE_RS5_CONVER/S user:HDCAM264 ISA/LI 1920x100_5D VOICE_RS5_CONVER/S user:HDCAM2944 ISA/LI 1920x100_5D#F VOICE_RS5_CONVER/S user:HDCAM298 ISA/LI 1920x100_5D VOICE_RS5_CONVER/S user:HDCAM236A ISA/LI 1920x100_2188P VOICE_RS5_CONVER/S user:HDCAM247 ISA/LI 1920x100_245F VOICE_RS5_CONVER/S user:HDCAM257 ISA/LI 1920x100_5D VOICE_RS5_CONVER/S user:HDCAM263 ISA/LI/UCL 1920x100_5D NO CONVERSION New Duplicate Cancel Vit Archive Resource Device: New Manual Start Timecode: 01:00:00:00 OK Applytext_image
Blackmagiclosure DaVinci Resolve 10 Version 18:26.678DeVinci Resolve 10

text_image
Capture and Playout Video capture and playback: HD 1080p 23.976 Use left and right eye SDI Video connection operates as: YUV 4-2-2 SDI RGB 4-4-4 Dual Link RGB 4-4-4 Single Link 3/6Gb Colorspace: Video Levels Data Levels Video bit depth: 10 bit ✓ Use deck autoedittext_image
Preferences Project Video Format: HD 1080p 25.95 Capture File Format: DPX 10-8bit RGB Use dropped frame timeoutcode Capture to DPX from a VYY source Use absolute frame numbering when capturing DPX When capturing DPX files, use 8 1 digit numbers in the frame count Capture audio and video to: /Volumes/Media Browse For all video and audio media file captures Capture still frames to: /Volumes/Media Browse For all cell frame captures only Stop capture if dropped frames are detected Stop playback if dropped frames are detected Use Anamorphic SD 16.9 Continue playback when in the background Set click to: 5 second pre-roll for curing When capturing use a 0 frame timeoutcode offset When mastering use a 0 frame timeoutcode offsettext_image
Log and Capture Name: Quick Capture 1,001 day/week 01.01 Description: Quick Capture 1 Flash: 001 Shader: Daytime 01 Taxes: 01 Angles: 01 Capture Copy Batch Logtext_image
Log and Capture Capture Add to Image 00:00:00:00 00:00:00:00 Dimensions 00:00:00:00 Capturing to Disk Recording Duration: 60.00x253 Disk Space Remapping: 455.9 GB Capture Crop Batch Logtext_image
Preferences Project Video Format: HD 104p 10.01 Capture File Format: QuickTime Uncompressed 30-bit YUV Use dropped frame decode Capture to DPK from a yUV source Use absolute frame numbering when capturing DPK When capturing DPK files, use 5 Digit numbers in the frame counttext_image
Name Duration In *Scratch* 3D Clip 1 00:03:20:15 00 3D Clip 1_right 00:03:20:15 00text_image
Media Express The video format of the selected clip does not match the project settings. Would you like to save this project and start a new one based on the video format of the selected clip? Save Don't Save Cancel
text_image
New Open... Open Recent Save Save As... Import Grab Still Frame Capture Now Batch Capture N O S S Media Files... Final Cut Pro XML... CMX EDL...text_image
Log and Capture Name: Quick capture 1,001.jpg/81.01 Description: Quick capture 1 Peaks: 001 Stream: https://81/ Tube: 81 Angle: 01 Cut Clip Batch Logtext_image
Project Video Format: HD 100p 50.0 Capture File Format: Quick Time Uncompressed, 10-bit YUV Use dropped frame thumbnails Capture to DFX from a YUV source. Use absolute frame numbering when capturing DFX When capturing DFX files, use 8 2 digit numbers in the frame counttext_image
Edit to Tape 00:00:00:00 00:00:22.03 Duration 00:00:22:04 2 Bits Selected Time Remapping: 00:00:00:00 Copy Computed Get 3 Preview Assembl Insert MasterSelect Target Drive... Save Screenshot... #S
| Stress |
| 1 GB |
| 2 GB |
| 3 GB |
| 4 GB |
| √ 5 GB |
| Disk Speed Test HelpAbout Disk Speed Test |
| Quit |
gauge
| Test | Format | Write | Read | Write | Read | Write | Read | |---|---|---|---|---|---|---|---| | 10 Bit YUV 4:2:2 | PAL | 482 | 459 | ✓ | ✓ | ✓ | ✓ | | 10 Bit YUV 4:2:2 | NTSC | 571 | 544 | ✓ | ✓ | ✓ | ✓ | | 10 Bit YUV 4:2:2 | HD 720 | 217 | 206 | ✓ | ✓ | ✓ | ✓ | | 10 Bit YUV 4:2:2 | HD 1080 | 96 | 91 | ✓ | ✓ | ✓ | ✓ | | 10 Bit YUV 4:2:2 | 2K | 62 | 59 | ✓ | ✓ | ✓ | ✓ | | 10 Bit RGB 4:4:4 | PAL | 321 | 306 | ✓ | ✓ | ✓ | ✓ | | 10 Bit RGB 4:4:4 | NTSC | 381 | 362 | ✓ | ✓ | ✓ | ✓ | | 10 Bit RGB 4:4:4 | HD 720 | 144 | 137 | ✓ | ✓ | ✓ | ✓ | | 10 Bit RGB 4:4:4 | HD 1080 | 64 | 61 | ✓ | ✓ | ✓ | ✓ | | 10 Bit RGB 4:4:4 | 2K | 41 | 39 | ✓ | ✓ | ✓ | ✓ | | 10 Bit RGB 4:4:4 | 12 Bit RGB 4:4:4 | Write | Read | ✓ | ✓ | ✓ | ✓ | | Write Read | PAL | 214 | 204 | ✓ | ✓ | ✓ | ✓ | | Write Read | NTSC | 254 | 241 | ✓ | ✓ | ✓ | ✓ | | Write Read | HD 720 | 96 | 91 | ✓ | ✓ | ✓ | ✓ | | Write Read | HD 1080 | 42 | 40 | ✓ | ✓ | ✓ | ✓ | | Write Read | 2K | 27 | 26 | ✓ | ✓ | ✓ | ✓ | The chart displays a multi-line visualization of a disk speed test (Disk Speed Test) with three main gauges (WRITE, READ, SPEED TEST) and a legend defining the start point for the Start. The text below each gauge indicates the beginning of the start point. The chart also includes a section on the Start point that is determined by the 'Einstellungen' in which it is called 'Ein Maliges Klicken auf diese Schaltfläche startet den Festplatten-Geschwindigkeitstest. Ein weiterer Klick beendet den Test'. The caption below states 'Wird es funktionieren?' and 'Wie schnell?' in which it is called 'Will it work' to indicate whether it's working?'natural_image
Red office desk with a pen and paper labeled 'C++', no readable text or symbols on the objects themselves.Caution: Risk of Electric Shock
On the UltraStudio 4K enclosure you will see a yellow warning label marked 'Caution: Risk of Electric Shock'. This is intended to warn users that there may be the presence of uninsulated "dangerous" voltage within the UltraStudio 4K enclosure which may be of sufficient magnitude to constitute a risk of electric shock to the user. Blackmagic Design advises you not to open the UltraStudio 4K unit, but rather contact your nearest Blackmagic Design service center should assistance be required.
natural_image
Scenic sunset view of a freight train on a rocky shore with water and hills in the background (no visible text or symbols)Español
Mac OS X ^TM
Windows™
Linux™
junio de 2014

natural_image
Portrait of a man in a black polo shirt against a brick wall background (no text or symbols visible)¡Bienvenido!
natural_image
Diagram of a computer motherboard showing cable connections and ports (no text or labels)natural_image
Illustration of a computer interface showing cable connections between ports (no text or symbols visible)natural_image
Illustration of a hand inserting a USB into a device labeled 'Risikosoftwork' (no text or symbols on the device itself)natural_image
Illustration of a rack-mounted electronic device with ports and connectors (no text or symbols visible)text_image
Blackmagic Design Desktop Video Setup Welcome to the Blackmagic Design Desktop Video Setup Wizard The Setup Wizard will install Blackmagic Design Desktop Video on your computer. Click Next to continue or Cancel to exit the Setup Wizard. Back Next CancelDesktop Video Installer para Windows
text_image
VMware Software Control File Edit View Help Get Tools... Help Desktopvideo Internet: https://localhost/1832v2000/ My device will file your own website. Add Remove/dev/blackmagic/card0 [DeckLink HD Extreme 3] UPDATED
/dev/blackmagic/card1 [DeckLink HD Extreme 3] NEEDS_UPDATE
text_image
Log and Capture 00:00:00:00 Out Duration 00:00:00:00 Capturing to Disk Recording Duration 40:00:02:03 Disk (name Remaining) 2019.08.05 Capture Clip Batch Logtext_image
BlackMatic Design Desktop Video Settings for your Decklink 4K Extreme Settings Processing Video Levels Audio Levels Set output: SDI & HDMI & Component for video pre audio output connectors Set Input: SDI Video & SDI Audio for audio and audio capture Use video output in NTSC: □ A: 7.5 RFE for use in the USA □ A: 0.9 RFE for use in Japan □ Use 8-RD SDI on video output when possible ✓ Use 3-RDS SDI max Dual Link SDI output ✓ Use 10.0pp net :1000Pul ✓ Remove first jitter when video is passed □ Use 100000000000000000000000000000000000000000000000000000000000000000000000000000000000000 Set default video standard as: HD 18861.50 First Cut Pre Load Initial video output will be hit setting When not playing videos, send: Black Display HDMI 3D as: Side by Side Set reference output timing: Referred input non-derivedtext_image
Backmagic Design Desktop Video Settings for your Becklink 4G Extreme Settings Processing Media Levels Audio Levels Set values: 100.0 MHz (at 250000000000000000000000000000000000000000000000000000000000000000000000000000000 Set input: 150 kHz & 95 dBm For video and audio/Video User video setup in NTSC: AT 1.5 MHz for use in the UIA A16.2 MHz for use in 32ppm Use 4.84 MHz on video output when possible Use 124.6 MHz on dual unit (32.1 ppm) Use 188.8 MHz (32.1 ppm) Remove Solid Media when video is unused Use 1.5 MHz Intrinsic input Set default video standard as: HRC When not playing videos, send: Black To all the video outputs. Display HRC to: size by size Set reference output timing: 0 Referential input not detected OK Cancel ApplyBlackmagic Design Control Panel on Windows
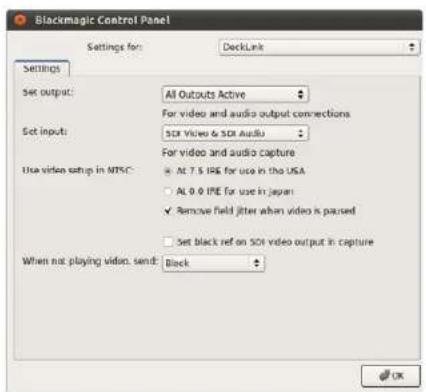
text_image
Blackmagic Control Panel Settings for: DeckLink Settings Set output: All Outputs Active For video and audio output connections Set input: SSI Video & SSI Audio For video and audio capture Use video setup in MTSC: • Alt 7.5 IRE for use in the USA • Alt 0.0 IRE for use in Japan ✓ Remove field jitter when video is passed □ Set black ref on SSI video output in capture When not playing video, send: Block OKBlackmagic Design Control Panel en Ubuntu Linux
text_image
Set input: SSI Video & SDI Audio For video and audio capture Use video setup in NTSC: ● At 7.5 IRE for use in the USA ○ At 0.0 IRE for use in Japan ○ Use 4:4:4 SDI on video output when possibletext_image
Use video setup in NTSC: At 7.5 IRE for use in the USA At 0.0 IRE for use in Japan ✓ Use 4:4:4 SDI on video output when possible Use 376Cb SDI not Dual Link SDI output Use 1080p not 1080PsF Remove field jitter when video is pausedtext_image
At 0.0 IRE for use in Japan Use 4:4:4 SDI on video output when possible ✓ Use 3/6Cb SDI not Dual Link SDI output Use 1080cp not 1080PsF Remove field jitter when video is paused Use LTC Timecode Inputtext_image
Use 4:4:4 SDI on video output when possible Use 3/6Gb SDI not Dual Link SDI output ✓ Use 108Op not 1080Ps Remove held jitter when video is paused Use LTC Timecode inputtext_image
Remove field jitter when video is paused Use LTC Timecode input Set default video standard as: HD 1080p 29.97 $ Final Cut Pro X and startup video output will use this setting When not playing video, send: Last Frame Played >text_image
Set default video standard as: NTSC Final Cut Pro X and startup video output will use this setting When not playing video, send Last Frame Played Black Display HDMI 3D as: Side by Sidetext_image
Display HDMI 3D as √ Frame Packing Side by Side Line by Line Top and Bottom Left Eye Right Eyetext_image
Settings PICKING Video Levels Audio Levels Select output processing / Off Simultaneous HD and SD Output HD 16 HD and SD Letterbox HD to HD and SD Anamorphic HD to HD and SD Center Cut Simultaneous 2K and SD Output 2K to 2K and SD Simultaneous SC and - ID 720p Output SD and 220p HD 8.9 W/Box SD and 720p HD 16:9 Zoom SD and 740p HD 14:9 Zoom Simultaneous SC and - ID 1600k Output SD and 3600k HD 4.3 W/Box SD and 3600k HD 16:5 Zoom SD and 3600k HD 14:5 Zoom Simultaneous HD and Cross Converted HD HD and Cross Converted HD Enable Conversion on Analog OutputSelect the output processing from the menu.
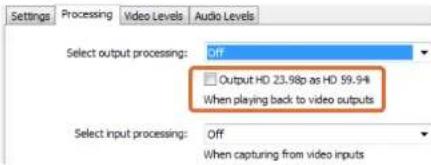
text_image
Settings Processing Video Levels Audio Levels Select output processing: Off Output HD 23.98p as HD 59.94 When playing back to video outputs Select input processing: Off When capturing from video inputsTick the checkbox to output HD 23.98PaF at HD 59,94i
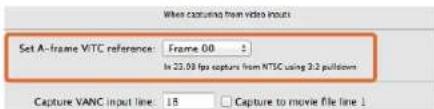
text_image
When capturing from video input Set A-frame VITC reference: Frame 00 In 23.08 fps capture from NTSC using 3.2 pulldown Capture VANC input line: 15 Capture to movie file line 1Set the A-Frame VITC Reference when performing 3:2 pulldown.

text_image
Capture VANC input line: 18 Capture to movie file line 1 19 Capture to movie file line 2 20 Capture to movie file line 3 To video lines 1, 2 or 3 in the captured movie fileTick the checkboxes to capture lines of VANC data.
text_image
Settings Processing Video Levels Audio Levels Calibrate Analog Video in Video 0.00 Chroma 0.00 Adjust Cu and Cr independently 0.00 0.00 Calibrate Analog Video Out Video 0.00 Chroma 0.00 Adjust Cu and Cr independently 0.00 0.00 Use Betacam YUV Levels Reset Gaintext_image
Ae After Effects CCAfter Effects ^® CC

text_image
Preferences Output Options: Output Mode: Output Quality: Output Rating: Output Method: Output Output: 100% Output Output: 100% Output Output: 100% Output Output: 100% Output Output: 100% Output Output: 100% Output Output: 100% Output Output: 100% Output Output: 100% Output Output: 100% Output Output: 100% Output Output: 100% Output Output: 100% Output Output: Output Output: Output Output: Output Output: Output Output: Output Output: Output Output: Output Output: Output Output: Output Output: Output Output: Output Output: Output Output: Output Output: Output Output: Output Output: Output Output: Output Output: Output Output: Output Output: Output Output: Output Output: Output Output: Output Output: Output Output: Output Output:• Uncompressed YUV 10 bit 4:2:2 (Apple)
• DV - NTSC (comprimido, Apple)
• Apple Uncompressed YUV 8 bit 4:2:2
• DV - PAL (comprimido, Apple)
text_image
Ps Photoshop® UC © 2000 Adobe Photoshop CS: 2000-03-2017Photoshop ^x CC

text_image
Blackmagic Image Import Image Import Settings Video Input Format: YUV 4:2:2 HD 1080i 59.94 Image Bit Depth: Photoshop RGB 16 Bits/Channel Cancel Import ImageImportar una imagen

text_image
Blackmagic Image Export Image Export Settings Video Output Format: YUV+K 4 2:2 HD 1080i 59.94 Cancel Export ImageExportar una imagen
Photoshop® CC
text_image
Export to Web File Edit View Help Export to Web Export to Web Export to Web Export to Web Export to Web Export to Web Export to Web Export to Web Export to Web Export to Web Export to Web Export to Web Export to Web Export to Web Export to Web Export to Web Export to Web Export to Web Export to Web Export to Web Export to Web Export to Web Export to Web Export to Web Export to Web Export toWeb Export to Web Export to Web Export to Web Export to Web Export to Web Export to Web Export to Web Export to Web Export to Web Export to Web Export to Web Export to Web Export to Web Export to Web Export to Web Export to Web Export to Web Export to Web Export to Web Export to Web Export to Web Export to Web Export to Web Export to Web Export to Export to Web Export to Web Export to Web Export to Web Export to Web Export to Web Export to Web Export to Web Export to Web Export to Web Export to Web Export to Web Export to Web Export to Web Export to Web Export to Web Export to Web Export to Web Export to Web Export to Web Export to Web Export to Web Export to Web Export to Web Export to WebNueva secuencia
Adobe® Premiere Pro® CC
text_image
Final Cut Pro X Version 10.0 Loading Compressor support © 2001-2011 Apple Inc., All rights reserved, Apple, the Apple logo, and Final Cut Pro are trademarks of Apple Inc., registered in the U.S. and other countries.Apple Final Cut Pro X

text_image
Use 1080p not 1080PsF Remove field jitter when video is paused Set default video standard as: HD 1080p 24 Final Cat Pro X and startup video output will use this setting When not playing video, send: Extended Desktop Choosing this option requires a restarttext_image
Name: First Project Default Event: New Event 8-22-11 Video Properties: Set automatically based on First video clip Customs 1080x1080 Format Resolution Rate Timecode Display: Non-Drop Frame Drop Frame Audio and Render Properties: Use default settings (Surround, 48kHz, PreRico 422) Customs Audio Channels: Stereo Audio Sample Rate: 48kHz Render Format: Uncompressed 10-bit Cancel OKApple Final Cut Pro X
text_image
Export "First Project" as a QuickTime movie Options Summary Export: Current Settings $$ Export a movie in the same format as the original project After export: Open with QuickTimer Player $$ Include: Video and Audio $$ Cancel Nexttext_image
Media Composer® Media Composer 7.30 ©2015 A&C Marketing, Inc. All rights reserved. Use of this software in subject to a related license agreement. Ukraine Type: Software (Note Locked) Computer Name: InstrumentsAvid Media Composer

text_image
Use 1080p not 1080PsF Set black left on SIM video output in capture Extended Desktop Last Frame Played When not playing video, send ✓ Black Display HDMI 3D as: Side by Sidetext_image
New Project Project Name: New Project Format: 1080x/59.94 Color Space: YC&C: 709 Raster Dimension: 1920x1080 Stereoscopic: OUT Aspect Ratio: 16.3 Match-back The selected raster dimension supports the following raster types: - Standard - AMC Intra 100 - XDCAM HD 50 - XDCAM EX Search Data Folder Default Project Foldertext_image
Deck Preferences - Current When the deck contains no tape or drop frame cannot be detected set timecode to: Non-drop Frame ✓ Allow assemble edit & crash record for digital cut ✓ Stop key pauses deck Shuttle holds speed ✓ Stop any paused decks when quitting ✓ Poll deck during digital cut ✓ Relax coincidence point detectionPaso 6. Marque la opción "Relax coincidence point detection".

text_image
Capture Tool V A1 A2 A3 A4 A5 A6 A7 A8 A9 420 411 412 413 414 415 416 TC Video: Blackmagic Audio: Blackmagic Capture. Bin: NTSC Bin S3D Bin: NTSC Bin Res: 1:1. MXF RAID Disk (20:25:65:00) 01:00:01:22 Sony DVW-500 DigitalCut Tape Custom Preroll 1 secondtext_image
Device: DeckLink 4K Extreme Output Mode: Real-Time Bit Depth: 10-bit Entire Sequence Digital Cut Safe Mode Stop on Dropped Frames LTC out during preroll Add Black at Tail 00:00:00:00 Deck Conrot: Remote Local Sequence Time Insert Edit Custom Rearoll 1 second 01:00:00:00 Copy /WV6-500 Digital/Cut Tapetext_image
Adobe Dream Project Name: Backmagic Volume: Autodesk Media Storage Frames Free: 300K7 Frames Used: 9 Setup Directory: Backmagic Setup Mode: New Scapes Loading template: 10000000000000000000000000000000000000000000000000000000000000000000000000000000000000 Description: 1985 x 2688 / 43 / 1888 Width: 1328 Height: 1888 Shift to 1679 Size: 1.2727m Split: Progressive: 16-bit FP Drawers Cache and Render Proxy Settings Preferred / Arrow Profile: 432 (RGB) Format Restrictions Maximum Width: None Maximum Height: None Depth: 10-36, 22-66 Allowable Preset: FAX, FAX, RAW Reset Cancel Deletetext_image
Smoke Setup Select the application to configure smoke_2013.2. General Preview Vtr Emulator Media Storage Ba Video Device BMD Audio Device BMD Reserved Application Memory Automatic Network Panel Display ShowMounted Default Web Browser open Menu Bar Yestext_image
01:00:59:04 Insert Start on Timecode Stop After Frames Frames 2250 In 00:59:30:00 Out 01:01:00:00 Duration 00:01:30:00 Offset 00:00:00:00text_image
Blackmagiclosure DaVinci Resolve 10 Version 18326.679DaVinci Resolve 10

text_image
Capture and Playout Video capture and playback: HD 1080p 23.976 Use left and right eye SDI Video connection operates as: YUV 4-2-2 SDI RGB 4-4-4 Dual Link RGB 4-4-4 Single Link 3/8Gb Colompace: Video Levels Data Levels Video bit depth: 10 bit ✓ Use deck autoedittext_image
Preferences Project Video Format: HD 1080p 25.95 Capture File Format: DPX 10-8bit RGB Use dropped frame timeoutcode Capture to DPX from a VYY source Use absolute frame numbering when capturing DPX When capturing DPX files, use 8 1 digit numbers in the frame count Capture audio and video to: /Volumes/Media Browse For all video and audio media file captures Capture still frames to: /Volumes/Media Browse For all cell frame captures only Stop capture if dropped frames are detected Stop playback if dropped frames are detected Use Anamorphic SD 16.9 Continue playback when in the background Set click to: 5 second pre-roll for curing When capturing use a 0 frame timeoutcode offset When mastering use a 0 frame timeoutcode offsettext_image
Log and Capture Name: Quick Capture 1,001 day/week 01.01 Description: Quick Capture 1 Flash: 001 Shader: Daytime 01 Takes: 01 Angles: 01 Capture Copy Batch Logtext_image
Log and Capture Capture Add to Image 00:00:00:00 00:00:00:00 Dimensions 00:00:00:00 Capturing to Disk Recording Duration: 60.00x253 Disk Space Remapping: 455.9 GB Capture Crop Batch Logtext_image
Project Video Format: HD 100p 2.5 W Capture File Format: DPX 10-Ri RGB Use dropped frame tobacco Capture to DPX from a tUV source Use absolute frame numbering when capturing DPX When capturing DPX files, use: 8 4 digit numbers in the frame counttext_image
Name Duration In *Scratch* 3D Clip 1 00:03:20:15 00 3D Clip 1_right 00:03:20:15 00text_image
Media Express The video format of the selected clip does not match the project settings. Would you like to save this project and start a new one based on the video format of the selected clip? Save Don't Save Cancel
text_image
New Open... Open Recent Save Save As... Import Grab Still Frame Capture Now Batch Capture N O S S Media Files... Final Cut Pro XML... CMX EDL...text_image
Project Video Format: HD 100p 50.0 Capture File Format: Quick Time Uncompressed, 10-bit YUV Use dropped frame thumbnails Capture to DFX from a YUV source. Use absolute frame numbering when capturing DFX When capturing DFX files, use 8 2 digit numbers in the frame counttext_image
Edit to Tape 00:00:00:00 00:00:22.03 Duration 00:00:22:04 2 Bits Selected Time Remapping: 00:00:00:00 Copy Computed Get 3 Preview Assembl Insert Mastergauge
| Metric | Value | |--------|-------| | Current | 432.5 | | Peak Speed | 432.5 (M/s) |Select Target Drive... Save Screenshot...
| Stress |
| 1 GB |
| 2 GB |
| 3 GB |
| 4 GB |
| √ 5 GB |
| Disk Speed Test HelpAbout Disk Speed Test |
| Quit |
natural_image
Red office desk with 'SDK' logo and a pen writing on paper (no text or symbols on main objects)Caution: Risk of Electric Shock
On the UltraStudio 4K enclosure you will see a yellow warning label marked 'Caution: Risk of Electric Shock'. This is intended to warn users that there may be the presence of uninsulated "dangerous" voltage within the UltraStudio 4K enclosure which may be of sufficient magnitude to constitute a risk of electric shock to the user. Blackmagic Design advises you not to open the UltraStudio 4K unit, but rather contact your nearest Blackmagic Design service center should assistance be required.
natural_image
View of a freight train at sunset with a railway crossing over rocky shore (no visible text or symbols)中文
Mac OS X ^TM
Windows™
Linux™
2014年6月

natural_image
Portrait of a man in a black polo shirt against a brick wall background (no text or symbols visible)欢迎使用Desktop Video!
CEO Blackmagic Design
250 入门
Desktop Video简介 250
系统要求 250
natural_image
Technical diagram of a server rack with connected cables and ports (no text or symbols visible)natural_image
Diagram of a computer interface showing two connected USB cables with ports and connectors (no text or symbols visible)natural_image
Illustration of a hand inserting a USB into a device labeled 'Boschus Software' (no text or symbols on the device itself)natural_image
Illustration of a rack-mounted electronic device with ports and connectors (no text or symbols visible)text_image
X2 Blackmagic Design Desktop Video Setup Blackmagic design Welcome to the Blackmagic Design Desktop Video Setup Wizard The Setup Wizard will install Blackmagic Design Desktop video on your computer. Click Next to continue or Cancel to exit the Setup Wizard. Back Next CancelWindows版Desktop Video Installer安装程序
在Mac OS X系统下安装
您需要具备管理员权限方可安装软件。
text_image
VMware Software Control File Edit View Help Get Tools... Help Desktopvideo Internet: https://localhost/1832v2000/ My device will file your own website. Add Remove/dev/blackmagic/card0 [DeckLink HD Extreme 3] UPDATED
/dev/blackmagic/card1 [DeckLink HD Extreme 3] NEEDS_UPDATE
text_image
Log and Capture 00:00:00:00 Out Duration 00:00:00:00 Capturing to Disk Recording Duration 40:00:02:03 Disk (name Remaining) 2019.08.05 Capture Clip Batch Logtext_image
BlackLogic Design Desktop Video Settings for your Desktop 4K Extreme Settings Processing Video Levels Audio Levels Set output: SDI & HDMI & Component for video pre audio output connectors Set Input: SDI Video & SDI Audio for video and audio capture Use video output in NTSC: □ As 7.3 IRE for use in the USA □ As 0.9 IRE for use in Japan □ Use 8.4 IRE for video output when possible □ Use 5.4 IRE for User Link SDI output □ Use 10.6 IRE for User Link SDI □ External final jitter when video is placed □ Use 10.6 IRE for video output Set default video standard as: HD 10800 50 First Cut by User Start status when output will be tested When not playing videos, send: Black Display HDMI 80 as: Side by Side Set reference output timing: Referred input not detected
text_image
Blackmagic Design Desktop Video Settings for your Becklink 4G Extreme Settings Processing Media Levels Audio Levels Set value: 100.0000000000000000000000000000000000000000000000000000000000000000000000000000000000000000000000000 Set input: 55% value & 95% value For video and audio output connections Use video setup in NTSC: 64.7.3.25K for use in the Web A16.2.2.25K for use in 3Dps Use 4.8-6.25K on video output when possible Use 1.2/3.6/3.6/3.6/3.6/3.6/3.6/3.6/3.6/3.6/3.6/3.6/3.6/3.6/3.6/3.6/3.6/3.6/3.6/3.6/3.6/3.6/3.6/3.6/3.6/3.6/3.8/4.8/4.8/4.8/4.8/4.8/4.8/4.8/4.8/4.8/4.8/4.8/4.8/4.8/4.8/4.8/4.8/4.8/4.8/4.8/4.8/4.8/4.8/4.8/4.8/4.8/5 Remove solid line with video to users Use ETC, Temporary Input Set default video standard as: http://www.boc.cn/ When not playing video, send: Black To all the video outputs. Display FUMS 52 ns: Side by Side Out reference output timing: 1 Reference input not detected OK Cancel Apply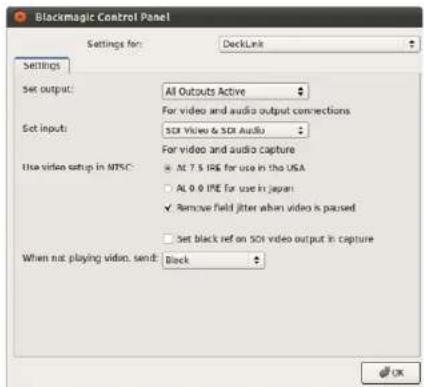
text_image
Blackmagic Control Panel Settings for: DeckLink Settings Set output: All Outputs Active For video and audio output connections Set input: SUI Video & SUI Audio For video and audio capture Use video setup in MTSC: • Alt 7.5 IRE for use in the USA • Alt 0.0 IRE for use in Japan ✓ Remove field jitter when video is paused □ Set black ref on SUI video output in capture When not playing video, send: BlackMac OS X下的Blackmagic Design系统偏好 Windows下的Blackmagic Design Control Panel Ubuntu Linux下的Blackmagic Design Control Panel
使用Blackmagic系统偏好
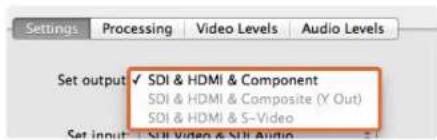
text_image
Settings Processing Video Levels Audio Levels Set output ✓ SDI & HDMI & Component SDI & HDMI & Composite (Y Out) SDI & HDMI & S-Video Set input ✓ SSI Video & SII Audio视频和音频输出接口。

text_image
Set output: SDI & HDMI & Component For video and audio output connections Set input ✓ SDI Video & SDI Audio SDI Video & AES/EBU Audio SDI Video & Analog XLR Audio HDMI Video & HDMI Audio HDMI Video & AES/EBU Audio HDMI Video & Analog XLR Audio Component Video & AES/EBU Audio Component Video & Analog XLR Audio Composite Video (Y In) & AES/EBU Audio Composite Video (Y In) & Analog XLR Audio S-Video & AES/EBU Audio S-Video & Analog XLR Audio standard as: HD 10804.50视频和音频输入接口。
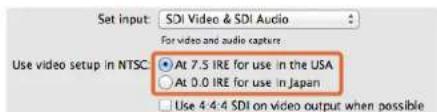
text_image
Set input: SDI Video & SDI Audio For video and audio capture: Use video setup in NTSC ● At 7.5 IRE for use in the USA ○ At 0.0 IRE for use in Japan □ Use 4:4:4 SDI on video output when possibletext_image
Use video setup in NTSC: At 7.5 IRE for use in the USA At 0.0 IRE for use in Japan ✓ Use 4/4 SDI on video output when possible Use 3/6Gb SDO not Dual Link SDI output Use 1080p not 1080PsF Remove field jitter when video is paused勾选图中复选框输出4:4:4视频。
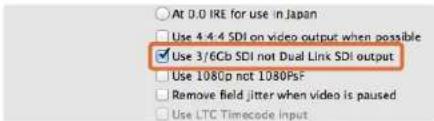
text_image
At 0.0 IRE for use in Japan Use 4:4:4 SDI on video output when possible ✓ Use 3/6Cb SDI not Dual Link SDI output Use 1080p not 1080PsF Remove field jitter when video is paused Use LTC Timecode Inputtext_image
Use 4:4:4 SDI on video output when possible Use 3/6Cb SDI not Dual Link SDI output ✓ Use 1080p not 1080psf Remove held jitter when video is paused Use LTC Timecode inputtext_image
Remove field jitter when video is paused Use LTC Timecode Input Set default video standard as: HD 1080p 29.97 final Cut Pro X and startup video output will use this setting When not playing video, send: Last Frame Playedtext_image
Set default video standard as: NTSC Final Cut Pro II and startup video output will use this setting. When not playing video, send ▼ Last Frame Played Black Display HDMI 3D as: Side by Sidetext_image
Display HDMI 3D and ✓ Frame Packing Side by Side Line by Line Top and Bottom Left Eye Right Eye为HDMI监看选择3D格式。

调整同步时间校准滑块直至画面稳定。
Set default video standard as (设置默认视频格式)
When not playing video, send (选择不播放视频时发送的信号)
Display HDMI 3D as (HDMI 3D显示格式)
text_image
Settings PICKING Video Levels Audio Levels Select output processing / Off Select Input processing Set A-frame VITC reference Capture VANC input line Net Cooling Fan Speed Set Level Motor Display Simultaneous HD and SD Output HD to HD and SD Letterbox HD to HD and SD Anamorphic HD to HD and SD Center Cut Simultaneous 2K and SD Output 2K to 2K and SD Simultaneous 5D and -1D 720p Output SD and 220p HD 8.9 Wallbox SD and 720p HD 16:9 Zoom SD and 740p HD 14:9 Zoom Simultaneous 5D and -1D 1600k Output SD and 3600k HD 4.3 Wallbox SD and 3600k HD 16:5 Zoom SD and 3600k HD 14:5 Zoom Simultaneous HD and Cross Converted HD HD and Cross Converted HD Enable Conversion on Analog Output请从下拉菜单选择输出处理。

text_image
Settings Processing Video Levels Audio Levels Select output processing: Off Output HD 23.98p as HD 59.94 When playing back to video outputs Select input processing: Off When capturing from video inputs勾选图中复选框使HD 23.98PsF输出为HD 59.94i。
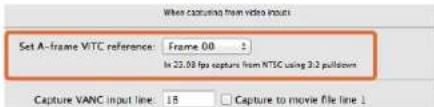
text_image
When capturing from video inputs Set A-frame VITC reference: Frame 00 In 23.08 fps capture from NTSC using 3.2 pulldown Capture VANC input line: 15 Capture to movie file line 1text_image
Capture VANC input line: 18 Capture to movie file line 1 19 Capture to movie file line 2 20 Capture to movie file line 3 To video lines 1, 2 or 3 in the captured movie file勾选图中复选框采集VANC数据行。
Processing处理选项卡
Select output processing (输出处理设置)
Output HD 23.98PsF at HD 59.94i (Windows only) (将 HD 23.98PsF 输出为 HD 59.94i,仅限 Windows)
text_image
Settings Processing Video Levels Audio Levels Calibrate Analog Video in Video 0.00 48 Chrome 0.00 48 Adjust Co and Cr Independently 0.00 48 Calibrate Analog Video Out Video 0.00 48 Chrome 0.00 48 Adjust Co and Cr Independently 0.00 48 Use Betacam YUV Levels: Reset Can使用滑块调整模拟视频的视频和色度电平。
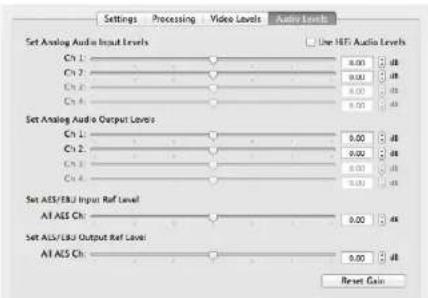
text_image
Settings Processing Video Levels Audio Levels Set Analog Audio Input Levels Ch 1: 0.00 µF Ch 2: 0.00 µF Ch 3: 0.00 µF Ch 4: 0.00 µF Set Analog Audio Output Levels Ch 1: 0.00 µF Ch 2: 0.00 µF Ch 3: 0.00 µF Ch 4: 0.00 µF Set AES/EBJ Input Ref Level Alt AES Ch: 0.00 µF SET AES/EBJ Output Ref Level Alt AES Ch: 0.00 µF Reset Gaintext_image
Ae After Effects CCAfter Effects ^® CC

text_image
Output Output Output Mode: Output Quality: Output Duration: Visual Feature Output Ratio: - Audio and Retrification Output to the FV Audio Marker - Note: The chart displays the output format of the audio output in the video frame."Video Preview" 视频预览首选项
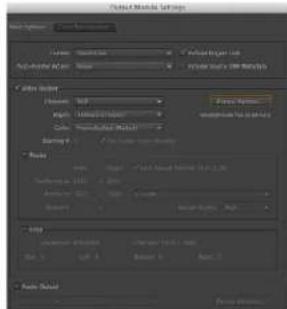
text_image
Particle Effects Settings Size: 100% Angle: 120° Distance: 5 px Size: 5 px Acceleration: 100% Acceleration: 100% Acceleration: 100% Acceleration: 100% Acceleration: 100% Acceleration: 100% Acceleration: 100% Acceleration: 100% Acceleration: 100% Acceleration: 100% Acceleration: 100% Acceleration: 100% Acceleration: 100% Acceleration: 100% Acceleration: 100% Acceleration: Acceleration: 100% Acceleration: 100% Acceleration: 100% Acceleration: 100% Acceleration: 100% Acceleration: 100% Acceleration: 100% Acceleration: 100% Acceleration: 100% Acceleration: 100% Acceleration: 100% Acceleration: 100% Acceleration: 100% Acceleration: 100% Acceleration : 100% Acceleration : 100% Acceleration : 100% Acceleration : 100% Acceleration : 100% Acceleration : 100% Acceleration : 100% Acceleration : 100% Acceleration : 100% Acceleration : 100% Acceleration : 100% Acceleration : 100% Acceleration : 100% Acceleration : 100% Acceleration : 3.5%"Output Module Settings" 输出模块设置渲染选项
After Effects ^® CC
如何预览视频
text_image
Blackmagic Image Import Image Import Settings Video Input Format: YUV 4:2:2 HD 1080i 59.94 Image Bit Depth: Photoshop RGB 16 Bits/Channel Cancel Import Image导入图像

text_image
Blackmagic Image Export Image Export Settings Video Output Format: YUV+K 4 2:2 HD 1080i 59.94 Cancel Export Image导出图像
Photoshop® CC
如何导入和导出视频帧
将图像导入Photoshop CC
text_image
Screenshot of a software interface showing file properties and folder navigation, with Chinese text labels and file names.新建序列
Adobe® Premiere Pro® CC
text_image
Auto Show Colors Custom Settings Custom Settings Automated Colors Custom Settings Auto Show Colors Color: 0.0000 Noise: 0.0000 Noise Filter Noise Mode: 100% Noise Speed: 50% Noise Quality: 100% Noise Output: 100% Noise Level: 100%采集
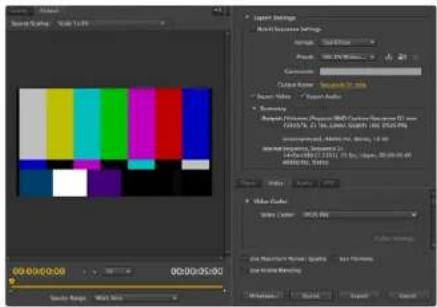
text_image
Sound Values 00:00:00:00 00:30:35:00 Audio Settings Multi-Noise Settings Audio 100% 20% 30% 40% 50% 60% 70% 80% 90% 100% 110% 120% 130% 140% 150% 160% 170% 180% 190% 200% 210% 220% 230% 240% 250% 260% 270% 280% 290% 300% 310% 320% 330% 340% 350% 360% 370% 380% 390% 400% 410% 420% 430% 440% 450% 460% 470% 480% 490% 500% 510% 520% 530% 540% 550% 560% 570% 580% 590% 600% 610% 620% 630% 640% 650% 660% 670% 680% 690% 700% 710% 720% 730% 740% 750% 760% 770% 780% 790% 800% 810% 820% 830% 840% 850% 860% 870% 880% 890% 900% 910% 920% 930% 940% 950% 960% 970% 980% 990% 100 Audio Settings Multi-Noise Settings Audio 1. 1. 1. 1. 1. 1. 1. 1. 1. 1. 1. 1. 1. 1. 1. 1. 1. 1. 1. 1. 1. 1. 1. 1. 1. 1. 1. 1. 1. 1. 1. 1. 1. 1. 2 Audio Audio Audio Audio Audio Audio Audio Audio Audio Audio Audio Audio Audio Audio Audio Audio Audio Audio Audio Audio Audio Audio Audio Audio Audio Audio Audio Audio Audio Audio Audio Audio Audio Audio Audio Audio Audio Audio Audio Audio Audio Audio Audio Audio Audio Audio Audio Audio Audio Audio Radio导出到磁带
采集
text_image
Final Cut Pro X Version 10.0 Loading Compressor support © 2001-2011 Apple Inc., All rights reserved. Apple, the Apple logo, and Final Cut Pro are trademarks of Apple Inc., registered in the U.S. and other countries.Apple Final Cut Pro X
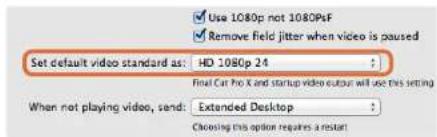
text_image
Use 1080p not 1080PsF Remove field jitter when video is paused Set default video standard as: HD 1080p 24 Final Cat Pro X and startup video output will use this setting When not playing video, send: Extended Desktop Choosing this option requires a restarttext_image
Name: First Project Default Event: New Event 0-22-11 Video Properties: Set automatically based on first video clip Custom 1080x1080 Format Resolution Rate Timercode Display: Non-Drop Frame Drop Frame Audio and Render Proportions: Use default settings (Surround, 48kHz, PreRcs 422) Custom Audio Channels: stereo Audio Sample Rate: 46kHz Render Format: Uncompressed 10-bit Cancel OKApple Final Cut Pro X
text_image
Export "First Project" as a QuickTime movie Options Summary Export: Current Settings Export a movie in the same format as the original project After export: Open with QuickTimer Player Include: Video and Audio Cancel Nexttext_image
Media Composer® Media Composer 7.30 ©2015 A.D. Microsoft, Inc. All rights reserved. Use of this software to subject to a related license agreement. Username Type: Software (Note Locked) Computer Name: InstrumentsAvid Media Composer
text_image
Use 1080p not 1080PsF Set black left on SIM video output in capture Extended Desktop Last Frame Played When not playing video, send ✓ Black Display HDMI 3D as: Side by Sidetext_image
New Project Project Name: New Project Format: 1080x/59.94 Color Space: YC&C: 709 Raster Dimension: 1920x1080 Stereoscopic: OUT Aspect Ratio: 16.3 Match-back The selected raster dimension supports the following raster types: - Standard - AMC Intra 100 - XDCAM HD 50 - XDCAM EX Search Data Folder Default Project Folder第五步:键入项目名称并设置项目选项。
Avid Media Composer
text_image
Deck Preferences - Current When the deck contains no tape or drop frame cannot be detected set timecode to: Non-drop Frame ✓ Allow assemble edit & crash record for digital cut ✓ Stop key pauses deck ✓ Shuttle holds speed ✓ Stop any paused decks when quitting ✓ Poll deck during digital cut ✓ Relax coincidence point detectiontext_image
Device: DeckLink 4K Extreme Output Mode: Real-Time Bit Depth: 10-bit Entire Sequence Digital Cut Safe Mode Stop on Dropped Frames LTC out during preroll Add Black at Tail 00:00:00:00 Deck Control: Remote Local Sequence Time Insert Edit Custom Alert 01:00:00:00 Grey IV/8-500 Digital/Cut Tapetext_image
Adobe Dream Project Name: Backmagic Volume: Autodesk Media Storage Frames Free: 300K7 Frames Used: 9 Setup Directory: Backmagic Setup Mode: New Scapes Loading template: 100000000000000000000000000000000000000000000000000000000000000000000000000000000000000 Description: 1985 x 2688 / 43 / 1888 Width: 1328 Height: 1888 Shift to 1679 Size: 1.2727m Split: Progressive: 16-bit FP Drawers Cache and Render Proxy Settings Preferred / Arrow Profile: 432 (RGB) Format Restrictions Maximum Width: None Maximum Height: None Depth: 10-36, 22-66 Allowable Preset: FAX, FAX, RAW Reset Cancel Delete键入项目名称并设置项目选项。
Autodesk Smoke 2013 Extension 1
text_image
Smoke Setup Select the application to configure smoke_2013.2. General Preview Vtr Emulator Media Storage Ba Video Device BMD Audio Device BMD Reserved Application Memory Automatic Network Panel Display ShowMounted Default Web Browser open Menu Bar Yestext_image
01:00:59:04 Insert Start on Timecode Stop After Frames Frames 2250 In 00:59:30:00 Out 01:01:00:00 Duration 00:01:30:00 Offset 00:00:00:00 Preview Split Righttext_image
00:00:00:00 Start on Pen Capture Grab Stop on Pen In 00:00:00:00 Out 00:00:00:00 Dur 00:00:00:00text_image
Blackmagiclosure DaVinci Resolve 10 Version 18:26.678DaVinci Resolve 10

text_image
Capture and Playout Video capture and playback: HD 1080p 23.976 Use left and right eye SDI Video connection operates as: YUV 4-2-2 SDI RGB 4-4-4 Dual Link RGB 4-4-4 Single Link 3/6Gb Colorspace: Video Levels Data Levels Video bit depth: 10 bit ✓ Use deck autoedittext_image
Preferences Project Video Format: HD 1086p 2.5.98 Capture File Format: DPX 10-Bit RGB Use dropped frame mscode Capture to DPX from a VYY source Use absolute frame numbering when capturing DPX When capturing DPX files, use 8 1 digit numbers in the frame count Capture audio and video to: /Volumes/Media Browse For all video and audio media file captures Capture still frames to: /Volumes/Media Browse For all still frame captures only Stop capture if dropped frames are detected Stop playback if dropped frames are detected Use Anamorphic SD 16:9 Continue playback when in the background Set clock to: 5 second pre-roll for curing When capturing use a 0 frame mscode offset When mastering use a 0 frame mscode offsettext_image
Log and Capture Capture Add to Image 00:00:00:00 00:00:00:00 Dimensions 00:00:00:00 Capturing to Disk Recording Duration: 60.00x253 Disk Space Remapping: 455.9 GB Capture Crop Batch Log点击 “Capture” 按钮开始采集。
采集
text_image
Name Duration In *Scratch* 3D Clip 1 00:03:20:15 00 3D Clip 1_right 00:03:20:15 00text_image
媒体列表 时间码列表、缩略图和收藏夹视图 VTR/录机时间码 视频预览 搜索栏 Media Express 00:00:07:07 "SOFORE" 100p 23 Profiles 2d ZOIC 2009 Craftman ZOIC 2008 Sas Horn ZOIC 2008 Sprita 10i ZOIC 2009 TV 100p ZOIC 2010 198p 23 Dur: 00:00:30:01 Dur: 00:00:30:01 Dur: 00:00:30:01 Dur: 00:00:30:01 Todays rashes 12 Clips ZOIC 2010 198p 23 ZOIC 2019 198p 23 ZOIC 2018 198p 23 ZOIC 2019 198p 23 ZOIC 2018 198p 23 ZOIC 2019 198p 23 ZOIC 2018 198p 23 ZOIC 2019 198p 23 ZOIC 2018 196p 23 Dur: 00:00:30:17 Dur: 00:00:48:56 Dur: 00:00:30:05 Dur: 00:00:31:56 ZOIC 2010 198p 23 ZOIC 2019 198p 23 ZOIC 2018 198p 23 ZOIC 2019 198p 23 ZOIC 2018 198p 23 ZOIC 2019 198p 23 ZOI Dur: 00:01:15:15 Dur: 00:02:56:16 Dur: 00:03:15:16 Dur: 00:04:26:24 Dur: 00:05:56:56 VFX plates 14 Clips ZOIC 2019 198p 23 ZOIC 2019 198p 23 ZOIC 2018 198p 23 ZOIC 2019 198p 23 ZOIC 2018 198p 23 ZOIC 2019 Dur: 00:01:15:15 Dur: 00:02:56:16 Dur: 00:03:15:16 Dur: 00:04:26:24 Dur: 00:05:56:56 ZOIC 2008 Sea York ZOIC 2599 TV 166p ZOIC 2019 198p 23 ZOIC 2018 198p 23 ZOIC 2019 198p 23 ZOIC 2018 198p 23 ZOIC 2019 198p 23 Dur: 00:03:30:17 Dur: 00:04:56:16 Dur: 00:05:56:56 ZOIC 2019 198p 23 ZOIC 2019 198p 23 ZOIC 2018 198p 23 ZOIC 2019 198p 23 ZOIC 2018 198p 23 ZOIC Dur: 00:03:30:17 Dur: 00:04:56:16 Dur: 00:05:56:56 New shots from location 5 Clips Playback OK Duration: OK VTR OK Project United HD TACOM/OSD/OSD/OSD/OSD/OSD/OSD/OSD/OSD/OSD/OSD/OSD/OSD/OSD/OSD/OSD/OSD/OSD/OSD/OSD/OSD/OSD/OSD/OSD/OSD/OSD/OSD/OSD/OSD/OSD/OSD/OSD/OSD/OSD/OSDtext_image
Media Express The video format of the selected clip does not match the project settings. Would you like to save this project and start a new one based on the video format of the selected clip? Save Don't Save Cancel
text_image
New Open... Open Recent Save Save As... Import Grab Still Frame Capture Now Batch Capture Media Files... Final Cut Pro XML... CMX EDL...text_image
"Scratch" horse: 2012-04-24_1723_C0000 Inc: 17:23:59:00 Out: 17:36:40:00 Dur: 00:12:41:01 Info: 1080p 24, ProRes 422 HQ, 1920x1080 Desc: None Take: Angle:text_image
Project Video Format: HD 100p 50.0 Capture File Format: Quick Time Uncompressed, 10-bit YUV Use dropped frame thumbnails Capture to DFX from a YUV source. Use absolute frame numbering when capturing DFX When capturing DFX files, use 8 2 digit numbers in the frame count选择一个3D项目视频格式。

text_image
*Scratch* 3D L••R 3D Clip 1 Dur: 00:03:20:15 Clip 1_right Dur: 00:03:20:15媒体列表可将导入的3D片段醒目表示。
text_image
V Bandito 422 ME test Bandito 422 ME test Dur: 00:00:46:22 Dur: 00:00:46:22text_image
Edit to Tape 00:00:00:00 00:00:22.03 Duration 00:00:22:04 2 Bits Selected Time Remapping: 00:00:00:00 Copy Computed Gel 3 Preview Assembl Insert Master两个片段被选中输出到磁带。

选按需要用来制作母带的音频通道号码。
将视频和音频文件编辑到磁带
Select Target Drive... Save Screenshot...
Stress
1 GB
2 GB
3 GB
4 GB
√ 5 GB
Disk Speed Test Help About Disk Speed Test
Quit
点击齿轮图标打开Settings菜单。
什么是Blackmagic Disk Speed Test?
natural_image
Red office desk with 'SDK' logo and a pen writing on paper (no text or symbols on main objects)Caution: Risk of Electric Shock
On the UltraStudio 4K enclosure you will see a yellow warning label marked 'Caution: Risk of Electric Shock'. This is intended to warn users that there may be the presence of uninsulated "dangerous" voltage within the UltraStudio 4K enclosure which may be of sufficient magnitude to constitute a risk of electric shock to the user. Blackmagic Design advises you not to open the UltraStudio 4K unit, but rather contact your nearest Blackmagic Design service center should assistance be required.