DeckLink Mini Monitor HD - Video card Blackmagic Design - Free user manual and instructions
Find the device manual for free DeckLink Mini Monitor HD Blackmagic Design in PDF.

| Product Type | PCI Express Video Card |
| Brand | Blackmagic Design |
| Model | DeckLink Mini Monitor HD |
| Video Connectivity | 1 SDI output (BNC) for HD monitoring |
| Supported Video Formats | SD, HD up to 1080p60 |
| Power | Via computer PCI Express slot |
| Host Interface | PCI Express 1 lane (x1) |
| Compatible Operating Systems | macOS, Windows 8/10 (64-bit), Linux (x86 64-bit) |
| Required Memory | 4 GB RAM minimum |
| Included Software | Desktop Video Setup, Media Express, Disk Speed Test, drivers and plug-ins |
| Main Functions | HD video playback and monitoring, SDI output for broadcast screen |
| Maintenance and Cleaning | Disconnect power before cleaning; use a dry cloth and avoid liquids |
| Safety | Do not expose to moisture; only a qualified technician should open the casing |
| Spare Parts and Repairability | No user-serviceable parts; contact Blackmagic Design support |
| Card Dimensions | Approximately 100 x 68 mm (standard PCIe form factor) |
| Weight | Approximately 50 g |
Frequently Asked Questions - DeckLink Mini Monitor HD Blackmagic Design
User questions about DeckLink Mini Monitor HD Blackmagic Design
0 question about this device. Answer the ones you know or ask your own.
Ask a new question about this device
Download the instructions for your Video card in PDF format for free! Find your manual DeckLink Mini Monitor HD - Blackmagic Design and take your electronic device back in hand. On this page are published all the documents necessary for the use of your device. DeckLink Mini Monitor HD by Blackmagic Design.
USER MANUAL DeckLink Mini Monitor HD Blackmagic Design
To go directly to your preferred language, simply click on the hyperlinks listed in the contents below.
English 3
日本語 77
Français 152
Deutsch 227
Espanol 302
中文 377
HK 452
Pycckn527
Italiano 602
Portugues 677
Türkce 752

Welcome
We hope you share our dream for the television industry to become a truly creative industry by allowing anyone to have access to the highest quality video.
Previously, high end television and post production required investment in millions of dollars of hardware, however with Blackmagic Design video hardware, even Ultra HD 60p is now easily affordable. We hope you get years of use from your new UltraStudio, DeckLink or Intensity and have fun working with some of the world's hottest television and design software!
This instruction manual should contain all the information you'll need on installing your Blackmagic Design video hardware. If you're installing a PCI Express card, it's always a good idea to ask a technical assistant for help if you have not installed hardware cards into computers before. As Blackmagic Design video hardware uses uncompressed video and the data rates are quite high, you'll need fast disk storage and a high end computer.
We think it should take you approximately 10 minutes to complete installation. Before you install Blackmagic Design video hardware, please check our website at www.blackmagicdesign.com and click the support page to download the latest updates to this manual and Desktop Video driver software. Lastly, please register your Blackmagic Design video hardware when downloading software updates. We would love to keep you updated on new software updates and new features. Perhaps you can even send us your latest show reel of work completed on your Blackmagic Design video hardware and any suggestions for improvements to the software. We are constantly working on new features and improvements, so we would love to hear from you!

Grant Petty
CEO Blackmagic Design
Contents
Getting Started 5 Adobe After Effects CC 34
Introduction to Desktop Video 5 Adobe Photoshop CC 36
System Requirements 5 AdobePremiere Pro CC 37
Connecting Power 5 Adobe Character Animator CC 42
Connecting Video Hardware 6 Final Cut Pro X 43
Installing the Desktop Video Software 10 Avid MediaComposer 46
Capturing and Playing Back Video 15 Blackmagic Media Express 53
Blackmagic Desktop Video Setup 16 What is Blackmagic Media Express? 53
Introducing Blackmagic Desktop Capturing Video and Audio Files 53
Video Setup 16 Playing back Video and Audio Files 58
Video Settings 18 Browsing Media 60
Connector Mapping for DeckLink Editing Video and Audio Files to Tape 63
Quad 2 22 Editing Video and Audio Files to Tape 63
Conversions Settings 25 H.265 Hardware Encoder 65
About 26 Capturing H.265 Video with
Teranex Mini Smart Panel 27 Blackmagic Disk Speed Test 66
Attaching a Teranex Mini Smart Panel 27
Smart Panel Features 29 from DeckLink 4K Extreme 12G 69
Teranex Mini Rack Shelf 29 Recovering a DeckLink Card
Using UltraStudio 4K Mini's
Front Control Panel 30 Help 72
DaVinci Resolve 31 Developer Information 73
Live Grading with DaVinci Resolve 31 Regulatory Notices 74
Editing with DaVinci Resolve 32 Safety Information 75
Using your Favorite 3rd Party Software 34 Warranty 76
Getting Started
Introduction to Desktop Video
This manual takes you through computer system requirements and installation instructions for Blackmagic Design's Desktop Video hardware and software, and how to use them with your favorite third party software.
The software includes drivers, plugins and applications like the Blackmagic Desktop Video Setup, and Blackmagic Media Express for fast capture and playback. Blackmagic Desktop Video software works in conjunction with your UltraStudio, DeckLink, Intensity or Teranex hardware.
System Requirements
Your computer requires at least 4GB of RAM to efficiently process video.
Mac OS
Blackmagic Desktop Video software runs on the latest versions of Mac OS.
Windows
Desktop Video runs exclusively on 64-bit versions of Windows 8 and 10 with the latest Windows updates installed.
Linux
Desktop Video runs on 64-bit x86 computers running Linux 2.6.23 or higher. Please refer to the release notes for the latest list of supported Linux distributions, package formats and software dependencies.
Connecting Power
If your Desktop Video hardware includes an external power supply, simply connect it to the unit and switch on the power.
TIP DeckLink 4K Extreme 12G can also be connected to additional power using the power adapter cable included with the card. DeckLink 4K Extreme 12G is very powerful and we are always looking for ways to provide additional features, such as mezzanine cards for expanded connectivity. For this purpose, we have included a power adapter cable so you can plug in additional power if future hardware expansion on your DeckLink card draws more power than your computer's PCIe slot can provide.
If you need to supply external power to your DeckLink 4K Extreme 12G you can easily use the supplied power adapter cable. Simply disconnect the power from your graphics card and plug it into the adapter cable. The plug will only connect to one end so there's no way to connect it incorrectly.
Connecting Video Hardware
There are three types of connectors your Blackmagic Desktop Video hardware may use to connect to your computer depending on your model. These connection types include Thunderbolt, USB 3.0, or PCIe.
Connecting via Thunderbolt
Blackmagic UltraStudio 4K and UltraStudio 4K Extreme feature two Thunderbolt* 2 ports so if your computer only has a single Thunderbolt port, you can use the additional port to attach a RAID or other device.
Blackmagic UltraStudio 4K Extreme 3 has two Thunderbolt™ 3 ports and UltraStudio HD Mini has one Thunderbolt 3 port, for up to 40Gb/s data speeds. When connecting via Thunderbolt 3, connect your Blackmagic Desktop Video hardware directly to the Thunderbolt 3 port on your computer using a Thunderbolt 3 cable. Connecting to a Thunderbolt 2 port on your computer via a Thunderbolt 3 to Thunderbolt 2 adapter is not supported on bus-powered products like UltraStudio HD Mini.
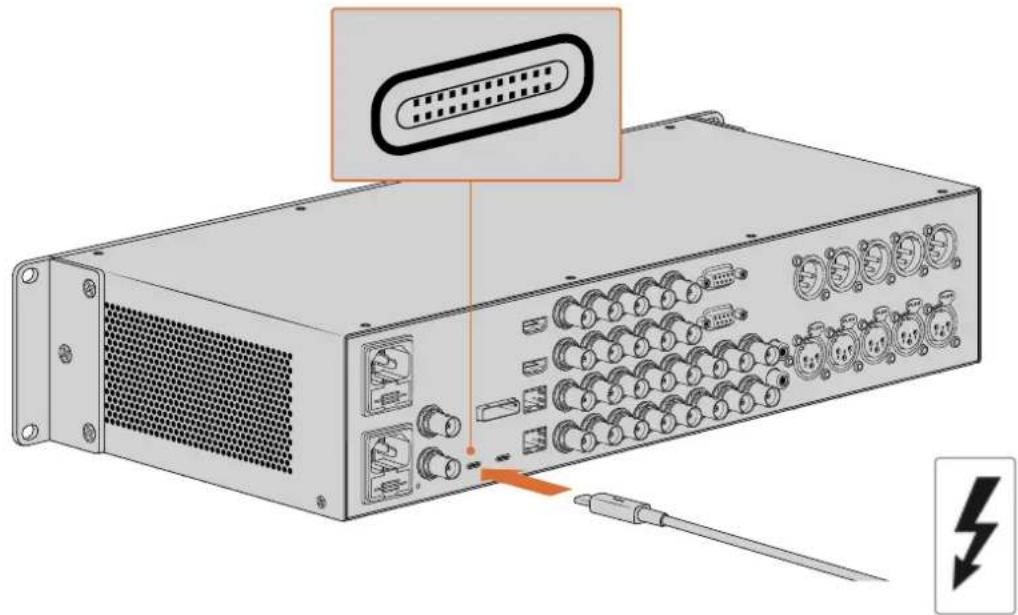
Make sure your computer is Thunderbolt 3 compatible by looking for the Thunderbolt Icon near its USB-C connector, as shown on the right.
Connecting via USB 3.0
Connect a SuperSpeed USB 3.0 cable into the USB 3.0 port on the unit. Plug the other end of the cable into your computer's USB 3.0 port.
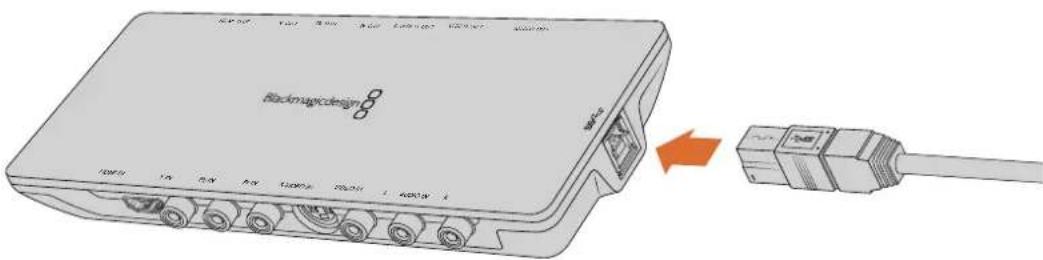
Connecting a SuperSpeed USB 3.0 cable to Intensity Shuttle
Connecting via PCIe
Blackmagic Design PCIe cards plug into a PCIe slot in your computer. Check the information printed on your card's box to determine the number of PCIe lanes your card requires. For example, depending on your PCIe card, it will require a x1, x4 or x8 PCIe slot.
It's worth noting that you can insert PCIe cards into higher capacity slots than they require. For example, a x4 lane PCIe card can be inserted into a x16 lane PCIe slot, though not the other way around.
If you can't find the information you need on the box, you can find the number of lanes your card requires, plus other helpful information about your card, in the tech specs at www.blackmagicdesign.com/products
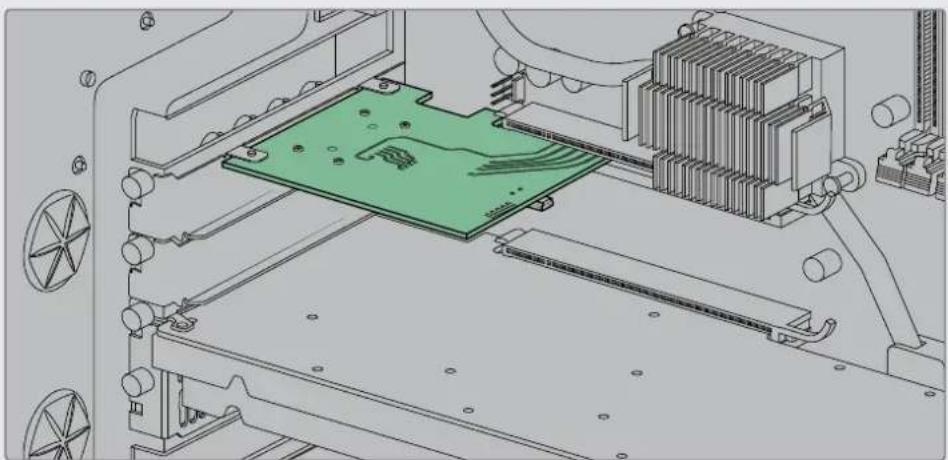
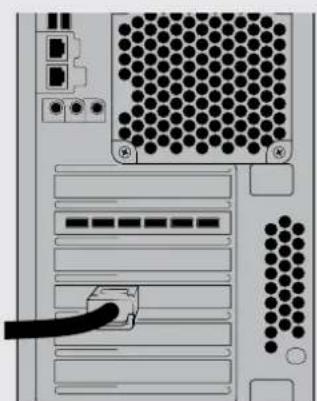
Install a Blackmagic Design PCIe card in a spare PCIe slot. If your card includes an HDMI bracket, it can be installed in any spare PCIe mount and connects to the rear of the card with the supplied HDMI cables.

Please be careful when installing your DeckLink PCIe card to avoid damaging delicate components on the card.

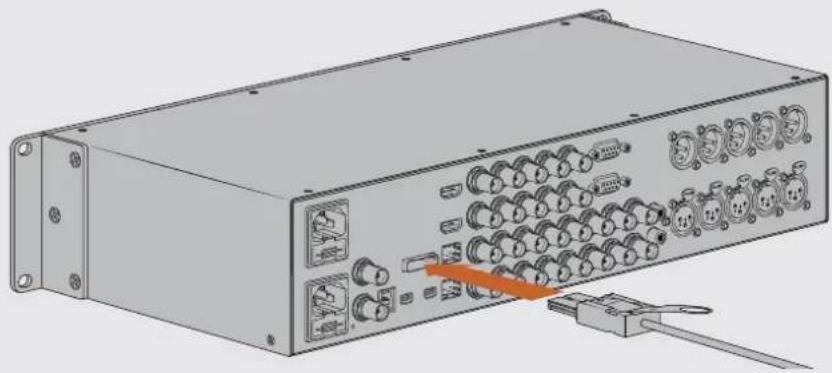
If your card includes a breakout cable, simply plug it into your card's breakout cable connector.
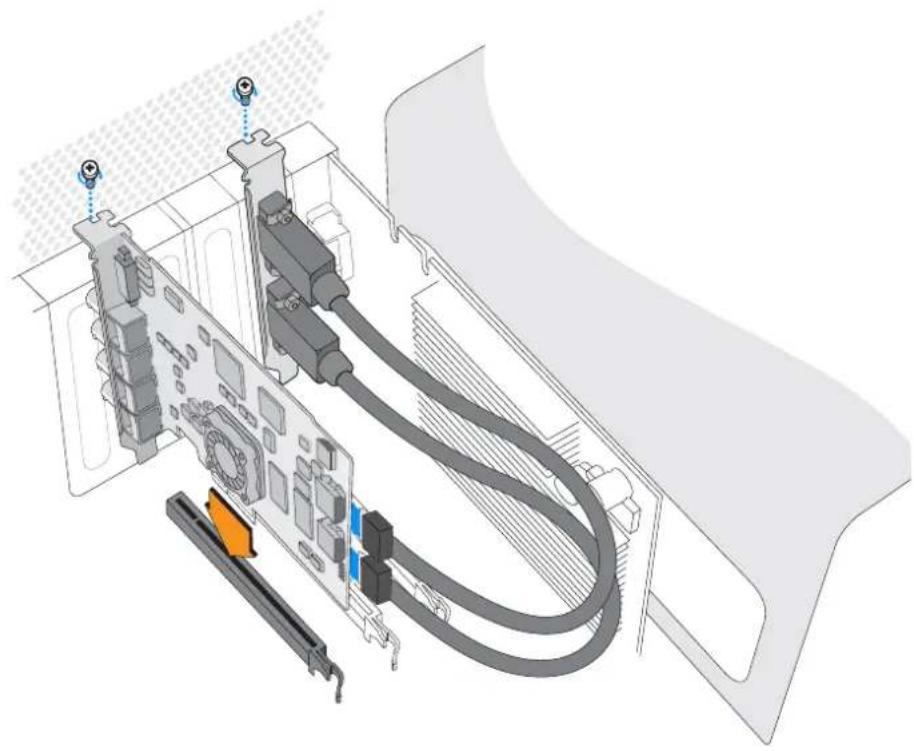
Connecting UltraStudio 4K Extreme via PCIe
UltraStudio 4K Extreme and UltraStudio 4K Extreme 3 can also connect to your computer via PCIe using a PCIe adapter card and cable. Both UltraStudio 4K Extreme and UltraStudio 4K Extreme 3 need to be connected to a PCIe Gen 2 slot in your computer. The Blackmagic PCIe Cable Kit contains a PCIe cable and the PCIe adapter card and is available from your nearest Blackmagic Design reseller.
For the original UltraStudio 4K Extreme, you can use either the Blackmagic PCIe Cable Kit, or purchase a standard PCIe adapter card from your nearest computer store.
UltraStudio 4K Extreme features a PCIe port for connection to an external PCIe adapter card that is installed in your computer
The PCIe adapter card is inserted into a PCIe Gen 2 slot inside your computer
Connect the other end of the PCIe cable to the PCIe port located at the back of your computer
Installing the Desktop Video Software
Applications, Plugins and Drivers
The Blackmagic Design Desktop Video software includes all the drivers, plugins and applications needed to use your Desktop Video hardware. Below is a list that shows all the software items that are installed on your computer.
| Mac OS Windows Linux | ||
| Blackmagic Desktop Video drivers | Blackmagic Desktop Video drivers | Blackmagic Desktop Video drivers |
| Blackmagic Desktop Video Setup Blackmagic Desktop Video Setup Blackmagic Desktop Video Setup | ||
| Blackmagic Design LiveKey Blackmagic Design LiveKey - | ||
| Blackmagic Media Express Blackmagic Media Express Blackmagic Media Express | ||
| Blackmagic QuickTime™ codecss | Blackmagic AVI and QuickTime™ codecss | - |
| Blackmagic Disk Speed Test Blackmagic Disk Speed Test - | ||
| AdobePremiere Pro CC, After Effects CC, Photoshop CC presets and plug-ins | AdobePremiere Pro CC, After Effects CC, Photoshop CC presets and plug-ins | - |
| Final Cut Pro X plug-ins - | ||
| Avid MediaComposer plug-in Avid MediaComposer plug-in - | ||
Automatic Updates
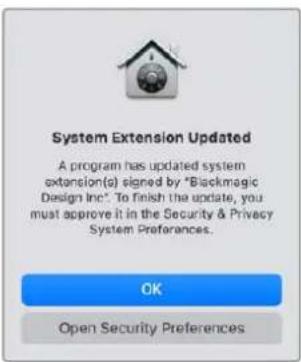
After installing the Desktop Video software and once your computer restarts, it will check the internal software on your Desktop Video hardware. If it doesn't match the version installed on your computer, the software will prompt you to update. Click 'ok' to start the update and restart your computer to complete the process.
NOTE If your DeckLink card is not working after an interrupted update, refer to the section near the end of this manual called 'recovering a DeckLink card from an interrupted update'.
The remainder of the Getting Started section will show you the Desktop Video software installation process for Mac OS, Windows and Linux.
Mac OS Installation
Make sure you have administrator privileges before installing any software.
1 Download the newest Desktop Video driver installer from www.blackmagicdesign.com/support
2 Launch the Desktop Video installer.
3 Click the 'continue', 'agree' and 'install' buttons to install the software. If you are installing Desktop Video for the first time, installation has a few extra steps that are described below.
4 Restart your computer to enable the new software drivers.

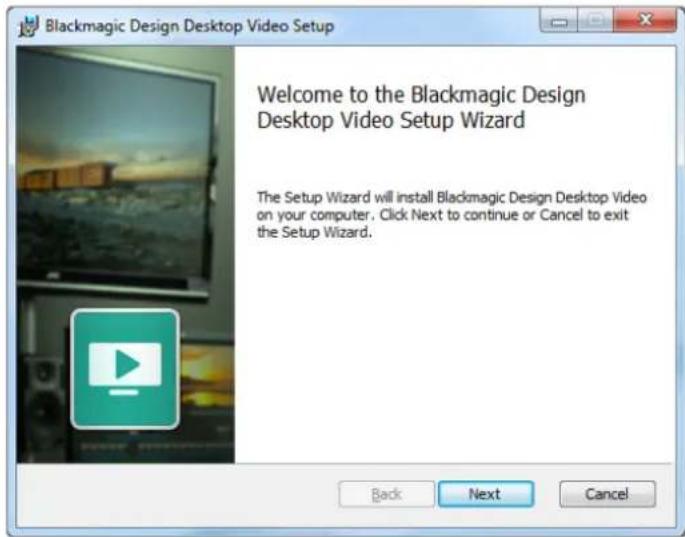
Desktop Video Installer for Mac
Installing on Mac OS for the First Time
When installing Desktop Video on a Mac for the first time, you will need to enable your Mac to use your Desktop Video equipment during the installation process.
When instructed, click on 'open security preferences' or open 'system preferences' and click on 'security and privacy'.
2 In the 'security and privacy' preferences, click 'allow' to enable the Desktop Video software on your computer.
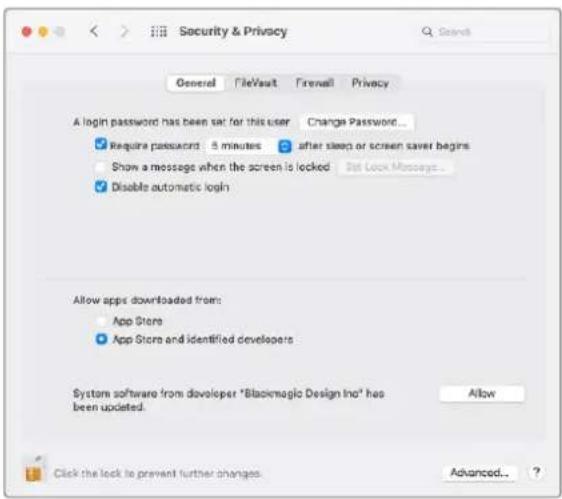
Click 'allow' in the security and privacy preferences to enable the Desktop Video software on your computer
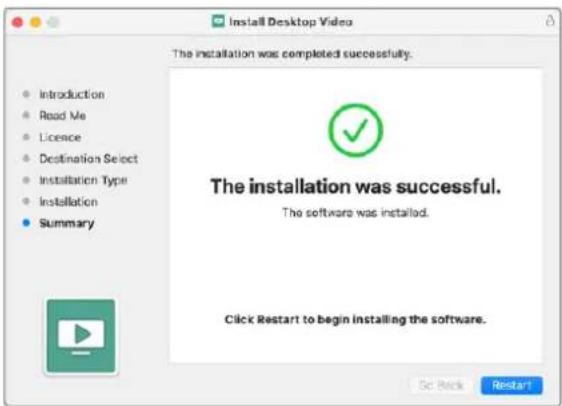
3 When instructed to restart, click 'not now'.

Back in Desktop Video Installer, complete the software installation by clicking 'restart'.
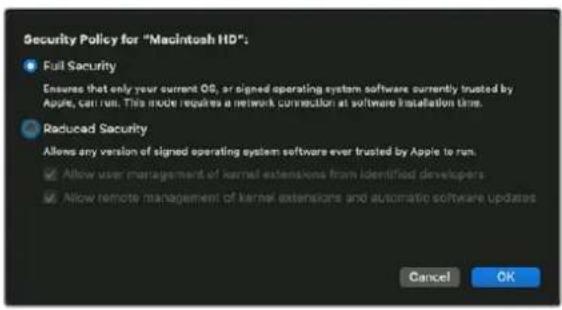
Resetting System Security Policy on an M1 Mac
From Desktop Video 12.2 or later, it is no longer necessary to have 'reduced security' enabled as your Mac's system security policy. If you had 'reduced security' set when installing previous versions of Desktop Video, it is now advisable to reset your M1 Mac's security policy to 'full security'.
To do this, follow these steps:
1 Start the computer by pressing and holding the power button until you see 'loading startup options' displayed.
2 Click 'security policy'.
3 Select 'full security'.
4 Click OK.
5 A notification will appear informing you that your computer is applying the security policy. When the notification disappears, you can restart your computer normally.
Windows Installation
1 Ensure you have the very latest driver. Visit www.blackmagicdesign.com/support
2 Open the "Desktop Video" folder and launch the "Desktop Video" installer.
3 The drivers will now be installed on your system. An alert will appear: "Do you want to allow the following program to install software on this computer?" Click 'yes' to continue.
4 You will see a dialog bubble saying "found new hardware" and the hardware wizard will appear. Select "install automatically" and the system will find the required Desktop Video drivers.
5 After all drivers have been installed, a dialog bubble will appear saying "your new hardware is ready for use." Restart your computer to enable the new software drivers.
Desktop Video Installer for Windows
Linux Installation
1 Download the latest Desktop Video software for Linux from www.blackmagicdesign.com/support
2 Open the Desktop Video folder and navigate to the packages required for your distribution and architecture. Note that 'amd64' refers to Intel and AMD 64 bit processors. There are three sets of packages provided:
- The desktopvideo package provides the core drivers and API libraries.
- The desktopvideo-gui package provides the Desktop Video Setup software.
- The mediaexpress package provides a simple capture and playback utility.
3 Double click the packages you wish to install and follow the onscreen instructions. If you see any messages about missing dependencies, ensure they are installed first and then rerun the Desktop Video installer.
4 When the installer has finished it is recommended that you restart your computer to complete the installation process.
If you cannot find a native Desktop Video package for your Linux distribution, or if you prefer to install from a command line, refer to the ReadMe file for detailed installation instructions.
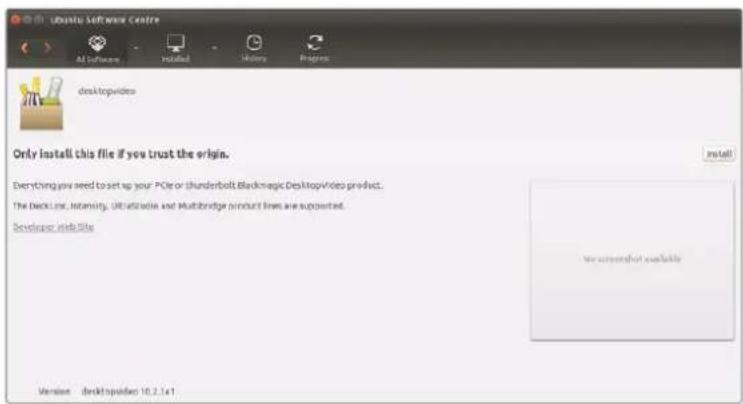
Desktop Video software ready to be Installed from the Ubuntu Software Center.
Updates
If you have not installed the setup software, you can check the internal software is up to date using the BlackmagicFirmwareUpdater command line tool:
BlackmagicFirmwareUpdater status
A message similar to the following will appear:
0:/dev/blackmagic/io0 [DeckLink SDI 4K] 0x73 OK
1: /dev/blackmagic/iol [DeckLink 4K Extreme 12G] 0x0A PLEASE_UPDATE
In this case you could update the internal software with the following command:
BlackmagicFirmwareUpdater update 1
See the 'man' page for a more detailed description of the command's usage. e.g., for more info on the internal software updater command, type "man BlackmagicFirmwareUpdater".
That's all there is to getting started! Now that you have installed your Blackmagic Desktop Video hardware and software, you can start capturing and playing back video.
Capturing and Playing Back Video
Once the Desktop Video hardware and software is installed, you can start capturing and playing back clips straight away. First, plug your video source into the input on your Desktop Video hardware, then connect a monitor to the output.
A quick way to begin capture and playback is to record a clip in Blackmagic Media Express, which was installed on your computer when you installed the Desktop Video software.
Setting Up
1 Connect a monitor or TV to the video output of your Blackmagic Design hardware.
2 Connect a video source to the input of your Blackmagic Design hardware.
Connect a video monitor and source to your Blackmagic Design video hardware.
Testing Video Capture
1 Launch Blackmagic Media Express. Click on the 'log and capture' tab. Your input video format is automatically detected and Media Express sets the project video format to match. Your video source will appear in the Media Express preview pane.
2 Click 'capture' at the bottom of the 'log and capture' window to perform the capture test. Click 'capture' again to finish the test. The captured clip is added to the media list on the left side of Media Express.
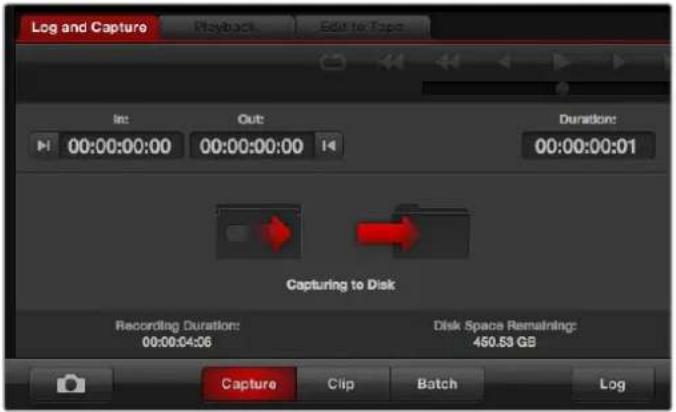
Click the 'capture' button to commence recording.
Testing Video Playback
1 Click on the 'playback' tab.
2 Double click the test clip. The video and any present audio will be sent to the monitor connected to your hardware's output.
Blackmagic Desktop Video Setup
Introducing Blackmagic Desktop Video Setup
Blackmagic Desktop Video Setup provides a central location for configuring hardware settings, plus a real time status display showing the video connected to your hardware's inputs and outputs.
To launch Blackmagic Desktop Video Setup:
- On Mac OS, click Blackmagic Desktop Video in 'system preferences' or you can launch the utility from your 'applications' folder.
- On Windows 8, from the 'start' page type 'Blackmagic' and then click the Blackmagic Desktop Video Setup application. The Desktop Video Setup utility also launches from the Windows 8 'control panel'.
- On Windows 10, click the 'start' button>all programs>Blackmagic Design>Desktop Video and click the Desktop Video Setup application. The Desktop Video setup software also launches from the Windows 10 'control panel'.
- On Linux, go to 'applications' and then 'sound and video' and double click the Blackmagic Desktop Video Setup application.
When you first open Blackmagic Desktop Video Setup, the home page displays your connected hardware and provides an overview of all video activity on your hardware's input and output connections. If you are sending a video signal to your input, it will be automatically detected and the format will be displayed under the Video Input icon.
If you have multiple Blackmagic capture and playback devices connected, you can cycle through them by clicking the arrow buttons on the sides of the home page. To configure settings, simply click on the hardware image, or the settings icon located below the hardware name. The Desktop Video Setup utility only displays the settings that are relevant to your selected hardware, so you don't have to scroll through pages of menus to find the settings you want.
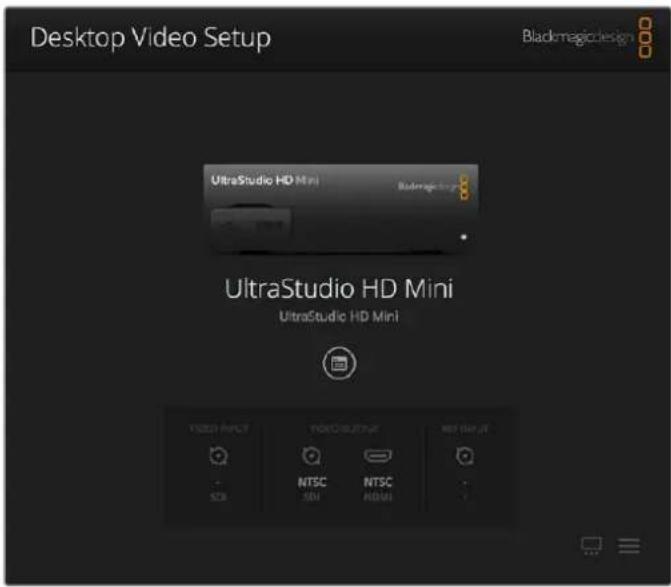
Blackmagic Desktop Video Setup home page
The following pages of this manual will show you how to adjust settings using Blackmagic Desktop Video Setup.
Blackmagic Desktop Video Setup lets you adjust video and audio input and output settings, apply up or down conversions during capture and playback, and provides information about the driver.
Video Settings
Video Input
Click on a connector icon to set the 'video input' connection for your Blackmagic Design hardware. Only the connectors that are built into your hardware will be shown. When a valid video signal is detected, the input and video format will be displayed on the Blackmagic Desktop Video Setup home page.
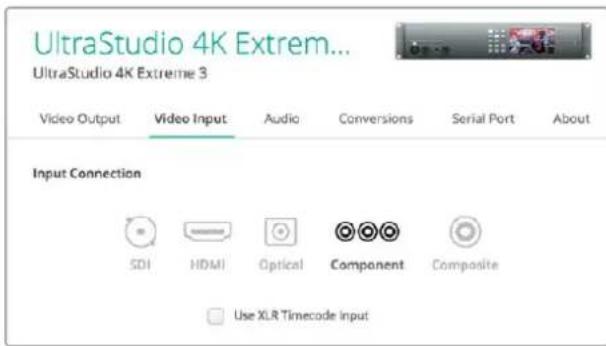
Click on an Icon to set your video Input connection.
Use XLR Timecode
Select this setting to read timecode from the XLR input instead of the SDI stream.

Use XLR Timedata Input
Enable the checkbox to capture timecode from the dedicated XLR input
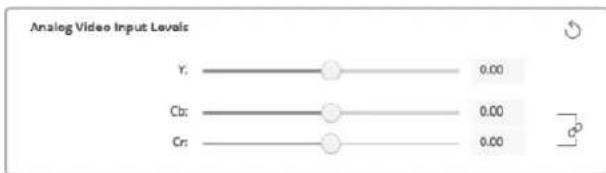
Analog Video Input Levels
Drag the 'video' and 'chroma' sliders to adjust the analog video input levels for component or composite video. Dragging the video slider affects the luma gain and the chroma sliders decrease or increase the color saturation. When using component video, you can adjust the Cb and Cr values independently. Click the 'link' icon to connect them if you want to adjust them simultaneously.
Video Output
Select the video standard and adjust other settings for your video output.
General
Default Video Standard
To use broadcast monitoring with Final Cut Pro X, set the output format to match your Final Cut Pro X project.
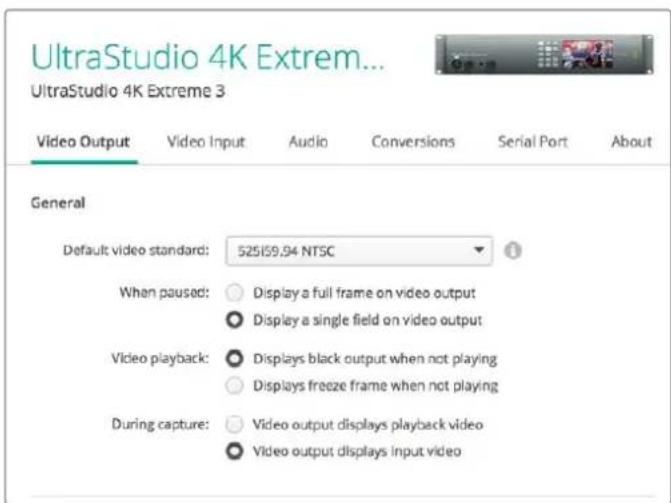
- When Paused
Click to select whether to display a full frame or a single field on the output when paused.
Video Playback
Click to select whether to display a freeze frame or black output when not playing.
During Capture
Click to select whether the video output displays the playback video or input video during capture. If you select the 'video output displays playback video' option, then your selection in the 'video playback' section will dictate what is displayed on your output. If you select the 'video output displays input video' option, then the input video will be displayed on your outputs.
During Playback
Some Desktop Video products are capable of converting Rec. 601 and Rec. 709 video outputs to Rec. 2020 for TVs and video monitors that may require it. If your Desktop Video hardware supports this feature, select 'convert to Rec. 2020' in the setup utility. If your video is already using the Rec. 2020 color space, or is displaying correctly, you can leave this setting set to 'keep default color gamut'.
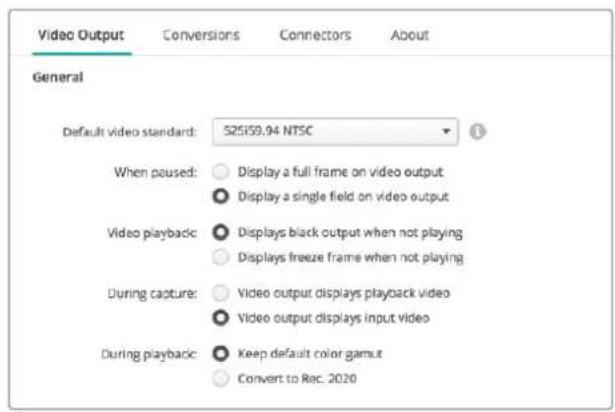
Select what to display on the output when paused, during video playback and during capture
SDI Output
Color Space
Click to select the color space to convert to. Options are 4:4:4 RGB video or Y, Cb, Cr 4:2:2.
3G-SDI Formats
Click to select whether to output 3Gb/s SDI signals as SMPTE Level A direct mapping or to have 3Gb/s signals sent with Level B mapping.
1080p HD and 2K
Click to select whether 1080p HD and 2K are output as 1080p progressive video, or as progressive segmented frame video.
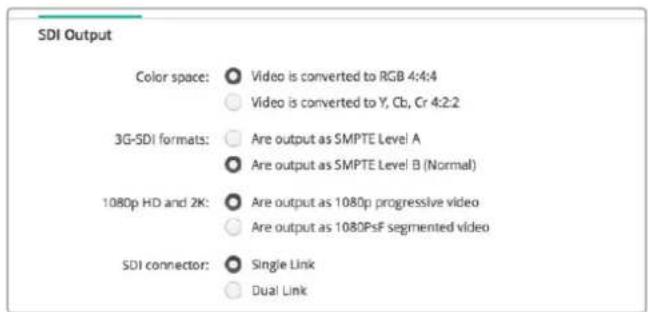
Use the SDI Settings to control the output of your SDI video.
SDI Configuration
Select between single link, dual link and quad link for 3G, 6G or 12G-SDI output. Some professional color grading monitors and projectors only accept high bandwidth signals like 2160p60 or DCI 4K 4:4 via quad link. UltraStudio 4K Extreme can output quad link 3G-SDI and you can also get a Quad SDI add on card for DeckLink 4K Extreme 12G.
SDI connector:

Single Link

Dual Link

Quad Link
Choose whether to output via single link, dual link or quad link for 3G, 6G and 12G-SDI video signals
8K Formats
8K video is played back via quad link SDI and you can choose your desired quad link output format.
The two options available are:
Square Division Quad Split - The 8K image is distributed as four quadrant 4K images in a 2 × 2 multi view configuration. Each 4K quadrant image is supplied via SDI using a quad link connection and reconstructed at the destination to form a complete 8K image. This is also the selection to use if you want to send each output to a separate display to create a video wall of Ultra HD monitors.
Sample interleave - Alternate pixels from a single 8K image are distributed as four separate 4K images via quad link SDI, then combined at the destination to form one complete 8K image. Therefore, an added benefit of this format is the option to use any of the four outputs as a down converted 4K image.
4K and 8K formats:

Are output as Square Division Quad Split (SQ)

Are output as Sample Interleave (SI)
When using desktop video equipment for 8K playback, set your desired quad link 8K output format
Set Analog Video Output
If your Blackmagic Design hardware has shared analog video connectors, you can choose whether to output your video via 'component', 'composite' or 's-video' by selecting between the 'analog video output' options.
HDMI 3D Output
This setting determines the 3D format for your HDMI monitoring.
Top and Bottom
Arranges both left and right eye images vertically with 50% compression.
- Frame Packing
Combines left and right eye images into a single frame without compression.
Side by Side
Arranges both left and the right eye images horizontally with 50% compression.
- Left Eye
Only the left eye image is displayed.
Line by Line
The left and right eye images are carried on alternate video lines without compression.
Right Eye
Only the right eye image is displayed.

Set your HDMI 3D Output format.
Analog Video Output Levels
Drag the 'video' and 'chroma' sliders to adjust the analog video output levels for component or composite video. Dragging the video slider affects the luma gain and the chroma sliders decrease or increase the color saturation. When using component video, you can adjust the Cb and Cr values independently. Click the 'link' icon to connect them if you want to adjust them simultaneously.
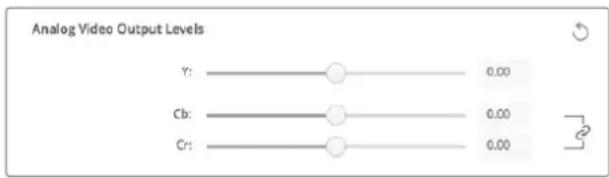
Adjust the video slider to set composite analog video output levels, and the Cb and Cr sliders for controlling color balance when using component video.
Use Betacam Levels
Blackmagic Design products use SMPTE component analog levels to maintain compatibility with most modern video equipment. Enable the checkbox if working with Sony Betacam SP decks.
NTSCIRE
Select the 7.5 IRE setup for the NTSC composite video used in the USA and other countries. Select the OIRE setup if you're working in Japan or countries that don't use the 7.5 IRE setup. PAL and high definition formats do not use this setting.

Enable the 'use Betacam levels' checkbox when working with Sony Betacam SP decks. Select the relevant NTSC IRE level when using an NTSC composite video format.
Reference Input
The reference adjustment lets you adjust the timing of the video outputs of your hardware relative to the video reference input. This is commonly used in large broadcast facilities where the video output needs to be accurately timed. The reference adjustment is in samples so you can get an extremely accurate timing adjustment down to the sample level.
A common example of how this setting would be used is where all the hardware in your facility has a stable common reference connected and then all the devices would have the timing set so the video outputs all match perfectly. This would then make it possible to switch between devices on a downstream router or production switcher and would eliminate any glitching when switching is performed.

If locking to a reference, adjust this setting to time the video output relative to the reference input.
Connector Mapping for DeckLink Quad 2
If you have a DeckLink Quad 2 installed in your computer, you can input or output SDI signals over 8 independent mini BNC connectors. This gives you the ability to capture or play back 8 separate video streams, similar to having 8 capture and playback devices in a single product. This is why your DeckLink Quad 2 appears in Desktop Video Setup as 8 individual DeckLink Quad devices which makes it easier to configure your inputs and outputs. You can even name each device so you can keep track of which DeckLink Quad device is being used for a specific video signal.
SDI connectors can be mapped to each device using the 'connector mapping' settings in the Desktop Video Setup utility, but it's important to know that specific connectors are dedicated to specific devices. For example, SDI 1 is dedicated to DeckLink Quad (1), and SDI 2 is dedicated to DeckLink Quad (1) and DeckLink Quad (5).

If you have a DeckLink Quad 2 installed, the 'connector mapping' setting lets you assign SDI connectors to each DeckLink Quad device.
You can see which SDI connectors are dedicated to each DeckLink Quad device by looking at the table below, where you can also check the mapping options for them.
Mapping Options
| DeckLink Quad Devices Dedicated SDI Connectors | |
| DeckLink Quad (1) SDI 1 and 2 or SDI 1 | |
| DeckLink Quad (2) SDI 3 and 4 or SDI 3 | |
| DeckLink Quad (3) SDI 5 and 6 or SDI 5 | |
| DeckLink Quad (4) SDI 7 and 8 or SDI 7 | |
| DeckLink Quad (5) SDI 2 or none | |
| DeckLink Quad (6) SDI 4 or none | |
| DeckLink Quad (7) SDI 6 or none | |
| DeckLink Quad (8) SDI 8 or none |
It's worth mentioning that when configuring an SDI connector for a specific device, it will also affect the device sharing that connector. For example, if DeckLink Quad (1) is set to use SDI 1 and 2, DeckLink Quad 5 will automatically be set to 'none' because its shared SDI connector is being used. Alternatively, if you select SDI 2 on DeckLink Quad (5), DeckLink Quad (1) will automatically be set to SDI 1. For this reason, it's important to note which SDI inputs or
outputs are being used by each device to avoid accidentally interrupting the input or output of another device.
TIP If you have an original DeckLink Quad installed in your facility and are using a custom designed SDK application, you can be confident that installing DeckLink Quad 2 will work in your system without having to make any changes to your application. Additional mapping features in your DeckLink Quad 2 will allow you to build on your existing system to provide even more input and output configurations if you need them.
Audio Settings
Audio Input
Click on a connector icon to set your 'audio input' connection for your Blackmagic Design hardware. You can select from the following inputs:
Embedded
Includes audio channels as part of video signals. SDI and HDMI are capable of carrying embedded audio.
AES/EBU
Is a digital audio signal that can carry 2 audio channels over a single connector.
XLR
Is a three pin audio connector that is predominantly used by professional analog audio equipment.
RCA or HIFI
Is a connector used to connect unbalanced analog audio to and from consumer audio equipment, such as HiFi systems, DVD players and televisions.
- Microphone
Phantom power supplies power through microphone cables and is a convenient power source for condenser microphones.
Enable the 'use +48V phantom power' option if your microphone requires phantom power. If you're unsure whether your mic needs phantom power or not, it's best to leave this box unchecked as there is a risk of causing damage to microphones that are self powered. An LED on the front of UltraStudio 4K Extreme will illuminate when phantom power is active. Be sure to wait at least 10 seconds for phantom power to discharge after disconnecting before plugging in a self powered microphone. Older ribbon type microphones and dynamic microphones are not suitable for phantom power usage.

Click on a connector icon to set your 'audio input' connection.
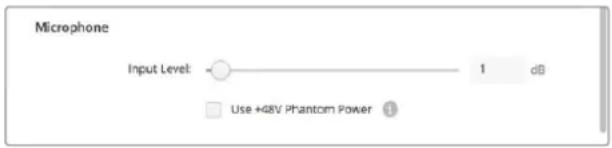
Drag the 'input level' slider to control your microphone input level.
HDMI Audio Output
This setting lets you remap the 5.1 audio channels in your project to match the configuration used by your HDMI monitoring equipment. For example, some home theatre AV receivers require your surround sound audio to be mapped to specific channels. If you are working on a project that uses a different surround sound channel ordering, such as SMPTE ordering, you can enable the 'Use 5.1 surround channel ordering' checkbox to ensure compatibility with your HDMI AV receiver.

Enable 'use 5.1 surround channel ordering' to ensure compatibility with other HDMI monitoring equipment
AES/EBU
Drag the sliders to adjust the 'ref' level, or gain, for the AES/EBU audio inputs and outputs. Press the reset icon to reset the gain to 0 dB.

Drag the 'output level' slider to control your AES/EBU digital output level.
Analog Audio Input Levels
Channel 1/Channel 2
These settings adjust the gain for the analog audio inputs when capturing. Click the 'link' icon to adjust them simultaneously.
Use HiFi Audio Levels
Professional XLR connectors are standard on UltraStudio and DeckLink models. If you want to connect consumer audio equipment to the XLR connectors, make sure you enable the 'use HiFi audio levels' checkbox as the audio levels between professional and consumer equipment differ. You'll also need to use an RCA to XLR adapter.
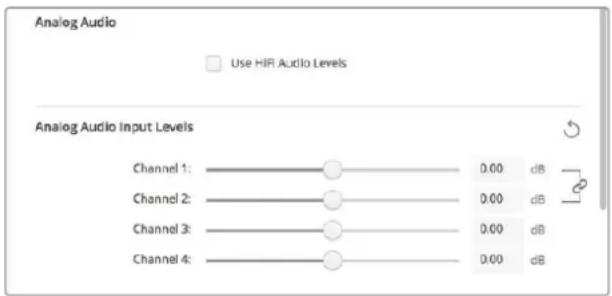
Adjust the input channel sliders to control your analog audio input levels. Enable the 'use HiFi audio levels' checkbox if connecting consumer audio equipment.
Analog Audio Output Levels
Channel 1/Channel 2
These settings adjust the strength of the audio signal, or gain, for the analog audio outputs while playing back video. Click the 'link' icon to adjust them simultaneously.
Reset Icon
When adjusting sliders, you may want to cancel your change. The reset icon is the circular arrow located at the right of each settings' title bar. Press the reset icon in each setting to restore the gain sliders to 0 dB.
Conversions Settings
Input Conversion
This setting enables real time up and down conversion during capture. Select your desired conversion from the 'input conversion' dropdown menu.
Input conversion results in up to a 2 frame delay, so you'll need to adjust your editing software's timecode offset to ensure frame accuracy.
Display As
Select how you would like your converted video presented. Depending on your input video's original aspect ratio, options may include letterbox, anamorphic, center cut, pillarbox, 16:9 zoom or 14:9 zoom.
Output Conversion
This setting enables real time up and down conversion during playback. Select your desired conversion from the dropdown menu.
Output conversion results in up to a 2 frame delay, so you'll need to adjust your editing software's timecode offset to ensure frame accuracy.
Convert Analog Outputs
Enable this checkbox to also perform your conversion on the analog video outputs.
Display As
Select how you'd like your converted video presented. Depending on your video's original aspect ratio, options may include letterbox, anamorphic, center cut, pillarbox, 16:9 zoom or 14:9 zoom.
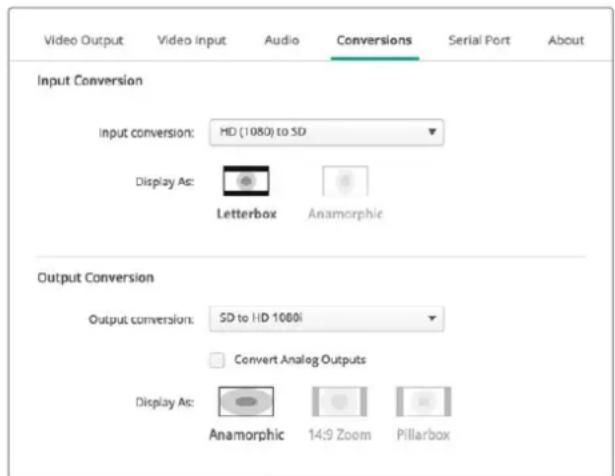
To set your up or down conversion settings, select your input or output conversion from the respective dropdown menu, and click on the desired aspect ratio selection. Remember to click 'save' to apply your settings.
The following table outlines the different aspect ratio selections available during conversions.
| Down Conversion | Source Image | Converted Image | |
| Letterbox | Scales the entire 16:9 HD image into a 4:3 SD frame leaving black bars on the top and bottom. | ||
| Anamorphic | Horizontally squeezes the 16:9 HD image into a 4:3 SD frame. | ||
| Center Cut | This setting cuts a 4:3 SD frame from the 16:9 HD image. This aspect ratio setting discards a portion from each side of the 16:9 image. | ||
| Pillarbox | Displays a 4:3 SD image inside an 16:9 HD frame. Black bars feature on the sides. | ||
| 16:9 Zoom | Scales the 4:3 SD image to fill the 16:9 HD frame. | ||
| 14:9 Zoom | A compromise between Pillarbox and 16:9 Zoom. Minimal black bars with slight crop top and bottom. |
About
Driver
The 'about' page in Blackmagic Desktop Video Setup provides information about your hardware's current driver and the last time your hardware was updated.
TIP You can generate a status report by clicking on the status report 'create' button, which lets you save a file containing technical information such as the video format detected on your input and output reference, color space, color sampling and bit depth, driver information, operating system and machine information. This report can be useful if you ever need to contact our technical support team. The file is also very small so can be easily emailed.
Product Notes
Changing the name of your Blackmagic Design equipment lets you identify each unit in the Desktop Video Setup software and keep track of where and how it's being used. This is useful if you have the same hardware in various locations on a network, plus it can be handy to name the different units for their purposes, e.g., Edit Suite 2, Color Suite 1, etc.
When you enter a name for your hardware in the label field, it is saved to the Blackmagic Desktop Video Setup home page and displayed beneath the hardware image.
You can also enter important information that you may want to refer to later, such as the hardware serial number, where and when your hardware was purchased, as well as the seller's contact details.
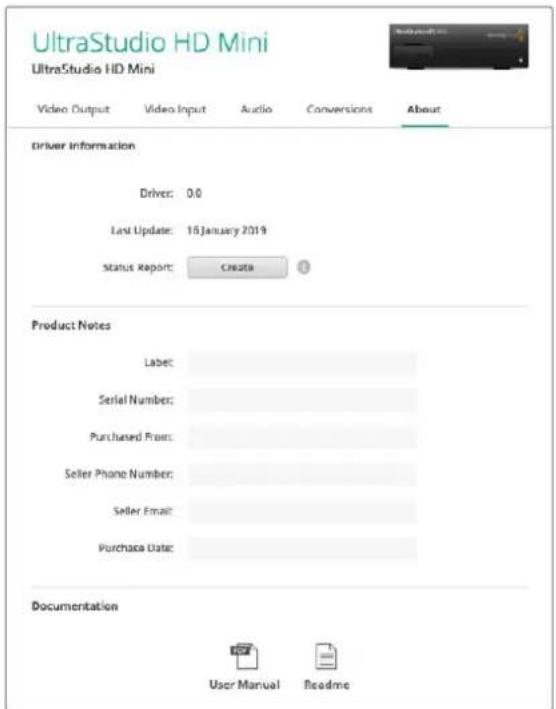
The 'about' section provides valuable information such as the driver version, user manual and release notes. You can also generate a status report and enter product notes specific to your hardware.
Teranex Mini Smart Panel
Attaching a Teranex Mini Smart Panel
Blackmagic UltraStudio HD Mini is a small capture and playback solution that shares a similar form factor to other Blackmagic equipment like Teranex Mini converters and recording decks such as HyperDeck Studio Mini. These products are designed to be portable and modular so you can take them with you on location, mount them on your desk, or attach them to a Teranex Mini Rack Shelf. The rack shelf lets you mount the equipment in a rack.
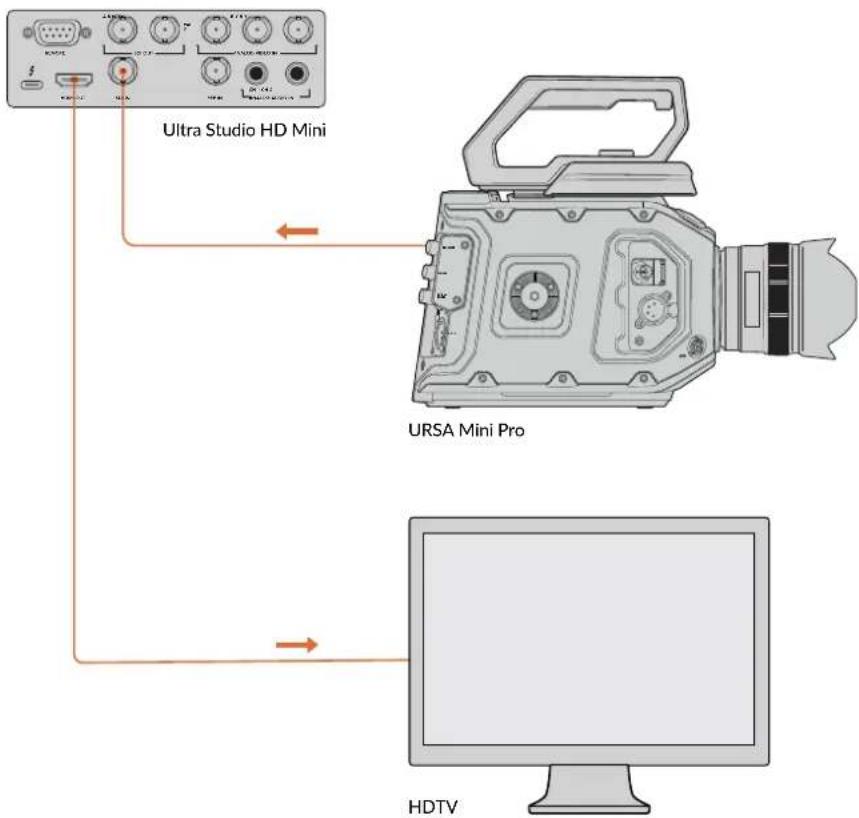
Attaching an optional Teranex Mini Smart Panel to your UltraStudio HD Mini allows you to preview video and audio directly from the front of the unit during playback and capture.
The built in LCD on the Teranex Mini Smart Panel displays the input image as well as audio meters, which allow you to preview your audio levels.
The Panels are hot swappable so you don't even need to turn off your Blackmagic UltraStudio HD Mini when installing it.
1 Remove the two M3 screws on each side of your Blackmagic UltraStudio HD Mini's basic front panel using a Pozidriv 2 screwdriver and gently pull the panel away from the front of your the unit.
2 On the inside of the basic panel, you'll notice a small clear plastic tube attached to the bottom corner. This tube directs light from the LED inside the unit to illuminate the status indicator on the basic panel. This tube should stay attached to the basic front panel.
TIP If reattaching the basic front panel, make sure the light tube is aligned with the slot in the front of the unit.
3 Align the connector on the rear of the Teranex Mini Smart Panel with the corresponding connector on the face of your UltraStudio HD Mini and gently push the Smart Panel towards the unit until the connectors are firmly seated. The Teranex Mini Smart Panel should make a firm connection and fit neatly inside the face of your UltraStudio HD Mini.
4 Re-insert the M3 screws from the original panel.
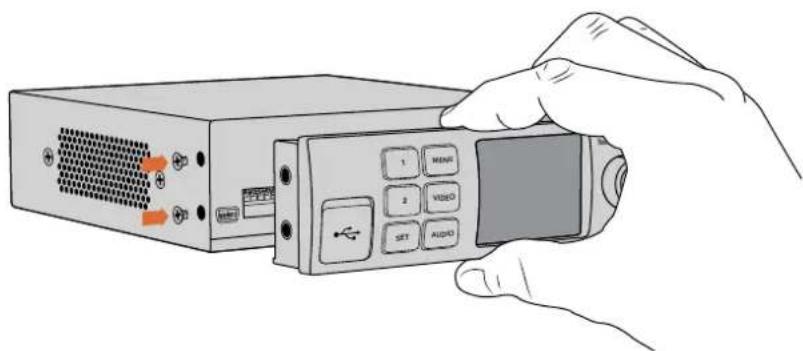
When installing the Teranex Mini Smart Panel to your Blackmagic UltraStudio HD Mini, holding the panel with your fingers and thumb aligned with the panel's rear connector will help guide it into place
If your UltraStudio HD Mini is installed in a Teranex Mini Rack Shelf, you will need to remove the unit from the rack shelf to access the front panel screws.
See the 'Teranex Mini Rack Shelf' section for more information.
The original basic panel is very strong, so if you need to mount your Blackmagic UltraStudio HD Mini in the back of a rack system or in areas where there are lots of cables or activity, you can always reinstall the original basic panel.
Smart Panel Features
LCD Display
The home screen is the first feature you'll see on your Teranex Mini Smart Panel's LCD display. The home screen shows you important information, including:
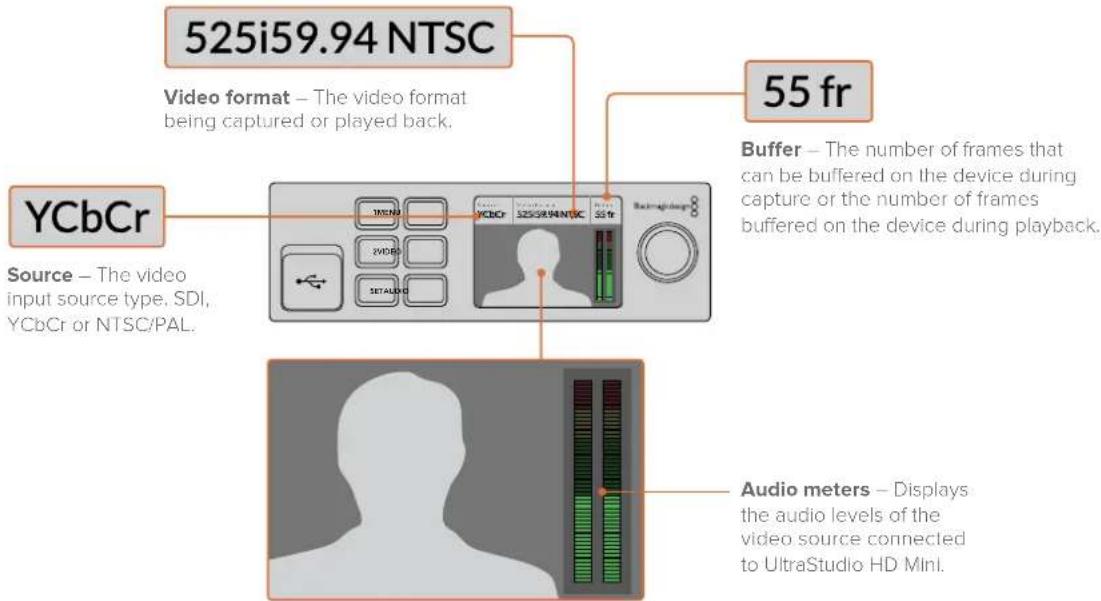
Video monitor - Displays the input video source that is connected to UltraStudio HD Mini.
Teranex Mini Rack Shelf
When using Blackmagic UltraStudio HD Mini with other equipment like Blackmagic ATEM Television Studio HD or Blackmagic Teranex Mini converters, you can use Teranex Mini Rack Shelf to install your units into a broadcast rack or road case. Up to three Teranex Mini sized units can fit neatly onto each 1RU Teranex Mini Rack Shelf.
UltraStudio HD Mini is installed into the rack shelf by removing the unit's rubber feet, if attached, and screwing the unit into the base of the shelf using the mounting holes on the underside.

The Teranex Mini Rack Shelf ships with two original blank panels which you can use to cover gaps if you don't need to install additional units.
For more information, check the Blackmagic Design website at www.blackmagicdesign.com
Using UltraStudio 4K Mini's Front Control Panel
On UltraStudio 4K Mini, most of the settings that can be changed in the Desktop Video Setup utility are also available via the LCD menu on the front panel. To navigate through the settings, press the 'menu' button to open the menu, then scroll through the options using the settings knob. To enter submenus and confirm a setting, press the 'set' button.
To exit the menu, keep pressing the 'menu' button to step back through the menus and return to the home screen.
TIP You can also navigate directly to the video or audio settings by pressing the 'video' or 'audio' buttons. This lets you go directly to the relevant settings without scrolling through the settings list, which can save time.

Use the LCD menu on UltraStudio 4K Mini's front panel to change settings
Audio Settings
UltraStudio 4K Mini also has additional audio settings in the LCD menu. These settings let you change the type of audio meters displayed on the LCD during capture and playback. The two audio meter types are VU and PPM.
vu
The VU meter, or 'volume units' meter, averages out short peaks and troughs in your audio signal. If you are using VU metering, adjust the output levels of your source so that the meter peaks at the 0db indicator on the audio meter. This maximizes the signal to noise ratio and ensures your audio is at the highest quality. If your audio peaks beyond the 0dB indicator there is a high risk of sound distortion. If you are using the analog audio inputs of the UltraStudio 4K Mini, the input levels can be adjusted in the LCD menu or setup utility.
PPM
PPM meters, or 'peak programme meters', display a 'peak hold' feature that momentarily holds the signal peaks with a slow fall back so you can easily see the audio level at which your audio is peaking.
Both VU and PPM meters can be set to use reference levels of -18dB or -20dB so you can monitor your audio to suit different international broadcasting standards.
SD Card Slot
UltraStudio 4K Mini's front panel also features an SD card slot that reads and writes files when the unit is connected to a Mac or Windows computer. This slot can be used just like a typical SD card reader or writer and is detected by your computer as another drive. This means you can quickly import clips from your camera's SD card or set Media Express to capture a clip to portable media.
DaVinci Resolve
Live Grading with DaVinci Resolve
Desktop Video 10 allows simultaneous capture and playback on Blackmagic Design 4K and 8K hardware. This is great for users who want to use the live grading feature within DaVinci Resolve, as it means you don't require two separate devices for input and output.
When using live grading on set, simply connect the output of the camera to the input of your Blackmagic Design hardware. Then connect the hardware's output to an on set monitor for grading evaluation and viewing.
Setting Up
1 Launch DaVinci Resolve. From the preferences menu, select the 'video and audio I/O' tab and select your hardware from the 'for Resolve Live use' option. Save your preferences and restart DaVinci Resolve to apply your changes.
2 Start a project and open the 'project settings' window. From the 'master settings' tab set the timeline resolution and frame rate to match your camera.
3 Go to the 'capture and playback' tab and select your desired format from the 'video capture and playback' menu.
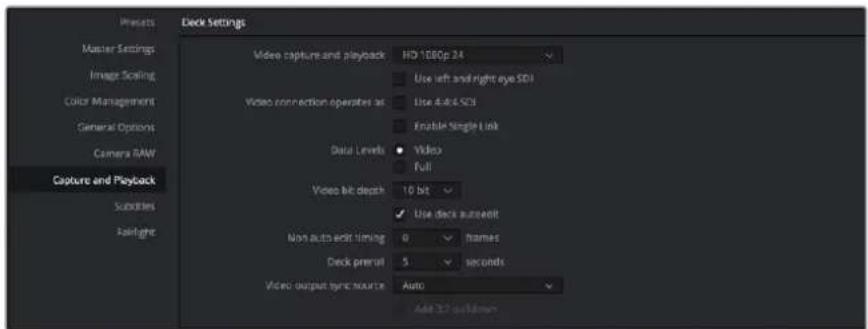
Select your format from the 'video capture and playback' menu.
4 Go to the 'edit' page and select file>new timeline.
5 From the 'color' page, click on the 'color' menu and select Resolve live > on. You should now see live video within the viewer and a bright red 'Resolve Live' button will appear above the video.
Using Resolve Live
1 In Resolve Live mode, the 'freeze' button (snowflake icon) freezes the current incoming video frame, so you can grade it without being distracted by motion occurring during the shoot.
2 Once you're happy with a grade, clicking the 'snapshot' button (camera icon) saves a snapshot of the current still in the viewer, the incoming timecode value, and your grade into the timeline. Snapshots are simply one frame clips. Once you've taken your snapshot, press the snowflake icon again to resume playing until you find the next shot you want to grade.
TIP Please refer to the DaVinci Resolve manual for more information on Resolve Live.
Editing with DaVinci Resolve
Blackmagic DaVinci Resolve features an editor friendly interface with all the tools to edit and finish projects. Whether you use the mouse to drag and drop clips, or your keyboard for precision editing, DaVinci Resolve features all of the functionality professional editors require.
Setting Up
1 Launch DaVinci Resolve. From the 'preferences' menu, select the 'video and audio I/O' tab and select your Blackmagic Design hardware from the 'for capture and playback use' option. Save your preferences and restart DaVinci Resolve to apply your changes.
2 Load a project, open 'project settings' from the file menu and under 'master settings', set your 'timeline resolution', 'timeline frame rate' and 'playback frame rate'.
3 Under the 'video monitoring' section, set your 'video format'. Blackmagic Desktop Video Setup will automatically change to the video format you choose for output to your Blackmagic Design video hardware.
4 Click the 'save' button to save the changes and close the project settings window.
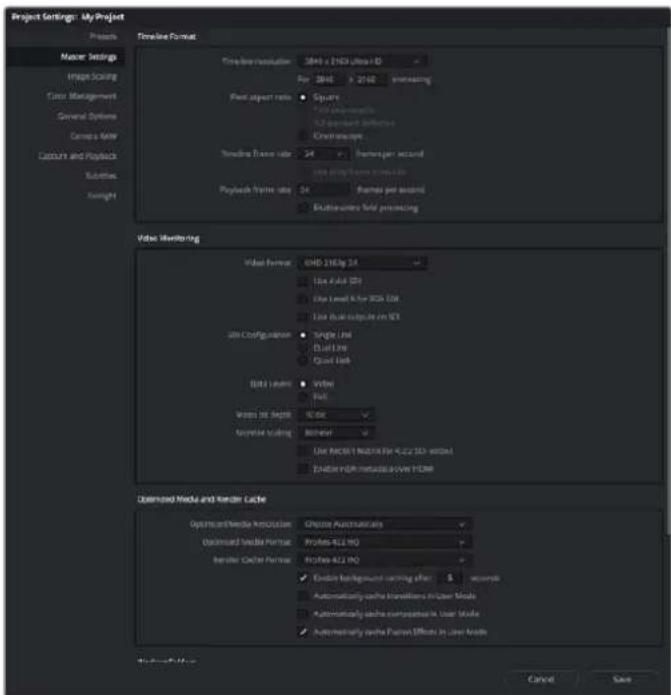
Use the 'project settings' window to set your timeline format and video monitoring options.
Editing
1 Use the media storage browser on the 'media' page to load your clips into the media pool.
2 On the 'edit' page, select file>new timeline, name your timeline and click the 'create' button.
3 Now you can drag a clip from the media pool to the source viewer on the left hand side.
4 You can set the in and out points in source clips by using the I and O keys and dragging the playhead in the bar below the viewer window.
5 To edit the clip into the timeline, simply drag and drop the clip from the source viewer into the timeline.
TIP Refer to the Blackmagic DaVinci Resolve manual for more detailed information on how to edit with DaVinci Resolve.
Using your Favorite 3rd Party Software
Adobe After Effects CC

After Effects CC
How to Preview Video
To display your composition in real time through your Blackmagic Design hardware, go to preferences > video preview. 'Enable Mercury Transmit' must be ticked in order to use your Blackmagic Design hardware with After Effects CC. Under 'video device', select Blackmagic Playback. You can now use a broadcast monitor to view your After Effects compositions in the correct video colorspace.
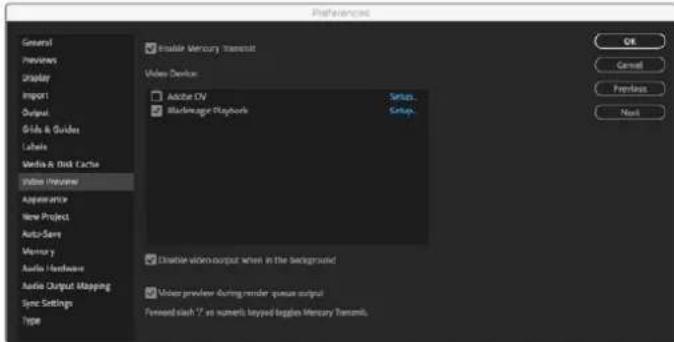
'Video Preview' preferences
If you work with unsupported or non standard frame sizes, these can also be correctly outputted by your Blackmagic Design hardware. Go to preferences > video preview and click the 'setup' button next to 'Blackmagic playback'. The 'Blackmagic device selection' window will appear. You can scale your image up or down to the next closest video standard supported by your hardware. For example, if you are using UltraStudio 4K and your After Effects composition is set to a resolution of 2048 × 1152 , scaling down will output DCI 2K, scaling up will output Ultra HD.
Rendering
When you have completed your composition, you can render a DPX image sequence or any of the following codec:
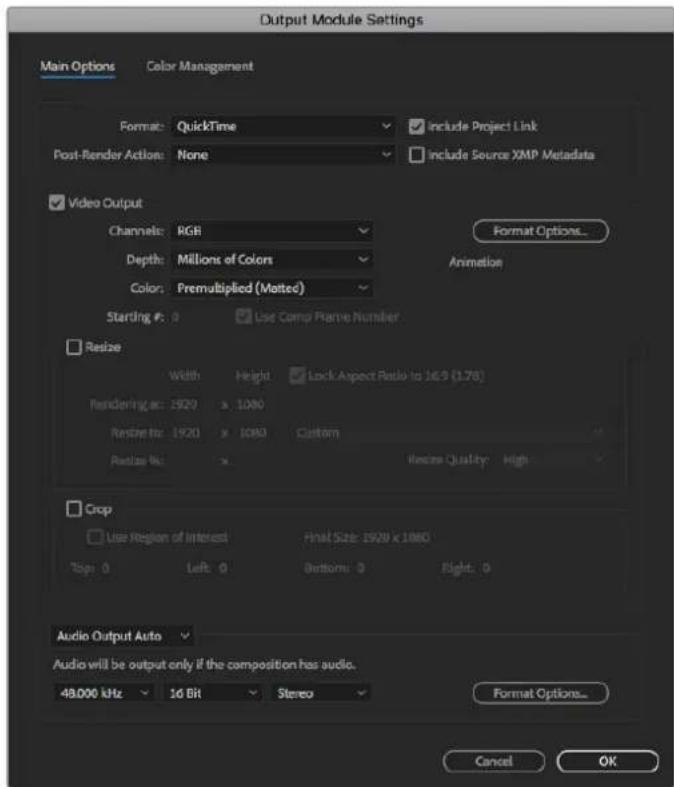
'Output Module Settings' rendering options
QuickTime codecs on Mac OS
- Blackmagic RGB 10 bit (uncompressed)
Apple Uncompressed YUV 10 bit 4:2:2
Apple Uncompressed YUV 8 bit 4:2:2
Apple Photo-JPEG (compressed)
Apple DV-NTSC (compressed)
Apple DV - PAL (compressed)
Other codecs including ProRes and DVCPRO HD will be available if you have Final Cut Pro installed.
AVI codecs on Windows
- Blackmagic 10 bit 4:4:4 (uncompressed)
- Blackmagic 10 bit 4:2:2 (uncompressed)
- Blackmagic HD 8 bit 4:2:2 (uncompressed)
- Blackmagic SD 8 bit 4:2:2 (uncompressed)
- Blackmagic 8 bit MJPEG (compressed)
Other codecs including DVCPRO HD and DVCPRO50 will be available if you have Premiere Pro CC installed.
QuickTime codecs on Windows
- Blackmagic RGB 10 bit (uncompressed)
- Blackmagic 10 bit (uncompressed)
- Blackmagic 8 bit (uncompressed)
Apple Photo-JPEG (compressed)
Apple DV-NTSC(compressed)
Apple DV-PAL (compressed)
AdobePhotoshop CC
Photoshop CC
How to Import and Export Video Frames
Import an image into Photoshop CC
1 Select file > import > Blackmagic image import.
2 Select the 'video input format' and the 'image bit depth' and then click 'import image'.
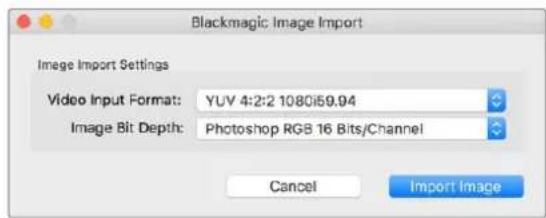
Image Capture
Export an image from Photoshop CC
1 Select file > export > Blackmagic image export.
2 Select 'video output format' and then click 'export image'.

Image Export
Once you have set the 'import' or 'export' options, subsequent imports and exports will not display the settings window. However, you can still change your settings, by holding the Option [Mac] or Ctrl [Win] key, when selecting import or export.
AdobePremiereProCC
Premiere Pro CC
Setting Up a Blackmagic Design Project
1 Open Premiere Pro and click on 'new project'. Type in a name for the project and select a storage location for it.
2 If your graphics card is supported by Premiere Pro CC's Mercury Playback Engine, the renderer option will be available and you should switch it to Mercury Playback Engine GPU acceleration.
3 In the 'capture format' drop down menu, select 'Blackmagic capture'. Click the 'settings' [mac] or 'properties' [windows] button to set the video and audio capture settings. Select the video standard and video format. Click 'ok' to return to the 'new project' window.
4 Click on the 'scratch disks' tab to set the locations for your captured video, captured audio, video and audio previews. Click 'ok' and your new project will open.
5 Now check your default system audio is not set to Blackmagic Desktop Video.
On Mac OS, open 'system preferences', click on the 'sound' option and in the output tab, make sure your Blackmagic device is not selected. In the input tab, select your microphone input, making sure your Blackmagic product is not selected.
On Windows, go to the task bar and right click on the audio 'speaker' icon to open the sound settings. Click on the 'playback' tab and set your PC to use the on board sound hardware or a sound output device other than your Blackmagic Design hardware. Click on the 'recording' tab and set the computer to use a recording device other than your Blackmagic Design hardware.
Back in Adobe Premiere Pro, click on the 'preferences' menu and select 'audio hardware'. Set your 'default output' to 'built-in output' using the dropdown menu. Under 'output mapping', map output for 'Adobe desktop audio'.
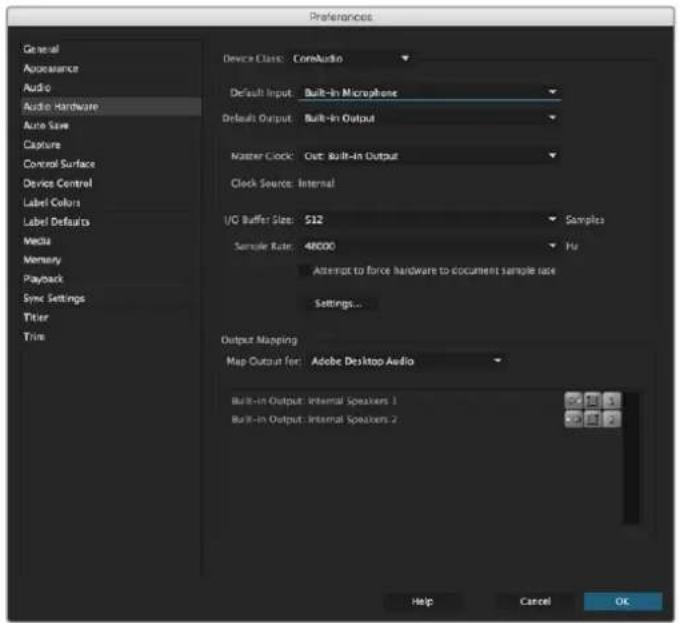
When setting up Adobe Premiere Pro's audio hardware preferences, make sure the default audio output and output mapping settings are set to 'built-in output'.
7 In the 'playback' menu under preferences, select 'Blackmagic playback' from the 'audio device' dropdown menu and check the 'Blackmagic playback' box under 'video device'. Press 'ok'.
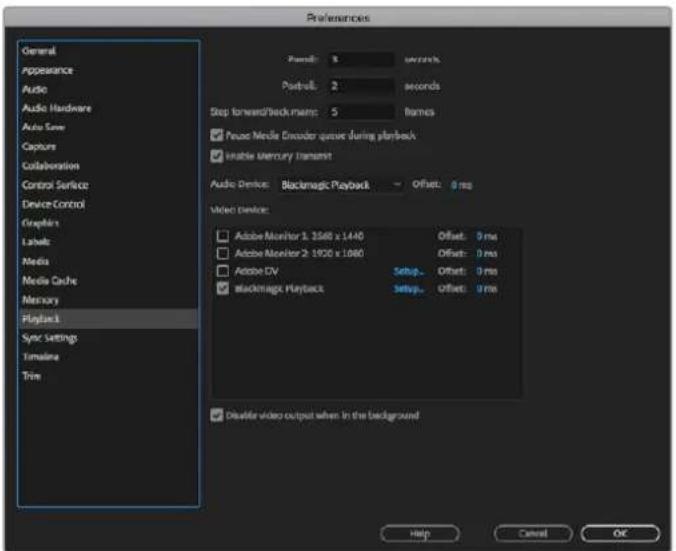
Set Adobe Premiere Pro's 'playback' audio device to 'Blackmagic Playback' and be sure to check the 'Blackmagic Playback' checkbox in the 'video device' settings.
8 To create a new sequence, click file > new > sequence. Select the desired preset, give the sequence a name and then click 'ok'.
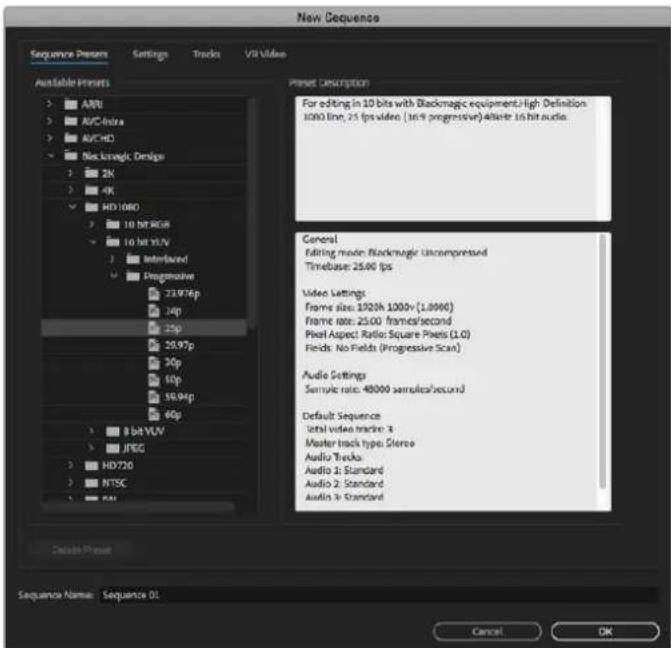
Create a new sequence from the Blackmagic Design presets
Device Control
Many Blackmagic Design capture and playback models feature RS-422 device control for controlling decks. Click preferences > device control, and check that Blackmagic device control has been selected from the 'devices' menu. Click 'ok'.

Playback
If you work with unsupported or non-standard frame sizes, these can also be correctly outputted from your Blackmagic Design hardware. Go to preferences > playback, and click the 'setup' button next to 'Blackmagic playback'. The 'Blackmagic device selection' window will appear. You can scale your image up or down to the next closest video standard supported by your hardware. For example, if you are using UltraStudio 4K and your Premiere sequence is set to a resolution of 3996 × 2160 , scaling down will output Ultra HD, scaling up will output DCI 4K.
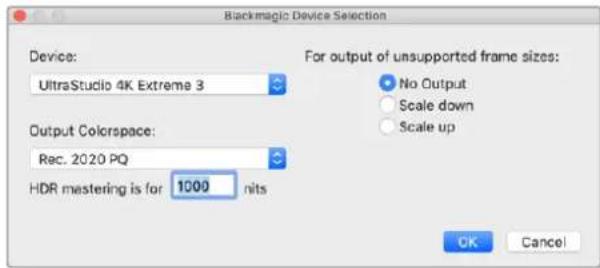
Select an option to output unsupported frame sizes.
If your Desktop Video device supports HDR, you can also set the color gamut and transfer function for HDR projects. These include HLG and PQ for Rec 2020. The HDR mastering display setting should be set to the maximum nits your monitor or television is capable of displaying.
Capture
To capture choose:
File > capture [F5]
Enter your desired tape and clip name.
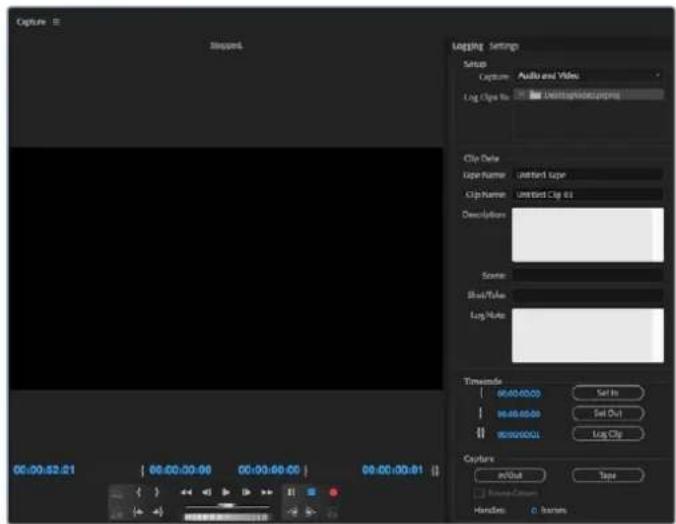
Set your capture and device control settings in the capture window
To immediately capture, or to capture from a non-controllable device, click the red record button [G].
If you wish to log the clip using RS-422 deck control, enter the desired in and out points using the 'set in' and 'set out' buttons, or by manually typing the timecode and clicking 'log clip'. Enter a clip name and press 'ok'. The empty clip will now appear in the 'project' window. Repeat this until you have logged all of the clips you wish to batch capture.
Then choose: File > batch capture [F6]. To set handles on the clips, enable the option to capture with handles and type the number of additional frames you require at the start and end of each clip and click 'ok'. You will now be prompted to enter your tape. Click 'ok' and your clips will now be captured.
Export to Tape
If you want to edit your timeline to an external deck, you can do so using Premiere Pro's 'edit to tape' feature. Choose between two export types: insert and assemble. Insert editing requires unbroken timecode for the duration of the project which is to be laid to tape, and is also a great solution when you want to replace a shot on an existing tape. In assemble mode, the tape needs only to be "blacked" until a point just beyond the starting timecode of the sequence. As assemble editing erases the tape ahead of the record heads, it should not be used where other projects already exist on the tape after the out point of your edit.
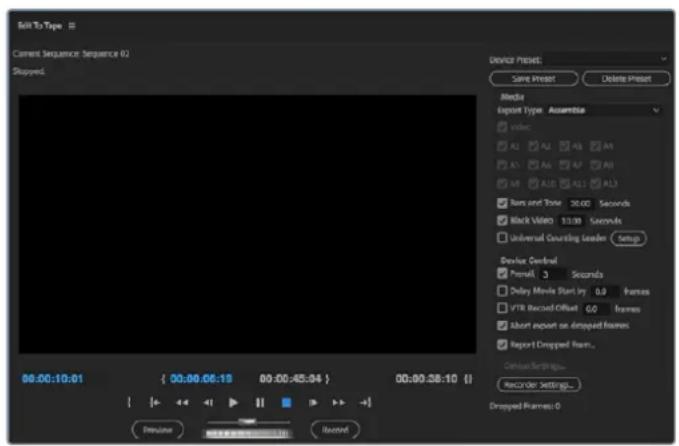
Use the 'edit to tape' feature to export your edit to an external deck
TIP When exporting to tape using the assemble mode, it's always good to add at least 30 seconds of black to the end of your sequence. This assists with tape post roll functions and prevents unwanted media appearing directly after your footage.
To export to tape via RS-422 deck control:
1 Make sure the Adobe Premiere Pro preferences are configured correctly as described in 'setting up a Blackmagic Design project' earlier in this section.
2 Open Premiere Pro's 'edit to tape' window by clicking File > export > tape (serial device). Click on 'recorder settings', select Blackmagic capture from the dropdown menu and click 'settings'. Choose your video standard and format along with audio settings. Click 'ok'. If the capture format does not match the output format, it can cause confusion for the deck during preroll and audio might not be exported.
3 Now choose your 'export type' by selecting 'assemble' or 'insert' from the dropdown menu, enter the desired in point timecode and click 'record'.
When editing to tape, the software waits at the first frame of your project for the deck to drop into record at the predetermined timecode. Should you find that either the first frame of your program is repeated or lost during the edit to tape procedure, you will need to adjust the 'playback > video device > offset' setting to bring the deck and computer in sync. You should only need to do this once with any combination of deck and computer and the correct setting will be retained.
Adobe Character Animator CC
Some Desktop Video capture and playback devices let you connect graphics generated by Adobe Character Animator CC to other video equipment such as a confidence monitor. For example, you may want to use the performance of a virtual character in a video edit and monitor the performance in realtime.
This section shows you how to set the output options in Adobe Character Animator CC.

1 In Adobe Character Animator, select Character > Preferences > Live Output.
2 Ensure 'enable Mercury transmit and syphon' is checked.
3 Ensure 'Blackmagic playback' is checked.
4 Select 'setup' next to 'Blackmagic playback'.
5 In the 'output mode' drop down menu, choose a mode from the following options.
Playback
Outputs a signal directly from Adobe Character Animator CC without any keying.
Internal Keying
This option allows you to superimpose your animated character over another video source using your Desktop Video device's internal keyer. For example, the background could be a video of a location relevant to a news story and the character could be superimposed over the top providing a live interview. Another option would be to have the character superimposed over the broadcast feed and sit in the bottom corner like a logo or watermark, providing reactions to the content that is being broadcast.
Fill/Key
If you want to perform the keying using an external switcher, for example an ATEM switcher, you can set the output mode to fill/key. The fill signal is the animated character and the key signal is the grayscale mask that tells a keyer to make the space around the character transparent. This allows the keyer to superimpose the character over a background.
Final Cut Pro X
You can use the A/V output option in Final Cut Pro X to output your video through Blackmagic Design video hardware. If you are using a Desktop Video device that supports HDR, you can also view and edit HDR video with a wide color gamut on a compatible television or monitor.
Final Cut Pro X
Setting Up Final Cut Pro X
1 Ensure you are running Final Cut Pro X 10.0.4 or later with the latest version of Mac OS.
2 Open Blackmagic Desktop Video Setup. Click on the 'video standard' drop down menu and then set the same format that you will use in your Final Cut Pro X project. For example, 2160p29.97. The format should be the same as the video format of your clips. The video standard setting also determines the monitoring video output mode.
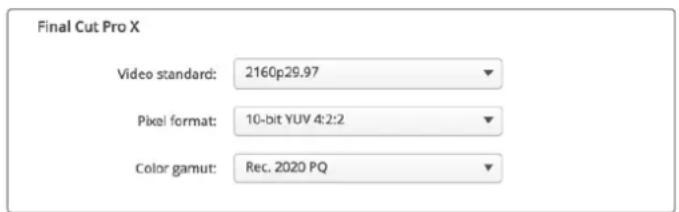
Set the 'output format' to match your Final Cut Pro X project format.
3 Click on the 'pixel format' drop down menu and set it to match a format your TV or external monitor will accept. For example, if you are working with a wide HDR color gamut, choose '10-bit YUV 4:2:2' or '10-bit RGB 4:4:4' based on your monitor's compatibility requirements.
4 Click on the 'color gamut' drop down menu and set this to match the color gamut your project is using. If you are working with a standard or high definition project with a standard dynamic range, choose 'Rec. 601/Rec. 709'. If you are using a Desktop Video device that supports HDR and you are editing a 4K or high dynamic range project, select 'Rec. 2020'. For projects that are both 4K and high dynamic range, choose either 'Rec. 2020 HLG' or 'Rec. 2020 PQ'. This should also be a format your TV or monitor is capable of displaying.
Now that you have set your output display settings using Desktop Video Setup, you can create a new project in Final Cut Pro X.
To create a new project:
1 Launch Final Cut Pro X. In the library properties, you will notice the default untitled standard project name. Click on its corresponding 'modify' icon. Create a new library by going to the file menu, then selecting new and library.
TIP If after creating a new library, the library properties on the right side of the screen are hidden, enable them by clicking the clapper board icon in the top left corner. This opens the libraries sidebar.
2 Select the new library in the libraries sidebar and click its corresponding 'modify' icon.
An options window will appear asking you to set the color space for your project. Select 'standard' for an SD or HD project using a standard color gamut. If you are intending to create a wide color gamut HDR movie, select 'wide gamut HDR'.
3 Click 'change' to confirm your setting.
4 Create a new project by right clicking the library name in the libraries sidebar and selecting, 'new project'. Type a name and choose an event to place your project in. If you haven't already created one, you can choose the default event, which is named as the current date.
5 Click 'use custom settings'. Set the 'video format', 'resolution' and 'rate' to match the video standard and frame rate you set in Blackmagic Desktop Video Setup.
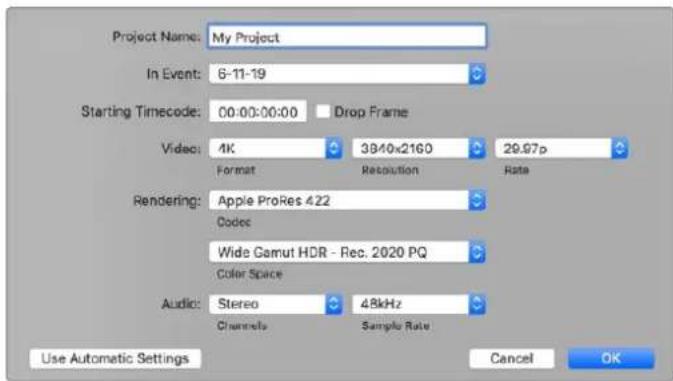
6 Set 'rendering' to your preferred Apple ProRes codec or 'uncompressed 10-bit 4:2:2' for an uncompressed workflow.
7 If your project is standard HD, you don't have to change the color space as Final Cut Pro selects the standard HD Rec. 709 color space for you. If you are working on an HDR project with a wide color gamut, select the color space and either PQ or HLG according to what your TV or monitor is able to display.
8 Set the audio channels to stereo, or you can choose 'surround' for 6 audio channels. Set the audio sample rate to the television rate of 48kHz
9 Click OK to complete the creation of your new project.
If you have an external HDMI or SDI monitor connected, you will need to ensure your new project displays correctly.
To set the output display settings in Final Cut Pro X:
1 Go to the Final Cut Pro menu, choose 'preferences' and then click the 'playback' tab. Ensure the 'A/V Output' setting has 'Blackmagic' selected and the video standard matches your project. Close the preferences.
2 In the menu bar, select 'window' and click on 'A/V Output' to enable the video output via your Blackmagic Design video hardware.
To configure the audio output on Mac OS:
1 Open the Mac OS 'system preferences' and click on the 'sound' icon.
2 Click on the 'output' tab and select 'Blackmagic Audio' for the sound output.
TIP You can also monitor audio via your Desktop Video hardware.
Playback
1 Import some clips in to your new project.
2 You can now use the Final Cut Pro X timeline on your computer monitor and view the video preview on the monitor or TV connected to the output of your Blackmagic Design video hardware.
Capturing Video and Audio
You can use Blackmagic Media Express to capture video and audio with your Blackmagic Design video hardware. Once you have captured the clips, you can import them into Final Cut Pro X for editing.
When capturing clips with Media Express, make sure you choose one of the video formats that is also supported by Final Cut Pro X. For example, Apple ProRes 4444 XQ, ProRes 4444, ProRes 422 HQ, ProRes 422, ProRes 422 LT or uncompressed 10-bit 4:2:2.
Editing to Tape
Once you have completed a project in Final Cut Pro X, you can render the project to a movie file and then use Blackmagic Media Express to master the movie to tape with your Blackmagic Design video hardware.
1 Select your clips from the timeline in Final Cut Pro X.
2 Go to file>share>master file and the 'master file' window opens.
3 Click 'settings' and select your desired video codec from the dropdown menu.
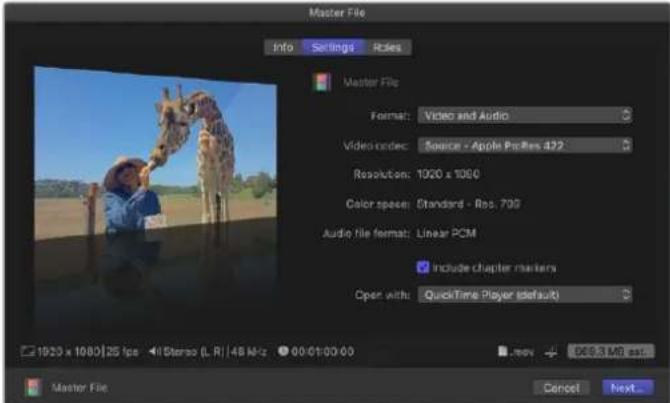
4 Click 'next...' and select a location for your movie and then click 'save'.
5 Open Media Express and import the clip that was exported from Final Cut Pro X.
Refer to the Blackmagic Media Express section of this manual for 'Editing video and audio files to tape'.
Avid MediaComposer
Avid MediaComposer captures and plays back up to 4K video and audio with Blackmagic Design video hardware and also supports RS-422 deck control. Blackmagic plugins for MediaComposer are automatically installed if MediaComposer is installed before the Desktop Video software.
Avid MediaComposer
Setting Up
1 Launch MediaComposer and the 'select project' dialog box will appear.
2 Choose your preferred 'user profile' if you have previously created one.
3 Select a private, shared or external project location for your project.
4 Click the 'new project' button.
5 Type a project name and set the project options including format, color space and stereoscopic. Click 'ok'. The color space and stereoscopic settings can be changed later in the 'format' tab of the project.
Type a project name and set the project options.
Double click the project name in the 'select project' dialog box. The MediaComposer interface will appear along with the project window for your new project. You have completed setting up your project.
Playback
As a quick test to make sure everything is connected correctly, go to the 'help menu', click 'read me' and select the MediaComposer Editing Guide. Follow the 'Importing Color Bars and Other Test Patterns' section. Double click the imported file to play it. You should now see the image on both your computer monitor and your Blackmagic Design hardware output.
If you can't see any video on your Blackmagic Design hardware output, check the connections again and ensure you have the correct output settings configured within Blackmagic Desktop Video Setup by choosing tools > hardware setup from within Media Composer. Make sure the hardware icon above the timeline is enabled.
NOTE If you are using an external Blackmagic video device such as Blackmagic UltraStudio 4K, make sure it is powered and connected prior to starting MediaComposer.
Capture from Non-Controllable devices
Many video sources including all kinds of modern cameras and disk recorders, as well as old cameras and VHS tape players, do not have any device control.
To capture video without deck control:
1 Choose file > input > tape capture to open the 'capture tool'.
2 Click the 'toggle source' button so that the button's icon of a deck shows the satellite button, an earth icon with plus symbol. This symbol indicates that deck control has been disabled.
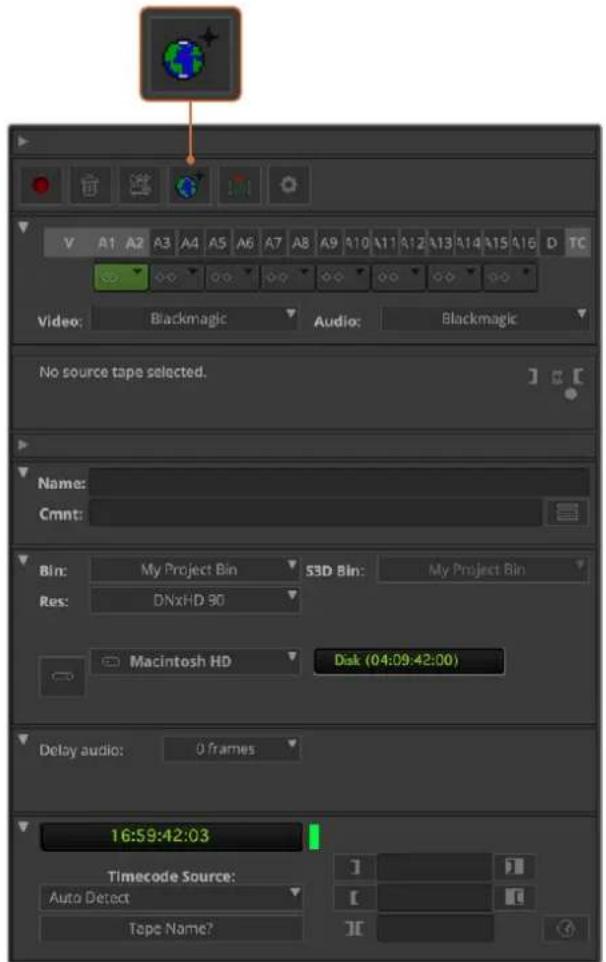
Set up the 'capture tool' to capture video without deck control by clicking the 'toggle source' button.
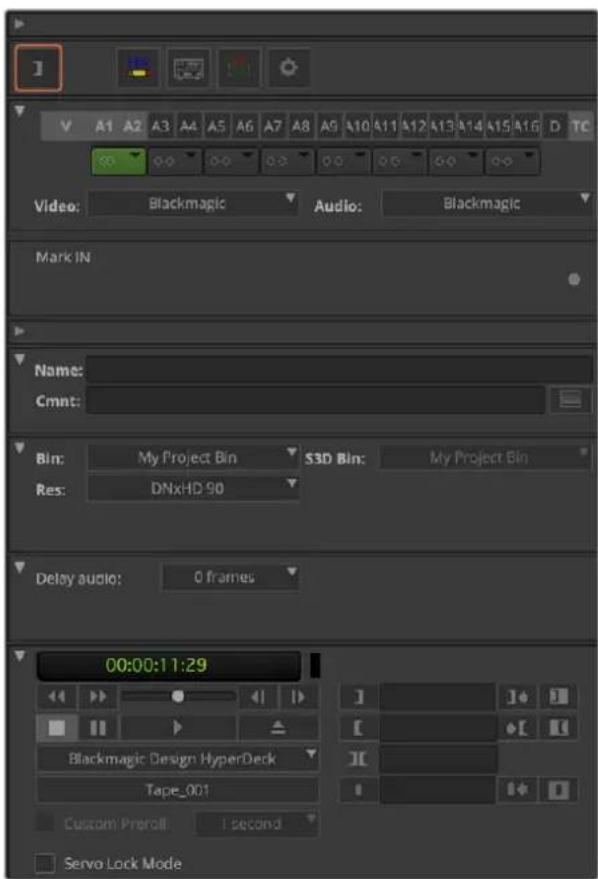
3 Select the video and audio source tracks you wish to capture. These are labeled 'V' and 'A1', 'A2', etc. Using the dropdown menus below, select Blackmagic for both video and audio.
4 Use the 'bin' menu to select a target bin from the list of open bins.
5 From the resolution menu labeled 'res', choose which codec you wish to use for your captured clips. In this example, select DNxHD175x for 10-bit HD video.
6 Select the disk storage for your captured video and audio. Use the 'single/dual drive mode' button to choose if video and audio will be stored together on a single drive or on separate drives. Select the drives for your captured media from the 'target drives' menu.
7 Click the 'tape name?' button at the bottom of the window to open the 'select tape' dialog box. Add a tape name, or select from the list if you've used the tape before.
Ensure your video and audio source is ready or playing and then click the 'capture' button. The capture button will flash red while recording. Click the capture button again to end the capture.
Capture from Controllable Devices with UltraStudio, DeckLink and Teranex
If you have a deck that connects via RS-422, you will need to configure the deck settings before performing a capture with deck control.
1 Connect an RS-422 serial cable from your Blackmagic Design video hardware and your deck. Set the deck to 'remote'. If you're using an external Blackmagic Video device, make sure it it connected and powered prior to starting Media Composer.
2 From your project window, click the settings tab and double click on 'deck configuration'.
3 In the 'deck configuration' dialog box, click 'add channel' and then set the channel type to 'direct' and the port to 'RS-422 deck control'. Click 'ok' and choose 'no' when asked, 'do you want to autoconfigure the channel now?'
4 Click 'add deck' and then select your brand and model of deck from the device menus and also set the desired preroll. Click 'ok' and then 'apply'.
5 Under the settings tab, double click on 'deck preferences'.
6 If you plan to make assemble edits to tape, enable the option to 'allow assemble edit and crash record for digital cut'. If this option is left unchecked, you will only be able to perform insert edits. Click 'ok'.
TIP If MediaComposer fails with the error, 'failed to find coincidence point on tape', you can check the 'relax coincidence point detection' option in deck preferences to continue.
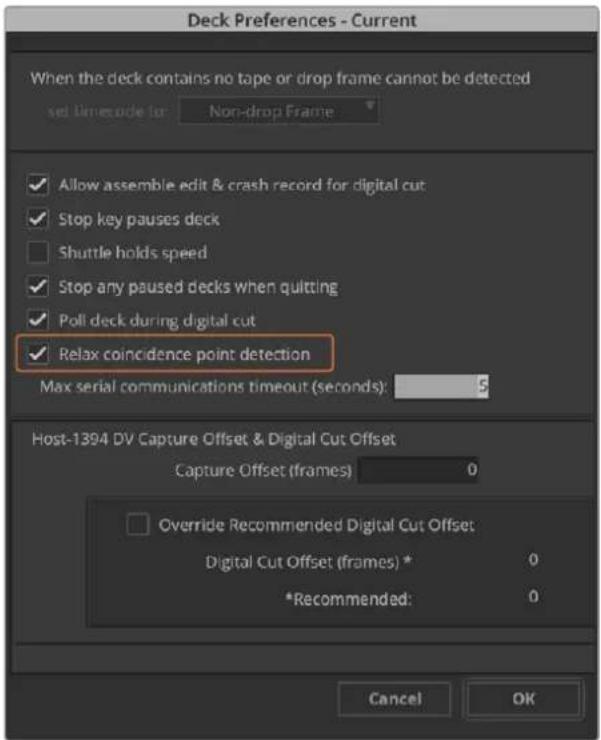
In the 'deck preferences', enable the option to 'relax coincidence point detection'.
To capture with deck control on the fly:
1 Choose file > input > tape capture to open the 'capture tool'. If a connected deck is recognized and contains a tape or disk, you will be prompted to enter a tape name, or you can choose it from the list.
2 The 'toggle source' button should show the icon of a deck. If the satellite icon is present, click the button to enable deck control and make the deck icon appear.
3 The 'capture/log mode' button should show the 'cap' icon. If this button displays a 'log' icon, click the button to switch to capture mode and the cap icon should appear.
4 If 'no deck' is displayed in the timecode window, or a deck name appears in italics underneath, click the dropdown menu and select 'check decks'. When deck control is re-established, the deck name will appear without italics. Now try the standard J, K, L shortcut keys to control the deck.
5 Select Blackmagic for the video and audio input. Select your video and audio source tracks, target bin, res, target drive and tape name the same way as in 'capture from non-controllable devices'.
6 Use the deck controller window in the 'capture tool' to cue the tape and start playing.
7 Click the 'capture' button. The capture button will flash red while recording. Click the capture button again to end the capture.

Set the 'cap' and 'toggle source' buttons to use deck control. Use the 'deck controller window' to cue the tape and start ple
Batch Capture with UltraStudio and DeckLink
To log clips for batch capture:
1 Choose file > input > tape capture to open the 'capture tool'.
2 If the deck is in satellite mode, click the toggle source button to change it to deck mode. Click on the 'capture/log mode' button so it displays the 'log' pencil icon.
3 Configure video and audio input, video and audio source tracks, target bin, res, target drive and tape name the same way as in 'capture from non-controllable devices'.
4 Use the 'deck controller window', or use the standard j, k, l shortcut keys, to shuttle backwards, pause and shuttle forwards on the deck and locate the video you want to capture.
5 Click the 'mark in/out' button, to the left of the log button. The icon will alternate between in and out so you only have to click the one button to mark all your in and out points and log your clip. This can be more convenient that using the separate 'mark in' and 'mark out' buttons in the deck controller window. Alternatively use the 'i' and 'o' keys on the keyboard to mark in and out points, and the keyboard shortcut 'F4' to log the clip.
Click on the 'mark in/out' button or use the 'I' and 'o' keys on the keyboard to mark in and out points.
6 When you have finished logging your clips, close the capture tool, open the logging bin and select the clips you want to capture.
7 From the 'clip' menu, choose batch capture, select the desired options in the resulting dialog box and click 'ok'.
Recording to Tape with UltraStudio and DeckLink
Once you have captured your clips, dragged them in to the timeline, edited them and applied and rendered any effects, you will want to record the completed project to tape.
1 Double click your sequence, to open it into the timeline window.
2 Choose file > output > digital cut to open the 'digital cut tool'.
3 Set 'output mode' to real time and bit depth to 10-bit. Check 'entire sequence' to record your whole sequence, and check the 'remote' deck control option.
4 Choose 'insert edit' or 'assemble edit' for precise edits onto a timecode striped tape. Alternatively choose 'crash record' for a simple way to record. If 'insert edit' is the only option, go to the settings tab in your project, double click on 'deck preferences' and enable 'allow assemble edit & crash record for digital cut'.
5 If a deck name appears in italics or 'no deck' is displayed, click the menu and select 'check decks' until the deck is listed without italics and deck control is re-established.
6 Press the 'play digital cut' button (red triangle icon) to record your sequence to tape.
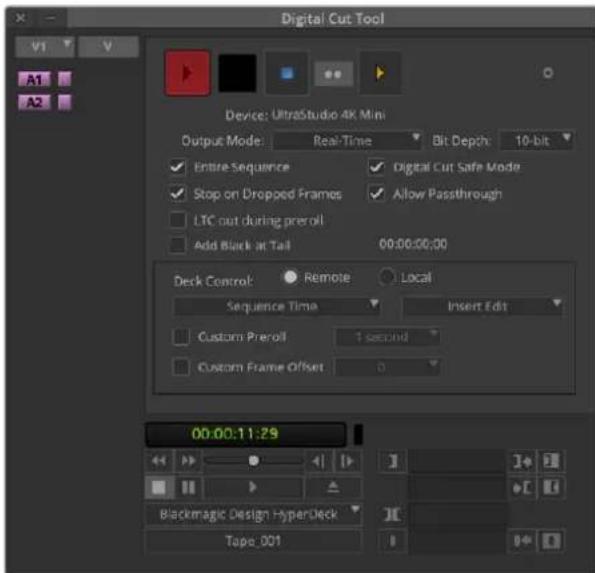
The 'digital cut tool' is used for recording to tape.
Blackmagic Media Express
What is Blackmagic Media Express?
Blackmagic Media Express software is included with every UltraStudio, DeckLink and Intensity as well as every ATEM Switcher, Blackmagic Camera, H.264 Pro Recorder, Teranex Processor and Universal Videohub. Media Express is a great tool when you don't need the complexity of NLE software but simply want to capture, play back and output clips to tape.
Capturing Video and Audio Files
Setting Up a Project
Media Express automatically detects your input video format and sets the 'project video format' to match. If you want to set the project video format manually:
1 Go to Media Express>preferences on Mac, or edit>preferences on Windows or Linux. Select your 'project video format' from the dropdown menu at the top of the preferences window. You can choose from a range of compressed and uncompressed capture formats, or even a DPX image sequence from the 'capture file format' drop down menu. Video will be captured in the chosen format and saved as a QuickTime movie. You can also choose to capture an RGB source using a YUV codec or vice versa.
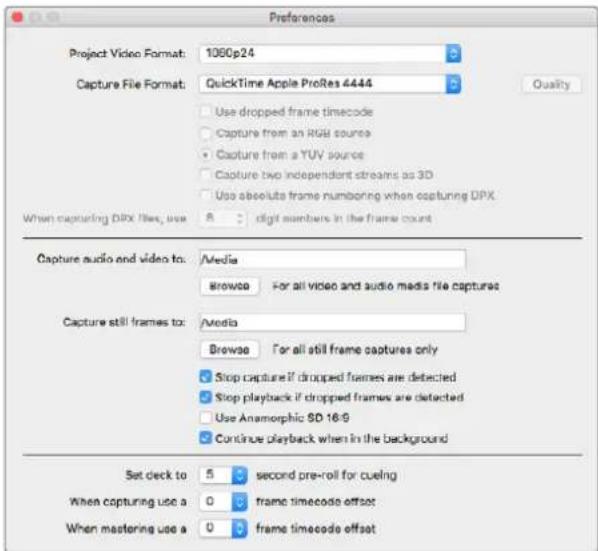
Use the preferences window to set project video format, capture file format, storage location and other settings.
2 Set the storage location for your captured video and audio. Click the 'browse' button to point the software to a folder on your computer.
3 Choose whether to stop capture or playback if dropped frames are detected.
Standard definition projects use the 4:3 aspect ratio unless you enable the 'use anamorphic SD 16:9' checkbox.
Applications will normally stop playing video if you send them to the background. Tick the checkbox 'continue playback when in the background' if you want Media Express to keep playing video even if you open another application.
The final options relate to tape decks with RS-422 deck control and include pre-roll and timecode offsets.
Capture
To capture video, all you need to do is connect a video source, wait for Blackmagic Media Express to detect your input and press the 'capture' button.
Enter a description for your video.
1 Start by connecting your video source to an input of your Blackmagic Design hardware. Launch Desktop Video Setup and check that the 'input connection' is the same as your video source, e.g., SDI, HDMI, Component, etc.
2 Open Media Express and click the red 'log and capture' tab.
3 Your source video will appear in the preview pane. Enter a description into the 'description' field.
4 Click the ^+ button next to the description to add it to the automatic name' field. Click the ^+ button next to any of the other fields that you wish to add to the name field.
- To increment the value in each of these fields, click the corresponding clapper board icon. Alternatively, type directly into any field to customize its name and number.
- The text in the automatic name field will be applied to the clip(s) about to be captured.
- To log the clip as a favorite, click the star icon next to the name field.
- For a clip name confirmation prompt to appear before every capture, click the ! icon next to the name field.
5 Set the desired number of audio channels to be captured.

Set the desired number of audio channels to be captured.
6 Click the 'capture' button to start recording. To stop the capture and keep the clip, click the 'capture' button again or press esc. The captured clips are added to the media list on the left side of Media Express.
Click the 'capture' button to begin capturing.
If the video input format changes from the project video format, Media Express will automatically detect it and will prompt you to save the current project and create a new one.
Blackmagic Media Express will automatically detect if you change your ATEM switcher's program output format and will give you the option to save and start a new project.
Logging clips
Ensure an RS-422 serial cable is connected between your Blackmagic Design video hardware and the deck.
Ensure the deck's remote/local switch is set to remote. Use the standard j, k, l shortcut keys to shuttle backwards, pause and shuttle forwards.
- Click the 'mark in' button to mark the in point, or use the shortcut key i.
- Click the 'mark out' button to mark the out point, or use the shortcut key o.
- Click the 'log clip' button to log the clip, or use the shortcut key p. The entry should now appear in the media list with a red X in its icon to indicate the media is offline.
Batch Capture
After logging a clip, you can click the 'clip' button to capture a single clip.
To capture multiple clips, continue logging the clips for batch capture.
Select the logged clips in the media list and do one of the following:
- Click the 'batch' button.
- Right click on the selection and select batch capture.
- Go to the 'file' menu and choose batch capture.
Media Express will capture the clip from the in to out timecode.
DPX Capture
If you want to capture a DPX image sequence rather than a movie file, open the Media Express preferences and set the 'capture file format' to DPX 10-Bit RGB.
- Create a DPX project by setting the capture file format to DPX.
- Capture.

DPX capture preferences.
When the capture has been completed, a single thumbnail will appear in the media list representing the entire frame sequence. The sequence of DPX frames will be stored in its own folder in your disk storage. Audio will be stored in a .wav file in the same folder.
By default, DPX captures are assumed to be from YUV sources. If you are capturing from an RGB source, select 'capture from an RGB source'.
If you want the DPX frame numbers to be based on the timecode of the captured video, rather than just starting from zero, enable the option to 'use absolute frame numbering when capturing DPX'.
If you aren't performing long DPX captures, you may wish to reduce the number of zeroes in the frame numbers by changing the option, 'when capturing DPX files, use (2-8) digit numbers in the frame count'.
3D Capture
When Media Express is used with a Blackmagic Design video hardware model that supports dual stream 3D, you can create left and right eye 3D video clips by capturing 2 streams of HD-SDI video simultaneously.
- Create a 3D project which matches the frame rate of your dual stream 3D video source.
- If capturing from an SDI source, make sure you have 2 discrete HD-SDI video inputs to the Blackmagic video hardware.
- Capture.
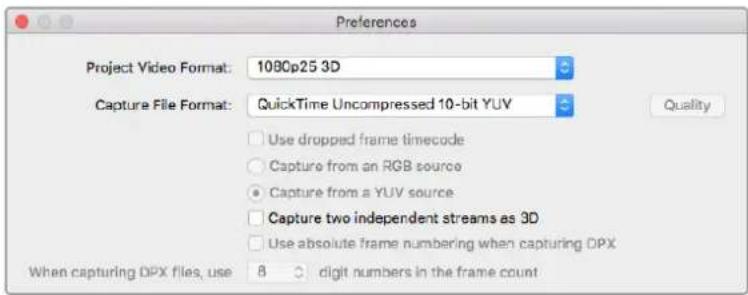
Select a project video format with "3D" in its name to capture dual stream stereoscopic 3D video clips.
When capturing and logging dual stream 3D in Media Express, the clip name will be applied to the left eye video. The right eye video will be appended with `_right' text. For example, if you name the stereo clip "Clip 1", the left eye clip will be called "Clip 1.mov" and the right eye clip will be called "Clip 1_right.mov".
The Media List presents an eye catching indication that the captured clip is a 3D clip:
- In thumbnail view, the left and right eye clips are connected by a 3D indicator and presented as a single, large icon.
- In timecode list view, the left and right eye clips are listed on two lines and linked together by a 3D indicator.
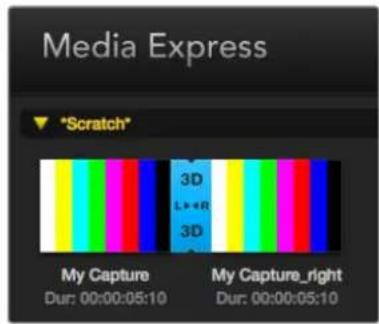
In Thumbnall view, the left and right eye clips are connected by a 3D indicator and presented as a single, large icon.
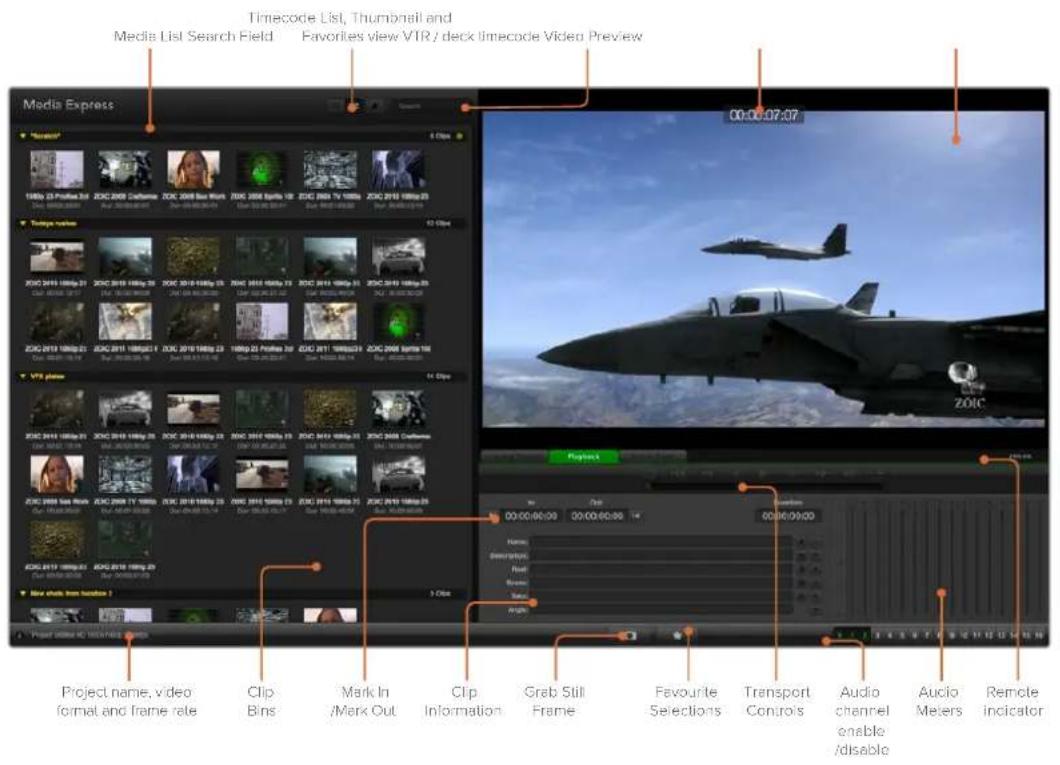
Playing back Video and Audio Files
Playing back single and multiple clips
To play back a single clip, double click the clip in the media list. Alternatively, select the clip in the media list and press the space bar on your keyboard or the play button in the transport controls.

You can use the transport controls to play, stop, jump to the next or previous clip and loop playback.
To play back multiple clips, select the clips in the media list and then press the space bar on your keyboard or the play button in the transport controls.
Your video will play back in the video preview pane of Media Express and on all the video outputs of your Blackmagic Design video hardware. During playback, the audio channels being monitored can be switched on or off via the track enable/disable buttons.
Importing clips
You can play back your video and audio files after importing media into Media Express in any of the following ways:
- Double click an empty area of the media list, browse to your file's location and click 'open'.
- Right click an empty area of the media list and select 'import clip' from the contextual menu.
- Go to the 'file' menu, select 'import' and then 'media files'.
Select the video and audio clip(s) you wish to import and press 'open'. The clips will appear in the 'scratch' area of the media list. If you have created your own bins in the media list, you can drag the clips into the desired bin.
To import directly to a bin, right click within the desired bin and select 'import clip' from the contextual menu.
If the files being imported do not match the frame rate and size of existing clips in the media list, you will be prompted to create a new project and to save the current project.
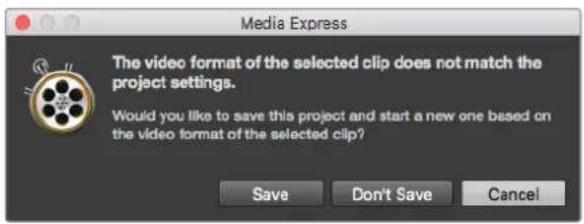
If the imported clips do not match the existing clips, you will be prompted to create a new project.
TIP Media Express also supports the import of multichannel audio only files recorded at 48kHz in the uncompressed WAVE and AIFF formats.
Another way to import media is to use an XML file exported from an NLE such as Final Cut Pro 7 or Final Cut Pro X. Go to the 'file' menu, select 'import' and then either Final Cut Pro 7 XML or Final Cut Pro X XML. Open the desired XML and all the bins and media from the Final Cut Pro project will appear in the media list.
Media Express also supports the import of CMX EDL files to batch capture clips using EDL files from other video software. Go to the 'file' menu, select 'import' and then CMX EDL. Select the EDL and open it.
You can import media directly, or import with an XML or EDL.
The logging information will appear in the media list. Select the logged clips and perform a batch capture to import the clips from your deck.
Browsing Media
Thamburger view
Thumbs nails are the most intuitive way to display your clips. Hover your mouse over the clip's thumbnail and then click on the popup info icon at the bottom right of the thumbnail. Click the info bubble to hide it.
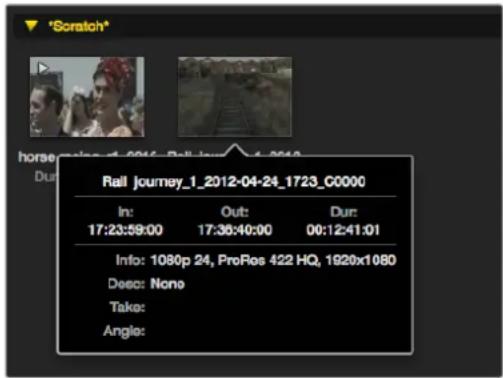
Click a thumbnail's popup Info Icon to view the Info bubble.
List view
You can view your clips in 'timecode list' view by clicking on the 'timecode list' button at the top right of the media list. Use the horizontal scroll bar to view all the columns of information for your clips.

In the media list, choose to view your clips in 'timecode list' view or 'thumbnail' view. Click the 'favorites' button to show only your favorite clips. Type in the search field to find your favorite clips.
Creating and using bins
To create a bin, right click an empty spot in the media list and select 'create bin'. Name the new bin.
You can move clips around by dragging the clip icons to the desired bin. If you want a clip to appear in more than one bin, import the same clip again by right clicking on the bin and choosing 'import clip'.
By default, logged clips appear in the 'scratch'. If you want to log clips and have them appear in a new bin, right click the new bin and choose 'select as log bin'.
Creating and using favorites
In the 'log and capture' tab, click the 'star' icon next to the name field if you want to tag a clip as a favorite.
In the 'playback' tab, clicking the star icon will make the clip a favorite if it is selected in the media list. Click the star icon again to deselect it as a favorite.
Clips marked as favorites will show a yellow star in their icon in 'timecode list' view and 'thumbnail' view.
Once you have marked clips as favorites, click on the 'show only favorites' button at the top of the media list. The star icon will turn yellow. All clips will be hidden except for those marked as favorites.
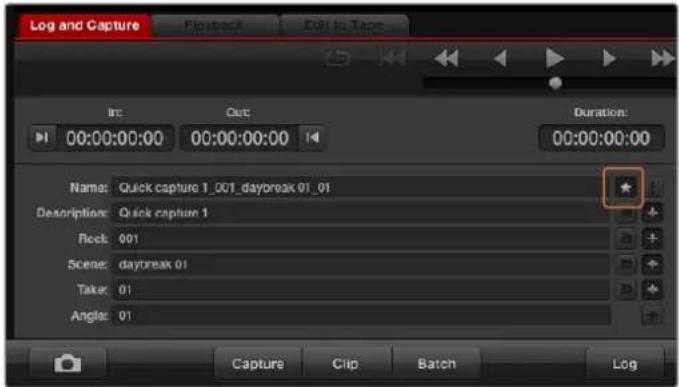
In the 'log and capture' tab, click the 'star' icon next to the name field if you want to log the clip as a favorite.
Linking an audio clip to a video clip
To link an audio clip to a video clip in the media list:
- Select a video clip which contains no audio channels.
- Right click on the video clip and select 'link audio file' from the contextual menu.
- Browse to the audio file you want to link to and click 'open'. The video and audio will link in the media list view.

The media list presents a highly visible indication that the video and audio clips are linked.
You can now play back the combined clip or master it to tape.
Deleting clips and bins
To delete clips, select the unwanted clips and press the backspace button on your keyboard.
This will only delete the clips from the media list and they will safely remain on your disk storage.
To delete bins, right click within a bin and choose 'delete bin'. This action will delete the bin and any clips it contained. This will only delete the clips from the media list and they will safely remain on your disk storage.
Creating a 3D clip
To add a stereoscopic 3D clip to the media list:
- Select a 3D project video format that is the same frame rate as your 3D media.
- Import the 'left eye' file into the media list.
- Right click on the left eye file and select "set right eye clip" from the contextual menu. If the right eye clip was previously captured by Media Express, the right eye video will be appended with 'right' text.
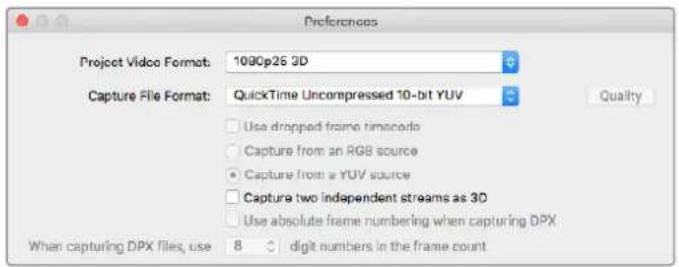
Select a 3D project video format.
The media list presents a highly visible indication that the imported clip is a 3D clip. The left and right eye clips are displayed side by side in the 'video preview' window, indicating a 3D video project.
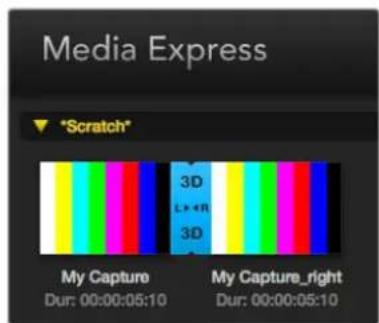
The media list presents a highly visible indication that the imported clip is a 3D clip.
If you find the left and right eyes of a 3D stereo clip have been loaded the wrong way around:
- Right click the 3D clip in the media list.
- Select 'swap eyes' from the contextual menu.
Searching the Media List
Clips can easily be found in a project by typing the name of your clips in the search field at the top of the media list. When used in conjunction with the favorites feature, the search will be confined to your favorite clips so you will see a shorter list of found clips.

Type in the search field to find clips.

Editing Video and Audio Files to Tape
While we usually talk about mastering or editing to "tape", it doesn't matter if your deck uses tapes or disks. To master your clips:
- Select the clips you want to send to tape.
- Click the blue 'edit to tape' tab.
- Set the in point and type of edit.
- Master to tape.
Selecting clips to master
From the media list, select the clips you wish to master to tape. You can even insert multichannel audio only clips to replace the master audio track on a master tape. If you only want to send your favorite clips to tape, click the favorite (star) icon at the top of the media list to show your favorites and hide all other clips. Then select the favorite clips you wish to send to tape.

Click the favorite (star) icon at the top of the media list to show only your favorites.
Insert and Assemble to tape
Click the 'edit to tape' tab. Enter the in point of the tape by entering timecode into the 'in' point field, or by cueing the tape to the desired in point via the transport control and then clicking the 'mark in' button.
If no 'out' point is entered, Media Express will set the duration of the edit to the total length of the clips in the media list. If an out point is defined, Media Express will stop recording once the 'out' point timecode is reached, even if some clips have not been output.
Two clips have been selected for output to tape.
Choose to master to tape using 'assemble' or 'insert' edit. Then press the 'master' button.
Preview mode mimics the edit process but does not record to tape. This mode lets you check the edit point. Preview edit operations should always be checked on monitors connected directly to the output of the deck. This lets you view the video already on tape in conjunction with the new video.
If 'record inhibit' is enabled either on the deck or on the tape, Media Express will report this when you click the 'master' button. Disable 'record inhibit' before trying again.
Select the video and audio channels you wish to output via the track enable/disable buttons. Deselect the video channel if you only want to output audio.

Set the desired number of audio channels to be mastered.
Click the favorite (star) icon at the top of the media list to show only your favorites.
Two clips have been selected for output to tape.
Set the desired number of audio channels to be mastered.
Capturing H.265 Video
To capture video using Blackmagic UltraStudio 4K Extreme's built in H.265 encoder:
1 Open Media Express 'preferences' and set the 'capture file format' to MP4 H.265.
2 Set the bitrate for your H.265 capture by clicking on the 'quality' button located next to the H.265 setting and dragging the 'encoding settings' slider left or right. Close the 'encoding settings' window to confirm your setting.
TIP For more information about H.265 capture and bitrate settings, refer to the next section in this manual, 'H.265 Hardware Encoder'.
H.265 Hardware Encoder
Capturing H.265 Video with UltraStudio 4K Extreme
Blackmagic UltraStudio 4K Extreme has a powerful built in H.265 hardware encoder that lets you capture the latest H.265 video in real time. This gives you the ability to capture video using encoding technology that maintains stunning video quality at the lowest possible bitrate.
To capture H.265 video using Blackmagic UltraStudio 4K Extreme, set the capture file format in Media Express preferences to MP4 H.265.
To capture video using the built in H.265 encoder:
1 Launch the Blackmagic Media Express software. Open Media Express 'preferences' and set the 'capture file format' to MP4 H.265.
2 Set the bitrate for your H.265 capture by clicking on the 'quality' button located next to the H.265 setting and dragging the 'encoding settings' slider left or right. Close the 'encoding settings' window to confirm your setting. Your Blackmagic UltraStudio 4K Extreme is now ready to encode H.265 video using Blackmagic Media Express. For information about how to capture and play back video using Media Express, refer to the 'Blackmagic Media Express' section of this manual.
Setting the Bitrate
The default bitrate is set to 15 Mb/s which is a good choice for high quality Ultra HD video that is streamed online, but you can set it anywhere between 3 to 50 Mb/s. For online streaming of HD video, a good choice is between 3 to 5 Mb/s.
Drag the 'encoding settings' slider to the left if you need to capture video with a smaller file size and a lower bitrate, or drag to the right if file sizes are not an issue and you want the best possible video quality. Setting the bitrate too low will result in compression artifacts in your picture, such as visible macro blocking, pixelation or banding. However, the H.265 hardware encoder is very efficient and keeps artifacts to a minimum, so you can set the bitrate lower than you normally would for H.264 video and still retain great video quality.
Set the bitrate for H.265 capture by clicking on the 'quality' button and dragging the encoding settings slider left or right.
When encoding H.265 video, or any type of video encoding for online streaming, it's often helpful to consider a few things, such as the bandwidth of your intended delivery system, the amount of movement and contrast between frames in your video, and the frame rate of your video. For example, if there is a large number of people streaming your video, you may need to lower the bitrate in your encoding so audience members with slower internet connections can watch without download interruptions. Higher bitrates are better for video content with lots of contrast and movement between frames, such as bright to dark, or high energy sporting events and graphics. Video with high frame rates also require higher bitrates compared to video at lower frame rates.
Choosing a bitrate for your encoding can often be an experimental process to achieve the best video quality in the smallest file size, so it's worth testing a variety of bitrate settings for the best results.
Blackmagic Disk Speed Test
Blackmagic Disk Speed Test measures the read and write performance of storage media in video frame sizes. Disk Speed Test is included with your Desktop Video software and can be downloaded free from the App Store for Mac OS.
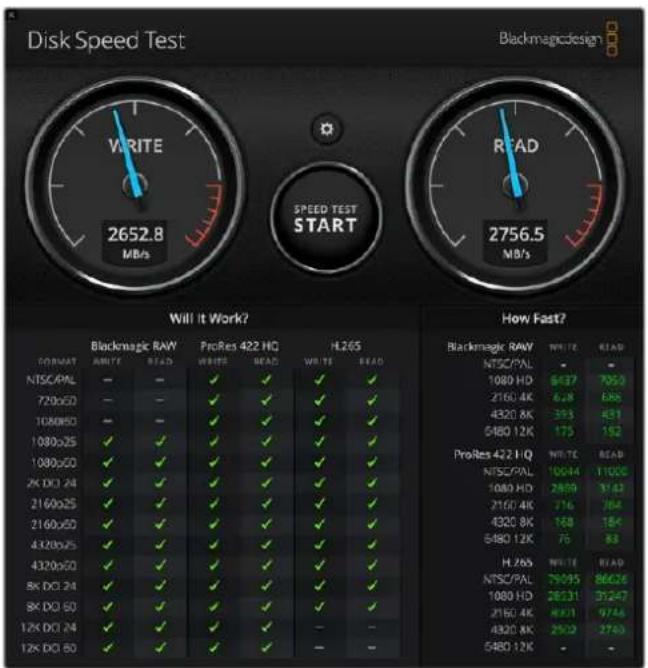
Access the Disk Speed Test settings by clicking on the 'settings' gear icon, located just above the 'start' button.
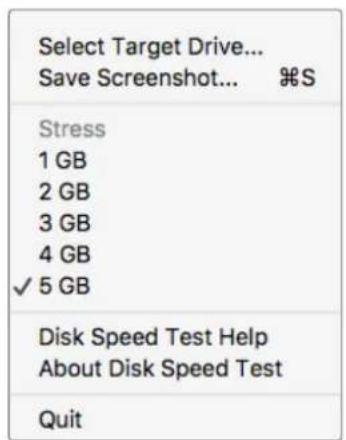
Open the Settings menu by clicking the gear icon.
Select Target Drive
Click 'select target drive' and ensure you have read and write permissions.
Save Screenshot
Click 'save screenshot' to save a screenshot of the results.
Stress
The stress level can be set between 1GB and 5GB. 5GB is the default setting and will provide the most accurate results.
Disk Speed Test Help
Click 'Disk Speed Test help' to launch the PDF manual for Blackmagic Disk Speed Test.
About Disk Speed Test
About Disk Speed Test displays which version of the Disk Speed Test software you are running.
Start
Click the 'start' button to commence the test. Disk Speed Test will write and then read a temporary file to the selected target drive. Disk Speed Test will continue writing and reading until you stop the test by clicking the 'start' button again.
Will it Work?
The 'will it work?' panel shows common video formats and displays a check mark or cross to indicate if disk performance is adequate. Be sure to do several test cycles to reveal any video formats for which the disk performance might be marginal. If a video format exhibits a check mark switching between a cross, it indicates that the disk storage cannot reliably support the video format.
How Fast?
The 'how fast?' results panel shows the frame rates your drive can achieve and should be read in conjunction with the 'will it work?' panel. If the 'will it work?' panel shows a green check mark for 2K DCI 24 using H.265, but the 'how fast?' panel shows that a maximum of 24fps will be supported, the disk storage performance is too marginal to be reliable.
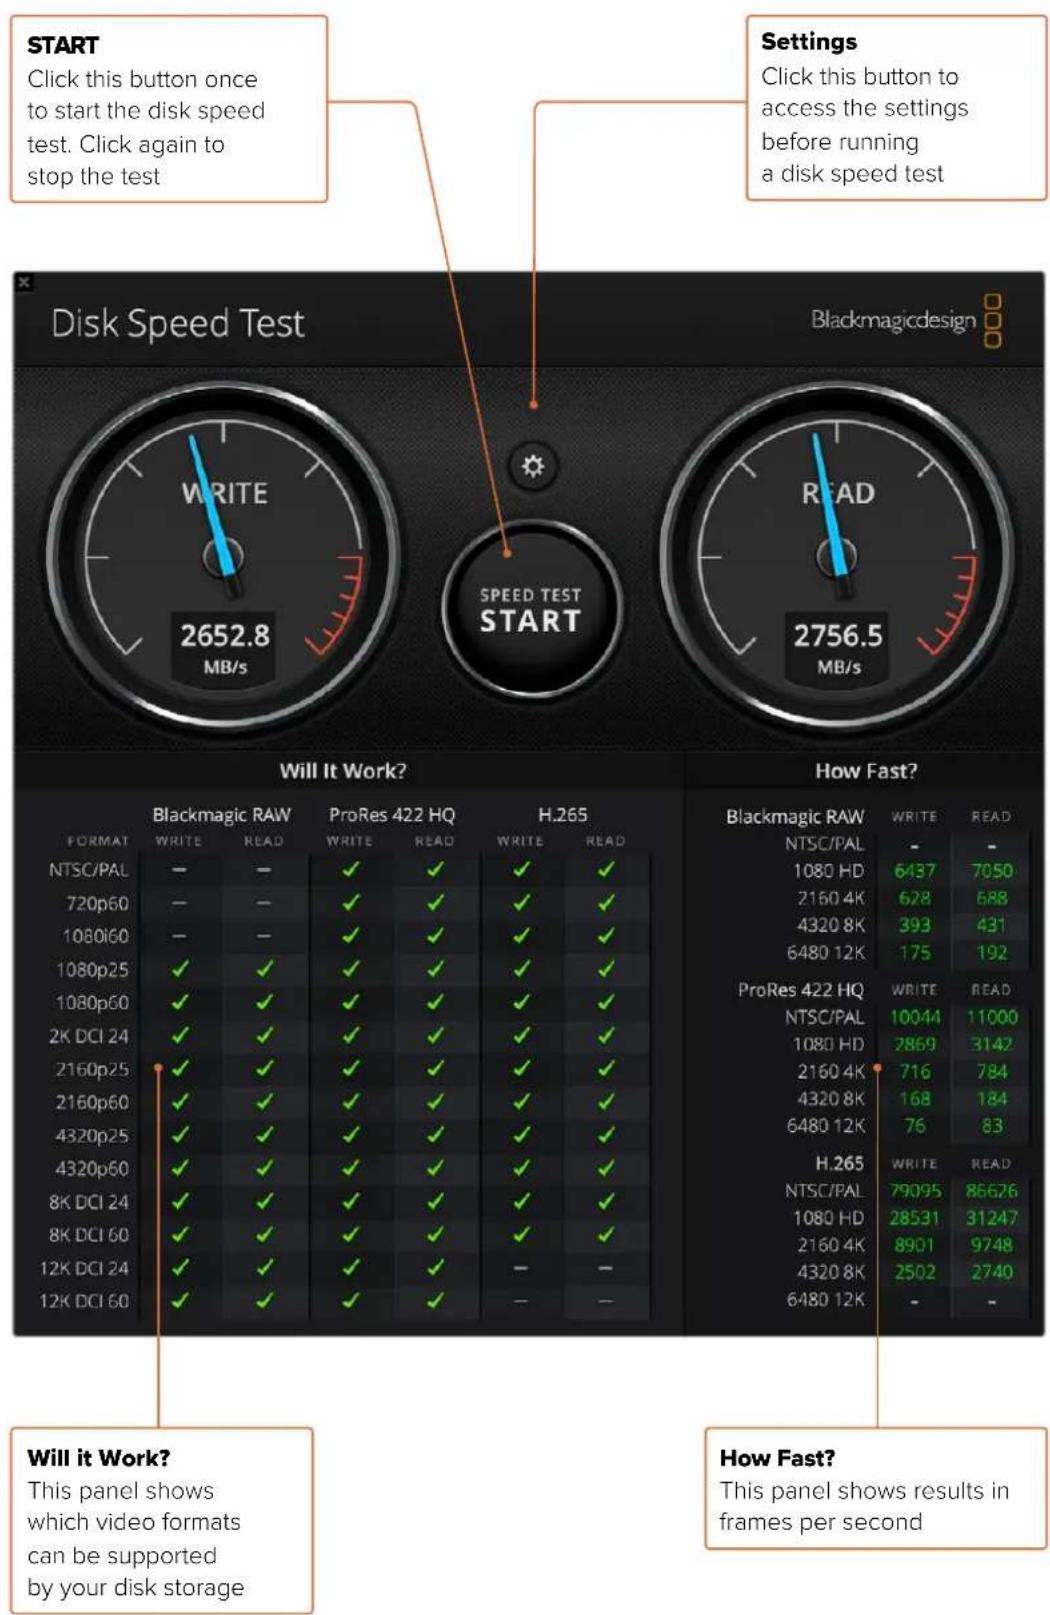
Removing the Mezzanine Card from DeckLink 4K Extreme 12G
How to Remove the Mezzanine Card
If you don't have enough room on your motherboard to fit a dual slot PCIe card, you can easily remove DeckLink 4K Extreme 12G's mezzanine card.
To remove the mezzanine card:
1 Ensure that you are statically discharged. Place the DeckLink card on its side on a flat, clean surface, with the gold PCIe contacts facing up.
2 On the underside of the DeckLink card, locate the two screws for the mezzanine card's stand off supports. They are the two screws furthest away from the BNC connectors. Gently remove the screws using a Phillips head screwdriver.
3 Hold the base DeckLink card by its edges and gently lift the mezzanine card until its bridge connector is released from the slot.
4 Ensure the bridge connector is firmly seated in the mezzanine card in case you'd like to reattach it.
5 Keep the two screws fastened to their stand off supports, place the mezzanine card in an anti static bag and store in a secure place.
You can now install your DeckLink 4K Extreme 12G card into your computer using one PCIe slot.
To reattach the mezzanine card:
1 Align the two mezzanine card stand off supports with the screw holes on each side of the base DeckLink card and gently secure the mezzanine card to the bridge connector slot. Ensure the mezzanine card is properly seated in the bridge connector slot.
2 Fasten the stand off supports to the base DeckLink card by tightening their screws using a Phillips head screwdriver. Be careful not to over tighten the screws.
If you need assistance or have any questions please visit the Blackmagic Design support center at www.blackmagicdesign.com/support.
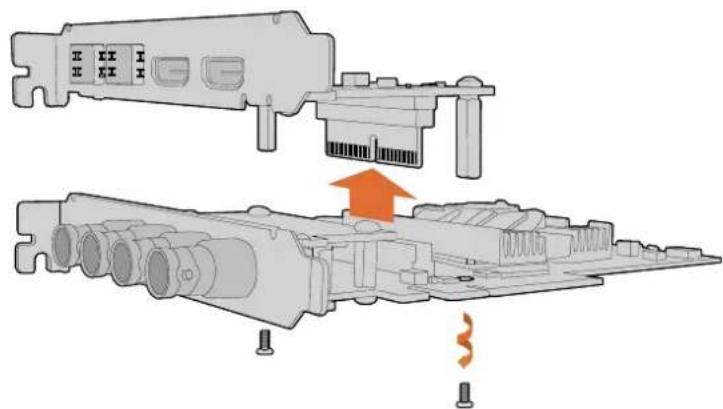
DeckLink 4K Extreme 12G's mezzanine card can easily be removed.
Recovering a DeckLink Card from an Interrupted Update
If you are updating a DeckLink card and the update process is interrupted, for example power is accidentally disconnected from your computer, this can leave your card in a disabled state. However, many DeckLink cards have a special USB port that will let you perform an update recovery.
If your DeckLink card supports USB recovery, the USB port will be located on the rear or side of the card. This USB port will let you plug into your computer and update the card directly.
To recover an interrupted update on a DeckLink card:
1 Shut down your computer and disconnect the power.
2 Gently remove your DeckLink card from your computer's PCIe slot and place it safely on a stable surface, such as a desk or workbench. We recommend placing the card on an anti-static bag and wearing an anti-static earthing wrist band to avoid the risk of damaging the card with a potential electric shock.
3 Plug a USB cable into the USB-C or mini B USB port on the rear or side of your DeckLink card
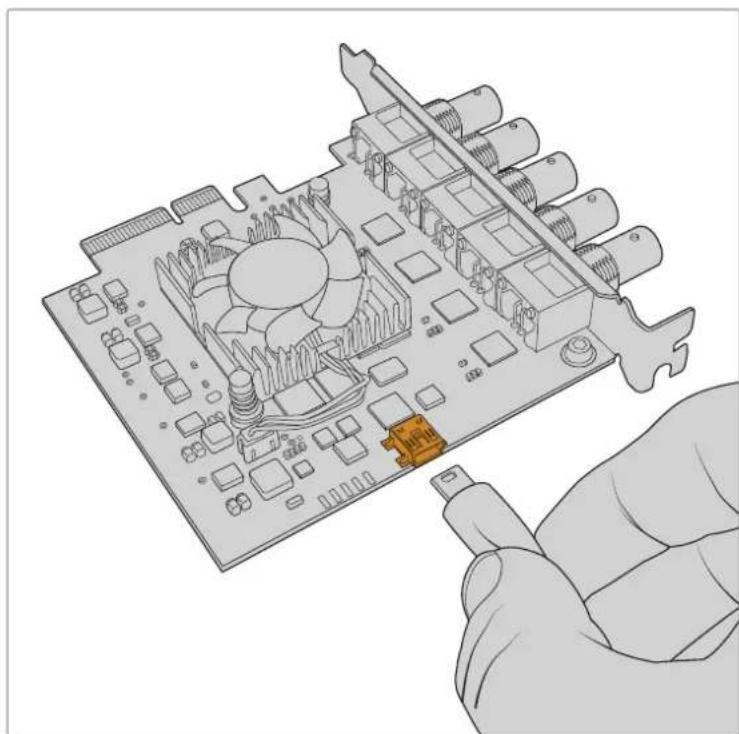
Remove the DeckLink card from your computer's PCIe slot and plug it into your computer using the USB-C or mini B USB port on the rear or side of the card
4 Plug the other end of the USB cable into your computer's USB port.
5 Power your computer and turn it on. After your computer's start up sequence an alert window will appear asking you to update the card.

Click 'update'.
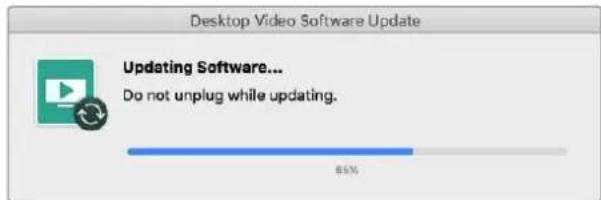
A progress bar will indicate the update process and will let you know when the update is complete.
Once complete, disconnect the USB cable and reinstall the card into your computer's PCIe slot.
NOTE Don't forget to shut down your computer and disconnect power before accessing the PCIe slot.
With your card reinstalled you can now power your computer. The DeckLink card will be recognized by your computer and you can continue with your production.
Help
Getting Help
The quickest way to obtain help is to check the latest support material for your specific hardware at the Blackmagic Design online support pages.
Blackmagic Design Online Support Pages
The latest manual, software and support notes can be found at the Blackmagic Design support center at www.blackmagicdesign.com/support.
Contacting Blackmagic Design Support
If you can't find the help you need in our support material, please use the "send us an email" button on the support page to email a support request. Alternatively, click on the "find your local support team" button on the support page and call your nearest Blackmagic Design support office.
Checking the Version Currently Installed
To check which version of Blackmagic Desktop Video Setup software is installed on your computer, open Blackmagic Desktop Video Setup.
- On Mac OS, open 'Blackmagic Desktop Video Setup' within your 'applications' folder. The software version number appears by clicking on the 'about Blackmagic Desktop Video Setup' menu heading.
- On Windows 8 and 8.1, from the 'start' page type "Blackmagic" and then click the Blackmagic Desktop Video Setup application. The software version number appears by clicking on the 'about Blackmagic Desktop Video Setup' menu heading.
- On Windows 10, click the 'start' button and type 'Blackmagic' in the search box. Click the Blackmagic Desktop Video Setup application. The software version number appears by clicking on the 'about Blackmagic Desktop Video Setup' menu heading.
- On Linux, go to 'applications' and then 'sound and video' and double click the Blackmagic Desktop Video Setup application. The software version number appears by clicking on the 'about Blackmagic Desktop Video Setup' menu heading.
How to Get the Latest Updates
After checking the version of Blackmagic Desktop Video Setup installed on your computer, please visit the Blackmagic Design support center at www.blackmagicdesign.com/support to check for the latest updates. While it is advisable to run the latest updates, you should avoid updating software when in the middle of an important project.
To see when you last updated your driver, click on the 'about' tab in the Blackmagic Desktop Video Setup utility. You can also generate a driver status report by clicking on the status report 'create' button.
Developer Information
Developing Custom Software using Blackmagic Design Hardware
The DeckLink SDK is available for developers to control Blackmagic video hardware with their own custom software. The DeckLink SDK supports the UltraStudio, DeckLink and Intensity products.

The DeckLink SDK provides both low level control of hardware and high level interfaces to allow developers to easily perform common tasks. The DeckLink SDK supports technologies including:
- DeckLink API
AppleQuickTime
Apple Core Media - Microsoft DirectX Show
Downloading the Free Blackmagic Design SDK
The DeckLink SDK can be downloaded at: www.blackmagicdesign.com/support
Joining the Blackmagic Design Software Developers Forum
If you're looking for answers, feedback or suggestions regarding technologies used by Blackmagic Design, such as codecs, core media, APIs, SDK and more, visit the Blackmagic Design Software Developers forum. The forum is a helpful place for you to engage with both Blackmagic Design support staff and other forum members who can answer developer specific questions and provide further information. The Software Developers forum can be found within the Blackmagic Design Forum at: forum.blackmagicdesign.com
Contacting Blackmagic Design Developer Assistance
If you wish to ask questions outside of the Blackmagic Design Software Developers forum, please contact us at: developer@blackmagicdesign.com
Regulatory Notices

Disposal of Waste of Electrical and Electronic Equipment Within the European Union.
The symbol on the product indicates that this equipment must not be disposed of with other waste materials. In order to dispose of your waste equipment, it must be handed over to a designated collection point for recycling. The separate collection and recycling of your waste equipment at the time of disposal will help conserve natural resources and ensure that it is recycled in a manner that protects human health and the environment. For more information about where you can drop off your waste equipment for recycling, please contact your local city recycling office or the dealer from whom you purchased the product.

This equipment has been tested and found to comply with the limits for a Class A digital device, pursuant to Part 15 of the FCC rules. These limits are designed to provide reasonable protection against harmful interference when the equipment is operated in a commercial environment. This equipment generates, uses, and can radiate radio frequency energy and, if not installed and used in accordance with the instructions, may cause harmful interference to radio communications. Operation of this product in a residential area is likely to cause harmful interference, in which case the user will be required to correct the interference at personal expense.
Operation is subject to the following two conditions:
1 This device may not cause harmful interference.
2 This device must accept any interference received, including interference that may cause undesired operation.
ICES-3 (A) NMB-3 (A)
ISED Canada Statement
This device complies with Canadian standards for Class A digital apparatus.
Any modifications or use of this product outside its intended use could void compliance to these standards.
Connection to HDMI interfaces must be made with high quality shielded HDMI cables.
This equipment has been tested for compliance with the intended use in a commercial environment. If the equipment is used in a domestic environment, it may cause radio interference.
Safety Information
For protection against electric shock, the equipment must be connected to a mains socket outlet with a protective earth connection. In case of doubt contact a qualified electrician.
To reduce the risk of electric shock, do not expose this equipment to dripping or splashing.
Product is suitable for use in tropical locations with an ambient temperature of up to 40^
Ensure that adequate ventilation is provided around the product and that it is not restricted.
When rack mounting, ensure that the ventilation is not restricted by adjacent equipment.
No operator serviceable parts inside product. Refer servicing to your local Blackmagic Design service center.
Some products have the facility to connect small form-factor transceiver (SFP) optical fibre modules. Only use Laser class 1 optical SFP modules.
Recommended Blackmagic Design SFP modules:
-3G-SDI:PL-4F20-311C
-6G-SDI:PL-8F10-311C
-12G-SDI:PL-TG10-311C

Use only at altitudes not more than 2000m above sea level.
State of California statement
This product can expose you to chemicals such as trace amounts of polybrominated biphenyls within plastic parts, which is known to the state of California to cause cancer and birth defects or other reproductive harm.
For more information go to www.P65Warnings.ca.gov.
Warning for Authorized Service Personnel


Disconnect power from both power inlets before servicing!


Caution - Double Pole/ Neutral Fusing
The power supply contained in this equipment has a fuse in both line and neutral conductors and is suitable for connection to the IT power distribution system in Norway.
Warranty
Limited Warranty
Blackmagic Design warrants that UltraStudio, DeckLink and Multibridge family products will be free from defects in materials and workmanship for a period of 36 months from the date of purchase excluding connectors, cables, cooling fans, fiber optic modules, fuses, keyboards and batteries which will be free from defects in materials and workmanship for a period of 12 months from the date of purchase. Blackmagic Design warrants that Intensity family products will be free from defects in materials and workmanship for a period of 12 months from the date of purchase. If a product proves to be defective during this warranty period, Blackmagic Design, at its option, either will repair the defective product without charge for parts and labor, or will provide a replacement in exchange for the defective product.
In order to obtain service under this warranty, you the Customer, must notify Blackmagic Design of the defect before the expiration of the warranty period and make suitable arrangements for the performance of service. The Customer shall be responsible for packaging and shipping the defective product to a designated service center nominated by Blackmagic Design, with shipping charges pre paid. Customer shall be responsible for paying all shipping charges, insurance, duties, taxes, and any other charges for products returned to us for any reason.
This warranty shall not apply to any defect, failure or damage caused by improper use or improper or inadequate maintenance and care. Blackmagic Design shall not be obligated to furnish service under this warranty: a) to repair damage resulting from attempts by personnel other than Blackmagic Design representatives to install, repair or service the product,b) to repair damage resulting from improper use or connection to incompatible equipment, c) to repair any damage or malfunction caused by the use of non Blackmagic Design parts or supplies, or d) to service a product that has been modified or integrated with other products when the effect of such a modification or integration increases the time or difficulty of servicing the product. THIS WARRANTY IS GIVEN BY BLACKMAGIC DESIGN IN LIEU OF ANY OTHER WARRANTYES, EXPRESS OR IMPLIED. BLACKMAGIC DESIGN AND ITS VENDORS DISCLAIMER ANY IMPLIED WARRANTYES OF MERCHANTABILITY OR FITNESS FOR A PARTICULAR PURPOSE. BLACKMAGIC DESIGN'S RESPONSIBILITY TO REPAIR OR REPLACE DEFECTIVE PRODUCTS IS THE WHOLE AND EXCLUSIVE REMEDY PROVIDED TO THE CUSTOMER FOR ANY INDIRECT, SPECIAL, INCIDENTAL OR CONSEQUENTIAL DAMAGES IRRESPECTIVE OF WHETHER BLACKMAGIC DESIGN OR THE VENDOR HAS ADVANCE NOTICE OF THE POSSIBILITY OF SUCH DAMAGES. BLACKMAGIC DESIGN IS NOT LIABLE FOR ANY ILLEGAL USE OF EQUIPMENT BY CUSTOMER. BLACKMAGIC IS NOT LIABLE FOR ANY DAMAGES RESULTING FROM USE OF THIS PRODUCT. USER OPERATES THIS PRODUCT AT OWN RISK.
Copyright 2022 Blackmagic Design. All rights reserved. 'Blackmagic Design', 'DeckLink', 'HDLink', 'Workgroup Videohub', 'Videohub', 'DeckLink', 'Intensity' and 'Leading the creative video revolution' are registered trademarks in the US and other countries. All other company and product names may be trade marks of their respective companies with which they are associated.
Thunderbolt and the Thunderbolt logo are trademarks of Intel Corporation in the U.S. and/or other countries.
Desktop Video


4. = ( x_1,y_1) , = ( x_2,y_2)
Blackmagic Design CEO
glnt-
目次
はの
Desktop Videoにいて 80
SUsTm要件 80
電源の接続 80
比才八一D工A接续 81
0:/dev/blackmagic/io0 [DeckLink SDI 4K] 0x73 OK
1:/dev/blackmagic/iol [DeckLink 4K Extreme 12G] 0x0A PLEASE_UPDATE
Are output as Square Division Quad Split (SQ)

Are output as Sample Interleave (SI)
About (This product is for use in the UK).
D拉氏一 (Driver)
Photoshop CCでイEX一書き出す
1「File] > 'Export] Blackmagic Image Export] 为选护
2「Video Output Format」を選択、「Export Image」をクルクしま�。
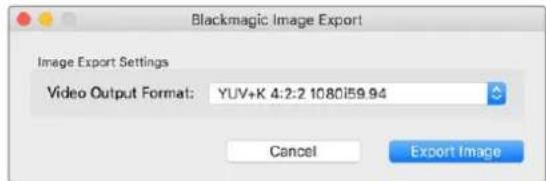
1X-30
This's the first time you can use this service. It's a great way to use this service for your computer. It's also useful to use this service for your home computers. This service is free, and you can use it on any device connected to the Internet.
FIL&Key(Fill/Key)
ATEMSvIHTa一等、外部SvIHTa一使用使卡一YING行的场合是、出力M-在「Fill/Key」设定。FIL信号是A二M一JXNKARK-一、一信号是K一Y一卡TARK-一のSv一EASToe通过之示指示的GLE一LMRQ。乙上,一卡TARK-一はBACKGRUwndiKAraK-一为Sau一YINPoo-
Final Cut Pro X
\(M\)1L\(=\)1.\(=\)1.\)1.\(=\)1.\)1.\(=\)1.\)1.\(=\)1.\)1.\(=\)1.\)1.\(=\)1.\)1.\(=\)1.\)1.\(=\)1.\)1.\(=\)1.\)1.\(=\)1.
3G-SDI:PL-4F20-311C
-6G-SDI:PL-8F10-311C
-12G-SDI:PL-TG10-311C

海拔2000m以上は使用くださいます。
力尔二州斯一
0:/dev/blackmagic/io0 [DeckLink SDI 4K] 0x73 OK
1:/dev/blackmagic/io1 [DeckLink 4K Extreme 12G] 0x0A PLEASE UPDATE
Are output as Square Division Quad Split (SQ)

Are output as Sample Interleave (SI)
forum.blackmagicdesign.com
-3G-SDI:PL-4F20-311C
-6G-SDI:PL-8F10-311C
-12G-SDI:PL-TG10-311C

CEO, Blackmagic Design
Inhaltsverzeichnis
Erste Schritte 230
0:/dev/blackmagic/io0 [DeckLink SDI 4K] 0x73 OK
1:/dev/blackmagic/iol [DeckLink 4K Extreme 12G] 0x0A PLEASE UPDATE
Are output as Square Division Quad Split (SQ)

Are output as Sample Interleave (SI)
Schneiden in DaVinci Resolve
-3G-SDI:PL-4F20-311C
-6G-SDI:PL-8F10-311C
-12G-SDI:PL-TG10-311C

California Proposition 65
Director executivo de Blackmagic Design
Contidente
Primeros pasos 305
IntroduccionaDesktopVideo 305
After Effects CC 334
AdobePhotoshop CC 336
Premiere Pro CC 337
Character Animator 342
Final Cut Pro X 343
MediaComposer 346
Blackmagic Media Express 353
Are output as Sample interleave (SI)
0:/dev/blackmagic/io0 [DeckLink SDI 4K] 0x73 OK
1:/dev/blackmagic/io1 [DeckLink 4K Extreme 12G] 0x0A PLEASE UPDATE
During Capture (采集期间)
Are output as Square Division Quad Split (SQ)
0
Are output as Sample Interleave (SI)
Use 5.1 surround channel ordering
Blackmagic 10 bit (无压缩)
Blackmagic 8bit (无压缩)
Apple Photo-JPEG (压缩)
Apple DV-NTSC(压缩)
Apple DV-PAL(压缩)
Adobe Photoshop CC

Photoshop CC
如何导入和导出视频帧
将图像导入Photoshop CC
12G-SDI:PL-TG10-311C

请在海拔高度2000米以下的地区使用。
加利福尼亚安全声明
DaVinci Resolvero panqahg 482
献有言 路 484
Adobe After Effects CC 484
AdobePhotoshop CC 486
AdobePremierePro CC 487
Adobe Character Animator CC 492
Final Cut Pro X 493
Avid MediaComposer 496
Blackmagic Media Express 503
Blackmagic Media Express? 503
ViDIOMOIODIOIPOIILCKTCHIG 503
ViDiOMOUoOIOIpaIJIJHcHg 508
MiD1eBraLuaI 510
ViDIOI 513
H.265 514
H.265 hdtweier inkdo 515
UltraStudio 4K Extreme00H.265 bito o kchh
Blackmagic Disk Speed Test 516
DeckLink 4K Extreme 12G000000000000000000000000000000000000000000000000000000000000000000000000000000
DeckLink Card
吉元 522
523
国制社 524
安捷隆 525
526
人
Desktop Video 新加
本 电电电电电电电电电电电电电电电电电电电电电电电电电电电电电电电电电电电电电电电电电电电电电电电电电电电电电电电电电电电电电电电电电电电电电电电电电电电电电电电电电电电电电电电电电电电电电电电电电电电电
SophteWoeHnDn DralIbWwAolrEhIn,BlaMgic Dsptop Vdeo Setupand hnnn AplilRcIeIenBn Ahnla SinucnKm/KeHn Wthn BlaMgic Medi Expressjit Fohd n. Blackmagic Desktop Video is UltraStudio, DeckLink, Intensity, Teranex ghi to hnsophteWoeHnDn
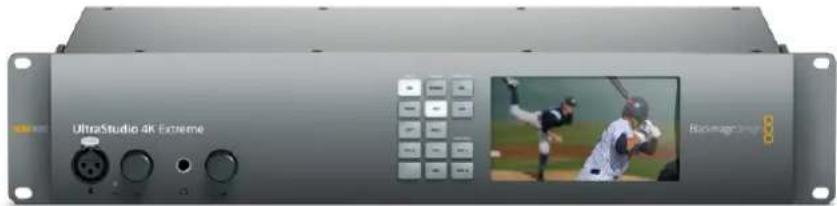
sbs
热上击的包口
Mac OS
Blackmagic Desktop Video Stóprówothanyh Chin Mac OSse Tn
Windows
Hiin Windows 8/10-Server Windows 8/10
Linux
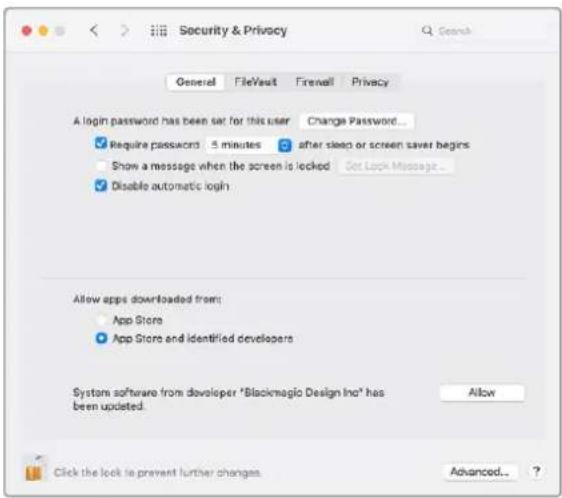
```````````````````````````````````````````````````````````````````````````````````````````````````Video 紅連用器》到 裁手器》到 横立歌》
3 3
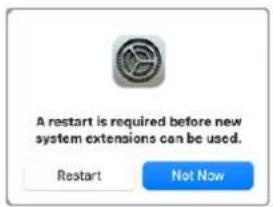
0:/dev/blackmagic/io0 [DeckLink SDI 4K] 0x73 OK
1: /dev/blackmagic/iol [DeckLink 4K Extreme 12G] 0x0A PLEASE UPDATE
IeRnEwDADiOgAaHcBnEeHbAeHbAeHbAeHbAeHbAeHbAeHbAeHbAeHbAeHbAeHbAeHbAeHbAeHbAeHbAeHbAeHbAeHbAeHbAeHbAeHbAeHbAeHbAeHbAeHbAeHb
BlackmagicFirmwareUpdater update 1
男,)man
BlackmagicFirmwareUpdater"将日默海内部SosTwHmM
모는 사고 죽비가 힠류였어요.이재 Blackmagic Desktop Video 기기 텔트워어 썸지가 힠류였어요만에 텔류만 썸류해 썸류를 기다 썸류해 썸류해 썸류해 썸류해 썸류해 썸류해 썸류해 썸류해 썸류해 썸류해 썸류해 썸류해 썸류해 썸류해 썸류해 썸류해 썸류해 썸류해 썸류해 썸류해 썸류esan 힠류만 썸류해 썸류해 썸류해 썸류해 썸류해 썸류해 썸류해 썸류해 썸류해 썸류해 썸류해 썸류해 썸류해 썸류해 썸류해 썸류해 썸류해 썸류해 썸류해 썸류bastian 힠류만 썸류해 썸류해 썸류해 썸류해 썸류해 썸류bastian 힠류만 썸류해 썸류bastian 힠류만 썸류bastian 힠류만 썸류bastian 힠류만 썸류bastian 힠류만 썸류bastian 힠류만 썸류bastian 힠류만 썸류bastian 힠류만 썸류bastian 힠류만 썸류bastian 힠류만 썸류bastian 힠류만 썸류bastian 힠류bastian 힠류만 썸류bastian 힠ride만 썸류bastian 힠ride만 썸류bastian 힠ride만 썸류bastian 힠ride만 썸류bastian 힠ride만 썸류bastian 힠ride만 썸류bastian 힠ride만 썸류bastian 힠ride만 썸류bastian 힠ride만 썸류bastian 힠ride만 썸류bastian 힠ridge만 썸류bastian 힠ridge만 썸류bastian 힠ridge만 썸류bastian 힠ridge만 썸류bastian 힠ridge만 썸류bastian 힠ridge만 썸류bastian 힠ridge만 썸류bastian 힠ridge만 썸류bastian 힠ridge만 썸류bastian 힠ridge만 썸류bastian 힠ride만 썸류bastian 힠ridge만 썸류bastian 힠ridge註 '
ViDIO
trie3Lm3SDIeT8KbitiOtoeJt#HsueoHJHcHnTieD13K3Jt#HJHcHJHcHJHcHJHcHJHcHJHcHJHcHJHcHJHcHJHcHJHcHJHcHJHcHJHcHJHcHJHcHJHcHJHcHJHcHJHcHJHcHJHcHJHcHJHcHJHcHJH
龍能達天龍之音,是人之言。
output as Square Division Quad Split (SQ)

Are output as Sample Interleave (SI)
[2018]
[2019]
[2020]
oko
OdiO IoIeR (Audio Input)
MaiK3 KJIeBbIe To He 100000000000000000000000000000000000000000000000000000000000000000000000
MaiKm 4K Extreme 103i 103i.
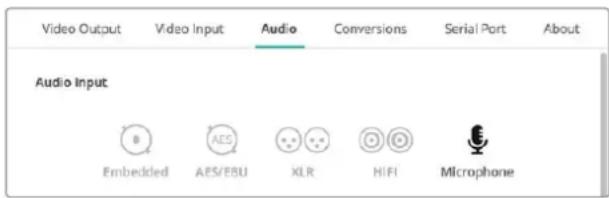
封甸阿贝可到格勒去,云口日信的
-3G-SDI:PL-4F20-311C
-6G-SDI:PL-8F10-311C
-12G-SDI:PL-TG10-311C

俱大
策拉托尼阿卡维男
i. 1. 1. 1. 1. 1. 1. 1. 1. 1. 1. 1. 1. 1. 1. 1. 1. 1. 1. 1. 1. 1. 1. 1. 1. 1. 1. 1. 1. 1. 1. 1. 1. 1. 1. 2. Blackmagic Design is a good way to make the user's experience better and it is important to keep the device in the right state when you use it. Blackmagic Design is a good way to make the user's experience better and it is important to keep the device in the right state when you use it. Blackmagic Design is a good way to make the user's experience better and it is important to keep the device in the right state when you use it. Blackmagic Design is a good way to make the user's experience better and it is important to keep the device in the right state when you use it. Blackmagic Design is a great way to make the user's experience better and it is important to keep the device in the right state when you use it. Blackmagic Design is a great way to make the user's experience better and it is important to keep the device in the right state when you use it. Blackmagic Design is a great way to make the user's experience better and it is important to keep the device in the right state when you use it. Blackmagic Design is a great way to make the user's experienced better and it is important to keep the device in the right state when you use it. Blackmagic Design is a great way to make the user's experienced better and it is important to keep the device in the right state when you use it. Blackmagic Design is a great way to make the user's experienced better and it is important to keep the device in the right state when you use it. Blackmagic Design is a great way to make the user's experienced better and it is important to
Copyright 2022 Blackmagic Design.
© Copyright 2022 Blackmagic Design.
B DaVinci Resolve 556
PepaKtpoBaHne B DaVinci Resolve 557
Pa6oTa c nporpammmn dpynx
PpOu3BODnteNe 559
Adobe After Effects CC 559
Adobe Photos@ CC 561
AdobePremierePro CC 562
Adobe Character Animator CC 567
Final Cut Pro X 568
Avid MediaComposer 571
Blackmagic Media Express 578
O63op Blackmagic Media Express 578
3aHnCb BnDeo- n ayDnOpaIIOB 578
Bocnpoun3BepeHne Bndeo
naydnoΦaHIOB 583
PpocmoTp aaiIOB 585
Bndeo- n aydnoomontk Ha neHTy 588
3aHnscb H.265-Bndeo 589
Koep H.265 590
3aHnscb H.265-BuJeO
cnomoublu UltraStudio 4K Extreme 590
Blackmagic Disk Speed Test 591
Chartne Me3OHHHHO nnatbI
c DeckLink 4K Extreme 12G 594
BocctaHOJIeHHe INaTbI
DeckLink nocne npepBaHHoro
06HOBJIeHH 595
POMOuB
HopmaqnaIpa3pa6oTuKOB 598
Co6nIOeHHe HopMaTHBbIX
Tpe6obAHn 599
Ppabnna 6e3oanchoctn 600
TapaANTn 601
Повтовka к paбote
BVeHne
To pykoBODCTBO coepknt BcO HeoXoDmyIO HOpMaUIO O CnCTEmHbIX TpeoBaHnX, yctaHOBKe nporpaMMHoro oecneueHn, NOKIOUeHN OOpydoBaHn N nCNOJIb3OBAHn npodkyTob DpyTHN pOnIbOAnTeNei.
Oh BkIIOaET B c6e IpaIbepbl nIpaIINbI, a TAKKe yTnITbI Blackmagic Desktop Video Setup in Media Express dIra 3axBaTa n BbIBoJa. IporpamMhbl npOyKT Desktop Video npedHa3NaeH en dIpaBbIc TaKIMPeWEnHmbl Blackmagic Design, kak UltraStudio, DeckLink, Intensiy n Teranex.
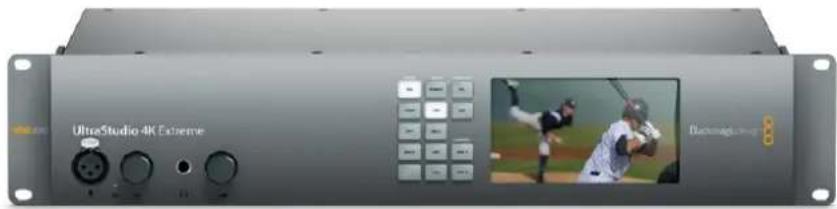
CnCTeMHbIe TpeObaHn
IJIa 3eKTHBHObpa6oKn BndeO obem OepaTHBOH namr KOMNBIOTepa DOnKeH 6bITb He MeHee 4 I6.
Mac OS
Blackmagic Desktop Video noDepxnaeTc Ha noCleHnx Bercnax nlatfopMb1 Mac OS.
Windows
Desktop Video paobTaet TOnbko Ha 64-pa3pHoi BepCnn Windows 8 n Windows 10 c nocneHnM nakeTOM oHOBHeHn.
Linux
Desktop Video moxho yctaHOHT ha KOMnbIOTepbI c pIaTfOpmoi Linux 2.6.23 n Bblwe c apxntektypoi x86 (64-pa3pndHare Bepn). IOnonHtEnbHa HΦopMaun O nocneHnx DnCTPNOyTINBax Linux, fOpMaTAX NaKetOB IN3aBNCmOCTn IpOgpaMMhIX IpOdyKTOB COepeXITcR B COnpoBOIDTeHbHO DOKymeHTaUHN.
IopKIOUeHHe nTuHn
Ecnn obopyoBaHne Blackmagic Design nMeet BHeuHn nctouHn nHTaHn, noCoeHHte erO nnoKIOUHTe K cTn.
COBET. DeckLink 4K Extreme 12G MoXHO NOKnIOHTb K DOONHITbHOMy ICTOUYKc
3Heprn C nCnObl3OBaHHe m npIraemoro Ka6eJr. PeSeHne IMeet MOChbI
fYHKUHOHa, HO MbI Bcerda CTapaemc ero pacuHpNTb, HApPIMep, C NOMOJIbO
yCTaHOBKN Me3OHHHo nnTaIb. Teepb B KOMNKeT NoCTaBKn BXODHT Ka6eJb, KOtOpBb
No3BOJnEe TNOKIIOHTb DOONHITbHb NCTOCHNK NtAHnBa B CnyuaRx, KOrDa PnlaTa
DeckLink Notpe6JIeR 60JIbe 3Heprn, Yem cnoocobn Obecneuytb PCie-cnot.
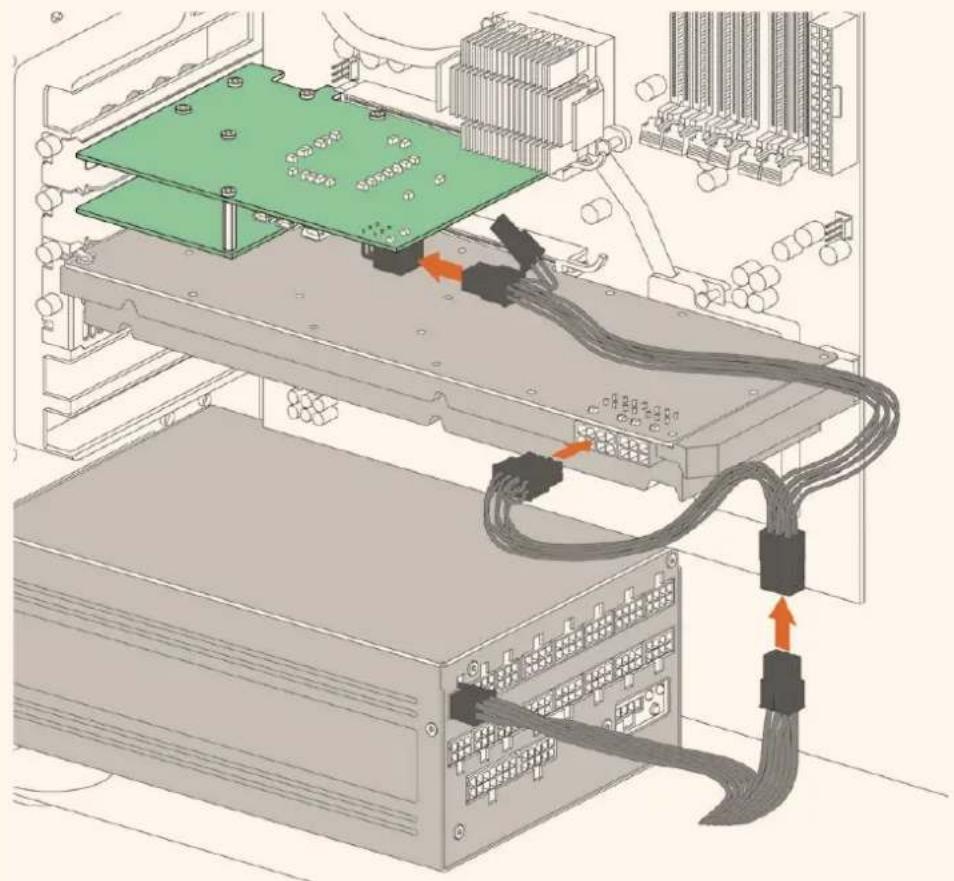
EcnnyHxnoNoKJIOuHTbTakOnNCTouHHK,NCnOJIb3yIte npnnaeemblKa6eb. OTKIOUHTe NcNOB3yEmbl Ka6ebbOT BnDEOKapbI N NOKIOUHTe K Hemy Y-OBpa3HbI Ka6ebb.BbIIOHNITb 3TO coeINHeHne MoXHO TOnbKO OINHM CnOCoBOM.
PoiKluoyene KaBela SuperSpeed USB 3.0 k Intensity Shuttle
PCIe-ⅡnabMOxHO yCTaHbNtB B 60one KpyHbIe Cnotb, Yem Tpebyetc. Hanpimep, 4-NHeHaA nnata CoBmecTima co Cnotom x16, Ho He Hao6opot.
Ecnn INHΦopMaζη Ha ynaKOBKe OTCyTCTByeT, nocTeTIte pa3dεN «TexHueckne xapakTePrcNTKNI, npeiδnHa CTpaHnu www.blackmagicdesign.com/ru/products.
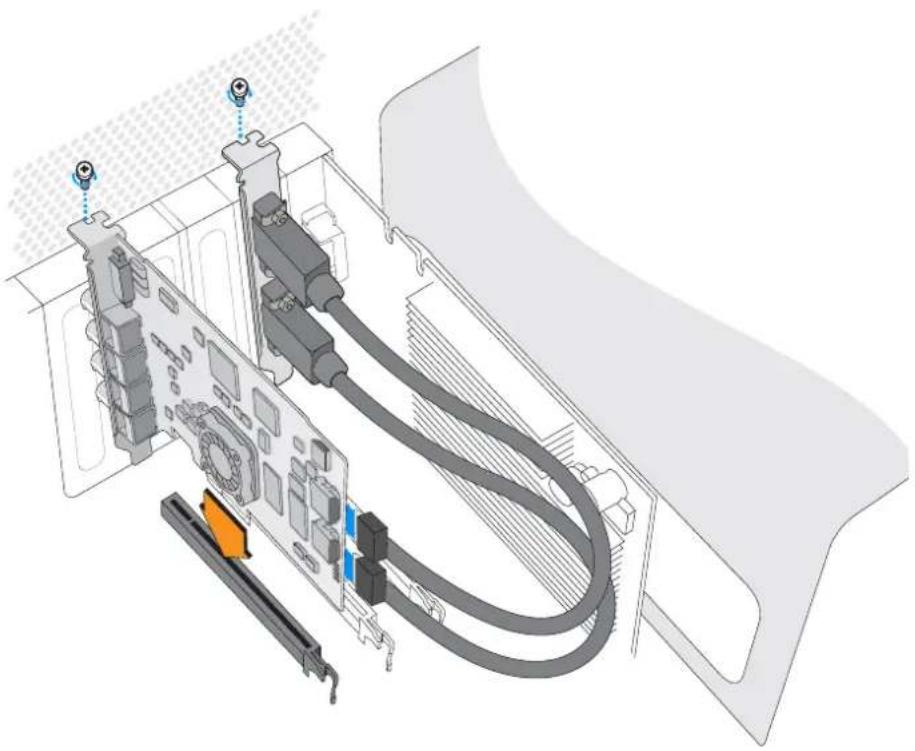
Bctabte PCIe-naty Blackmagic Design B hxyhbl PCIe-cnot. Pn Hannu cok6nnHDMI yctahOBnTe ee B liobb Cbo6nbHcnotPCI nnoocennte K 3adne nahe nnptbC nmoosbHDMI-kaenei.

PnuyctahOBKe PCle-ntaTb DeckLink co6IIOdaIte octopoKHOCTb, UTO6bl He donyCTNTb NOBpeXdEHHe eKOMnoHEHToB
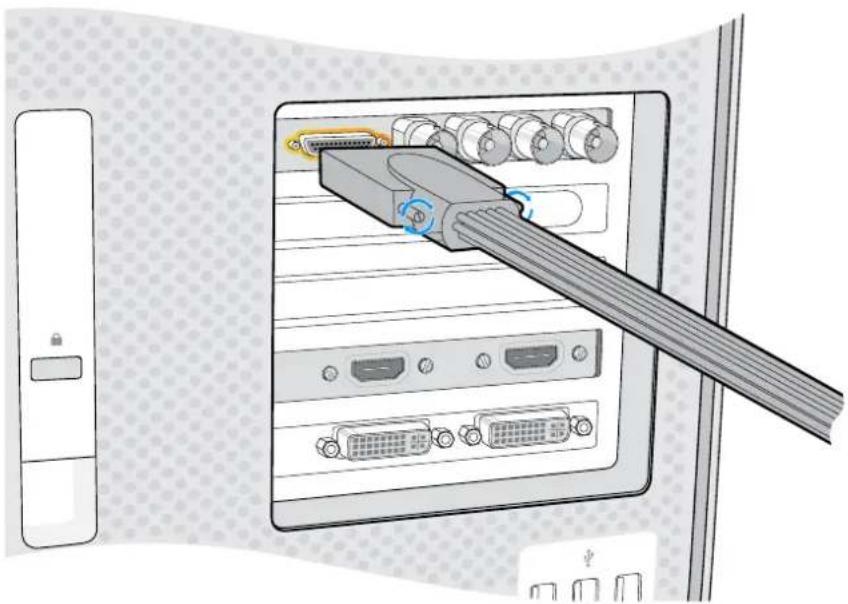
EcnHmEeTc npexoHoi KaebI, coeHNHTe erC COOTBETCTBYIOUM NoptOM Ha Pnate
Поdkлоченue UltraStudio 4K Extreme uepe3 nopT PCIe
UltraStudio 4K Extreme n UltraStudio 4K Extreme 3 Moxho nooklountb K Komblotepy uee3 nopT PCIe c nomoobdo dononHntelhoro aantepa n kaebn. Dnra 3toro nnonb3yte PCIe-cnot Gen 2. Komnekt Blackmagic PCIe Cable Kit, Bknouaounn aantephyo nnaty PCIe n kaebn, moxho npnoobpctny BCex dInepob KomnaHn Blackmagic Design.
Htobnoknupntb moelb UltraStudio 4K Extreme,ncnojbyre Blackmagic PCIe Cable Kit nIcTahdapTHyO aanTepeHyIO PCIe-nnaty.

UltraStudio 4K Extreme NmeeT PCIe-nopt, npedha3HaueHHb Ira noKnHoeHHBnHe HnA1bPCIe-adantepa,yctahOBenHHo HA KOMtbItepe
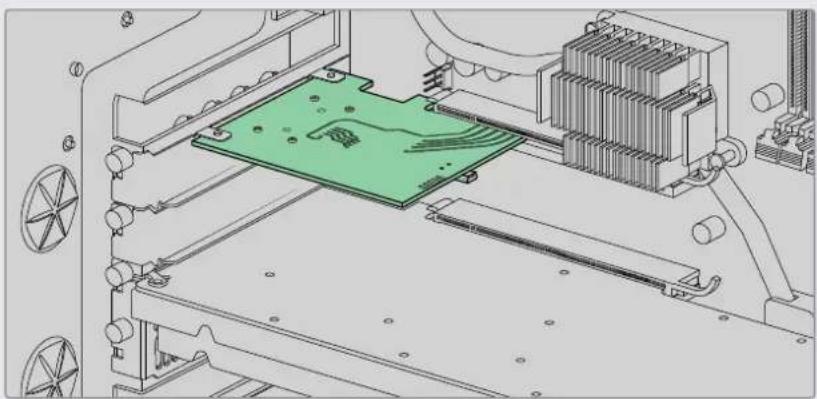
Aaantephyio nnaTy yctanabnbaot BPCIe-cnot Gen 2 konmbiotepa
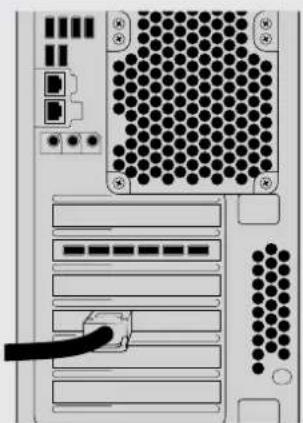
PoiKIOHHTe PClcKa6eB KcooTBeCTByOuEmy npTy, KOtOpbI HaxoDITcH Ha 3aHHe NaneHn KOMITbOTepa
YctaHOBka nporpaMMHoro oecneueHra Desktop Video
PpInoxKeHHn, nlaHnbl n dpaiBepb
IporpamnHoe oecneueHne Blackmagic Design Desktop Video Bknouaet B c6ea dpaBepbl, narnbI npnoXeHna, Heo6xOdMble Ira paoTbC o6opydoBaHem. Hxke npuBeH nepeHb BCEx npIoXeHni, narnHOB INpaaiBepOB, yCTaHOBHeHHix Ha BaW KOMnbIOTeP.
| Mac OS Windows Linux | ||
| Драивера Blackmagic Desktop Video | Драивера Blackmagic Desktop Video | Драивера Blackmagic Desktop Video |
| Blackmagic Desktop Video Setup Blackmagic Desktop Video Setup Blackmagic Desktop Video Setup | ||
| Blackmagic Design LiveKey Blackmagic Design LiveKey - | ||
| Blackmagic Media Express Blackmagic Media Express Blackmagic Media Express | ||
| КODEки Blackmagic QuickTime" | КODEки Blackmagic AVI in QuickTime" | - |
| Blackmagic Disk Speed Test Blackmagic Disk Speed Test - | ||
| Настойки и пагинь专门为AdobePremiere Pro CC,After Effects CC and Photoshop CC | Настойки и пагинь专门为Adobe Premiere Pro CC, After Effects CC and Photoshop CC | - |
| Пагинь专门为 Final Cut Pro X - - | ||
| Пагинь专门为 Avid MediaComposer | Пагинь专门为 Avid MediaComposer | - |
ABTomatnueckne O6HOBNeHna
Iocne yctahOBKn nporpamM Horo oecneueHn Desktop Video n nepe3anycka kombtopea 6ydet npobepeno BnytpenHee PO obopydoBaHn. Ecnn OHO He COOTBcTByet BepCnn, yctahOBlenHo HA KOMNBIOTep, NOBtCn DnaIanoROoe OKHO C npednoXeHnem OBHOBT npoWNkB. BbEpnte OK dIra 3anyska 0bHOBLeHn, 3aTe m nepe3arpy3nte KOMNbOteP, TTo6bl 3aBepuNTb yCTAHOBKy.
PIMMEAHNE. Ecnn nata DeckLink He pa6oTaet n3-3a c608 B o6HOBHeHH, BbINOHNTEeIcTBnOncuHbE B pa3dene «BocctaHOBHeHne PnAToi DeckLink noCne npepBaHHoro 06HOBHeHH
Iopraok yctaHOBKn nporpamMHoro oecneueHn Desktop Video nlaatfOpM Mac OS, Windows i Linux onncan danee B 3om pa3dene.
YctaHOBka nIy macOS
IyctaHOBKn IIObO rnporpaMMHO OeocneueHn Heo6xOIMo 0bladat npabamn aDMNHCTpato.
1 3arpynte nocleHIOBepcno yctaHOBunka dpaNBepoB Desktop Video bpa3dene noapecy www.blackmagicdesign.com/ru/support.
2 3anyctntye yctaHOBunk Desktop Video.
3ДЯУCTAHOBKNIpyorpaMMHOrO OeCneueHnRAbEpInTe「PpOdoJNKITb》,3aTeM「PpHnTb」 n《UCTAHOBNTB].ПипетвчнуYCTAHOBKe npINoxeHnDEsKTop Vdeo notpebyotcdo nOONHTeNBHeIwAr,npINBeDeHHbIe HNKe.
4 Npe3aRpy3nte KOMNbIOTep, yTO6blakTNBnPoBaTb HOBblpe daPaiBepbl.
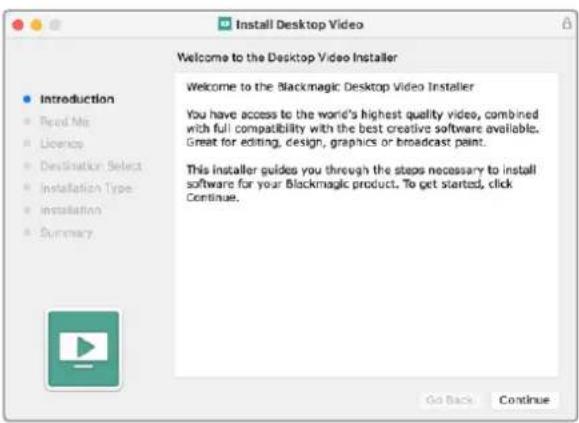
Desktop Video Installer gnMa
IepBnHa yctaHObKa Ha KOMnbTepe Mac
Pn nepBnuHou yctahOBKe Desktop Video Ha kombItepe Mac Heo6xoImo pa3peuNTb nCNoJIb3OBAHHe 3TOrO nporpaMMHoro oecneueHn.
1 Pn noBneHn cooBueHn 6eOnacHocT Bb6epnte Open Security Preferences nn OTKpOte «CnCTeMHbIe HAcTpOKn» n 9eJIKNHe «3aunTa n 6eOnacHocTb>.
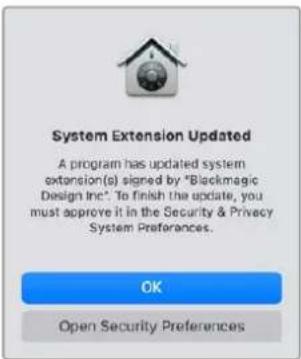
2 Yto6bl nCnOJIb3OBArB npINIOJKeHne Desktop Video, BbIbepIne 已 Pa3peuNTb
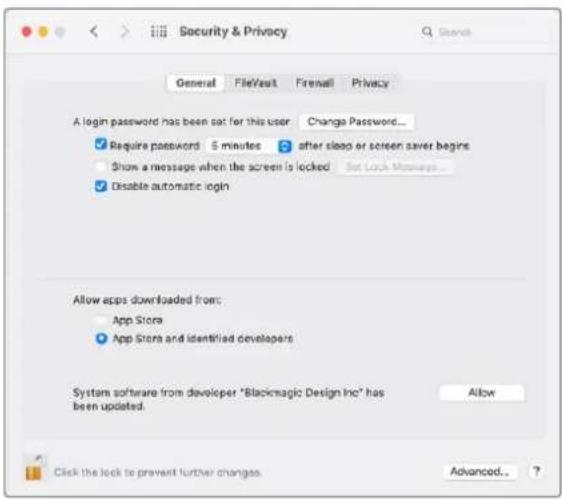
Yro6bpa0aTaC Desktop Video, Hc06xOmyBKNIOHT npINOKeHHe B CnCOK pa3peWHeHHbIX
3 Pn nonyueHHH 3anpoCA nepeaanyCTntb cIcTeMy HaxMITE KhoNky He ceuac
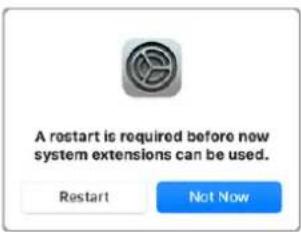
3aBepuHTe yCTaHOBKy IIO, HaxkAB KHOKNKy «Ipepe3arpy3ntb».

Ipeheactpoika noHTKn 6eONacHcToHa KOMbItepe Mac c npoceccopom M1
Pn yctaHOBKe Desktop Video 12.2 nnn bOonee no3dHeBepCN «ChnHexHHb ypoBeHb
be3oNaCHocTn» 60nbue He Tpe6yETc. Ecn 3ta onuia 6bIa kAnBnPoBaHa BO BpeMa YCTaHOBKn
npdeIduyeBepCN Desktop Video, peKOMeHdyem I3MeHHTb HAcTpOiKy Ha «BbICmN ypoBeHb
be3oNaCHocTn».
Popraok BbInonHeHn onepaun
1 Haxmte u yepkBaite KhoNky 3aNycka kOmblKepepa Do Tex nop, noka He noBtca OtkpItne 3arpy30hix npametpoB.
2 UeKnHe «IOnHTnKa 6e3oNaCHOCTn
3Bb6epnte «Bicuyn ypoBeH 6e3oNaChocn.
4 HaxmTe OK.
5 NOBNTcCoOeHHe O TOM, UTo IeT BbINOnHeHne NOnTNKn Be3OnaCHOCTN. NocNe TOro KaK OHO INcE3HeT, KOMIbOTep MOXHO Nepe3aRpy3ntb ObiHbIM CnOCOBOM.
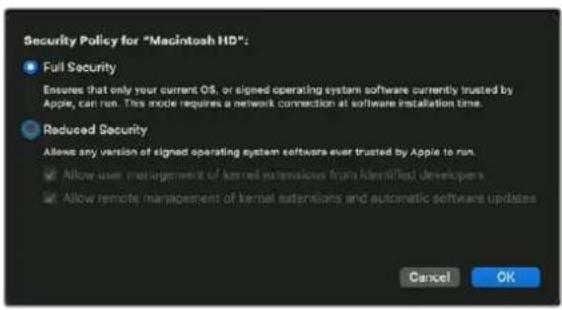
YctaHOBka Jnra Windows
1 Y6eInTeScb, yTo Ha KOMNbiotepe yCTaHOBJIeHa nocIeHNH BepcH JaPnBepa. IpeeiDte No CcbInke www.blackmagicdesign.com/ru/support.
2 OtkpoTe nanky Desktop Video n 3anyctute Desktop Video Installer.
3 Haunetc yctanobka npaBepo. NpBntc danaoroboek okho: "Do you want to allow the following program to install software on this computer?" (PaapeuNb cneyuioe nporpaMme BHeCTn nMeHEnHa 3OM KOMbItope?). BbIepeNTe "Yes" (Ja), qTO6bl npoDOnKHTb.
4 Nocne coocheHn "Found new hardware" (HaJeHO HOBoe oOpyDobAHne) noBntcmaTep yctaHOBKn oOpyDobAHn. BbIePnte "Install automatically" (AbTomuHecka yctaHOBKa). CInTeMa oOhApyKHT HeoXoDmblte dpaiBepbl Desktop Video.
5 Nocne yctahOBKn Bcex dpaBepoB noBHTc DaIaIorOBoe OKHO C COOOHem O TOM, TTO 06opydoBaHne rTOBO K nCIOJIb3OBAHIO. Pepe3arpy3nte KOMIbIOTep, TTO6bl aKTHINPOBAtb HOBble dpaBepbl.
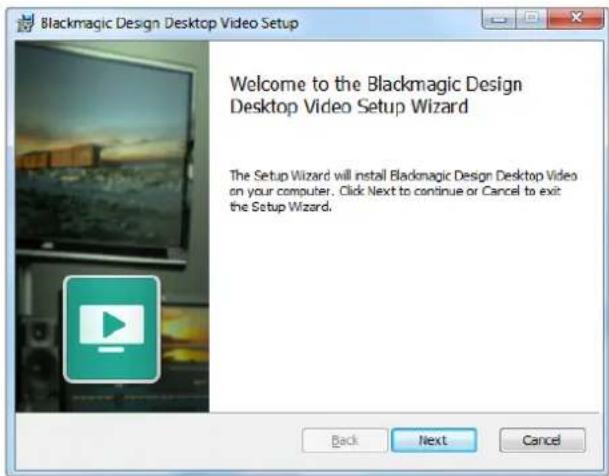
Desktop Video Installer Windows
YctaHOBka nla Linux
1 3arpynte noceHIOB Bepcno Desktop Video nIa Linux, nepeia no cblke www.blackmagicdesign.com/ru/support.
2 OtkpoTe nanky Desktop Video n nepeunite K nakeTaM Desktop Video, kotopbie Heo6xOIMo yCTaHOBnTB Ha KOMNbIOTep. Amd64 npedHa3Haauaetcra 64-pa3pndhix npoueccopOB Intel n AMD. PAnka coedePknTpn NaKeTa.
-Desktopvideo coapednT OCHBhIe npaBepbI n API-6n6nnoTeK.
- Naeker desktopvideo-gui coepknt Desktop Video Setup.
Mediaexpress coepxnt ytnity dna 3axbata n BbOda BuJeO.
3 Daxkbl 1eKHTe KHOKNIO MbIIN NO BbIpaHHOMy NaKeTy NcEduTe HCTpyKmHa Ha kpaHe. Ecn NoBnTc coo6ueHne O Heoctaoux 3aBncmoctx, Chauana yctahOBnte nx, a 3aTEM BePHNTecb K Desktop Video.
4No OKOHaHn yCTaHOBKn nepe3arpy3nte KOMNbHTep, YTObI N3MeHeHn BCTynnn B Cnny.
Ecnnnaket Desktop Video nIa Linux oTcyTCTByET NIN BbXOTte yCTaHOBtB nporpamMy C NOMOJIbIO KOMaHdHoi CTPOKNI, ObaTNTecb K paIy ReadMe, B KOtOpOM NoDpoBO OnncAHBI Heo6xOAnMbIe DeIcTBn.
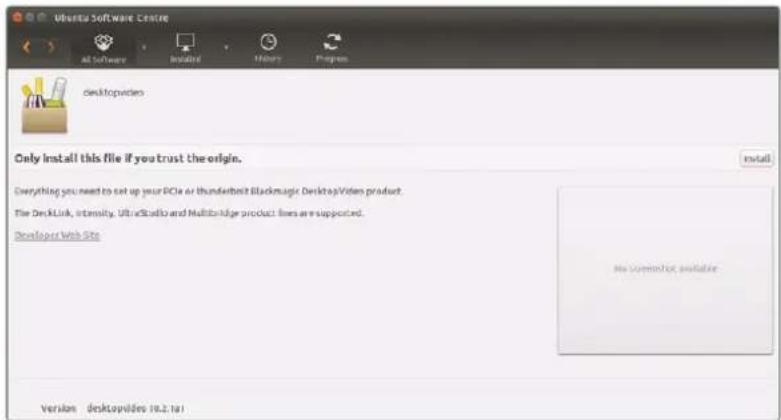
Iporpamma Desktop Video rotoBAДЯ yctaHOBKc nmoocbU Ubuntu Software Center
06HOBJIeHHa
EcnI NO He yctaHOBneHo, MoXHO cAmOCToTeJIbHO npOBepNT bHaUNue ObHOBneHn, BBeJBA KOMaHdHoi CTPOKe TEKT HIXe.
BlackmagicFirmwareUpdater status
PONBNTc coo6eHHe npMepHo cneDyUoEro coedeJxHaHn.
0:/dev/blackmagic/io0 [DeckLink SDI 4K] 0x73 OK
1:/dev/blackmagic/iol [DeckLink 4K Extreme 12G] 0x0A PLEASE UPDATE
Ecni Tpe6yetcCenatb 0bHOBHeHne, BBeNTe
BlackmagicFirmwareUpdater update 1
YTo6bI nOlyuHTb 6oJee noJpOHyU INHOpMaUIO 06 IcNoJIb3OBaHN KOMaHd, B TOM YnCne dNIA
OboBHeHnB HyTpEHHero nporpaMMHOrO oecneueHnA, BBeDnte "man
BlackmagicFirmwareUpdater".
Bce rotoBO dIra hauana paobTo! Nocne toro, KaK obOpdyOBaHne noKnIOueHO npOrpaMMHO oecneueHHe yctAHOBNeHO, MoKHO npCTyNaTb K 3aIncn I BOCpOnBaBeHIO.
PpOBepka Bocnpon3BedeHnBnDeo
1 Bb6epnte BknaKy Playback (Bocnpn3BeHeHne).
2 LcHKnHte DaBa pa3a Ha np6bHom KInne. Buae no ayinocnHaBb 6dyT nepeabatcbn HA MOHTOP, NOKIOUeHHbIK BbIXOy O6OpyOBaHN.
Blackmagic Desktop Video Setup
O630p yTnIITbI Blackmagic Desktop Video Setup
Blackmagic Desktop Video Setup npedhaHaetaTc nlaHacpoNnnapaMeTPOB o6opydOBHn n OTo6paKeHn 3aIncbBaemoro KOHTeHTa B peXmpeaIbHO BpEmHe.
3anyck Blackmagic Desktop Video Setup
- Пп пабое В onepaunonHнсnte Mac OS X BBbepnite Blackmagic Desktop Video B pa3dene System Preferences (Cnctemhble HactpoKu) nIn 3anycnte nporpaMMy n3 nanKn Applications (ПрлoxKeHn).
- Пи павOTE В onepaunonHOn CnCTeMe Windows 8 Ha ekpaHe «Iyck» BVeДпe Blackmagic,ЗатEM Bbl6epHTe Blackmagic Desktop Video Setup. Ha Windows 8 yTInNtY Desktop Video Setup MoxHo TAKKe 3anyctntb c NaHEn YuPabJIeHn.
- Пи павоте В оретацоннов сисмЕ Windows 10 ВьберпгуСьс>Всрогамы> Blackmagic Design>Desktop Video>Desktop Video Setup. Ha Windows 10 утуну Desktop Video Setup можно takже заусть с наени уралени.
- Пи радоте в Onepaционн сстeme Linux Вьберпг�se Appli cations >Sound and Video > Blackmagic Desktop Video Setup.
PnO tKpbTtnn Blackmagic Desktop Video Setup Ha 3kpane 6dyt OTo6paKaTcBce NpokNueHoe obopyoobAHne n yHKun, nCnoIb3yEmble dny paOto b C Hm. Pn noIyueHn BIndeocirHana ero fOpMaT 6dyet ABToMaTuCeckn pacNo3HaH n OTo6paKeH nOd 3HaYkom Video Input.
Ecnno nocknueho HeckoBko yctpoaB Dna 3axBaTn Bocnpn3BeDeHn, npeyn ot OndHO Kdpyromy moxho C nOmoCIO CTpeNOK NO bokam fnaBHOn CTpaHnU. INaI N3MeHeHn HAcTPOe Haxmte Ha n3obpaxeHne obopydoBaHn nn 3NaOcK hactpoek npd HaaBaHnem yctpoiCTBa. Desktop Video Setup oToobpaxaet HacTpoKn ToblKO nIbBpaHnO o6OpydoBaHn, YTO n36abJIaET OT Heo6XoDnMoCTn IpocMaTpNbAIB MHOKeCTBO CTpaHnC MeHIO B PONCKax HyxHoi IHΦopMauH.
BbEpTe HxKhbl CTaHapT BnDeo N BbINONHTe Heo6xOIMbIe HaCTPOIK CNHaHa Na BbIXOe.
06aHOpMa
ΦopMaT BnDeO No yMOnuHaHnIO
IyBeaTeBHO MOHITOpHHra B Final Cut Pro X yctAHOBHTe fOpMaT Ha BbIXOe B COOTBeCTBUN C fOpMaTOM npoeKtAB Final Cut Pro X.
- When Paused
Bb6epnte Bocnpoun3BeeneHne nonHoro kaJa pa nn OndHoro ppaemTa npn noctahOBKe Ha nay3y.
Video Playback
Bb6epnto noka3 ctaunhbyixn06paqkeHm nn cepho 3kpaHa npn ocTaHOBe.
During Capture
Bb6epnte Bocpon3BeHne Bndeo nIN BxOJaIero CnHaHa Na BvIXoe BO BpeMa 3axBaT. PnBbOpoe onu "Video output displays playback video" Ha ekpaHc OTo6paxaTcR TO TcHaN, KOTOpBn Bb6PAn B pa3dJe Video Playback. PnBbOpoe onu "Video output displays input video" Ha BvxOe oSyet OTo6paxaTcB XOnHOi CnHaN.
During Playback
Hekotopbie peehenna Naketa Desktop Video Moryt BblnoHrB ppeo6pa3OBaHne Ha BIndeobbxOe n3 Rec. 601 n Rec. 709 B cTanapt Rec. 2020, Tpe6yemn dny BocnpOn3BeDHeN CnHaHa H TeLeBn3Opax m MoHToPax. Ecnn o6OpyDoBaHne NpndepxHBaET Aty fynKcuu, B MeHIO Setup Bbl6epnte Convert to Rec. 2020. B ocTaNbHbIX cnUyax octabTe hAcTpoKy no ymoIunHIO (Keep default color gamut).
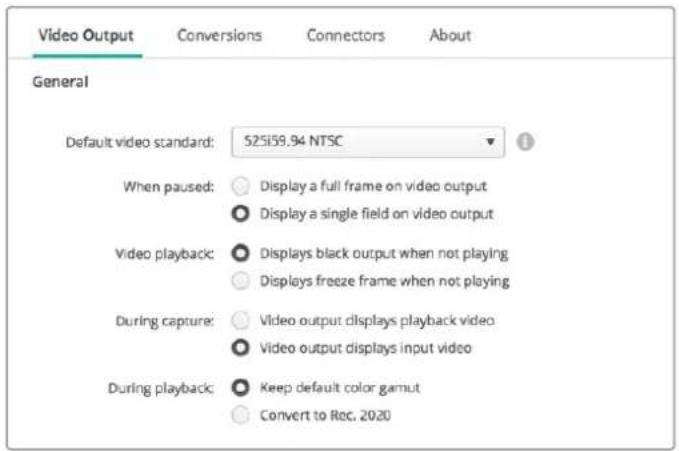
BbEpnte Hynhble onnnpn noctaHOBKe Ha nay3y, BO Bpemr Bocnpou3BeDHeNn 3axBaT
SDI Output
Color space
3aatae cbeotoe npoctpaHCTBO mekdy cneyuouuMOnuymn:RGB-Bndeo CacrtoT 4:4:4nnY,Cb,Cr 4:2:2.
3G-SDI formats
Bb6epnte BbIOd SDI-cnHana 3 F6nt/c no cTaNapTy SMPTE Level A nn no cTaNapTy SMPTE Level B.
1080p HD and 2K
Bb6epnte BbIOd cunHaoB 108Op HD n 2K kaK Progressive nn PSF.
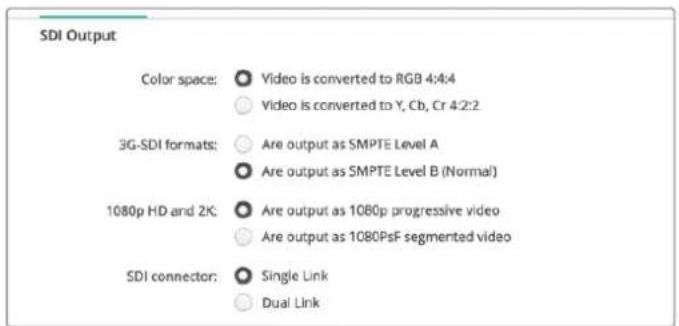
ДянастpoиnapametpoB bIxohoro SDI-curhana nCnoNb3yTe SDI Output
- HactpoiKa nHTepFeicca SDI
Bb6epTe Single Link (oHokaHaJIbHyIO), Dual Link (dByxkaHaJIbHyIO) nIq Quad Link (YeIbIpeKKaHaJIbHyIO) nepeaCy dIy BbIBOda ciHaNoB 3G, 6G nIi 12G-SDI. HeKoTOpbl MoHTOpbl I npoeKTOpbl InI npoPeCCNOHaJIbHO uBeToKOppeKcIMn NopDePknBaOT ToIbKO ueIbIpeKKaHaJIbHyIO nepeaCy ciHaNoB a fOpMaTx 2160p/60 n DCI 4K 4:4. UltraStudio 4K Extreme no3BOJnEeBbIOInb Quad Link 3G-SD, a npu nCnoJIb3OBAHNn DeckLink 4K Extreme 12G moXHO yCTaHOBt bdoONHInteBHyIO pNAty Quad SDI.
SDL connector:

Single Link

Durl Link

and

Bb6epTe OndHokaHaIbHyIO, DByXKaHaIbHyIO nnYeTbIpeXKaHaIbHyIO nepeaay nra BbOda cirHanob 3G, 6G nn12G-SDI
- OpMaTbI 8K
BndeoB8K BbIbOuNTcpe3eTbIpyexKaHaJIbHbI SDI-nHTeppeic, nla paobtbc KOTOpbIM MoKHO BbIpaTaHyKbI pExMM.
OocTynHbI DBa peXIMa BbIBOda.
Are output as Square Division Quad Split (SQ)

Are output as Sample Interleave (SI)
Дя Вьюа 8K-и3obpaхeну чepe зчырханьнИНТЕРсЕС MOKHNO ICNOLB3OBAt ONY I3 DBYx ONIIN
HactpoynAnalog Video Output
Ecn nncnbl3yemoe obopuyobAHne Blackmagic Design noDepknaeT pa60ty c ananorOBbIM BnDeo, moXHO BBpaTB BbBOd Ha KOMNoHENTbH, KOMNo3HTbH nn S-Video-inHTpeFeic.
HDMI 3D Output
3aHaCtpoKa 3a4eT cno6 BbB0da 3D nmoHHTOpnHra uepe3 HDMI.
Top and Bottom
BbBOuI3o6paXeHnJIeBOrO n npaBOrO KaHaNoB no BepTnKaAIn Co cKaTaHem 50%.
- Frame Packing
ObeHnIeTn3OpaXeHnJIeBOrIO npaBOrO KaHaIOB OOnH KaApD 6e3 CKaTnI.
Side by Side
BbOu n3o6paXeHn neBOrO npaBOrO kaHaNoB no rOpN3oHTaNo cXaTneM 50%.
Left Eye
BbOu n3o6paKeHnToIbko neBoro KaHana.
Line by Line
I3o6paKeHn IeBOrO n npaBOrO KaHaNoB nepeaIoTc H a NooopeepNbIX cTpokax 6e3 Cxatna.
Right Eye
BbOIOI306paKeHnTOnbKO npaboro KaHana.

BbIepeHnHyKHyIO OunIO DnA HacTPOIK BbIbOa 3D-BnIeO Hepe3 HDMl
Analog Video Output Levels
IcnoIb3yIte cnaIepbI Video n Chroma, yTo6bl yctaHOBHTyPOBHN aHaIOROBTO BnDeo Ha BbIXOe IIN KOMNOHEHTHO INI KOMIO3HTHO CnHana.CNX NOMOUI MOHReYrKOCtB IN HacblueHHocCTCbETA.Ipn paOBe Tc KOMNOEHTbIM BnDeo HAcTpaNBt 3HaueHnBaCnCr MOxHO He3aBnCmO dpyr OT dpya. JnX CBraHHo HAcTpoNk UeKNHITE KHONKO Mblu N O COOTBETCTByUoIeMy 3Hauchy.
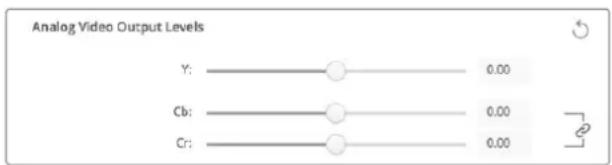
VcnoB3yte cnaep Video nya yctahOBkypoBn KOMNo3HTHO aHaNOBOBO BIDecOcnHana Ha BbXoJe, Cn Cr- nna 13MeHeHnBaAnca CBeta npaPabote c KOMNoHEHTbIM BnDeo
Use Betacam Levels
B peuhenx Blackmagic Design nCnoIb3yOToC yPOBn aHaIoroBOrO KOMNoHeHTHO BnDeo no cTaNapTy SMPTE, YTO oBeCneuBaET COBMeCTMocTb C 60JIbSINHCTBOM COBpeMeHHOrO BnDeoobOpyOBaHN. BbIePeNTe 3Ty OOnIO npn paOte C dekAMN Sony Betacam SP.
NTSCIRE
Bb6epnte hactpoKy 7.5 IRE nIy KOMno3HTHO Bnedeo NTSC, nCnoN3yEmoro B CLJA
HKeKOTOpbIX dpyrnx cTpaHax. Bb6epnte hactpoKy O IRE npn paObe T RnoHN
HcTpaHax, He nCnoN3yUoXx 3NaueHne 7.5 IRE. 3Ta hactpoKa He nCnoN3yETcra dny
fOpMaTOB PAL n HD.

Bb6epnte onuio "Use Betacam Levels" npn pa6ote c dekamn Sony Betacam SP. Pnp nCIOJIb3OBAHN KOMN3HTHO BInDeo B NTSC yctahOBtne Heoo6xOIMoe 3HauHHe NTSCIRE.
Reference Input
3aHactpoKa NOMoraet corlacobatb BndeoHa BbIXOe NO BXODHomy ONOpHOMy cnHaIy.
Noobhag 3aadaa qacto cont nped KpynhbIMn BeaTeNbHbIMn Ctydma, rHeo6xOma
toHa hCnHxPOHn3aunr CnHaIOB.HactpOka CnHXPOHn3aunr IpOcXoDHT Ha nPmepax.
Hactpoika 6ydt none3noB TOM cnyae, ecn Bce o6opuyoBaHne NOKIOUOHe K CTaBbHOMY nCTOUYKc ONOPHO CnHaIa DnCnxPOHN3aun INCXODaXxCnHaIOB. C ee NOMOuTO CTAHOBITc BO3MOxHbIM IaADKOe IpeKIOUeHne MExdy UCTPOINCTBaMn, COeINHeHHbIMN C KOMMYaTOPOM IIN 3ΦnPHbIM BnDeOmNKwepom.

Bb6epntHee06xOIMoe3HaehnE npNcnoIb3oBaHn CnHxpOnnaaun no onopHomy cnHany
Ha3nauHHe pa3bEmOB Ha DeckLink Quad 2
IInata DeckLink Quad 2 IImeet BOCem MBHn-pa3bEmOB BNC, BCE nKOTOpBx DOCTynbl dnn nepeana SDI-cunHanOB B He3aBncmOM pexnme. BnaOanapr AToMy oBecepeuBaetc 3axBat NBOCPoIN3BeDHeNHe HecKONbKnx pa3hIx nTOKOB C NOMOu ONDHO peWeHn. Desktop Video Setup otobpaKaET IIATy DeckLink Quad 2 KaK BOCem CBMOCToTEnbHy xCTpoiCTB DeckLink Quad, no3BOJra co3daTb Heo6XOnMlyO KOHfHipyaPauIO BBODOB IN BBIOOB. KaJDMoy yCTpoiCTBy MOXHO PnICBOINTCBOE IMR, YTObI NCNoJIb3OBaTB erO dIra paOToC cOnpeJeHHbIM BIDoeOCHHaLOM.
Desktop Video Setup nmeet hactpoikn Connector Mapping, c nomoubkoTOpbx moKHO BbnoHntb na3haeHne SDI-pa3bemOB. Cneyet nomHtB, yTo KaJdbn 3n Hx3akpePnEh 3a onpeJeHHbIM ycTpoiCtBM. Hanpimep, nHTepfnc SDI 1 nCNoB3yeTcN c DeckLink Quad (1), SDI 2 - c DeckLink Quad (1) n DeckLink Quad (5).

EcnHa pa6oey cTAnu yCTaHOBnHe nnata DeckLink Quad 2, HacpoKn Connector Mapping no3B0nIOH b6npatb SDIpa3bem Ira KaJdoro yCTpOcTBa DeckLink Quad
Tabnua Hxke codepknt Bo3mOxHbIe BapnaHTbI HactpoKn SDI-pa3bEmOB, npedHa3haeHHbIX dnnncnoBzOBAHn C kaxdbim n3 yctpoCTB DeckLink Quad.
BapnaHTbI KOHΦnγpaζη
UcTpoIcTbA DeckLink Quad SDI-pa3bEmbl
DeckLink Quad (1) SDI 1 n 2 nn SDI 1
DeckLink Quad (2) SDI 3 n 4 nn SDI 3
DeckLink Quad (3) SDI 5 n 6 nnSDI 5
DeckLink Quad (4) SDI 7 n 8 nn nSDI 7
DeckLink Quad (5) SDI 2 nnn He nncnonbayetc
DeckLink Quad (6) SDI 4 nnn He nncnbo3yetc
DeckLink Quad (7) SDI 6 nnn He nncnbo3yetc
DeckLink Quad (8) SDI 8 nnn He nnonb3yetc
CneNyET nomHnHb o TOM,уTo Ha3NaueHHe SDI-pa3bema 3aTpaHnBaet BCE CBraaHHbIe C HmUcTpoiCTBa.HanpIMep,ecnn dJa DeckLink Quad (1) Bb6pana KOnfHpyaunrSDI 1 n 2,To dJaDeckLink Quad 5 ABtOMaTHueckn 3aJaTeCn OuJNRA «He NcNoB3yEtCn»,notomy yTo aTN yCTpoiCTBaIMeOT oOuIN SDI-pa3bEM.Ecnn dJa DeckLink Quad (5) Bb6pabnteppeic SDI 2,ДЯ DeckLinkQuad (1) Byedet ABtOMaTHueckn npImeHbTcB onuINrSDI 1. YTo6bln36exKaTb cnyaHoro
peeknoueHnHa paobTy CpyrM CNrHaNOM, HeoXoIMo BbIOnHrTa Ha3HaueHne BXOOB nBixOoBD SDI BcootBeCTBnC Ta6nuei Bbiie.
COBET. EcnHa pa6oey cTAnu nEcTb nnata DeckLink Quad, dny ynpabHeHn KOTopoI NcnoB3yETcCobCTBeHHoe npINOxKeHne Ha OCHOBe NaKeta SDK, npu ycTaHOBKe DeckLink Quad 2 HnKaKne I3MeHEnB B CnCTeMe He TpeSyIOrC. Bo3MOXHoCTb Co3DaHn CO6CTBeHHoN KOHfNpyaoun BXODOB N BIXODOB N03BOJNT pacWpRtB FyHKUHOHaYke IMeIOUeOcpeWeHn 3a CHT DonONHInTeNbHbIX KaHANOB nepeaun CnHana.
Вкладka Audio
Audio Input
Bb6epnte 3naok,cooTBeTCTByouu pa3bemy nla BBOda 3Byka.Moxho nCnoIb3ObaTb Odn H3 Hebpex BXoIOB.
- Embedded (BcTpoeHHbI)
Aynokahanbly6yuyrABnTbcraactbIOBnDEOCHNAOB.PpN3OMnHTeppeHcBI SDI nHDMI cnoocnbnepedaBat BCTpoEHhbl 3Byk.
AES/EBU
LcnpoBoi aynocirHan, KOTOpBIO bcneuBaET npepaHy dByx kaHAnOB 3Byka Ypeez OIN pa3bem.
XLR
TpexkHTaKTHbI aynopa3bem, yacto nCNoJb3yEmbB npocceccnoHaHbHom aHaIorOBOM ayuoo60pyoBaHH.
RCA HNI HIFI
Pa3bEm nI npnemn nppeaun Hebaacno aHaanoroboro 3Byka npn noKnKouehnn IIOBntbcckoro oobopyo, taKOrKa Hi-Fi-cncTeMb, DVD-nneepbI n TeJeBn3Opbl.
- Microphone (Mnkpocoh)
ФанTomhoe nHTaHHe uepe3 KaebIyaue BCero IcNoIb3yETc npn noKnIOueHIN KOHecHCATOpHbIX MkPofoHOB.
BknOHTe onuio "Use +48V phantom power", ecn dIy MnkpofoHO TBpebyetc
fANTOMHoe nITAHue. PekomeHdyETc CHaTb fIaNKoI ITOI ONUIN, YTObI N36KxATb
NOBpeJXeHHN MkPOFOHO B cABTOHOMHBIM nITAHUEm. Pn INCNoJIb3OBaHN NFAHTOMHOR
nITAHN 3aropaeTc CBToNDIOHb INDnKaTOP Ha nepeDHe nAHeN UltraStudio 4K
Extreme. NocJe OTKnIOUeHHN FyHKUIN Phantom Power Heo6xoIMNo NOOJaTB He MeHee
10 cekyHd nepei NCOnJIb3OBaHHm MkPOFOHa C ABTOHOMHBIM nITAHUEm. FAnTOMHOe
nITAHne He npedycMOtpeHo dIy MnkpofoHO B NeHTOCHoro
n 3JIeKTPODNHAMUHeCKOrO Tnla.
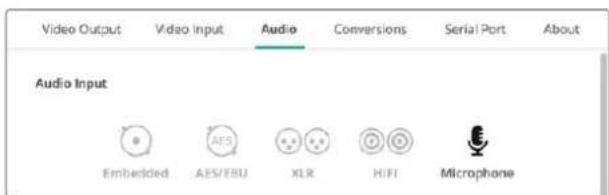
C NOMOUBMOIINBIBepeHTE3HAOK, COOTBETCTBYOU PAaBemyDnBBODa 38yKa
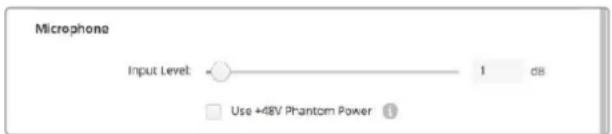
IyPOBnMkpoOHOro ayDnOcHnHa npeDbHbTe cnaep
HDMI Audio Output
3Ta onu nOBoJrT ppeo6pa3OBaBb ayDnOKaHbIb foPmTa 5.1 B KOHfNpyauuIO dJa KOHKpeTHoro yCTpoiCTBa HDMl-MOHHTOpINHa.ДЯ HeKOTOpBX MHorOKaHbIbX ycNITeJeI DOMaHnx KInHOteATPOB ObEMhbl 3Byk Tpe6yETcpaCIIpeDeJIb IIO KOHKpeTHbIM KaHAlam. EcnB BaWem npoeKeT MaTePnAImEe Dpyro NopdOK KaHAnOB, Knpimepy cTaNdapTa SMPTE, oBeceNeHTcooTBcETBne CnCTeme NcNoJIb3yEmoR OAV-pecNBepa MoXHo C NOMOu bIO ONuN "Use 5.1 surround channel ordering".

ObecneHHe cooTBcTBnCnTeMe o6opyDobHn HDMIMOHITOpINr c nOouOnu "Use 5.1 surround channel ordering"
AES/EBU
IpeBnBte cnaep, yTo6bI yCTaHOBt bYcIneHne dny ayDIOBxoOOB N BbIXoOB AES/EBU. HaxMITE 3haQoC6pocA dny yCTaHOBKn ycIneHn Ha O dB.

IcnoIb3yIte cnaIep Output Level nIpeynipovKn ypoBHa BvKa Ha AES/EBU-BbxOe
Analog Audio Input Levels
Channel 1/Channel 2
Hactpoika ycnneHnaanoroboro aynocnHnOB H BxOe np3axBate. IINCBaHHo Hactpoikn oboNXnapaMeTPOB UeKNHTe NO COOTBETCTBYIOUcemy 3HaKy.
Use HiFi Audio Levels
Moenn UltraStudio n DeckLink oshaenbl npopecceonhaibbimn XLR-pa3bemamn. PnncnoBzOBAHm 3Tnx pa3bemOB dny noKIOUeHn IIOBNTelbCKoro aynoobopudobAHn BbepuTE onuio "Use HiFi Audio Levels", ta kak ypoBHn 3Byka Ha npoccecoHaIbHO n bItBOH texHnke pa3nuaOTc. Bam takxe notpe6yETc r nepexoHNk RCA/XLR.
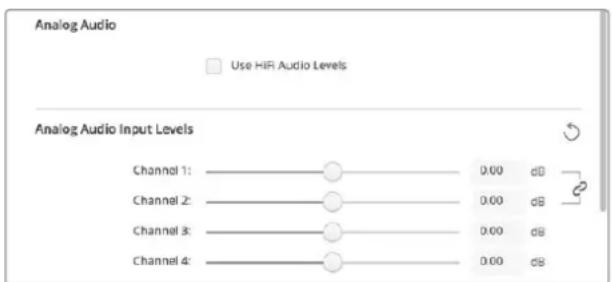
ДлгнадюйурбяанloroboroaydnoHaBXOe nCNoB3yIte cnaedpebldbyxKanAOB.Бb6epTe onLIOu "Use HiFi Audio Levels" npn nodkluohennlnoBteJIbckcKOro 3BykoBOrO obopydoBaHn.
Analog Audio Output Levels
Channel 1/Channel 2
HahtpoKa ycnHnaydnocnHaJa nna aHaIorOBOrO ayDnO Ha BbXoNe npu BocnpOn3BeDeHNBnEo. Dnra CBAaHHo HacTPOKn ObouxnapaMeTPOB 9eJIKNHTe NO COOTBeTCTByIOUeMy 3NaHyK.
3NaOKc6poca
Pn pa6oTe co cnaepamMoKeT nTope6oBaTbC OTMHe H3MeHEnB 3OM CUYae NcNoIb3yOT 3HaQOK c6pOca - KpyrnyIO CTpeNky Cnpaba OT CTPOK HaCTpoEe. HaxMITE Ha 3HaQOK, YTObI yCTaHOBTb ycInHe He O dB.
Вкладka Conversions
Input Conversion
3a HactpoKa nO3BONrET BpealbHOM BpemeH NBIIOHrTb NOBIIaOIOU IO NHOHXaIOU KOHBepCNO BO Bpem 3axBaTa BnIeO. Bbi6epnt Heo6xOIMbI BnD pneobpaObaHn I3 packpbIbAioUeOcra MeHIO Input Conversion.
KoHBepcnHa BxOe Daet 3aepkky Do DByx KaipOB, NoaTOMy IJra CnHxpOHn3aun Heo6xoDmOB BHeCTN COOTBETCTByIOUne N3MeHEnB V TaIIM-KoI.
Display As
Bb6epnte cnooc 0to6paeken Hndeo nocne konHbpcn. B 3aBncmoctn ot nponopun KaPna Ha Bxoide moYr 6bIb DoctyNbI cneDyUOuie onu: Letterbox, Anamorphic, Center Cut, Pillarbox, 16:9 Zoom uinn 14:9 Zoom.
Output Conversion
3a HactpoKa No3BOnAeT BpealbHOM BpeMeHN BbINONHrT NOBbIaOuSyIO NHOHXaOuSyIO KOHBepCIO BO Bpem BocpnOn3BeDeHn. BbIepTe Heo6xOdMlb BnD npeo6pa3oBaHnN 3 packpbBaIOUeOcR MeHO.
KoHBepcnHa BbXOe daet 3aepkky do DaByx KaipOB, no3TOMy dIra CnHXpOH3aun Heo6xOIMo BheCTN COOTBcETbYIOUne I3MeHeHHB TaM-KoD.
Convert Analog Outputs
Bb6epnte 3ty onuio, cnn Heo6xOIMMO BbINONHHTb KOHBPcNIO Ha BbIXOaX aHaIOROBOr BOuJeO.
Display As
Bb6epnte cnoocb oTo6paKeHn BIneo nocle KOHbpCnn. B 3aBncmocTn OT nponopn KaDpHa BbXOme MOrTy bbl Doctynbl CneDuoune onu: Letterbox, Anamorphic, Center Cut, Pillarbox, 16:9 Zoom nn 14:9 Zoom.
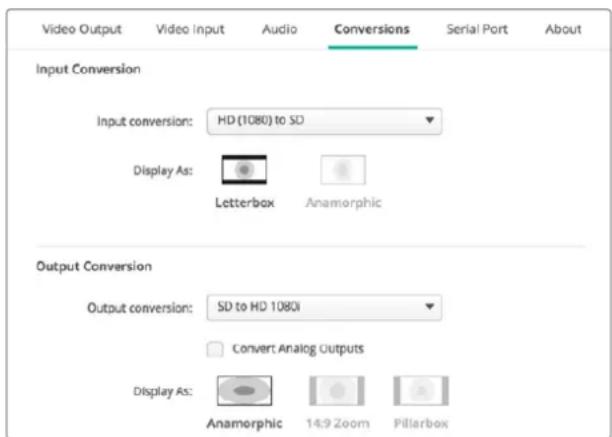
C NOMOJIbIOpackpbIBAIOUeO MeHIO BbIbepnTe HeoXoIMBIuINpeo6pa3OBaHNHa BxOJeNNBbIXOe.HakMITE Save,HTo6blcoxpaHHTbHacTPOky.
Tabnua Hnke codepknt onncanhe nponopun KaDpa, KOtOpBc MOxHO Bb6paT npn BbINOHn KOHbepCnn.
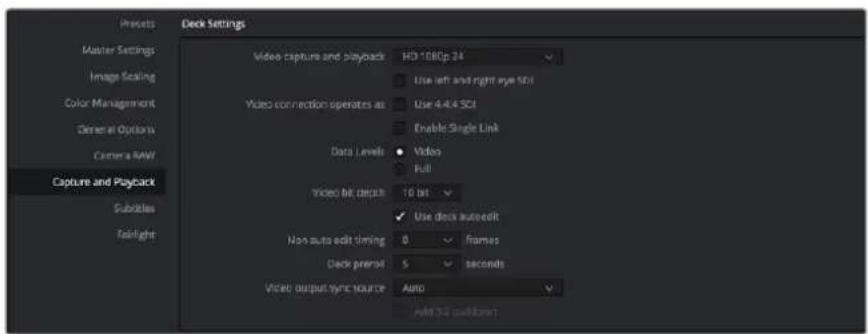
B MeHIO Video capture and playback BbIbepnTe Heo6xoDmMb foOpMaT
4 Npeeynte Ha ctpaHcy Edit n Bb6epnte File > New Timeline.
5 Ha ctpaHnue Color uenKnHTe no MeHIO Color n BbIbepuTe Resolve Live >On. NpAurTcna06paKeHne JKBorO BuDeo, HAD KOtOpBIM 3aRopuTcKa Kpachra Khonka Resolve Live.
Pa6ota c Resolve Live
1 B pexime Resolve Live KhoIka Freeze (3HaoyckexKHNc) cnocobha 3amop0ntb> BXoJnBnBeOkaDp, YTO No3BOHnT pa0TaTb CO CTaTHbIM N3o6paKeHnEM. Pocne Heo6xOUMOn OBpa0TK MoXHO Pa3MOP0NTb> KaDp DnA Co3DaHn MOMeHTaBHO CHIMKa.
2 Ecn pe3yIbTaT uBetoctAHOBKn yDObIeTBOpntelhBi, HaxMITE KhoNkY Snapshot (3aHocK kamepb), YTObI COxpaHNTb MOMeHTaJIbHBI CHIMOK TEkyUero CTaTHORO IIO6paxeHN B OKHe Viewer, daHHble TaIM-KODa N UBeToBvO cxemy Ha MOHTaxHOIINHeKe. KaJdbi CHIMOK IpeCTabIeT cOboi OndHokApobBkiKnI. Pocne coXpaHnHa CHIMKa BHOBb HaxMITE KhoNkCy Co 3HauchKom ChexnHKn, YTObI npoDOnXHTb BOCnpON3BeHeNe i nepeTNI K CneDuOcEmy KaDpy DnBInlHeHnra.
COBET.ДононтельнаяифорmaцьофункцnResolveLivecoapedkntcB pykoBoDCTBe no paOte c DaVinci Resolve.
PepaKtpoBaHneB DaVinci Resolve
Blackmagic DaVinci Resolve Imeet Bce Heo6xOIMbIe INHCTpymEnI bI IINI pOpeccnHaJIbHO peaKTIPOBaHIn N KOHeuHoi OboApOtnKn. PpInIOKeHne IO3BOJraTe OINHaKO BO JERKO nCIOB3OBaT BeCb FyHKcHOnAH npi paOte C MbIbU N KnaBnAtypoi.
HactpoKa
1 3anyctnte DaVinci Resolve. B MeHIO Preferences nepeynite Ha BknaIky Video and Audio I/O n BbIepeNte Heo6xOaHmoe obOpyDobAHne B onCIN For capture and playback use. CoXpaHnTe HacrpoiKn n nepe3anyctnte npniloxeHne DaVinci Resolve.
2 OtkpoiTe npoeKT n B MeHIO File Bb6epnte Project Settings. NpeeiDte K hactpoiKaM Master Settings n Bb6epnte napametpy Timeline resolution (Pa3peweHne MOHTaXhoI nnHeKn),Timeline frame rate (KaPobBa aactota MoHTaXHOI nnHeKn) n Playback frame rate (KaPobBa aactota Bocnpon3BedeHn).
3 B 6noke Video monitoring (MoHITOpINr BIneO) yCTaHOBtE HAcTPOky Video format (ΦopMaT BIneO). C NOMOJIyTNITbI Blackmagic Desktop Video Setup φopMaT BIneO 6ydet ABTOMaTHUeCKN I3MeHEN Ha TOT, KOTOpBb IbI BbIbpaH dIra BbIBoHa ha 06opydoBaHne Blackmagic Design.
4 HaxmTe Save Iy coxpaHeHn I3MeHeHn I BixOda I3 HactpoeK npoeKaTa.
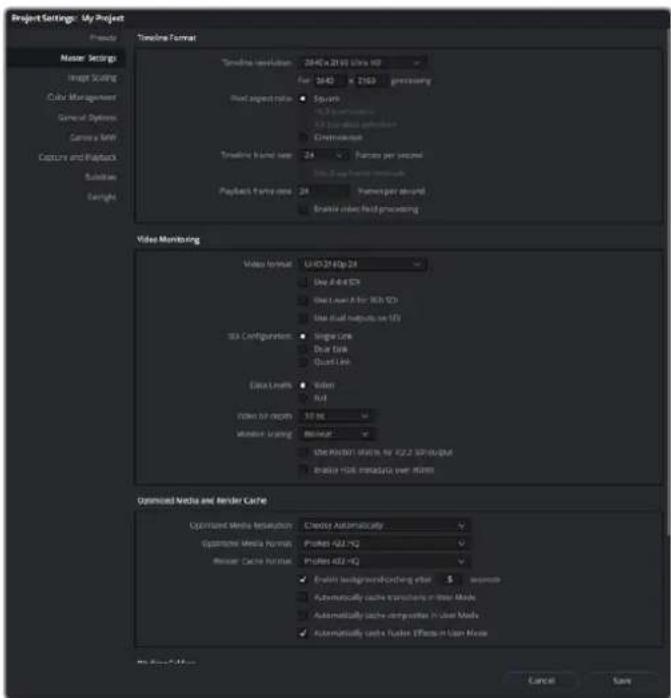
Okho Project Settings no3BONrE Bb6npatb cOpMaMTaHHOIINHeIKN BapNaHTb MOHTOpHra
PepaKtpoBaHne
1 Ha strpaHnue Media 3aRpy3nte KInnbB 6b6NtEky MednaMaTePnAnOB C nOmoIbIO 6pay3epa Media storage.
2 Ha ctpaHnue Edit BbIepeHte File > New timeline, BBeDInTe Ha3BaHne MoHTaXHoJ IINHeKn Hn HaxMnte KHOnKy Create (Co3daTb).
3 Tenepb moxno nepetaunb knnn 36n6nnotekn Media Pool B pacnonoxeHHoe cneba OKHO NCXODHOro n3OpaKeHH.
C NOMOJIbIO KJIaBNIUI OI nepetacknBaHnKypcopa B cTPOKe HIXe OKHa npocMOTpa MOXHO 3aDaTb TOUKN BXODa N BbIXOda B KINNAx.
5ДлpeaktpoBaHnKlna nepetaite erO n3 okHa nCxOHorO n3obpaKeHnHa MOHTAXHYIOJIHeNky.
COBET.Дононгельнуинфорmaию о радктурааниВ DaVinci Resolve можноНаTN b pykoBoDCTBE noIb3ObaTeNl Blackmagic DaVinci Resolve.
Pa6ota c npoigrpammamn dpynx npOn3BODnteJe
Adobe After Effects CC

After Effects CC
PpocMToP BnDeo
Дявьбдддддддддддддддддддддддддддддддддддддддддддддддддддддддддддддддддддддддддддддддддддддддддддддддддддд徴псгггггггггггггггггггgгggtggtggtggtggtggtggtggtggtggtggtggtggtggtggtggtggtggtggtggtggtggtggtggtggtggtggtggtggtggtggtggtggtggtggtggtggtggtggtggtggtggtggtggtggtggtggtggtggtggtg
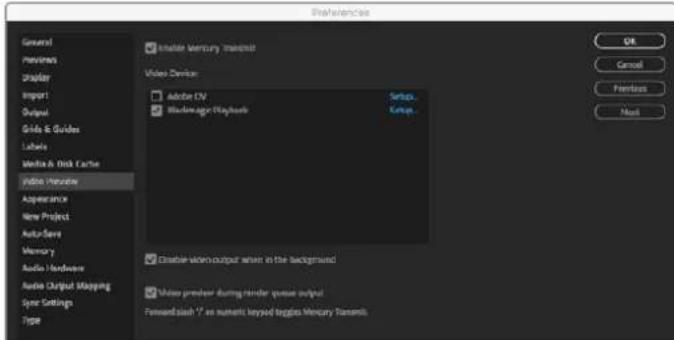
HactpoKn Video Preview
EcnBb pa6oTaTe C HeCTaHdApTHbIMn HHeNoDpeKxBaEMbIM nponopzmaN KaPAMn, nBbVbOda uepe3 o6OpyOBaHne Blackmagic Design moXHO BbIpaTb hyXhble pa3Mepb. NpeeiDuTe B Preferences > Video preview n Haxmte Setup praom c Blackmagic playback. OTKpoEtc OkHo Blackmagic device selection. Bb6epnte macTabn 3o6paKeHH, KOTpbl 6bnke BCero K noDepKxBaEMbIM nponopzmaRk aJaPa. HanpImep, eCnn Bbl pa6oTaTe c UltraStudio 4K nncnbl3yeTe pa3peSeHne 2048 x 1152 dnn KOMno3tINrA B After Effects, To npn yMeHbWeHH mAcSTaba BixOnbHM fOpmatom 6ydet DCI 2K, npn yBeInuHeHH - Ultra HD.
PENDEPNH
Iocne co3aHnKoMIO3HTINHra BO3MOKeH peHepnH B BIne DPX-paHa nnB OOnOM n3 KOeKOB, yKa3aHHbIX HnKe.
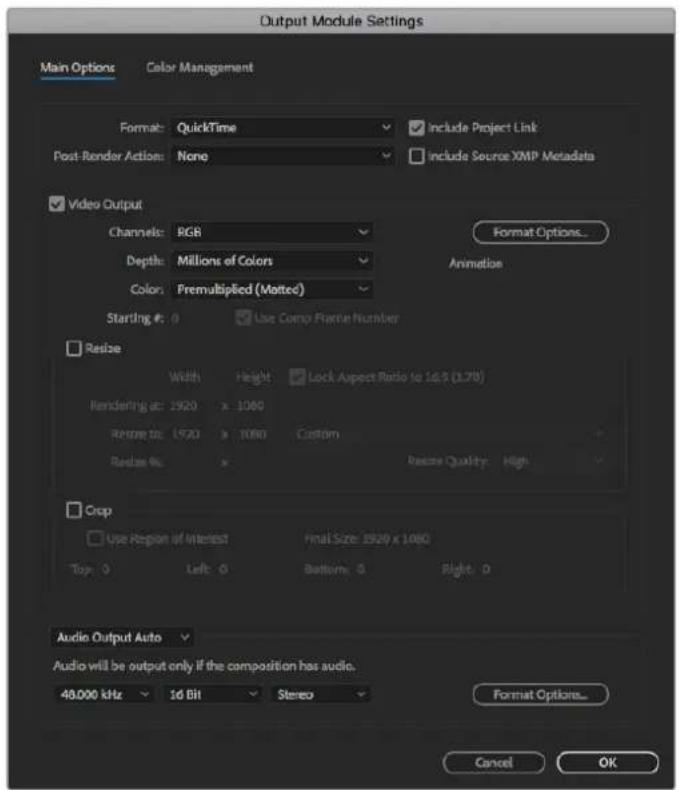
Hactpoukni Output Module Settings
Koekn QuickTime Ha Mac OS
- Blackmagic RGB (10 6nt, 6e3 kompceccn)
Apple Uncompressed YUV 4:2:2 (106nT)
Apple Uncompressed YUV 4:2:2 (8 6uT)
Apple Photo-JPEG(cKomnpceccnei)
Apple DV-NTSC (c komnpcecnne)
Apple DV-PAL (c kompceccnei)
Дугге кodekn, takne kak ProResи DVCPRO HD,будт дocTynhbl, ecnHa KOMnbItepe yctaHOBNeHa nporpamma Final Cut Pro.
Koeku AVI Ha Windows
- Blackmagic 4:4:4 (10 6nt, 6e3 komnpcecnn)
- Blackmagic 4:2:2 (10 mbT, 63 kompcecnn)
- Blackmagic HD 4:2:2 (8 mbT, 6e3 kompcecnn)
- Blackmagic SD 4:2:2 (8 6nt, 6e3 kOMnpeccnn)
- Blackmagic MJPEG (8 6nt, c komnpceccne)
Дугге КODEки, Такne КС DVCPRO HD и DVCPRO50, 6удт Дocтуны, ecn Ha KOMNBIOTepe yctaHOBNeHa nporpamma Premiere Pro CC.
Koekn QuickTime Ha Windows
- Blackmagic RGB (10 6nt, 6e3 kompcecm)
- Blackmagic (10 6nt, 6e3 kompcecnn)
- Blackmagic (8 6nt, 6e3 kompeccnn)
Apple Photo-JPEG (c kOMnpccne)
Apple DV-NTSC (cKomnpceccnei)
Apple DV-PAL (c kompceccnei)
AdobePhotoshop CC
Photoshop CC
HmnpT n 3KcnpT BndeokapOB
IMnopt n06paxhenBPhotoshop CC
1 Bb6epuTe File > Import > Blackmagic image import.
2 BbIepeHTe Video Input Format n Image Bit Depth, 3aTeM haxMnTe Import Image.
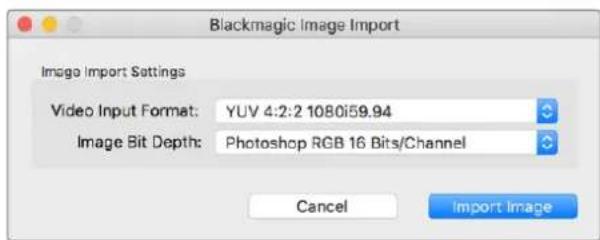
IMNoptn306p8aekHn
3KcnpTn3o6paXeHnI3Photoshop CC
1 Bb6epute File>Export>Blackmagic Image Export.
2 BbIepeHte Video Output Format n HaxMnTe Export Image.
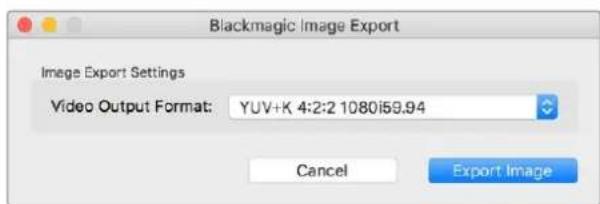
3Kcnpntno6paXeHHa
Iocne nepbOHaayabHOn HAcTpoKn onuIm Import nnn Export nocneDyUcne onepaun mnmopta n kcnopTa bydyT bInnoNraTbcra 6e3 oToBpaKeHn OkHa hactpoek, Ecn HactpoKn Heo6xOdmo n3MeHnTB, ydepKNaBte Haxato KnaBnuy Option Ha Mac nn Ctrl Ha Windows npn BbIbope n3OcbapKeHn dIy NmnpTa nn 3kCnpTa.
AdobePremiereProCC

Premiere Pro CC
CoZaHne npoekTa Blackmagic Design
1 OtkpoTe npinloKeHne Premiere Pro n BbIepeTne New Project (HoBbI npoeKT).BBeDInTe Nm npoekTa u kaxnTe MeCTo dner er o coxpaHeHn.
2 Ecn Mercury Playback Engine B Premiere Pro CC noDepxnaet paoty c Baueen BndeokapToi, bdyet DocTyHa onuRnra Renderer. Ine Hee Heo6xoIMo BbipaTb HactpoiKy "Mercury Playback Engine GPU Acceleration".
3 BpackpbBaioeMcm MeHIO Capture Format bBbepne onuio Blackmagic Capture. Haxmte Settings (HactpoKn Ha Mac) nni Properties (CboiCTba Ha Windows), uTo6bl yctaHOt b Video Standard (CtaHdpT bVideo) n Video Format (Opmat bVideo), a TaKke 3aTaTb HactpoKn 3axBata BIneo-aynOcHnHa. Uekknite OK dny Bo3Bpata K OkHy New Project.
LJIeKHTe Ha BknaKe Scratch Disks, yTo6bI yka3aTb nyTb K MeCTam xpaHEnn 3aHncaHHoro BnDeo n ayDIO. HaxMITE OK. ByET OTkpBt HOBBI npoeKT. Y6eHNTecB B TOM, yTO dIra 3ByKa no yMOJuaHIO He BblOpaHa onuia Blackmagic Desktop Video.
5 Пи работе в опациони сстeme Mac пойnte К Настpoшam System Preferences, Вьберпгe Sound (3Byk) и убдпесь, чо на вьладke Output (BbXoД) He вьбрано obopyдоване Blackmagic. Habькадke Input (BxOД) ykaxnte BxOД mknpoфona n BHOь npobepte, чо He вьбразно obopyдоване Blackmagic.
Pn paOBe B onepaunHHO cnCTe Me Windows npeiDte Ha PAnHeB 3aDau uKeIKNHe npAOB KnaBnue Mbln no 3NaUky DnHaMnka, YTObI OTKpbTb 3ByKObIe HAcTpoNk. Bb6epTe BkJaKy BoCnpOnzBeDeHne N HAcTpOte KOMNbIeP e Ha NCNoJIb3OBaHne 3ByKObo I naTb nn 3BykoBOrO o6OpydoBaHn, OtnuHoro ot peuHn BlaKmigc Design. Bb6epTe BkJaKy 3aNcB n HAcTpOte KOMNbIeP e Ha NCnoJIb3OBaHne 3aNcSbBAIOeO6OpydoBaHn, OTnuHoro ot peuHn BlaKmigc Design.
6 BepHntecb B npInoxeHne AdobePremiere Pro n nepeiDte Preferences > Audio hardware.C nomoubiopackpbBaIOUceroC meHO 3aJaTe Default Output (BbIbO no ymoJauHHo)HaBuilt-inOutput(BCTpoEHnBbIBoD).Ina napaMeTpA Output Mapping BBbepnte Hactpoy Adobe Desktop Audio B nolc Map Output for.
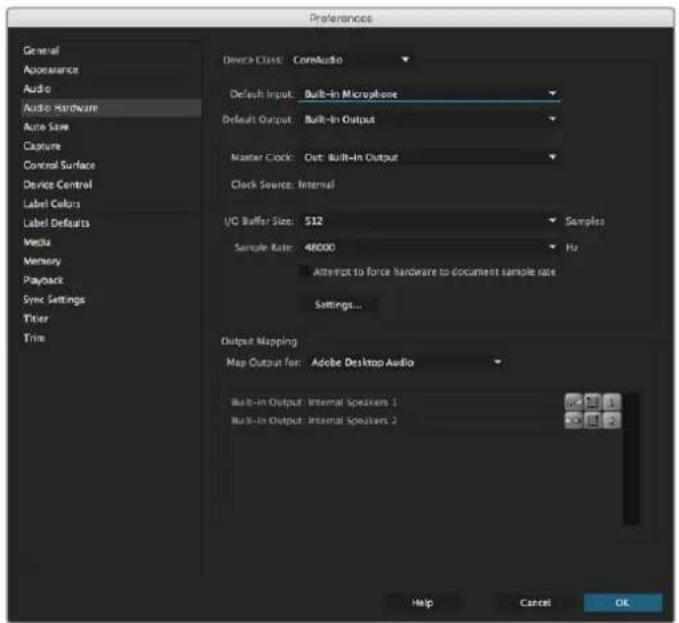
PnBbIbOpHe Nactpoek ayDIO (Audio Hardware) B npnOKeHn Adobe Premiere Pro y6eDntecb, TTo dNr HacTpoek Default Output n Output Mapping bIbpaHbOnuN BuIt-in Output
7 B Playback Šnoka Preferences nepeɪdnte k packpbBaiouemycr MeHIO Audio Device, BbIepeIte hactpoiky Blackmagic Playback n npobepbTe, yTo B noIe Video Device cTont Φλακοι Ḥaŋpθιν onμι Αlt Blackmagic Playback. Haxmnte OK.
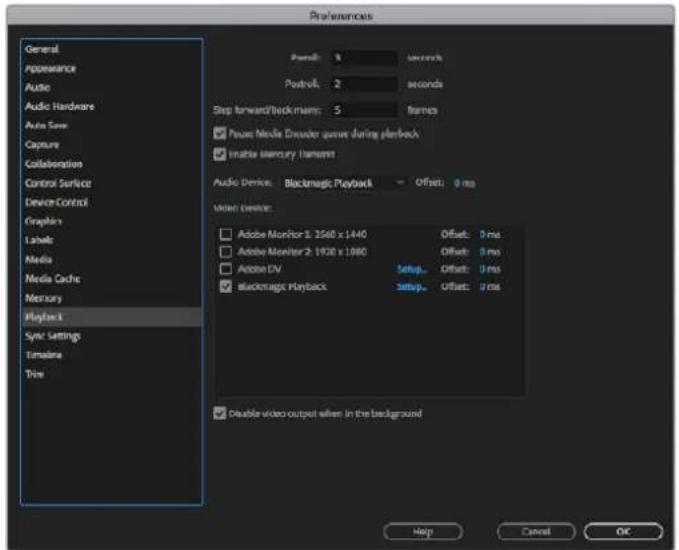
Bb6epnte HactpoKy Blackmagic Playback B MeHIO Audio Device cekun Playback n ybeintecb, tO B none Video Device CTouT fIaxok HanpotnB onuN Blackmagic Playback
8 Tcob co3aTb HOByIO nocJeIOBaTeIbHocTb, Bb6epnte File > New > Sequence. YcTaHOBtne Heo6xOIMbIe HactpoKn, PpncBOITe IMa HOBoI nocJeIOBaTeIbHocTn HaxMNTe OK.
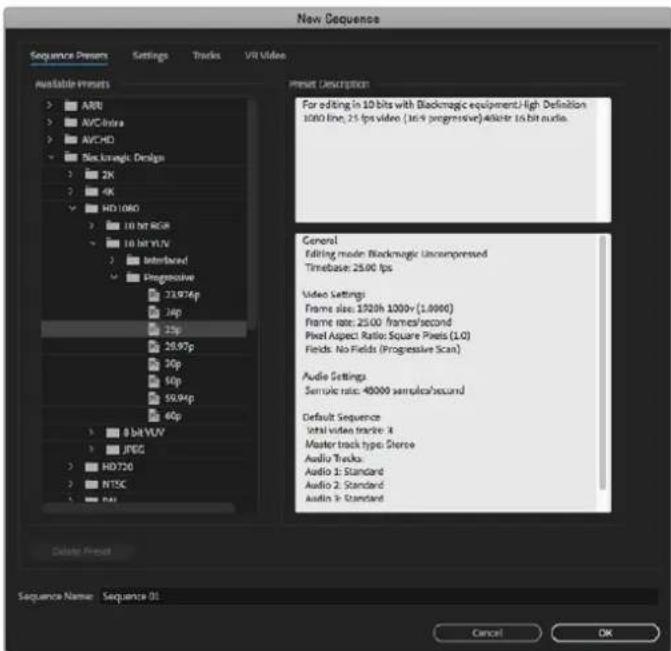
Co3dHHe HOBO nocnEoBateNBocn c noMoouBo Hactpoek Blackmagic Design
YnpaBHeHne yctpoICTBaMn
Mhorne pehenia Blackmagic Design nla 3axbata n Bocnpon3BedeHn IMeIOT npT RS-422 dnyu npablenia dekami. Bb6epnte Preferences > Device Control u ybeiNTecb, TTO B MeHIO Devices (ObopyoBaHne) BKIOueHa onua Blackmagic Device Control. Haxmnte OK.
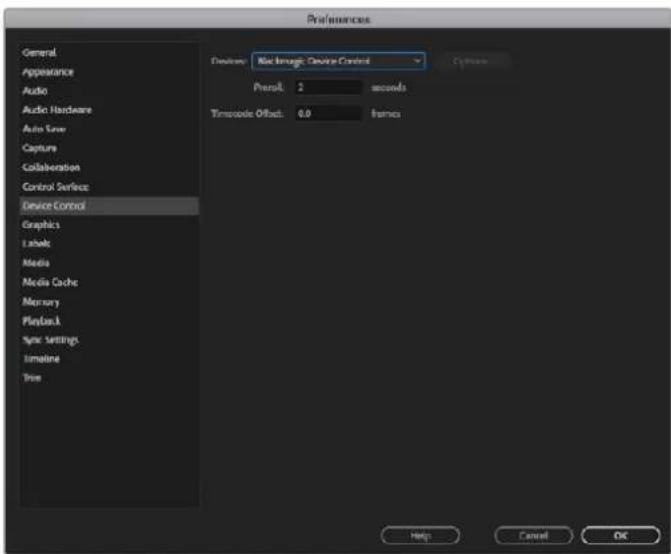
Bocnpon3VeDHeN
EcnBbpaBoTaTe C HeCTaHapTbIMn HHeNoDepKbAeMbIM npOnopCmKaDpaMn,
IaBbOdauepe3obOpyOBaHne Blackmagic Design MoXHO Bb6paTB HyXHbte pa3Mepbl.
Ipeennte B Preferences > Playback n HaxMITE Setup pAnOM c Blackmagic Playback, OTKpoetc
OKHO Blackmagic device selection. Bb6eprte Mac7ab 306paXeHn, KOtOpBn 6bnke BCero
K NOdepKbBaEMbIM npOnopCm KaDpa. HanpImep, ecn Bb paBoTaTe c UltraStudio 4K
INcNoJIb3yeTe pa3peSeHne 3996 x 2160 dJa NoCneDoBateNbOcTHn Premiere, To npu yMeNbWeHn
Mac7a6Ba BxOndBM fOpMaTOM 6dyET DCI 2K, npu yBeInuYeHN - Ultra HD.
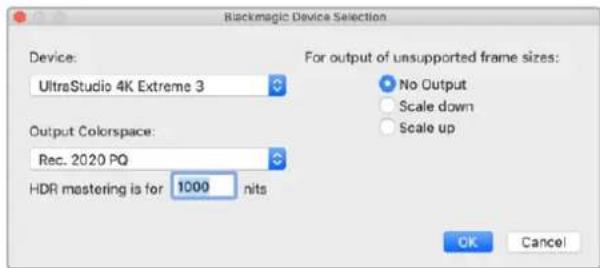
Bb6epnte BapnAHT BbOda npu nCnoIb3oBaHH HenoDaePKBaemix nponopun KaPa
Ecn yctpoiCTBO n3 naketa Desktop Video noDpeknaeT paOby c HDR-MaepnAnom, dIy Hero MoKHO 3aDaTb CBeTOBvIO nnITpy u cnCTemy nepeaun (HLG n PQ no Rec. 2020). Iy HAcTPOIKn HDR mastering Heo6xOJMo yCTaHOBtB MaKcImaJIbHoe 3HaueHne npKocTn, noDpeknaeMaEO MOHTOPOM NIN TEJIeBnOpOM.
3axbaT
Длэзхьага ВидевинхмITE:
File > Capture [F5]
BBeDHTe HeoXOIMbIe IMeHa PJIeHKn N KJIna.
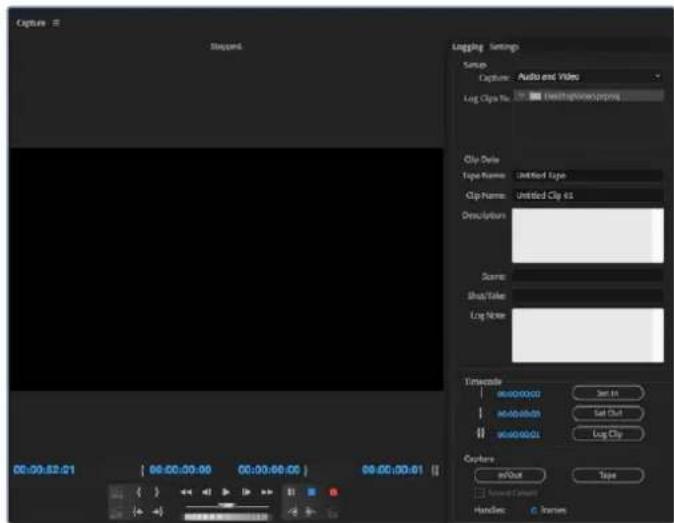
BbnoHnre HacpoKn 3axBaTn ynpaBHeHn yctpoCTBaMn BokHe Capture
YTo6bI npCTynTb K 3axBaTy BnDeo Ha yctpoiCTBe 6e3 nctaHIOHO YnpabneHn, HAKMITE KpaCHyO KhONkY zannC [G].
Yto6b3a4aTbpapametpbipereNCTpaunnKlnnauepe3 npT RS-422,BBeDnte 3HaueHnIn n Out c
nomoIIO KhoNOK Set In n Set OutnnBpyHyu ykaxnte TaM-KoNn HaxmTe Log Clp.BbeDnte
IMRA Klnna n HaxmTe OK.BokHe Projecl NoBNTcnyctOIN. NobToPte 3TN WArn dIra
perNCTpaunn BceXKnIOB, npedHa3NaYeHHbIX dIy naKeTHOH 3aNNCn.
3aTeM bIbepnTe File > Batch Capture [F6]. NocTaBte ranoUky HAnpoTnB Capture with handles uYkaxnTE KOJIuHecTBO KaIPOB, KOTOpBe Bbl XOTnE DoabnB B Haayane n B KOHcE KaKdoTo KInna, 3aTeM hAxmnte OK. IOnBaNTcraI npoc dnn BBoDa nnEHN. HaxmnTe OK, noCne yero knnbl BydycoxpaHeHbI,
3KcnpT Ha nIeHKy
Длп поно монгхноги лннськ ha BhewHIODEky nCNoIb3yIteФуHKcIO Edit To Tape (MoTax ha nneKHy)В Premiere Pro.ДocTynbl DaBa BapnaHTa 3Knopta:Insert n Assemble. B nepBOM cnyae Heo6xOIMO Imetb HnpepbIBhB TaM-KOD Ira BCero npoeKTA, KOtOpB i oydet 3ancaH ha leHTy.Takke 3TO yDobHO npi 3amHe OnpedeneHHoro KaIpa Ha cyuectByIOeH nnEKe. Bo BToPOM cnyae Heo6xOIMO co3dTa b N3OpaKeHne C cepHBm NOIeM Do MeCTA, HaxOJaUeROc cpa3y nocLe NaayalbHOn TouKn taM-KoDa nocJeDoBaTeNbHocTn. TaK kaN ppi peDAkTIpoBaHnB Pexime Assemblpepebduyaa 3anCb CTnpaETc, erO he CneJyET BBInOHrB, ecn Ha neHe yke eCTb dpyrNe npoeKtbl.
"Relax coincidence point detection"
Pnpaok mRHOBeHHoro 3anycka 3anncn
1 Bbepre File > Input > Tape Capture, yTo6bl oTkpbItb Capture Tool. Iocne toro kak deka paCno3HaHa n B Hee BCTaBHeHa PnEHKa Nn DnCK, MoXHO BBecTN mR PnEHKu Nn BbOpat b ee n3 cnnKa.
2 Khonka Toggle Source donxha noka3bBaTb 3aayok deKn. Ecnn noBnncr 3aayok cnyTHnka, HaxMITE Ha KHONky, YTObI BKIOUYtB ynpabHeHne deKo, nocne yero 3HaK n3MeHNTcRa Hn3O6paKeHne deKn.
3 Khonka Capture/Log Mode doJnKHa noka3bIbTaB 3aUOK CAP. Ecn oTo6paKaETc3aUOK LOG, HaxMITE Ha Hero, yTo6bl nepeKIOuHTbcB PexIM 3aIncn. Iocne 3TOrOdoJXeH NOABITbc3aUOK CAP.
4 EcIn B OKHe TaIM-KoJa OToBpaXaEcTc TeKCT "NO DECK" IIN IIMa DeKn NOKa3aHO KypCUBOM, Bb6epnte Check Decks BpackpbBaHooIeMcm MeHIO. Pocne BOCCTaHOBJIeHHOrO ynpabJIeHnI deKoI ee IIMa He ImMeet KypCIBa. IOnpObyIte IcNOL3OBaTb rOpAue KnaBUnJ, K n L dnn ynpabJIeHnI deKoI.
5 BbIepnTe Blackmagic nIaBxOaHnx ayDIO-N BIndeocnHaNoB. YkaJnte nCxOhbie BnDeo- n ayDnOdoPoxKn, ZeneByo nnKy, pa3peSeHne, ZeneBOi nckN Ha3BaHne PnEKn TAK Je, KaK OncaHO B pa3dene «3axBaT BnDEO C yCTpOietB 6e3 FyHKuIN DnCTaHcNOHHOrO ynpabHeHnR.
6 OtkpoTe okHo Deck Controller B Capture Tool, TToBbI nepemotab NeHTy n Haatb Bocnpou3BeHeHne.
7 HaxMMTE KhONky Capture. OHa 3aMraet KpaCHbIM BO BpEma 3aNcN. YTo6bl OCTaHOBNTb 3aNcB, eue pa3 HaxMMTE KhONky Capture.
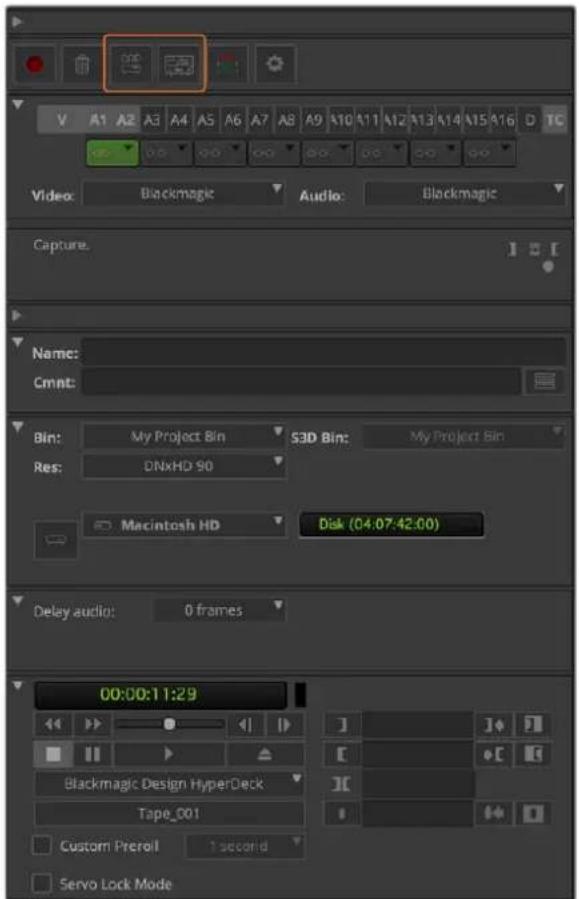
HactpoTe KhoNk CAP Toggle Source dnypablenen
dekoi. OtkpoTe okHo Deck Controller, yTo6bl
pepeMOrTaB neHTy n Hauatb BocnpounBeDeHne.
PaketHa 3aHcB npn nOmoUs UltraStudio u DeckLink
Perncpaun KnnnoB npn naketno 3annc
1 Bbepre File > Input > Tape Capture, tO6bl oTkpbTb Capture Tool.
2 TTo6bl nepeKnHouTbcra c pexmHa Satellte Ha Deck, haxMnte KhONky Toggle Source. HaxMnte KhONky Capture/Log Mode. IorBntc3HaQOK LOG.
3BbIohnHe hactpoKn BxOoB BnEo n ayuNo, NcxOaHbix BnEo- n ayDnOTpeKOB, CneBcNnpanKn, pa3peWeHn, cIeBoro DnCKa n HaBaHnJeHTb TaK Je, KAK ONCaHO B pa3dene<3axBa BnDeo C yCTpoCTB 6e3 fynKcnn DnCTaHcNOHHOro ynpabNeHn>.
C NOMOIOKOHA Deck Controller nKn KnaBnJ, K, LMOXHO BInnoHnTb nepemOTky BnpeiHa3aD, CTaBnTb Ha Naay3y HaxoOnTb BIndeo dIra 3axBaTa.
5 Haxmte Ha KhoNky Mark IN/OUT cIeBa ot KhoNk NLOG. 3NaOc6ydt MeHrbcMexNy IN n OUT, noTOMy Hado HaxaB Bcero OndHy KhoNky dny pernctpaun Toeyk BXoJa n BixOda, a TAKKe dny pernctpaun KInna. 3TOT cnocob 0onee ydoeben, Yem IcnoJb3OBaHne DByx KhoNok Mark IN n Mark OUT B OKhe Deck Controller. Kpome toro, dny yka3AHn Toeyk BXoJa n BixOda MoXHO NcNoJIb3OBaTb KnaBnI n O, a TAKKe ropayuO KhoNky F4 dny pernctpaun KInna.
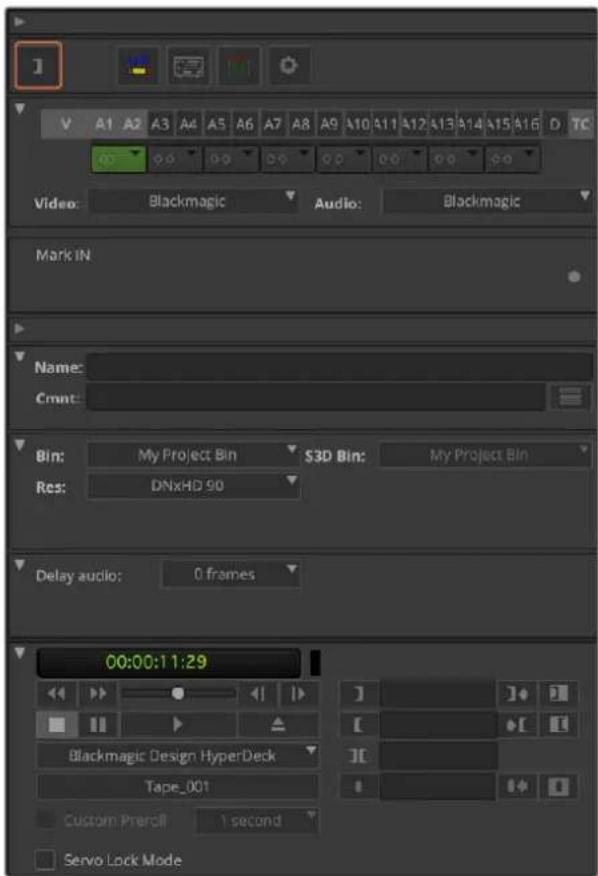
Haxmte Ha Khonky Mark IN/OUT mBocnoIb3yITeCb KnaBnawmIM O dny yka3aHaTHouEe BXOJa BbXoJa
6 Nocle pernctpaun KlnnoB zakpoite naHel Capture Tool, oKpoTe nanky Logging bin N Bblbepnte KInnbI dna 3axbata.
7 BbEpnte Clip > Batch Capture. YkaKnTe HxKHe onuB DnaIoroBOM OKHe n HaxMITE OK.
3aHbHa nIeHky c nOmoIy UltraStudio n DeckLink
Iocne toro kak Bb3annacnn Knnnb, nepeataunn Hs ha MOHTaxHyIOHNHeKy, OtpedaktnpoBaNN IOobabnn 3000HO Co3daTb 3aBepueHHb npoekt Ha nnEhke.
1 YoobI OTKpbITb NocneIOBaTeJIbHOCTb B OKHE MOHTaXHOJ LInHeKN, DBAxDbI UeJIKHNTe NO Hei KHOKO Mblu.
2 Bbepne File > Output > Digital Cut, tOsbI oKpbTb Digital Cut Tool.
3Дянсгоун Output Mode Вьберпго onuio Real-Time,дя Bit Depth - 10-bit.ДяЗаись сьй поседоватьнocstabte ФлжокВ none Entire Sequence,a dЯDeck Control ykaxite onuio Remote.
4ДЯболгToCHOrO MoNTaKa Ha JIeHTy C TaIM-KoOM BbIepeIne Insert Edit nII Assemble Edit.MoxHOTAKKe BoCnONb3OBaTbCry fYHKUeN Crash Record.KordaMOHTaK BpeKIme BCTaBKN RAJIeTCr eDINHCTBeHHbIM BO3MOXHbIM cNoCo6OM,nepeINTe Ha BkLnAky Settings B npoeKTe,DbaxdblIeIKHIne KHOKNM MBIuN Deck Preferences n BkIoUHTe onuio "Allow assembl edit & crash record for digital cut".
5 Ecnn H3BaHne DeKn BbIeJIeTcKypcBOMnnnoBHeTc coo6ueHne "NO DECK", BbIepeTe Check Decks B MeHIO. Ppu npaBnBHOHaCTpoKe Ha3BaHne DeKn DoJXHO oTo6paKaTaBC 63 KypcBa.
6 Haxmte KhoNky Play Digital Cut (3haQoB Bnupe KpaCHOro TpeyrolbHnka) nra 3annncnocneobateIbHOCTn Ha nnEHy.
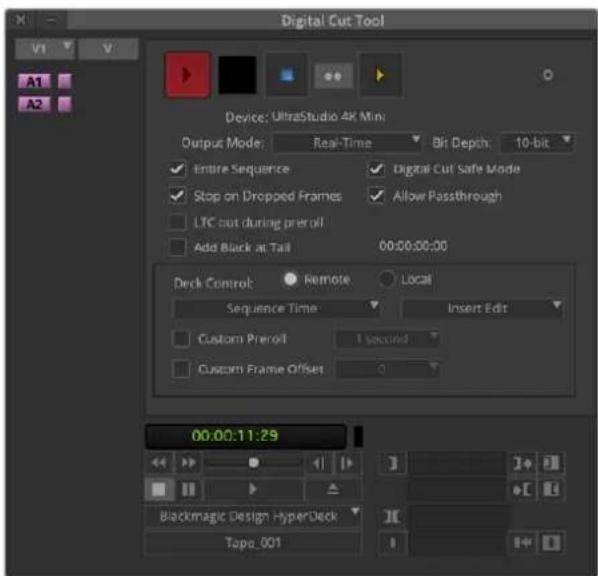
Khonka Digital Cut nra tannc Ha nneHky
Blackmagic Media Express
O63op Blackmagic Media Express
Прилобене Blackmagic Media Express noctablaясь в komплкte c UltraStudio, DeckLink n Intensity, a takke c вideomikшерам ATEM, Blackmagic Camera, H.264 Pro Recorder, Teranex Processor n Universal Videohub. 3to ngealbhoe peweHne, ecn Bby xotite zanncbaitb, BocnpounBODINb n KOnnpobatb BindeoklinbHa nIeKHy be3 CnoXhIx npInloxeHn dny HeJIiHeHOrO MONTaKa.
3aHcB video- n aydnnofoiNoB
CɔzdaHne npoeKta
Media Express abTomatueckn onpeidenet fopmat Bxodraero BndeocnHana nncnoB3yert erO dI npoeKta. Ia Bbopa BpyHyIO BInONHte nepeucneHHhe Hxke DeiCTBna.
1 Bb6epnte Media Express>Preferences Ha Mac nIu Edit>Preferences,ecnBpa0taTe c Windows nn Linux. N3 packpbbaiooeroa MeHIO Project Video Format b OkHe Preferences Bb6epnte oINn 3 npednaeraembix fopmatOB.PackpbbaiooeecmeHIO Capture File Format no3BOJAE Tbbipatb pa3JIuHbte CxATbIE HecXaTbe fopMaTb, a TaKKe DPX. 3axBaT BvDoe bdyet BbINOHNrBCB Bb6paHHOM fopMaTe C coXpaHHeHEM B faJIe QuickTime movie. MoKHO TaKKe BeCTn 3aNNcB n3 RGB-NTOCHNKOB cncnoB3OBAHEm KodeKa YUV nHaobopot.
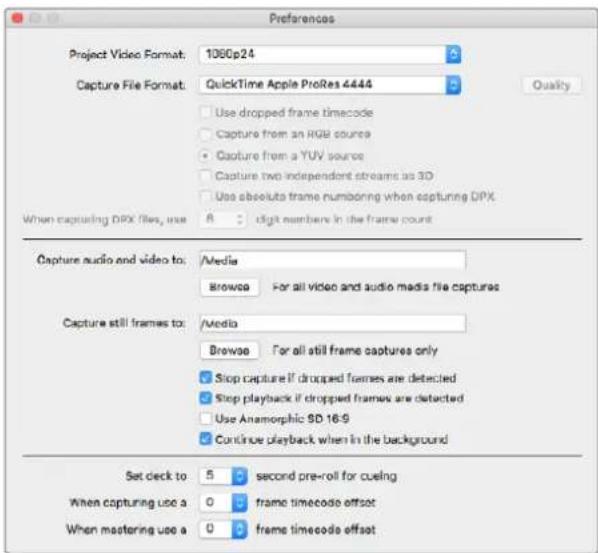
IpeepuHTe BOKHO Preferences,TO6bHactpoNTb foPmAT Bndeo n 3axbata, Mecto coxpaHeHHaJIOB n Dpyrue onuun
2 Ykaxnte MeTo coXpaHHe H3nnCbBaemoro BnDeo n ayDno. HaxmTe Khonky Browse, TTO6bl Bb6pTaB NaKy Ha KOMNbIOTpe.
3 YkaXnTe, HxHIO nIO octaHOBt baxBaT INN BocnpOn3BeHeHne npn ObHapyKeHHn npOnyueHHbIX KaDPOB.
IpyoekTOB CO CTaHdAPTHbIM pa3peWeHnEM nCnoJIb3yETcH fOpMaT KaIpa 4:3, eCIn He BbIbpaHa onu Use Anamorphic SD 16:9.
Ecnn Okno nporpammbi cBepyt, Bocnpoun3BedeHne Bndeo oBbHuO octaHaBnBaETc. Bb6epnte onuio "Continue playback when in the background", ecnn Bbl He xoTnte octaHaBnBaTb Bocnpoun3BedeHne B Media Express npn otKpbTIN dpyrTO npniloxKeHna.
PocneHne OOnnn OTHocTcK BndeomarHHTofoHaM C noptom RS-422 n npedycmatpnaot paHHn 3aynck N CMeueHne TaM-KoJa.
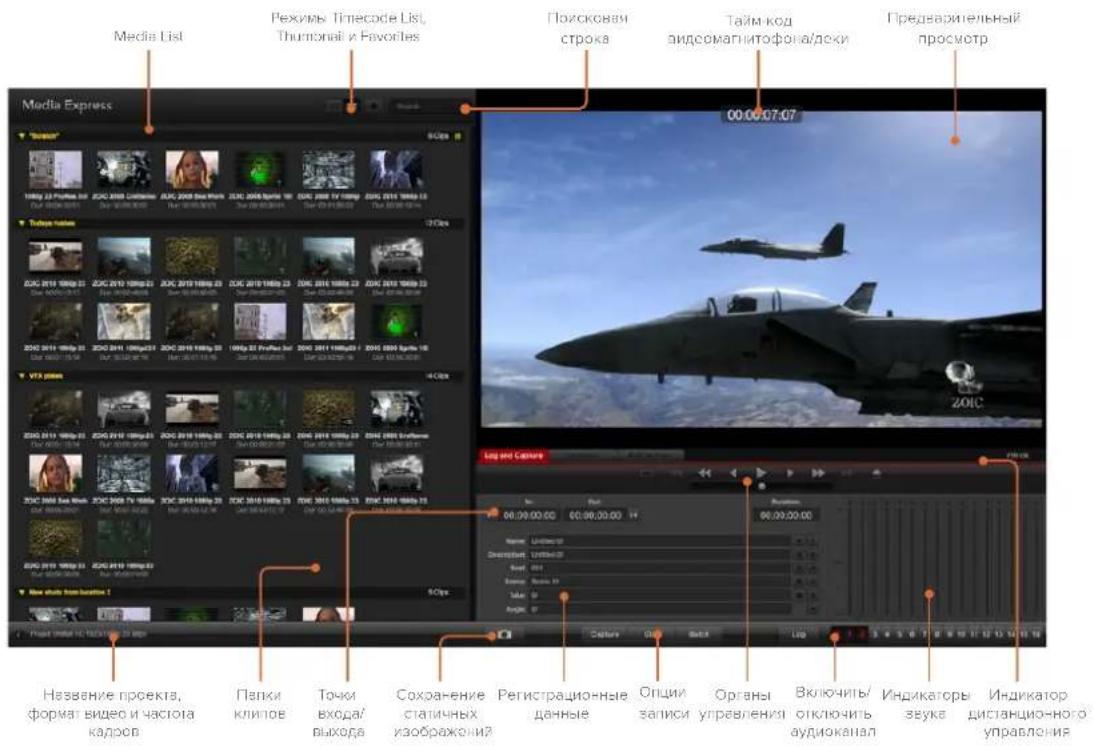
3axBaT
YTo6bI npictynHb K 3aHnCn, DoctatoUHO NOKJIIOUHTb HCTOuHKn BIneo. Nocne toro kak Media Express onpeJenl fopmat BxOJaero CnHa, HaxMnte KhoNky Capture.

D6aBteonncnne Bnneo
1 Поdkлioчnte nctouнь bideocnHana ko BXody obopydobanra Blackmagic Design. 3anyctnte Desktop Video Setup u ybeintecb TROM,уTo ДгЯ HabtpoiKn Input Connection BblpaH TO TKe BXOD, Hanpimep SDI, HDMI nII KOMnoHeHTbI.
2 OtkpoTe Media Expressи BbIepeNte BklaKy Log and Capture.
3 NctouHnBnDoe 6ydt OTo6paXaTbCn Ha nHei npEaBapntelbHOro npocmotpa. BBeHne onncAnHe B cTpoKe Description.
4 Haxmte KhoNky ^ 十 praOM c nolem Description, Tto6bI doabuTB TeKCT B cTpOy Name. Haxmte KhoNky ^ 十 praOM c IIObIM npyRM nolem, KOtOpoe HyxHO doabuTB K cTpOke Name.
-убу yBENHITb 3HaueHne CTpOKn, HaxMITE Ha n3o6paXeHne XIOnyuKn. MoKHO BBECTN ONCAHne HOMep B IIOBOI CTPOKe BpyHyIO.
- Onicahne B ctpoke Name 6ydt npmeHeo K cneDyUOeMy 3anncaHHOMy kInny.
-ECIN BbXOTNE NOMETNB KINK KaN 3OpaHHbH, HAKMITE 3HaOH C n3OpaKeHNEM 3Be3DOyKn PAnOM CO CTPOKOI Name.
-HaxMITE""pIOM co ctpoko Name, nocne yero noBtca npoc Ha noTBepxdeHn H3BaHnKnna.
5 BbIepeTe HxKHe KOJIueCTBO ayINOKaHAnOB dJr 3xAxBata.

BbEpTe HxKHOe KOINueCTBO ayDnOKaHaNOB nna 3axBaTa
6 Haxmte Khonky Capture, yto bHaayt 3anncb. Dn octahOBKn 3anncu coxpaHEnn knina haxmte khoNky Capture eue pa nkn knaBny ESC. 3auncaHHbIe kninbl 6ydyT doabneHk cncky Media List B neoohy actn Media Express.
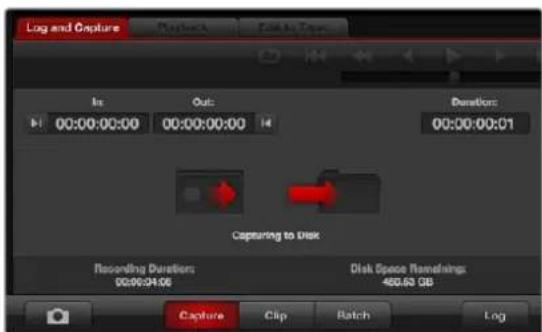
Haxmte KhoNky Capture nna haua 3axbata
EcHnΦopMaTb BxOJaUeO CnHaI NpOeKTA He CoBnAaOT, NOBHTc DaIaIIOBOE OKHO C npEnIOXeHHe m Co3DaTb HObI npoeK T coXpaHNTb TeKyu.
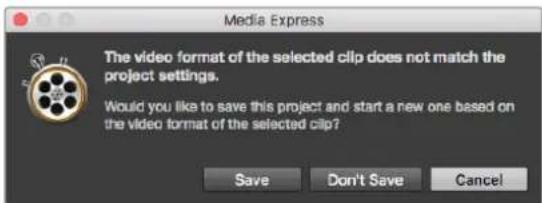
Blackmagic Media Express automatackn onpeennet nmehenne foopmata Ha nporpaMMHb bixoDCBicomkwcpa ATEM, npednaracoxpahntb Tekyu npoeKt co3daTb HObBi
Pernctpaun KInnoB
Y6eIntecbTOM,HTO BnEooobopyoBaHne Blackmagic Design n deKa coeHHeHbI nocJeIOBATEbHbIM KaBelem Ype3 nopT RS-422.
Y6eIntecb, yTO nI nepeKIOUaTe rmeote/Locai yCTaHOBHeHaHACtpoKa Remote. IcnoJIb3yIte KlaBnJ J, K, L dI nepeMOTKn Haazd, noCTaHOBKn Ha na3y i nepeMOTKn Bnepei.
Hakmte KhoNky Mark In dny bIbopa tOuKn BxOda nn nncnolb3yTe knaBnuy i.
Haxmte KhoNky Mark Out nBbIbopa TouKn BxOda nnncnObl3yIe KnaBnU O.
Haxmte KhoKky Log Clp dner pcrntpaun klnna nnnncnbl3yute knabnu np. DOnxHa NOBtbcra COOTBETCTBYIOUaA 3aNNCB Media List C KpaCHbIM CMBONOM X, yka3bBAIOua Ha To, cTO MeDnmaTePnAn eue He 3aNCAH.
PaketHa3anncb
Pocne pernctpaun KInna moXHO BocnoIb3oBaTbcN KHonKo CIp, YTObI 3aIncatb OTdJIbHbIK NIN.
Ecnny Hxno 3aunncatb HeckonbKnx KlnnOB, npdoJXte pernctpaunIO KInnoB nnaKeTHo 3aunCn.
Bb6epnte 3apeHcnpobAHbIe KINbI n3 Media List, 3aTeM BbIOJIHnTe OINH n3 cnedyuixx waOB.
Haxmte Khonky Batch.
- Βεικηνιτη πραβοῦ Κλόπου Μβίων έν ὄνχκου Μλήμην ἀν ἀν ἀν ἀν ἀν ἀν ἀν ἀν ἀν ἀν ἀν ἀν ἀν ἀν ἀν ἀν ἀν ἀν ἀν ἀν ἀν ἀν ἀν ἀν ἀν ἂν ἀν ἀν ἀν ἀν ἀν ἀν ἀν ἀν ἀν ἀν ἀν ἀν ἀν ἀν ἀν ἀν ἀν ἀν ἀν ἀν ἀν ἀν ἀν ἀν ἲ
- PerenDte B MeHIO File N BbIbepnTe Batch Capture.
Media Express 3aannn e Knn c yueTOM TaH-KoDa ToeK BXOda H BbIXOda.
3axbaT Bndeo B cOpMaTe DPX
Ecn Heo6xOIMBO BbIOnHnB 3axBaT B fOpMaTe DPX,OTKpoIte HacToKn Media Express n nnapaMetpa Capture File Format BbIePeITe HacToKy DPX 10-Bit RGB.
Co3daTe DPX-npoeKt, yctaHOBnHacTPOky DPX nla foPmata aannnc.
BbInOnHnTe 3axBaT BnDeO.
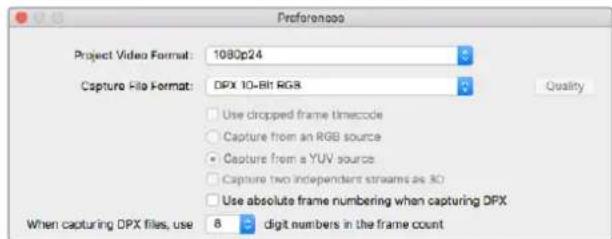
HactpoKn 3axBaTaBΦopMaTE DPX
IIO OKOHaHn 3axBata NOBNTcMHNAtOpHoe n3o6paxeHne KInna B Media List.ФaJIbIBΦopMaTe DPX coxpaHOTcB OTdEHLHO nnKe Ha JecTKOM DnCKe. AyINO bdyet coxpaHeHO B ToJKe nnKe BΦopMaTe .wav.
Iyo mOnuahnIO cHTaETcra, yTO 3axBaT BIneO B fOpMaTe DPX Beetcra YUUV-ntouHKnOB. EcnHneobxOdmo 3auncaTb BIneO n3 RGB-ntouHKnOB, Bb6epTe onuio "Capture from an RGB source".
BkIouHte onuio "Use absolute frame numbering when capturing DPX",ecn Bbl xotne, yto6bl Hymepaunz DPX-kaPob BeJacb Ha oChOB TaM-KoDa zanncahHOro BIneo,a He c HyJ.
Ecn n faIb B fopMaTe DPX coCToR n3 He60nbIoro Yo cncla noCnedeObaTeNbHbIX KaIPOB, MoXHO cokpatntb KOnueeTBO HyneB Hmepaun. Jnra 3ToR Obleprte onuio "When capturing DPX files, use (2-8) digit numbers in the frame count".
3axbaT 3D-Bndeo
KoHpIpyaunn 3 Media Express n obopydOBaHnBa Blackmagic Design c noDepkko DByxNtOKOBoro 3D-BnDeo no3BOnJeT co3DaBaTb 3D-BnDeo KInbI dI npaBoro nLeBoro KaHaIOB, ONDHOpeMeHHO 3axBaTBBA JDa Notoka HD-SDI-BnDeo.
Co3daIte 3D-npoek T c yactotoon kaipob, cootbetctbyioe nctouhky DByxnotokOBoro 3D-BuJeO.
- Пи заши си з SDI-нсточни поберпге налчу NGBx OTДьньх BXODOB HD-SDI Ha obopydobahn Blackmagic.
- BbInOnHnTe 3axBaT BnDeo.
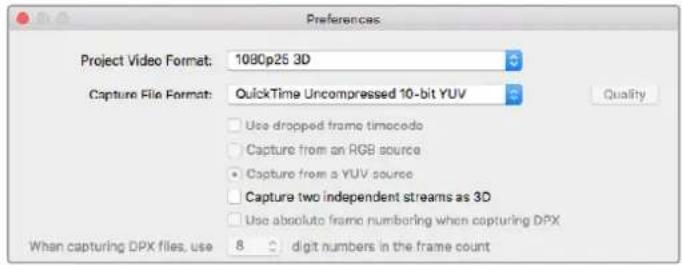
Длгдзпсн 3D-кллов Дувхnotokoborot crepeocknueckoto BndeO bIbepnte foPmT,В haBaHmKOToporo ectb"3D"
Pn3aXbATE n peRcTpaun DByxNtOKOBoro 3D-BuJeO B Media Express HaBaHne Klnna 6ydet oTo6paxaTbcraB NLeBOM KaHane. K HaBaHnIO npaBOrO KaHana 6ydet DoabAnen Tekct"right". Hanpimep,ecn CTpeoKInny npucBOuntb HaBaHne "Clip1",KnI neBoro KaHana 6ydet oTo6paxaTbcraKa "Clip 1.mov", a npaBOrO - "Clip 1_right.mov".
Media List no3B0n8T nerko pacno3HaB 3D-KlnnbI.
KnInbI JJI neBoro n npaboro KaHaNOB oBeeHNHJOTc c NMOOuB 3D-UNkAToPA B CnNcke Thumbnail n 3o6paKeHb B Vnde Ondoro BoJbWoR OHaJa.
B cnncke Timecode List knnbI dIe IeBoro n npaboro kaHaoB oToobpaKaioTcB DByx ctpokax n obednHIOrC c nomoubu 3D-nHdkarota.
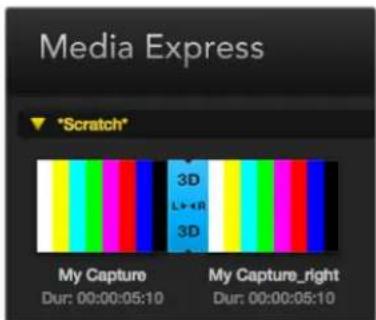
KnblnIeNbeBOI npaboroKaHAnOB 06bEHNHOCTC nOMOuBIO3D-IMdkaTopa B cncke Thmbnall IIN3o6paKeHb IBVde OndHO BoNbWOrO 3HaKa
Bocnpon3BeDeHne Bndeo- n aydnnoaJnoB
Bocnpo3BeDeHne Ondoro HeckoJIbKx KInIOB
Ytobbocnpon3Bectn Ondn Knnn n3 cnncKa Media List, DbaXdbI ueKHNte no Hemy KhoKoMblu. MoxHO TaKxe Bb6paTb HyKbI Knnn B Media List n HaxaTb Knabu npObeNa 1nboKnony Play Ha naHeI ynpabLeHnra Bocnpon3BeDeHnem.

PanaB ynpaBneHn CdyHKunm Bocnpoun3BeDHeN, octaHOBK, nepexoKa cnEduioemy KInnyu nuknueckoro Bocnpoun3BeDHeN.
YTo6bI ydaJIbI bIaKny, IeKKnIte Ha He npAbO KhoNko Mblu N BbIepTe DeIte Bin. BbIpaHna Ianka n HaxoJaIueCeB He N KInIbI 6yDyT ydaJIeHbI. KInIbI ydaJIaIOTc TOnbKO n3 cnNcKa Media List, Ho octaiOTcHa JxectkOM dUcKe.
Co3dahne 3D-klina
Popnyokdoabavlenia ctepeockonueckoro 3D-Bndeoklna B cnncok Media List
BbIepnte npoeKT B cOpMaTe 3D c taKo Xe aCtoToK KaPBo, KaK 3D-KoHTeH.
-ИмнортугштcfainлпьогканаВMediaList.
- Κεικητης πραοῦ κθόπου Μβιδη ἀνλη έλυσα Ακαλήσιν ΒκόθεκτΗΟ MeHQ Bbɪðepɪte Set Right Eye Clip. Ecnι Κλυση πραοῦ kaHana yxe əaɪncaŋ npɔrρaʌmɒ Mɪd iæ Express, K eró Naɪbaɪnio ŷydɛt ὅδobʌbɪneɪ ἀνκeɪˈ_right".

BbeputeΦopmat3D-npoekta
B OkHe Media List nKnnOB B φopMaTe 3D nCnoIb3yetyraHnAHOe oO3HaueHne. KInnbl nI npaboro n neBoro kaHaoB paCNOIOKeHb pIaOM dpyr C dpyrom B OKHe Video Preview, yTo yka3bBaet Ha 3D-fOpMaT npoeKaTa.

BokHeMediaListnKINOBΦopMaTe 3Dncnonb3yctcHarnnHoe0603HaCHHe
Ecnna Kaanb3D-ctepeoknna oToobpaKaIOrTaHaOboPOT:
- ⅢeIKNHtE npaBov KhoNkoMbIuIN IO 3D-KIny B OkHe Media List.
B KOHTeKCTHOM MeHIO BbIepePte"Swap Eyes".
Ponck no cncky Media List
Yto6b HauTN HyKbI KInB npoeKe, HapePte ero NmB Ctpoke Search BBepxO kHa Media List. B coUeTaHnC cyHKuEn OToBopa n3bpaHHbx paNob 3TO No3BOJraT cOKpaNTb BpemNoCKa.

B nonckoboi cpoke h6epnte h3BaHne klnna
Bndeo- n aydnoMTaK ha neHTy
XoTn TpaDnHIO ObIHy IOcNOb3yIOT TePMNH 《NeHTa》,B DeIeCTBtENbHOCTN DaKa MoKet paOToTb C nIeHkAmnn nn DnCKamn. MoTAX KInIOB BblONHReTCB OINCAHHOn HnKe nocJeDoBaTeNbHOCTn.
BbIepnTe KINMbI, KOtOpBie Bbl XOTnTe 3aNcCatb Ha nHTy.
Bb6epntereyny6yIO BknaKy Edit to Tape.
- YcTaHOBInTe ToUky BXOJa N TIN peJaTnPOBaHnA.
- BbINOHNHe 3aNNcBaJeHTy.
Bb6op KInnoB dIa MoTtKa
I3 cncka Media List b6epnte KInbI, KOtOpBte HxHIO 3aNcAtb HaJeHTy. MoXHO BCTaBnTb MHOKHaJIbHbIe ayDnOTpeKN, 3aMeHNb IMN OCHOBHyO 3ByKOByIO DOpOxy HA MaCTep-KOnNI. EcII bIXoTIte 3aNcAtb I3paHHbIe KInbI, HaxMITE 3NaOH K3Be3DOHKn B BepxHeJ qactn Media List drr OTo6paxeHn TOnkO 3TNX KInnoB. 3aTeM b6epnte KInbl.

HaXMMTE Ha 3NaOHK «Ia6paHHOE» (3Ba3IOOka) BBepxu CnNCKa Media List nro oTo6paKeHnTOnbko Ia6paHHbIX KInnoB
MOnTaK Ha IeHTy BpeXImax Insert u Assemble
Bb6epnte Bknaikky Edit to Tape. BBeDnTe ToKy BxoJa, HabpaTaiM-KoB B none In, nIe npEeyiTe K HyxHomy fpaarmenty c nOmoIbu IaHeJI ynpabIeHnBaCpPOn3BeDeHnEm, a 3aTeM HaXmTe Khonky Mark In.
Ecni ToKa BbIXoHa He BBeHeHa, Media Express yctaHOBn DnnteBHOCTb peaKtnpOBAHHa Ka o6uYIO npToJxKeHHocTb KInIOB BCnCke Media List. EcnI ToKa BbIXoHa onpeJeHema, Media Express octaHOBn 3aNNcB nocNe TOrO, KaK bdyet DoCTnHyT TaIM-KOD TOUYK BbIXoHa.
EcnHa MaTePnHcKoI nate HeNoctaToHO MeCTa IIN pa3MeueHn PCIE C DByMaN, MoXHo CHrTb MeOHHHyIO nATy c DeckLink 4K Extreme 12G.
PopraOK CHaTHMa MeoHHHOI nAtei
1PnIMTe Mepbl dna ChTnA CTaTuYeCKoro 3apraJa. NoLoXnTe nIaTy DeckLink bokom Ha pOBHyIO uNCTyIO NOBepxHOCTb TaK, yTO6bl N03ONoeHHbE KOHTaKTb 6bln HApBaJIeHbI BBepx.
2 Ha HnKHeu qactn nIaTb DeckLink haInte Dba BnHTa, KOtOpBie NcNol3yOTc dIg KpeHHeHm Me3OHNHHo nIaTb. C NOMOJIbIO OTBePTKn Phillips aKKypaTHo OTKpyTne BnHTb, Hau60lee ydaJIeHHbIe ot pa3bema BNC.
3Держа пату DeckLink зкрая,akkypatho noHmnte MezOHnHHyIO nlaty,yTO6bI COeINHHTeBHyI KOHHKTop BIIWeI n3 CNOTa.
4 Y6eHNTecb B TOM, YTO KOHNHeKTop npOuHO CoeUNHeC Me3OHHHo Nnatoi, ecn Bbl nnaHpye ee NOBtOpHyO yCTaHOBky.
3aKpyTHe BnHTbB CToKN Me3oHnHHo NlaTb.IIJa ee xpaHEnr CneJyET nCNoB3ObaTb aHTnCTaTnueckyIO Cymky.
HaxmTe KhOnKy Update.
INHdkatop BbInoJIHeHnI 3aIauN I03BOnJeT BInTeB COCTOHNe OOBHeHnI nOKa3bBaet erO 3aBepWeHne.
IIO OKOHuaHmObHOJIeHn OTKJIouHTe USB-Ka6eJIy UcTaHOBInTe NnATy 6paTHo B cNtOT PCIe Ha KOMNbItepe.
PIMMEAHNE. 3aBepuHTe ceaHc paobToHa KOMbIOTepe n OTKIOHTe NITaHHe, npexJe Hm BblONHb onepauu co cnotom PCIe.
BkIouHte nTaHHe KOMbIepea noCne o6paTHo yCTaHOBKn nnTbI DeckLink. Korda OHa 6ydet paCnO3HaHa, MoXHO Bo3O6HOBInb pa6Oty.
Pomoucb
Kak nojyntb nomoucb
Cama 6bIcptbI cnooc noJyUHTb nOmoB - o6paTITbC K CTpaHnuaM NOdepKKn Ha caIte Blackmagic Design n npOBepitb HAnuue NoCneDnHex CnpaBOUYbIX MaTePnaIIO B No Heo6xoDnOMy obOpudobAHIO.
CtpaHnua noDpeKKn Ha caTe Blackmagic Design
IocneHnE Bercnn pykoBODCTBa no 3Kcnnyatau, nporpaMMHO o6ecneHn IdoonHntelbHyIO nHFOpMaUIO moKHO haHTN B paZene eoepxKn Blackmagic Design Ha cTpaHnce www.blackmagicdesign.com/ru/support.
YTo6bI y3NaTb BepcNo Blackmagic Desktop Video Setup, yCTaHOBJIeHnyo Ha BaWem KOMNbIOTpe, OKpOte yTuNTy.
- Пи павOTE в onepaционн систeme Mac OS X otkpoine Blackmagic Desktop Video Setup в палк «Прилwxеня》,чобу узань Версию nporpaMMHoro obecneuenia, BBiберпte About Blackmagic Desktop Video Setup.
- Пи паве В onepaционн систeme Windows 8 n 8.1 на закaine «Пуск» Вьадипe Blackmagic, Затем Быберпite Blackmagic Desktop Video Setup. Тобу узоть Версию nporpamm Horо obecneueHЯ, Быберпite About Blackmagic Desktop Video Setup.
- Пи пабote в операционн сисе Windows 10 на захе «Пуск» Вьадит e Blackmagic B nonckoboiстoke. 3aTeM bIbepite Blackmagic Desktop Video Setup. YTO6by y3HaTb bepcno nporpammmoro obecneueHn, bIbepite About Blackmagic Desktop Video Setup.
- Pn pa6ote B onepaunonHno cnCTe Me Linux bblbepnte Applications >Sound and Video
Blackmagic Desktop Video Setup. 附表bl y3HaTb Bepcno nporpamMnHoro oecneueHH, b6epnte About Blackmagic Desktop Video Setup.
3aRpy3ka nocleDnHex Bercn IIO
Yzhab yctahOBHeHnyo BepCIO Blackmagic Desktop Video Setup, npeiIte B ceHTp noDepKKn Blackmagic Design ha cTpaHnue www.blackmagicdesign.com/ru/support, TToBb npOBepnTb Hannuhe obHOBHeHni. PekomeHdyetc Bcerda nCnoJIb3ObaTb nocJeHIOBepCIO nporpaMMHoro oBeceueHnia, Ondako obHOBHeHne lyuwe BCero BblONHraTb nocNe 3abepSeHnra Tekyuero npoeKta.
YTo6bI y3HaTb dAty nocneHrero 06HOBnEHHaPaiBepa, nepeiNITe Ha BknaKy About BytInnte Blackmagic Desktop Video Setup. DOnonHnTeJIbHO MoXHo co3dAe bOTcET COCTOHNHn, Haxab Ha Khonky Create B Status report.
Информацnia對於 pa3pa6otychkoB
Co3dHne co6CTBENHO npoPamMHorO oecneueHnI pa60tbI c obOpudBaHem Blackmagic Design
Paket SDK Дд DeckLink no3BolЯт pa3pa6otnKam ynpaBnTb obopydoBaHem Blackmagic Cnomoьco6cTBeHHoro nporpaMMHoro obecneHn. Paket SDK Дд DeckLink noДeprxnaBaet peWeHn UltraStudio, DeckLink n Intensity.

Oh daet pa3pa6oTukam Bo3MOxHocTb pa6oTaTb co cnoXhIMn 3aDaamn Ha ypoBHe annapaTHoro
yipabLeHn I BblONHrTB TINOBBe JeIcTBnO obbHOr OnbzOBaTeN. PaKet SDK nra DeckLink
nonepxnae TneDyUoune texHonoru:
- DeckLink API
AppleQuickTime
Apple Core Media - Microsoft DirectX Show
Kak 3arpy3ntb 6ecnnaTnb naket SDK
COOTBETCTBNE Tpe6oBaHnI M ISED (KaHaDa)
JaHHe OobpyoBbAHne COOTBeCTByeT KaHaDCKIM CTAHdApTaM nIuΦpOBbIX yCtpoiCTB Klacca A.
JIO6a MoIINPkaIIN INCNOB3OBAHHe I3eNn He NO Ha3NaueHIO MOrYT NOBneb 3a COoB aHNIpOBaHne 3aRBeHnO COOTBetCTBnN 3Tm CTahdApTAM.
IopKIOUeHne K HDM-INTeppeCy DOJXHO BbINONHrTbcra C NOMOUIKO KaueCTBeHHoro 3kpaHnPOBaHHoro Ka6eJIa.
DahHoe oobopyoBaHHe npoteCTnpoBaHO nTopeboaHnM, ppeBraIeMbIM
K yCTpOHTBAM npn paBote B HexNlblx NOMEeHnX. Pn INCIOJIb3OBaHmN B 6bITOBbIX ycIOBnX OHO MoKET CTAHOBNTBCR NCTOCHNKOM NOMEX nla PaINOCIRHaJa.
ПразвILA 6e3ОпасноCTN
Bo n36exaHne ydaapa 3NeKtpnueckm Tokom po3eTka IJnnoKnIOueHn yCTpoCTBa K cETN OJnxHa IMetb 3a3emIouIi KOHTAK. Ppi Heo6xOIMOCIn o6paTNTecb 3a nomouBIO K KBaIIINpUPOBaHHomy 3NeKtpNKy.
YTObIMHmMn3NpOBaTb ONACHOCTb nopaxeHHa 3neKtpueckn m TokOM, n3dJIne Heo6xOIMO 3aunuTaB OT nonadaHn 6pb1r N KaenB BODbl.
Donyuckaetc ero 3KcnnyataaB yCNOBnX TpOnnueckoro KImMaTc Temnepatypoi Okpykaioe cpebl do 40^
Дяраобъюсгьи Heo6xOIMO OeCneHbdoCTaTOHy BOHTINJIACIO.
Pn yctaHOBKe B cToiKy y6eDiuTeCb B TOM, YTO He HApUweH npTOK BO3dyxa.
BHytpn Kopnyca He coedepekatae Taann, noDneXaune ocbnykaBaHIO. DnBbInonHeHH peMOHTbIX paOTo obpaTteCb B MeCTbIc cepBncHbI cHtp Blackmagic Design.
Pád obópyoBáHnI NOZBOJAE YCTaHOBtB KOMNaKTbI ONTNUeCKN SFP-MOyNb. IcnoNb3yTe TOnbko Modyn Tnna Laser class 1.
Pekomehdyembte Tnblb SFP-Moynne
-3G-SDI:PL-4F20-311C
-6G-SDI:PL-8F10-311C
-12G-SDI:PL-TG10-311C

DonyckaetcaKcnnyataaB Mectax He BbIe 2000 metpoB HAD ypOBHem MOpA.
YBeDomHeHneIgXHTeIeWtataKaIINΦopHnIa
Pn pa6ote c 3Tm OOBpyoBaHnem CyueCTByeT BO3MOxHOCTb KOHTa T C codepaunMnC B nactMaCCe MKNpOpnpMeCmM HOrOobpOMcTOr OupeHnla, KOTopBn B Wtate KaNpOpHn np3HaH kaHeporeHOM uYBeIuHbaet PnCK BPOXDeHHbx DepeKToB n NopOKOB pePOnyKTINBHOI CNTEmbl.
Iopno6HyIO INHOpMaunio cm. Na caIte www.P65Warnings.ca.gov.
IpeDynpexdEHHaTeyHnueckoro nepcoHa


IpepeoocnykBaHnemOTKnIOHTe nTahHe Haobux CINOBbIX pa3beMax.


OctopoxHo: nIaBkn npedoxpaHnteB DByxNoIOChbIN/B HeHTpann
Bnok nntaHn B 3tOM yctpoCTBe NMeET npedeoxpAHNTeB BLINHeHOM HneITpaHbONPOBOADx INoXODNTIg NOKJIUOChENK CnCTeMe 3HePronHTaHn TnA IT B HopBerN.
Гаразня
OrpaHnueHHa rapaHTna
KomnaHnBaKmigc Design rapaHTpyer oTCyCTBne B npOdykTx UltraStudio, DeckLink u Multibridge deΦeKTOB MaTePnAna n npOn3BOJCTBeHHORo 6paka B TeueHne 36 MecaueB c DaTbI npOdaXn. B OTHouEHn pa3bEmOB, KaBEn, OxJaXaUxuX BeHTNlAToPOB, ONTOBOLOKOHNbIX MOyJe, npedoxpaHntEne, KlaBnAtypb I aKKymJrTOpHbX 6aTapei OTCyCTBne DeΦeKTOB MaTePnAna n npOn3BOJCTBeHHORo 6paka rapaHTpyetc B TeueHne 12 MecaueB c DaTbI npOdaXn. KomnaHn BAckmigc Design rapaHTpyet oTCyCTBne B npOdykTax Intensity DeΦeKTOB MaTePnAna n npOn3BOJCTBeHHORo 6paka B TeueHne 12 MecaueB c DaTbI npOdaXn. Ecln Bo Bpemra rapaHTnHoro cpoKa bdyT bYBaBHeHbI DeΦeKtBu, Blackmagic Design no CBoemy ycMoTpeHHIO BbINOHNr peMOHT HeNCnpaBHOrO N3dEInra 6e3 OOnABy CTOnMOCTn 3aAnactei N Tpydo3aTp aT INN 3aMeHNT TaKoe N3dEInne HOBbIM.
YTO6bI BOCNoB3OBAbTc HAcToIe IraPAnThne, NOTpe6ntel b 08aHaN yBeDoMnTb KOMnHIO Blackmagic Design o DepeKeTe do OKOHuaHna RapaHTnHoro cPoka n OecneuHt b YcNOBn Dn npedocTabHeHn Heo6xOaMbIX ycnyr. NOTpe6ntel h HeceT OTBeTCTBeHHocTb 3a yNaKOBky n DoCTabKy HeNCnPpABHorO n3dEInB B COoTBcTByUoHn cepBnCHbI ueTp Blackmagic Design c Onnato nOyTObIx paXoOB. NOTpe6ntel b 08a3aH onnAtnB BCE paXoDbI no DoCTabK e n CtpaxOBaHIO, NoJINHbI, HanoN INHbI c6OpbI B CBaN C Bo3BpAtom n3dEInB Bhe 3aBnCmOCTn OT pnuHbI.
Hactoiaa rapaHTna He paocnoctpaHaeTc H daeFekbI,OTKa3bI NOBpeKdHnra,BO3NkUne n3-3a HeHaJnxAeero IcNoBzOBAHn, HenpabunbHoro yXOda nn OcbnyKnbAHn. KomnHnra Blackmag Design He obra3ana IpeoCTabTb ycLytn no Hactoaneparantnn: a) dna yctpanen HOBpeKdHn, BO3NkUnx B peyntaTe deCTBn no yctahOBke, pemOnTy nn o6cnyKnbAHIO n3deHnla NiuaMn, KOToBie He raToc npcoHAnom Blackmagic Design; 6) dna yctpanen HOBpeKdHn, BO3NkUnx B peyntaTe He HAdnEkaeero IcNoBzOBAHn nn NODKnUoyehn K HecOBmectUMOMy oOpdyOBaHnO; B) dna yCTpaHcnr NOBpeKdHn nn DeFeKTOB, B13BaHHbIX IcNoBzOBAHm 3auchTe nn MATEPnAIOB npOn3BoDInTeJe; r) ecnn n3deHnne 6blNO MoiNtpoBAHO nn INTErpnpoBAHO CDPyHM O6OpdyOBaHm, KOrDa TAKaMaOnfNkauZn nn INTEpauzYBEJIuHbAET Bpem nn NobIIaet C0xHOCb OBcNyKBaHn nn3deHn. HACTOIAI RA PAHTNl PPEOCTABJARETC KOMPAHNEI BLACKMAGIC DESIGN BMECTO JIObix DPYHX PPIMBO BVIPAXEHbIX NNIOPA3YMEMBAEMbIX TAPAHNT. KOMPAHNAI BLACKMAGIC DESIGN N EE DINIEPbI OTKA3bIBAOTC OT JIObIX IOPDyMEBAEMbIX TAPAHNT KOMMEPQCKOI CEHHOCTN NIN PNIFOJHOCTN DJa KAKOI-NI5O ONPEDELEHHOJ LCEIN. OTBETCTBEHHOCb BLACKMAGIC DESIGN NO PEMONTY NIN 3AMEHE HENCnPABHBIX N3DEJIIN YBJIETC NOJHBIM NCKJIOCHTEbHM CPeDCTBOM BO3MeUeHN, PPEOCTABJREMbIM NOTPEBITEJIIO B CB83N C KOCBEHHbIM, FAKTUeCKMn, CONVTCTBYUOUMN NIN NOCLEUYOUUMN YbItKAMN, BHE 3ABNCIMOCTN OT TOLO, BbIA NIN HET KOMPAHNAI BLACKMAGIC DESIGN (NIOE Ee DInIEP) PPEDBAPNTbHO N3BEUeHA O BO3MOXHOCTN TAKNX YbBITKOB. BLACKMAGIC DESIGN HE HECET OTBETCTBEHHOCTH 3A IPOTINBOPTPABHOE NCIOJIb3OBAHNE O6OPyIOBAHNAI CO CTOPOHBIOTPEBITEJL. BLACKMAGIC DESIGN HE HECET OTBETCTBEHHOCTH 3A YbItKN, BO3NkAIouJIe BCJEIDCTBVE NCIOJIb3OBAHNAI 3TOGO N3DEJIIN. PNCKN, CB83AHNBIE C ETO 3KCIJLYATAUINEI, BO3JIAGAOTCR HA NOTPEBITEJI.
Copyright 2022 Blackmagic Design. Bce npaba zauuene. Blackmagic Design, DeckLink, HDLink, Workgroup Videohub, Videohub, DeckLink, Intensity n "Leading the creative video revolution" apernctpopobahk kak tobaphe hckn B CUA n pax HaaBnHn npyHX KOMnHn HnHaMeHOaHn IpOyKTOB Moryr RbIbch TOBAPbIM 3hakm COOTBeCTByoX npaboo6naateno.
TexHONorma Thunderbolt norotn Thunderbolt ybnhotc toBaphmya Kopnpauin Intel B CUSA npynx cpaahx.
Desktop Video

Gentile utente
DaVinci Resolve 631 Normative 674
0:/dev/blackmagic/io0 [DeckLink SDI 4K] 0x73 OK
1:/dev/blackmagic/io1 [DeckLink 4K Extreme 12G] 0x0A PLEASE UPDATE
Are output as Square Division Quad Split (SQ)

Are output as Sample Interleave (SI)
Channel 1, Channel 2
Channel 1, Channel 2
Acquisire file video e audio
Acquisire file video e audio
Riproducic clip single o multiple
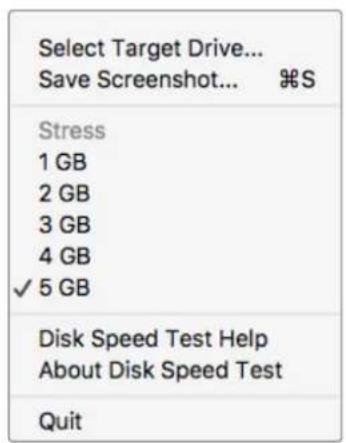
April 10:10 PM (Monday)
Appli t i n g r a n g gio
Select Target Drive
Acesse www.blackmagicdesign.com/br/support
2 Abra o Media Express e clique na aba "Log and Capture".
-3G-SDI:PL-4F20-311C
-6G-SDI:PL-8F10-311C
-12G-SDI:PL-TG10-311C

CEO Blackmagic Design
icindekiler
Baslarken
Desktop Video'ya Giri 755
0:/dev/blackmagic/io0 [DeckLink SDI 4K] 0x73 OK
1:/dev/blackmagic/iol [DeckLink 4K Extreme 12G] 0x0A PLEASE UPDATE
Are output as Square Division Quad Split (SQ)

Are output as Sample Interleave (SI)
8K oynatim icin Desktop video ekipmanini kullanirken, tercih ettiqiniz quad link 8K cikis formatini ayarlayin.
Use 5.1 surround channel ordering
-3G-SDI:PL-4F20-311C
-6G-SDI:PL-8F10-311C
-12G-SDI:PL-TG10-311C