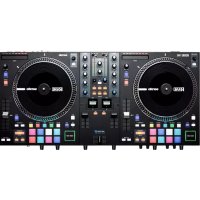
Seventy ATrack Signature Edition - DJ Equipment Rane - Free user manual and instructions
Find the device manual for free Seventy ATrack Signature Edition Rane in PDF.

User questions about Seventy ATrack Signature Edition Rane
0 question about this device. Answer the ones you know or ask your own.
Ask a new question about this device
Download the instructions for your DJ Equipment in PDF format for free! Find your manual Seventy ATrack Signature Edition - Rane and take your electronic device back in hand. On this page are published all the documents necessary for the use of your device. Seventy ATrack Signature Edition by Rane.
USER MANUAL Seventy ATrack Signature Edition Rane
Powered by Serato DJ Pro
User Guide (English)
Introduction
Thank you for purchasing the Seventy A-Trak Edition. At Rane DJ, we know how serious music is to you. That's why we design our equipment with only one thing in mind—to make your performance the best it can be.
Box Contents
Seventy A-Trak Edition
Power Cable
(2) Serato NoiseMap™ Control Vinyl Records
(2) Serato NoiseMap ^TM Control CDs
Serato Pitch 'n Time Download Card with Serial Number
(2) USB Cables
Rane Stickers
User Guide
Safety & Warranty Manual
Support
For the latest information about this product (documentation, technical specifications, system requirements, compatibility information, etc.) and product registration, visit rane.com.
For additional product support, visit rane.com/support.
Setup
Items not listed under Introduction > Box Contents are sold separately.
- Visit rane.com and log into your account. (Create an account if this is your first Rane product.) In your account, register your Seventy A-Trak Edition and download the Rane Control Panel.
Windows users only: The Rane Control Panel contains drivers required for Windows. - IMPORTANT: Occasionally, we may update Seventy A-Trak Edition's firmware to improve its performance. Visit rane.com to check for available firmware updates, especially after you update your software (firmware updates may address new software features).
- Download and install the latest version of Serato DJ Pro from serato.com.
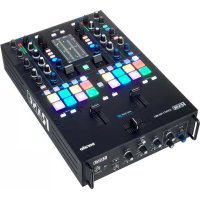
- Using USB cables, connect the USB ports on the Rane Twelve MKII (if using) or other USB MIDI controllers to the Twelve/Controller USB ports on Seventy A-Trak Edition.
- Connect audio input sources (microphones, turntables, etc.) to Seventy A-Trak Edition.
- Connect audio output devices (headphones, power amplifiers, loudspeakers, etc.) to Seventy A-Trak Edition.
- Connect all devices to power outlets, and power on the devices in proper order:
- When starting a session, turn on (1) input sources, (2) Seventy A-Trak Edition, (3) output devices.
- When ending a session, turn off (1) output devices, (2) Seventy A-Trak Edition, (3) input sources.
- Using a USB cable, connect the USB port on Seventy A-Trak Edition to your computer. Open Serato DJ Pro and go! For more information on how to use Serato DJ Pro with Seventy A-Trak Edition, visit support.serato.com and select Rane Seventy A-Trak Edition.
flowchart
graph TD
    A["Computer"] --> B["Rane Twelve MKII (or other USB MIDI controller)"]
    C["Microphone"] --> D["Rane Twelve MKII (or other USB MIDI controller)"]
    B --> E["Powered Loudspeakers"]
    B --> F["Booth Monitors"]
    B --> G["Turntable"]
    D --> H["Media Player"]
    E --> I["Radio"]
    F --> J["Radio"]
    G --> K["Radio"]
Note: Seventy A-Trak Edition is Serato DVS enabled, which allows you to control a track in Serato DJ Pro with a vinyl turntable or CD player connected to one of Seventy A-Trak Edition's PH/CD or Aux inputs. To use DVS with Seventy A-Trak Edition, you need Serato NoiseMap™ control records or CDs (included). See the Serato DJ Pro manual to learn more about DVS.
Features
Top Panel
text_image
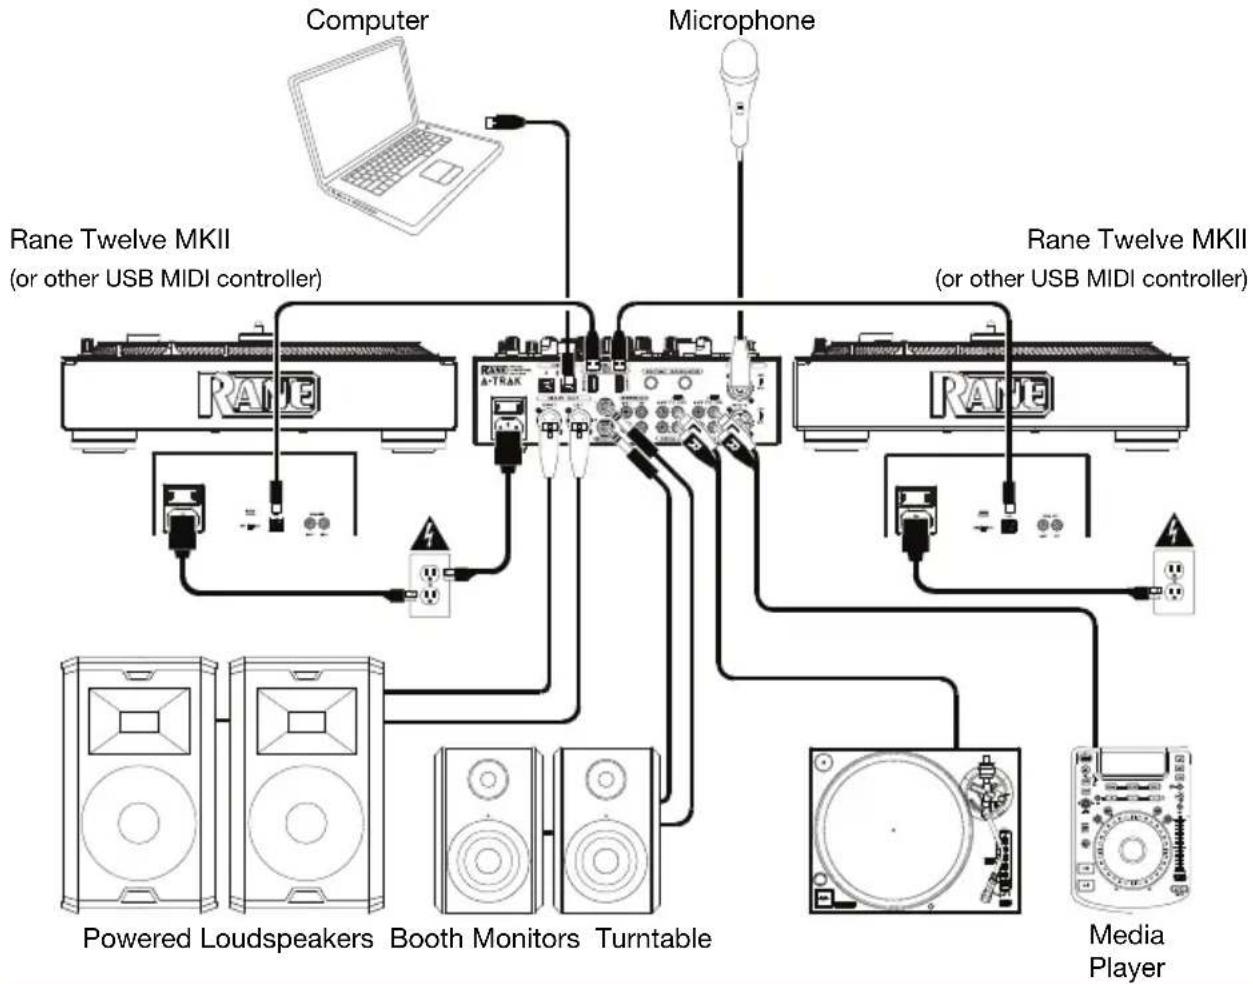
SC1 1 DAD DECK ONE MIX DECK TWO SCR1 1 2 3 4 6 PH/CD AUX USB A USB B SOUR HIGH MAIN HIGH PH/CD AUX USB A USB B Rock Load MIC 35 7 31 2 4 2 3 LEVEL LEVEL MID BOOTH MID LEVEL IN 36 L 8 TONE LOW 9 LP/HP LP/HP 37 On Ec 16 LOOF ON / OFF 18 Echo Reverb Brake Flex Fx Flanger Phaser Fader H 18 RELOOP 19 REOFP ×1/2 ×2 Loop In Loop Out LOCK FX TIME BEAT LOCK FX 17 ON DEPTH DEPTH ON 15 + PARAMETER + 15 Hot Cure Saved Loop Roll Sampler Transport Hot Cure Saved Loop Rail Sampler Transport 13 14 TAP SHIFT 23 11 24 SYNC SYNC DECK-1 DECK-2 25 SAMPLER LEVEL 28 SYNC CUE MIX 27 29 TRAK serato RANE Seventy SIGNATURE EDITION- Scroll/Load: Turn this knob to browse through lists and press it to select an item or load the currently selected track to the deck.
Tip: Press this knob twice quickly to load the same track to both decks ("instant doubles").
- Back: Press this button to view the previous screen in Serato DJ Pro.
Hold Shift ^ and press this button to cycle through the Files, Browse, Prepare, and History windows in Serato DJ Pro.
- Load Prep: Press this button to send the highlighted track to the Prepare window in Serato DJ Pro.
Hold Shift and press this button to open the Prepare window.
- Deck Source: Set this knob to the desired audio source for this channel: USB A or B (a track playing on that layer in the software), PH/CD (a device connected to the Deck PH/CD In on the rear panel), or Aux (a device connected to the Deck Aux In on the rear panel).
Note: If you select PH/CD, set the PH/CD selector switches on the rear panel properly.
Note: A deck's controls will send MIDI information only when its deck source selector is set to USB A or B.
-
Deck Level: Turn this knob to set the pre-fader, pre-EQ audio level of the corresponding channel. The meter next to this knob indicates the signal's volume level (reduce it if it begins "clipping," reaching the red part of the meter).
-
Deck EQ High: Turn this knob to adjust the high (treble) frequencies.
-
Deck EQ Mid: Turn this knob to adjust the mid-range frequencies.
-
Deck EQ Low: Turn this knob to adjust the low (bass) frequencies.
Note: All EQ controls are full-kill.
- Deck LP/HP: Turn this knob to adjust the filter applied to the deck.
Turn the knob counterclockwise to apply a low-pass filter. Turn the knob clockwise to apply a high-pass filter. Set it to the center ("12:00") position to deactivate the filters.
Note: The filters are full-kill by default, but you can adjust the cutoff frequencies by going to the Main Menu. See Operation > Main Menu for more information.
-
Loop Controls: Use the Loop On/Off (Reloop), x1/2 (Loop In), and x2 (Loop Out) buttons to loop segments of the track playing on the corresponding deck. See Operation > Looping to learn more about creating loops.
-
Shift: Press and hold this button to access secondary functions of other controls on Seventy A-Trak Edition.
-
Sync: Press a deck's Sync button to automatically sync the deck's tempo with the other deck. Hold Shift and press the button to deactivate sync. If you would like these buttons to instead perform Instant Double or Silent Cue functions, you can adjust the button mode from Seventy A-Trak Edition's Main Menu. See Operation > Main Menu for information on how to change the mode and how the modes work.
-
Pad Mode Buttons: Press one of these buttons to enter the corresponding pad mode. Press once to enter the primary (printed above) mode, and press a second time to enter the secondary mode. See Operation >Pad Modes to learn how to use the pads in each mode.
-
Performance Pads: These pads have different functions on each deck depending on the current pad mode. Use the Pad Mode Buttons to select the pad mode. These pads are velocity-sensitive (in certain modes only), durable, and easy to play. See Operation >Pad Modes to learn how to use the pads in each mode.
-
Parameter ◀/▶: Use these buttons for various functions in each pad mode. Press and hold Shift↑ and use these buttons to access secondary parameters.
-
Display: The main Display screen shows adjustable parameters for software and internal Flex FX. The Display can also be used to access and edit settings for the mixer. See Operation > Effects and Operation > Main Menu for more information.
-
E effects Toggle: Move this toggle switch away from you to activate the software effects or Seventy A-Trak Edition's Flex effects—the toggle will latch to that position. Pull the toggle back to the center position to deactivate the effects.
Pull and hold this toggle toward you to activate the software effects or Seventy A-Trak Edition effects momentarily, and release the toggle to deactivate the effects—the toggle will return to the center position.
Note: The Effects Toggle switches can be removed and rotated 180^ depending on your preference.
- FX Buttons: Use these buttons to select or deselect effects for activation by the Effects Toggles.
- FX Mode Button: Use this button to determine whether the FX Buttons select Seventy A-Trak Edition's internal Flex FX or software effects. While in Flex FX Mode, the FX Mode Button will be lit blue. While in Software Effects Mode, the button will be lit amber.
- FX Joystick: Push this joystick up and down or left and right to navigate effect parameters and menu settings shown on the Display.
- Parameter Knob: Turn this knob to edit effect parameters and menu settings. When editing menu settings, press this knob to save your changes to the setting.
- Depth: Turn this knob to adjust the "wet-dry" mix of the effects on the corresponding deck.
- Tap: Press this button two or more times at the desired BPM in order to manually set the FX tempo for the deck in focus on the Display. To reset the FX tempo back to automatically matching the software tempo, press and hold the Tap button for three seconds.
Hold Shift and press the Tap button to bring up Seventy A-Trak Edition's Main Menu. - Sampler Level: Turn this knob to adjust the volume level of the software sampler.
- Cue Slider: Push this slider to the left or right to determine which deck is sent to the cue channel. When the slider is in the center position, both decks will be sent to the cue channel.
- Cue Level: Turn this knob to adjust the volume level of the cue channel.
- Cue Mix: Turn to mix between the cue channel and program mix in the headphone outputs. When all the way to the left, only the cue channel will be heard. When all the way to the right, only the program mix will be heard.
- Channel Fader: Move this fader to adjust the volume level of the corresponding deck.
- Crossfader: Move this fader to mix between the decks.
- Main: Turn this knob to adjust the output volume of the main outs. The meters next to this knob indicate the signal's volume level (reduce it if it begins "clipping," reaching the red part of the meter).
- Booth: T urn this knob to adjust the output volume of the Booth Outs.
- Session Out: Turn this knob to adjust the output volume of the Session Outs.
- Session In: Turn this knob to adjust the input volume of the Session Ins.
- Session In Cue: Press this button to send the signal from the Session Ins to the cue channel for monitoring. When engaged, the button will be lit.
- Mic 1 Level: Turn this knob to adjust the gain of the Mic 1 Input.
- Mic 1 Tone: Turn this knob to adjust the balance of low (bass) and high (treble) frequencies of the audio signal coming from the Mic 1 Input.
- Mic 1 On/Duck: Press this to activate or deactivate the Mic 1 Input on the rear panel.
Press and hold this button for 2 seconds to activate the "ducking" feature, which reduces the volume level of all other inputs by 10 dB. The button will flash when this feature is active. Press this button once more to deactivate this feature and the Mic 1 Input. If you would like to edit the volume threshold or the hold time for the mic ducking feature, you can do so in the Main Menu. See Operation > Main Menu for more information. - Mic 1 Echo: Press this button to activate or deactivate the echo effect on the Mic 1 Input signal. Turn the Mic 1 Echo knob on the front panel to adjust the amount of the effect. If you would like to edit the amount of feedback for the mic echo feature, you can do so in the Main Menu. See Operation > Main Menu for more information.
Rear Panel
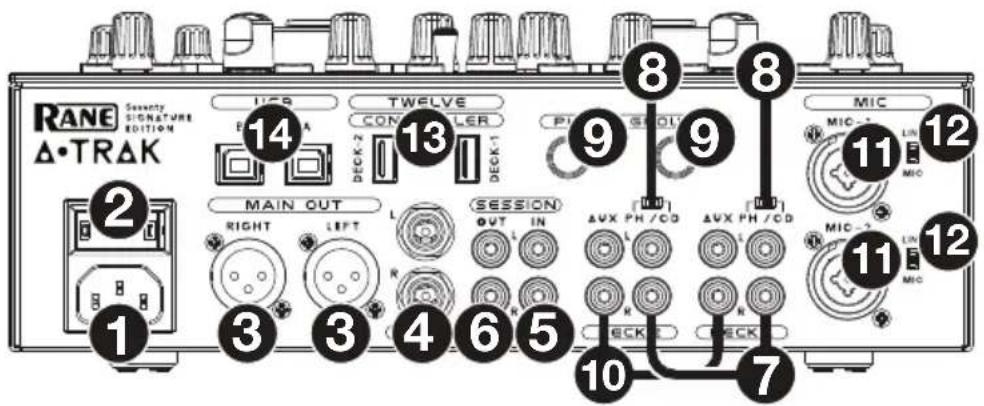
text_image
RANE Security SIGNATURE EDITION Δ·TRAK 14 13 9 8 8 MAIN OUT RIGHT LEFT SESSION OUT IN ΔVX PH / CD ΔVX PH / CD MIX-2 MIC-2 LIN MIC 10 7 11 12 11 12 2 3 4 5 6 7- Power Input: While Seventy A-Trak Edition is powered off, connect the included power cable to this input and then to a power outlet.
- Power Switch: Use this switch to power Seventy A-Trak Edition on or off. Power on Seventy A-Trak Edition only after you have connected all of your input devices and before you power on your amplifiers and loudspeakers. Power off your amplifiers and loudspeakers before powering off Seventy A-Trak Edition.
- Main Out (XLR): Connect these outputs to loudspeakers or an amplifier system. Use the Master knob on the top panel to control the volume level.
- Booth Out (1/4"/6.35 mm, TRS): Connect these outputs to booth monitors or a booth amplifier system. Use the Booth knob on the top panel to control the volume level.
- Session In (RCA): Connect these inputs from a line-level device like another mixer, a CD player, drum machine, etc. The signal will be sent directly to the program mix. Turn the Session In knob on the top panel to control the input volume level.
- Session Out (RCA): Connect these outputs to another mixer, recording device, etc. The program mix will be sent to these outputs. Turn the Session Out knob on the top panel to control the volume level.
- Deck PH/CD In (RCA): Connect these inputs to an external audio source or to a turntable, CD player, or other line-level device. Remember to set the corresponding PH/CD selector to the appropriate position and to set the deck source knob for that deck to PH/CD to play its audio signal on that deck.
- PH/CD Selector: Set this switch to the appropriate position, depending on the device connected to the PH/CD Ins of the corresponding deck. If you are using phono-level turntables, set this switch to PH to provide the additional amplification needed for phono-level signals. If you are using a line-level device, such as a line-level turntable, CD player or sampler, set this switch to CD.
- Phono Grounds: If you are using phono-level turntables with a grounding wire, connect the grounding wire to these terminals. If you experience a low "hum" or "buzz", this could mean that your turntables are not grounded.
Note: Some turntables have a grounding wire built into the RCA connection and, therefore, nothing needs to be connected to the grounding terminal. - Deck Aux In (RCA): Connect these inputs to an external line-level audio source. Remember to set the Deck Source knob for that deck to Aux to play its audio signal on that deck.
- Mic Inputs 1–2 (XLR / 1/4"/6.35 mm, TS): Connect microphones or line-level devices to these mono inputs. Their mono audio signals are split and routed directly to the stereo program mix and cue channel. If you prefer a stereo line input, the Session In may be used.
- Line/Mic Selector: Set this switch to the appropriate position, depending on the device connected to Mic Inputs 1-2. If you are using a microphone, set this switch to Mic. If you are using a line-level device, such as a keyboard or sampler, set this switch to Line.
- Twelve/Controller USB Ports (USB Type-A): Use USB cables to connect these USB ports to your controllers such as Twelve or a standard USB MIDI controller.
Important: Do not connect USB drives to these ports. Switching the Deck Source knob will force eject the drive from the connected computer, which could damage the contents and should be avoided. - USB Ports (USB Type-B): Use USB cables to connect these USB ports to available USB ports on your computer. These connections send and receive audio and MIDI control information to and from the computer.
Note: Make sure you have downloaded and installed the Rane Control Panel from rane.com.
Front Panel

text_image
RANE Sensely SIGNATURE EDITION △·TRAK 2 MIC ON MIC 3 5 ECHO 4 TONE MIC 2 LEVEL CONTOUR CONTROLS 7 Slow Fast DECK-1 6 Slow Fast CROSSFADER 7 Slow Fast DECK-2 REVERSE OFF ON REVERSE OFF ON REVERSE OFF ON 9 10 SPLIT CUE HEADPHONES 8- Headphone Outputs (1/4", 1/8" / 6.35 mm, 3.5 mm, TRS): Connect your 1/4" or 1/8" (6.35 mm or 3.5 mm) headphones to this output for cueing and mix monitoring.
- Mic 2 On: When set to On, the Mic 2 Input on the rear panel is active, and its audio signal is routed directly to the program mix and cue mix. When set to Off, the Mic 2 Input is disabled.
- Mic 2 Level: Turn this knob to adjust the gain of the Mic 2 Input.
- Mic 2 Tone: Turn this knob to adjust the balance of low (bass) and high (treble) frequencies of the audio signal coming from the Mic 2 Input.
- Mic 1 Echo: Turn this knob to adjust the amount of the echo effect on the Mic 1 Input signal. Press the Mic 1 Echo button on the top panel to activate or deactivate this effect.
- Crossfader Contour Knob: Use this knob to adjust the slope of the crossfader curve. Turn the knob to the left for a smooth fade (mixing) or to the right for a sharp cut (scratching). The center position is a typical setting for club performances.
- Channel Fader Contour Knobs: Use this knob to adjust the slope of the Channel Fader curves. Turn the knob to the left for a smooth fade or to the right for a sharp cut.
- Tension Knob: Use this knob to adjust the tension of the Crossfader. Turn the knob to the left to loosen the crossfader for a lighter feel and to the right to tighten the crossfader for a heavier feel.
- Fader Reverse: Set this switch to On to reverse the direction ("polarity") of the corresponding fader. Set it to Off to use the conventional fader polarity.
- Split Cue: When this switch is set to the On (right) position, the headphone audio will be "split" such that the cue channel is summed to mono and sent to the left headphone channel while the program mix is summed to mono and sent to the right channel. When the switch is set to the Off (left) position, the cue channel and program mix will be "blended" together. In both cases, use the Cue Mix knob on the top panel to control the balance of the two signals.
Operation
Looping
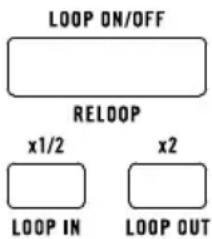
Each deck on the Seventy A-Trak Edition is equipped with three buttons on the top panel that you can use to easily create and modify loops. Each button has a primary function (printed above the button) and a secondary function (printed below the button).
To activate an autoloop of a track playing on a deck, press the deck's Loop On/Off (Reloop) button. The length of the loop in bars will depend on your software's current loop size setting. If the current setting is not the loop size you want, you can change the loop size.
text_image
LOOP ON/OFF RELOOP x1/2 x2 LOOP IN LOOP OUTTo change the autoloop size, use the x1/2 (Loop In) button to divide the number of bars in half or the x2 button (Loop Out) to double the number of bars. You can change the loop size either before you activate a loop or while a loop is active and playing.
To deactivate an autoloop of a track playing on a deck, press the deck's Loop On/Off (Reloop) button.
To activate the last used loop on a deck, hold Shift and press the Loop On/Off (Reloop) button on the corresponding deck while the previously looped track is still playing. The same segment of the track that was looped before will be looped again.
To activate a manual loop of a track playing on a deck, use the deck's x1/2 (Loop In) and x2 (Loop Out) buttons. Press the x1/2 (Loop In) button to set the start point for the loop, then press the x2 (Loop Out) button to set the end point for the loop. After you set the end point, the loop will automatically begin playing.
To deactivate a manual loop of a track playing on a deck, press the deck's Loop On/Off (Reloop) button.
Effects

bar
| Category | Value | | -------------------- | ----- | | Depth Level Meter | 95.5 | | Depth Level Meter | 120.1 | | Depth Level Meter | 1/2T | | Beat Division Setting | 8 | | Beat Division Setting | 1/2T | | Deck 1 FX Tempo | 95.5 | | Deck 2 FX Tempo | 120.1 |Software Effects Mode Display (with Multi FX enabled)

other
| Component | Value | |-----------------------|-------| | LPF PHASER REVERB | 2 | | BEATS | 1/4 | | HPF FLANGER ECHO | 1/4 | | Beat Division Setting | 102.9 | | Depth Level Meter | 102.9 | | Depth Level Meter | 140.0 | | Selected Deck 1 | - | | Selected Deck 2 | - | | Software Effects | - | | Depth Level Meter | - | | Beat Division Setting | - | | Depth Level Meter | - | | Beat Division Setting | - | | Depth Level Meter | - | | Depth Level Meter | - | | Depth Level Meter | - | | Depth Level Meter | - | | Depth Level Meter | - | | Depth Level Meter | - | | Depth Level Meter | - | | Depth Level Meter | - | | Depth Level Meter | - | | Depth Level Meter | - | | Depth Level Meter | - | | Depth Level Meter | | Depth Level Meter | - | | Depth Level Meter | - | | Depth Level Meter | - | | Depth Level Meter | - | | Depth Level Meter | - | | Depth Level Meter | - | | Depth Level Meter | - | | Depth Level Meter | - | | Depth Level Meter | - | | Depth Level Meter | - | | Depth Level Meter | - | | Depth Level Meter | - | | Depth Level Meter | - | | Depth Level Meter | - | | Depth Level Meter | - | | Depth Level Meter | - | | Depth Level Meter | - | | Depth Level Meter | - | | Depth Level Meter | - | | Depth Level Meter | - | | Depth Level Meter | - | | Depth Level Meter | - |Applying Effects to a Deck
To activate software or internal effects on a deck, use the deck's Effects Toggle. Latch the toggle in the up position to apply effects to a deck. Alternatively, you can pull the toggle down and then let go in order to momentarily apply effects to the deck.
To deactivate software or internal effects on a deck, place the deck's Effects Toggle in the center position.
To select or deselect which effects will be activated by the Effects Toggles, press the FX buttons. When an effect is selected, the corresponding FX button will be brightly lit, and the effect name will appear on the Display.
To change whether the FX buttons select software or internal effects, press the FX Mode button. When set to Flex FX Mode, the FX Mode button will be lit blue. When set to Software Effects Mode, the button will be lit amber.
If set to Flex FX Mode, you can activate one effect, which will be applied to both decks.
If set to Software Effects Mode, you can stack up to three different effects on each deck.
Note: If you would like to use multiple software effects on a deck, set Software FX > Multi FX to On in the Main Menu, which you can access by holding Shift↑ and pressing Tap (see the Main Menu section of this manual for more help navigating the settings). Also, make sure that Serato DJ Pro is set to Multi FX mode by going to the FX tab and selecting the deck's •••• icon.
In Software Effects Mode, the FX buttons to the left of the FX Mode button will correspond to Bank A software effects (routed by default to Deck 1), and the three FX buttons to the right of the FX Mode button will correspond to Bank B software effects (routed by default to Deck 2). Names of Serato DJ Pro effects will be visible on Seventy A-Trak Edition's Display (as pictured on the previous page).
To change which Serato DJ Pro effect is applied to a deck in Software Effects Mode:
- Hold Shift▲ and then press the FX button corresponding to the effect. The FX button will flash.
- Turn the Parameter Knob to scroll through effects. As you scroll, the effect name will update on the Display.
- When the effect you'd like to apply is displayed, press the Parameter Knob. The FX button will stop flashing.
To use software effects and a Flex effect simultaneously, set Software FX > Mix Flex FX to On in the Main Menu, which you can access by holding Shift▲ and pressing Tap (see the Main Menu section of this manual for more help navigating the settings). While this setting is On, the currently activated effect(s) will remain active even as you change the FX mode. If the setting is Off, switching the FX mode will deselect any effect(s) from the previous mode.
To change how software effects sound when they're deselected, set Software FX > USB Insert to On or Auto in the Main Menu, which you can access by holding Shift↑ and pressing Tap (see the Main Menu section of this manual for more help navigating the settings). When set to Auto, any active software effect will be muted as soon you deselect it with the FX button. When set to On, deselected software effects will have an audible "tail" as they gradually decay.
Note: The Auto setting may be preferable for Scratch DJ's, as it decreases the amount of overall audio latency, better allowing you to scratch with precision.
Editing Live Effects on a Deck
The Display screen will show the FX tempo for each deck, which will automatically match the tempo of the song playing on the deck (unless you manually change this setting as described below). With most effects, the Display will also show the FX beat division and depth level for each deck. See the previous page for an illustration of the Display.
To change which deck is in focus on the Display, push the FX Joystick left and right. The Focus Arrow surrounding the FX tempo will show which deck is currently in focus.
To edit a deck's FX tempo, turn the Parameter Knob or press the Tap button two or more times at the desired BPM while the deck is in focus on the Display. The new FX tempo will be shown on the Display.
Note: After you manually edit a deck's FX tempo, the setting will not reset even after loading a new song to the deck. To make a deck's FX Tempo go back to automatically matching the tempo of the track loaded on the deck, press and hold the Tap button for three seconds while the deck is in focus on the Display.
To edit a deck's FX beat division, push the FX Joystick up or down while the deck is in focus on the Display. Use this setting to adjust the rhythmic timing of a deck's effect(s) in accord with the FX tempo.
By default, the available beat division settings for the Flex FX range from 1/32T (32nd note triplet) – 32D (32 bars dotted), while the beat division settings for Serato DJ Pro effects range from 1/16 (16th note) – 8 (8 bars). If you would like to modify the available beat division settings for the Flex FX, you can go to the Main Menu and switch from the default Extended Mode to No Dotted, No Triplet, or Simple Mode. See the Main Menu section of this manual for more help navigating the settings.
Note: The Brake effect does not have a beat division parameter. In place of a beat division parameter, the Reverb effect has a Decay parameter, which adjusts the intensity and duration of the reverb.
To increase or decrease a deck's FX depth level, turn the Depth Knob for the deck. As you increase or decrease the depth level, the Depth Level Meter will update on the Display.
Note: In place of a Depth Level Meter, the Brake effect has a Length Meter, which adjusts the amount of time it will take for a track to stop or “brake” when the effect is activated.
To edit a secondary Flex effect parameter while in Flex FX Mode:
-
Hold Shift and press the FX button for the effect. This will take you to the secondary parameter Display screen.
-
Highlight the parameter you want to adjust with the FX Joystick. Then turn the Parameter Knob to adjust the parameter.
-
Push the Parameter Knob to confirm your changes to the parameter. The new setting will be saved and remembered when you power off Seventy A-Trak Edition.
-
Press an FX button or push the Joystick to the left in order to return to the Display screen.
Secondary Parameter Display (for the Reverb Flex Effect)
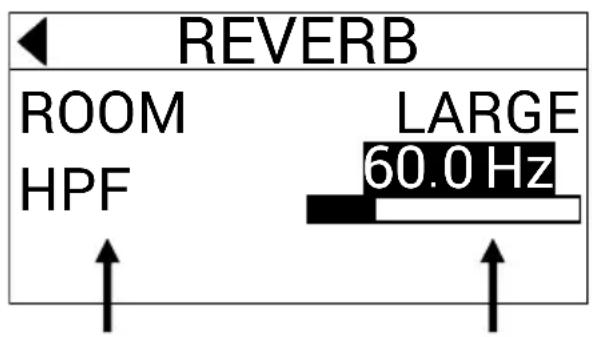
text_image
REVERB ROOM HPF LARGE 60.0 HzAdjustable Parameters
main Flex FX
Current Settings
Note: The Brake Flex FX does not have secondary parameters.
The following secondary Flex effect parameters are available for editing:
- Echo:
o Type: Simple, Duck, or Hold. Use the Simple setting for a standard echo effect. If Duck Echo is selected, the echo effect will be heard only when the deck is muted with the Channel Fader or Crossfader. Use the Hold setting for a standard echo effect with extra feedback; if Hold Echo is selected and the Feedback parameter is set to 100%, the echoes will infinitely recirculate.
o HPF: Sets the cutoff frequency for the echo effect. Any frequencies below the assigned cutoff will be bypassed by the effect.
o Feedback: Sets the level and decay time of the echo.
- Reverb:
Room: Small or Large. The Small setting will simulate the reverb effect of a small room, making for tighter reverberation sounds. The Large setting will simulate the reverb effect of a larger room, making for longer reverberations.
o HPF (High Pass Filter): Sets the cutoff frequency for the reverb effect. Any frequencies below the assigned cutoff will be bypassed by the effect.
- Flanger:
o Feedback: Adjusts the intensity and resonance of the flanger.
o Polarity: Select between POS (positive) and NEG (negative) to adjust the overall harmonics of the flanger.
- Phaser:
o Feedback: Adjusts the intensity and resonance of the phaser.
- Fader FX: When Fader FX is enabled, you can use the channel faders to apply one of the following effects to the audio singal.
Note: When enabled, the channel fader level is "Frozen" at the current position. The Deck Level knobs may be used to adjust the track volume while Fader FX are engaged, if necessary.
o Filter: When moving the channel fader up and down, a filter is applied to the audio signal.
- Type: Sets the type of filter applied: Band Pass, High Pass or Low Pass.
- Roll: When the Effects Toggle is engaged, moving the channel fader up and down will apply a roll as the deck audio continues playing. The Depth Knob controls the mix between the roll and the original audio.
- HPF (High Pass Filter): When set to On, any frequencies below the assigned cutoff will be bypassed by the effect. Set to Off to bypass the filter.
o Pitch: When the Effects Toggle is engaged, moving the channel fader up and down will alter the pitch of the track playing.
- Shift: Sets the type of pitch shifting applied: Up, Up Wide, Down, or Down Wide.
- Scale: Select between Major or Minor scale modes to tune the pitching shifting, or set to Off.
o Ring (Modulator): When the Effects Toggle is engaged, moving the channel fader from the top to the bottom will apply a 50% shift in frequency focus. For instance, at the default Freq setting of 2000, the frequency focus will be 2000 at the top of the channel fader to 1000 at the bottom when Mod is set to Decrease.
- Freq: Sets the base frequency of the ring modulation (800, 1000, 1500, 2000, 4000, or 8000).
- Mod: Select Increase to increase the frequency with the channel fader from top to bottom, or Decrease to decrease the frequency.
o Sine / Sawtooth / Square / Triangle: When the Effects Toggle is engaged, moving the channel fader up and down applies one of these sound waves to the audio signal. The Depth Knob controls the volume of the wave, and the channel fader controls the tone.
- Note: Sets the pitch of the wave (C, D, E, F, G, A or B).
- Octave: Sets the octave of the wave (0–8).
You can also change default Flex FX parameters from Seventy A-Trak Edition's Main Menu. To learn more, see the Main Menu section of this manual.
Pad Modes
This chapter describes the different pad modes. Each deck has eight pads, which are always in one of these modes, and each deck's pads can be in a different mode. Press one of the Pad Mode buttons to enter the corresponding pad mode on that deck. With each press, a Pad Mode button will alternate between a primary and secondary pad mode. When you enter a primary pad mode, the corresponding Pad Mode button will be lit with its primary color. When you enter a secondary pad mode, the corresponding Pad Mode button will be lit red.
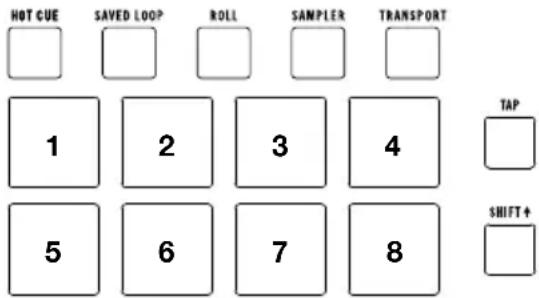
text_image
HOT CUE SAVED LOOP ROLL SAMPLER TRANSPORT 1 2 3 4 TAP 5 6 7 8 SHIFT↑Note: If you would like to increase the brightness of the pads, set Pad > Daytime Mode to On in the Main Menu, which you can access by holding Shift↑ and pressing Tap (see the Main Menu section of this manual for more help navigating the settings).
Hot Cue
In Cue Mode, each pad assigns a hot cue point or returns the track to that hot cue point.
To enter Hot Cue Mode, press Hot Cue so that it lights white (with the other pad mode buttons lit in their primary colors).
To assign a hot cue point, press an unlit Pad at the desired point in your track. The pad will light up when it is assigned (with the corresponding color, if available).
To jump to a hot cue point, press a lit Pad.
To delete an assigned hot cue point, press Shift▲ and the corresponding pad.
Pitch Play
In Pitch Play Mode, each pad plays the track from a hot cue point at a different transposition (adjustable by semitones). The Serato Pitch 'n Time DJ Expansion Pack must be installed to use this mode. See Hot Cue to learn how to assign hot cue points.
Note: A Serato Pitch 'n Time download card with serial number is included with your Seventy A-Trak Edition.
To enter Pitch Play Mode, press Hot Cue so that it lights red.
To select which hot cue point to use, press Shift and a dimly lit Pad.
To select the range of transpositions the pads will use, use the Parameter ◀/▶ buttons (see the diagrams here).
To adjust the key of the current track down or up, press Shift▲ and the Parameter ◀/▶ buttons, respectively.
To play the track from the hot cue point, press a lit Pad. Each pad corresponds to a specific transposition (by semitones), depending on the current range of transposition (see the diagrams here). The pad with no transposition (the original pitch) will be lit white.
Saved Loop
In Saved Loop Mode, each pad triggers a loop previously saved in your software.
To enter Saved Loop Mode, press Saved Loop so that it lights dark blue.
To play a loop, press a lit Pad. Each deck's eight pads will correspond to Saved Loops 1-8 in your software, and the color of each pad will correspond to the color assigned to each loop in your software.
To restart the currently playing loop, press Shift and the corresponding lit Pad.
To halve or double the length of the loop, press the Parameter ◀/▶ buttons.
To shift the loop backward or forward, press Shift and the Parameter ◀/▶ buttons.
Up
| +4 semitones | +5 semitones | +6 semitones | +7 semitones |
| 0 (original pitch) | +1 semitone | +2 semitones | +3 semitones |
Middle
| 0(original pitch) | +1semitone | +2semitones | +3semitones |
| -4semitones | -3semitones | -2semitones | -1semitone |
Down
| -3 semitones | -2 semitones | -1 semitone | 0 (original pitch) |
| -7 semitones | -6 semitones | -5 semitones | -4 semitones |
| 1Saved Loop 1 | 2 Saved Loop 2 | 3 Saved Loop 3 | 4 Saved Loop 4 |
| 5 Saved Loop 5 | 6 Saved Loop 6 | 7 Saved Loop 7 | 8 Saved Loop 8 |
Flip
If you have purchased the Serato Flip Expansion Pack, you can access the Flip control by pressing Saved Loop so that it lights red. If you have not purchased the Flip Expansion Pack, this will be available as a Custom Pad mode.
In this mode, unlit pads have no Flip assigned to them; pads lit blue have a Flip assigned but are not playing; pads lit orange have a Flip assigned and are currently playing.
| Flip 1 | Flip 2 | Flip 3 | Flip 4 | |
| Flip 5 | Flip 6 | No Function | No Function | |
To assign a Flip to a pad, press an unlit pad (1-6).
To play an assigned Flip, press the corresponding blue lit pad (1-6).
To immediately stop playback of a Flip, hold Shift▲ and then press the corresponding orange lit pad (1-6).
To start Flip recording, press the left Parameter ◀ button.
To return to the start of the selected Flip, press the right Parameter ▶ button.
To toggle the Flip Slot Loop, hold Shift↑ and then press the left Parameter ◀ button.
To toggle the Flip Slot on and off, hold Shift↑ and then press the right Parameter ▶ button.
Roll
In Roll Mode, each pad triggers a momentary loop roll. Releasing the pad stops the loop roll and resumes normal playback where the playhead would be if you had not triggered the loop roll (i.e., as if the track had been playing forward the whole time).
Note: Disable Show Beat Jump Controls in the Serato Setup menu to access 8 loop rolls at once. You can also view and edit the set loop sizes in the software.
To enter Roll Mode, press Roll so that it lights aqua.
To trigger a loop roll, press and hold a Pad.
To change which eight lengths for loop rolls are shown (in the software), press either of the Parameter ◀/▶ buttons. The pad layout will shift to match it.
To shift the loop roll backward or forward, press Shift▲ and the Parameter ◀/▶ buttons, respectively.
Sampler
In Sampler Mode, the pads will control the sampler in the software. The pads each trigger a sample at a specified volume (you can assign the sample and its volume in the software).
To enter Sampler Mode, press Sampler so that it lights purple.
To assign a sample, first highlight the desired sample in your library. Then hold Shift and press a pad corresponding to an empty sampler slot. The sampler slot volume can be adjusted in Serato.
To play a sample, press a lit pad. The pad will flash as the sample plays.
To stop playback of a sample, press Shift▲ and a Pad while it plays.
To cycle through the sample banks, press the Parameter ◀/▶ buttons.
To cycle through the Sampler outputs, press Shift▲ and the Parameter ◀/▶ buttons.
Scratch Bank
In Scratch Bank Mode, each pad loads a song to the selected deck. You can assign the song and set the starting point in the software. This is useful for preparing and performing with song samples for scratching.
To enter Scratch Bank Mode, press Sample a second time.
Transport
In Transport Control Mode, the pads correspond to different transport controls. The software will automatically enter Internal Mode when you do this (if you are using a Twelve controller with Seventy A-Trak Edition, the software will always be in Internal Mode).
To enter Transport Mode, press Transport so that it lights green.
To bend the pitch downward temporarily, press Pad 1.
| 1Pitch Bend- | 2Pitch Bend+ | 3Pitch Fader- | 4Pitch Fader+ |
| 5Keylock INT/REL | 6Sync | 7Cue | 8II▶ |
To bend the pitch upward temporarily, press Pad 2.
To move the pitch fader down, press Pad 3.
To move the pitch fader up, press Pad 4.
To enable or disable Keylock, press Pad 5.
To switch between Internal Mode (INT) and Relative Mode (REL), press Shift ^ and Pad 5. (Switching to Relative Mode will allow you to resume control of playback with control vinyl or control CDs.)
To activate Sync, press Pad 6. Press Shift↑ and Pad 6 to deactivate sync.
To skip to the cue point, press Pad 7.
To play or pause the track, press Pad 8.
Custom Pad Sets
Seventy A-Trak Edition comes with two customizable pad modes. For these modes, you can use Serato DJ Pro's MIDI mapping feature to program the Performance Pads to trigger functions of your choosing.
To enter a custom pad mode, press either Roll or Transport so that the button lights red.
Note: You may need to set Pad > User Modes to On in the Main Menu, which you can access by holding Shift ^ and pressing Tap (see the Main Menu section of this manual for more help navigating the settings). If this setting is not On, the custom pad modes will not be accessible.
To create a custom pad set:
- While connected to Serato DJ Pro, make sure that Seventy A-Trak Edition is entered into one of the two custom pad modes (as described above).
- In Serato DJ Pro, open the Setup menu and select MIDI.
- Select Seventy A-Trak Edition and make sure that Allow Serato DJ Hardware Remapping is enabled. Close the Setup window.
- In the main Serato DJ Pro window, click the MIDI button at the top of the screen to begin mapping.
- Click a feature in Serato DJ Pro, then touch or move a control on your hardware to map the feature to that control.
See the Serato DJ Pro manual for more information on MIDI mapping.
Main Menu
The Seventy A-Trak Edition comes with various settings that you can edit and save in order to customize the mixer's operation. Settings can be edited in the Main Menu, which can be viewed on the Display.
Navigating the Main Menu

text_image
MAIN MENU SETTINGS CUT-IN ADJUST FLEX FX SOFTWARE FXTo enter or exit the Main Menu on the Display, hold Shift▲ and press the Tap button.
To highlight pages or settings in the menu, push the FX Joystick up and down.
To select pages in the menu, press the Parameter Knob.
To go back one page in the menu, push the FX Joystick to the left.
To edit settings in one of the menu pages, turn the Parameter Knob while the setting is highlighted.
To save your changes to a setting, press the Parameter Knob while the setting is highlighted.
Menu Options
The Main Menu contains the following pages and options:
Settings: Select this page to adjust settings for some of the mixer's audio controls:
- Audio:
o Main Out: Determines whether the main mix is in stereo or mono.
- Mix Pan: Controls the left-right balance of the main mix signal.
- Deck 1 and Deck 2:
- PH Sens (Phono Sensitivity): If connecting a turntable to a deck's PH/CD In, use this setting to make sure that the turntable functions optimally with Seventy A-Trak Edition. Set the input sensitivity level (2.5 mV – 10.0 mV) to the setting recommended by your turntable cartridge's manufacturer.
- Tone XOver: Use this setting to edit the range of frequencies controlled by each of the deck's EQ knobs. If 150/6K is selected, the Low EQ Knob will control frequencies below 150 Hz, the Mid EQ Knob will control frequencies between 150 Hz and 6000 Hz, and the High EQ Knob will control frequencies over 6000 Hz. If 300/3K is selected the Low EQ Knob will control frequencies below 300 Hz, the Mid EQ Knob will control frequencies between 300 and 3000 Hz, and the High EQ Knob will control frequencies above 3000 Hz.
- Pan: Use this setting to adjust the left-right balance of the deck's signal within the main mix.
- DVS Input: If you are connecting Seventy A-Trak Edition to an external device (such as a vinyl turntable) in order to control Serato DJ Pro with Serato DVS, you can use this setting to determine which of Seventy A-Trak Edition's inputs is recognized by Serato DJ Pro as the control source: PH/CD (the Deck PH/CD In) or AUX (the Deck Aux In).
- Filter:
- Deck1 and Deck2 Res: Use this setting to increase or decrease the amount of resonance effect heard when the filter is used.
o LPF Min: The cutoff frequency for the LOW position of the filter knobs. At FULL CUT, the LOW position will silence the deck.
HPF Max: The cutoff frequency for the HI position of the filter knobs. At FULL CUT, the HI position will silence the deck.
- Pad:
o Sensitivity: Adjusts how hard you need to strike the Performance Pads in order for them to perform their assigned functions. The lower the setting, the harder you have to strike the pad.
User Modes: Turns On or Off the ability to access the two custom pad modes. See Pad Modes > Custom Pad Sets to learn more about the custom modes.
Daytime Mode: Turning this setting On increases the brightness of the Performance Pad LEDs.
- Headphone:
○ Tone: Adjusts the balance of low and high frequencies sent out the Headphone Outputs. Turn the Parameter Knob to the left for more low (L) frequencies or to the right for more high (H) frequencies.
- Mic 1:
○ Echo Fdbk: Increases or decreases the amount of audible feedback effect when the Mic 1 Echo is activated.
- Duck Thres: This setting (Low, Med, or High) adjusts how much microphone input volume is required in order for the main mix volume to be decreased (or "ducked" under the mic audio). The higher the setting, the louder you have to speak in the microphone in order for the main mix to be ducked.
- Duck Hold: This setting determines how long the main mix volume will remain ducked after you stop using the microphone.
- Clean Feed: When this setting is On, Serato DJ Pro will not receive audio from the Seventy A-Trak Edition's Mic 1 Input while recording is in progress. This way, you can record your live DJ set and still use the microphone without it affecting the recorded mix.
- Sync: Select this option to determine the default mode for each deck's Sync button:
Normal: In this mode, press the button to automatically sync the deck's tempo with the other deck. Hold Shift▲ and press the button to deactivate sync.
o Instant Doubles: In this mode, press the button to load the deck's track to the other deck.
- Silent Cue: In this mode, press the button to mute the deck. You can use this feature to silence a track before selecting a hot cue for playback with the Performance Pads (the deck will unmute as the cued audio begins playing). You can also unmute the deck by holding Shift and pressing the button (the track's playhead will be unaffected).
- Defaults: Select this option to restore all of the settings in the Settings page to their factory default values.
Cut-In Adjust: Select this page to enter the Cut-In Adjust setup menu:
- Deck 1 and Deck 2: Set these between 0 and 16 to determine the amount of dead space between the closed and open positions of the deck's fader. The higher the setting, the higher you have to push the Channel Fader in order for any audio to be heard.
- XFader L and XFader R: Set these between 0 and 16 to determine the amount of dead space between the Crossfader's closed and open positions. The higher the setting, the further you have to push the Crossfader toward the center position in order for any audio to be heard.
Flex FX: Select this page to view and edit the internal Flex FX settings:
- Beats: Select this option to determine the increments in which the Flex FX beat division parameter can be adjusted:
○ In Extended Mode, you can set Flex FX to standard timings ranging from 1/32 to 32 beats as well as dotted and triplet variants of each of these timings. - In Simple Mode, which is the factory default, you can set Flex FX beats only to standard timings (no triplet or dotted timings).
- In No Dotted Mode, the Flex FX beats include standard timings and triplets but no dotted timings.
- In No Triplet Mode, the Flex FX beats include standard and dotted timings but no triplets.
- Echo, Reverb, Brake, Flanger, Phaser, and Fader FX: Select one of these pages to edit a Flex effect's parameters. When you save a change to an effect parameter here, it will be made the default setting for whenever you select the effect. To learn more about Flex FX parameters, see the Effects section.
- Defaults: Select this option to restore all of the Flex FX settings to their factory default values.
Software FX: Select this page to adjust how Serato DJ Pro's software effects function with the Seventy A-Trak Edition:
- Multi FX: Setting this to On will enable you to use stacked software effects (as described in the Effects section).
- Mix Flex FX: Setting this to On will enable you to combine software effects with a Flex effect (as described in the Effects section).
- USB Insert: When set to Auto, any software effect will be muted as soon as you deselect it with the FX button, thus decreasing overall latency (which is beneficial for scratching). When set to On, deselected software effects may have an audible "tail" as they gradually decay (depending on the effect).
Version: Select this page to check which firmware version is currently installed on your Seventy A-Trak Edition.
Factory Reset: Select this to reset all of Seventy A-Trak Edition's settings to their factory default values.
Control Panel
The Rane Control Panel allows you to adjust settings on your Seventy A-Trak Edition mixer and save and load these settings to a file (.r72) on your computer. Using settings files lets you maintain several different control configurations to use in different situations.
To manage settings files, navigate to the Settings section of the Rane Control Panel, under the General tab.
- Load: Select this to locate and load a Seventy A-Trak Edition settings file (.r72) on your computer to the Control Panel.
- Save: Select this to save the mixer's settings to your computer as a Seventy A-Trak Edition settings file (.r72).
You can also use the Rane Control Panel to calibrate the faders on your Seventy A-Trak Edition:
- Make sure your Seventy A-Trak Edition is powered on and connected to an available port on your computer using a USB cable.
- Open the Rane Control Panel.
- Go to File > Fader Calibration.
- Follow the instructions on screen to select the desired fader and calibrate it. You will be prompted once the calibration is successful.

text_image
Detected Device only Two Select Dias Input 1/2 Main Data: Stereo Mina Headphone Tone: Low High Mix 1 Chain Feed: Or CT Filter Resonance: 0% 100% HSD Part Status: A B Active Level Footswitch 1: RMS Footswitch 2: RMS Footswitch 3: RMS Fader Cut in CHL 1 CHL 2 Consolator Left Consolator Right Settings Driver Load Save Open Drive Settings
text_image
Fader Calibration Select Fader to Calibrate DECK 1 CROSSFADER DECK 2 This fader has successfully calibrated. You can verify the calibration using the slider below. 0 127 MIN 127 MAXtext_image
Fader Calibration Select Fader to Calibrate DECK 1 CROSSFADER DECK 2 This fader has successfully calibrated. You can verify the calibration using the slider below. 0 127 MIN 127 MAXother
| Module | Value | | --- | --- | | LPF PHASER REVERB | 102.9 | | HPF FLANGER ECHO | 140.0 | | Flèche indicatrice | Not labeled (implied by arrow) |text_image
REVERB ROOM HPF LARGE 60.0 Hztext_image
3 Device: Sewampy-Tone General Clock Inputs 1/2 Main Out Status: None Headphone Tone Low High Min 1 Cloud Tone On Ctrl Fiber Sequence 0% 100% Fader Cut In CH: 1 CH: 2 Crossover Left Crossover Right Settings Load Start Open Driver Settings RANGE USB Port Status: A Active Local: Footswitch 1: 1000 Footswitch 2: 1000 Footswitch 3: 1000text_image
Select Fader to Calibrate DECK 1 GROSSFADER DECK 2 This fader has successfully calibrated. You can verify the calibration using the slider below. 0 MIN 127 MAX 127text_image
RANE Δ·TRAK Secure SIGNATURE EDITION 14 TOWEVE DECK-2 13 PI SOU 9 8 8 MIC 11 LIN MIC MAIN OUT RIGHT LEFT SESSION OUT IN L L L L L L L L L L L L L L L L L L L L L L L L L L L L L L L L L L L L L L L L L L L L L L L L L L MIC-1 LIN MIC 11 LIN MICLoop salvato (Saved Loop)
| Bend del pitch- | Bend del pitch+ | Fader del pitch- | Fader del pitch+ |
| Keylock INT/REL | Sync | Cue | II ▶ |
text_image
Detected Device: Severity General Dock Input 1-2 USB Port Status: A B Active: ● Local: ● Meln Out: ○ Stereo ○ None Headphone Tone: Low High Mix 1 Clean Feed: ○ On OFF Filter Resonance: 8 % 100 % Footswitch 1: MDI Footswitch 2: MDI Footswitch 3: MDI Fader Cut in CCL 1: CCL 2: Crosshister Left: Crosshister Right: Settings Load Save Open Driver Settings
text_image
Fader Calibration Select Fader to Calibrate DECK 1 CROSSFADER DECK 2 This fader has successfully calibrated. You can verify the calibration using the slider below. 0 127 MIN 127 MAX| Pitch-Bend- | Pitch-Bend+ | Pitch-Fader- | Pitch-Fader+ |
| KeylockINT/REL | Sync | Cue | II▶ |
text_image
Detected Device: Severity Overall Desh Input 1/2 Main Out: Stress None Headphone Tone: Low High Mix 1 Clean Feed: On Off Filter Resonance: 8 % 100 % Feder Cut In OIL 1: OIL 2: Crossfader Left: Crossfader Right: Settings LOAD Save Open Driver Settings USB Port Status: A B Active: ● Local: ● Footswitch 1: MIDI Footswitch 2: MIDI Footswitch 3: MIDItext_image
Fader Calibration Select Fader to Calibrate DECK 1 CROSSFADER DECK 2 This fader has successfully calibrated. You can verify the calibration using the slider below. 0 127 MIN 127 MAXAppendix (English)
Technical Specifications
Specifications are subject to change without notice.
| Digital Audio | ||
| Converters | AKM High Definition Audio; 24-bit PCM, 48 kHz | |
| Digital Signal Processing | 32-bit, floating point, double precision | |
| Dynamic Range(A-weighted, unity gain) | ADC | 114 dB |
| DAC | 114 dB | |
| CD Input to Analog Output | 111 dB | |
| CD Input to USB Output | 114 dB | |
| USB Input to Analog Output | 114 dB | |
| Inputs | ||
| Microphone 1/2(Combo XLR/1/4" [6.35 mm] TRS, Mic/Line switchable) | Analog Gain | 30 dB (Mic), 4.75 dB (Line) |
| Maximum Input | 0.126 Vrms (Mic), 2.3 Vrms (Line) | |
| Gain Trim | Off to +20 dB (unity at center) | |
| Aux Inputs 1/2(RCA stereo pairs) | Maximum Input | 4 Vrms |
| Dynamic Range (A-weighted) | 114 dB | |
| CD/Phono Inputs 1/2(RCA stereo pairs, switchable) | CD | Line |
| Maximum Input | 4 Vrms | |
| Dynamic Range (A-weighted) | 114 dB | |
| Phono | RIAA | |
| RIAA Curve | +0.1/-0.2 dB | |
| Gain (@ 1 kHz) | 30 dB | |
| Maximum Input (@ 1 kHz) | 126 mV | |
| Session Input(RCA stereo pair) | Maximum Input | 4 Vrms |
| Dynamic Range (A-weighted) | 114 dB | |
| Outputs | ||
| Main Outputs(XLR) | Frequency Response | 20 Hz to 20 kHz (± 0.2 dB) |
| Maximum Output | 8 Vrms | |
| THD+N (@ 1 kHz, 4 Vrms) | 0.002% | |
| Booth Outputs(1/4"/6.35 mm TRS) | Frequency Response | 20 Hz to 20 kHz (± 0.2 dB) |
| Maximum Output | 8 Vrms | |
| THD+N (@ 1 kHz, 4 Vrms) | 0.002% | |
| Session Outputs(RCA stereo pair) | Frequency Response | 20 Hz to 20 kHz (± 0.2 dB) |
| Maximum Output | 4 Vrms | |
| THD+N (@ 1 kHz, 2 Vrms) | 0.002% | |
| Headphone Outputs(1/4"/6.35 mm and 1/8"/3.5 mm TRS) | Maximum Output Voltage | 4 V (no load) |
| THD+N (@ 1 kHz, 2 Vrms) | 0.003% | |
| Output Power | 96 mW (50 ohms) | |
| Controls | On/Off muting | |
| General | ||
| Display | 1.6” OLED (diagonal) | |
| Pads | (16) velocity-sensitive multi-color back-lit pads (8 per deck, 10 modes each) | |
| Faders | (3) MAG FOUR tension-adjustable faders (2 channel/line faders, 1 crossfader) | |
| Connectors | (2) XLR outputs (Main)(2) 1/4” (6.35 mm) TRS outputs (Booth)(4) RCA stereo input pairs (Deck 1-2)(2) XLR / 1/4” (6.35 mm) TRS inputs (Mic 1-2)(1) RCA stereo input pair (Session)(1) RCA stereo output pair (Session)(1) 1/4” (6.35 mm) TRS output (Headphones)(1) 1/8” (3.5 mm) TRS output (Headphones)(1) 1/4” (6.35 mm) TRS input (Footswitch)(2) USB Type-A ports (Deck 1-2 USB Controllers)(2) USB Type-B ports(1) IEC power cable input | |
| Power Connection: IEC | Voltage: 100-240 V, 50/60 HzConsumption: 30 W | |
| Dimensions(width x depth x height) | 11.2” x 17.5” x 4.13”285 x 445 x 105 mm | |
| Weight | 12.3 lbs.5.6 kg | |
Trademarks & Licenses
Rane is a trademark of inMusic Brands, Inc., registered in the U.S. and other countries.
Serato, Serato DJ Pro, NoiseMap and the Serato logo are registered trademarks of Serato Audio Research. Windows is a registered trademark of Microsoft Corporation in the United States and other countries.
All other product names, company names, trademarks, or trade names are those of their respective owners.
rane.com