
TTM57mkII - DJ Equipment Rane - Free user manual and instructions
Find the device manual for free TTM57mkII Rane in PDF.


| Type | Professional DJ Mixer |
| Channels | 4 (2 phono/line, 2 line) |
| Dimensions (W x H x D) | 322 x 112 x 274 mm (12.7 x 4.4 x 10.8 in) |
| Weight | 3.4 kg (7.5 lb) |
| Power Supply | External AC adapter 100-240V AC, 50/60Hz |
| Power Consumption | 15W typical |
| Inputs | 2 x Phono (RCA), 2 x Line (RCA), 2 x Mic (XLR/1/4") |
| Outputs | Main XLR balanced, Booth (1/4"), Record (RCA), Headphone (1/4") |
| EQ | 3-band (High, Mid, Low) per channel, kill switches |
| Crossfader | Magnetic, contour adjustable, replaceable |
| Frequency Response | 20Hz - 20kHz ±0.5dB |
| Signal-to-Noise Ratio | >90dB (line) |
| Total Harmonic Distortion | <0.01% |
| MIDI Control | USB MIDI for software control (Serato, etc.) |
| Faders | Channel faders: 45mm conductive plastic |
| Phono Preamp | RIAA equalization for turntables |
| Maintenance | Clean with dry cloth; avoid liquids; use compressed air for faders |
| Safety | Do not expose to moisture; use only supplied adapter; disconnect when not in use |
| Spare Parts | Crossfader, knobs, faders available via Rane service centers |
| Reparability | Modular design; service manual available from Rane |
| General Information | Model: TTM57mkII, Brand: Rane, Origin: USA |
Frequently Asked Questions - TTM57mkII Rane
User questions about TTM57mkII Rane
0 question about this device. Answer the ones you know or ask your own.
Ask a new question about this device
Download the instructions for your DJ Equipment in PDF format for free! Find your manual TTM57mkII - Rane and take your electronic device back in hand. On this page are published all the documents necessary for the use of your device. TTM57mkII by Rane.
USER MANUAL TTM57mkII Rane
natural_image
Isometric line drawing of a rectangular electronic device with multiple cylindrical components and mounting holes (no text or symbols)RANE TTM57mkII MIXER MANUAL
OWNER'S MANUAL
Important Safety Instructions
- Read these instructions.
- Keep these instructions.
- Heed all warnings.
- Follow all instructions.
- Do not use this apparatus near water.
- Clean only with a dry cloth.
- Do not block any ventilation openings. Install in accordance with manufacturer's instructions.
- Do not install near any heat sources such as radiators, registers, stoves, or other apparatus (including amplifiers) that produce heat.
- Do not defeat the safety purpose of the polarized or grounding-type plug. A polarized plug has two blades with one wider than the other. A grounding-type plug has two blades and a third grounding prong. The wide blade or third prong is provided for your safety. If the provided plug does not fit into your outlet, consult an electrician for replacement of the obsolete outlet.
- Protect the power cord and plug from being walked on or pinched particularly at plugs, convenience receptacles, and the point where it exits from the apparatus.
- Only use attachments and accessories specified by Rane.
- Use only with the cart, stand, tripod, bracket, or table specified by the manufacturer, or sold with the apparatus. When a cart is used, use caution when moving the cart/apparatus combination to avoid injury from tip-over.
- Unplug this apparatus during lightning storms or when unused for long periods of time.
- Refer all servicing to qualified service personnel. Servicing is required when the apparatus has been damaged in any way, such as power supply cord or plug is damaged, liquid has been spilled or objects have fallen into the apparatus, the apparatus has been exposed to rain or moisture, does not operate normally, or has been dropped.
- The plug on the power cord is the AC mains disconnect device and must remain readily operable. To completely disconnect this apparatus from the AC mains, disconnect the power supply cord plug from the AC receptacle.
- This apparatus shall be connected to a mains socket outlet with a protective earthing connection.
- When permanently connected, an all-pole mains switch with a contact separation of at least 3 mm in each pole shall be incorporated in the electrical installation of the building.
- If rackmounting, provide adequate ventilation. Equipment may be located above or below this apparatus, but some equipment (like large power amplifiers) may cause an unacceptable amount of hum or may generate too much heat and degrade the performance of this apparatus.
- This apparatus may be installed in an industry standard equipment rack. Use screws through all mounting holes to provide the best support.
WARNING: To reduce the risk of fire or electric shock, do not expose this apparatus to rain or moisture. Apparatus shall not be exposed to dripping or splashing and no objects filled with liquids, such as vases, shall be placed on the apparatus.
WARNING
CAUTION
RISK OF ELECTRIC SHOCK DO NOT OPEN

ATTENTION: RISQUE DE CHOCS ELECTRIQUE - NE PAS OUVRIR
To reduce the risk of electrical shock, do not open the unit. No user serviceable parts inside. Refer servicing to qualified service personnel.
The symbols shown below are internationally accepted symbols that warn of potential hazards with electrical products.

This symbol indicates that a dangerous voltage constituting a risk of electric shock is present within this unit.

This symbol indicates that there are important operating and maintenance instructions in the literature accompanying this unit.
WARNING: This product may contain chemicals known to the State of California to cause cancer, or birth defects or other reproductive harm.
NOTE: This equipment has been tested and found to comply with the limits for a Class B digital device, pursuant to part 15 of the FCC Rules. These limits are designed to provide reasonable protection against harmful interference in a residential installation. This equipment generates, uses and can radiate radio frequency energy and, if not installed and used in accordance with the instructions, may cause harmful interference to radio communications. However, there is no guarantee that interference will not occur in a particular installation. If this equipment does cause harmful interference to radio or television reception, which can be determined by turning the equipment off and on, the user is encouraged to try to correct the interference by one or more of the following measures:
- Reorient or relocate the receiving antenna.
- Increase the separation between the equipment and receiver.
- Connect the equipment into an outlet on a circuit different from that to which the receiver is connected.
- Consult the dealer or an experienced radio/TV technician for help.
CAUTION: Changes or modifications not expressly approved by Rane Corporation could void the user's authority to operate the equipment. CAN ICES-3 (B)/NMB-3(B)
RANE
TTM57mkII

OWNER'S MANUAL
©2015 Rane Corporation. All rights reserved. Serato DJ and Scratch Live are trademarks of Serato. Trademarked in the United States and other countries. This software is based in part on the work of the Independent JPEG Group, and uses libpng code, copyright © 2000-2002 Glenn Randers-Pehrson. The Serato NoiseMap™ Control Tone, the audio pressed on Serato Control vinyl and Control CDs, is copyright ©2004-2015 Serato. The Control Vinyl and Control CDs are licensed for personal use only. The creation of personal backups of the Control CD is allowed, however duplicating Control CDs for commercial benefit is strictly prohibited. For avoidance of doubt the duplication or creation of Control vinyl for any use is strictly prohibited. Please respect our copyright. Windows® is a registered trademark of Microsoft Corporation in the United States and other countries. Apple, Mac, Macintosh, iTunes, Safari, QuickTime, GarageBand, and OSX are registered trademarks of Apple Inc., registered in the United States and other countries.
Check List
These items are included in the box:
• TTM57mkII Mixer.
• Serato DJ software and drivers install disc.
• 2 (two) control CDs.
• 2 (two) control records.
- USB cable.
- IEC C5 line cord.
• Serato DJ Software Manual.
• This TTM57mkII Mixer Manual.
Wear Parts
The TTM57mkII Mixer contains no wear parts. The control vinyl records and CDs are wear parts as described in "Limited Warranties" on page 33.
OWNER'S MANUAL
Contents
2 Important Safety Instructions
4 Copyright Notices
4 Check List
6 TTM57mkII Overview
7 Quick Start: Software
8 Quick Start: Hardware
9 Quick Start: Operation
10 Audio Connections
11 Two USB Ports
12 Deck Input Channels
12 Source
12 Gain
12 Tone Controls and Kill Buttons
13 Filter
13 FlexFX
13 Mic Input
13 Session In and Out
13 ⇔ Aux
14 Main and Booth
14 Headphone Cue
14 Channel Faders & Crossfader
15 Software Controls
15 FX encoder, On & Shift buttons
15 Loop encoder and Roll button
16 Library encoder and Shift button
16 Transform Joystick
16 Cues / Samples control
17 Footswitch Jack
18 DJ Changeover
19 Class Compliant USB Ports
19 Rane Control Panel
19 Settings
19 Firmware
20 Deck Inputs 1-2 Control Panel
21 General Control Panel
22 MIDI Mapping
22 MIDI Implementation Chart
28 RGB & Red-Green LEDs
29 RGB Color Palette
29 Red-Green Color Palette
29 Backlight Specification
30 Magnetic Fader Maintenance
30 Fader Assembly Removal
30 Fader Cleaning
31 Fader Calibration
31 Fader Replacement
32 Technical Specifications
33 Limited Warranties
33 Factory Authorized Service
33 Limited U.S.A. Warranty
33 Limited Warranty Outside the U.S.A.
35 Declaration of Conformity
OWNER'S MANUAL
TTM57mkII Overview
The Mic input can be switched for a regular dynamic mic or to line-level for a wireless mic. It has its own meter, Level and a one-knob tone control.
Two Program buses with Gain trim and meters:
- Select USB Port A or B computer playback.
- Select Two Phono / CD deck Inputs.
- Select Two Aux line-level Inputs.
• 3-band full-cut tone controls with kill switches. - Sweepable Low / High-pass effect Filter.
Level control for each Output:
- Main Outputs on XLR
- Booth Outputs on TRS
• Session Outputs on RCA
The FlexFX external FX Loop can assign the Left Deck, Right Deck or Both to an external analog FX Loop, independent of USB software FX inserts.
The USB Aux Input is usually from the Serato SP-6 Sample Player, with it's own Level control, Low / High-pass sweep Filter and headphone cue. The USB Cue overrides the Deck Cue when on.
Channel Swap switches the left or right fader between Deck 1 and Deck 2. Contour controls adjust the faders and crossfader for a smooth transition or a fast cut. Faders can be individually reversed.
The Crossfader and channel faders are Rane's famous and dependable no-noise, no-bleed, no-contact magnetic faders.
The front panel accepts either 3.5mm or 1/4" headphone plugs. A footswitch (optional) can be connected to access learned MIDI functions.
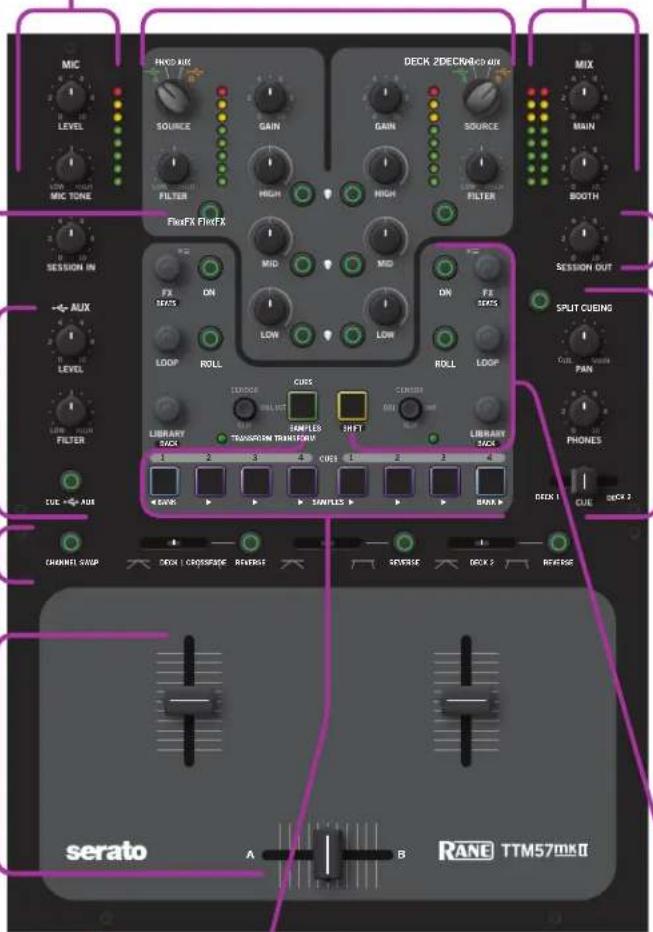
Session Input (opposite side) can connect an output from another mixer, or use it as another auxiliary input. Session Output connects to an input of another mixer, to connect two mixers together.
True Split Cue or Stereo Cue with classic Left Deck and Right Deck slide control.
Direct control of Serato DJ Decks:
- Software FX on/off button.
• FX knob parameter adjustment:
- Press to select the FX.
- Hold SHIFT to change the Beats multiplier.
- LOOP knob selects loop length.
- Press it to engage Auto Loop.
- Hold ROLL for Loop Roll.
- LIBRARY knob scrolls songs or crates, press to load.
-
Hold SHIFT to tab between song and crate selection.
• TRANSFORM joystick: -
Press for Transform on/off.
- Transform on: any direction cuts the audio.
- Transform off: multifunction software control (gray text).
Direct control of Serato DJ Cues and Samples:
- CUES / SAMPLES button toggles between Cues (red) and Samples (green).
-
Cue 1-4 or 5-8 for each Deck. The active USB follows the Deck source selection.
-
Lit button colors match the Cue colors in Serato DJ software.
- Press an un-lit button to create a new Cue. Hold SHIFT to delete a Cue.
- Six Sample triggers with Bank up (A-B-C-D) and Bank down (D-C-B-A) selectors.
- Lit button (purple) indicates a ready-to-play sample in Serato DJ.
RANE
TTM57mkII
Quick Start: Software
Before using your mixer, at least read this short section for the basics. Read the complete manual to get the best investment from your new TTM57mkII. This section will help get you started with one computer.
Class Compliant Audio and MIDI
The USB ports are 100% class compliant, allowing hook-up to any Mac OSX computer without the need for an additional driver. A high-performance ASIO driver is installed with the Serato DJ installer to run most Windows DAW and DJ software. A TTM57mkII control panel delivering additional mixer options is installed with the Serato DJ installer on both Mac and Windows. MIDI end points are class compliant with both OSX and Windows devices. See "Class Compliant USB Ports" on page 19.
Serato DJ Software Installation for Mac OSX
Before installing, we recommend you check for a newer version of Serato DJ at serato.com/dj/ downloads and install the latest version if it is newer than the version on the CD-ROM that comes with your mixer.



- Insert the Serato DJ Installer CD-ROM that came with your unit, -or-
browse using Finder to the location where the Serato DJ download was saved.
- Double-click the Serato DJ .dmg installer file.
- The software EULA screen will appear - read the License Agreement, then click Agree.
- The disk image mounts and opens the actions folder, once this is finished you can unmount the disk image and launch Serato DJ.
- Drag the Serato DJ application icon to the Applications folder alias.
- You may then need to enter your User Password to authenticate.
- Serato DJ will now copy to the Applications folder, once this is finished you can unmount the disk image and launch Serato DJ.
Serato DJ Software Installation for Windows
Before installing, we recommend you download and install the latest Serato DJ version from serato.com/dj/downloads if it is newer than the version on the CD-ROM that comes with your mixer.
- Insert the Serato DJ Installer CD-ROM that came with your unit, -or-
browse using Windows Explorer to the location where the Serato DJ download installer was saved.
- Double click the SeratoDJ_installer.exe file.
- Accept the Security Warning and click "Run".
- The installer introduction screen will appear, click Next.
- Read the License Agreement, then tick "I agree to the license terms and conditions," then click Install.
- If a User Account Control window appears, click Yes.
- Serato DJ will now perform a standard installation.
- The installation is now complete. You can now click Close.
NOTE: A shortcut will be also created on your desktop.
When you first connect your TTM57mkII Mixer via USB in Windows, you may see a request to install drivers. Accept the request and allow the driver installation to proceed. After drivers are installed, a TTM57mkII control panel will be available, and your software will recognize the mixer.
After Serato DJ is installed, you will be prompted to "Install Driver" in the Online Panel if you connect a new compatible device that has not already had its driver installed.
RANE
TTM57mkII
OWNER'S MANUAL
Quick Start: Hardware
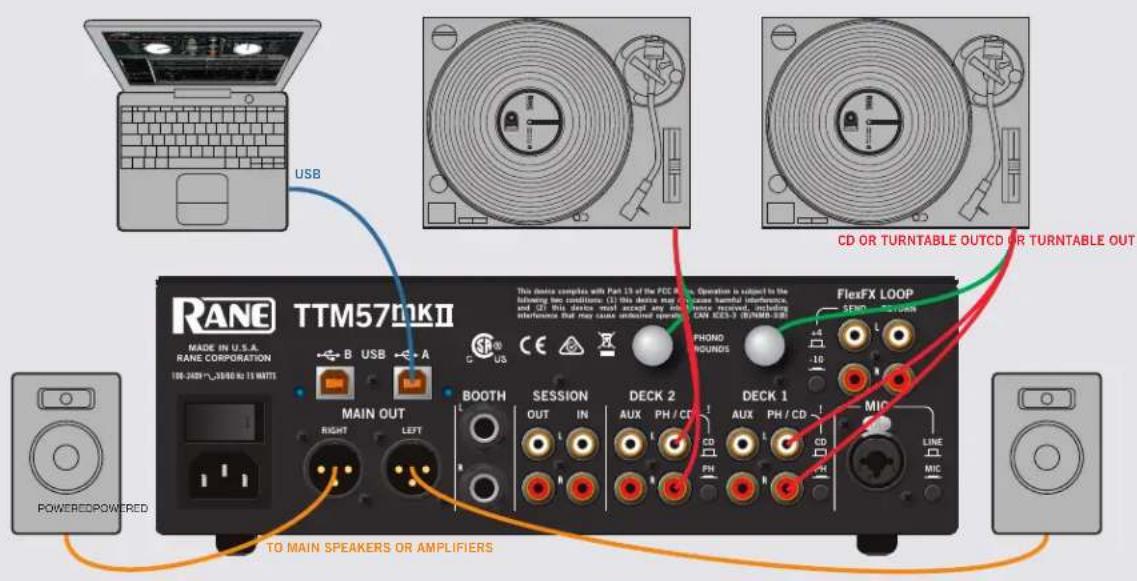
This guide will help you get your decks connected and music playing on one computer. Leave the power off until your decks and amplifiers are connected.
- Connect your Left deck's RCA cables to DECK 1 PH / CD.
- If it's a CD player, release the CD button next to these jacks so it's out.
- If it's a turntable, push the CD button next to these jacks so it's in. Secure the ground wire to a Phono Ground terminal.
- Set the SOURCE selector for DECK 1. This lets the left PH / CD 1 deck play directly.
To play from Serato DJ, choose A.
- Connect your Right deck's RCA cables to DECK 2 PH / CD.
- Select CD or PH as in step 1.
- Set the SOURCE selector for DECK 2. This lets the right PH / CD 2 deck play directly.
To play from Serato DJ, choose A.
-
Connect one of the outputs to amplifiers or powered speakers.
-
Main Out is on a pair of balanced XLR jacks with pin 2 "hot" per AES standards.
- Booth Out is on a pair of balanced 1/4 " TRS (tip-ring-sleeve) jacks.
- Session Out is on a pair of unbalanced RCA jacks.
The Main, Booth and Session outputs arrive from the same "Main Mix" signal. Main, Booth and Session outputs each have their own LEVEL control. Because all signals are identical, you may use any of these outputs as the "Main" output if a different cable type is required to your speaker amplifiers.
Rane recommends balanced wiring (3-conductor) for the strongest signal and rejection of hum and noise. If your cable to the destination is less than 10 feet (3 meters), you can often get away with an unbalanced cable. See the RaneNote "Sound System Interconnection" at rane.com for cable wiring recommendations.
RANE
TTM57mkII
Quick Start: Operation
Calibrating Serato DJ for Control Vinyl or CD
Since Serato DJ is controlled by an analog signal, there is no guarantee of what state that signal will be in by the time the software gets to interpret it. Therefore, Serato DJ needs to be able to handle a wide range of signals, and be configurable to use them optimally. Calibrating is just configuring the software to your situation. Calibration is equally important for both vinyl and CD users of Serato DJ.
There are two parts to the Serato DJ Control Vinyl: The directional tone, and the NoiseMap™. Listening to the control vinyl, the directional tone is the 1 kHz tone. The noise map sounds like random noise over the top of the tone. The directional tone provides the current speed and direction of the record, while the noise map tells the software precisely where on the record the needle is currently.
The Noise Sensitivity slider lets you adjust the noise threshold. A threshold is a lower limit, below which a process will not occur. In the case of Serato DJ, the noise threshold is the limit below which the input signal will not be interpreted as control signal; in other words if it's below the threshold, it is considered noise and ignored.
This setting is necessary because a stylus is very sensitive, and will inevitably pick up noise from the environment as well as the signal on the record, especially in the noisy environment of a live show.
How To Calibrate Serato DJ
With music playing in the background through your system or booth output, put your needle on the record with the turntable stopped. If you are using CD players, the same rules apply. Have the CD deck paused or stopped while calibrating.
Click and hold the estimate button until the slider stops moving. Moving the Noise Sensitivity slider to the left will make Serato DJ more sensitive to slow record movement, but also more sensitive to background noise.
Repeat the process for each deck.
Things to remember:
- Your needle must be on the record.
- Your turntable (or CD player) must be stationary.
- The background music playing must be at a similar level to which you will play your set at.
- Calibrate Serato DJ every time you play.
TIP: If the slider jumps to the far right, then you have a problem with noise in your turntables/CD players/mixer. Check all your connections and make sure your equipment is well earthed. In some situations you will not be able to improve the signal quality, and you will have to play on regardless. In this situation, stick to rel mode.

The Scopes
The scopes on the setup screen in Serato DJ display the input signal as a phase diagram. The key factors to look at on the scope display are crisp clean lines, round shape, and the tracking percentage in the lower right corner.
Start both turntables or CD players. You will see green rings appear in the scope view, as shown above.
For optimal performance the inner ring should be as close to circular as possible. Use the scope Zoom slider to fill the view. Use the scope L/R balance and P/A balance controls to adjust the shape of the inner ring. The number in the top left corner of the scope view gives the current absolute position within the control record or CD. The number in the top right corner is the current speed in RPM. In the bottom left is the current threshold setting, and the number in the bottom right shows the percentage of readable signal – this number should be close to 85% when your system is calibrated properly.
For complete software operating instructions, see the Serato DJ Manual.
RANE
TTM57mkII
Audio Connections
Analog Inputs
Two Phono / CD inputs may each be set for PH or CD using the rear panel buttons, in for a turntable and out for a CD deck. Two more RCA Aux inputs are provided, one for each input channel. This configuration allows you to connect the Aux inputs to a pair of CD decks, while the PH/CD inputs connect to a pair of turntables or two more CD decks. Connect your turntable ground wires to the PHONO GROUNDS posts when using PH inputs.
One stereo Session Input is on a pair of RCA input jacks. This input may connect two mixers together or as a general purpose auxiliary input to the mixer.
The Mic Input will accept an XLR 3-pin plug, a balanced 1/4 " TRS (tip-ring-sleeve) plug or an unbalanced TS (tip-sleeve) plug. This input may be set for Microphone or Line level using the MIC - LINE button on the rear panel. Set this to Line (button out) when connecting a wireless receiver.
A stereo FlexFX Loop Return input is on unbalanced RCA jacks. The FlexFX Return input is normally used along with the FlexFX Send output to connect an outboard analog effects processor.
Phono Sensitivity can be adjusted in the "Deck Inputs 1-2 Control Panel" on page 20.
Analog Outputs
There are five stereo analog outputs available on the mixer:
- MAIN OUT is on a pair of balanced XLR jacks with pin 2 "hot" per AES standards.
- BOOTH OUT is on a pair of balanced 1/4 " TRS jacks.
- SESSION OUT is available on a pair of unbalanced RCA jacks.
- FLEXFX LOOP SEND output is available on a pair of unbalanced RCA jacks. The FlexFX Send output is normally used along with the FLEXFX LOOP RETURN input to connect outboard effects. The +4 / -10 switch changes the send level for your effects device. Typically, RCA connections prefer the -10 setting, and 1/4" devices may sound better with the +4 setting. Consult your effects device manual.
The Main, Booth and Session outputs arrive from the same "Main Mix" signal. Main, Booth and Session outputs each have their own LEVEL control. Because all signals are identical, you may use any of these outputs as the "Main" output if a different cable type is required for system connection.
Rane recommends balanced wiring for the strongest signal and rejection of hum and noise. If your cable to the destination is less than 10 feet (3 meters), you can often get away with an unbalanced cable. See the RaneNote "Sound System Interconnection" at rane.com for cable wiring recommendations.
Power Supply
This mixer features an internal universal switching power supply that operates on any AC mains 100 to 240 VAC, 50 or 60 Hz (most places in the world). The universal supply is a major plus for the traveling DJ, who only needs the right IEC line cord, available from a local electronics store. Though this mixer has turn on/off muting, it's smart to leave the power unplugged until everything else is connected.

RANE
TTM57mkII
Two USB Ports
There are five stereo record channels and five stereo playback channels. These channels are simultaneously available on two USB ports, allowing two computers to share the device. This allows two DJs to play together and supports uninterrupted transitions from one DJ to another.
Rane class-compliant audio compatibility and a Windows ASIO driver allows the TTM57mkII to act as a 10-record 10-playback USB sound card for use with Serato DJ and most DJ and DAW programs. Multiple applications on one or two computers can share the mixer at the same time.
Each of the two USB ports are completely independent. It is possible to run Serato DJ on one computer while running third-party software on the other, Mac or PC. See how to easily share the TTM57mkII in "DJ Changeover" on page 18.

flowchart
graph TD
    A["User Laptop"] --> B["USB RECORD"]
    B --> C["1-2 Left Virtual Deck L&R"]
    B --> D["3-4 Right Virtual Deck L&R"]
    B --> E["5-6 SP-6 Sample Player L&R"]
    B --> F["7-8 Left Virtual Deck FX Return L&R"]
    B --> G["9-10 Right Virtual Deck FX Return L&R"]
    H["x2 USB Ports"] --> I["USB PLAYBACK"]
    I --> J["1-2 Deck 1 record L&R (DVS control or audio)"]
    I --> K["3-4 Deck 2 record L&R (DVS control or audio)"]
    I --> L["5-6 Main Mix Record L&R"]
    I --> M["7-8 Deck 1 FX send, or post-fader record L&R"]
    I --> N["9-10 Deck 2 FX send, or post-fader record L&R"]
USB Playback Stereo Pair Serato DJ Description Mixer Use
| 1 1-2 Left Virtual Deck Output | Select as Deck 1 Source from ⇌ A or ➕ | ||
| 2 3-4 Right Virtual Deck Output | Select as Deck 2 Source from ⇌ A or ➕ | ||
| 3 5-6 SP-6 Output Option | → AUX Source | ||
| 4 7-8 Left Deck FX Return to the Mixer Deck 1 FX Return | |||
| 5 9-10 Right Deck FX Return to the Mixer Deck 2 FX Return | |||
| USB Record | |||
| 1 | 1-2 | Record or DVS Control for Left Deck | Deck 1 Pre-fader; Record PH/CD 1 or AUX 1* |
| 2 3-4 Record or DVS Control for | Right Deck | Deck 2 Pre-fader; Record PH/CD 2 or AUX 2* | |
| 3 5-6 Record the Main Mix | Main Mix Output, Pre-Level control. | ||
| 4 | 7-8 | Left Deck FX Send from the Mixer | Deck 1 Post-fader; Send to Deck 1 FX |
| 5 | 9-10 | Right Deck FX Send from the Mixer | Deck 2 Post-fader; Send to Deck 2 FX |
*Select the USB Record Source in the "Deck Inputs 1-2 Control Panel" on page 20.
RANE
TTM57mkII
Deck Input Channels
Source
The SOURCE selector for DECK 1 selects one of four sources:
• A Left Virtual Deck (USB stereo playback pair 1-2) from USB A.
- Assigns MIDI controls for the Left Deck software and Deck 1 mixer to USB A.
- PH / CD (THRU): Set to PH or CD on the rear panel.
- When selected in software, this input is available on USB record 1-2 for use as the DVS control signal or for audio recording. Select this control source in the "Deck Inputs 1-2 Control Panel" on page 20.
- AUX (THRU).
- When selected in software, this input is available on USB record 1-2 for use as the DVS control signal or for audio recording. Select this control source in the "Deck
• B Left Virtual Deck (USB stereo playback pair 1-2) from USB B.
- Also assigns the MIDI controls for the Left Deck software and Deck 1 mixer to USB B.

The SOURCE selector for DECK 2 selects one of four sources:
• A Right Virtual Deck (USB stereo playback pair 3-4) from USB A.
- Also assigns the MIDI controls for the Right Deck software and Deck 2 mixer to USB A.
- PH / CD (THRU): Set to PH or CD with the rear panel switch.
- When selected in software, this input is available on USB record 3-4 for use as the DVS control signal or for audio recording. Select this control source in the "Deck Inputs 1-2 Control Panel" on page 20.
- AUX (THRU).
- When selected in software, this input is available on USB record 3-4 for use as the DVS control signal or for audio recording. Select this control source in the "Deck Inputs 1-2 Control Panel" on page 20.
• B Right Virtual Deck (USB stereo playback pair 3-4) from USB B.
• Also assigns the MIDI controls for the Left Deck software and Deck 2 mixer to USB B.
Gain
This adjusts the Deck input level from off to +15 dB. Unity gain (no boost or cut) is at 12 o'clock. Each Deck channel has a mono meter to assist setting gain. These meters are quasi-peak with peak hold. Use the GAIN control to stay out of the red.
Tone Controls and Kill Buttons
HIGH, MID and LOW full-cut isolator tone controls adjust the frequency response from off to +6 dB. Unity gain (no boost or cut) is at 12 o'clock. Each tone control has a kill switch with two modes:
- Pressing a kill button will cut the tone, as if its control is fully off (CCW). Releasing the button returns the tone to where the control is set. Use this to drop the bass, mid or highs for a moment of suspense.
- Pressing the Shift button before pressing a kill button locks the tone off, and stays off after the kill is released. Pressing the kill button again removes the kill, unlocking the tone to where its control is set.
- Crossover points for Low/Mid and Mid/High default at 300 Hz between Low and Mid, 3 kHz between Mid and High. This can be changed for each Deck. See "Deck Inputs 1-2 Control Panel" on page 20
RANE
TTM57mkII
OWNER'S MANUAL
Filter
The Filter sweeps from Low-Pass to High-Pass. Set it to 12 o'clock for a flat "no-filter" response. Moving the Filter toward the LOW position progressively reduces high frequencies. Moving the Filter toward the HIGH position progressively reduces low frequencies. The Resonance or Q of each of these Filters can be adjusted in the "Deck Inputs 1-2 Control Panel" on page 20. High resonance adds a "zip" effect to the Filter when it is moved. Low resonance is best when the Filter is used for mixing.
FlexFX
The FlexFX buttons assign a Deck to the FlexFX Loop where an external effects unit may be connected.
- Connect the FlexFX Loop SEND to the input of your external effects processor.
- Connect the output of the effects processor to the FlexFX Loop RETURN.
a. If you use a consumer-grade effects processor, such as the Korg Kaoss Pad, engage the -10 switch by pressing it in. This matches the I/O level of the external effects processor to the mixer.
- Simply press the FlexFX button to engage the Loop. This is independent of Serato DJ FX.

Mic Input
The Mic input comes from a rear panel XLR/TRS combo jack. A rear panel switch by this jack selects different mic types:
• LINE level accepts the output from a wireless mic receiver.
- MIC level is suitable for a dynamic mic.
- MIC LEVEL the mic is off at "0" and is turned up as the knob is rotated clockwise.
- MIC TONE is a spectral tilt bass and treble control.
- Increasing highs reduces lows by the same amount.
• Decreasing highs increases lows by the same amount.
Session In and Out
The SESSION IN has its own level control and may be used as a general purpose analog stereo AUX input from RCA jacks. SESSION IN and SESSION OUT are typically used to chain mixers together, though any line-level device may be connected to the Session Input and mixed here.

Aux
This digital input is on USB playback stereo pair 5-6 and is normally used in Serato DJ with the SP-6 Sample Player.
To enable the SP-6, go to Setup > Expansion Packs > SP-6 Sample Player and check the box for "Enable SP-6 Sample Player."
To assign the SP-6 Sample Player to AUX, click the SP-6 tab at the top of the main software screen and select SP-6 Output as "A."
This ⇔ AUX input has it's own LEVEL, FILTER and CUE. The Filter behaves the same as those on the Deck inputs. The Resonance for the Aux Filter can be
adjusted in the "General Control Panel" on page 21.
RANE
TTM57mkII
Main and Booth
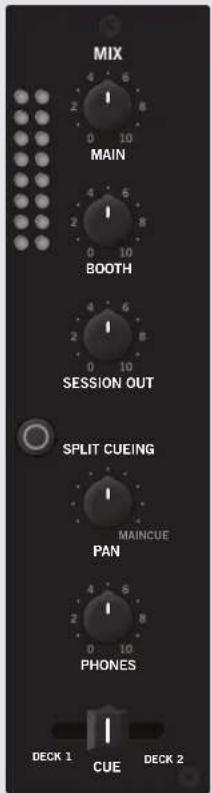
The Main and Booth outputs each have their own LEVEL control. The Main outputs use balanced XLR connectors and the Booth outputs use balanced 1/4 " TRS connectors. Since the Main, Booth and Session Outputs have the same Mix, you can run any of them to your main amplifier if the proper cables are not available. The Main Mix section has a quasi-peak stereo meter with peak hold. The Main Mix can be set to Stereo or Mono in the Rane Control Panel. Booth and Session Outputs are always in stereo. See the "General Control Panel" on page 21.
Headphone Cue
Deck 1, Deck 2, and USB Aux can each be cued in the headphones before bringing into the mix. USB Aux has its own CUE 🔊 AUX button. The Deck cues are determined by a slide control, as they were on the original TTM57SL.
- The Headphone monitor provides stereo or mono split cue operation.
- When set for stereo operation (SPLIT CUE button off), the PAN control pans between stereo Cue and stereo Main Mix.
- When set for Split Cue operation (SPLIT CUE button On), the PAN control pans between Mono Cue in the left ear and mono Main Mix in the right ear.
- The PHONES control sets the volume sent to the headphone jacks.
- The CUE slider cues Deck 1 or Deck 2 by moving the slider accordingly.
- Headphone 1/4 " and 3.5 mm jacks are on the front panel. Both share the same mix.
Channel Faders & Crossfader
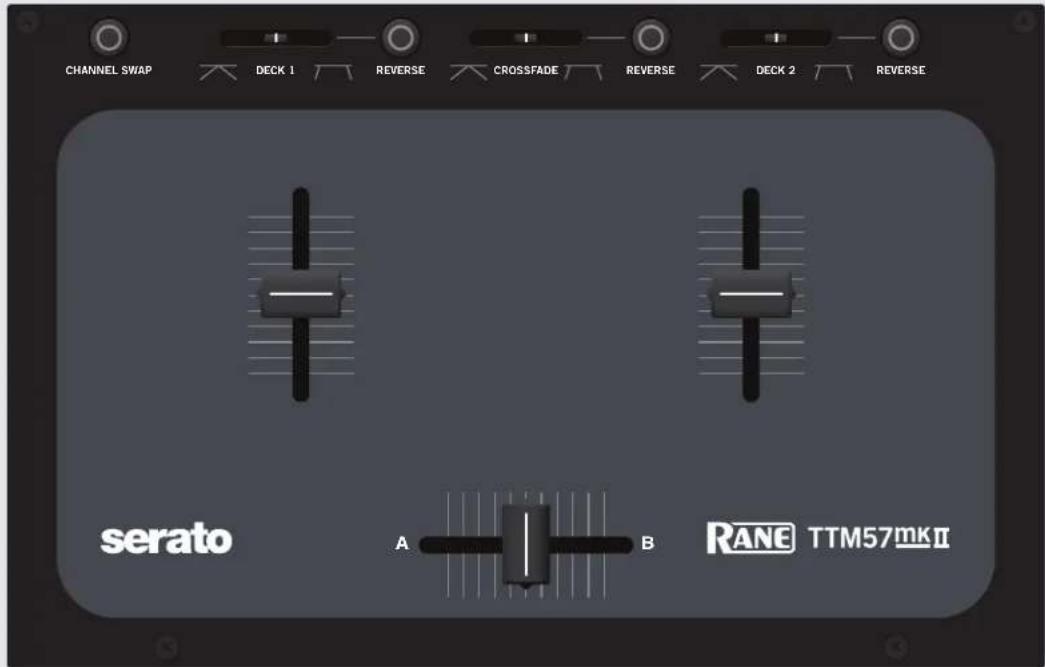
These faders use magnetic non-contact mechanisms with no noise and no bleed. Each fader has REVERSE and CONTOUR controls. Normally, Deck 1 is routed to the left fader and left side of the crossfader, while Deck 2 is routed to the right. When activated, CHANNEL SWAP puts Deck 1 on the right, and Deck 2 on the left. See "Magnetic Fader Maintenance" on page 30.
RANE
TTM57mkII
Software Controls
The TTM57mkII Mixer has dedicated Serato DJ software controls. Virtual Deck and associated controls are assigned to A or B using the DECK 1 and DECK 2 SOURCE selectors. This allows completely independent software control for each port. Simply, DECK 1 has the left side controls, and DECK 2 has the right side controls (with the exception of Samples). See the descriptions for DJ-FX, Looping, Library, Internal mode, Instant doubles, Censor, Slip mode, Cue Points and the SP-6 Sample Player in the Serato DJ manual.
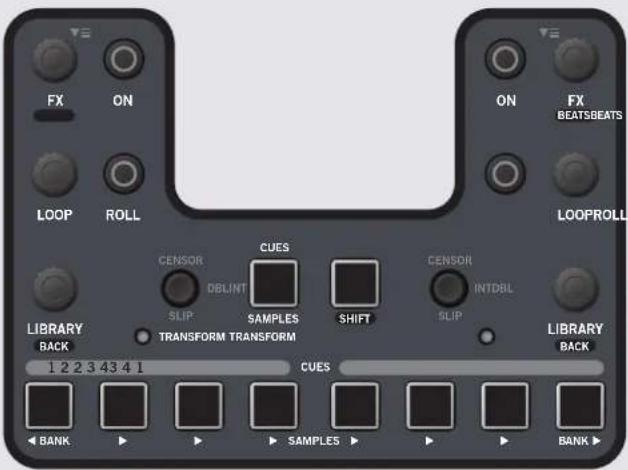
FX encoder, On & Shift buttons
Each Deck of the mixer has a dedicated USB Insert for post-fader software effects. The USB FX loop is disabled when USB is not connected. The USB FX loop is enabled automatically with Serato DJ, and can be enabled in other programs through the "Deck Inputs 1-2 Control Panel" on page 20. Audio will always be sent to the computer and returned with the FX on/off state determined in software. The result is no loss of audio or shift in latency when an effect is engaged.
- The FX encoder adjusts the primary parameter of the selected effect.
- Holding SHIFT and adjusting the encoder changes the FX BEATS Multiplier.
- The ON button lets you turn an effect on and off.
To change an effect:
- Press the FX encoder, the ON button flashes, and an FX menu appears in Serato DJ.
- Turn the FX encoder to highlight an effect.
- Press the FX encoder to select the effect, and the ON button stops flashing and goes dark.
- Hold the SHIFT button down and rotate the FX encoder to adjust the FX BEATS Multiplier.
- The new effect is ready to use.
- Press ON.
- Turn the FX encoder CCW to make it more Dry, and turn it CW to make it more Wet.
Loop encoder and Roll button
Two modes of operation are supported: Auto Looping and Loop Roll.
Auto Looping workflow:
- Turn the LOOP encoder to select a length as displayed in Serato DJ.
- Press the LOOP encoder to engage the loop.
- While the Loop is active, turn the LOOP encoder to expand or contract the Loop.
- While the Loop is active, press the LOOP encoder to exit the loop.
Loop Roll workflow:
- Turn the LOOP encoder to select a length as displayed in Serato DJ.
- Press the ROLL button to engage the loop. The loop continues to play while the button is held.
- While holding the ROLL button down, turn the LOOP encoder to expand or contract the loop.
- To end the Loop, release the ROLL button, and the track moves forward to where it would have been without the loop.
RANE
TTM57mkII
OWNER'S MANUAL
Library encoder and Shift button
- When in the Crates folder, rotate the LIBRARY encoder to highlight the desired crate and press the encoder to select.
- When in the Songs folder, rotate the LIBRARY encoder to highlight the desired song and press the encoder to load it.
- Hold SHIFT and press the LIBRARY encoder to go BACK, switching the focus between the Crates and Songs in Serato DJ. If you have any panels open in Serato DJ, this also changes the focus between this and the Library areas.
Transform Joystick
There are two primary joystick modes. Press the joystick to toggle Transform mode on and off.
Transform Mode (LED On)
- The joystick cuts all audio with up/down/left/right movements.
- Audio returns when joystick is back in the center position.
Multifunction Serato DJ Control Mode (LED off)
- Move a joystick toward the outside of the mixer for emergency internal mode (Jumps to 0% pitch).
- Move a joystick toward the center of the mixer for instant doubles to the opposite Virtual Deck.
- Move a joystick up to censor. Releasing the joystick resumes playback without losing time.
- Move a joystick down to slip (the Transform LED flashes when slip is active). When Slip Mode is active you can manipulate the audio as normal (e.g., Scratch, Loop, Cues etc.). Once you release the joystick, playback is returned to where it would be if you had not manipulated the audio.
Cues / Samples control
The CUES / SAMPLES button toggles the eight buttons between Cues and Samples modes.
In Cues mode, the CUES / SAMPLES button is normally lit red. The Cue buttons light up the same color as any Cue markers saved with a song in Serato DJ. Any saved Cue is lit when the song is loaded, and pressing a lit button will trigger that Cue.
Any Cue not lit when a song is loaded is available to make, and pressing an unlit Cue button adds a Cue point at the current location. To delete a Cue, hold SHIFT and press a Cue trigger, and it will go dark. Any Cues created are saved in the song file, and deleted cues are erased from the file.
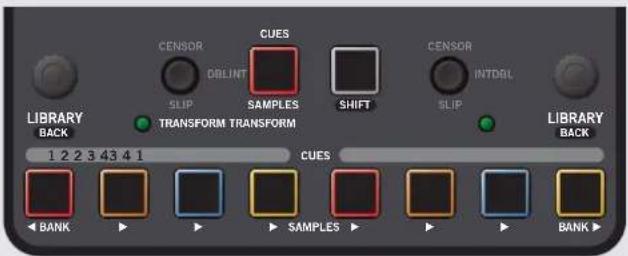
The four left Cues are assigned to the left Virtual Deck selected by the A or B DECK 1 SOURCE, and the four right Cues are assigned to the right Virtual Deck selected by the A or B DECK 2 SOURCE.
Cues 1-4 have buttons, though Serato DJ can have eight cues per song. When in Cues mode, press SHIFT and CUES to access Cues 5-8 (the Cues button lights yellow). Press SHIFT and CUES again to return to Cues 1-4 (the Cues button lights red). The button colors tell if the Cues are in 1-4 or 5-8.
RANE
TTM57mkII
OWNER'S MANUAL
In Samples mode, the CUES / SAMPLES button is green, the two Bank buttons are blue and the six Sample buttons are lit purple if they have an assigned sample.
The six center Sample buttons trigger loaded Samples from a selected Bank. If a bank has a Sample assigned to a slot its button is lit, and the button is dark if no

Sample is loaded in that slot. Pressing a lit button plays the associated Sample. The button flashes while its Sample is playing. The Play behavior follows the behavior selected in Serato DJ. Hold SHIFT and press a playing Sample to force it to stop playing regardless of play mode.
The left ◀ BANK button decrements the current Bank, and the right BANK ▶ button increments the current Bank, starting with A, B, C, D and back to A.
The TTM57mkII has a dedicated AUX input for the sample player typically used for SP-6 playback. Sample playback defaults to AUX, but can be assigned to DECK 1, DECK 2, AUX or MAIN MIX in Serato DJ.
Sample triggers are broadcast to any active USB ports. If there is a conflict using two computers, turn the SP-6 off on one of the ports.
Footswitch Jack
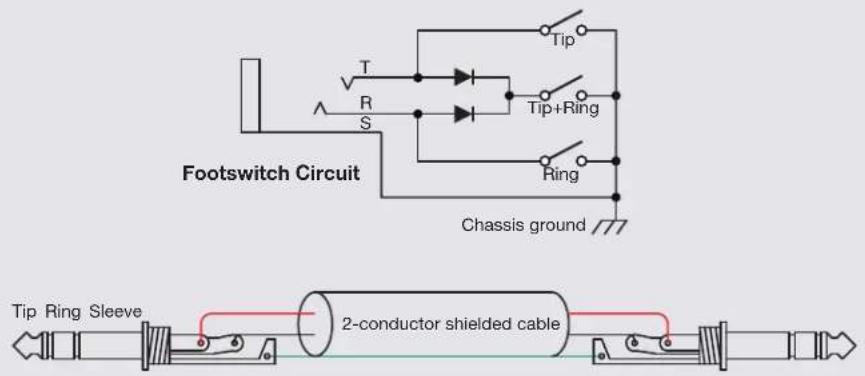
The TTM57mkII has a 1/4" TRS jack to connect an optional footswitch. Footswitch controls are not mapped to any function, but can be learned. MIDI commands can be generated from:
- tip connection to ground
- ring connection to ground
- tip-ring connection to ground
See "MIDI Mapping" on page 22.
RANE
TTM57mkII
OWNER'S MANUAL
DJ Changeover
The TTM57mkII allows two computers to connect to the mixer simultaneously. This allows two DJs to play at the same time and for easy DJ set changeover, even if they run different software.
Connect both computers to the two USB ports on the TTM57mkII. For each channel on the mixer, set the DECK SOURCE to either

A or B. depending
on which your computer is connected to.
NOTE: If a channel is in use by a computer already, the second computer's Virtual Deck in Serato DJ will become black and display IN USE.
When a Deck channel is assigned to a USB port with the SOURCE selector, both MIDI and audio are assigned to the A or B port. MIDI assignment for Deck 1 and Deck 2 mixer controls follow the SOURCE selection.
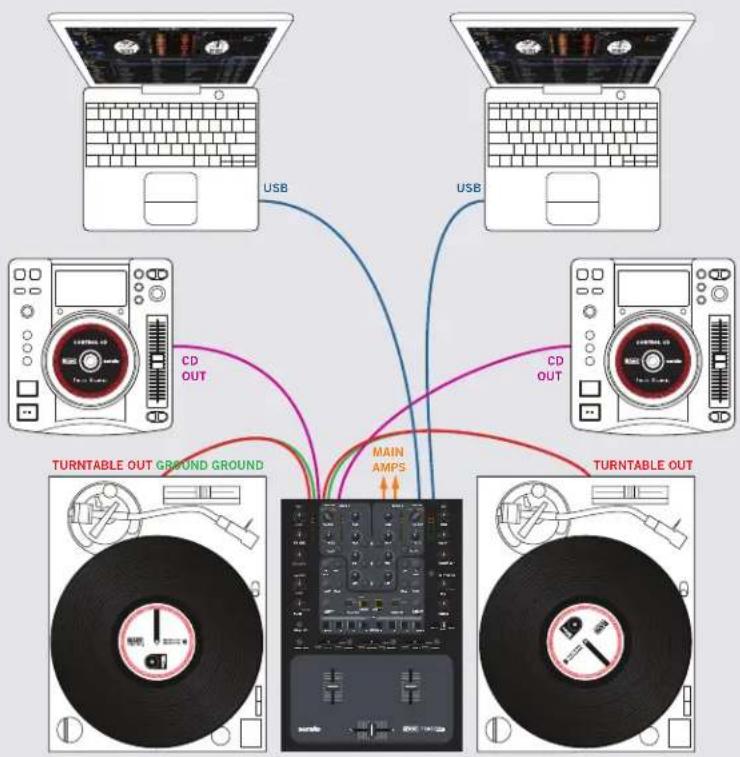
flowchart
graph TD
    A["User Laptop"] -->|USB| B["CD OUT"]
    C["User Laptop"] -->|USB| D["CD OUT"]
    E["User Laptop"] -->|USB| F["CD OUT"]
    G["User Laptop"] -->|USB| H["CD OUT"]
    I["Turntable OUT Ground Ground"] --> J["Main Amps"]
    K["Turntable Out"] --> J
    J --> L["Computer"]
Swapping between two DJs is now easier than ever! With a computer already connected to the TTM57mkII and playing, do the following:
- Connect the second computer to the unused USB port on the TTM57mkII.
- Switch the DECK SOURCE on the non-playing mixer channel to the USB source of the second computer.
- Play a track on this Deck and mix it in when ready — you'll now have audio from both computers in the mix.
- Fade out the audio playing from the first computer to the audio playing from the second computer.
- When only audio from the second computer is left in the mix, remove the first computer.
- Assign the DECK SOURCE for the remaining free mixer channel to the second computer and keep rocking.
RANE
TTM57mkII
OWNER'S MANUAL
Class Compliant USB Ports
The USB ports are 100% class compliant, allowing hook-up to any Mac OSX device without the need for an additional driver. A high-performance ASIO driver runs most Windows DAW and DJ software. MIDI end points are class compliant with both OSX and Windows devices.
ASIO (Windows)
A low-latency ASIO driver is available to interface with most DJ and DAW audio software applications on Windows operating systems. Multi-client ASIO allows different audio software applications to simultaneously stream audio to and from the TTM57mkII. If the same playback channel is selected in more than one application, the driver mixes the audio from the applications before streaming it to the device. The driver Control Panel may be launched from the Windows Control Panel. Select Start > Control Panel > Rane Products. The Serato DJ installer includes the ASIO driver and Rane Control Panel for Windows 7-SP1, Windows 8 and 8.1.
Core Audio (Macintosh)
No driver installation is required. Connect the TTM57mkII to a Mac running OSX, and the mixer inputs and outputs become available in your audio program. Install the Rane control panel to provide additional mixer settings as described below. The most recent control panel installer may be downloaded from the TTM57mkII page at dj.rane.com. The Serato DJ installer includes the Rane Control Panel for Mac OSX.
Rane Control Panel
NOTE: Settings are saved in the mixer. The control panel for Windows or Macintosh is updated with the mixer's settings. Therefore, when you connect to a different TTM57mkII Mixer, it's saved settings override your previous Control Panel settings.

Settings
The TTM57mkII allows you to save and export settings. You can load your preferences when using a different TTM57mkII than your own, or putting things back after another DJ has used your mixer.
Once you have set Rane Control Panel preferences, click Export to write these to a computer file. Click Import to load a .rms settings file. The Control Panel shows the current settings file loaded in the mixer. If any changes are made since the last import, [Modified] will appear after the filename along with a Save button, offering to save your changes as the new default.
Firmware
The TTM57mkII Firmware Version currently installed in the mixer is shown in the active Rane Control Panel. The Downloads link on the TTM57mkII page at dj.rane.com is a place to check if there is a control panel / firmware update. Newer versions of Serato DJ may also contain firmware updates. After downloading and installing, if the TTM57mkII firmware installed on your computer is newer than the firmware in your mixer, an Update Firmware button is enabled. Pressing the button updates the TTM57mkII firmware to the new version.
RANE
TTM57mkII
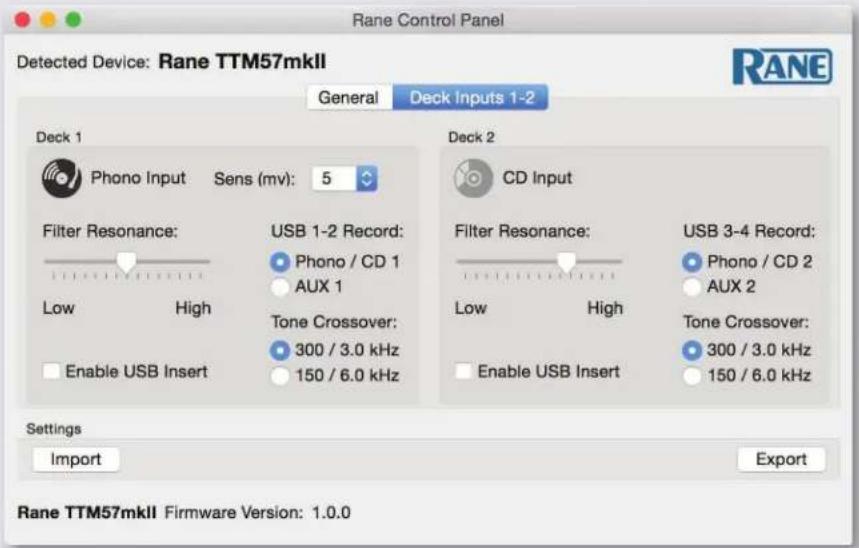
Deck Inputs 1-2 Control Panel
Analog Input Source: The analog input for each channel is set for CD (Line level) or Phono level (PH) using a switch on the rear of the mixer. The control panel shows the input mode selected on the mixer for each of the four inputs. The mode can only be changed on the mixer.
Phono Sensitivity: If Phono Input is selected on the mixer, the Phono Sensitivity adjustment appears in the panel. Click the down-arrow to display a list of 16 sensitivity settings between 2.5 mV and 10 mV in 0.5 mV steps. The default is 5 mV. Set the Phono Sensitivity to the same level of your cartridge (see your cartridge documentation for the correct value). Another method is to match the level of a CD on another input.
Filter Resonance: Each Deck channel has a sweep FILTER control that provides a High- and Low-Pass filter effect. Filter resonance controls the "peak" of the filter cutoff frequency. The Low setting provides the smoothest Filter without adding gain. The High setting adds accent to frequencies near the Filter cutoff point by adding about 12 dB of gain. Adding gain in a narrow region around the cutoff frequency adds a "zip" effect to audio as the Filter is swept. The default is 5 dB.
USB Record Source: sets PH/CD or AUX as the record source output for digital vinyl simulation (DVS). Each Deck records to separate USB slots. Deck 1 outputs on USB slots 1-2, Deck 2 outputs on slots 3-4.
- Select Phono / CD for DVS in Serato DJ (default), or to record the Deck pre-fader.
- Select AUX for DVS in Serato DJ, or to record the Aux Input pre-fader.
Tone Crossover sets the crossover points of the 3-band Tone controls in both Deck channels to either:
• 300 Hz between Low and Mid, 3 kHz between Mid and High.
- 150 Hz between Low and Mid, 6 kHz between Mid and High (default).
Enable USB Insert connects the signal for the USB FX loop. This is off by default and disabled when USB is not connected. This is automatically enabled with Serato DJ. Check this box only when you need to send and return software effects through other DJ and DAW programs.
- Deck 1 FX Send is in USB slots 7-8 Deck 1 FX Return is in USB slots 7-8.
- Deck 2 FX Send is in USB slots 9-10 Deck 2 FX Return is in USB slots 9-10.
RANE
TTM57mkII

General Control Panel
Main Out can be set to Stereo or Mono. The Booth and Session Outputs are always in stereo.
Headphone Tone slider adjusts the tone going to the headphones using spectral tilt filters.
- Increasing Treble reduces lows by the same amount.
- Increasing Bass reduces highs by the same amount.
USB AUX Filter Resonance: The USB Aux, usually used with the Serato DJ SP-6 Sampler, has its own sweep FILTER control that provides a High- and Low-Pass filter effect. Filter resonance controls the "peak" of the filter cutoff frequency. The Low setting provides the smoothest Filter without adding gain. The High setting adds accent to frequencies near the Filter cutoff point by adding about 12 dB of gain. Adding gain in a narrow region around the cutoff frequency adds a "zip" effect to audio as the Filter is swept. The default is 5 dB.
USB Port Status indicates the connection status of both USB ports. Active indicates a USB connection between the mixer and a computer. Local shows the USB Port connected to this control panel's computer.
The Buffer Size control allows the USB buffer to be increased or decreased. This only appears in the Rane Control Panel for ASIO in Windows. In Mac systems, the buffer control is in the DAW or DJ audio preferences screen and does not appear here. The Rane driver is designed to run at latencies as low as 5 milliseconds round-trip. However, computer performance and available resources (number of applications running) may adversely affect the computer's ability to stream audio reliably. If pops and clicks are heard in USB audio, try increasing the buffer size to eliminate them. With ASIO, total round-trip latency is equal to Buffer Size plus device latency. With Core Audio, total round-trip latency is determined by the Buffer Size set by the DAW/DJ software, plus device latency. Device latency is 3 to 4 ms.
OWNER'S MANUAL
MIDI Mapping
When using Serato DJ software, the mixer is plug-and-play with all required MIDI mapping done for you. For advanced users or with third-party DAWs, it is possible to custom MIDI-map most mixer controls on the TTM57mkII and control the lighting and color of buttons in the Serato DJ Cues and Samples strip.
There are three groups of MIDI controls:
- Those associated with Deck 1.
- Those associated with Deck 2.
- Mixer controls not associated with Deck 1 or Deck 2.
There are two USB ports on the mixer, USB A and USB B. Assign Deck controls to either port as follows: - The SOURCE selector for DECK 1 determines which USB port will be used for Deck 1 controls.
- The SOURCE selector for DECK 2 determines which USB port will be used for Deck 2 controls.
- MIDI not associated with a Deck is sent and received from both USB ports.
MIDI Implementation Chart
| Control Description Control | Type | Status MIDI Channel | Control # Dec. | Control # Hex | Data Comment | ||
| SDJ Deck 1 FX | |||||||
| Effect Depth Slot 1 Encoder CC 9 | 0 | 3F decr, 41 incr | 3F=Decrement 1, 41 = Increment 1, (applies to all encoders) | ||||
| Effect Select Slot 1 Encoder CC 9 | 11 | 0B 3F decr, 41 incr | Mixer Context: Press Encoder, Blink (On) Button, Rotate to Highlight, Press to Select, Selection Exits Context Mode | ||||
| Effect On Moment. switch | Note 9 | 0 | 00 | ||||
| Beats Slot 1 Encoder CC 9 | 3 | 03 | 3F decr, 41 incr | Shift + Deck 1 FX Encoder | |||
| Select Effect Slot 1 Encoder switch | Note 9 | 11 | 0B | ||||
| Effect Select Mode On | Encoder switch | Note 15 | 5 | 05 | See Mixer Context: Effect Select Slot 1 | ||
| SDJ Deck 2 FX | |||||||
| Effect Depth Slot 2 Encoder CC 10 | 0 | 00 | 3F decr, 41 incr | ||||
| Effect Select Slot 2 Encoder CC 10 | 11 | 0B 3F decr, 41 incr | Mixer Context: Press Encoder, Blink (On) Button, Rotate to Highlight, Press to Select, Selection Exits Context Mode | ||||
| Effect On Moment. switch | Note 10 | 0 | 00 | ||||
| Beats Slot 2 Encoder CC 10 | 3 | 03 | 3F decr, 41 incr | Shift + Deck 2 FX Encoder | |||
| Select Effect Slot 2 Encoder switch | Note 10 | 11 | 0B | ||||
| Effect Select Mode On | Encoder switch | Note 15 | 6 | 06 | See Mixer Context: Effect Select Slot 2 | ||
| SDJ Deck 1 Loops | |||||||
| Loop Length Adjust | Encoder CC 5 | 52 | 34 | 3F decr, 41 incr | Roll and Auto Loop | ||
| Loop On | Encoder switch | Note 5 | 50 | 32 | Auto Loop | ||
| Loop Roll | Roll switch | Note 5 | 62 | 3E | |||

TTM57mkII
OWNER'S MANUAL
| Control Description Control | Type | Status MIDI Channel | Control # Dec. | Control # Hex | Data Comment | |
| SDJ Deck 2 Loops | ||||||
| Loop Length Adjust Encoder | CC 6 | 52 | 34 3F decr, 41 incr | |||
| Loop On Encoder | switch | Note 6 | 50 | 32 | ||
| Loop Roll Roll | switch | Note 6 | 62 | 3E | ||
| Modifiers | ||||||
| Shift Moment. | switch | Note 16 | 50 | 32 Mixer | Modifier | |
| Cues Mode (Cues/Samples switch) | Moment. switch | Note 5 | 0 | 00 Mixer | Modifier | |
| Cues 5-8 Mode (Shift + Cues/Samples switch) | Moment. switch | Note 16 | 54 | 36 Switch between Cues 1-4 and Cues 5-8 when in Cues mode. | ||
| Samples Mode (Cues/ Samples switch) | Moment. switch | Note 5 | 11 | 0B | Mixer Modifier | |
| SDJ Samples | ||||||
| Deck 1 Pad 1 Bank Select Left | Moment. switch | Note 5 | 40 | 28 Samples Mode, Decrement Bank | ||
| Deck 1 Pad 2 Play Sample 1 | Moment. switch | Note 5 | 20 | 14 | Samples Mode | |
| Deck 1 Pad 3 Play Sample 2 | Moment. switch | Note 5 | 21 | 15 | Samples Mode | |
| Deck 1 Pad 4 Play Sample 3 | Moment. switch | Note 5 | 22 | 16 | Samples Mode | |
| Deck 2 Pad 1 Play Sample 4 | Moment. switch | Note 5 | 23 | 17 | Samples Mode | |
| Deck 2 Pad 2 Play Sample 5 | Moment. switch | Note 5 | 24 | 18 | Samples Mode | |
| Deck 2 Pad 3 Play Sample 6 | Moment. switch | Note 5 | 25 | 19 | Samples Mode | |
| Deck 2 Pad 4 Bank Select Right | Moment. switch | Note 5 | 41 | 29 Samples Mode, Increment Bank | ||
| Deck 1 Pad 2 + Shift, Stop Sample 1 | Moment. switch | Note 5 | 28 | 1C Shift Modifier, Force Stop | ||
| Deck 1 Pad 3 + Shift, Stop Sample 2 | Moment. switch | Note 5 | 29 | 1D Shift Modifier, Force Stop | ||
| Deck 1 Pad 4 + Shift, Stop Sample 3 | Moment. switch | Note 5 | 30 | 1E | Shift Modifier, Force Stop | |
| Deck 2 Pad 1 + Shift, Stop Sample 4 | Moment. switch | Note 5 | 31 | 1F | Shift Modifier, Force Stop | |
| Deck 2 Pad 2 + Shift, Stop Sample 5 | Moment. switch | Note 5 | 32 | 20 Shift Modifier, Force Stop | ||
| Deck 2 Pad 3 + Shift, Stop Sample 6 | Moment. switch | Note 5 | 33 | 21 | Shift Modifier, Force Stop | |

TTM57mkII
OWNER'S MANUAL
| Control Description Control | Type | Status MIDI | Control# Dec. | Control# Hex | Data Comment | ||
| Channel | |||||||
| SDJ Deck 1 Cues | |||||||
| Pad 1 Cue 1 Moment. | switch | Note 5 | 20 | 14 Cues | Mode | ||
| Pad 2 Cue 2 Moment. | switch | Note 5 | 21 | 15 Cues | Mode | ||
| Pad 3 Cue 3 Moment. | switch | Note 5 | 22 | 16 Cues | Mode | ||
| Pad 4 Cue 4 Moment. | switch | Note 5 | 23 | 17 Cues | Mode | ||
| Pad 1+Shift, Delete Cue 1 Moment. switch | Note 5 | 28 | 1C Cues | Mode, Shift | Modifier | ||
| Pad 2+Shift, Delete Cue 2 Moment. switch | Note 5 | 29 | 1D Cues | Mode, Shift | Modifier | ||
| Pad 3+Shift, Delete Cue 3 Moment. switch | Note 5 | 30 | 1E Cues | Mode, Shift | Modifier | ||
| Pad 4+Shift, Delete Cue 4 Moment. switch | Note 5 | 31 | 1F Cues | Mode, Shift | Modifier | ||
| Pad 1 Cue 5 Moment. | switch | Note 5 | 24 | 18 Cues | Mode | ||
| Pad 2 Cue 6 Moment. | switch | Note 5 | 25 | 19 Cues | Mode | ||
| Pad 3 Cue 7 Moment. | switch | Note 5 | 26 | 1A Cues | Mode | ||
| Pad 4 Cue 8 Moment. | switch | Note 5 | 27 | 1B Cues | Mode | ||
| Pad 1+Shift, Delete Cue 5 Moment. switch | Note 5 | 32 | 20 Cues | Mode, Shift | Modifier | ||
| Pad 2+Shift, Delete Cue 6 Moment. switch | Note 5 | 33 | 21 Cues | Mode, Shift | Modifier | ||
| Pad 3+Shift, Delete Cue 7 Moment. switch | Note 5 | 34 | 22 Cues | Mode, Shift | Modifier | ||
| Pad 4+Shift, Delete Cue 8 Moment. switch | Note 5 | 35 | 23 Cues | Mode, Shift | Modifier | ||
| SDJ Deck 2 Cues | |||||||
| Pad 1 Cue 1 Moment. | switch | Note 6 | 20 | 14 Cues | Mode | ||
| Pad 2 Cue 2 Moment. | switch | Note 6 | 21 | 15 Cues | Mode | ||
| Pad 3 Cue 3 Moment. | switch | Note 6 | 22 | 16 Cues | Mode | ||
| Pad 4 Cue 4 Moment. | switch | Note 6 | 23 | 17 Cues | Mode | ||
| Pad 1+Shift, Delete Cue 1 Moment. switch | Note 6 | 28 | 1C Cues | Mode, Shift | Modifier | ||
| Pad 2+Shift, Delete Cue 2 Moment. switch | Note 6 | 29 | 1D Cues | Mode, Shift | Modifier | ||
| Pad 3+Shift, Delete Cue 3 Moment. switch | Note 6 | 30 | 1E Cues | Mode, Shift | Modifier | ||
| Pad 2+Shift, Delete Cue 4 Moment. switch | Note 6 | 31 | 1F Cues | Mode, Shift | Modifier | ||

TTM57mkII
OWNER'S MANUAL
| Control Description Control | Type | Status MIDI | Control # Dec. | Control # Hex | Data Comment | |
| Channel | ||||||
| SDJ Library Encoder Deck 1 | ||||||
| Library Scroll Encoder CC 16 | 0 | 00 3F decr,41 incr | ||||
| Library Scroll Fast Encoder CC 16 | 1 | 01 3F decr,41 incr | Shift Modifier | |||
| Library Backward + Expand Crates | Encoder switch | Note 16 | 7 | 07 Shift Modifier | ||
| Select Crate and Move Forward | Encoder switch | Note 16 | 2 | 02 Software Context | (If in Crates Then Select Crate and Move Forward) | |
| Load Song to Deck 1 Encoder switch | Note 16 | 2 | 02 Software Context | (If in Songs Then Load Song) | ||
| SDJ Library Encoder Deck 2 | ||||||
| Library Scroll Encoder CC 16 | 0 | 00 3F decr,41 incr | ||||
| Library Scroll Fast Encoder CC 16 | 1 | 01 3F decr,41 incr | Shift Modifier | |||
| Library Backward + Expand Crates | Encoder switch | Note 16 | 7 | 07 Shift Modifier | ||
| Select Crate and MoveForward | Encoder switch | Note 16 | 3 | 03 Software Context | (If In Crates Then Select Crate and Move Forward) | |
| Load Song to Deck 2 Encoder switch | Note 16 | 3 | 03 Software Context | (If in Songs Then Load Song) | ||
| Deck 1 Joystick | ||||||
| Joystick Mode | Press Joy switch | Note 16 | 51 | 33 Press | Encoder to Toggle Between SDJ and Transform Modes, LED On in Transform Mode | |
| Internal Mode | Joy Left | Note | 1 | 41 | 29 Send in SDJ Mode Only | |
| Shift + Internal Mode, Safety Mode | Joy Right | Note 1 | 42 | 2A | Send in SDJ Mode Only | |
| Censor | Joy Up | Note | 1 | 16 | 10 | Send in SDJ Mode Only |
| Slip | Joy Down | Note 1 | 15 | 0F Send in SDJ Mode Only, Toggle On/Off,Flash Transform LED When Active | ||
| Instant Doubles | Joy Right | Note 1 | 33 | 21 Right | ||
| Deck 2 Joystick | ||||||
| Joystick Mode | Press Joy switch | Note 16 | 52 | 34 Press | Encoder to Toggle Between SDJ and Transform Modes, LED On in Transform Mode | |
| Internal Mode | Joy Right | Note 2 | 41 | 29 Send in SDJ Mode Only | ||
| Shift + Internal Mode, Safety Mode | Joy Right | Note 2 | 42 | 2A | Send in SDJ Mode Only | |
| Censor | Joy Up | Note | 2 | 16 | 10 | Send in SDJ Mode Only |
| Slip | Joy Down | Note 2 | 15 | 0F Send in SDJ Mode Only, Toggle On/Off,Flash Transform LED When Active | ||
| Instant Doubles | Joy Left | Note | 2 | 33 | 21 | |

TTM57mkII
OWNER'S MANUAL
| Control Description Control | Type | Status MIDI Channel | Control # Dec. | Control # Hex | Data Comment | |
| Mixer Deck 1 | ||||||
| Input Mode (PH/CD) Slide | switch | CC 1 | 40 | 28 0-7F Phono (0-3F), CD (40-7F) Read-only | ||
| Input Mode (PH/CD) Control | Panel | CC 15 | 49 | 31 0-7F Phono (0-3F), CD (40-7F) Read-only | ||
| RIAA Sensitivity Control | Panel | CC 15 | 1 | 01 0-F 2.5 (00), 3 (01), 3.5 (02), 4 (03), 4.5 (04), 5 (05), 5.5 (06), 6 (07), 6.5 (08), 7 (09), 7.5 (0A), 8 (0B), 8.5 (0C), 9 (0D), 9.5 (0E), 10 (0F) | ||
| Input Selector 1 of 4 | switch | CC 1 | 34 | 22 0-7F USB A (0-1F), PH/CD (20-3F), AUX (40-5F), USB B (60-7F) Read-only | ||
| USB A/USB B Selected Logical CC 1 | 61 | 3D | 0-7F USB A (0-3F), USB B (20-7F) | |||
| Gain | Pot | CC | 1 | 22 | 16 0-7F | |
| High EQ | Pot | CC | 1 | 23 | 17 0-7F | |
| Kill High EQ | Moment. switch | Note | 1 | 35 | 23 | MIDI Receive Velocity sets Backlight |
| Mid EQ | Pot | CC | 1 | 24 | 18 | |
| Kill Mid EQ | Moment. switch | Note | 1 | 36 | 24 | MIDI Receive Velocity sets Backlight |
| Low EQ | Pot | CC | 1 | 25 | 19 | |
| Kill Low EQ | Moment. switch | Note | 1 | 37 | 25 | MIDI Receive Velocity sets Backlight |
| FlexFX Enable | Moment. switch | Note | 1 | 00 | MIDI Receive Velocity sets Backlight | |
| Channel Fader | Slider | CC | 1 | 28 | 1C | |
| Channel Fader Contour | Slider | CC | 1 | 29 | 1D | |
| Channel Fader Reverse Moment. switch | Note | 1 | 38 | 26 | MIDI Receive Velocity sets Backlight | |
| USB Record Source Control | Panel | CC 15 | 62 | 3E | 0-7F Record PH/CD (0-3F), Record AUX (40-7F) | |
| EQ Crossover | Control Panel | CC 15 | 11 | 0B | 0-7F 300/3.0k (0-3F), 150/6.0k (40-7F) | |
| HP/LP Filter | Pot | CC | 1 | 26 | 1A 0-7F | |
| Filter Resonance | Control Panel | CC 15 | 13 | 0D | 0-7F | |
| Enable USB FX Insert | Control Panel | CC 15 | 15 | 0F | 0-7F Bypass (0-3F), Active (40-7F) | |
| Mixer Deck 2 | ||||||
| Input Mode (PH/CD) Slide | switch | CC 2 | 40 | 28 0-7F Phono (0-3F), CD (40-7F) | ||
| Input Mode (PH/CD) Control | Panel | CC 15 | 50 | 32 0-7F Phono (0-3F), CD (40-7F) | ||
| RIAA Sensitivity Control | Panel | CC 15 | 16 | 10 0-F 2.5 (00), 3 (01), 3.5 (02), 4 (03), 4.5 (04), 5 (05), 5.5 (06), 6 (07), 6.5 (08), 7 (09), 7.5 (0A), 8 (0B), 8.5 (0C), 9 (0O), 9.5 (0E), 10 (0F) | ||
| Input Selector 1 of 4 | switch | CC 2 | 34 | 22 0-7F USB A (0-1F), PH/CD (20-3F), AUX (40-5F), USB B (60-7F) | ||
| USB A / USB B Selected | Logical | CC | 2 | 61 | 3D | 0-7F USB A (0-3F), USB B (20-7F) |
| Gain | Pot | CC | 2 | 22 | 16 0-7F | |

TTM57mkII
OWNER'S MANUAL
| Control Description Control | Type | Status MIDI Channel | Control # Dec. | Control # Hex | Data Comment | ||
| High EQ Pot CC 2 | 23 | 17 0-7F | |||||
| Kill High EQ Moment. | switch | Note 2 | 35 | 23 MIDI | Receive Velocity sets Backlight | ||
| Mid EQ Pot CC 2 | 24 | 18 0-7F | |||||
| Kill Mid EQ Moment. | switch | Note 2 | 36 | 24 MIDI | Receive Velocity sets Backlight | ||
| Low EQ | Pot | CC | 2 | 25 | 19 0-7F | ||
| Kill Low EQ | Moment. switch | Note 2 | 37 | 25 MIDI | Receive Velocity sets Backlight | ||
| FlexFX Enable | Moment. switch | Note | 2 | 00 | MIDI Receive Velocity sets Backlight | ||
| Channel Fader | Slider | CC | 2 | 28 | 1C | 0-7F | |
| Channel Fader Contour | Slider | CC | 2 | 29 | 1D | 0-7F | |
| Channel Fader Reverse | Moment. switch | Note 2 | 38 | 26 MIDI | Receive Velocity sets Backlight | ||
| USB Record Source | Control Panel | CC 15 | 63 | 3F | 0-7F | Record PH/CD (0-3F), Record AUX (40-7F) | |
| EQ Crossover | Control Panel | CC 15 | 26 | 1A | 0-7F | 300/3.0k (0-3F), 150/6.0k (40-7F) | |
| HP/LP Filter | Pot | CC | 2 | 26 | 1A | 0-7F | |
| Filter Resonance | Control Panel | CC 15 | 28 | 1C | 0-7F | ||
| Enable USB FX Insert | Control Panel | CC 15 | 29 | 1D | 0-7F | Bypass (0-3F), Active (40-7F) | |
| Mixer Preferences | |||||||
| USB AUX Filter Resonance | Control Panel | CC 15 | 30 | 1E | 0-7F | ||
| Headphone Tone | Control Panel | CC 15 | 31 | 1F 0-7F | |||
| USB Port Active | Control Panel | CC 15 | 32 | 20 | BINARY | USB A Active (0x01), USB B Active (0x04) [0x05 indicates both are active] | |
| Stereo | Control Panel | CC 15 | 34 | 22 | 0-7F Stereo (0-3F), Mono (40-7F) | ||
| Mixer General | |||||||
| Main Level | Pot | CC | 15 | 35 | 23 | 0-7F | |
| Booth Level | Pot | CC | 15 | 36 | 24 0-7F | ||
| Session IN Level | Pot | CC | 15 | 37 | 25 | 0-7F | |
| Session Out Level | Pot | CC | 15 | 38 | 26 | 0-7F | |
| Cue/Main Pan | Pot | CC | 15 | 39 | 27 | 0-7F | |
| Deck 1/Deck 2 Cue Pan | Slider | CC | 15 | 40 | 28 | 0-7F | |
| Split Cue Note (Off) | Moment. switch | Note 15 | 14 | 0E | |||
| Crossfader | Slider | CC | 16 | 8 | 08 | ||
| Crossfader Contour | Slider | CC | 16 | 9 | 09 | ||
| Crossfader Reverse | Moment. switch | Note 16 | 29 | 1D | |||
| Channel switch | Moment. switch | Note 16 | 30 | 1E | |||
| Mic Level | Pot | CC | 15 | 43 | 2B | 0-7F | |
| Mic Tone | Pot | CC | 15 | 44 | 2C | 0-7F | |

TTM57mkII
OWNER'S MANUAL
| Control Description Control | Type | Status MIDI | Control # Dec. | Control # Hex | Data Comment | |
| Channel | ||||||
| USB Aux Level Pot CC 15 | 45 | 2D 0-7F | ||||
| USB Aux HP/LP Filter Pot CC 15 | 46 | 2E 0-7F | ||||
| Headphone Level Pot CC 15 | 47 | 2F 0-7F | ||||
| USB Aux Cue Note (Off) Moment switch | Note 15 | 17 | 11 | |||
| Foot switch Bit-1 | Moment switch | Note 15 | 18 | 12 | Bit-1 | |
| Foot switch Bit-2 | Moment switch | Note 15 | 19 | 13 | Bit-2 | |
| Foot switch Bits-1&2 | Logical | Note | 15 | 20 | 14 | Bit-1 and Bit-2 |
RGB and Red-Green LEDs
The 8 performance pads on the TTM57mkII are backlit by RGB (Red-Green-Blue) LEDs that may be controlled using MIDI messages. In addition, the CUES/SAMPLES and SHIFT switches are backlit by Red-Green LEDs that may also be controlled using MIDI messages. The note number of an RGB or Red-Green LED matches the note number of the pad it is associated with. The Velocity value sent along with that MIDI note determines the color, brightness, and blink mode of the LED.
For example: When in CUES mode, Deck 1 Pad 1 sends note number 20 (14 HEX) on MIDI channel 5. To set the color of that pad to red in CUES mode, the computer sends note number 20 with a velocity of 33 (21 HEX) on MIDI channel 5.
RGB MIDI Velocity Values
Note: The Green-Red LEDs in the CUES/SAMPLES and SHIFT buttons only support colors 0-7.
| RGB Colors | MIDI Note Velocity (Decimal) | ||||
| Color | # | Bright On | Bright Blink | Dim On | Dim Blink |
| 0 | 32 (LED off) | 96 (LED off) | 0 (LED off) | 64 (LED off) | |
| 1 | 33 | 97 | 1 | 65 | |
| 2 | 34 | 98 | 2 | 66 | |
| 3 | 35 | 99 | 3 | 67 | |
| 4 | 36 | 100 | 4 | 68 | |
| 5 | 37 | 101 | 5 | 69 | |
| 6 | 38 | 102 | 6 | 70 | |
| 7 | 39 | 103 | 7 | 71 | |
| 8 | 40 | 104 | 8 | 72 | |
| 9 | 41 | 105 | 9 | 73 | |
| 10 | 42 | 106 | 10 | 74 | |
| 11 | 43 | 107 | 11 | 75 | |
| 12 | 44 | 108 | 12 | 76 | |
| 13 | 45 | 109 | 13 | 77 | |
| 14 | 46 | 110 | 14 | 78 | |
| 15 | 47 | 111 | 15 | 79 | |
| 16 | 48 | 112 | 16 | 80 | |
| 17 | 49 | 113 | 17 | 81 | |
| 18 | 50 | 114 | 18 | 82 | |
| 19 | 51 | 115 | 19 | 83 | |
RANE
TTM57mkII
OWNER'S MANUAL
RGB Colors MIDI Note Velocity (HEX)
| Color | # | Bright On | Bright Blink | Dim On | Dim Blink |
| 0 20 (LED off) 60 (LED off) 00 (LED off) 40 (LED off) | |||||
| 1 | 21 | 61 | 01 | 41 | |
| 2 | 22 | 62 | 02 | 42 | |
| 3 | 23 | 63 | 03 | 43 | |
| 4 | 24 | 64 | 04 | 44 | |
| 5 | 25 | 65 | 05 | 45 | |
| 6 | 26 | 66 | 06 | 46 | |
| 7 27 67 07 47 | |||||
| 8 | 28 | 68 | 08 | 48 | |
| 9 | 29 | 69 | 09 | 49 | |
| 10 | 2A | 6A | A | 4A | |
| 11 | 2B | 6B | B | 4B | |
| 12 | 2C | 6C | C | 4C | |
| 13 | 2D | 6D | D | 4D | |
| 14 | 2E | 6E | E | 4E | |
| 15 | 2F | 6F | F | 4F | |
| 16 | 30 | 70 | 10 | 50 | |
| 17 | 31 | 71 | 11 | 51 | |
| 18 | 32 | 72 | 12 | 52 | |
| 19 | 33 | 73 | 13 | 53 | |
Magnetic Fader Maintenance
The faders and crossfader in the TTM57mkII are designed with materials highly resistant to corrosion and most chemicals. While they will handle millions of operations, they may become dirty over time. Bad things may be spilled into a fader, but in many instances the fader may not be damaged and the sound quality thus unaffected. Cleaning is only required to maintain the feel of the fader.
In order to maintain the feel of your faders, they may occasionally require cleaning and lubrication. The bearings in the fader work best with DuPont Teflon Multi-use Lubricant (part # D00040101). Make sure to follow the instructions and warnings on the bottle.
This lubricant goes on wet to deeply penetrate moving parts, but sets up with a clean, dry, long-lasting film which will not attract and absorb dirt and grime. Wet or oily lubricants may feel good at first, but will attract dirt and evaporate or become dry over time. See the fader cleaning instructions below.
Fader Assembly Removal
- Remove all three fader knobs.
- Remove all four screws holding the fader panel face plate.
- Lift up the fader panel face plate and set it aside where it can't get damaged.
- Remove the two screws at each end of a fader, holding the bottom of the fader in place with your other hand.
- Take out the fader assembly completely.
- Note the left connector goes to the left fader, the center connector goes to the crossfader, and the right connector goes to the right fader.
- Unplug the connectors of the white wires at the fader assembly without pulling the wires.
Reverse this procedure to re-assemble.
- Plug in the connector before re-installing the fader. Notice the connector only will fit one way.
- Test all the faders before installing the fader panel face plate and fader knobs.
Fader Cleaning
- For a light cleaning, move the carrier to one side and wipe rails with a lint-free cloth. Move the carrier to the other side and repeat.
- If a heavier cleaning is required to remove oily lubricants or grease, first take the carrier off of the rails by removing one of the endblocks. Clean the rails using a lint-free cloth and alcohol. Use a cue-tip and alcohol to clean the carrier bearings.
- With the fader clean, dry and assembled, add a couple of drops of Teflon Multi-use Lubricant to each rail of the fader.
- Move the carrier back and forth to distribute lubricant.
- Do not disturb the position of the small sensors at each end of the fader. If you accidentally do, make sure the parts are standing straight before re-installing.
OWNER'S MANUAL

Fader Calibration
After cleaning or replacement, the sensors may get moved, affecting the contour. After any fader service, perform this procedure to re-calibrate the faders and crossfader.
- Power off the TTM57mkII.
- Move all faders to the center-most position.
- Push down both of the Low Kill buttons at the same time.
-
While holding these buttons down, power on the TTM57mkII.
-
Immediately after powering up, the lights will flash one time, indicating a successful calibration. If the lights flash three times, the sensors may have moved too far or all faders were not properly centered, and the faders cannot correctly calibrate.
Fader Replacement
You probably won't need to replace a magnetic fader, as cleaning usually solves the problem. If you really need a spare, they are available for US customers at the Rane Factory Store at rane.com. They are also available through Rane's international distributors, found through dj.rane.com. Please order the Magnetic Fader V2. The fader from the original TTM57SL will not work in the TTM57mkll.
Problems? Contact Rane Corporation customer service at 425-355-6000 or email us at info@rane.com. Online help is available at dj.rane.com.
Technical Specifications
All specifications typical unless otherwise stated
Analog Inputs 4 Stereo unbalanced RCA jacks
.....Phono or Line level input Rear panel switches for each input
.....Phono Response RIAA ±1 dB, Gain: 31 dB at 1 kHz
......Rumble filter Butterworth 3rd-order Infrasonic
ADCs 24-bit, 48 kHz; Dynamic range 102 dB A-weighted
DACs 24-bit, 48 kHz; Dynamic range 108 dB A-weighted
Dynamic Range, Line in to Line Out 101 dB A-weighted
Digital Signal Processing 32-bit floating point
USB 2.0 Audio (2 Independent Ports) Five Stereo Record, Five Stereo Playback
....PCM 24-bit @ 44.1, 48, or 96 kHz
....Class Compliant
....Universal ASIO driver included for Windows 7-SP1, Windows 8 and 8.1
FlexFX Send and Return
Mic Input
.....Tone Controls
.....Mic-Line level switch
Line Outputs: Frequency Response
.....THD+N
.....Unbalanced jacks (RCA & FlexFX)
.....Balanced jacks (Main 1/4")
Universal Power Supply
USB Power
Unit: Conformity
.....Size (chassis)
.....Weight
Shipping Size
.....Weight
No driver needed for Mac OSX
Stereo unbalanced RCA jacks
Balanced 1/4" TRS & XLR combination jack
2-band, High and Low
Choose Line to connect wireless receiver
20 Hz to 20 kHz ±0.25 dB, Line in to Line out
<0.01% re 0 dBFS, 20 to 20 kHz, 20 kHz BW
Maximum 4 Vrms
Maximum 8 Vrms
100 to 240 VAC, 50 Hz to 60 Hz, 15 W max
Mixer is self-powered
CE, FCC, cCSAus
14" × 10" × 3.2" (35.6 × 25.4 × 8.2 cm)
8 lb (3.7 kg)
7.75"H x 15"W x 19.25"D (19.7 x 38.1 x 49 cm)
12 lb (5.5 kg)

natural_image
Technical line drawing of a rectangular electronic component with mounting holes and a hexagonal nut, dimensioned at 10.00 in width (no text or symbols beyond measurement labels)![jack river Line out kHz BW V max (49 cm) [1.8 cm] 0.70 in [8.2 cm] 3.22 in [10.6 cm] 4.17 in [1.6 cm] 0.65 in [35.6 cm] 14.00 in [1 cm] 0.39 in](/content/2026/06/1269217/images/66de7cf55e13453a1411a4e5287a582135e77712e5b0e4a711c220e1c1582ce6.jpg)
RANE
TTM57mkII
Limited Warranties
Factory Authorized Service
Your unit may someday need to be serviced by the Rane Factory if you live in the USA. International customers should contact your dealer or distributor for service. You must call the Rane factory before shipping. Please do not return your unit to Rane without prior authorization.
To obtain service or a Return Authorization in the USA, please phone Rane Corporation at 425-355-6000, or fax Rane at 425-347-7757.
Limited U.S.A. Warranty
RANE CORPORATION WARRANTS ALL RANE PRODUCTS (except those items classified and listed in "Wear Parts" on page 4) PURCHASED IN THE U.S. AGAINST DEFECTS IN MATERIAL OR WORKMANSHIP FOR A PERIOD OF TWO (2) YEARS. WEAR PARTS ARE LIMITED TO A PERIOD OF NINETY (90) DAYS FROM THE INITIAL DATE OF RETAIL PURCHASE FROM AN AUTHORIZED RANE DEALER — WEAR PARTS REQUIRE PROOF OF PURCHASE DATE. This limited warranty extends to all purchasers or owners of the product during the warranty period beginning with the original retail purchase. Rane Corporation does not, however, warrant its products against any and all defects: 1) arising out of material or workmanship not provided or furnished by Rane, or 2) resulting from abnormal use of the product or use in violation of instructions, or 3) in products repaired or serviced by other than the Rane Factory, or 4) in products with removed or defaced serial numbers, or 5) in components or parts or products expressly warranted by another manufacturer. Rane agrees to supply all parts and labor to repair or replace defects covered by this limited warranty with parts or products of original or improved design, at its option in each respect, if the defective product is shipped prior to the end of the warranty period to the Rane Factory in the original packaging or a replacement supplied by Rane, with all transportation costs and full insurance paid each way by the purchaser or owner.
Limited Warranty Outside the U.S.A.
RANE PRODUCTS ARE WARRANTED ONLY IN THE COUNTRY WHERE PURCHASED, THROUGH THE AUTHORIZED RANE DISTRIBUTOR IN THAT COUNTRY, AGAINST DEFECTS IN MATERIAL OR WORKMANSHIP, THE SPECIFIC PERIOD OF THIS LIMITED WARRANTY SHALL BE THAT WHICH IS DESCRIBED TO THE ORIGINAL RETAIL PURCHASER BY THE AUTHORIZED RANE DEALER OR DISTRIBUTOR AT THE TIME OF PURCHASE. Rane Corporation does not, however, warrant its products against any and all defects: 1) arising out of materials or workmanship not provided or furnished by Rane, or 2) resulting from abnormal use of the product or use in violation of instructions, or 3) in products repaired or serviced by other than authorized Rane repair facilities, or 4) in products with removed or defaced serial numbers, or 5) in components or parts or products expressly warranted by another manufacturer. Rane agrees, through the applicable authorized distributor, to repair or replace defects covered by this limited warranty with parts or products of original or improved design, at its option in each respect, if the defective product is shipped prior to the end of the warranty period to the designated authorized Rane warranty repair facility in the country where purchased, or to the Rane factory in the U.S., in the original packaging or a replacement supplied by Rane, with all transportation costs and full insurance paid each way by the purchaser or owner.
ALL REMEDIES AND THE MEASURE OF DAMAGES ARE LIMITED TO THE ABOVE SERVICES, IT IS POSSIBLE THAT ECONOMIC LOSS OR INJURY TO PERSON OR PROPERTY MAY RESULT FROM THE FAILURE OF THE PRODUCT; HOWEVER, EVEN IF RANE HAS BEEN ADVISED OF THIS POSSIBILITY, THIS LIMITED WARRANTY DOES NOT COVER ANY SUCH CONSEQUENTIAL OR INCIDENTAL DAMAGES. SOME STATES OR COUNTRIES DO NOT ALLOW THE LIMITATIONS OR EXCLUSION OF INCIDENTAL OR CONSEQUENTIAL DAMAGES, SO THE ABOVE LIMITATION MAY NOT APPLY TO YOU.
ANY AND ALL WARRANTIES, EXPRESS OR IMPLIED, ARISING BY LAW, COURSE OF DEALING, COURSE OF PERFORMANCE, USAGE OF TRADE, OR OTHERWISE, INCLUDING BUT NOT LIMITED TO IMPLIED WARRANTIES OF MERCHANTABILITY AND FITNESS FOR A PARTICULAR PURPOSE, ARE LIMITED TO A PERIOD OF TWO (2) YEARS FROM EITHER THE DATE OF ORIGINAL RETAIL PURCHASE OR, IN THE EVENT NO PROOF OF PURCHASE DATE IS AVAILABLE, THE DATE OF MANUFACTURE, SOME STATES OR COUNTRIES DO NOT ALLOW LIMITATIONS ON HOW LONG AN IMPLIED WARRANTY LASTS, SO THE ABOVE LIMITATIONS MAY NOT APPLY TO YOU. THIS LIMITED WARRANTY GIVES YOU SPECIFIC LEGAL RIGHTS, AND YOU MAY ALSO HAVE OTHER RIGHTS WHICH VARY FROM STATE TO STATE, COUNTRY TO COUNTRY.
Warranty Procedure - Valid in U.S.A. only
NOTICE! You must complete and return the warranty card or register your product online to extend the Warranty from 2 years to 3 years!
TO VALIDATE YOUR EXTENDED WARRANTY: Use the postcard that came in the box with your unit, or go to the support page at dj.rane.com and click on product registration. Fill out the warranty completely, being sure to include the model and serial number of the unit since this is how warranties are tracked. If your Rane product was purchased in the U.S.A., mail the completed card or register online with to Rane Corporation within 10 days from the date of purchase. If you purchased the product outside the U.S.A. you must file your warranty registration with the Rane Distributor in that country. It is advised that you keep your bill of sale as proof of purchase, should any difficulties arise concerning the registration of the warranty card. NOTICE: IT IS NOT NECESSARY TO REGISTER IN ORDER TO RECEIVE RANE CORPORATION'S STANDARD TWO YEAR LIMITED WARRANTY.
WARRANTY REGISTRATION is made and tracked by MODEL and SERIAL NUMBERS ONLY, not by the purchaser's or owner's name. Therefore any warranty correspondence or inquires MUST include the model and serial number of the product in question. Be sure to fill in the model and serial number in the space provided below and keep this in a safe place for future reference.
WARRANTY SERVICE MUST BE PERFORMED ONLY BY AN AUTHORIZED RANE SERVICE FACILITY LOCATED IN THE COUNTRY WHERE THE UNIT WAS PURCHASED, OR (if product was purchased in the U.S.) AT THE RANE FACTORY IN THE U.S.. If the product is being sent to Rane for repair, please call the factory for a Return Authorization number. We recommend advance notice be given to the repair facility to avoid possible needless shipment in case the problem can be solved over the phone. UNAUTHORIZED SERVICE PERFORMED ON ANY RANE PRODUCT WILL VOID ITS EXISTING FACTORY WARRANTY.
FACTORY SERVICE: If you wish your Rane product to be serviced at the factory, it must be shipped FULLY INSURED, IN THE ORIGINAL PACKING OR EQUIVALENT. This warranty will NOT cover repairs on products damaged through improper packaging. If possible, avoid sending products through the mail. Be sure to include in the package:
- Complete return street shipping address (P.O. Box numbers are NOT acceptable).
- A detailed description of any problems experienced, including the make and model numbers of any other system equipment.
- Remote power supply, if applicable.
Repaired products purchased in the U.S. will be returned prepaid freight via the same method they were sent to Rane. Products purchased in the U.S., but sent to the factory from outside the U.S. MUST include return freight funds, and the sender is fully responsible for all customs procedures, duties, tariffs and deposits.
In order to qualify for Rane's one year extended warranty (for a total of 3 years parts and labor), the warranty must be completely filled out and sent to us immediately. Valid in USA only.
We recommend you write your serial number here in your owners manual and on your sales receipt for your records.
SERIAL NUMBER: ____ PURCHASE DATE: ____
dj.rane.com is your center for support, accessories, community, and learning how to get the most from your TTM57mkII Mixer.
Declaration of Conformity
Application of
Standard(s) to which
Council Directives:
conformity is declared:
2001/95/EC 2002/96/EC
EN60065:2002/A1:2006/A11:2008/A2:2010/A12:2011
2004/108/EC 2006/95/EC
EN55103-1:2009/AM1:2012
2011/6 5/EU
EN55103-2:2009
EN50581:2012
ENVIRONMENT E2
Manufacturer:
SERIAL NUMBERS 900000 - 999999
Rane Corporation
CE MARK FIRST AFFIXED IN: 2015
10802 47th Avenue West
Mukilteo WA 98275-5000 USA
This equipment has been tested and found to be in compliance with all applicable standards and regulations applying to the EU's Low Voltage (LV) directive 2006/95/EC and Electromagnetic Compatibility (EMC) directive, 2004/108/EC. In order for the customer to maintain compliance with this regulation, high quality shielded cable must be used for interconnection to other equipment. Modification of the equipment, other than that expressly outlined by the manufacturer, is not allowed under this directive. The user of this equipment shall accept full responsibility for compliance with the LV directive and the EMC directive in the event that the equipment is modified without written consent of the manufacturer. This declaration of conformity is issued under the sole responsibility of Rane Corporation.
Type of Equipment: Professional Audio Signal Processing
Brand: Rane
Model: TTM57mkII (mark 2)
Immunity Results: THD+N: 4 dBu, 400 Hz, BW 20 Hz - 20 kHz
Test Description Measurement Conditions
RF Electromagnetic Fields Immunity
80 MHz -1000 MHz, 1 kHz AM, 80% depth, 3V/m <-68 dB
1400 MHz - 2700 MHz, 1 kHz AM, 80% depth, 3V/m <-68 dB
Conducted RF Disturbances Immunity
150 kHz - 80 MHz, 1 kHz AM, 80% depth, 3V rms <-68 dB
Magnetic Fields Immunity
50 Hz - 10 kHz, 3.0 - 0.3 A/m < -64 dB
Common Mode Immunity (Signal Ports) Bandpass re: 4 dBu, 1/3-octave
50 Hz - 10 kHz, -20 dBu
<-64 dB
I, the undersigned, hereby declare that the equipment specified above conforms to the Directive(s) and Standard(s) shown above.

(Signature)
Greg Frederick
(Full Name)
Compliance Engineer
(Position)
February 3, 2015
(Date)
Mukilteo WA USA
(Place)
RANE
TTM57mkII
OWNER'S MANUAL


- RANE TTM57mkII MIXER MANUAL
- OWNER'S MANUAL
- Important Safety Instructions
- WARNING
- Check List
- Wear Parts
- Contents
- TTM57mkII Overview
- Quick Start: Software
- Class Compliant Audio and MIDI
- Serato DJ Software Installation for Mac OSX
- Serato DJ Software Installation for Windows
- Quick Start: Hardware
- Quick Start: Operation
- Calibrating Serato DJ for Control Vinyl or CD
- How To Calibrate Serato DJ
- The Scopes
- Audio Connections
- Analog Inputs
- Analog Outputs
- Power Supply
- Two USB Ports
- Deck Input Channels
- Source
- Gain
- Tone Controls and Kill Buttons
- Filter
- FlexFX
- Mic Input
- Session In and Out
- Aux
- Main and Booth
- Headphone Cue
- Channel Faders & Crossfader
- Software Controls
- FX encoder, On & Shift buttons
- To change an effect:
- Loop encoder and Roll button
- Auto Looping workflow:
- Loop Roll workflow:
- Library encoder and Shift button
- Transform Joystick
- Transform Mode (LED On)
- Multifunction Serato DJ Control Mode (LED off)
- Cues / Samples control
- Footswitch Jack
- DJ Changeover
- Class Compliant USB Ports
- ASIO (Windows)
- Core Audio (Macintosh)
- Rane Control Panel
- Settings
- Firmware
- Deck Inputs 1-2 Control Panel
- General Control Panel
- MIDI Mapping
- TTM57mkII
- RGB and Red-Green LEDs
- RGB MIDI Velocity Values
- Magnetic Fader Maintenance
- Fader Assembly Removal
- Reverse this procedure to re-assemble.
- Fader Cleaning
- Fader Calibration
- Fader Replacement
- Technical Specifications
- All specifications typical unless otherwise stated
- Limited Warranties
- Factory Authorized Service
- Limited U.S.A. Warranty
- Limited Warranty Outside the U.S.A.
- Warranty Procedure - Valid in U.S.A. only
- We recommend you write your serial number here in your owners manual and on your sales receipt for your records.
- Declaration of Conformity
Brand : Rane
Model : TTM57mkII
Category : DJ Equipment