Obey 10 - Controller Chauvet - Free user manual and instructions
Find the device manual for free Obey 10 Chauvet in PDF.

| Product type | Universal DMX controller for stage lighting |
| Brand | Chauvet |
| Model | Obey 10 |
| Dimensions (W x D x H) | 483 x 89 x 89 mm |
| Weight | 1.78 kg |
| Power supply | DC 12 V, 500 mA (power adapter included, AC 100-240 V, 50/60 Hz) |
| Number of DMX channels | 128 channels (8 fixtures x 16 channels) |
| DMX output connector | Locking 3-pin female XLR |
| DMX protocol | DMX-512 USITT |
| DMX polarity selector | Yes |
| Number of chases | 6, with up to 999 steps each |
| Playback functions | Manual, sound-activated (built-in microphone), automatic, chase linking |
| Control faders | 8 channel faders (A/B pages for channels 1-8 and 9-16), Speed and Fade Time faders |
| Display | 3-digit LED (0-255 or 0-100% display) |
| Function buttons | Program, Music/Add, Auto/Del, Step Up/Down, Blackout, Page Select, fixture selection |
| Rack mountable | Yes, 2U |
| Max. ambient temperature | 45 °C |
| Use | Indoor use only |
| Factory reset | Press Step Up and Auto/Del simultaneously |
| Warranty | Limited 2-year warranty |
| Maintenance and cleaning | No user-serviceable parts; do not open housing. Clean with a dry cloth, power off. |
| Safety instructions | Do not expose to rain or moisture; ventilate at least 50 cm; disconnect before repair; do not connect to a dimmer. |
Frequently Asked Questions - Obey 10 Chauvet
User questions about Obey 10 Chauvet
0 question about this device. Answer the ones you know or ask your own.
Ask a new question about this device
Download the instructions for your Controller in PDF format for free! Find your manual Obey 10 - Chauvet and take your electronic device back in hand. On this page are published all the documents necessary for the use of your device. Obey 10 by Chauvet.
USER MANUAL Obey 10 Chauvet
UNPACKING INSTRUCTIONS 5
DISCLAIMER....5
LIMITED WARRANTY 5
SAFETY INSTRUCTIONS....6
2. Introduction ......7
FEATURES 7
PRODUCT OVERVIEW (REAR PANEL) 7
PRODUCT OVERVIEW (FRONT)......8
COMMON TERMS....9
3. Operating Instructions....10
SETUP....10
Setting up the System 10
Fixture Addressing 10
Reset to Factory Default....10
Blackout....10
PROGRAMMING....11
Entering program mode....11
Delete a Step....11
Delete Chase....11
ADDING A STEP TO A CHASE 12
Delete a Chase....12
PLAYBACK....13
Manual Run Chase....13
4. Technical specifications....14
Returns 15
Contact Us....16
VUE D'ENSEMBLE DU PRODUIT (FACE ARRIERE) 31
VUE D'ENSEMBLE DU PRODUIT (AVANT) 32
TERMES USUELS 33
Neem Contact Op....65
1. BEFORE YOU BEGIN
What is Included
- Obey 10 controller
- DC 12V 500 mA, 110V Power Adapter or 230V Power Adapter
- User Manual
Unpacking Instructions
Immediately upon receiving a fixture, carefully unpack the carton, check the contents to ensure that all parts are present, and have been received in good condition. Notify the shipper immediately and retain packing material for inspection if any parts appear damaged from shipping or the carton itself shows signs of mishandling. Save the carton and all packing materials. If a fixture must be returned to the factory, it must be returned in the original factory box and packing.
Disclaimer
Chauvet believes that the information contained in this manual is accurate in all respects. However, Chauvet assumes no responsibility and specifically disclaims any and all liability to any party for any loss, damage or disruption caused by any errors or omissions in this document, whether such errors or omissions result from negligence, accident or any other cause. Chauvet reserves the right to revise the content of this document without any obligation to notify any person or company of such revision, however, Chauvet has no obligation to make, and does not commit to make, any such revisions. Download the latest version from www.chauvetlighting.com.
The works of authorship contained in this manual, including, but not limited to, all design, text and images are owned by Chauvet.
© Copyright 2019 Chauvet & Sons, Inc. All rights reserved.
Electronically published by Chauvet in the United States of America.
CHAUVET, the Chauvet logo, D-Fi, and D-Fi USB are registered trademarks or trademarks of Chauvet & Sons Inc. (d/b/a Chauvet and Chauvet Lighting) in the United States and other countries. Other company and product names and logos referred to herein may be trademarks of their respective companies.
Limited Warranty
FOR WARRANTY REGISTRATION AND COMPLETE TERMS AND CONDITIONS PLEASE VISIT OUR WEBSITE.
For Customers in the United States and Mexico: www.chauvetlighting.com/warranty-registration
For Customers in the United Kingdom, Republic of Ireland, Belgium, the Netherlands, Luxembourg, France, and Germany: www.chauvelighting.eu/warranty-registration/
Chauvet warrants that this product shall be free from defects in material and workmanship under normal use, for the period specified in and subject to the exclusions and limitations set forth in, the full limited warranty on our website. This warranty extends only to the original purchaser of the product and is not transferable. To exercise rights under this warranty, you must provide proof of purchase in the form of an original sales receipt from an authorized dealer that shows the product name and date of purchase. THERE ARE NO OTHER EXPRESS OR IMPLIED WARRANTIES. This warranty gives you specific legal rights. You may also have other rights that vary from state to state and country to country. This warranty is valid only in the United States, United Kingdom, Republic of Ireland, Belgium, the Netherlands, Luxembourg, France, Germany and Mexico. For warranty terms in other countries, please consult your local distributor.
Safety Instructions

Read these instructions carefully. They include important information about the installation, usage and maintenance of this product.
- Please keep this User Guide for future consultation. If you sell the unit, be sure that they receive this instruction booklet.
- Always connect to the proper voltage and verify that the line voltage you are connecting to is not higher than that stated on decal or rear panel of the fixture.
• This product is intended for indoor use only! - To prevent risk of fire or shock, do not expose fixture to rain or moisture. Make sure there are no flammable materials close to the unit while operating.
- The unit must be installed in a location with adequate ventilation, at least 50cm from adjacent surfaces. Be sure that no ventilation slots are blocked.
- Always disconnect from power source before servicing or replacing lamp or fuse and be sure to replace with same lamp source.
- In the event of serious operating problem, stop using the unit immediately. Never try to repair the unit by yourself. Repairs carried out by unskilled people can lead to damage or malfunction. Please contact the nearest authorized technical assistance center. Always use the same type spare parts.
- Do not connect the device to a dimmer pack.
- Make sure power cord is never crimped or damaged.
- Never disconnect power cord by pulling or tugging on the cord.
- Do not operate this device in more than 113^ ambient temperature conditions.
- To eliminate unnecessary wear and improve its lifespan, during periods of non-use completely disconnect the product from power via breaker or by unplugging it. To eliminate unnecessary wear and improve its lifespan, during periods of non-use completely disconnect the product from power via breaker or by unplugging it.
Caution!
There are no user-serviceable parts inside the unit. Do not open the housing or attempt any repairs yourself. If the unit requires service, please contact Chauvet at www.chauvetdj.com.
2. INTRODUCTION
The Obey 10 is a universal intelligent lighting controller. It allows the control of 8 fixtures composed of 16 channels each and up to 6 programmable chases. Six chase banks can contain up to 999 steps. Programs can be triggered by music, automatically or manually. On the surface you will find various programming tools such as 8 universal channel sliders, quick access scanner buttons, and an LED display indicator for easier navigation of controls and menu functions.
Features
• Universal DMX-512 controller
• Controls up to 8 intelligent lights of up to 16 channels each
• 128 DMX channels of control
- 6 sets of chases containing 999 scenes each
• Sequential linking of chases
• Grab any fixture on the fly
- Beat activation and auto run
• DMX polarity selector
• 2-space (2U) rack mount
Product Overview (rear panel)
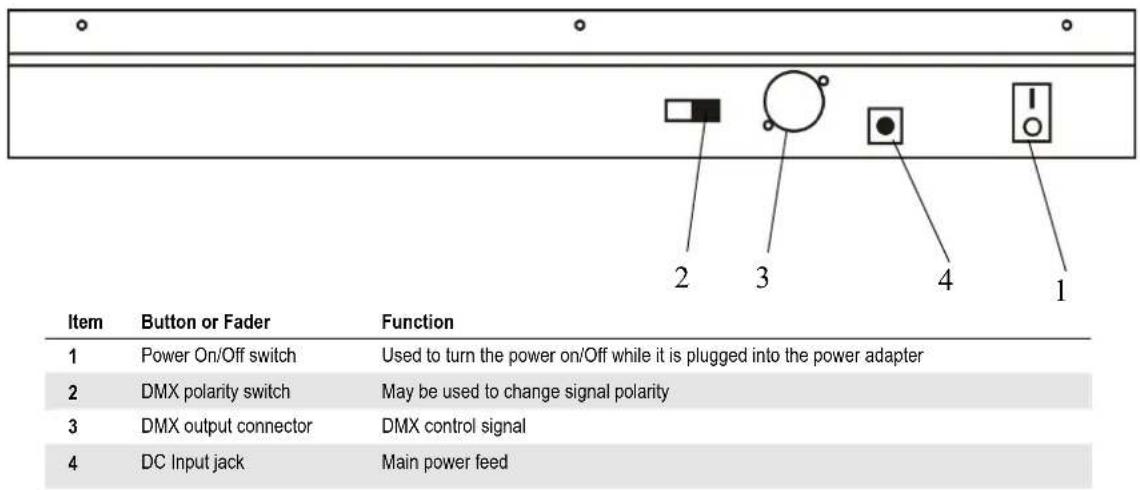
text_image
Item Button or Fader Function 1 Power On/Off switch Used to turn the power on/Off while it is plugged into the power adapter 2 DMX polarity switch May be used to change signal polarity 3 DMX output connector DMX control signal 4 DC Input jack Main power feedProduct Overview (front)

text_image
1 2 3 4 5 6 7 8 9 10 11 12 TICKUETES Chases CHAVEL Chases Step Time Step Time Step Time Step Time Step Time Step Time Step Time Step Time Step Time Step Time Step Time Step Time Step Time Step Time Step Time Step Time Step Time Step Time Step Time Step Time Step Time Step Time Step Time Step Time Step Time Step Time Step Time Step Time Step Time Step Time Step Time Step Time Step Time Step Time| Item | Button or Fader | Function |
| 1 | Fixture select buttons | Fixture selection |
| 2 | Fixture indicator LED's | Indicates the fixtures currently selected |
| 3 | Channel faders | For adjusting DMX values, Ch 1~8 can be adjusted immediately after pressing the respective scanner select button, Ch 9~16 after pressing the Page select button |
| 4 | Page A Indicator LED | Represents Ch 1~8 range selected |
| 5 | Page B Indicator LED | Represents Ch 9~16 range selected |
| 6 | Page select button | Press to toggle between pages of control. |
| 7 | Program button | Used to enter programming mode |
| 8 | Music/Add Copy button | Used to activate Music mode and as the confirm command during programming |
| 9 | LED display window | Status window displays pertinent operational data |
| 10 | Step Up button | Function button to scroll through steps in a scene during programming and playback |
| 11 | Step Down button | Function button to scroll through steps in a scene during programming and playback |
| 12 | Blackout button | Reduces all DMX values to zero. |
| 13 | Auto/Del button | Used to activate Auto mode and as the delete function key during programming |
| 14 | Chase buttons | Chase memory 1 ~ 6 |
| 15 | Speed fader | This will adjust the hold time of a scene or a step within a chase |
| 16 | Fade Time fader | Also considered a cross-fade, sets the interval time between two scenes in a chase |
| 17 | Step/Dis button | This is used to change steps and modify the display from 0-255 or 0-100% |
Common Terms
The following are common terms used in intelligent light programming.
- Blackout is a state where all lighting fixtures' light output are set to 0 or off, usually on a temporary basis.
DMX-512 is an industry standard digital communication protocol used in entertainment lighting equipment. For more information read Sections "DMX Primer" and "DMX Control Mode" in the Appendix. - Fixture refers to your lighting instrument or other device such as a fogger or dimmer which you can control.
Programs are a bunch of scenes stacked one after another. It can be programmed as either a single scene or multiple scenes in sequence.
■ Scenes are static lighting states.
■ Sliders are also known as faders.
Chases can also be called programs. A chase consists of a bunch of scenes stacked one after another.
Scanner refers to a lighting instrument with a pan and tilt mirror; however, DMX controllers can use this term to control any DMX-512 compatible device as a generic fixture.
MIDI is a standard for representing musical information in a digital format. A MIDI input would provide external triggering of scenes using midi device such as a midi keyboard.
■ Standalone refers to a fixture's ability to function independently of an external controller and usually in sync to music, due to a built-in microphone.
■ Fade slider is used to adjust the time between scenes within a chase.
■ Speed slider affects the amount of time a scene will hold its state. It is also considered a wait time.
Shutter is a mechanical device in the lighting fixture that allows you to block the light's path. It is often used to lessen the intensity of the light output and to strobe. - Patching refers to the process of assigning faders to a DMX channel within a fixture.
■ Playbacks can be either scenes or chases that are directly called to execution by the user. A playback can also be considered program memory that can be recalled during a show.
3. OPERATING INSTRUCTIONS
Setup
Setting up the System
1) Place the Obey 10 on a level surface.
Note! The Obey 10 can also be rack mounted, occupying two rack spaces (2U).
2) Plug the AC to DC power supply into the system back panel and into the mains outlet.
3) Plug in your DMX cable(s) to your intelligent lighting as described in the respective fixture's manual. For a quick overview of DMX see the "DMX Primer" section.
4) Reset the system using the instructions on page 9.
Fixture Addressing
The Obey 10 is programmed to control 16 channels of DMX per fixture. Therefore, the fixtures you wish to control with the corresponding "FIXTURE" buttons on the unit must be spaced 16 channels apart (check the respective fixture's manual for how to enter the information into the fixture).
Note: failure to use these DMX assignments may cause a lack of control of the fixtures.
| FIXTURE OR SCANNER # | DEFAULT DMX STARTING ADDRESS | BINARY DIPSWITCH SETTINGS SWITCH TO THE “ON POSITION” |
| 1 | 1 | 1 |
| 2 | 17 | 1,5 |
| 3 | 33 | 1,6 |
| 4 | 49 | 1,5,6 |
| 5 | 65 | 1,7 |
| 6 | 81 | 1,5,7 |
| 7 | 97 | 1,6,7 |
| 8 | 113 | 1,5,6,7 |
Reset to Factory Default
Action
1) Press the STEP UP and AUTO/DEL buttons simultaneously.
2) All LEDs will flash, indicating a successful reset of the controller.
Notes □
This will erase all saved Chases!
This will work in any mode: Program or Playback.
Blackout
The Blackout button brings all lighting output to 0 or off (also called the home position of the unit).
Programming
A program (bank) is a sequence of different scenes (or steps) that will be called up one after another. In the Obey 10, 6 programs can be created with up to 999 steps each.
Entering program mode
Press the PROGRAM button for 3 seconds until an LED dot next to the label PROGRAM blinks. This indicates that the user is in programming mode.
Action
1) Press and hold the PROGRAM button for 3 seconds.
2) Select a FIXTURE to program.
3) Select a Chase to store the program to (1\~6).
4) Compose a look by moving the FADERS. (Changes in fixture attribute such as colors and gobos.) Press PAGE SELECT to access Channels 9\~16 on the faders.
5) To program another FIXTURE press the FIXTURE button you have just finished programming then select another FIXTURE button to program.
6) Repeat steps 2 \~ 4 until you have your look.
7) Tap MUSIC/ADD button to store.
8) All FIXTURES LEDs will flash, indicating a successful save of the step to the memory.
9) The display will automatically go on to the next step. Use the Step Up and Step Down buttons to navigate through the existing steps in the Chase.
10) Repeat steps 2 \~ 8 to record more scenes.
( Read Important notes on the right -> )
11) To exit program mode, hold the PROGRAM button for 3 seconds. The controller will default to a BLACKOUT when exiting the programmer.
Notes □
Deselect Blackout if LED is lit.
A FIXTURE button represents one lighting fixture.
You can access channels 9\~16 by pressing the Page Select button. This is necessary for fixtures that use more than 8 channels of control. When switching pages it will be necessary to move previously moved faders up then down to activate.
Pressing the same FIXTURE button again will hold the parameters changed for that fixture in the program scene.
There are 999 scenes available for every chase.
Delete a Step
Action
1) Press the PROGRAM button for 3 seconds.
2) Press the Chase button (1\~6) for the corresponding chase you wish to edit.
3) Locate the step in the program by using the Step Up and Step Down buttons.
4) Press the Auto/Del button to delete the current step.
5) All FIXTURES LEDs will flash, indicating a successful delete of the step from the memory
6) When you have finished deleting the steps, press & hold the Program button for 3 seconds to exit the Program mode.
Notes □
Deselect Blackout if LED is lit.
The currently selected scene will be outputted to the light fixtures connected to the DMX output.
Delete Chase
Action
1) Press the PROGRAM button for 3 seconds.
2) Press and hold the AUTO/DEL button while pressing the Chase you want to delete.
Notes ☐
! This will erase all Steps in the Chase!!!
3) All LED's will flash, indicating that the Chase was successfully erased.
Adding a Step to a Chase
Action
1) Press and hold the PROGRAM button for 3 seconds to enter programming mode.
2) Press the desired CHASE (1\~6) button.
3) Use the Step Up/Step Down buttons to scroll through the chase and arrive at the step number for which you would like to add a step to.
4) Select a FIXTURE button.
5) Adjust the Faders to the desired look on stage.
6) Press Music/Add button and one step number will be added after the previously displayed step number. All FIXTURES LED indicators will flash to confirm successful copy.
7) Repeat steps 3\~6 until all scenes have been added to the chase.
8) Press and hold the PROGRAM button for 3 seconds to exit programming mode.
Notes
The step will be added after the scene displayed on the digital readout.
Delete a Chase
Action
1) Press and hold the PROGRAM button for 3 seconds to enter programming mode.
2) Press the CHASE button (1\~6) to be deleted.
3) Press and hold the AUTO/DEL button and the respective CHASE button then release to delete the chase. All LED's will blink 3 times. All FIXTURES LED indicators will flash to confirm successful copy.
Notes □
Steps will remain programmed on the controller. Only the chase is affected.
Playback
Manual Run Chase
When power is first turned ON, the controller will be in manual scene mode.
Action

1) Make sure neither MUSIC TRIGGER nor AUTO TRIGGER LED's on the LED display are on.
2) Select the program CHASE button that stores the scene you want to run manually by using the STEP UP/DOWN.
Notes ☐
If you are in programming mode you can also press and hold the PROGRAM button until the Program LED goes off.
1) Press the MUSIC/ADD button until the MUSIC TRIGGER LED turns on.
2) Select the CHASE you wish to operate.
3) Press the AUTO/DEL button to exit the Chase.
Notes □
In the Sound mode, programs will be triggered by the sound using its built-in microphone. All scenes in a Bank will chase.
Running in Auto-Mode
Action

1) Press and hold the AUTO/DEL button until the AUTO TRIGGER LED turns on.
2) Select the CHASE you wish to operate.
3) You can set the time between steps by moving the SPEED fader and the fade time of the step by moving the FADE TIME fader.
4) You can change Banks while in operation by using the STEP UP/DOWN buttons.
Notes □
In the Auto mode, programs will be triggered by controllers fade and speed time as set on the faders. All scenes in a Bank will chase.
CAUTION! The fade setting should never be slower than the speed setting or the scene will never complete execution.
Running Sequential chases
Action

1) Press either AUTO/DEL or MUSIC/ADD buttons to select the trigger mode.
2) Press the CHASE button for each chase you wish to add to playback.
3) Adjust the Chase speed by changing the SPEED fader.
Notes □
Chases must already be programmed.
The chases will run in the order they are pressed
To delete a chase from the playback, press the CHASE button you wish to exclude from the playback.
4. TECHNICAL SPECIFICATIONS
WEIGHT & DIMENSIONS
Length....19 in (482 mm)
Width 3.5 in (89 mm)
Height 3.5 in (89 mm)
Weight....3.9 lb (1.78 kg)
POWER
Operating Range ...... DC 12V 500 mA max
Adapter....Provided
THERMAL
Maximum ambient temperature 113 °F (45 °C)
CONTROL & PROGRAMMING
Data output ....locking 3-pin XLR female socket
Data pin configuration.... pin 1 shield, pin 2 (-), pin 3 (+)
Protocols......DMX-512 USITT
ORDERING INFORMATION
Obey 10 Controller....OBEY10
WARRANTY INFORMATION
Warranty 2-year limited warranty

text_image
CE RoHSRETURNS
To get support or return a product:
• If you are located in the US, contact Chauvet World Headquarters.
• If you are located in the UK or Ireland, contact Chauvet Europe Ltd.
- If you are located in Benelux, contact Chauvet Europe BVBA.
- If you are located in France, contact Chauvet France.
• If you are located in Germany, contact Chauvet Germany.
- If you are located in Mexico, contact Chauvet Mexico.
- If you are located in any other country, DO NOT contact Chauvet. Instead, contact your local distributor. See www.chauvetdj.com for distributors outside the U.S., UK, Ireland, Benelux, France, Germany, or Mexico.

If you are located outside the US, UK, Ireland, Benelux, France, Germany, or Mexico, contact your distributor of record and follow their instructions on how to return Chauvet products to them. Visit our website www.chauvetdj.com for contact details.
Call the corresponding Chauvet Technical Support office and request a Return Merchandise Authorization (RMA) number before shipping the product. Be prepared to provide the model number, serial number, and a brief description of the cause for the return.
Send the merchandise prepaid, in its original box, and with its original packing and accessories. Chauvet will not issue call tags.
Clearly label the package with the RMA number. Chauvet will refuse any product returned without an RMA number.

Write the RMA number on a properly affixed label. DO NOT write the RMA number directly on the box.
Before sending the product, clearly write the following information on a piece of paper and place it inside the box:
- Your name
- Your address
- Your phone number
- RMA number
• A brief description of the problem
Be sure to pack the product properly. Any shipping damage resulting from inadequate packaging will be your responsibility. FedEx packing or double-boxing are recommended.

Chauvet reserves the right to use its own discretion to repair or replace returned product(s).
CONTACT Us
| General Information | Technical Support |
| Chauvet World Headquarters | |
| Address: 5200 NW 108th Avenue Sunrise, FL 33351 Voice: (954) 577-4455 Fax: (954) 929-5560 Toll free: (800) 762-1084 | Voice: (844) 393-7575 Fax: (954) 756-8015 Email: chauvetcs@chauvetlighting.com Website www.chauvetdj.com |
| Chauvet Europe Ltd | |
| Address: Unit 1C Brookhill Road Industrial Estate Pinxton, Nottingham, UK NG16 6NT Voice: +44 (0)1773 511115 Fax: +44 (0)1773 511110 | Email: UKtech@chauvetlighting.eu Website: www.chauvetdj.eu |
| Chauvet Europe BVBA | |
| Address: Stokstraat 189770 KruishoutemBelgiumVoice: +32 9 388 93 97 | Email:BNLtech@chauvetlighting.euWebsite:www.chauvetdj.eu |
| Chauvet France | |
| Address: 3, Rue Ampère91380 Chilly-MazarinFranceVoice: +33 1 78 85 33 59 | Email:FRtech@chauvetlighting.frWebsite:www.chauvetdj.eu |
| Chauvet Germany | |
| Address: Bruno-Bürgel-Str. 1128759 BremenGermanyVoice: +49 421 62 60 20 | Email:DEtech@chauvetlighting.deWebsite:www.chauvetdj.eu |
| Chauvet Mexico | |
| Address: Av. de las Partidas 34-3B(Entrance by Calle 2)Zona Industrial LermaLerma, Mexico C.P. 52000Voice: +52 (728) 690-2010 | Email:servicio@chauvet.com.mxWebsite:www.chauvetdj.mx |
Visit the applicable website above to verify our contact information and instructions to request support. Outside the US, United Kingdom, Ireland, Mexico, France, Germany, or Benelux, contact the dealer of record.
1. ANTES DE EMPEZAR
Qué va incluido
INFORMATIONS DE GARANTIE
Chauvet World Headquarters
Adresse : 5200 NW 108th Avenue
Sunrise, FL 33351
Brookhill Road Industrial Estate
Pinxton, Nottingham, UK
NG16 6NT
Chauvet World Headquarters
Adresse: 5200 NW 108th Avenue
Sunrise, FL 33351
Tel: (954) 577-4455
Fax: (954) 929-5560
Brookhill Road Industrial Estate
Pinxton, Nottingham, UK
NG16 6NT
Tel: +44 (0)1773 511115
Fax: +44 (0)1773 511110
E-Mail: UKtech@chauvetlighting.eu
Chauvet World Headquarters
Adres: 5200 NW 108th Avenue
Sunrise, FL 33351
Bandopname: (954) 577-4455
Fax: (954) 929-5560
Gratis: (800) 762-1084
Bandopname: (844) 393-7575
Fax: (954) 756-8015
E-mail: chauvetcs@chauvetlighting.com
Website www.chauvetdj.com
Chauvet Europe Ltd
Adres: Unit 1C
Brookhill Road Industrial Estate
Pinxton, Nottingham, UK
NG16 6NT
Bandopname: +44 (0)1773 511115
Fax: +44 (0)1773 511110
E-mail: UKtech@chauvetlighting.eu
Website: www.chauvetdj.eu
Chauvet Europe BVBA
(Entrance by Calle 2)
Zona Industrial Lerma
Lerma, Mexico C.P. 52000
Bandopname: +52 (728) 690-2010
E-mail: servicio@chauvet.com.mx
Website: www.chauvetdj.mx