
WPFXF500 - Camera bag FUJIFILM - Free user manual and instructions
Find the device manual for free WPFXF500 FUJIFILM in PDF.
| Product Type | Waterproof housing for digital camera |
| Brand | Fujifilm |
| Model | WPFXF500 |
| Compatible cameras | FinePix F300EXR / F500EXR / F550EXR |
| Maximum depth | 40 m |
| Dimensions (L × H × D) | 142.7 mm × 100.5 mm × 107.8 mm (including accessories) |
| Weight | Approx. 507 g (without camera or accessories) |
| Housing material | Transparent polycarbonate |
| Lens window | Glass |
| Seal | O-rings (white and orange), special silicone grease included |
| Included accessories | Wrist strap, stylus, special silicone grease (3 g), silica gel packets (×3), flash diffuser plate, instruction manual, quick maintenance guide |
| Power | Uses the camera's built-in battery (Fujifilm-specific battery) |
| Maintenance and cleaning | Clean the O-ring with a soft cloth, use only the supplied silicone grease. Rinse with fresh water after use in the sea. Do not use solvents. |
| O-ring replacement | Recommended once a year. Replacement kit available (ORK-FXF500). |
| Safety | Do not disassemble, do not expose to temperatures >40°C, do not use in water >40°C, do not drop. Perform an immersion test before each use. |
| Storage | Open the housing slightly after use, store in a cool place away from sunlight. Do not store with the camera inside. |
Frequently Asked Questions - WPFXF500 FUJIFILM
User questions about WPFXF500 FUJIFILM
0 question about this device. Answer the ones you know or ask your own.
Ask a new question about this device
Download the instructions for your Camera bag in PDF format for free! Find your manual WPFXF500 - FUJIFILM and take your electronic device back in hand. On this page are published all the documents necessary for the use of your device. WPFXF500 by FUJIFILM.
USER MANUAL WPFXF500 FUJIFILM
Specially Designed for
FINEPIX F300EXR/F500EXR/F550EXR
防水□町夕一
Waterproof Case
WP-FXF500
使用說明書
防水口町夕一WP-FXF500保証書付
OWNER'S MANUAL
WP-FXF500 Waterproof Case
MODE D'EMPLOI
http://repairlt.fujifilm.co.jp/repair/certificate.jsp
Thank you for purchasing this product.
Before using the product, make sure to read this "Owner's Manual," particularly these "Safety Notes," as well as the "Owner's Manual" for the Digital Camera. After reading them, keep them available so that you can check them easily at any time.
| ■The icons shown below are used in this document to indicate the severity of the injury or damage that can result if the information indicated by the icon is ignored or the product is used incorrectly. | |
| WARNING | This icon indicates that serious injury can result if the information is ignored. |
| CAUTION | This icon indicates that personal injury or material damage can result if the information is ignored. |
| ■ The icons shown below are used to indicate the nature of the information which is to be observed. | |
| ▲ | Triangular icons notify the user of information requiring attention ("Important"). |
| ◎ | Circular icons with a diagonal bar tell you that the action indicated is prohibited ("Prohibited"). |
| ● | Filled circles with an exclamation mark notify the user of an action that must be performed ("Required"). |
| WARNING | |
| Do not disassemble. | Never attempt to modify or disassemble the product. This may cause water to leak in. |
| Do not place the product on an unstable surface. This can cause the product to fall or tip over and cause damage or injury. | |
| Use only the battery specified for use with the camera. The use of other power sources can cause fire. | |
| Do not use the battery except as specified. Load the battery as shown with the indicator. | |
| Do not heat, modify or attempt to disassemble the battery. Do not drop or subject the battery to any impact. Do not short-circuit the battery. Do not store the battery with metallic products. Do not use chargers other than the specified model to charge the battery. Ignoring any of the above instructions can cause the battery to explode or leak and cause fire or injury as a result. | |
| Keep out of the reach of small children. This product could cause injury in the hands of a child. | |
| Take care when using the waterproof case with the strap attached. This may cause the case to swing unexpectedly, causing damage or injury. | |
| Do not leave the underwater camera housing in direct sunlight or in places subject to extreme temperatures. If pressure inside the case rises due to heat, the lid may pop open violently and cause damage or injury. | |
| Do not eat the silica gel or grease for use with this product. If it is put in the mouth or eaten, seek medical advice immediately. | |
| CAUTION | |
| Do not drop the product or strike it against hard objects. It may crack the product and cause water to leak in. | |
| Remove the battery when you are cleaning the camera or you do not plan to use the camera for an extended period. Failure to do this can cause the battery to leak or cause fire. | |
| Do not use the flash too close to a person's eyes. It may temporarily affect the eyesight. Take particular care when photographing infants and young children. | |
| ⊗ | Do not open or close this product in sandy or dusty places. If a sand grain or dust is caught in the O-ring, it may cause water to leak in. |
| ⊗ | Do not leave the product in places subject to extremely high or low temperatures. It may cause it to break down. |
| ⊗ | If the camera gets wet, immediately remove the battery from the camera. |
| ⊗ | Do not use the product at depths exceeding 40 m (131 ft.) below the surface. It may cause it to break. |
Contents
Safety Notes 2
Contents. 4
Preface. 5
Accessories Included. 5
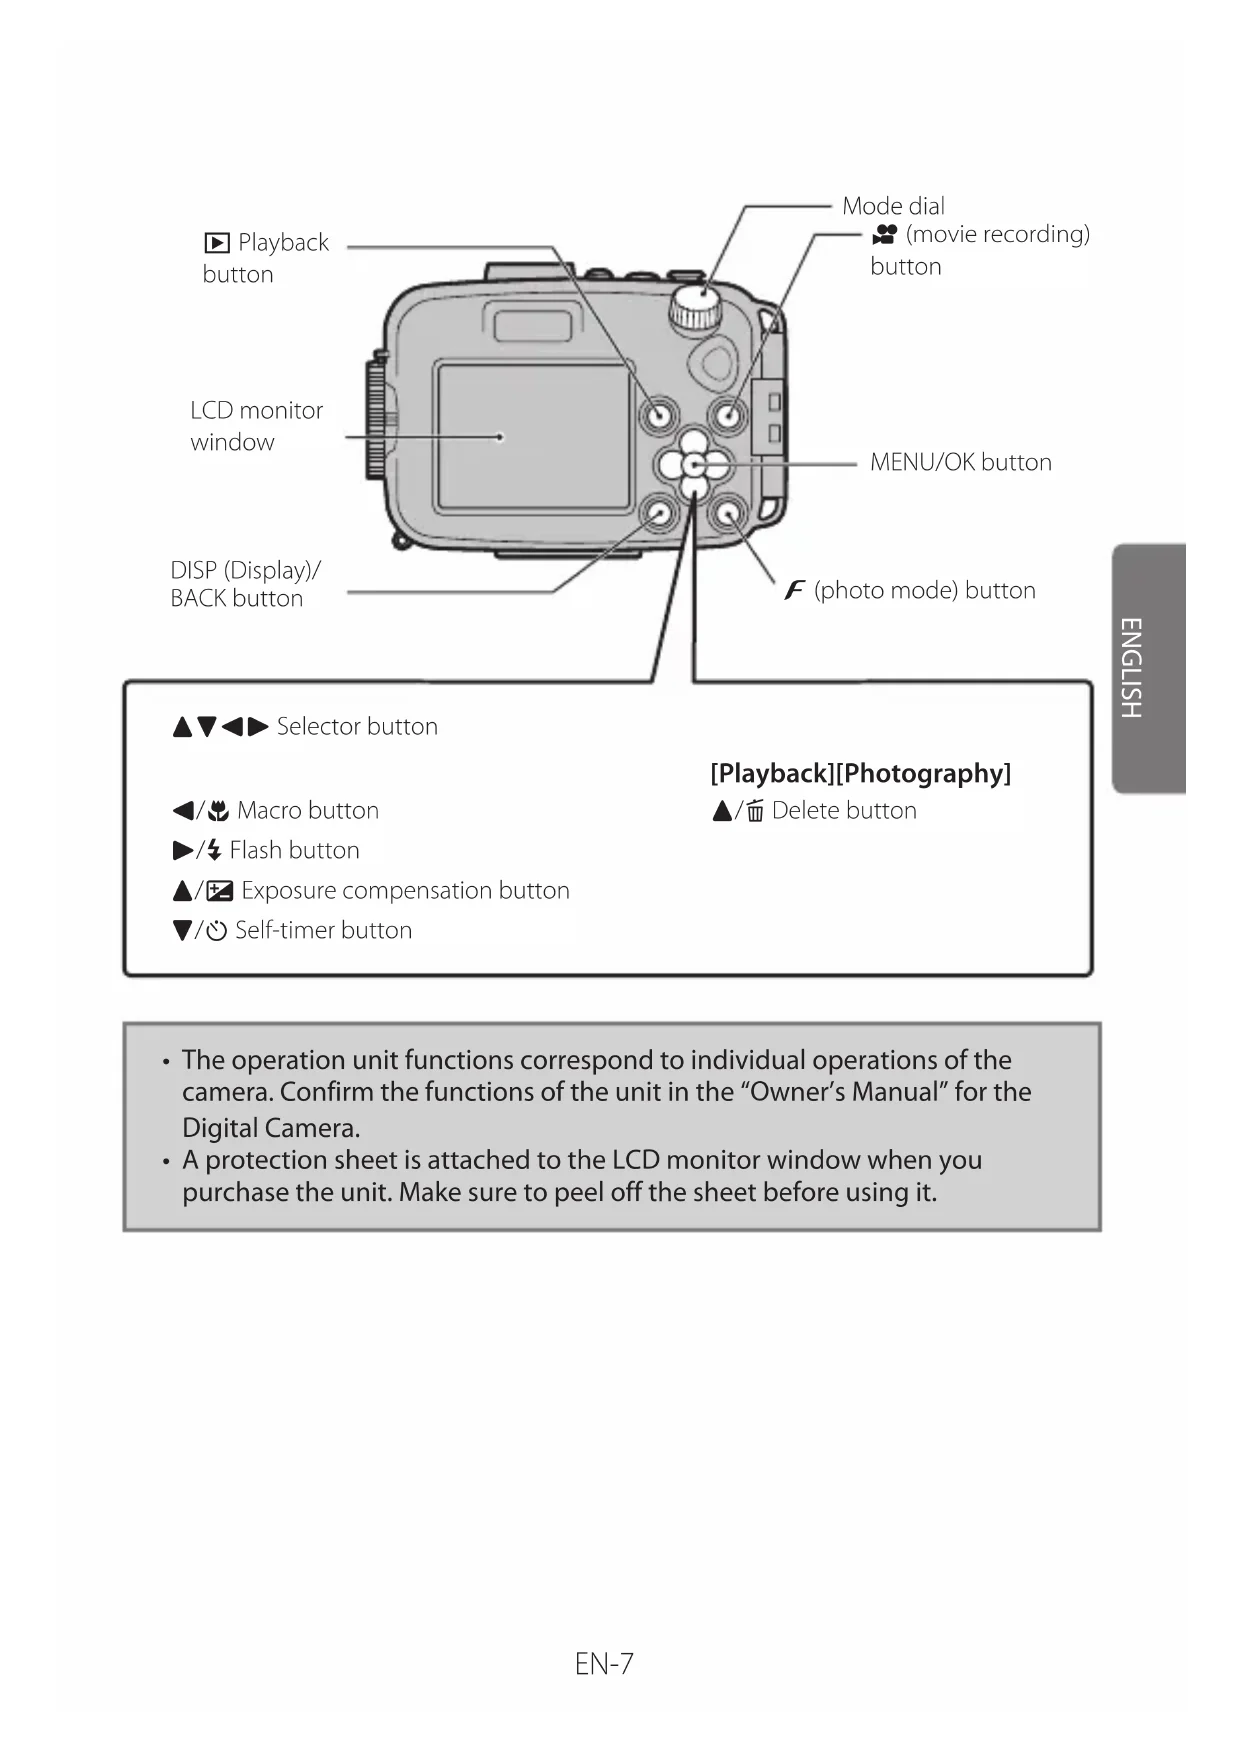
Part Names 6
Preliminary check of the case. 8
Make a preliminary submersion test on the waterproof case before positioning the digital camera. 8
Positioning the Digital Camera in the Waterproof Case 11 Conducting a final test. 13
Attaching the strap 15
Installing the flash diffusion plate 16
Taking Pictures 17
After Taking Pictures (Storage) 19
Maintenance 22
Maintenance after use. 22
Notes on Using the Waterproof Case Correctly 26
Specifications 27
Accessories Guide. 27
- FUJIFILM Corporation cannot accept liability for any incidental losses (such as photographic costs or loss of income from photography) incurred as a result of faults with this product.
■ Be sure to read this before use
- This waterproof case is designed for use underwater to a depth of 40m (131 ft.). Handle the case carefully.
- Please follow the guidelines in this manual regarding how to prepare the waterproof case for use, how to make a preliminary check, maintaining the case and putting it away it after use. Use the product only as described in this manual.
- FUJIFILM Corporation will not compensate for any damage to the digital camera or any incidental losses caused by improper use of the waterproof case.
- FUJIFILM Corporation will not compensate for any personal injury or death or property damage caused during use.
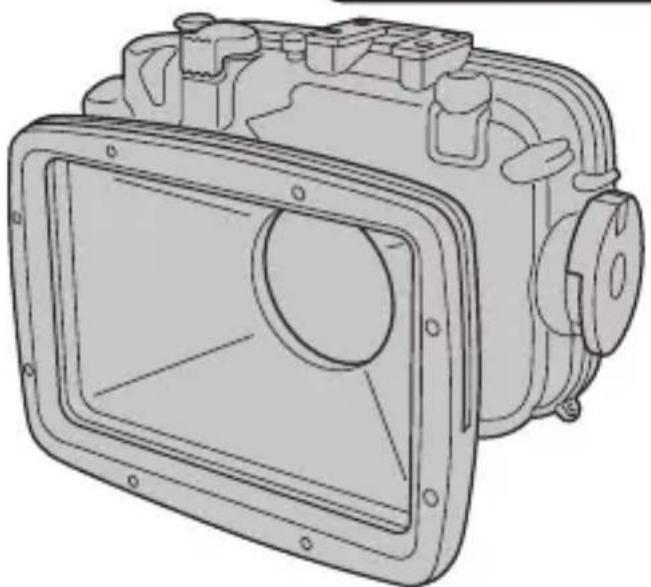
Accessories Included
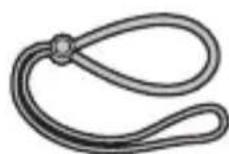
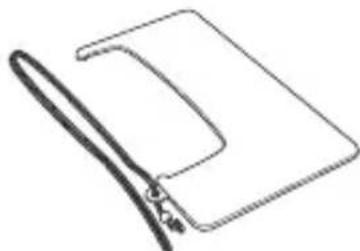
- Hand strap (1)
-
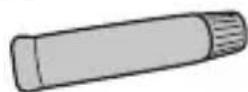
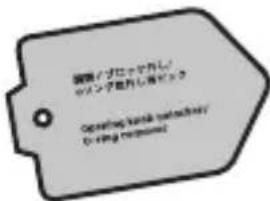
Special pick (1) (for Opening knob unlocked / O-ring remover)
-
Special silicone grease (1)

Silica gel pack (3)

-
Owner's manual (this manual)
-
Quick maintenance guide
-
Flash diffusion plate
EN-5


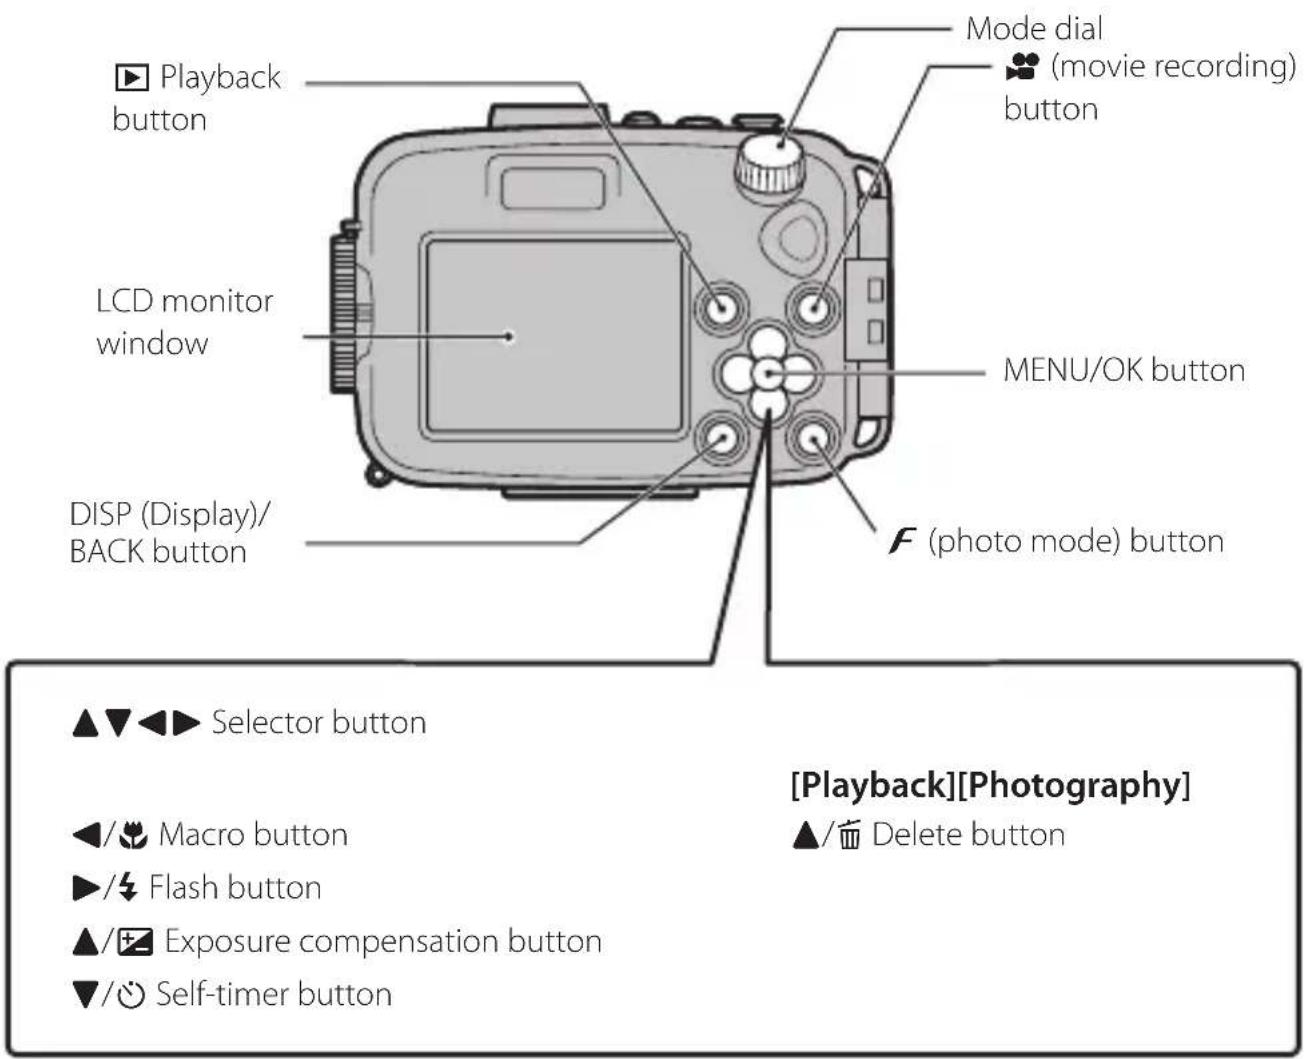
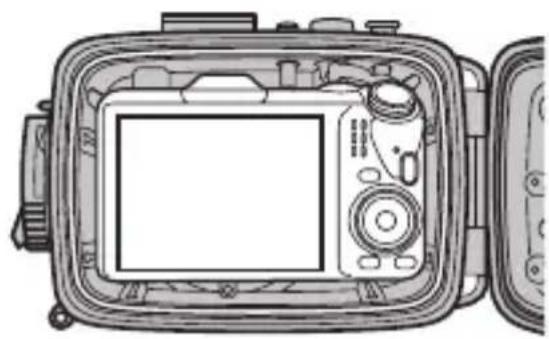
- The operation unit functions correspond to individual operations of the camera. Confirm the functions of the unit in the "Owner's Manual" for the Digital Camera.
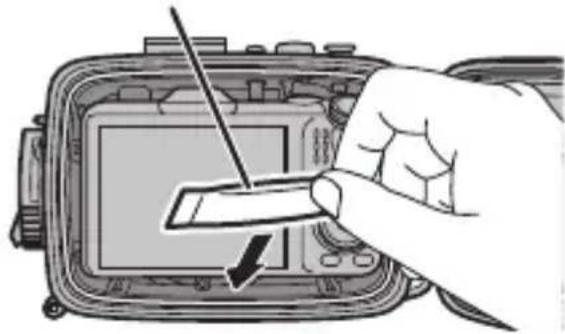
- A protection sheet is attached to the LCD monitor window when you purchase the unit. Make sure to peel off the sheet before using it.
Make a preliminary submersion test on the waterproof case before positioning the digital camera
Before installing the digital camera in the case, make sure that there is no water leakage.
1 Check the outside of the waterproof case to make sure that there are no cracks or faults with it.
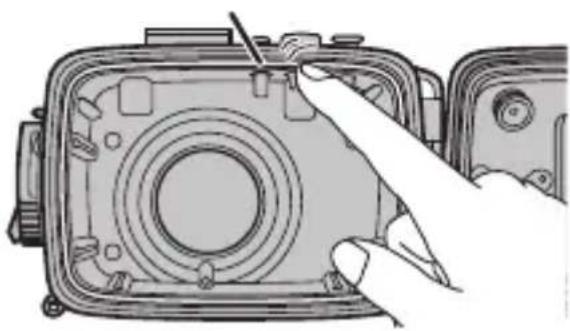
2 Open the waterproof case using the special pick (included).

special pick (included)
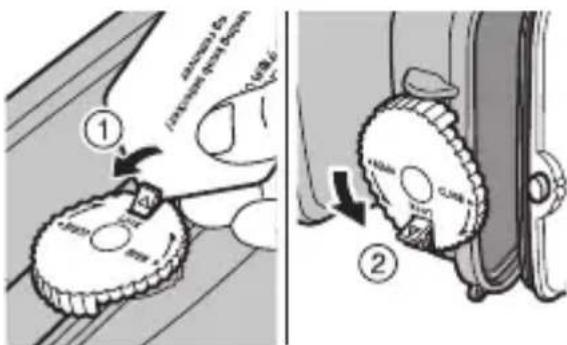
① Release the lock of the open/close knob.
② Turn the open/close knob in the direction of the "OPEN" arrow to open the waterproof case.
When opening or closing the waterproof case, take care not to catch your fingers or palm in the case.
You can also use the adjuster of the strap if you do not have the special pick (pg. 15).
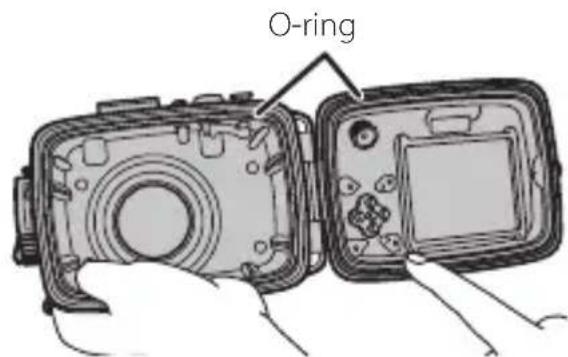
3 Check the inside of the waterproof case for the following:

O-ring
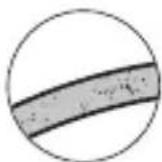
- Cracks (especially around the O-ring)
- Correct seating of the O-ring (For correct installation of the O-ring, see page 24.)
- That the O-ring has no scratches or cracks, or that it is oddly shaped, twisted, detached, etc.
- Sand or foreign particles stuck to the O-ring
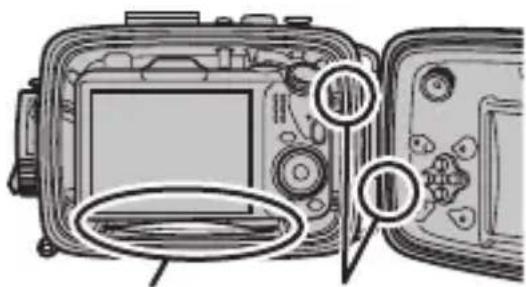
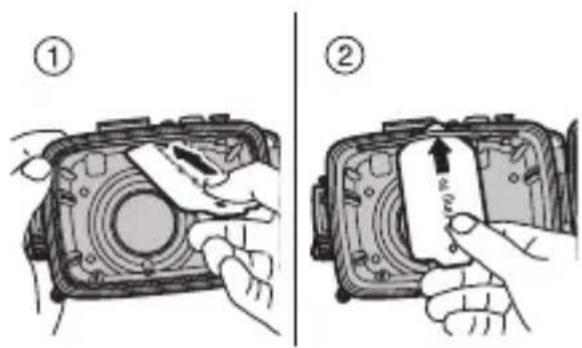
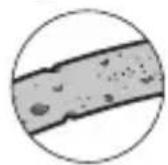
4 Wipe off any foreign particles attached to the O-ring and O-ring seal surface (Fig. A position) using soft, lint-free cloth or something similar.
If using tissue paper to wipe it off with, be careful, since fine lint may be left behind.

5 Check the O-ring installed.
Check the front-side O-ring (white) installed.
Feel the O-ring with the tip of your finger to confirm that there is no step. If you feel a step, the O-ring may be twisted. Reinstall it, following the instructions on page 24.
Front-side O-ring (white)
If the O-ring is twisted or stretched, or if there is any foreign particle on or underneath it, water will leak in.
Check the back-side O-ring (orange) installed.
If installed incompletely, reinstall it, following the instructions on page 25.
Back-side O-ring (orange)

6 When all is well, use a clean fingertip to apply the special silicone grease. And then spread it on the surface of the O-ring until it is completely covered.
Only use the special silicone grease provided.
After applying the grease, check that there is no sand or other substances attached to the O-ring.
7 Close the waterproof case.
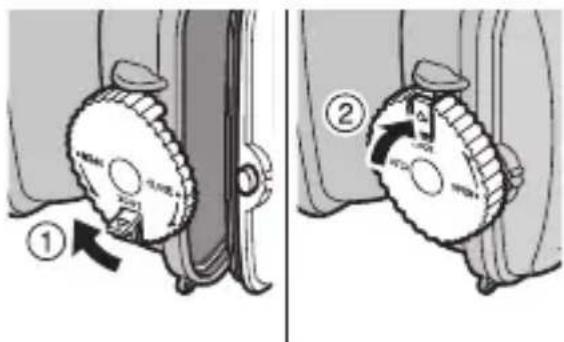
① Close the waterproof case and turn the open/close knob in the direction of the "CLOSE" arrow to seal it.
② Lock the open/close knob.
When closing the waterproof case, take care not to catch your fingers or palm in the waterproof case.
8 Dip the empty waterproof case into a water tank or a bathtub and check for water leaks. For how to check it, see page 13.

If a water leak is detected …
① Immediately take the waterproof case out of the water and dry it on the outside.
② Make sure that there are no cracks in the waterproof case body. Check the O-ring for attached foreign particles, flaws, cracks, odd shape, or twisting, and for any foreign particles in the O-ring groove.
③ When all is well, start over from the procedure on page 8.
If you find something wrong with the waterproof case, immediately stop using it and contact your FUJIFILM dealer.
Positioning the Digital Camera in the Waterproof Case
Before installation, check the following:
- To avoid losing power while shooting underwater, charge the battery fully before use.
- Check how many new images can be stored on the media.
- Remove the hand strap from the digital camera. Using the camera in the waterproof case with its strap may cause the case to leak.
1 Turn the camera off.
2 Open the waterproof case (pg. 8) and set the camera in it.
Slip the camera into the waterproof case until it stops securely.
When opening or closing the waterproof case, take care not to catch your fingers or palm in the case.
When setting the camera, pay attention to the position of the camera upon attachment.
3 Insert the silica gel pack into the space underneath the bottom of the camera.
Silica gel pack
Make sure to insert the silica gel pack correctly. If it is incompletely inserted, it will prevent the O-ring from acting as a seal, and water will leak in.
4 Confirm the following before closing the waterproof case.
Silica gel pack O-ring
- No part of the silica gel pack is protruding.
- There is no dust, hair, or other foreign particle on the O-ring, in the O-ring groove, or on the edge face of the waterproof case that engages with the O-ring.
- The camera is correctly seated and aligned in the waterproof case.
5 When all is well, close the waterproof case (pg. 10).
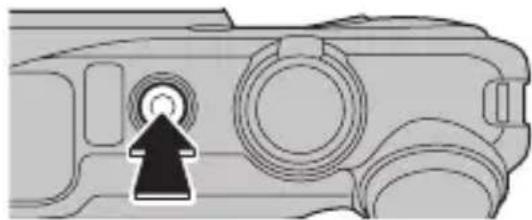
Check that the camera's "ON/OFF" button can be correctly operated using the controls on the housing.
When closing the waterproof case, take care not to catch your fingers or palm in the waterproof case.
To prevent water leaks
Any foreign particles attached to the O-ring may cause a water leak. Remove the foreign particles (see page 22). If you cannot remove them, replace the O-ring with a new one.


Hair Lint Sand
Conducting a final test
Carry out a final submersion test on the waterproof case after mounting the digital camera. To check for water leaks, watch for any water leaking in while immersing it in a water tank or a bathtub filled with water. Check it in a way that lets you take it out of water immediately (to save the camera inside) if you need to.
1 Immense it in water for 30 seconds.

-
If you see a continuous flow of air bubbles from the joint of the waterproof case while in the water, this indicates a leak.
-
When all is well, operate the buttons and take some test shots while it is under water.
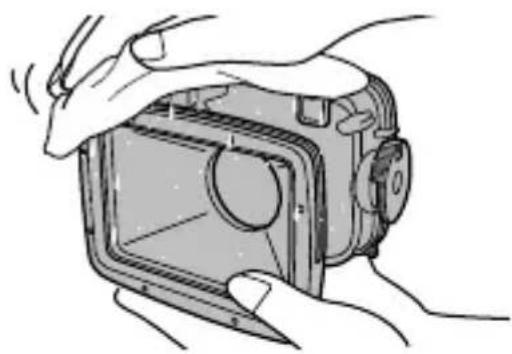
2 After slowly lifting the waterproof case out of water, closely check for the following:

Water droplets near the joint of the waterproof case.
- Water pooled inside the waterproof case.
Positioning the Digital Camera in the Waterproof Case
If a water leak is detected ...
(1) Immediately take the waterproof case out of the water and dry it on the outside.
② Take the digital camera out of the waterproof case. If you see any drops of water on the digital camera, wipe them off at once.
When taking the camera out of the waterproof case, open the waterproof case with the lens facing downwards to avoid the camera falling out. Also, when opening or closing the waterproof case, take care not to catch your fingers or palm in the case.
③ Make sure that there are no cracks in the waterproof case body. Check the O-ring for attached foreign particles, flaws, cracks, odd shape, or twisting, and for foreign particles in the O-ring groove.
④ When all is well, start over from the procedure on page 8.
If you find something wrong with the waterproof case, immediately stop using it and contact your FUJIFILM dealer.
If water has entered the camera body, stop using it immediately and contact your FUJIFILM dealer. Using the camera in a faulty state may cause fire or electric shock. Do not use it in this state under any circumstances.
Any kind of foreign particle attached to the O-ring may cause a water leak. Remove the foreign particles after checking how to on page 22.
Hair Lint Sand
1 Attach the strap to the waterproof case.
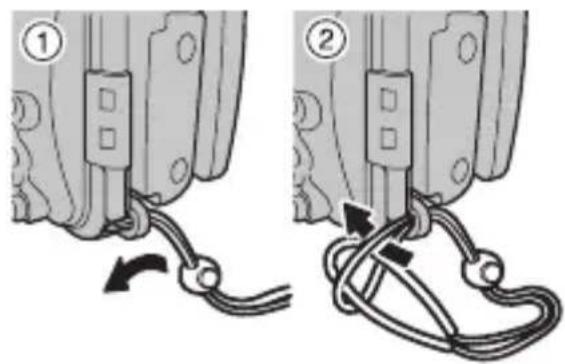
Attach the strap to the waterproof case as shown in ① and ②.
2 Tighten the hand strap around your wrist.

① Put your hand and wrist through the hand strap.
② To reduce the risk of dropping the camera, tighten the hand strap around your wrist using the adjuster.
Opening the waterproof case using the adjuster of the strap
When opening the waterproof case, you can also use the adjuster of the strap if you do not have the special pick.

① Insert the adjuster's tab as shown in the illustration.
(2) Release the lock of the open/close knob.
Do not use the adjuster of the strap to detach the O-ring. Water leaks may result if the O-ring is damaged or contaminated with foreign particles.
Installing the flash diffusion plate
Install the supplied flash diffusion plate.
Install the flash diffusion plate

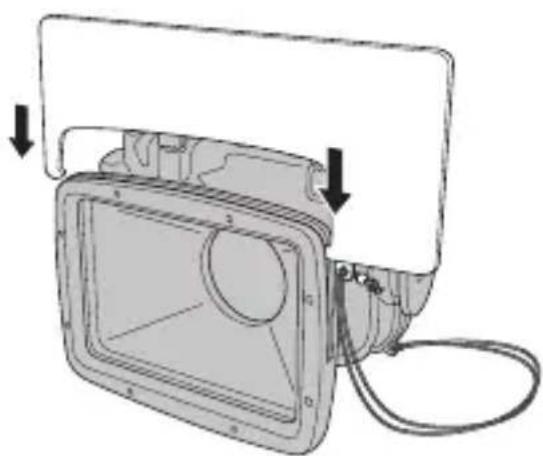
Attach the flash diffusion plate strap to the waterproof case as shown in ① and ②.
Avoid catching the strap when opening or closing the waterproof case.
Insert the flash diffusion plate into the groove of the lens ring as shown in the illustration.
Insert the plate securely until it clicks.
- Using the waterproof case, you can take pictures down to 40m (131 ft.) underwater.
- The operation unit functions correspond to individual operations of the camera. For the operating instructions or functions for the camera, see the Owner's Manual supplied with your camera.
1 Turn the camera on.

Press the "ON/OFF" button.
2 Set the Shooting Mode.
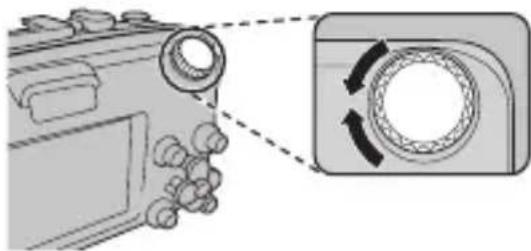
(1)
① Rotate the mode dial to choose a Shooting mode.
② Check the Shooting mode on the LCD monitor window.
Test-shoot before using the protected camera under water.

(2)

When setting the Shooting mode, be sure to that the mode indication for the selected mode appears in the LCD monitor.
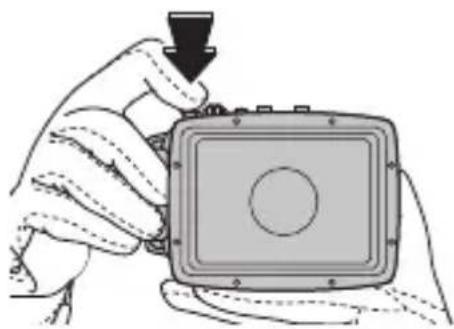
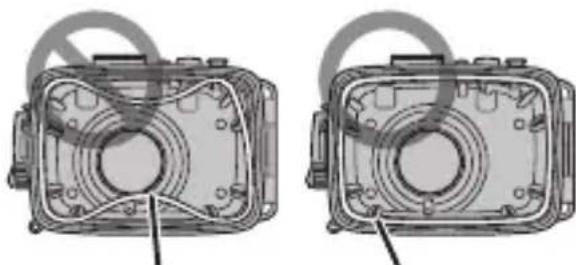
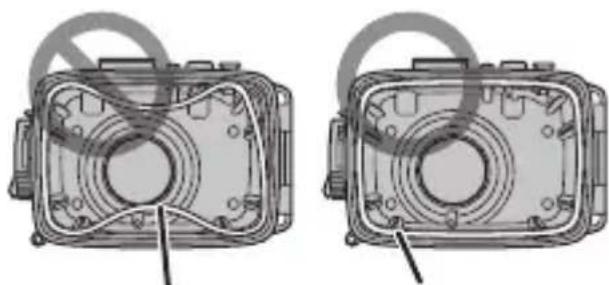
3 Hold the waterproof case firmly with both hands.
Hold the camera so that your fingers or the strap do not cover the lens, or flash. If the lens, or flash is obscured, subjects may be out of focus or the brightness (exposure) of your shot may be incorrect.


EN-17
4 Take the pictures.
① Press the Shutter button down halfway to focus.
It is not possible to press the Shutter button halfway while recording movies.
② Press the Shutter button down fully to take a picture.

About the UNDERWATER mode
Rotate the camera mode dial to SP and select UNDERWATER for vivid blues when shooting underwater. You can also select for the WHITE BALANCE option in the camera mode menu.
For more information, see the Owner's Manual supplied with your camera.
Close-ups
Using a commercially available external flash is recommended for close-up shooting.
1 Turn the camera off.

Press the "ON/OFF" button to turn the camera off.
Make sure that the camera is turned off.
2 At the end of shooting, immediately fill a container with fresh water to wash off the salty sea water.

Rinse the outside of the waterproof case well by stirring the water by hand.
If any salt remains on the case, it can cause rust, local malfunctioning, and other problems.
3 Wipe off the water droplets carefully from the waterproof case.
In particular, carefully wipe away the droplets from the joint of the waterproof case.
Use a soft, lint-free piece of cloth or something similar.
Remove the water droplets from under the Shutter button, the open/close knob and the others.
4 Take the camera out of the waterproof case.

(1) Release the lock of the open/close knob.
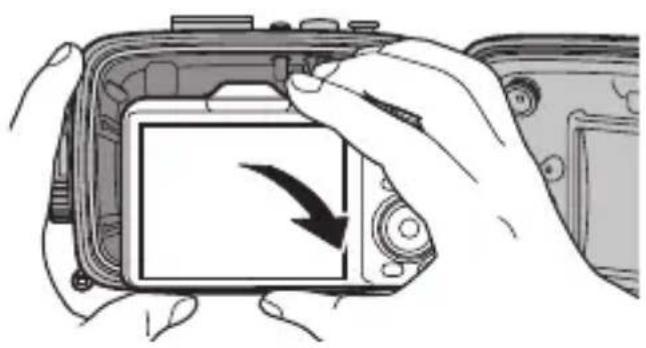
② Turn the open/close knob in the direction of "OPEN" arrow to open the waterproof case. Open it slowly so that water does not drip onto the camera inside.
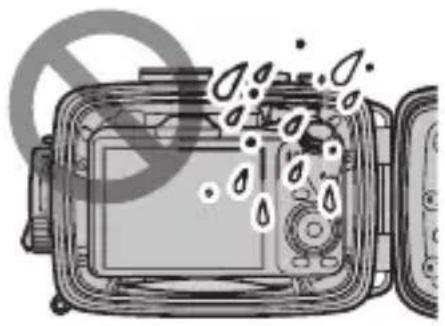
Before opening or closing the waterproof case, confirm that your hands and hair are dry so that water droplets do not drip onto the camera and inside the waterproof case.
When opening or closing the waterproof case, take care not to catch your fingers or palm in the case.
When your hands are wet, make sure not to touch the camera or the battery.
Do not open the waterproof case in places where the inside might get wet or sandy.
③ Take the camera out of the waterproof case.
When taking the camera out of the waterproof case, open the waterproof case with the lens facing downwards to avoid the camera falling out.
5 With the camera dismounted, make sure that there are no water droplets or foreign particles on the O-ring, close the waterproof case and turn the open/close knob in the direction of "CLOSE" arrow to seal it tight (pg.10). Wash it thoroughly with fresh water once again.

Try to remove any remaining salt by lightly moving the various buttons under the water.
We recommend soaking it in fresh water for about 1 hour.
If stored with drops of salty water on it, salt crystals will clog the movement of the open/close knob and other parts. Rusting may also be caused.
When closing the waterproof case, take care not to catch your fingers or palm in the waterproof case.
6 Carefully wipe off the water droplets from the waterproof case.

Use a soft, lint-free piece of cloth or something similar.
Remove the water droplets from under the Shutter button, the open/close knob and the others.
7 Open the waterproof case a little and dry it in a breezy place out of direct sunlight. After drying the case, store it where it will not be directly exposed to sunlight.

Do not use a hair dryer, warm or hot air, or direct sunlight to dry the waterproof case.
Maintenance after use
Always do this immediately after using the waterproof case. Check that the O-ring has no dents or flaws caused by foreign particles, cracks, or other damage.
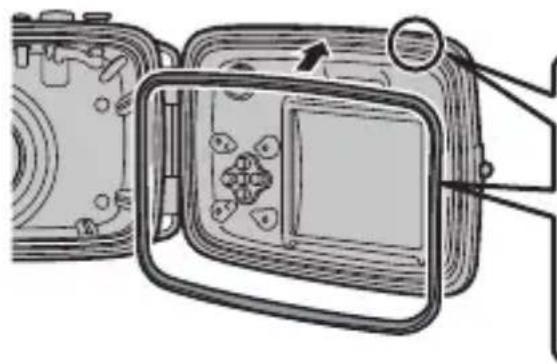
1 Remove the O-ring from the waterproof case.

Front-side O-ring (white)
Back-side O-ring (orange)
① Insert the special pick between the O-ring and the O-ring groove.
② Insert the tip of the special pick beneath the O-ring. Take care not to scratch the groove with the tip of the pick.
③ Grip the suspended the O-ring between your fingers and remove it from the waterproof case.

2 Remove old grease and foreign particles such as fibers and sand from the O-ring.
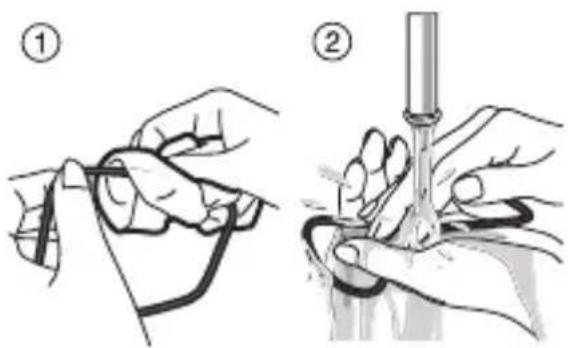
① Wipe foreign particles off with a soft, lint-free piece of cloth.
② Dry the rinsed O-ring without wiping water again. This is to prevent fiber attachment.
3 Pick up the O-ring with your fingers and feel it carefully, exerting only light pressure, all along it to check whether or not there are any dents or flaws caused by foreign particles or cracks due to deterioration (you can feel these with the tip of the finger).
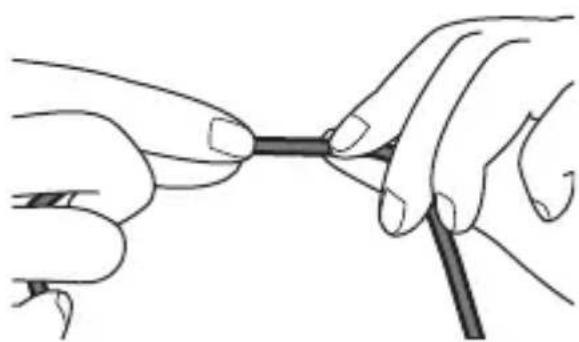
When pressing with your fingers and sliding them over the O-ring, be careful not to stretch it by pulling too tight.
Examples of foreign particles and damage


Hair Lint Sand Dents caused by
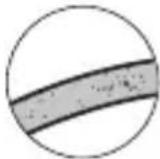
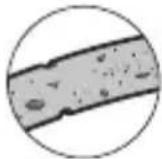


foreign particles
Flaw Crack
4 Remove all foreign particles from the O-ring groove using a toothbrush or cotton swab.

Make completely sure that no waste lint from the cotton swab is left behind.
5 Coat the O-ring with the special grease.

To apply a uniformly thin layer of silicone grease to the O-ring, squeeze out about 5mm (0.2 in.) of the grease provided with this product from the tube into a clean plastic bag (about 10cm (3.9 in.) × 20cm (7.9 in.) in size) and then knead it thoroughly. Put the O-ring into the plastic bag and continue kneading until the O-ring is completely covered with grease. The plastic bag can be used more than once if kept clean.
6 Install the front-side O-ring (white).

For correct installation, observe the sticker (white) inside the waterproof case.
O-ring (white) O-ring (white)
Place the front-side O-ring on the waterproof case beforehand to confirm that the O-ring is not twisted. If it is not twisted, make sure that it is clean, with no foreign particles embedded in it or dust stuck to it, before installing it.

If you cannot install the front-side O-ring successfully, insert it into the four corners first and then push the other parts into the groove.
7 Install the back-side O-ring (orange).
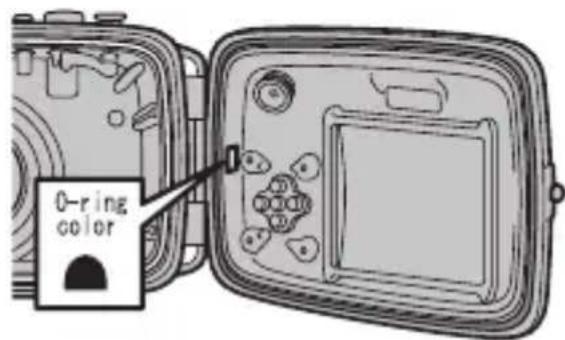
For correct installation, observe the sticker (orange) inside the waterproof case.
Match the flat face of the O-ring to the bottom face of the groove.
Cross section of the O-ring

Flat face
Correctlyinstalled O-ring and groove
Cross section of the groove

Bottom face of groove

O-ring
When installing the O-ring, check that it neither twists, bends, nor bulges out of the groove.
Check both front and back side O-rings.
When carrying out O-ring maintenance, take particular care to avoid getting grease on the lens window and LCD monitor window. If there is any soiling on the lens window or LCD monitor window, gently wipe it off with a soft dry cloth.
- Do not use or store the waterproof case at temperatures above +40^ / +104^ .
- Do not use in water above +40^ C / +104^ F , since it may leak.
- Do not use thinner, benzene, alcohol, or other volatile chemicals for cleaning. Applying any such chemicals to the waterproof case may cause damage to its surface, and it will crack under high pressure.
- Do not overstrain the tripod mount.
- Do not strike or subject the waterproof case to impacts.
- Do not throw the waterproof case into the water.
- When you use waterproof case in seawater, wash it, while still tightly closed, in a bucketful of fresh water to rinse off the salt. Then dry the outside of the case, using a dry, soft piece of cloth.
- This product is designed to be used under water as a waterproof case. Do not leave it or store it with the camera still inside: the battery may leak or even cause a fire.
- When the camera is carried onboard an airplane with the waterproof case closed, the case may not open. Be sure to open the waterproof case before bringing the camera onto the airplane. If the waterproof case does not open, immerse the camera into lukewarm water to warm the inside air and reduce the difference in air pressure, and then open the waterproof case.
To avoid water leaks
If this case leaks while using it and soaks the digital camera inside, the camera cannot be repaired. Take the following precautions before use.
- The standard life of the O-ring is about one year, though it depends on operating conditions. Replace the O-ring with a new one once a year.
- Any foreign particles caught in the O-ring may cause a water leak. Wipe them off, making sure that no lint remains stuck to the O-ring. If a foreign particle cannot easily be removed, try washing it off with water.
- If the O-ring is scratched, cracked, discolored or deformed, replace it with a new one.
- When replacing the O-ring, first clean the groove for the O-ring and check that it is free of grains of sand, dust, hair, and other foreign particles.
- For the O-ring, use the specified brand of silicone grease recommended by FUJIFILM.
- If the O-ring is not seated correctly, a water leak may occur. When mounting the O-ring, take care that it stays in the groove and does not become twisted (pg. 24).
- Do not leave the waterproof case in direct sunlight in summer, in a closed vehicle, or near heating equipment. Do not apply any long-term external force to the waterproof case. Deformation caused by heat or force may cause a loss of waterproofing, making it unusable for use under water.
-
Be careful not to damage the O-ring or the face that contacts it by banging them together or letting foreign particles (sand, dust or hair) get between them.
-
Carry out the submersion and final test before using the product.
- If you find any signs of water leakage while taking photos, immediately take the product out of the water. Look into the cause and take suitable action.
Examples of foreign particles and damage


Hair Lint Sand Dents caused by


foreign particles
Specifications
| Camera with which it should be used | Digital camera FinePix F300EXR/F500EXR/F550EXR |
| Pressure resistance Up to 40 m (131 ft.) deep in water | |
| Main materials | Case proper: Transparent polycarbonate Lens window: Glass |
| Dimensions (W × H × D) | 142.7 mm × 100.5 mm × 107.8 mm / 5.61 in. × 3.95 in. × 4.24 in. (including the attachments) |
| Weight | Approx. 507 g / 17.88 oz. (not including camera and accessories) |
- These specifications are subject to change without notice. FUJIFILM shall not be held liable for any damage resulting from errors in this Owner's Manual.
Accessories Guide
Silica gel pack set (SST-01)
Desiccating agent for lens blur reduction (Silica gel pack × 6
- O-ring kit (ORK-FXF500)
Optional kit for maintenance
(Spare O-ring × 1 each, Special pick for Opening knob unlocked/O-ring remover × 1 )
- Special silicone grease (SGR-01)
Special silicone grease for O-ring maintenance
(Special silicone grease × 1 [approx. 3g / 0.1oz]
O-Ring (weiβ) O-Ring (weiβ)
This warranty is valid only in JAPAN.