FLINT - Barbecue Burnhard - Free user manual and instructions
Find the device manual for free FLINT Burnhard in PDF.

User questions about FLINT Burnhard
0 question about this device. Answer the ones you know or ask your own.
Ask a new question about this device
Download the instructions for your Barbecue in PDF format for free! Find your manual FLINT - Burnhard and take your electronic device back in hand. On this page are published all the documents necessary for the use of your device. FLINT by Burnhard.
USER MANUAL FLINT Burnhard
natural_image
Stylized black-and-white logo featuring a flame-like shape with a stylized human face (no text or symbols)BURNHARD
natural_image
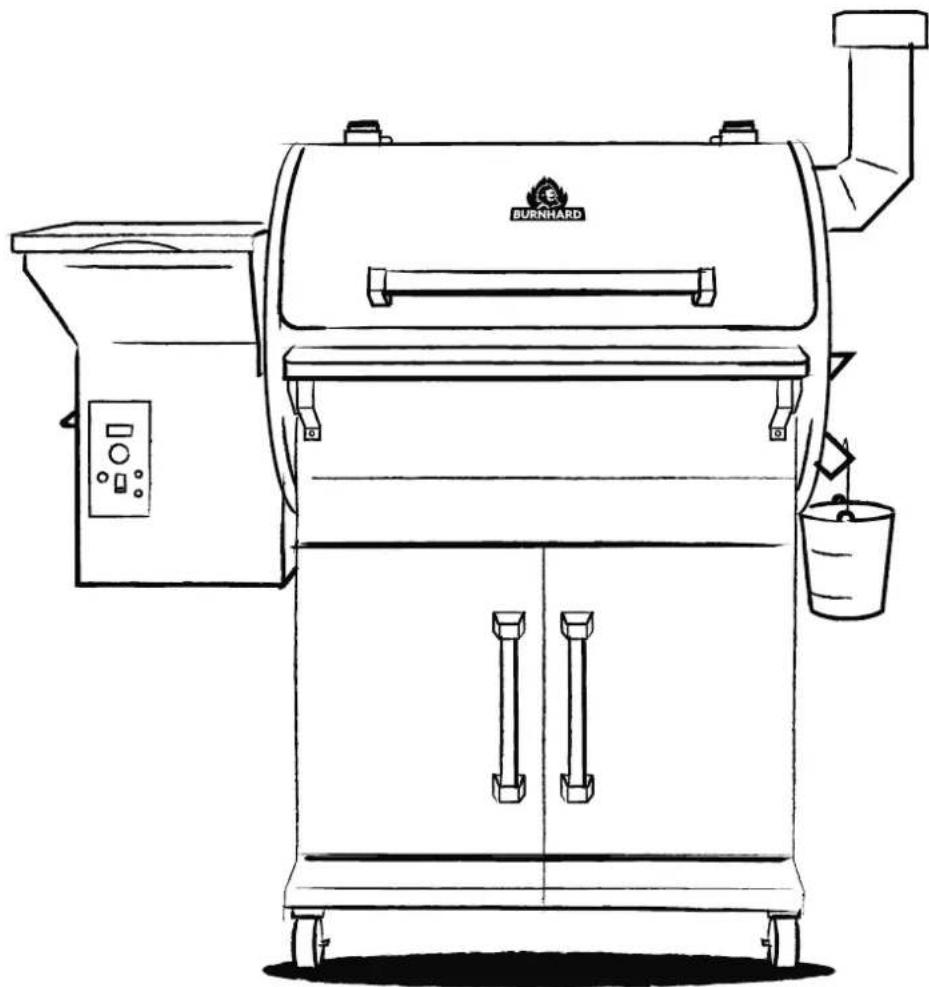
Line drawing of a BURNHARD portable grill with control panel and bucket (no text or symbols)PELLET SMOKER

text_image
FINTINHALT
DE
Technische Daten 4
Parts included/description of parts 32
Parts included/description of parts 34
Assembling the pellet smoker 36
Operating the pellet smoker 46
Cleaning and maintenance 48
Troubleshooting 50
Storage and transport 51
Customer service 51
Disposal/environmental protection 51
INHOUD
NL
text_image
Weather warning icons with symbols for heating, vehicle use, house, and forest fire safetytext_image
Exploded view diagram of a portable air conditioner unit with numbered components for identificationtext_image
Exploded view diagram of electronic devices with numbered parts for identificationtext_image
Technical diagram of a mechanical frame with labeled components including wheels and numbered parts 61②
text_image
AA AA 54 AA AA
text_image
56 AA AA AA AA AA AA AA5
text_image
AA AA 63 AA AA7
text_image
Technical diagram of an electrical enclosure with labeled components including EE, KK, and numbered parts 3 and 10.
natural_image
Line drawing of a mechanical device with control panel and power outlet (no text or symbols)GRILLKAMMER BEFESTIGEN
⑨
text_image
Technical diagram of a portable industrial machine with numbered components and labeled parts (1, 4, AA)11
text_image
Technical diagram of a mechanical device with numbered components and exploded view, showing internal components and assembly steps.
text_image
Technical line drawing of a cylindrical industrial machine with labeled components and part numbers (48, BB)14
text_image
60 59 60 50 FF AA FF AA18
text_image
Technical line drawing of a portable industrial machine with labeled components and parts19
natural_image
Technical line drawing of a mechanical device with open lid and internal compartments (no text or symbols)21
text_image
Technical diagram of a machine with labeled components including 'BB' and numbered parts 1820
natural_image
Technical line drawing of a mechanical device with labeled parts (no text or symbols present)22
text_image
Technical diagram of a mechanical device with numbered components for identification23
text_image
JJ 26 JJ 25 2324

text_image
Technical diagram of a portable industrial machine with labeled components and numbered parts
natural_image
Technical line drawing of a portable industrial machine with control panel and labeled parts (II), no readable text or symbols beyond labels.text_image
Technical diagram of a portable industrial machine with labeled parts including control panel, fan, and buttons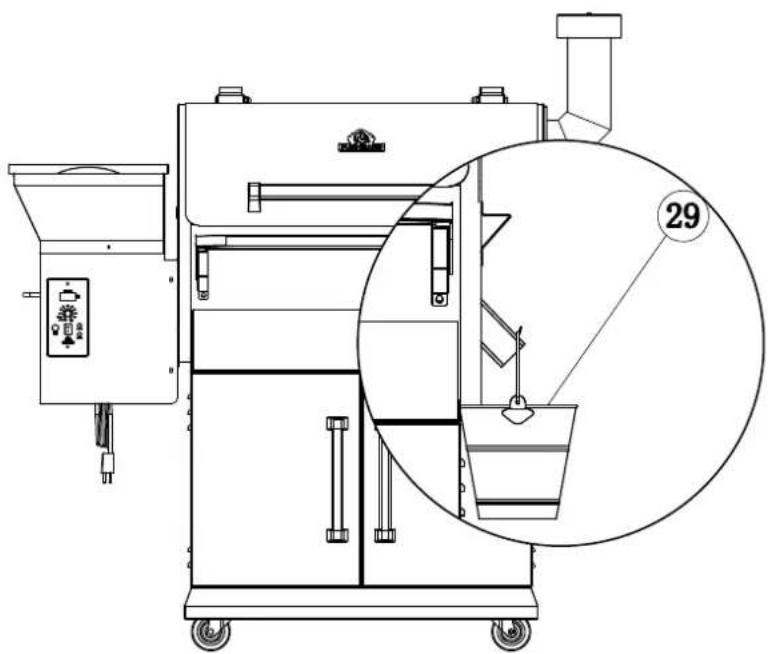
natural_image
Technical line drawing of a mechanical device with a circular inset showing a bucket labeled '29' (no text or symbols on the diagram itself)Weight: approx. 71 kg
Grilling surface: 66 x 49 cm (main lower grid), 66 x 36 cm (upper grid)
Output gear: 25 W
Output lighter: 200 W
Output ventilator: 25 W
Operating voltage: 220–230 V \~ 50 Hz
Volume pellet chamber: ca. 9 kg
Pellet consumption: 0.3–0.5 kg/hr (<105°C), 0.8–1 kg/hr (>176°C)
Equipment: 3 stainless steel grilling grids, grease collecting bucket, folding front deposit with removable cutting and serving tray made of acacia wood, steerable full-rubber rollers
Accessories: cover hood, bottle opener, 2 temperature sensors for grilled food
Specifications, technology, colours, and design are subject to change without notice.
EXPLANATION OF SYMBOLS

This symbol warns of hazards that can damage the appliance or cause injury.
SAFETY INFORMATION
Please read these instructions carefully before use and retain them for future reference. All instructions and guidelines given in this manual must be followed without exception.
INTENDED USE
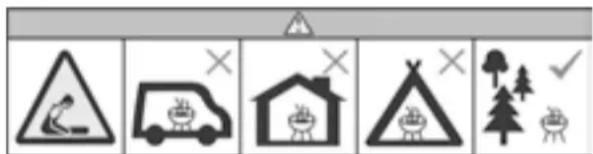
This pellet smoker is designed for the smoking, heating, cooking, and grilling of food, and is solely intended for outdoor use. Never use the smoker in a building, garage, or other enclosed space. Not intended for commercial use.
We assume no liability for damages caused by improper operation or by using the appliance for purposes other than those stated above.

General hazards
- Hazardous for children or persons with limited ability to operate equipment. This appliance is not intended for use by children or persons with limited ability to operate equipment. The appliance may only be used by persons who are able to operate equipment safely.
- CAUTION: Accessible parts can be very hot. Keep children and pets away.
- NOTE: Do not make any changes to the appliance. Any changes to the appliance can lead to accidents.
UNPACKING THE APPLIANCE
Danger to children. Danger to life by suffocation/choking. Keep all packaging material away from children. Dispose immediately. Keep small parts out of reach of children.
CONNECTING THE ELECTRICAL APPLIANCE

Fire and explosion hazard
- Only connect the appliance to sockets which match the voltage indicated on the type plate.
- Please take note of the country-specific guidelines beforehand! To prevent the risk of electric shock, use a (safety) socket which is situated no further than 1.8 m away. Please observe the valid safety guidelines when connecting the appliance.
- Check the wattage of your socket before using the appliance for the first time. Ensure that the fuse is not overloaded to prevent short-circuits.
- When using an extension cord (or cable reel), make sure it is not being pinched anywhere and keep it far away from sharp edges and hot objects.
- Make sure cables are lain in a safe manner, so that no one can trip over them.
- If the power cable is damaged, it must be replaced by qualified personnel.
- Improper assembly of the appliance may be dangerous. Stick precisely to the assembly instructions.
GENERAL SAFETY INFORMATION
Do not operate the device in closed and/or habitable rooms, e.g. buildings, tents, caravans, mobile homes, boats. There is a risk of death due to carbon monoxide poisoning.

Fire and explosion hazard Electric shock hazard
- This smoker may only be operated with solid fuels (pellets).
- It may not be operated in enclosed spaces.
- Do not use in humid or rainy weather conditions.
- Operate your smoker at a dry location, protected against wind to the greatest possible extent.
- Do not immerse the appliance plug or power cable in water or any other liquid and protect them from moisture.
- Make sure that the appliance plug is always stored in a dry place and only plug it into the socket when it is dry.
- Place the smoker on a solid and level surface which is resistant to heat and non-flammable.
- Keep (highly) inflammable materials and liquids away from the appliance.
- This pellet smoker is operated with electricity and does not require an external ignition source.
- Do not use spirit or petrol for lighting or re-lighting.
- Keep the smoker under supervision during operation.
text_image
Safety warning icons with symbols for construction, vehicle, house, and tree protection- The appliance becomes very hot and may not be moved during operation. Wait until the smoker has cooled down completely.
- Check the power cable for tears or other damage before each use. Do not operate the smoker if the power cable is defective.
- Check the pellet chamber for soiling or foreign objects before each use and remove them before operating the smoker.
- The surfaces of the smoker become very hot during operation. Warn people surrounding the smoker and keep children and pets away.
- Always wear protective gloves when the smoker is in operation and when handling hot parts. Use suitable grilling tongs to place and turn the grill food on the smoker.
- Keep fingers, hair, and clothes away from hot/moving parts at all times. Do not wear any clothes with wide sleeves while handling the appliance.
- The lid of the smoker must always be open before ignition.
• Always unplug the smoker from the socket when the smoker is not in operation or when you want to clean the appliance.
- Observe the local provisions and laws specifying when and where you can work with open fire.
- Do not grab into the pellet chamber during operation as this can lead to serious injury.
- Do not grab into the combustion chamber during operation as this can lead to serious burns.
- Do not fill pellets into the pellet chamber by hand.
• Always exercise caution when opening the lid of the smoker. Pent-up heat can cause burns if the lid is opened abruptly.
- Only use pellets specially developed for pellet
grills.
- Keep pellets away from children. Danger to life by suffocation/choking.
- Store pellets in a dry place. Ensure that humidity cannot enter the pellet chamber. The pellets may expand, break up, and block the spiral conveyor.
- Do not place heavy objects on the lid of the pellet chamber.
- The smoker must be burned-in before first use (see BURNING IN THE SMOKER).
- If a grease fire erupts, turn off the smoker and leave the lid closed until the fire extinguishes. Do NOT remove the mains plug. Do NOT attempt to extinguish the fire with water. Do NOT attempt to suffocate the fire.
MEASURES TO BE TAKEN WITH CARBON MONOXIDE POISONING

WARNING: Risk of carbon monoxide poisoning! Only operate the grilling appliance outdoors, and not in enclosed spaces!
Symptoms of carbon monoxide poisoning include headache, dizziness, feebleness, nausea, vomiting, tiredness, and confusion. Carbon monoxide impairs the blood's capacity to transfer oxygen. Low blood oxygen content might result in unconsciousness or even death.
- Immediately visit a doctor if you or another person develop symptoms of a cold or flu during operation of the smoker!
- Alcohol and drug consumption reinforce the effects of carbon monoxide poisoning.
- Carbon monoxide is particularly dangerous for: pregnant women and their unborn child, small children, the elderly, smokers, and people with cardiovascular diseases such as anaemia and heart disease.
- Bring surrounding people to safety.
- If a grease fire erupts, turn off the smoker and close the lid until the fire extinguishes. NEVER leave the lid open during a grease fire.
- WARNING: Never attempt to extinguish an oil or grease fire with water.
- Stay away from the source of fire and immediately inform the firefighting department.
FIRST-AID MEASURES
Measures to take after serious burns or scalding
- There is an acute risk of hypothermia and shock. Immediately call the rescue services!
- Immediately extinguish burning clothes with water or suffocate the flames with a heavy blanket.
• In case of burns: Leave clothing on the body. - In case of scalding: Immediately remove clothing from the body.
- Cool the affected areas with cold water for at least 15 minutes until the pain subsides.
- Afterwards, cover the affected area with a sterile Metalline burn sheet. Place the side coated with Metalline onto the damaged skin and affix lightly with a gauze bandage or a triangular bandage.
- Do not use any "home remedies" such as ointments, powders, oils, disinfectants, etc.!
Measures to take after light burns or scalding
- In case of burns: Only remove clothing from the body if it doesn't stick.
- In case of scalding: Immediately remove clothing from the body.
- Cool the affected areas with cold water for at least 15 minutes until the pain subsides.
- Allow minor burns or scalding without any blister formation to heal in fresh air, do not cover with a band-aid or bandage.
text_image
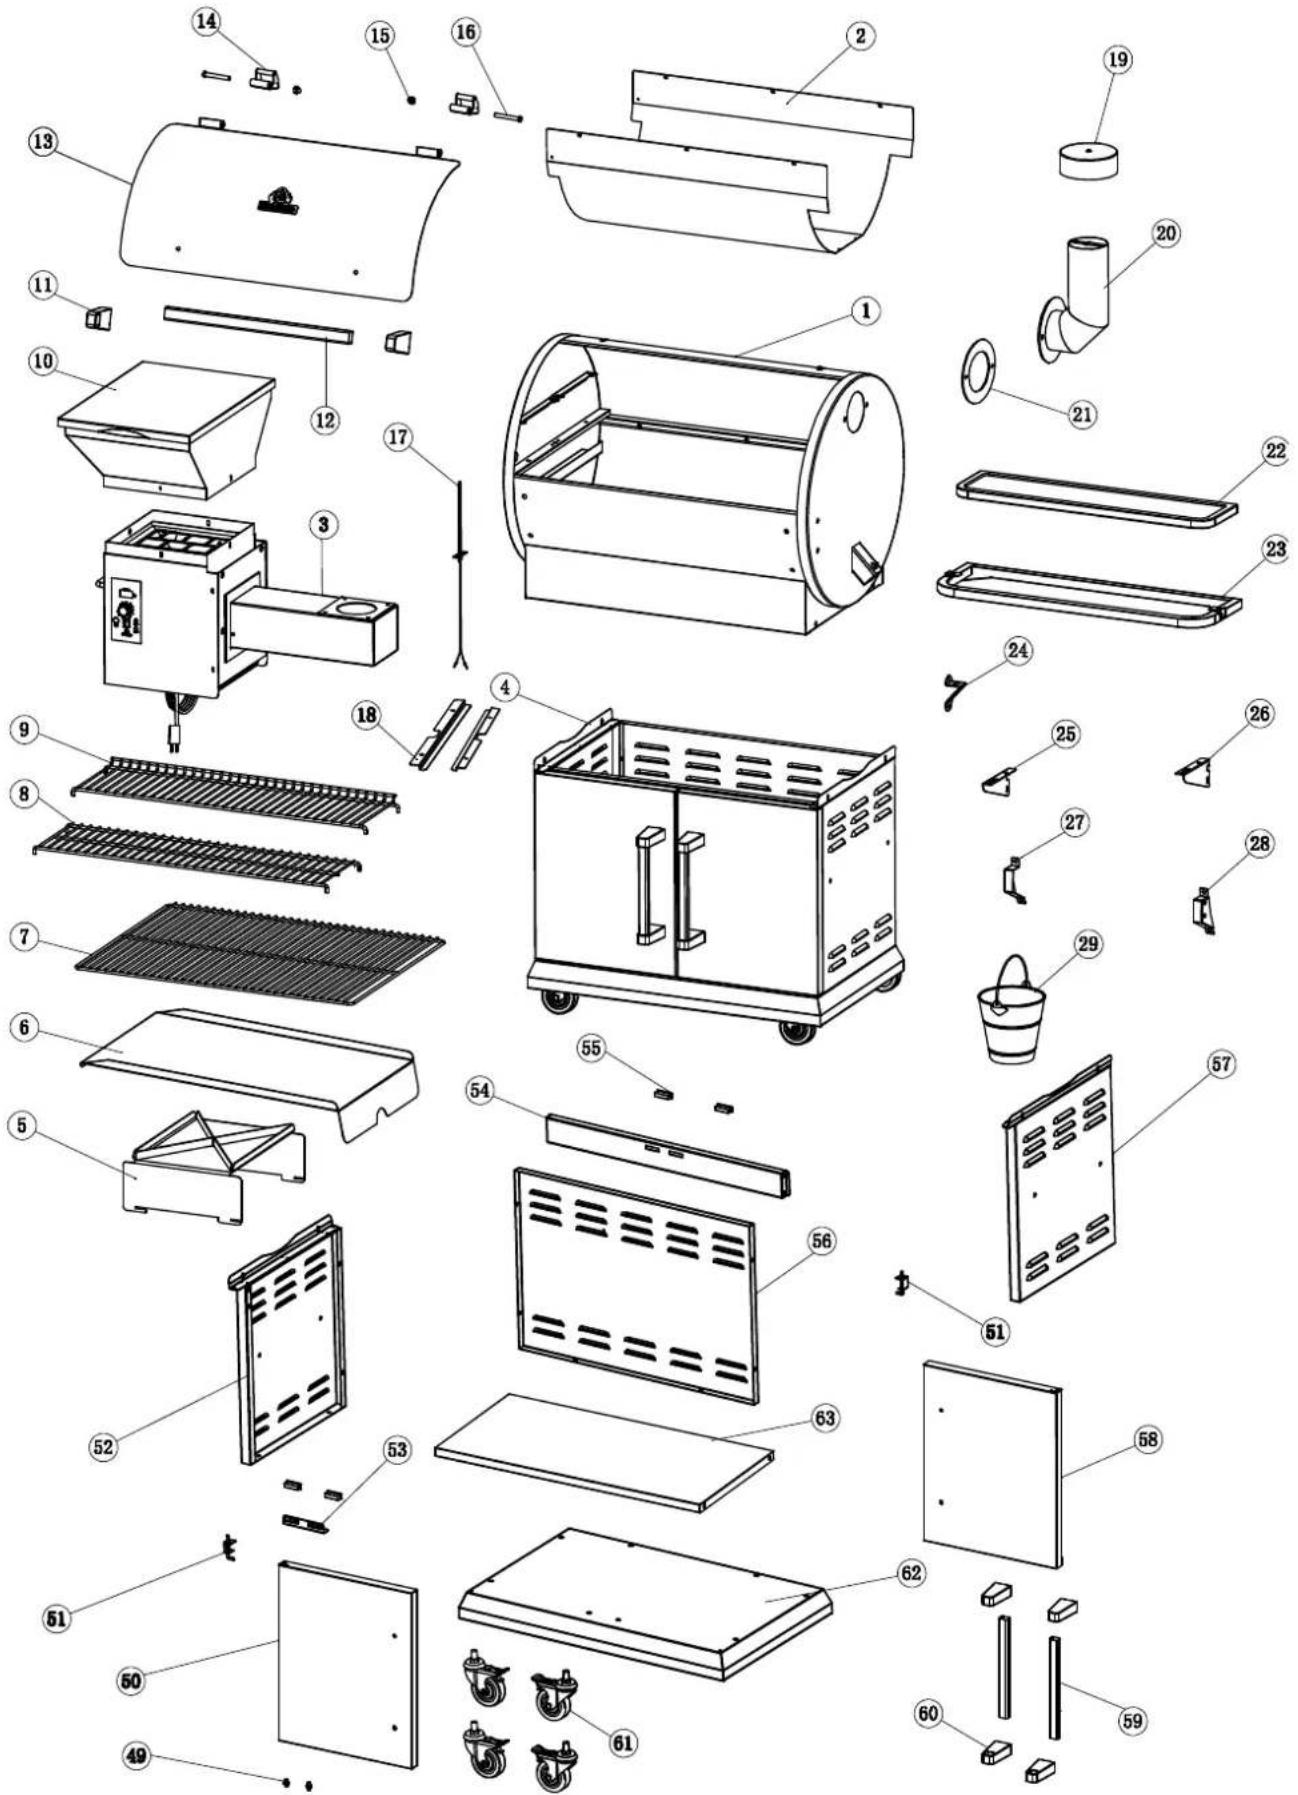
Exploded view diagram of a household appliance with numbered parts for identificationRef. Description Quantity
| 1 Grilling chamber 1 | ||
| 2 Thermal Baffle 1 | ||
| 3 Combustion chamber 1 | ||
| 4 Base cabinet (Ref. 49 – 63) 1 | ||
| 5 Heat conduction sheet 1 | ||
| 6 Grease removal sheet 1 | ||
| 7 Main stainless steel grid | 1 | |
| 8 Top stainless steel grid | 1 | |
| 9 Top stainless steel grid | 1 | |
| 10 | Pellet chamber 1 | |
| 11 | Handle bracket grill chamber | 2 |
| 12 | Lid handle grill chamber | 1 |
| 13 | Lid grilling chamber | 1 |
| 14 | Hinge lid grilling chamber | 2 |
| 15 | Cap nut | 2 |
| 16 | Hinge Pin | 2 |
| 17 | RTD temperature sensor | 1 |
| 18 | Grilling grid bracket top | 2 |
| 19 | Chimney cover | 1 |
| 20 | Chimney | 1 |
| 21 | Chimney sealing | 1 |
| 22 | Serving board for front tray | 1 |
| 23 | Frame for front tray | 1 |
| 24 | Bottle opener | 1 |
| 25 | Left connection for front tray | 1 |
| 26 | Right connection for front tray | 1 |
| 27 | Bracket front tray left | 1 |
| 28 | Bracket front tray right | 1 |
| 29 | Grease collection basket | 1 |
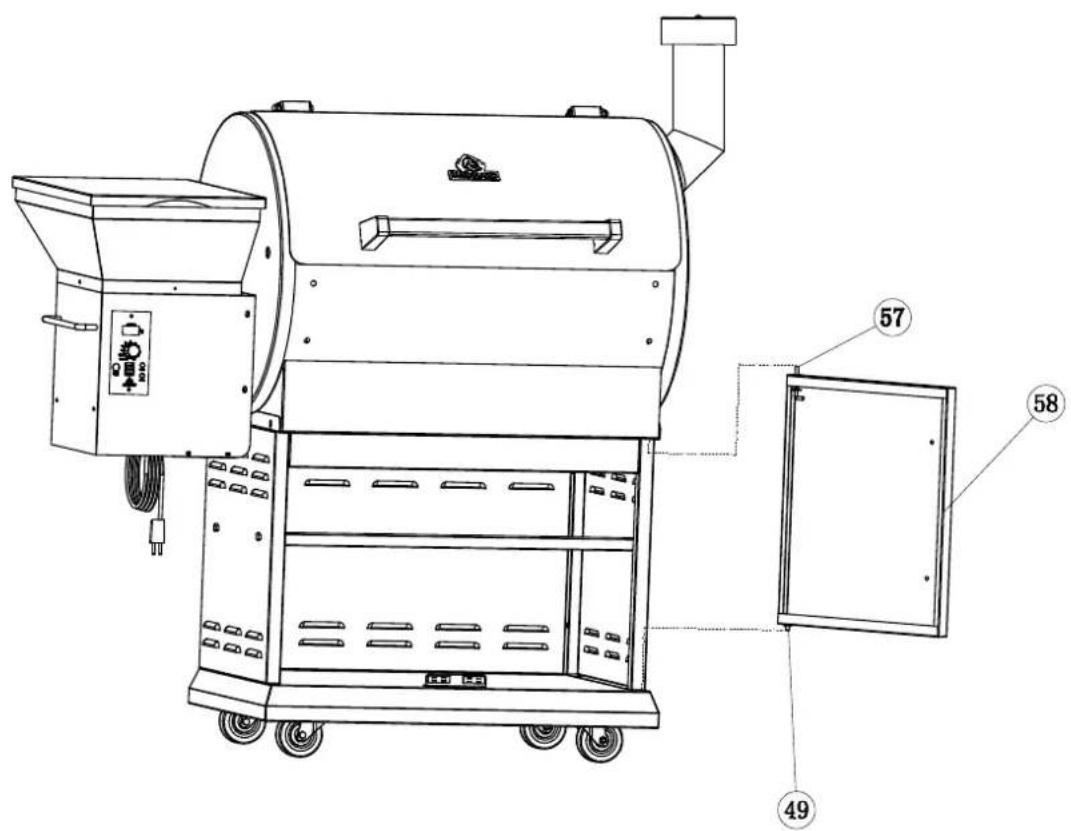
| 49 | Lower hinge door | 2 |
| 50 | Door base cabinet left 1 | |
| 51 | Upper hinge door | 2 |
| 52 | Door base cabinet left 1 | |
| 53 | Magnet fixing plate | 1 |
| 54 | Cross strut | 1 |
| 55 | Magnet | 4 |
| 56 | Back panel base cabinet | 1 |
| 57 | Side panel base cabinet left | 1 |
| 58 | Door base cabinet right | 1 |
| 59 | Door handle base cabinet | 2 |
| 60 | Grip holder base cabinet | 4 |
| 61 | Rollers | 4 |
| 62 | Floor base cabinet | 1 |
| 63 | Base cabinet shelf | 1 |
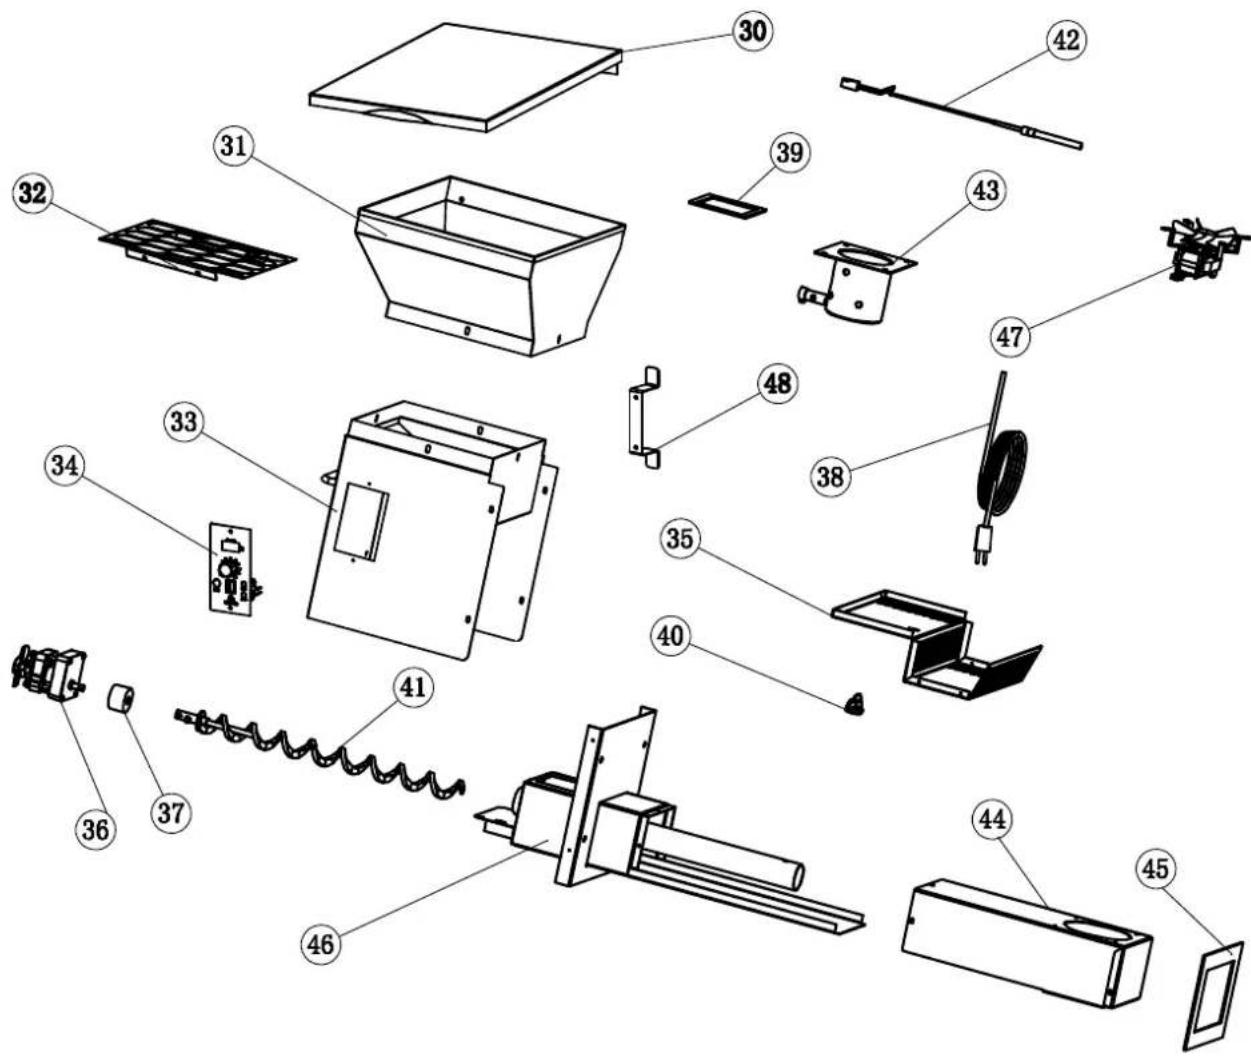
text_image
Exploded view diagram of electronic devices with numbered parts for identificationRef. Description Quantity
| 30 Lid pellet chamber 1 | ||
| 31 Pellet chamber funnel 1 | ||
| 32 Pellet chamber grate 1 | ||
| 33 Pellet chamber housing 1 | ||
| 34 Operating element 1 | ||
| 35 Floor cover pellet chamber 1 | ||
| 36 Motor 1 | ||
| 37 Spiral conveyor socket 1 | ||
| 38 | Power cable | 1 |
| 39 Pellet chamber seal | 1 | |
| 40 | Power cord separator | 1 |
| 41 Spiral conveyor | 1 | |
| 42 | Ignition rod | 1 |
| 43 | Combustion chamber element | 1 |
| 44 Combustion chamber housing | 1 | |
| 45 | Combustion chamber seal | 1 |
| 46 Pellet chamber/combustion chamber design | 1 | |
| 47 Fan | 1 | |
| 48 Cable suspension | 1 | |
ATTACHMENTS
| AA | BB | CC | DD | EE | FF | II | JJ | KK |
 x 32 x 32 |  x 6 x 6 |  x 4 x 4 |  x 2 x 2 |  x 4 x 4 |  x 8 x 8 |  x 4 x 4 |  x 4 x 4 |  x 4 x 4 |
ASSEMBLING THE BASE CABINET
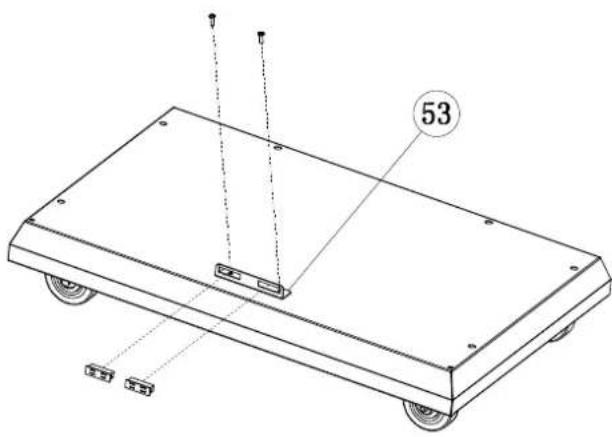
①
Place the bottom panel with the inside facing down. Enter the rollers into the screw holes and tighten with a screwdriver.
text_image
53
text_image
Technical diagram of a mechanical frame with labeled components including wheels and numbered parts 612
Turn the lower panel around. Screw the magnet mounting plate on the marked position and insert magnets into the holes.
③
Attach both side panels to the lower panel.
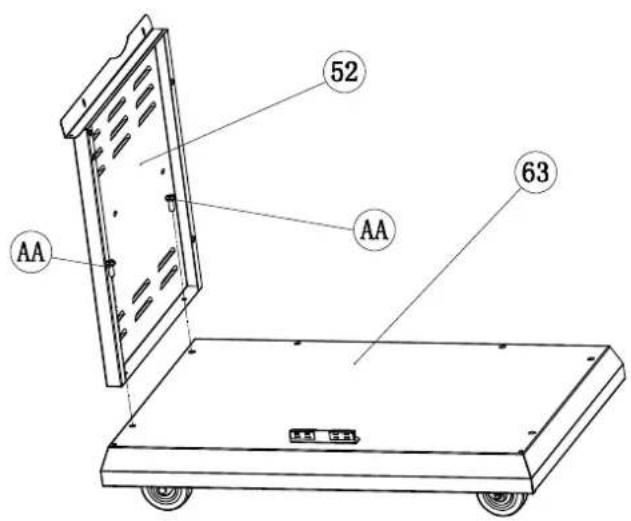
text_image
52 AA 63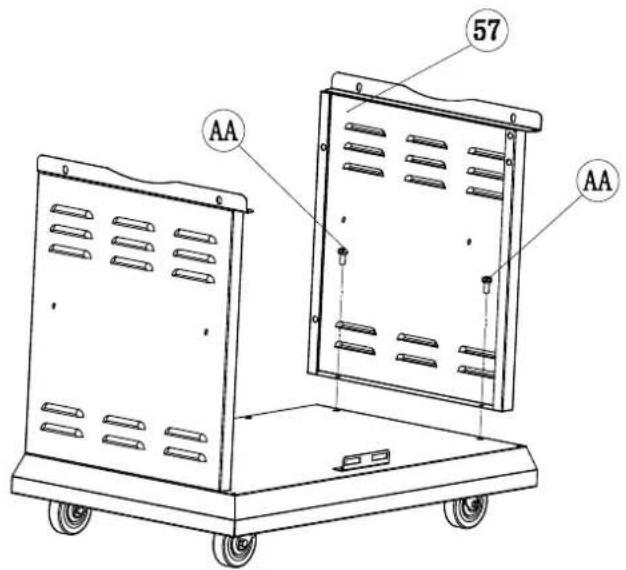
text_image
57 AA AA4
Screw the back panel onto the lower panel and connect with the right and left panels.
text_image
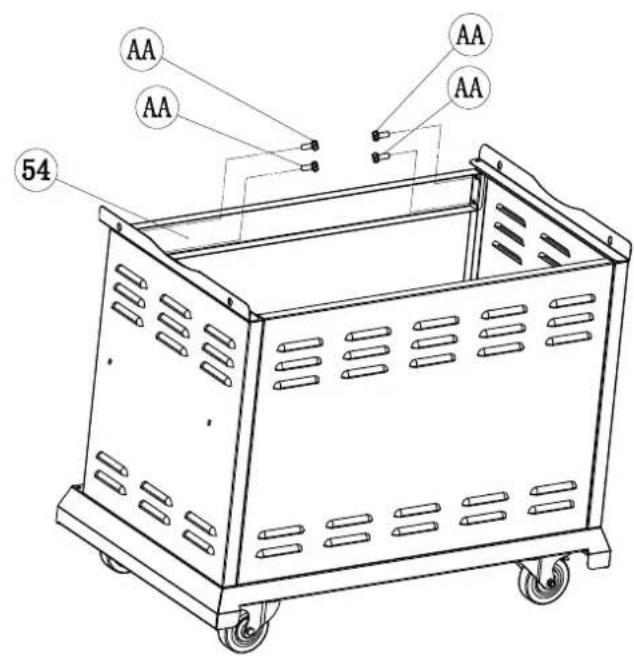
AA AA 54 AA AA
text_image
56 AA AA AA AA AA AA5
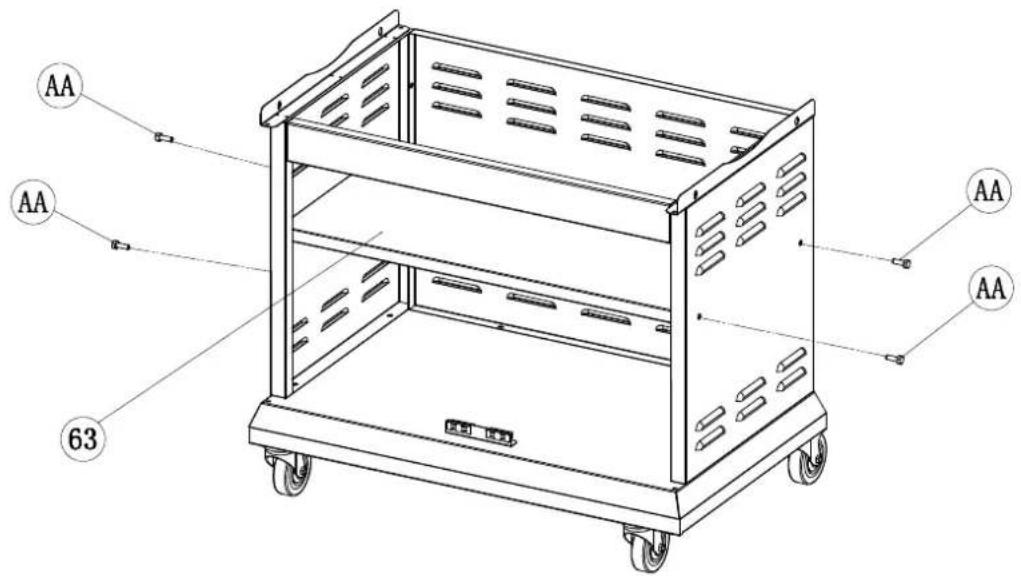
Mount the cross strut between the side panels.
6
Attach the shelf to the marked position of the base cabinet.
text_image
AA AA 63 AA AA7
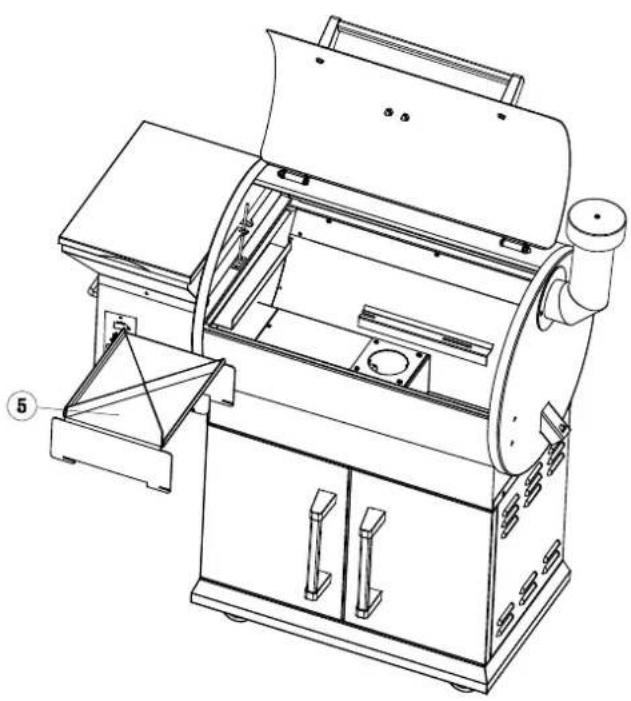
Place the funnel onto the pellet chamber. Make sure that the lid opens to the front side (operating element).
⑧
Open the lid and insert the pre-assembled screws into the cap nuts through the holes in the funnel from the outside. Tighten from the inside.

text_image
Technical diagram of an electrical enclosure with labeled components including EE, KK, and numbered parts 3 and 10.
natural_image
Line drawing of a mechanical device with control panel and power outlet (no text or symbols)ATTACHING THE GRILLING CHAMBER
⑨
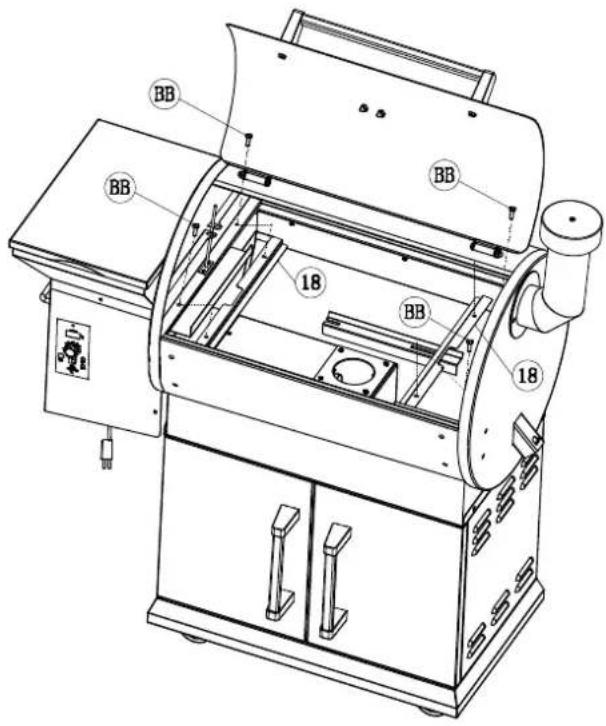
Place the grilling chamber onto the base cabinet. Make sure that the chamber is located between the left and right-side panels.
10
Screw the grilling chamber onto the side panels.

text_image
Technical diagram of a portable industrial machine with numbered components and labeled parts AA and 411
Connect the RTD connector from the inside of the grilling chamber to the counter plug on the outside. Warning: Any excess wire of the RTD plug should be located outside of the chamber.
12
Slide the combustion chamber into the grilling chamber using the provided opening.
13
Open the funnel lid and screw the pellet chamber onto the grilling chamber from the inside.

text_image
Technical diagram of a mechanical device with numbered components and exploded view, showing internal components and assembly steps.
text_image
Technical line drawing of a cylindrical industrial machine with labeled components and part numbers (48, BB)14
Attach the cable suspension onto the back side of the pellet chamber.
ATTACHING THE HANDLE AND CHIMNEY
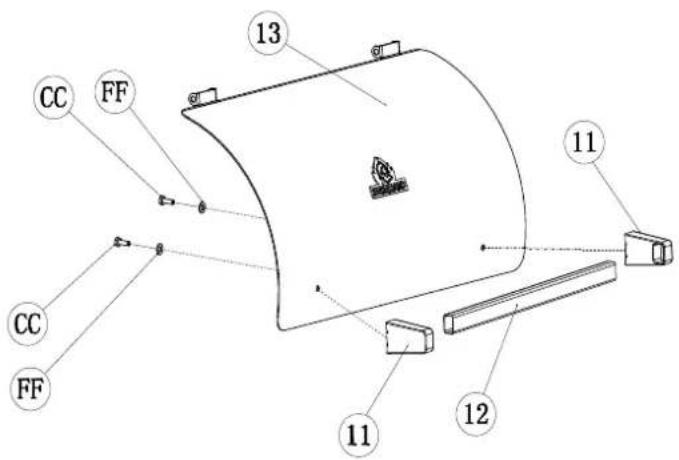
15
Attach the handle on the lid of the grilling chamber.
text_image
CC FF 13 11 CC FF 11 12
text_image
DD FF 20 21 CC CC16
Attach the chimney with sealing onto the grilling chamber.
17
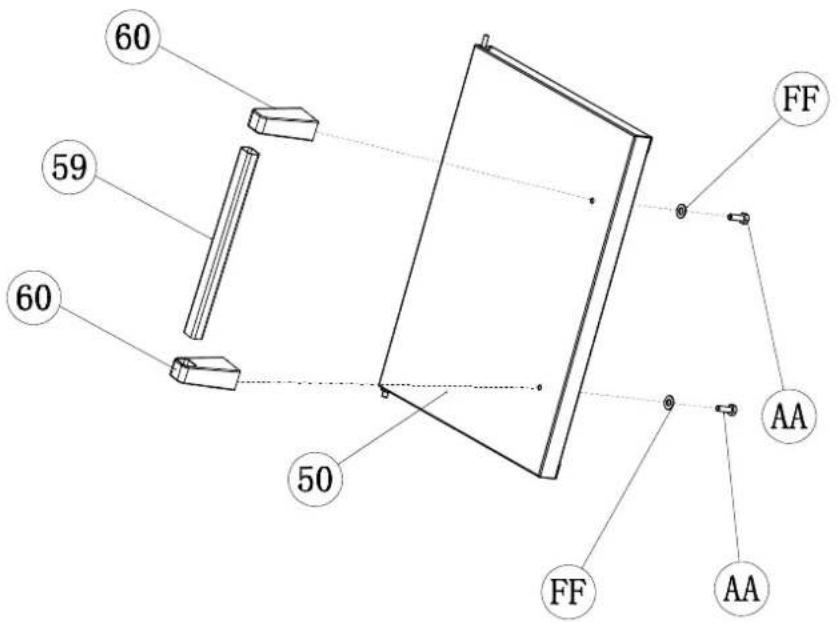
Attach the handles onto the doors.
text_image
60 59 60 50 FF AA FF AA18
First place both doors into the smaller hole on the platform with the lower swivel joint.
Pull down the upper swivel joint, align it with the upper hole in the base cabinet, and engage.
text_image
Technical line drawing of a portable industrial machine with labeled components and parts19
Attach the grill bracket inside the grill chamber.
natural_image
Technical line drawing of a mechanical device with open lid and internal compartments (no text or symbols)21
Insert the grease removal sheet into the mounting on the side of the grilling chamber, above the heat conduction sheet.
Make sure that the rail points downwards and that the sheet is located directly underneath the hole for grease removal. The sheet should now tilt slightly to the right.
text_image
Technical diagram of a machine with labeled components including 'BB' and numbered parts 1820
Insert the heat conduction sheet with the rails into the mounting on the front and back side of the grilling chamber.

natural_image
Technical line drawing of a mechanical device with labeled parts (no text or symbols present)22
Place the grilling grate and warming grate into the provided mountings.
text_image
24 AA AA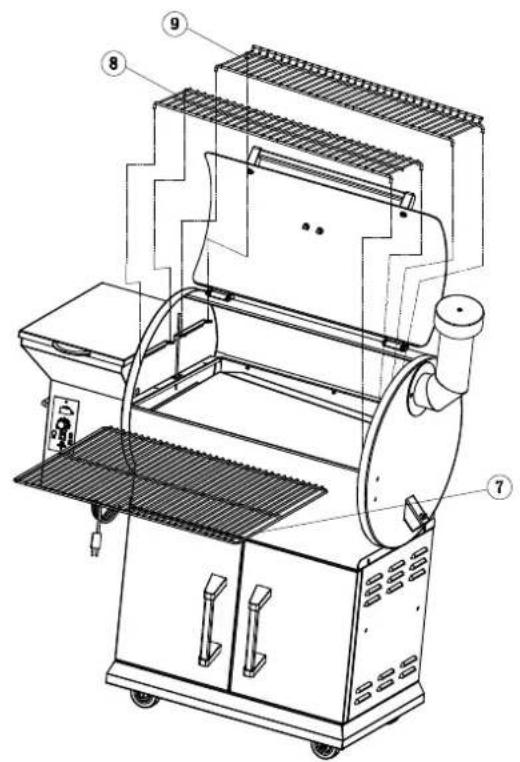
text_image
Technical diagram of an industrial machine with numbered components for identification23
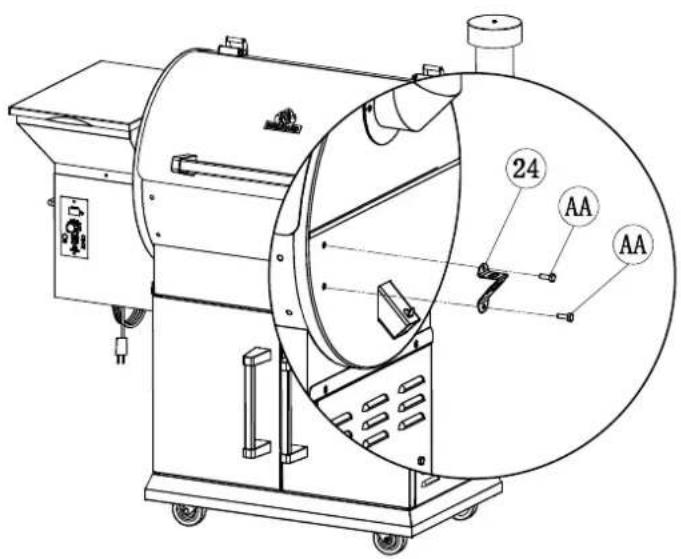
Attach the bottle opener to the side of the grill chamber.
24
Attach the brackets for the front tray.
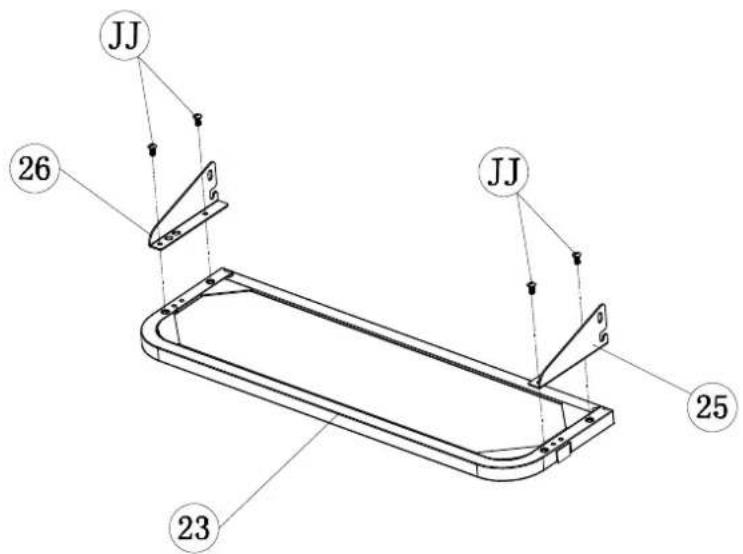
text_image
JJ 26 JJ 25 2324

text_image
Technical diagram of a portable industrial machine with labeled components and numbered parts
natural_image
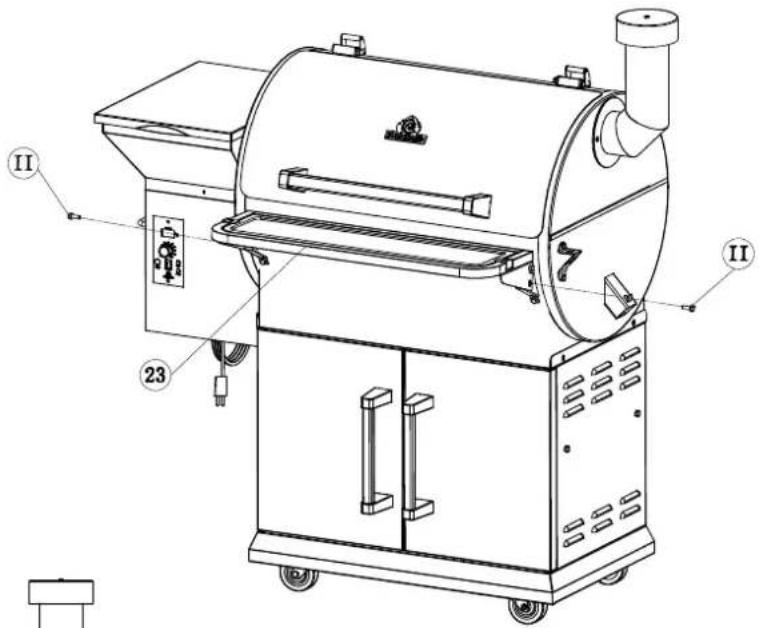
Technical line drawing of a portable industrial machine with control panel and labeled parts (II), no readable text or symbols beyond labels.25
Insert front tray with serving board and tighten.
text_image
Technical diagram of a portable industrial machine with labeled components (II and 23)
natural_image
Technical line drawing of a mechanical device with a circular inset showing a bucket labeled '29' (no text or symbols on the diagram itself)26
Hang the grease collection bucket from the hook of the drain tube.
WARNING: The pellet smoker radiates heat. Never place the device directly on glass fronts, walls, plants, etc. The minimum distance to objects of any kind is:
Back: 60 cm
Sides: 60 cm
Top: 100 ~cm

text_image
100 cm 60 cm 60 cm 60 cmBEFORE USING THE APPLIANCE FOR THE FIRST TIME
Carry out the following steps before using your pellet smoker for the first time. Repeat the steps each time you're out of pellets.
- Open the lid of the grilling chamber and remove the grids, grease removal sheet, and heat conduction sheet from your smoker.
- Open the lid of the pellet chamber and make sure that it's free of foreign objects.
- Set the switch to OFF (O) and plug the mains cable into the suitable 230-volt socket.
- Flip the switch to ON (I) and set the temperature controller to SMOKE.
- Observe the spiral conveyor for 1 or 2 minutes to make sure it's turning.

WARNING: Never reach into the pellet chamber and never touch the spiral conveyor. Keep fingers, hair, and clothes away from moving parts at all times. Risk of injury!
- Hold your hand at least 10 cm above the combustion chamber to check whether the ventilator is working and air is circulating.

WARNING: Do not grab into or touch the combustion chamber. Risk of burning!
- Wait for approx. 1 minute to see whether the ignition rod underneath the spiral conveyor starts to glow and whether you notice heat developing over the combustion chamber.

WARNING: Never touch the ignition rod. Risk of burning!
- You should first see a temperature indication on the display. If you see anything else, this is an error code. NOTE: You can find detailed information on the error codes under TROUBLESHOOTING.
- Set the controller to COOL DOWN. (The ventilator continues to operate for 10 minutes in this mode.)
- Fill suitable pellets into the pellet chamber using the funnel.
- Turn the temperature controller to MAX. The spiral conveyor starts to turn and transport the pellets into the combustion chamber. The process takes a few minutes.

WARNING: Never fill pellets into the combustion chamber by hand. Risk of burning!
- As soon as you hear the first pellets entering the combustion chamber, set the controller to COOL DOWN.
- Set the controller to SMOKE. Wait for the pellets to ignite and for white-grey smoke to form. Set the controller to COOL DOWN and let the smoker cool.
BURNING-IN THE SMOKER
The smoker must be burned-in before preparing food for the first time. This process is necessary to remove any production residues.
- Place the grids, grease removal sheet, and heat conduction sheet back into the appliance. Open the lid and turn the controller to SMOKE.
- As soon as white-grey smoke starts to billow from the smoker, close the lid and set the temperature controller to MAX.
- Let the smoker operate on this setting for 45 minutes. Afterwards, it is ready for use.
USING THE SMOKER
- Open the lid of the grilling chamber. Flip the switch to ON (I) and set the temperature controller to SMOKE.
- As soon as the pellets start to kindle and white-grey smoke starts to billow from the smoker after 3 to 5 minutes, close the lid and set the temperature controller to the desired temperature.
TIP: Allow the smoker to heat up for at least 10 minutes and only place food into the smoker after the set temperature has been reached. Adding food to the smoker earlier slows down the heating process.
-
Warning: Do not immediately switch off the smoker after the food is ready, but rather set the controller to COOL DOWN. The ventilator continues to operate for 10 minutes in this mode, burning up the remaining pellets in the combustion chamber.
-
Only disconnect the mains plug after the COOL DOWN programme has finished.

WARNING: Always have the lid open when starting the smoker! Do not set the temperature controller to COOL DOWN during use.

text_image
888 °C 121 135 148 107 162 82 176 SMOKE 190 COOL DOWN MAX. SELECT PROBE PROBE 1 PROBE 2 BURNHARDUSING THE TEMPERATURE SENSORS
Use the temperature sensors to always keep track of the core temperature of your grilled food.
- Plug one or both temperature sensors into the socket(s) on the operating element.
- Lead the temperature sensor(s) into the grilling chamber using the provided opening.
- Stick the temperature sensor into the thickest part of the grilled food, roughly up to the centre.
- Briefly press the switch on the operating element to display the temperature of the sensor (SENSOR 1 or 2). The measured temperature is now shown. The display automatically switches back to the temperature in the cooking chamber afterwards.
WARNING: If the smoker doesn't ignite or if the fire dies down during operation (even with a sufficient number of pellets in the pellet chamber), excess pellets must be removed before operation. An excess of unburned pellets might result in your smoker overheating.
- Switch off the appliance and remove the mains plug. Wait until the smoker has cooled down completely. Remove the grids, the grease removal sheet, and the heat conduction sheet.
- Remove all unburned pellets and ash from the inside of the appliance and around the combustion chamber (s. REMOVING ASH).
- Reconnect the mains plug and switch on the smoker. The pellets should start falling into the combustion chamber and the ignition rod should start glowing.

WARNING: Never touch the ignition rod. Risk of burning!
- As soon as flames start coming from the combustion chamber, set the controller to COOL DOWN and let the smoker cool.
- Place the grids, grease removal sheet, and heat conduction sheet back into the appliance and open the lid. Turn the controller to SMOKE. Wait for a few minutes until white-grey smoke starts to billow from the smoker. Close the lid and turn the controller to the desired temperature.
If problems persist after restarting the smoker, consult the TROUBLESHOOTING section or contact the BURNHARD customer service.
CLEANING AND MAINTENANCE
NOTE: Make sure that the appliance has cooled down completely, is switched off, and that the mains plug is disconnected before cleaning your smoker.
- Clean the smoker after each use.
- Only have the appliance repaired by qualified specialists if there are problems. Never open the housing yourself.

WARNING: Do not use any varnish removers or thinners for cleaning.
CLEANING THE GREASE DRAIN
Grease which drips from the food collects in the grease collection tray, the V-shaped grease drain, and the grease draining tube. This might result in grease deposits. To minimise the fire hazard, you should clean these components after each use.
TIP: To make cleaning easier, you can place hard-wearing tinfoil on the grease removal sheet before use. Replace the foil after each use to minimise the risk of grease fires.
- Grease which has collected on the inside of the grease tube can be scraped off using a rugged, non-metallic tool (e.g. wood, silicon, or plastic spatula). This way, most of the grease can be pushed down through the grease tube into the grease collection bucket. Remove the remaining grease residues with a detergent and boiling water or a suitable grill cleaning agent.
- Regularly empty the grease collection bucket (depending on how frequently you use your smoker).

WARNING: Failure to clean the grease collection tray, the V-shaped grease drain, and the grease draining tube might result in grease fires. In this case, set the switch to OFF (O) and keep the lid open until the fire extinguishes completely. WATCH OUT, RISK OF BURNING! Once the grill has cooled down completely, remove all residues from the grease tube and the grease drain sheet. If necessary, also place new foil on the sheet.
CLEANING THE CHIMNEY
Burning pellets produce tar and other fumes which form creosote with humidity. This creosote can collect in the chimney. To minimise the fire hazard, you should clean the chimney of your smoker once every 3–4 months.
- Remove the chimney cap and clean it with a soft sponge, warm water, and mild detergent.
- Scrape off creosote and grease deposits from the inside of the flue tube using a rugged, non-metallic tool (e.g. wood, silicon, or plastic spatula). Remove any residues with a paper towel.

WARNING: Do not spray any liquid/flammable detergents onto the inside of your smoker!
CLEANING THE HOUSING
- Wipe off grease and dirt with a soft sponge, warm water, and mild detergent. Refrain from using an oven cleaning agent, abrasive cleaning agents, or steel wool!
CLEANING THE STAINLESS-STEEL GRILLING GRIDS
- Use a sponge or grill brush, warm water, and some detergent to clean the grids.
- The stainless-steel grilling grids do not rust and can also be cleaned in the dishwasher.
- Clean the grilling grids after each use.
REMOVING THE ASH

WARNING: Make sure that the appliance has cooled down, is switched off, and that the mains plug is disconnected before removing the ash.
Regularly remove the ash from the inside of your grill. Excess ash in the combustion chamber might extinguish the fire. This applies particularly when in SMOKE operating mode.
- Remove the grids, the grease removal sheet, and the heat conduction sheet.
- You can remove most ash deposits located outside of the combustion chamber, for example, with a small scoop and a hand brush.
- You can use a vacuum cleaner to remove the ash from the inside of the combustion chamber.
- When using a bagless vacuum cleaner: First empty the dust container. Vacuum the ash from the combustion chamber. Empty the dust collector and make sure that it's free of ash.
- Using a vacuum cleaner with disposable dust bags: First place a new dust bag. Vacuum the ash from the combustion chamber. Afterwards, immediately remove and dispose of the entire dust bag.

WARNING: Always dispose of ash residues in a metal container with fitting lid. Do not place the sealed ash container on any flammable surface and keep it away from flammable materials until final disposal.
| PROBLEM: THE SMOKER DOES NOT IGNITE | |
| Possible cause Solution | |
| Power | Check that the power cord is plugged in. Make sure that the socket is supplied with power. |
| Fuse | Remove the operating element and check the fuse at the back. Replace the fuse if it has blown. |
| Combustion chamber | If both the ventilator and the drive motor work properly, the ignition rod might need to be replaced. Please contact our customer service. |
| Cables & connections | Make sure that the cables and plugs are connected properly and free of damage. Contact customer service if you need any assistance. |
| Drive motor | If the ventilator is not working properly, the drive motor might need to be replaced. Please contact our customer service. |
| PROBLEM: PELLETS DO NOT REACH THE COMBUSTION CHAMBER | |
| Power | Check that the power cord is plugged in. Make sure that the socket is supplied with power. |
| Pellets Make sure that there are enough pellets in the pellet chamber. | |
| Spiral conveyor | Check that the spiral conveyor is not clogged. Flip the switch to OFF, disconnect the mains plug, and let the grill cool down.Open the lid and remove the grids, the grease removal sheet, and the heat conduction sheet from the grilling chamber. Remove the pellets from the pellet chamber and make sure that it is free of foreign objects. Remove all pellets and ash from the grilling chamber. |
| PROBLEM: THE FIRE GOES OUT | |
| Excess ash Remove the ash (see CLEANING AND MAINTENANCE). | |
| PROBLEM: THE DISPLAYED GRILLING TEMPERATURE IS HIGHER THAN EXPECTED | |
| External influence | The grilling temperature is influenced by environmental factors such as a high ambient temperature, wind, and direct sunlight. Place the appliance in a shady area. Open the lid to lower the inner temperature. |
| PROBLEM: EXCESS OR DISCOLOURED SMOKE FORMATION | |
| Pellets Replace moist pellets with fresh and dry pellets. | |
- Always disconnect your smoker from the mains when storing or transporting it.
• Always store your smoker protected from moisture.
• Always store the wood pellets in a dry place, away from any heat-generating devices or fuel containers. - The cover hood protects the smoker year-round against weather conditions such as rain, hail, snow, wind, and frost.
CUSTOMER SERVICE
As a basic principle, our products are subject to the statutory warranty of 2 years. Claims made after this period can only be processed in conjunction with proof of purchase. Wearing parts are excluded from warranty claims when it comes to normal wear and tear. The service life of the appliance depends on the handling and usage of the product and is therefore variable.
If you have any questions regarding the operation or function of our products, please contact our customer service:
Free hotline for Germany/Austria: 0800 270 70 27
From other EU countries: +49 211 - 7499 55 10*
*Additional charges may apply.
E-mail: service@burnhard.de
DISPOSAL/ENVIRONMENTAL PROTECTION
Our products are manufactured to high quality standards and are designed for a long service life. Regular maintenance and care will help to extend service life. If the appliance is defective and can no longer be repaired, it must not be disposed of in the normal household waste.
Take the appliance to a designated disposal point for recycling electrical or electronic equipment. Through professional disposal and recycling you make an important contribution to protecting our environment.
Afmetingen (b/h/d): 120 x 129 x 72 cm
Gewicht: ca. 71 kg
text_image
Weather safety icons showing hazard, vehicle, house, campfire, and tree symbols with checkmarkstext_image
Exploded view diagram of a portable air conditioner unit with numbered components for identificationtext_image
Exploded view diagram of electronic devices with numbered parts for identificationtext_image
Technical diagram of a mechanical frame with labeled components including wheels and numbered parts 612
text_image
52 63 AA AA
text_image
57 AA AA4
text_image
AA AA 54 AA AA
text_image
56 AA AA AA AA AA AA5
text_image
AA AA 63 AA AA7
text_image
Technical diagram of an electrical enclosure with labeled components including EE, KK, and numbered parts 3 and 10.
natural_image
Line drawing of a mechanical device with control panel and power outlet (no text or symbols)text_image
Technical diagram of a portable industrial machine with numbered components and labeled parts (1, 4, AA)11
text_image
Technical diagram of a mechanical device with numbered components and exploded view, showing internal components and assembly steps.
text_image
Technical line drawing of a cylindrical industrial machine with labeled components and part numbers (48, BB)14
text_image
Technical diagram of a portable industrial machine with labeled components including DD, FF, and numbered parts 20, 21, CC.16
text_image
Technical line drawing of a portable industrial machine with labeled components and parts19
Grillroosterhouder in de grillkamer bevestigen.

natural_image
Technical line drawing of a mechanical device with open lid and internal compartments (no text or symbols)21
text_image
Technical diagram of a machine with labeled components including 'BB' and numbered parts 1820
natural_image
Technical line drawing of a mechanical device with labeled parts (no text or symbols present)22
text_image
Technical diagram of an industrial machine with numbered components for identification23
text_image
JJ 26 JJ 25 2324
text_image
Technical diagram of a portable industrial machine with labeled components and numbered parts
natural_image
Technical line drawing of a portable industrial machine with control panel and side ports (no text or symbols)text_image
Technical diagram of a portable industrial machine with labeled components (II and 23)
natural_image
Technical line drawing of a mechanical device with a circular inset showing a bucket labeled '29' (no text or symbols on the diagram itself)LET OP: Never reach into the pellet chamber and never touch the spiral conveyor. Keep fingers, hair, and clothes away from moving parts at all times. Risk of injury!
WAARSCHUWING: Do not use any varnish removers or thinners for cleaning.
VETAFVOER REINIGEN
text_image
Weather safety icons with symbols for heating, vehicle use, house, and tree protectiontext_image
Exploded view diagram of a portable air conditioner unit with numbered components for identificationtext_image
Exploded view diagram of electronic devices with numbered parts for identificationtext_image
Technical diagram of a mechanical frame with labeled components including wheels and numbered parts 61②
text_image
AA AA 54 AA AA
text_image
56 AA AA AA AA AA AA5
text_image
AA AA 63 AA AA7
text_image
Technical diagram of an electrical enclosure with labeled components including EE, KK, and numbered parts 3 and 10.
natural_image
Line drawing of a mechanical device with control panel and power outlet (no text or symbols)FISSAGGIO DEL CAMERA BARBECUE
⑨
text_image
Technical diagram of a portable industrial machine with numbered components and labeled parts (1, 4, AA)11
text_image
Technical diagram of a mechanical device with numbered components and exploded view, showing internal components and assembly steps.
text_image
Technical line drawing of a cylindrical industrial machine with labeled components and part numbers (48, BB)14
text_image
60 59 60 50 FF AA FF AA18
text_image
Technical line drawing of a portable industrial machine with labeled components and partsINSERISCI IL SUPPORTO DELLA GRIGLIA, LA PIASTRA DI DISSIPAZIONE DEL CALORE E LA PIASTRA DI SCARICO DEL GRASSO
19
natural_image
Technical line drawing of a mechanical device with open lid and internal compartments (no text or symbols)21
text_image
Technical diagram of a machine with labeled components including 'BB' and numbered parts 1820
natural_image
Technical line drawing of a mechanical device with labeled parts (no text or symbols present)22
text_image
Technical diagram of an industrial machine with numbered components for identification23
text_image
JJ 26 JJ 25 2324

text_image
Technical diagram of a portable industrial machine with labeled components and numbered parts
natural_image
Technical line drawing of a portable industrial machine with control panel and labeled parts (II), no readable text or symbols beyond labels.text_image
Technical diagram of a portable industrial machine with labeled components (II and 23)
natural_image
Technical line drawing of a mechanical device with a circular inset showing a bucket labeled '29' (no text or symbols on the diagram itself)text_image
Safety warning icons with symbols for construction, vehicle, house, tree, and gear protectiontext_image
Exploded view diagram of a portable air conditioner unit with numbered components for identificationRef. Description Quantité
text_image
Exploded view diagram of electronic devices with numbered parts for identificationRef. Description Quantité
text_image
Technical diagram of a mechanical frame with labeled components including wheels and numbered parts 61②
text_image
AA AA 54 AA AA
text_image
56 AA AA AA AA AA AA5
text_image
AA AA 63 AA AA7
text_image
Technical diagram of an electrical enclosure with labeled components including EE, KK, and numbered parts 3 and 10.
natural_image
Line drawing of a mechanical device with control panel and power outlet (no text or symbols)FIXER LA CHAMBRE DU GRILL
9
text_image
Technical diagram of a portable industrial machine with numbered components and labeled parts AA and 411
text_image
Technical diagram of a mechanical device with numbered components and exploded view, showing internal components and assembly steps.
text_image
Technical line drawing of a cylindrical industrial machine with labeled components and part numbers (48, BB)14
text_image
60 59 60 50 FF AA FF AA18
text_image
Technical line drawing of a portable industrial machine with labeled components and parts19
natural_image
Technical line drawing of a mechanical device with open lid and internal compartments (no text or symbols)21
text_image
Technical diagram of a machine with labeled components including 'BB' and numbered parts 1820
natural_image
Technical line drawing of a mechanical device with labeled parts (no text or symbols present)22
text_image
Technical diagram of a mechanical device with numbered components for identification23
text_image
JJ 26 JJ 25 2324

text_image
Technical diagram of a portable industrial machine with labeled components and numbered parts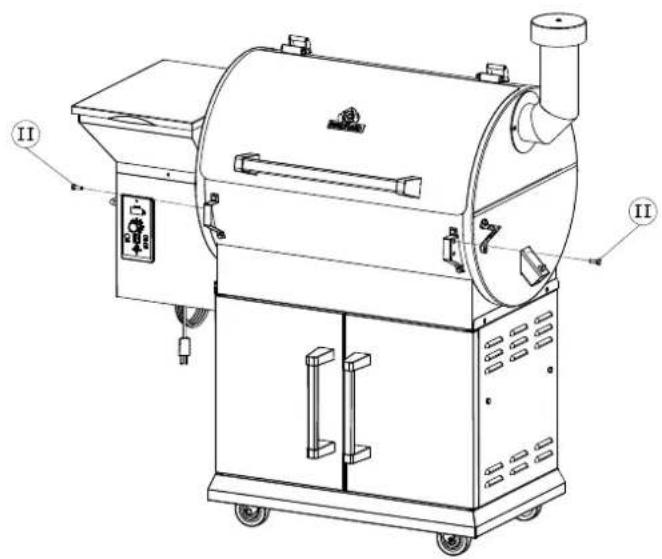
natural_image
Technical line drawing of a portable industrial machine with control panel and side ports (no text or symbols)text_image
Technical diagram of a portable industrial machine with labeled components and numbered parts
natural_image
Technical line drawing of a mechanical device with a circular inset showing a bucket labeled '29' (no text or symbols on the diagram itself)text_image
Weather warning icons showing different types of hazards: triangular warning, van, house, mountain, and tree with checkmark indicators.text_image
Exploded view diagram of a portable air conditioner unit with numbered components for identificationtext_image
Exploded view diagram of electronic devices with numbered parts for identificationtext_image
Technical diagram of a mechanical frame with labeled components including wheels and numbered parts 61②
text_image
AA AA 54 AA AA
text_image
56 AA AA AA AA AA AA5
text_image
AA AA 63 AA AA7
text_image
Technical diagram of an electrical enclosure with labeled components including EE, KK, and numbered parts 3 and 10.
natural_image
Line drawing of a mechanical device with control panel and power outlet (no text or symbols)text_image
Technical diagram of a portable industrial machine with numbered components and labeled parts AA and 411
text_image
Technical diagram of a mechanical device with numbered components and exploded view, showing internal components and assembly steps.
text_image
Technical line drawing of a cylindrical industrial machine with labeled components and part numbers (48, BB)14
text_image
60 59 60 50 FF AA FF AA18
text_image
Technical line drawing of a portable industrial machine with labeled components and partsnatural_image
Technical line drawing of a mechanical device with open lid and internal compartments (no text or symbols)21
text_image
Technical diagram of a machine with labeled components including 'BB' and numbered parts 1820
natural_image
Technical line drawing of a mechanical device with labeled parts (no text or symbols present)22
text_image
Technical diagram of an industrial machine with numbered components for identification23
text_image
JJ 26 JJ 25 2324

text_image
Technical diagram of a portable industrial machine with labeled components and numbered parts
natural_image
Technical line drawing of a portable industrial machine with control panel and side ports (no text or symbols)text_image
Technical diagram of a portable industrial machine with labeled components (II and 23)
natural_image
Technical line drawing of a mechanical device with a circular inset showing a bucket labeled '29' (no text or symbols on the diagram itself)40589 Düsseldorf, Germany
Free hotline for Germany/Austria:
0800 270 70 27
From other EU countries: +49 211 - 749 55 10*
* Different costs may apply.
E-Mail: service@burnhard.de