FP411XN1 - Electric oven BRANDT - Free user manual and instructions
Find the device manual for free FP411XN1 BRANDT in PDF.
| Product type | Built-in electric oven |
| Brand | BRANDT |
| Model | FP411XN1 |
| Dimensions (W x H x D) | 595 x 592 x 545 mm |
| Weight | 30 kg (estimated) |
| Power supply | 220-240 V ~ 50 Hz, 16 A |
| Cooking type | Fan forced, conventional, grill, ECO, pyrolysis |
| Main functions | Conventional cooking, fan forced, grill, ECO (energy saving), pyrolysis, keep warm, defrost |
| Cleaning | Pyrolysis (high temperature self-cleaning) |
| Child safety | Door locking system with stop |
| Pyrolysis door lock | Automatic during cycle |
| Interior lighting | 15 W bulb, 220-240 V, E14 socket |
| Included accessories | Anti-tilt rack, drip tray, multi-purpose tray, non-stick tray |
| Number of cooking levels | 5 |
| Temperature range | 40 °C to 275 °C |
| Capacity | Approximately 70 L (estimated) |
| Installation | Built-in, requires cutout 560 x 585 mm (min) |
| Energy consumption | Class A (according to EN 50304) |
| Repairability index | Availability of spare parts (bulb, heating elements) |
Frequently Asked Questions - FP411XN1 BRANDT
User questions about FP411XN1 BRANDT
0 question about this device. Answer the ones you know or ask your own.
Ask a new question about this device
Download the instructions for your Electric oven in PDF format for free! Find your manual FP411XN1 - BRANDT and take your electronic device back in hand. On this page are published all the documents necessary for the use of your device. FP411XN1 by BRANDT.
USER MANUAL FP411XN1 BRANDT
natural_image
Line drawing of a rectangular metal grate with evenly spaced vertical rods (no text or symbols)Grill med sikkerhedsforanstaltning mod vipning
DK
natural_image
Technical line drawing of a square frame with mounting holes (no text or symbols)natural_image
Technical line drawing of a rectangular fan or vent with internal grid pattern (no text or symbols)natural_image
Simple gray diamond shape with rounded corners on white background (no text or symbols)flowchart
graph TD
    A["0"] --> B["P"]
    A --> C["εCO"]
    A --> D["εCO"]
    A --> E["εCO"]
    A --> F["εCO"]
    A --> G["εCO"]
    A --> H["εCO"]
    A --> I["εCO"]
    A --> J["εCO"]
    A --> K["εCO"]
    A --> L["εCO"]
    A --> M["εCO"]
    A --> N["εCO"]
    A --> O["εCO"]
    A --> P["εCO"]
    A --> Q["εCO"]
    A --> R["εCO"]
    A --> S["εCO"]
    A --> T["εCO"]
    A --> U["εCO"]
    A --> V["εCO"]
    A --> W["εCO"]
    A --> X["εCO"]
    A --> Y["εCO"]
    A --> Z["εCO"]
    A --> AA["εCO"]
    A --> AB["εCO"]
    A --> AC["εCO"]
    A --> AD["εCO"]
    A --> AE["εCO"]
    A --> AF["εCO"]
    A --> AG["εCO"]
    A --> AH["εCO"]
    A --> AI["εCO"]
    A --> AJ["εCO"]
    A --> AK["εCO"]
    A --> AL["εCO"]
    A --> AM["εCO"]
    A --> AN["εCO"]
    A --> AO["εCO"]
    A --> AP["εCO"]
    A --> AQ["εCO"]
    A --> AR["εCO"]
    A --> AS["εCO"]
    A --> AT["εCO"]
    A --> AU["εCO"]
    A --> AV["εCO"]
    A --> AW["εCO"]
    A --> AX["εCO"]
    A --> AY["εCO"]
    A --> AZ["εCO"]
    A --> BA["εCO"]
    A --> BB["εCO"]
    A --> BC["εCO"]
    A --> BD["εCO"]
    A --> BE["εCO"]
    A --> BF["εCO"]
    A --> BG["εCO"]
    A --> BH["εCO"]
    A --> BI["εCO"]
    A --> BJ["εCO"]
    A --> BK["εCO"]
    A --> BL["εCO"]
    A --> BM["εCO"]
    A --> BN["εCO"]
    A --> BO["εCO"]
    A --> BP["εCO"]
    A --> BQ["εCO"]
    A --> BR["εCO"]
    A --> BS["εCO"]
    A --> BT["εCO"]
    A --> BU["εCO"]
    A --> BV["εCO"]
    A --> BW["εCO"]
    A --> BX["εCO"]
    A --> BY["εCO"]
    A --> BZ["εCO"]
What does your oven look like?
Description of the appliance P.18
Accessories P.19
Safety Recommendations P.20
Child safety device P.20
How do you install your oven?
Electrical connection P.21-22
Useful dimensions for installing your oven P.23
How does your oven work?
How do you program for immediate cooking? P.24
How do you program for energy-saving cooking? P.24
What do you do in case of operating malfunctions? P.25
Oven cooking modes P.26-27
How do you clean the oven cavity with pyrolysis?
What is pyrolysis? P.28
In what situations should pyrolysis be used? P.28
How do you use the pyrolysis function? P.29
How do you change the bulb? P.29
Throughout the manual,

indicates safety recommendations,
indicates advice and tips
Introduction
Dear Customer,
You have just acquired a BRANDT oven and we would like to thank you.
Our research teams have designed for you a new generation of appliances so that you can cook with enjoyment each day.
With pure lines and modern aesthetics, your new Brandt oven blends harmoniously into your kitchen and perfectly combines ease of use with cooking performance.
In the line of Brandt products, you will also find a wide range of hobs, ventilation hoods, dishwashers and refrigerators, all of which can be built in and all of which can be coordinated with your new Brandt oven.
At the cutting edge of innovation, Brandt helps to improve the quality of everyday life by bringing you products that are ever more effective, easy to use, environmentally friendly, attractive and reliable.
The BRANDT brand.
What does your oven look like?
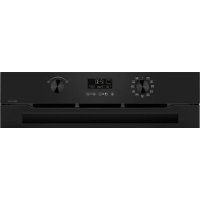
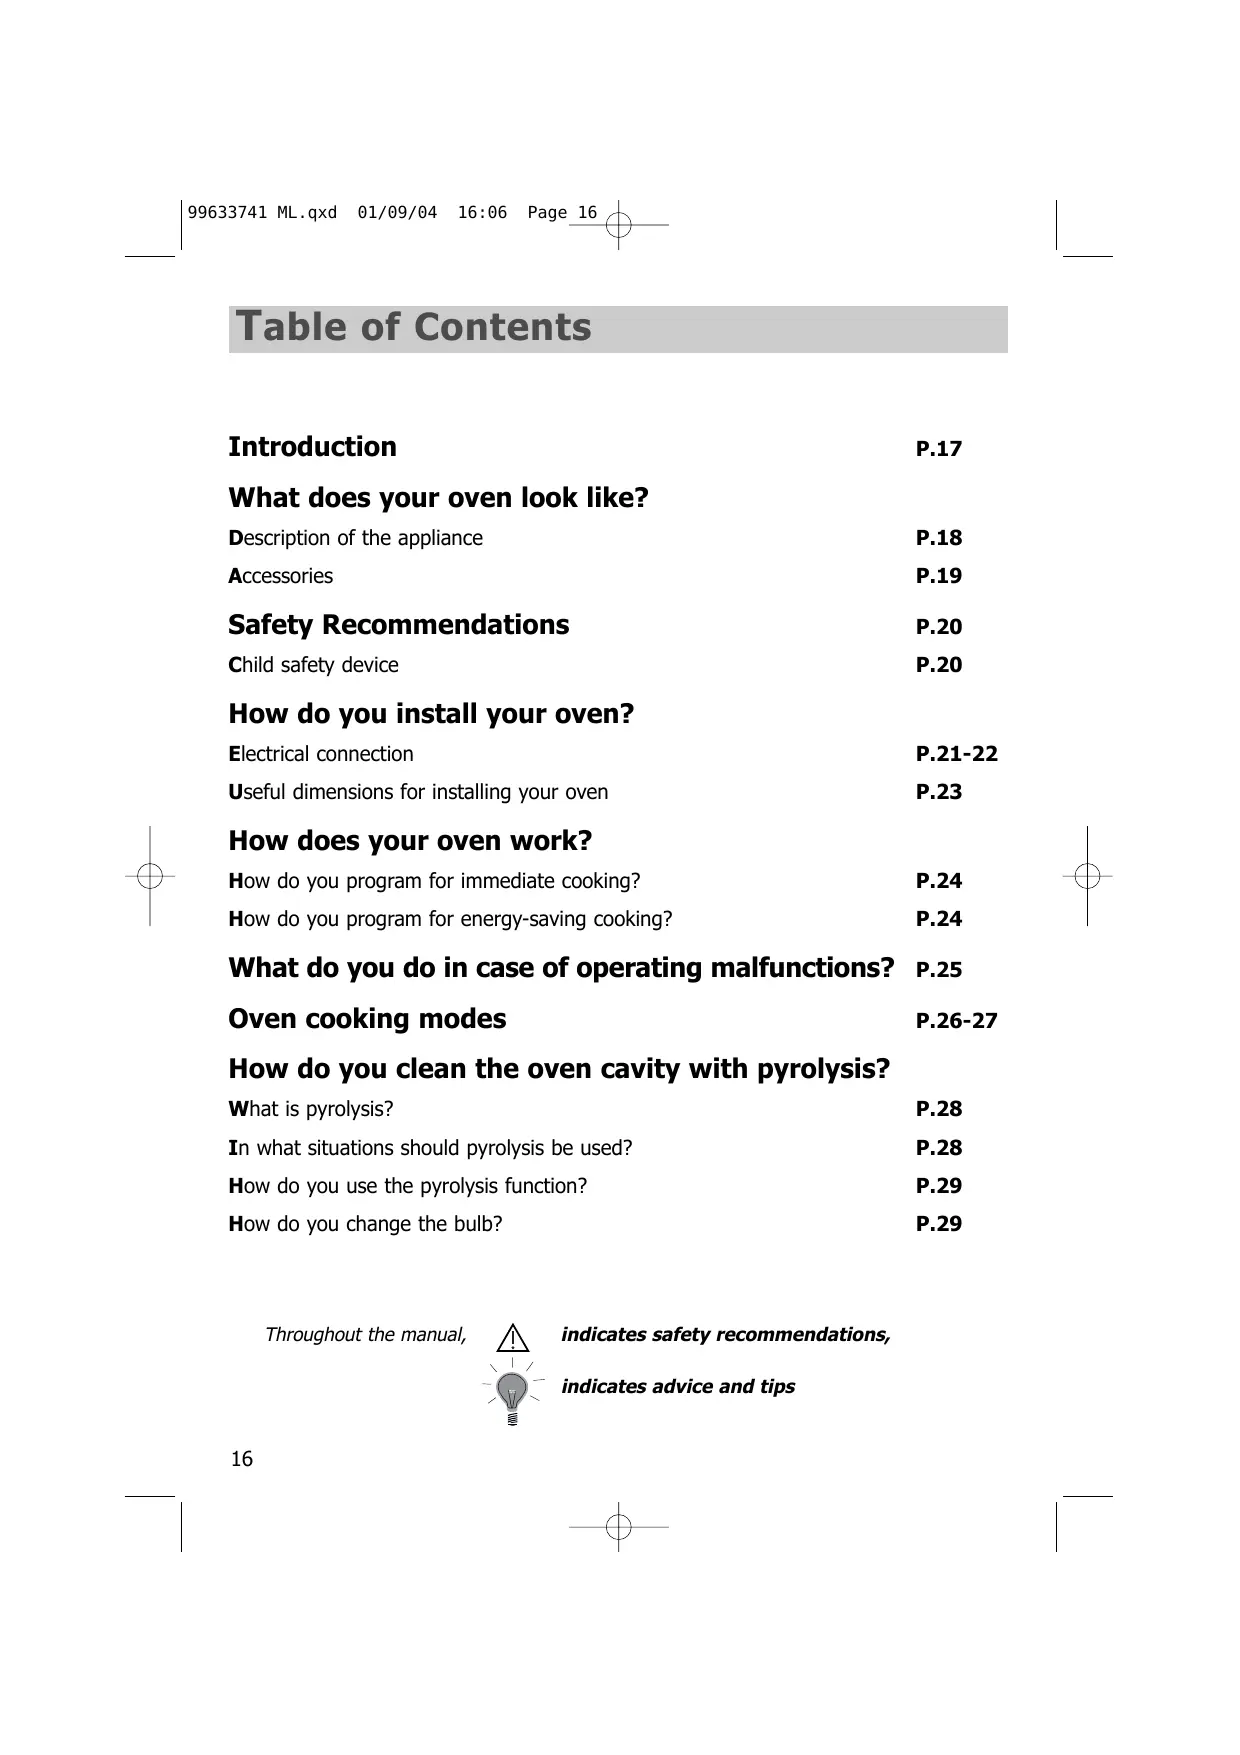
DESCRIPTION OF THE APPLIANCE
① Temperature selector
4 Shelf support indicator
② Function selector
5 Contact for open door detector
3 Light
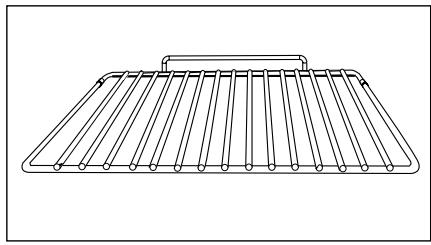
Accessories
natural_image
Line drawing of a rectangular metal grate with evenly spaced vertical rods (no text or symbols)Anti-tipping safety grid
The grid can be used to hold all dishes and moulds containing foodstuffs to be cooked or browned. It can be used for barbecues (to be placed directly on the grid).
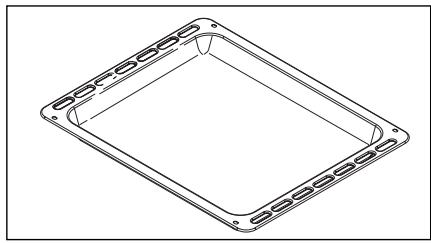
natural_image
Technical line drawing of a square frame with mounting holes (no text or symbols)Multi-purpose dish (pastry)
GB
It serves as a baking dish and has a sloped edge. It is used for cooking pastries such as cream puffs, meringues, madeleines, puff pastry, etc. Avoid placing roasts or meats directly in the dish because you are certain to have major spattering on the oven walls
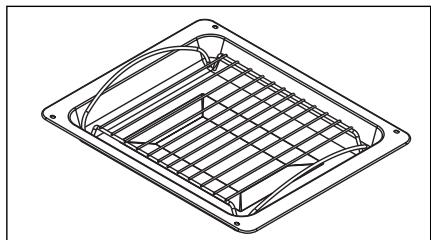
natural_image
Technical line drawing of a rectangular fan or vent with internal grid pattern (no text or symbols)Grill Tray
With special grid for grilling
The tray can be used for collecting juices when cooking with the grill element by itself or with the oven set to pulsed grill (grill and fan). It is particularly useful as a large roasting tray for meat and vegetables.
Never cook with the grill tray sitting on the
bottom of the oven.
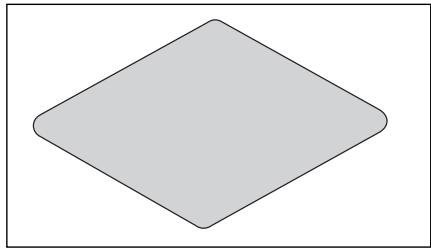
natural_image
Simple gray diamond shape with rounded corners on white background (no text or symbols)Non-stick baking tray
(to be placed on a grid)
Placed on the dish support grid, it can be used for cooking pastries, pies and pizza.
Its non-stick coating allows for easy removal of baked items.
Wear oven mitts to protect your hands when removing it from the oven.
Let it cool before washing it by hand in the
kitchen sink with dish soap. Avoid scouring sponges.
WARNING: Do not cut on it with a knife or a metallic pizza cutter; use plastic or silicone utensils instead.
Do not use the tray at temperatures above 250^ C or during the PYROLYSIS mode.

Safety Recommendations
Please become familiar with these recommendations before installing and using your oven. This oven was designed for household use only. It is intended solely for cooking foodstuffs. This oven does not contain any asbestos-based components.
FIRST USE:
Before using your oven for the first time, heat it up while empty with the door closed for approximately 15 minutes using the maximum setting in order to "cure" the appliance. The rock wool that surrounds the oven cavity may initially release a particular odour caused by its composition. Similarly, you may notice the release of some smoke. All of this is normal.
SUBSEQUENT USES:
- Ensure that the door of your oven is completely closed so that the seal can properly do its job.
- Do not let anyone lean against or sit on the oven door when it is open.
- When using the grill with the door semi-open, exposed parts and surfaces may become hot. Keep small children away.
- When in use, the appliance becomes hot. Be careful not to touch the heating elements located inside the oven.
- After cooking, do not use bare hands to touch the dishes or accessories (grid, turnspit, drip tray, turnspit support, etc.); use a potholder or heat-resistant material.
- Do not line your oven with sheets of aluminium. Otherwise, the result could be an accumulation of heat that could have an undesirable effect on cooking and roasting results and could damage the enamel.
- Do not use a steam cleaner or high-pressure cleaner.
- Before beginning a pyrolysis cleaning cycle in your oven, remove all parts of your grids, trays and accessories and remove major spill residue.
- During cleaning, the exposed surfaces may become hotter than during normal use; small children should be kept away from the oven.
The oven must be turned off for all attempts to clean the cavity.
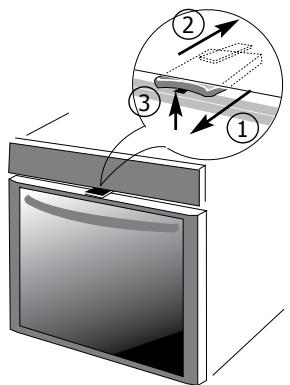
Child safety device
ACTIVATION
① Activating the child safety device:
Pull the stop towards you to activate the device.
② Releasing the child safety device:
Push the stop away from you.
USE
③ If you have opted to use the child safety device: Open the door by simultaneously lifting the stop.
If you chose not to use the child safety device: Open the door normally.
How do you install your oven?
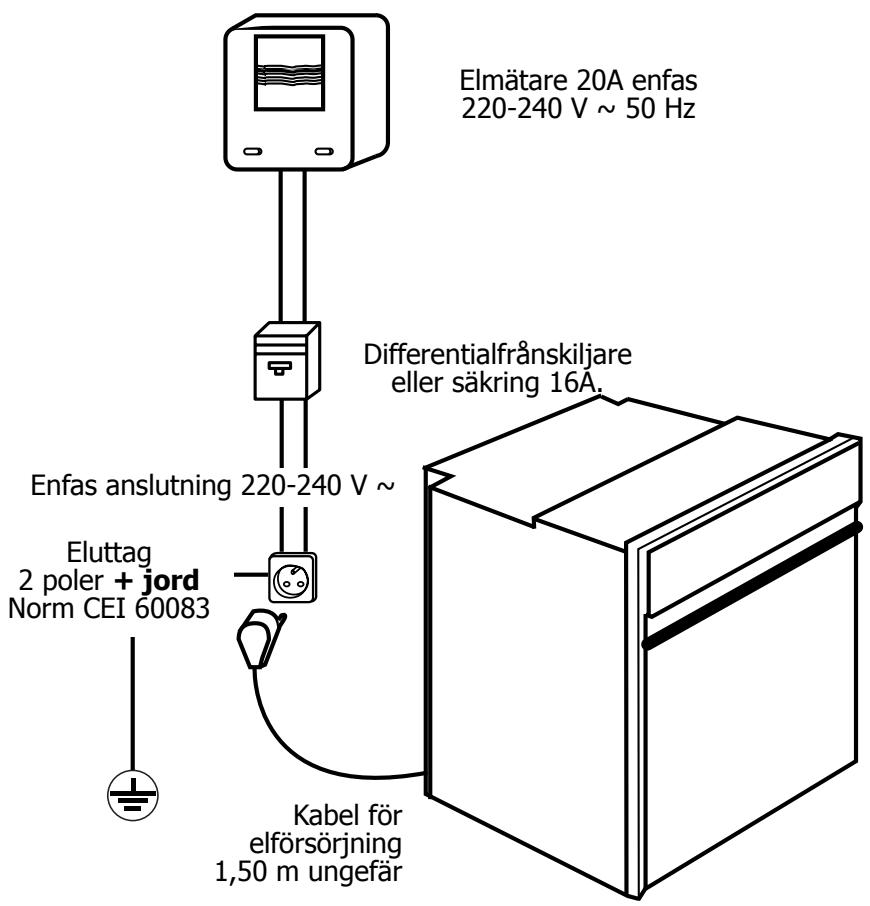
Electrical connection
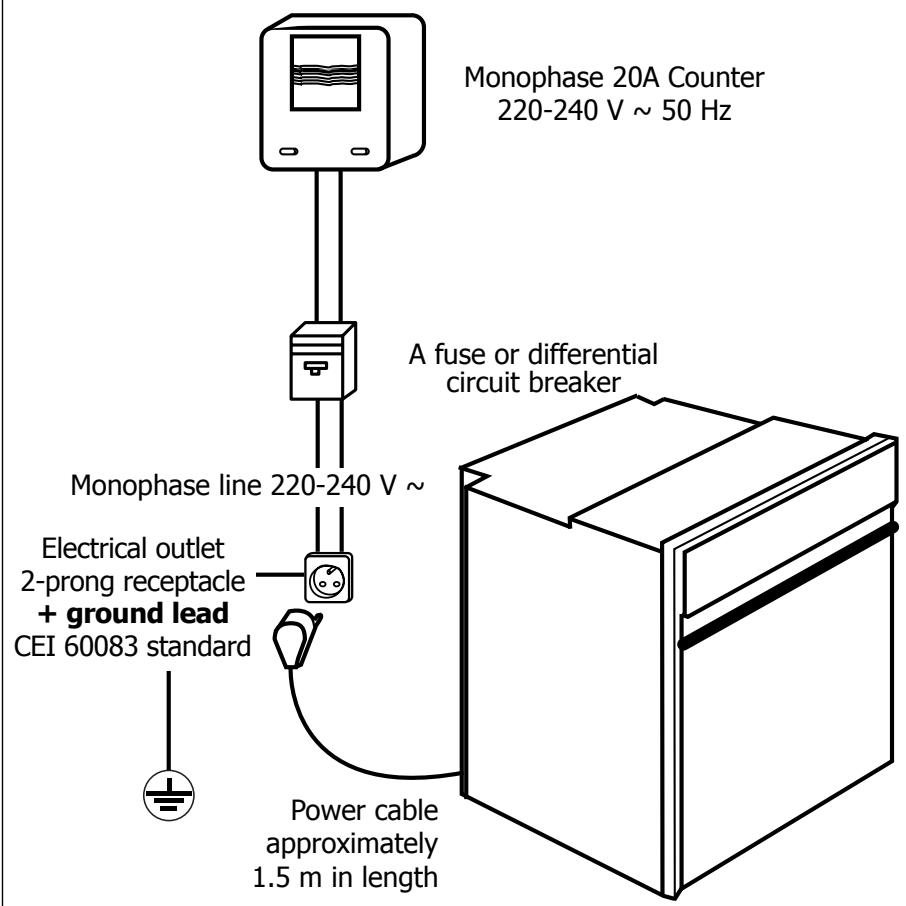
GB

Before making the connection, ensure that the wires in your electrical set-up have enough cross-sectional area to properly supply electricity to the appliance (cross-sectional area must be at least equal to that of the power cable). The fuse in your set-up must be 16 amperes.
How do you install your oven?
The electrical connection should be performed before the appliance is installed in the cabinet.
- The oven must be connected with a power cable (standardized) with three 1.5 mm ^2 conductors (1 ph +1 N + ground ⏻) that must be connected to a monophase 220–240 V network via a CEI 60083 standardized receptacle (1 ph +1 N + ground lead ⏻) or in accordance with installation rules. The safety wire (green-yellow) is connected to the appliance's terminal ⏻ and must be connected to the ground lead of the electrical set-up.
- In the case of connections with an electric receptacle, it must remain accessible after installation of the appliance.
- The oven's neutral conductor (blue wire) must be connected to the network's neutral conductor.
Installation and/or replacement of power cable
- The power cable (H05 RR-F, H05 RN-F or H05 VV-F) must be of sufficient length to be connected to the build-in oven while it sits on the floor in front of the cabinet.
To do this the appliance must be disconnected from the electrical network: - Open the inspection flap located at the lower right of the back cover by unscrewing the two screws, then pivot the inspection flap.
- Strip 12 mm along each wire of the new power cable.
- Carefully twist together the strands.
- Loosen the screws from the terminal board and remove the power cord to be replaced.
- Introduce the power cable through the side of the cover in the cable clip located to the right of the terminal board
- Connect the power cord wires in accordance with the written markings on the terminal board.
- All the strands of the electricity wires must be captured under the screws.
- The phase wire on the L terminal.
- The green-yellow coloured ground wire should be connected to the terminal ⏚.
- The neutral conductor (blue) on the N terminal.
- Screw down tightly the screws on the terminal board and check the connection by pulling on each wire.
- Attach the cable with the cable clip located to the right of the terminal board.
- Close the inspection flap using the two screws.

We cannot be held responsible for any accident resulting from an inexistent, defective or incorrect ground lead.
How do you install your oven?
Useful dimensions for installing your oven
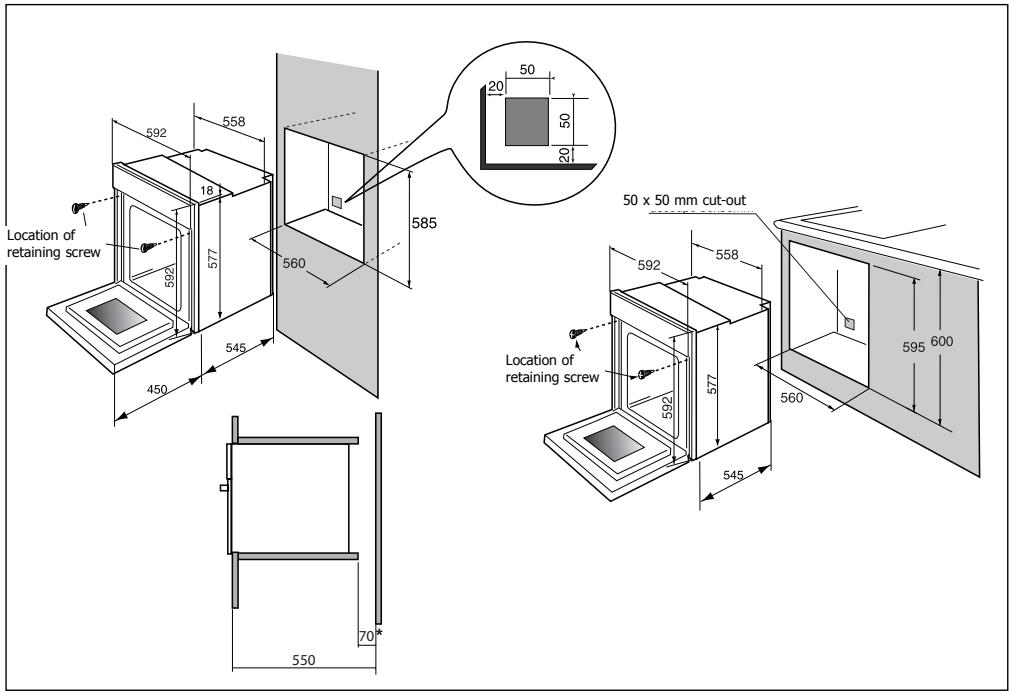
GB
The oven can be installed under a worktop or in a column of cabinetry (open* or closed) having the appropriate dimensions for built-in installation (see adjacent diagram).
Your oven has optimised air circulation that allows it to achieve remarkable cooking and cleaning results if the following guidelines are respected:
- Centre the oven in the cabinet so as to guarantee a minimum distance of 5 mm between the appliance and the neighbouring cabinet.
- The material of the built-in cabinetry must be heat resistant (or be covered with such a material).
- For greater stability, attach the oven in the cabinet with two screws through the holes provided for this purpose on either side of the front inner panel (see diagram).
To do this:
1) Remove the rubber screw covers to access the mounting holes.
2) Drill a ∅ 3 mm hole in the cabinet panel to avoid splitting the wood.
3) Attach the oven with the two screws.
4) Replace the rubber screw covers (they also serve to absorb the shock caused by closing the oven door).
(*) If the cabinet is open, its opening must be 70 mm (maximum).

To be certain that you have properly installed your appliance, do not hesitate to call on a household appliance specialist.
How does your oven work?
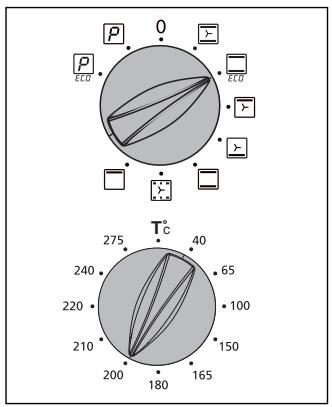
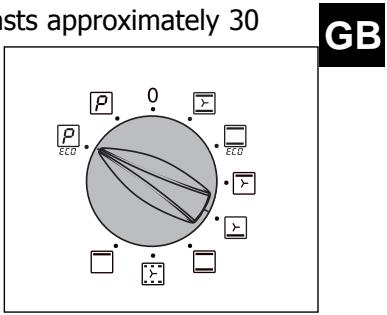
1. How do you program for immediate cooking?
- Choose the cooking mode Turn the function selector to the position of your choice.
Example: "☐" position.
- Choose the cooking temperature Turn the thermostat (temperature selector) to the temperature recommended in your recipe.
Example: temperature set to 200^ .
• After these steps, the oven heats up and the thermostat indicator lights up or turns itself off in accordance with the rate of temperature adjustments.
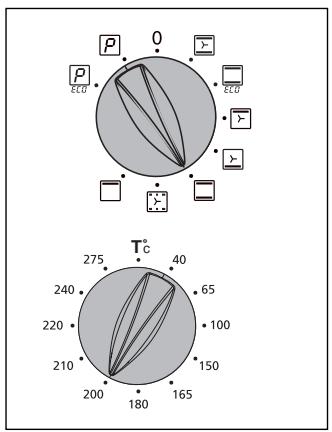
2. How do you program for energy-saving cooking?
- Turn the function selector to the "ECO" position.
- Adjust the temperature according to your recipe.
To optimise the ECO cooking mode, do not pre-heat and do not open the door.
* This position makes it possible to save up to 20% energy while still offering identical cooking results. The ECO position is used for the energy label performance.
radar
| Category | Value | |---|---| | P | 0 | | ECO | 0 | | Tc | 40 | | ECO | 65 | | Tc | 100 | | Tc | 150 | | Tc | 165 | | Tc | 200 | | Tc | 210 | | Tc | 220 | | Tc | 240 | | Tc | 275 |
After a cooking cycle, the circulating fan continues to function for a period to ensure the heating elements are properly cooled down.
What to do in case of operating malfunctions?
If you have a doubt about the functioning of your oven, this does not necessarily mean that there is a malfunction. In any event, check the following items:
You observe that...
The oven is not heating.
Possible causes
- The oven is not connected.
- The fuse in your electrical set-up is not working.
- The selected temperature is too low.
- The sensor is defective.
- The oven has experienced overheating and has engaged safety steps.
What should you do?
- Connect the oven.
- Replace the fuse in your electrical set-up and check its capacity (16A).
- Increase the selected temperature.
- Call the Post-Sales Service Department.
- Call the Post-Sales Service Department.
- Call the Post-Sales Service Department.
The temperature indicator is flashing.
- Problem with the door's locking mechanism.
• Defective temperature sensor.
- Call the Post-Sales Service Department.
- Call the Post-Sales Service Department.
The oven light is not working.
- The light is out of order.
-
The oven is not connected or the fuse is not working.
-
Replace the light.
- Connect the oven or replace the fuse.
The cooling fan continues to operate after the oven stops.
- The fan should work for a maximum of one hour after cooking, or when the oven temperature is greater than 125^ .
- If it does not stop after one hour.
- Open the oven door to accelerate cooling of the oven.
- Call the Post-Sales Service Department.
The pyrolysis cleaning cycle does not begin.
- The door is not properly closed.
- The locking system is defective.
- The temperature sensor is defective.
-
The contact for "closed door" detection is defective.
-
Verify that the door is locked.
- Call the Post-Sales Service Department.
- Call the Post-Sales Service Department.
- Call the Post-Sales Service Department.
O ven cook
Symbol
*

Name of cooking mode
Traditional fan heating
Cooking controlled by the upper and lower heating elements and the fan.

Descrip
▶ Quick temperati in the oven whil
*

Traditional ECO
Cooking controlled by the upper and lower heating elements with no fan.

This position allows the quality of the energy label

Grill, fan-assisted
Cooking controlled, alternately, by the upper element and by the fan.

▶ No need for pre Roasts and poul

Bottom element, fan-assisted
Cooking controlled by the bottom element combined with a slight dose of the grill and the fan.

▶ Cooking heat from the to
Place the grid on

Traditional
Cooking controlled by the upper and lower heating elements with no fan.

Requires prehea
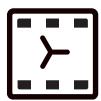
Hold warm function
Heat regulated by the upper element with use of fan.

Low temperature

Grill
Cooking controlled by the upper element without the fan.

▶ Preheat the ove
* Programme(s) used to obtain the results indicated on the energy label in compliance w
ing modes
ption of cooking mode
sure increase. Some dishes can be placed ile it is still cold.
Recommendations
Recommended for MEATS, FISH and VEGETABLES--preferably placed in a terra cotta dish.
GB
lows for energy savings while preserving the cooking. The ECO position is used for el performance.
Note: All cooking is done without preheating.
eheating. Iltry that are juicy and crispy all over.
Recommended for all poultry or roasts on the turnspit. ▶ To sear and thoroughly cook leg of lamb, rib roasts. To preserve the texture of fish steaks that melt in your mouth.
om the bottom with a small amount of :op.
Recommended for moist dishes (quiches, juicy fruit tarts, etc.). The crust will be thoroughly cooked on the bottom. Recommended for dishes that rise (cake, buns, breads, etc.) and for soufflés that will not be stuck by a crust formed on the top.
on the lower shelf support.
Recommended for slow, gentle cooking: tender game meat, etc. ▶ To seal roasts of red meat. To simmer in a covered stew pan dishes that were begun on the hob (coq au vin, stew, etc.).
ating before the dish is placed in the oven.
Recommended for rising doughs for bread, buns, cakes, etc. without exceeding 40°C (plate warming, defrosting).
re stabilisation.
▶ Recommended for grilling chops, sausages, toast or prawns placed on the grid.
en for five minutes.
ray onto the bottom shelf support.
with European standard EN 50304 and in accordance with European Directive 2002/40/CE.
How do you clean the ovo
1. What is pyrolysis?
- Pyrolysis is a cycle during which the oven cavity is heated to a very high temperature in order to eliminate soiling from splattering and spills. The smoke and odours released are destroyed as they move through catalyser.
- Pyrolysis is not necessary after each cooking cycle, but simply when the dirtiness warrants it.
- As a safety measure, the cleaning operation only begins after the door has automatically locked. As soon as the internal temperature of the oven exceeds cooking temperatures, it is impossible to unlock the door--even if the "function selector" knob is turned to 0.
2. In what situations should pyrolysis be used?
If your oven emits smoke during preheating or releases large volumes of smoke during cooking.
If your oven releases an unpleasant odour when cooled after various cooking applications (lamb, fish, barbecue, etc.).
| RELATIVELY CLEAN COOKING APPLICATIONS | Biscuits, vegetables, pastry, quiches, soufflés | Splatter-free cookingPyrolysis is not warranted |
| DIRTY COOKING APPLICATIONS | meats, fish, (in a dish) stuffed vegetables | Pyrolysis is warranted after three cooking cycles |
| VERY DIRTY COOKING APPLICATIONS | Large cuts of meat on the spit | Pyrolysis can be performed after one cooking application of this kind of there is a lot of splattering. |

You should not wait until the oven is coated in grease to initiate a cleaning cycle.
en cavity with pyrolysis?
3. How do you use the pyrolysis function?
a) Remove the grids, trays and wire shelf supports from the oven clean any major spill residue.
b) Turn the "function selector" knob to the "PYRO" or "PYRO ECO" position. The pyrolysis time is 1 hour, 30 minutes in "PYRO ECO" mode and 2 hours in "PYRO" mode.
This time does not include the oven cooling time, which lasts approximately 30 minutes.
- During the pyrolysis cycle, the lock warning light is activated to indicate that the door is locked.
- The thermostat indicator lights up when the oven is heating.
- Pyrolysis automatically stops when the lock warning light turns off and it is then possible to open the door.
c) Return the function selector to the 0 position.
d) When the oven is cool, use a damp cloth to remove the white ashes. The oven is clean and once again ready for the cooking application of your choice.
flowchart
graph TD
    A["0"] --> B["P"]
    A --> C["ECO"]
    A --> D["0"]
    A --> E["0"]
    A --> F["0"]
    A --> G["0"]
    A --> H["0"]
    A --> I["0"]
    A --> J["0"]
    A --> K["0"]
    A --> L["0"]
    A --> M["0"]
    A --> N["0"]
    A --> O["0"]
    A --> P["0"]
    A --> Q["0"]
    A --> R["0"]
    A --> S["0"]
    A --> T["0"]
    A --> U["0"]
    A --> V["0"]
    A --> W["0"]
    A --> X["0"]
    A --> Y["0"]
    A --> Z["0"]
    A --> AA["0"]
    A --> AB["0"]
    A --> AC["0"]
    A --> AD["0"]
    A --> AE["0"]
    A --> AF["0"]
    A --> AG["0"]
    A --> AH["0"]
    A --> AI["0"]
    A --> AJ["0"]
    A --> AK["0"]
    A --> AL["0"]
    A --> AM["0"]
    A --> AN["0"]
    A --> AO["0"]
    A --> AP["0"]
    A --> AQ["0"]
    A --> AR["0"]
    A --> AS["0"]
    A --> AT["0"]
    A --> AU["0"]
    A --> AV["0"]
    A --> AW["0"]
    A --> AX["0"]
    A --> AY["0"]
    A --> AZ["0"]
    A --> BA["0"]
    A --> BB["0"]
    A --> BC["0"]
    A --> BD["0"]
    A --> BE["0"]
    A --> BF["0"]
    A --> BG["0"]
    A --> BH["0"]
    A --> BI["0"]
    A --> BJ["0"]
    A --> BK["0"]
    A --> BL["0"]
    A --> BM["0"]
    A --> BN["0"]
    A --> BO["0"]
    A --> BP["0"]
    A --> BQ["0"]
    A --> BR["0"]
    A --> BS["0"]
    A --> BT["0"]
    A --> BU["0"]
    A --> BV["0"]
    A --> BW["0"]
    A --> BX["0"]
    A --> BY["0"]
    A --> BZ["0"]
    A --> CA["0"]
    A --> CB["0"]
    A --> CC["0"]
    A --> CD["0"]
    A --> CE["0"]
    A --> CF["0"]
    A --> CG["0"]
    A --> CH["0"]
    A --> CI["0"]
    A --> CJ["0"]
    A --> CK["0"]
    A --> CR["0"]
    A --> CS["0"]
    A --> CT["0"]
    A --> CU["0"]
    A --> CV["0"]
    A --> CW["0"]
    A --> CX["0"]
    A --> CY["0"]
    A --> CZ["0"]
4. How do you change the bulb?
- The bulb is located on the ceiling of your oven's cavity.

Disconnect your oven before performing any task on the bulb to avoid the risk of electric shock and, if necessary, let the appliance cool down.
a) Unscrew the view port (see adjacent diagram).
b) Unscrew the light bulb in the same direction.
Bulb specifications:
- 15 W
- 220-240 V
- 300°C
- E 14 cap
c) Replace the bulb then reposition the view port and reconnect your oven
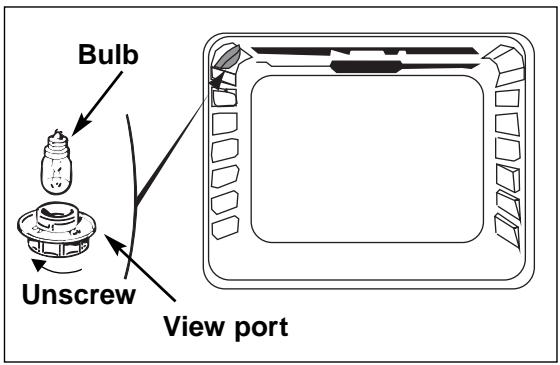

To unscrew the view port and the light, use a rubber glove, which will make disassembly easier.
Innholdsfortegnelse
Innledning s.31
natural_image
Line drawing of a rack with multiple vertical rods (no text or symbols)Stabil sikkerhetsrist
natural_image
Technical line drawing of a square frame with evenly spaced cutouts (no text or symbols)Stekebrett (baking)
natural_image
Technical line drawing of a rectangular fan or vent with internal grid pattern (no text or symbols)Dyp panne
natural_image
Simple gray diamond shape with rounded corners on white background (no text or symbols)radar
| Metric | Value | |---|---| | p | 0 | | 0 | 0 | | Tc | 40 | | 165 | 165 | | 180 | 180 | | 200 | 200 | | 210 | 210 | | 220 | 220 | | 240 | 240 | | 275 | 275 | | ECO | 0 | | ECO | 0 | | ECO | 0 | | ECO | 0 | | ECO | 0 | | ECO | 0 | | ECO | 0 | | ECO | 0 | | ECO | 0 | | ECO | 0 | | ECO | 0 | | ECO | 0 | | ECO | 0 | | ECO | 0 | | ECO | 0 | | | ECO | 0 | | | ECO | 0 | | | ECO | 0 | | | ECO | 0 | | | ECO | 0 | | | ECO | 0 | | | ECO | 0 | | | ECO | 0 | | | ECO | 0 | | | ECO | 0 | | | ECO | 0 | | | ECO | 0 | | | ECO (top) | 0 | | ECO (bottom) | 0 | | Tc (bottom) | 40 | | Tc (top) | 65 | | Tc (bottom) | 100 | | Tc (top) | 150 | | Tc (bottom) | 165 | | Tc (top) | 180 | | Tc (bottom) | 200 | | Tc (top) | 210 | | Tc (bottom) | 220 | | Tc (top) | 240 | | Tc (bottom) | 275 | | Tc (top) | 300 | | Tc (bottom) | 330 | | Tc (top) | 360 | | Tc (bottom) | 390 | | Tc (top) | 420 | | Tc (bottom) | 450 | | Tc (top) | 480 | | Tc (bottom) | 510 | | Tc (top) | 540 | | Tc (bottom) | 570 | | Tc (top) | 600 | | Tc (bottom) | 630 | | Tc (top) | 660 | | Tc (bottom) | 690 | | Tc (top) | 720 | | Tc (bottom) | 750 | | Tc (top) | 780 | | Tc (bottom) | 810 | | Tc (top) | 840 | | Tc (bottom) | 870 | | Tc (top) | 900 | | Tc (bottom) | 930 | | Tc (top) | 960 | | Tc (bottom) | 990 | | Tc (top) | 1020 | | Tc (bottom) | 1050 | | Tc (top) | 1080 | | Tc (bottom) | 1110 | | Tc (top) | 1140 | | Tc (bottom) | 1170 | | Tc (top) | 1200 | | Tc (bottom) | 1230 | | Tc (top) | 1260 | | Tc (bottom) | 1290 | | Tc (top) | 1320 | | Tc (bottom) | 1350 | | Tc (top) | 1380 | | Tc (bottom) | 1410 | | Tc (top) | 1440 | | Tc (bottom) | 1470 | | Tc (top) | 1500 | | Tc (bottom) | 1530 | | Tc (top) | 1560 | | Tc (bottom) | 1590 | | Tc (top) | 1620 | | Tc (bottom) | 1650 | | Tc (top) | 1680 | | Tc (bottom) | 1710 | | Tc (top) | 1740 | | Tc (bottom) | 1770 | | Tc (top) | 1800 | | Tc (bottom) | 1830 | | Tc (top) | 1860 | | Tc (bottom) | 1890 | | Tc (top) | 1920 | | Tc (bottom) | 1950 | | Tc (top) | 1980 | | Tc (bottom) | 2010 | | Tc (top) | 2040 | | Tc (bottom) | 2070 | | Tc (top) | 2100 | | Tc (bottom) | 2130 | | Tc (top) | 2160 | | Tc (bottom) | 2190 | | Tc (top) | 2220 | | Tc (bottom) | 2250 | | Tc (top) | 2280 | | Tc (bottom) | 2310 | | Tc (top) | 2340 | | Tc (bottom) | 2370 | | Tc (top) | 2400 | | Tc (bottom) | 2430 | | Tc (top) | 2460 | | Tc (bottom) | 2490 | | Tc (top) | 2520 | | Tc (bottom) | 2550 | | Tc (top) | 2580 | | Tc (bottom) | 2610 | | Tc (top) | 2640 | | Tc (bottom) | 2670 | | Tc (top) | 2700 | | Tc (bottom) | 2730 | | Tc (top) | 2760 | | Tc (bottom) | 2790 | | Tc (top) | 2820 | | Tc (bottom) | 2850 | | Tc (top) | 2880 | | Tc (bottom) | 2910 | | Tc (top) | 2940 | | Tc (bottom) | 2970 | | Tc (top) | 3000 | | Tc (bottom) | 3030 | | Tc (top) | 3060 | | Tc (bottom) | 3090 | | Tc (top) | 3120 | | Tc (bottom) | 3150 | | Tc (top) | 3180 | | Tc (bottom) | 3210 | | Tc (top) | 3240 | | Tc (bottom) | 3270 | | Tc (top) | 3300 | | Tc (bottom) | 3330 | | Tc (top) | 3360 | | Tc (bottom) | 3390 | | Tc (top) | 3420 | | Tc (bottom) | 3450 | | Tc (top) | 3480 | | Tc (bottom) | 3510 | | Tc (top) | 3540 | | Tc (bottom) | 3570 | | Tc (top) | 3600 | | Tc (bottom) | 3630 | | Tc (top) | 3660 | | Tc (bottom) | 3690 | | Tc (top) | 3720 | | Tc (bottom) | 3750 | | Tc (top) | 3780 | | Tc (bottom) | 3810 | | Tc (top) | 3840 | | Tc (bottom) | 3870 | | Tc (top) | 3900 | | Tc (bottom) | 3930 | | Tc (top) | 3960 | | Tc (bottom) | 3990 | | Tc (top) | 4020 | | Tc (bottom) | 4050 | | Tc (top) | 4080 | | Tc (bottom) | 4110 | | Tc (top) | 4140 | | Tc (bottom) |
natural_image
Line drawing of a rectangular metal grate with evenly spaced vertical rods (no text or symbols)Vippsäkert grillgaller
natural_image
Technical line drawing of a square frame with bolt holes, no text or symbols presentnatural_image
Technical line drawing of a rectangular fan or vent with internal grid pattern (no text or symbols)Djupfat
natural_image
Simple gray diamond shape with rounded corners on white background (no text or symbols)Hur installerar du din ugn?
Elektrisk anslutning