
VCOBD9610 - To scan VOLTCRAFT - Free user manual and instructions
Find the device manual for free VCOBD9610 VOLTCRAFT in PDF.
| Product Type | Multibrand OBD II automotive diagnostic scanner |
| Brand | Voltcraft |
| Model | VCOBD9610 |
| Dimensions (LxHxD) | 155 x 98 x 33 mm |
| Weight | 360 g |
| Power Supply | 8 to 18 V/DC via vehicle OBD II interface |
| Display | 2.8 inch color LCD (320 x 240 pixels) |
| Supported OBD II Protocols | CAN, J1850 PWM, J1850 VPW, ISO9141, KWP 2000 |
| Supported VW Protocols | KWP1281, KWP2000, KWP1281CAN16, KWP2000CAN16, CAN20, UDS |
| Main Functions | Reading and clearing fault codes, live data stream, I/M test, EVAP test, vehicle information, service reset, EPB reset, battery registration, injector adaptation, DPF function, steering angle recalibration, TPMS |
| Compatible Vehicles | VW, Audi, Skoda, Seat, Bentley, Lamborghini (models up to 2022) |
| Operating Temperature | 0 °C to +55 °C, 0-90% RH |
| Storage Temperature | -20 °C to +70 °C, 0-90% RH |
| Package Contents | Device, USB cable, pouch, instruction manual |
| Care and Cleaning | Clean with a slightly damp cloth or soft brush; do not use aggressive solvents; do not immerse in water |
| Safety Instructions | Keep out of reach of children; use in a well-ventilated area; avoid open flames near engine compartment; disconnect before any cleaning |
| Repairability / Spare Parts | Not specified; contact technical service in case of malfunction |
| Software Update | Downloadable at www.conrad.com/downloads; update via included USB cable |
| Warranty | Warranty void if safety instructions are not followed |
Frequently Asked Questions - VCOBD9610 VOLTCRAFT
User questions about VCOBD9610 VOLTCRAFT
0 question about this device. Answer the ones you know or ask your own.
Ask a new question about this device
Download the instructions for your To scan in PDF format for free! Find your manual VCOBD9610 - VOLTCRAFT and take your electronic device back in hand. On this page are published all the documents necessary for the use of your device. VCOBD9610 by VOLTCRAFT.
USER MANUAL VCOBD9610 VOLTCRAFT
GB Operating Instructions
VC-OBD-9610
Car Diagnostic Tool OBD II
Item No. 2619478 Page 36 - 69
F Mode d'emploi
VC-OBD-9610
text_image
QR code image containing encoded data, no visible human-readable text
text_image
I/M Readiness IGN Spark DTC 0 MIL PdDTC 0 MIS ∅ EVAP ∅ FUE ✓ AIR ∅ CCM ✓ O2S ✗ CAT ✓ HRT ✗ HCAT ∅ EGR ∅| 05-Grundeinstellung |
| This Basic Setting function is not supported on this vehicle. |
| 07-Anpassung |
| This function is not supported on this vehicle. |
| Tool Setup |
| Language |
| Beeper |
| Unit of Measure |
| Skin Style |
| Device Information |
| Language |
| English |
| Deutsch |
14.2 Piepser
text_image
Diagram showing a laptop connected to a VOLTcraft device with labeled ports and an external cable.Windows 7
text_image
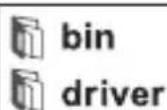
bin driver
- Click "driver" file


- Click "install driver.bat" to install the driver

text_image
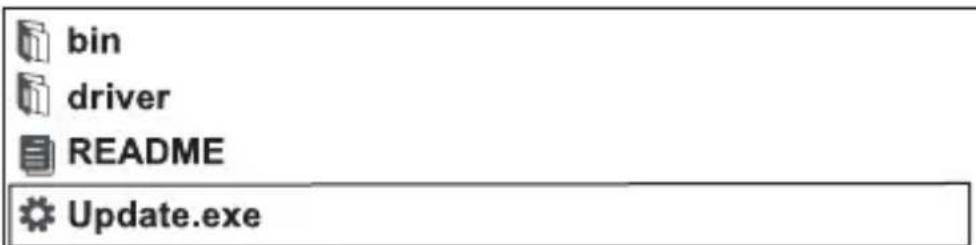
bin driver README Update.exe3.Click "Update"
Windows 8 / Windows 10
text_image
bin driver README Update.exe Windows8/10 can run update directly16. Entsorgung

- Introduction....37
- Description of symbols....37
- Intended use....38
- Features and functions....38
- Package contents....39
- Latest product information 39
- Safety instructions....40
- Product overview....42
- Connecting to the vehicle 44
- Function description ....44
- Resetting the EPB....53
- Battery registration ....56
- OBD II diagnostics....58
- Tool setup....62
- Software update....64
- Disposal....66
- Troubleshooting....67
- Care and cleaning 67
- Technical data ....68
1. Introduction
Dear customer,
Thank you for purchasing this product.
This product complies with statutory, national and European regulations.
To ensure that the product remains in this state and to guarantee safe operation, always follow the instructions in this manual.

These operating instructions are part of this product. They contain important information on setting up and using the product. Do not give this product to a third party without the operating instructions. Therefore, retain these operating instructions for reference!
If there are any technical questions, please contact:
www.conrad.com/contact
2. Description of symbols

The symbol with an exclamation mark in a triangle is used to highlight important information in these operating instructions. Always read this information carefully.

The arrow symbol indicates special information and tips on how to use the product.
3. Intended use
The product is used to establish communication with control units in motor vehicles. The list of vehicles supported by the device can be found in “Technical data”. The device is connected to the vehicle's data bus system via the OBD II interface and powered simultaneously.
This product is only intended for indoor use and in protected areas of vehicles. Contact with moisture must be avoided at all times.
For safety and approval purposes, do not rebuild and/or modify this product. Any misuse of the product may damage the product itself or the vehicle to which it is connected. Furthermore, improper use can cause hazards such as fire, overheating, vehicle malfunction, etc.
Read the operating instructions carefully and store them in a safe place. Only make this product available to third parties together with its operating instructions.
All company and product names contained herein are trademarks of their respective owners. All rights reserved.
4. Features and functions
• Supports vehicles such as VW, AUDI, SKODA, SEAT, Bentley etc.
• Supports the following OBD II protocols: CAN/J1850 PWM/J1850 VPW/ISO9141/KWP 2000
- Supports the following VW diagnostic protocols: KWP1281/KWP2000/KWP1281CAN16/KWP2000CAN16/CAN20/UDS)
- Special functions: service reset, throttle adjustment, parking brake pad change, steering angle learn function, TPMS reset, injector adjustment, battery registration, DPF function
- OBD II functions: read fault codes, clear fault codes, I/M readiness test, EVAP system test, vehicle information readout
• 320 x 240 pixels colour screen
5. Package contents
• OBD II car diagnostic scanner
- USB cable
- Transport bag
- Operating instructions
6. Latest product information
Download the latest operating instructions at www.conrad.com/downloads or scan the QR code shown. instructions on the website.

text_image
Folkw the7. Safety instructions

Read the operating instructions carefully and adhere in particular to the safety instructions. If you do not follow the safety information and information on proper handling in these operating instructions, we will assume no liability for any resulting personal injury or damage to property. Such cases will invalidate the warranty/guarantee.
General information
- This product is not a toy and must be kept out of the reach of children! Children do not understand the hazards associated with the incorrect use of electrical devices.
- Do not leave packaging material lying around carelessly. It may become a dangerous plaything for children.
- Protect the product from extreme temperatures, strong jolts, high humidity, moisture, flammable gases, vapours and solvents.
• Do not expose the product to any mechanical stress. - If it is no longer possible to operate the product safely, stop using it and prevent unauthorised use. Safe operation can no longer be guaranteed if the product:
- is visibly damaged,
- is no longer working properly,
- has been stored for extended periods in poor ambient conditions or
- has been subjected to any serious transport-related stress.
- Handle the product carefully. It can be damaged by impact, blows, or by being dropped, even from a low height.
- Pay attention to all additional safety information in the individual sections of these operating instructions.
- Consult a technician if you are not sure how to use or connect the product or if you have safety concerns.
- Maintenance, modifications and repairs must be carried out only technician or a specialist repair centre.

- If you have questions that remain unanswered by these operating instructions, contact our technical support service or other technical personnel.
- Any person operating, installing, launching or servicing this unit must comply with these operating instructions.
Product
- Make sure you read and follow the instructions in your vehicle's service manual before using the product.
- Always seek professional advice if you are unfamiliar with the use of car diagnostic tools and vehicle repair. Failure to observe these instructions may cause damage to the vehicle.
- Adhere to the standard safety regulations when working on the vehicle, especially in the engine compartment.
• Always keep your clothes, hair, hands, tools, test equipment, etc., clear of all moving and hot parts of the vehicle and engine. - Exhaust fumes are noxious! Never run the vehicle's engine in a place without adequate ventilation.
• Never leave the vehicle unattended while performing tests. - Risk of electrocution when the engine is running! Use extreme car working near the ignition coil, wiring, distributor cap and spark plugs.
- Fumes and gases emitted by fuels and the vehicle battery are highly flammable. Keep the engine compartment away from sparks, hot equipment, open flames, etc., to prevent explosion or fire. Do not smoke near the vehicle during work.
- Do not connect or disconnect any test equipment with the ignition on or the engine running.
- Ensure the gear lever is always in the "PARK" (automatic gearbox) or "NEUTRAL" (manual gearbox) position. Activate the parking brake.
- Tests in drive mode must only be carried out by an assistant and never by the driver himself.
8. Product overview
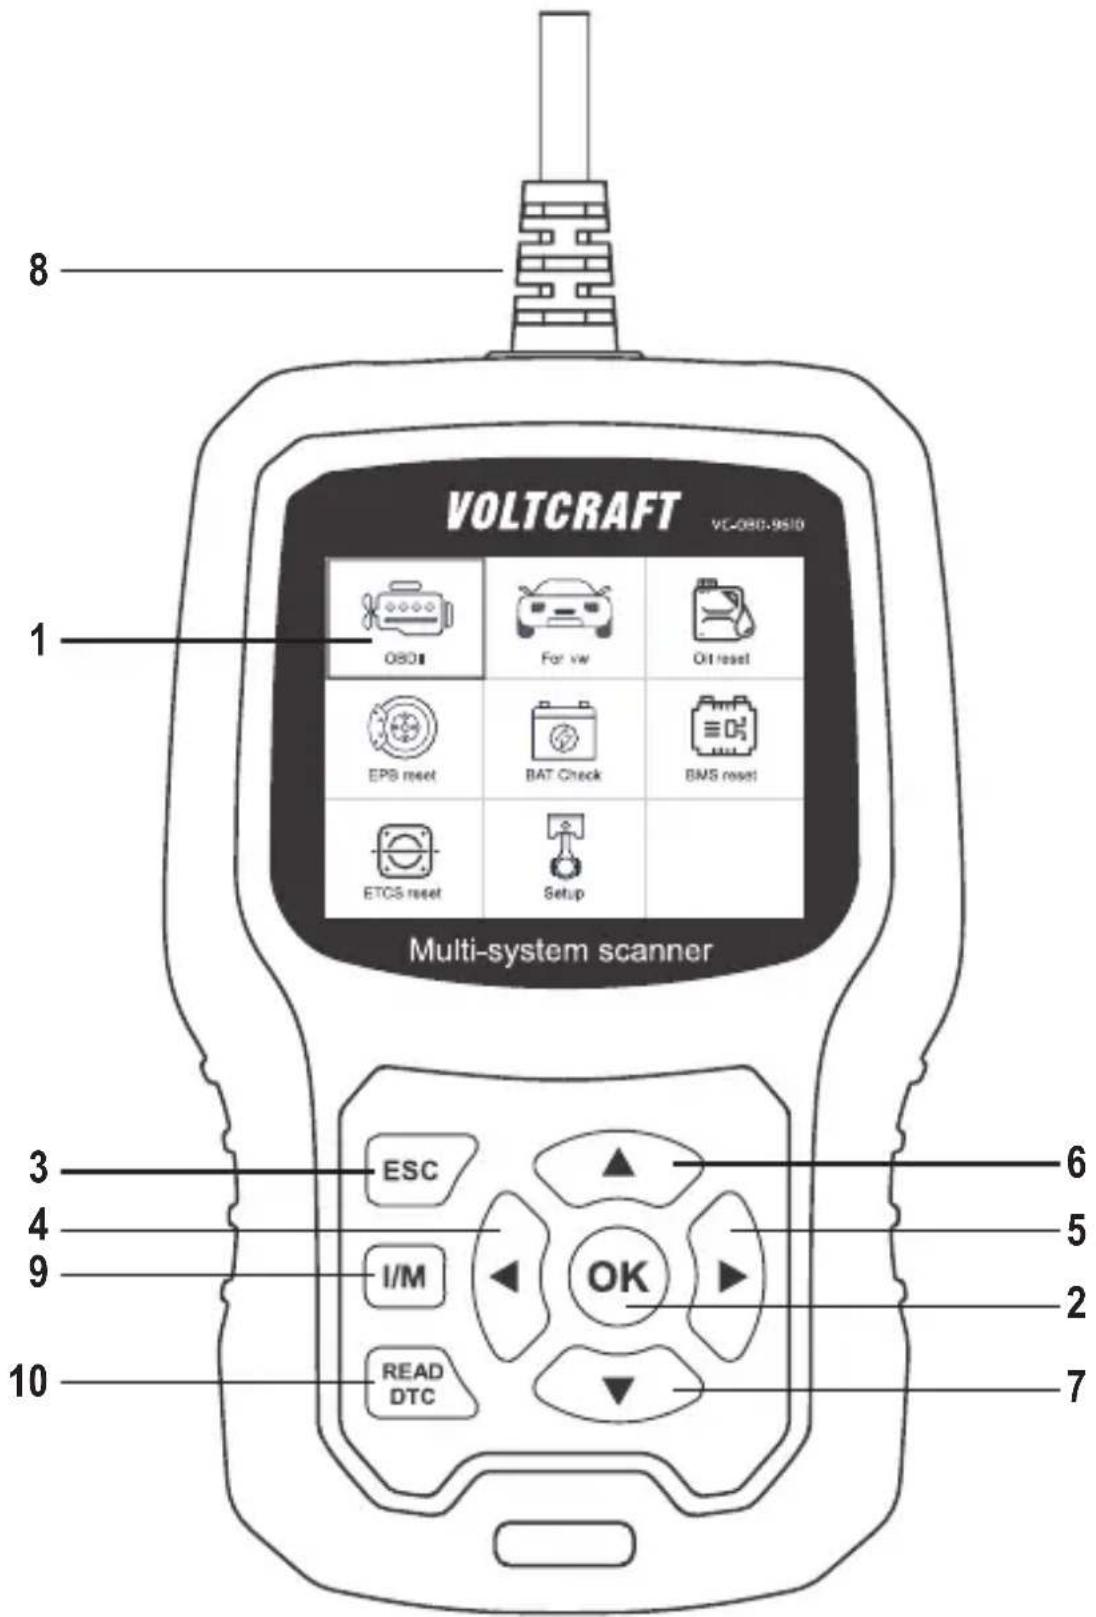
text_image
VOLTCRAFT VC-080-9510 Multi-system scanner OSC For vw Ott reset EPS reset BAT Check BMS reset ETCS reset Setup ESC I/M OK READ DTC 6 5 2 7 10 81 Display
2 OK button
Confirms the selection of menu items, actions, etc.
3 ESC button
Cancels a selection or stops an action, or returns to the menu.
4 button
Navigates to the left in the menu or takes you one step back in the menu.
5 button
Navigates to the right in the menu or takes you one step forward in the menu.
6 button
Navigates up in the menu or moves the menu view up (if the whole view does not fit on a screen).
7 button
Navigates down in the menu or moves the menu view down (if the whole view does not fit on a screen).
8 ODB II connector
Connects the diagnostic scanner to the vehicle's data interface (OBD II interface).
9 I/M button
Quick test for inspection and maintenance
text_image
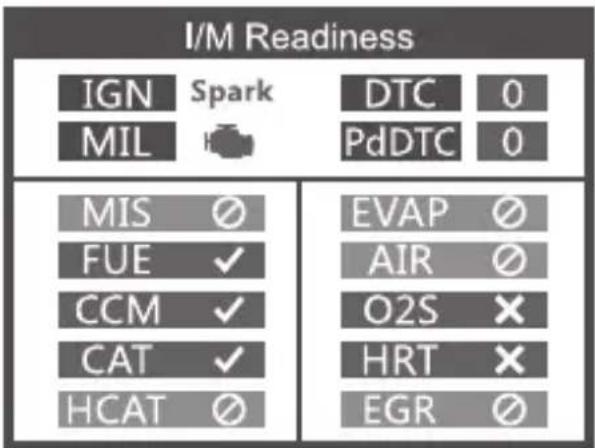
I/M Readiness IGN Spark DTC 0 MIL PdDTC 0 MIS ∅ EVAP ∅ FUE ✓ AIR ∅ CCM ✓ O2S ✗ CAT ✓ HRT ✗ HCAT ∅ EGR ∅MIL yellow > Malfunction indicator lamp on MIL grey > Malfunction indicator lamp off
∅ > not supported
√ > completed
✗ > not completed
10 READ DTC button
Reads out the vehicle fault memory directly.
9. Connecting to the vehicle

The diagnostic scanner must always be connected or disconnected with the ignition switched off.
- Connect the ODB II connector plug (8) to the vehicle's OBD II interface.
The vehicle's OBD II interface is usually located near the steering wheel or centre console. If you cannot find the interface, consult your vehicle's service manual for further details. - Switch on the ignition of the vehicle.
10. Function description
→ Controls vary depending on the vehicle model and year of manufacture. Please follow the instructions shown on the display (1). The following instructions are for reference only.
10.1 For VW vehicles
Select [For VW], then [All Other Vehicles] and then [Vehicle-Scan]:
| Vehicle Selection |
| All Other Vehicles |
| Only for Crafter(LT3) 2006-2017 |
| Select Menu |
| Vehicle Scan |
| System Selection |
| Special Functions |
→ Use [Vehicle-Scan] to check faulty systems and display the number of faults.
10.1.1 Select [0017-Dash Board]
10.1.1.1 Select [01-Version Information]
| Select System | |
| 0017-Dash Board | 4 |
| 0019-Gateway | 5 |
| 0061-Battery Regulation | 1 |
| Select Function |
| 01-Version Information |
| 02-Read Fault Codes |
| 03-Erase Fault Codes |
| 04-Read Datastream |
| 05-Basic Setting |
| 07-Adaptation |
| 08-Access Authorization |
| 01-Version Information |
| Protocol Type: CAN20VW/Audi part number:3C0920870TVIN:System description:KOMBIINSTRUMENT VD1 |
| 01-Version Information |
| Serve station code: 01 81 CD34 4C 04Coding: 7505 |
10.1.1.2 Select [02-Read Fault Codes]
| Select Function |
| 01-Version Information |
| 02-Read Fault Codes |
| 03-Erase Fault Codes |
| 04-Read Datastream |
| 05-Basic Setting |
| 07-Adaptation |
| 08-Access Authorization |
| 02-Read Fault Codes |
| 1/4 |
| 01312 Drive train data bus |
10.1.1.3 Select [03-Erase Fault Codes] and press the OK button (2)
![VOLTCRAFT VCOBD9610 - Select [03-Erase Fault Codes] and press the OK button (2) - 1](/content/2026/04/608455/images/6b4aa325edde6131e85d67b57a9a6b966727d323563482f393af1910b6cb7676.jpg)
text_image
Information Erase fault codes! Are you sure?![VOLTCRAFT VCOBD9610 - Select [03-Erase Fault Codes] and press the OK button (2) - 2](/content/2026/04/608455/images/83dffe2634b65fe7e87efb3a61bac5634d095f9c98c992a3f6448adbd7111972.jpg)
text_image
Information Erase fault codes had success. Please wait 10 seconds, Turn ignition off and Switch on again. Read fault codes to verify.10.1.1.4 Select [04-Read Datastream] and enter 005.
![VOLTCRAFT VCOBD9610 - Select [04-Read Datastream] and enter 005. - 1](/content/2026/04/608455/images/160b97f4e54665360e97153f6e4cb9fd4f55a7b4e8f904b5dc3d4e639536e5a1.jpg)
text_image
Input channel OK Delete 0 1 2 3 4 Input a channel number (0~255) 3/12 ↑↓←→ OK ESC| Special Functions CH:5 | |
| ASCLL Character | - - |
| ASCLL Characte | - - |
| Count | 300 |
| Count | 365 |
10.1.1.5 Select [05-Basic Setting] and enter 005.
![VOLTCRAFT VCOBD9610 - Select [05-Basic Setting] and enter 005. - 1](/content/2026/04/608455/images/9493730cd654d7d44f9f2777c0d3726c101fa3bd368c282abde2dab2dbe8579e.jpg)
text_image
Input channel OK Delete 0 1 2 3 4 Input a channel number (0~255) 3/12 ↑↓←→ OK ESC![VOLTCRAFT VCOBD9610 - Select [05-Basic Setting] and enter 005. - 2](/content/2026/04/608455/images/c8d88cd783217dafc541bc88002be0cce443c01e15316307a77e2b0a12a4ba1c.jpg)
text_image
Throttle Learning This function is not supported on this vehicle Note! When ten test function is abnormal,Please use the feedback function(tool setup)10.1.1.6 Select [07-Adaptation], then [Input channel] and then enter 005.
| 07-Adaptation |
| Input channel |
| Select Function |
| Input channel | |
| OK | 005 |
| Delete | Input a channel number(0~255) |
| 0 | |
| 1 | |
| 2 | |
| 3 | |
| 4 | |
| 3/12 ↑↓←→ OK ESC | |
| 07-Adaptation |
| This function is not supported on this vehicle |
| Note! |
| When ten test function is abnormal,Please use the feedback function(tool setup) |
| 07-Adaptation |
| feedback) to save the test records, Carry out vehicle test again, then use the upgrade tool to export record file. Mail the file at last. |
Select {Select Function}, then [Input channel] and then enter 005.
| Select Function |
| 001 Tank Characteristic (F... |
| CH:002 Service reminder |
| CH:002 Restting Service In... |
| CH:002 Consumption display |
| CH:002 Consumption Corre... |
| CH:002 Language |
| CH:002 Language for error ... |
| Input channel | |
| OK | 005 |
| Delete | Input a channel number(0~255) |
| 0 | |
| 1 | |
| 2 | |
| 3 | |
| 4 | |
| 3/12 ↑↓←→ OK ESC | |
10.1.1.7 Access Authorization
| Select Function |
| 01-Version Information |
| 02-Read Fault Codes |
| 03-Erase Fault Codes |
| 04-Read Datastream |
| 05-Basic Setting |
| 07-Adaptation |
| 08-Access Authorization |
| 08-Access Authorization | |
| OK | |
| Delete | Login code (Enter five decimal digits) |
| 0 | |
| 1 | |
| 2 | |
| 3 | |
| 4 | |
| 3/12 ↑↓←→ OK ESC | |
10.1.2 Gateway
| Select System | |
| 0017-Dash Board | 4 |
| 0019-Gateway | 5 |
| 0061-Battery Regulation | 1 |
| Select Function |
| 01-Version Information |
| 02-Read Fault Codes |
| 03-Erase Fault Codes |
| 04-Read Datastream |
| 05-Basic Setting |
| 07-Adaptation |
| 08-Access Authorization |
Further details can be found in sections 10.1.1.1 to 10.1.1.7
10.1.3 Battery Regulation
| Select System | |
| 0017-Dash Board | 4 |
| 0019-Gateway | 5 |
| 0061-Battery Regulation | 1 |
| Select Function |
| 01-Version Information |
| 02-Read Fault Codes |
| 03-Erase Fault Codes |
| 04-Read Datastream |
| 05-Basic Setting |
| 07-Adaptation |
| 08-Access Authorization |
Further details can be found in sections 10.1.1.1 to 10.1.1.7
10.2 System selection
10.2.1 Select [Select Menu] and then [Common System]
| Select Menu |
| Common System |
| All Systems |
| Select System |
| 0001-Engine Control Modu... |
| 0002-Transmission Contro... |
| 0003-Brakes 1 |
| 0008-Air Conditioning |
| 0009-Central Electrics |
| 0015-Airbag |
| 0016-Steering Column Ele... |
Select a system to test. Further details can be found in sections 10.1.1 to 10.1.3
| Select Function |
| 01-Version Information |
| 02-Read Fault Codes |
| 03-Erase Fault Codes |
| 04-Read Datastream |
| 05-Basic Setting |
| 07-Adaptation |
| 08-Access Authorization |
10.2.2 Select [All Systems]. All supported systems are shown on the display (1). Then select a system to test.
| Select Menu |
| Common System |
| All Systems |
| Select System |
| 0001-Engine Control Modu... |
| 0002-Transmission Contro... |
| 0003-Brakes 1 |
| 0008-Air Conditioning |
| 0009-Central Electrics |
| 0015-Airbag |
| 0016-Steering Column Ele... |
10.3 Testing Crafter (LT3)
| Vehicle Selection |
| All Other Vehicles |
| Only for Crafter(LT3) 2006-2017 |
| Select Menu |
| System Scan |
| Manual Select |
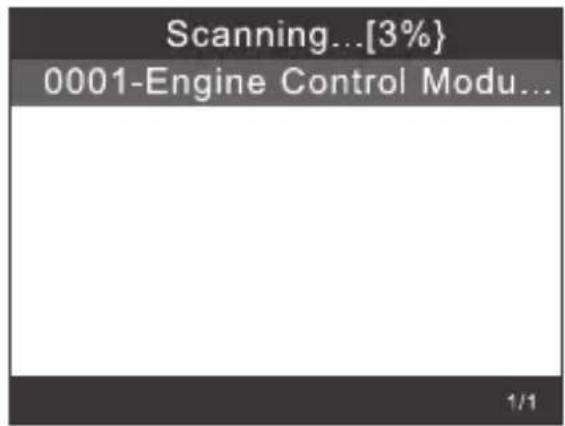
text_image
Scanning...[3%] 0001-Engine Control Modu... 1/110.4 Special functions
Select [Special Functions]
| Select Menu |
| Vehicle Scan |
| System Selection |
| Special Functions |
| Special Functions |
| Service Reset |
| Throttle Learning |
| EPB ReplaceBrakePads |
| Diesel Engine Special Fun... |
| Steering Angle Learning |
| Tire Pressure Reset(TPMS) |
| Injector Adaptation |
Select a special function, e.g. [Service Reset].
Then press the OK button (2) to continue.
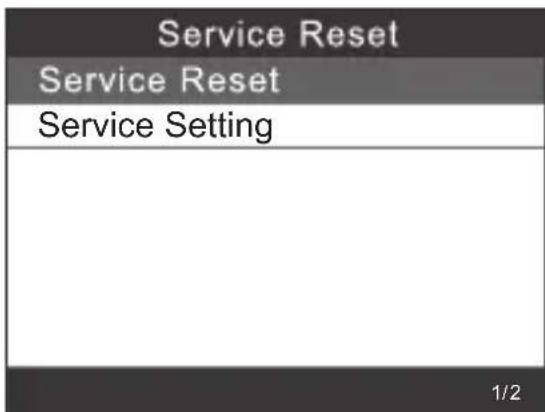
text_image
Service Reset Service Reset Service Setting 1/2Select [Flexible Interval]. The display shows the following information:
| Select Maintenance Interval Type |
| Flexible Interval |
| Fixed Interval |
| Inspection Interval Setting |
| Flexible Interval |
| Set Oil Change Service Distance |
| Set Oil Change Service Time |
| CH:45 Oil Quality |
| Select Maintenance Interval Type |
| Flexible Interval |
| Fixed Interval |
| Inspection Interval Setting |
| Fixed Interval |
| Set Oil Change Service Distance |
| Set Oil Change Service Time |
| CH:45 Oil Quality |
Set the appropriate [Oil quality] before adjusting the service interval.
For vehicles using the UDS protocol, you can configure the inspection reset, service reset, mileage and time settings. You can manually enter any values for mileage and time.
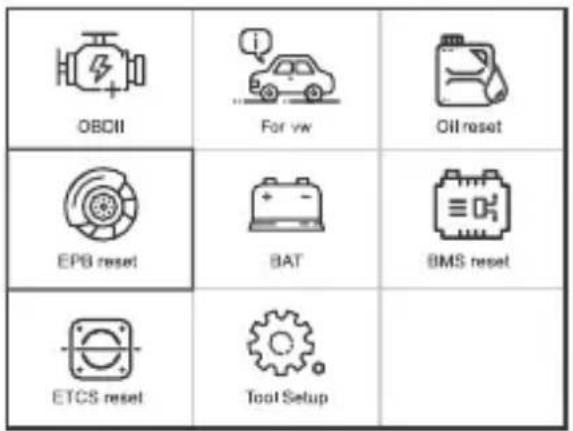
11. Resetting the EPB
→ EPB = Electric Parking Brake (parking brake)
Select [EPB reset] and press the OK button (2) to continue.
text_image
OBDII For vw Oil reset EPS reset BAT BMS reset ETCS reset Tool Setup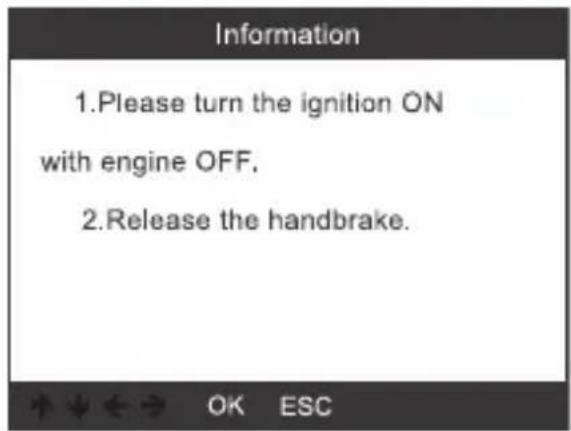
text_image
Information 1.Please turn the ignition ON with engine OFF. 2.Release the handbrake.11.1 Select [EPB ReplaceBrakePads] and press the OK button (2).
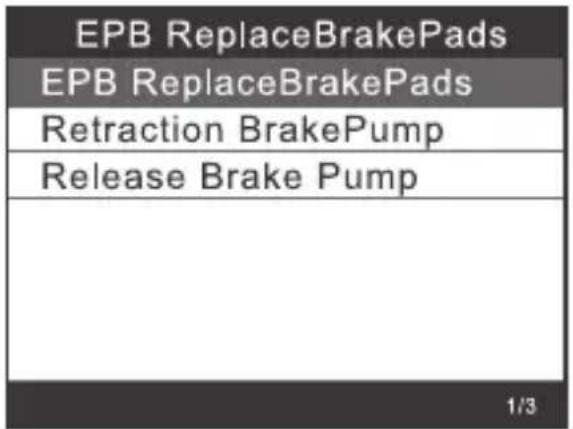
text_image
EPB ReplaceBrakePads EPB ReplaceBrakePads Retraction BrakePump Release Brake Pump 1/3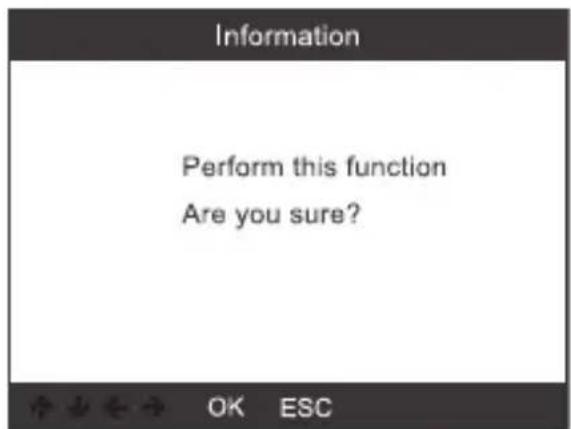
text_image
Information Perform this function Are you sure? OK ESCConfirm the prompt, follow the instructions on the display (1) and press the OK button (2) to continue.
text_image
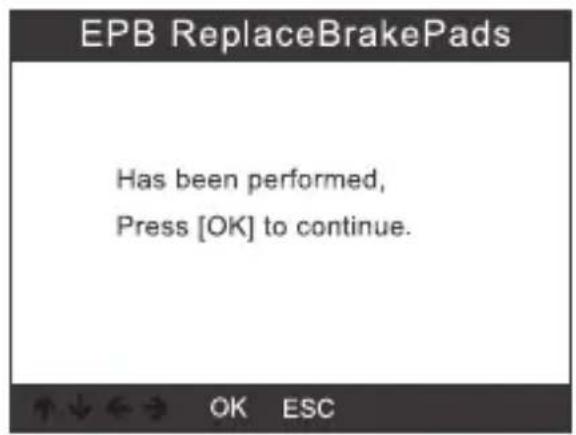
EPB ReplaceBrakePads Has been performed, Press [OK] to continue.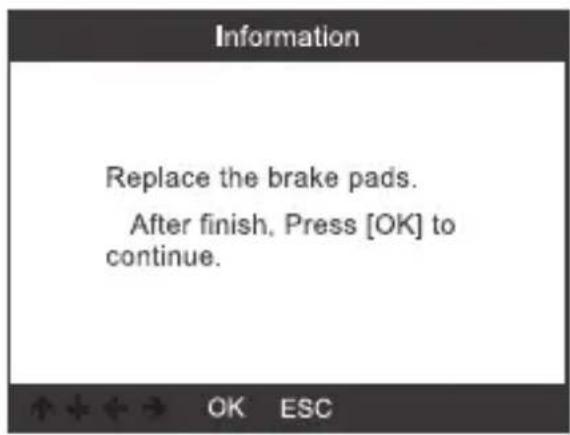
text_image
Information Replace the brake pads. After finish, Press [OK] to continue.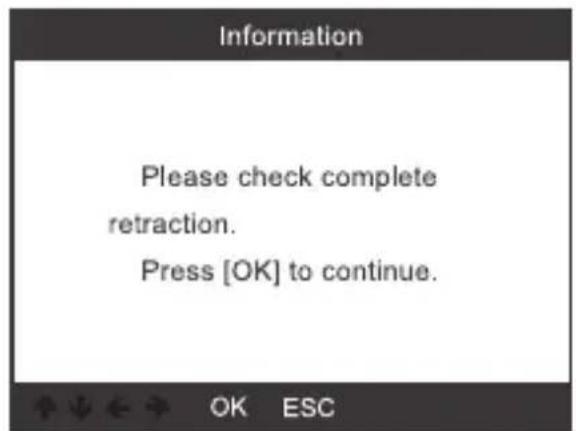
text_image
Information Please check complete retraction. Press [OK] to continue.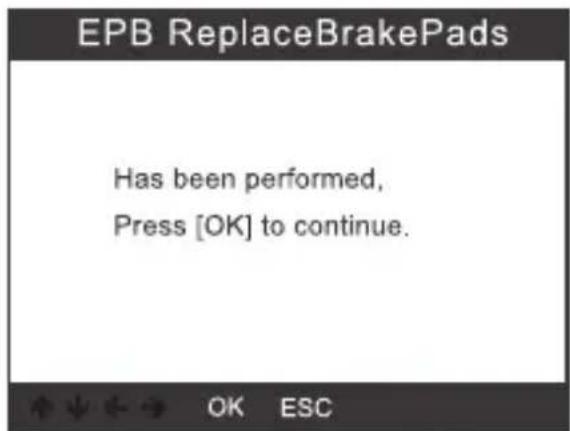
text_image
EPB ReplaceBrakePads Has been performed, Press [OK] to continue.11.1.1 Check that the electric parking brake is fully released. Replace the brake pads and then press the OK button (2).
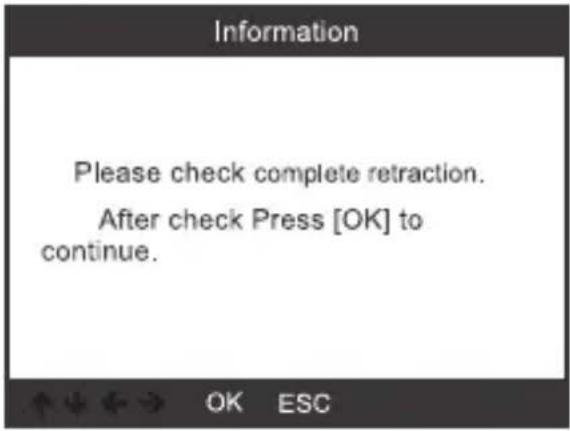
text_image
Information Please check complete retraction. After check Press [OK] to continue.11.2 Select [Retraction Brake Pump] and press the OK button (2) to continue.
![VOLTCRAFT VCOBD9610 - Select [Retraction Brake Pump] and press the OK button (2) to continue. - 1](/content/2026/04/608455/images/82c19479f3cc95d547983f4ad767c56cea6426918c5f455bfdfdcf39efdcb84e.jpg)
text_image
Information Perform this function Are you sure? OK ESC11.2.1 Once the parking brake is released, press the OK button (2) to continue.
![VOLTCRAFT VCOBD9610 - Select [Retraction Brake Pump] and press the OK button (2) to continue. - 2](/content/2026/04/608455/images/bda475bbad27fb5b02cd95008bcb6cbe3857d7eb0ecc26054851e3adf00e25c4.jpg)
text_image
EPB ReplaceBrakePads Has been performed, Press [OK] to continue.11.2.2 Check that the brake has been fully released, and then replace the brake pads. When you are done, press the OK button (2) to continue.
![VOLTCRAFT VCOBD9610 - Select [Retraction Brake Pump] and press the OK button (2) to continue. - 3](/content/2026/04/608455/images/9eb4836440c9aba428b1c48ed66e108dbd7999b56d73b23b4f314b46462485c0.jpg)
text_image
Information Please check complete retraction. Press [OK] to continue.11.3 Select [Release Brake Pump] and press the OK button (2) to continue.
![VOLTCRAFT VCOBD9610 - Select [Release Brake Pump] and press the OK button (2) to continue. - 1](/content/2026/04/608455/images/d3df976cc887b0ae4fff9e5c1256ca9d036d573d1d2badc08bf0796ec999b308.jpg)
text_image
EPB ReplaceBrakePads EPB ReplaceBrakePads Retraction BrakePump Release Brake Pump 1/3![VOLTCRAFT VCOBD9610 - Select [Release Brake Pump] and press the OK button (2) to continue. - 2](/content/2026/04/608455/images/81063648359e702f7a897c23f1d3f5a7a6578140ab2987759ecf61957b390f48.jpg)
text_image
Information Perform this function Are you sure? OK ESC11.3.1 Select [Release Brake Pump] and press the OK button (2) to continue.
![VOLTCRAFT VCOBD9610 - Select [Release Brake Pump] and press the OK button (2) to continue. - 1](/content/2026/04/608455/images/579bfb3093e2940b2118b272e77520330b7bcfca2ff6a51722d9e89625c8c0af.jpg)
text_image
EPB ReplaceBrakePads Has been performed, press [OK] to continue.![VOLTCRAFT VCOBD9610 - Select [Release Brake Pump] and press the OK button (2) to continue. - 2](/content/2026/04/608455/images/31277033eb05591923b9e55deb658425501307177d5922b29f032df9c1e19a03.jpg)
text_image
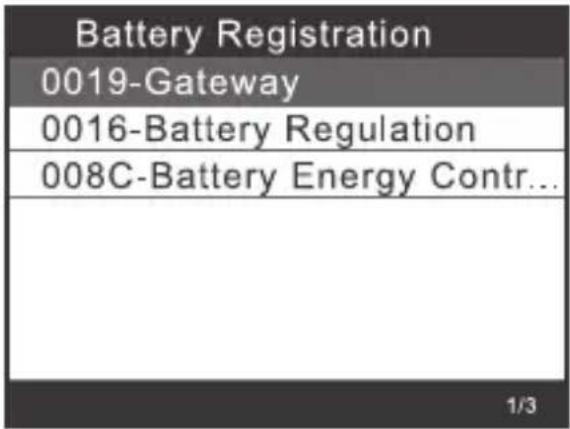
Information Please check complete release After finish, press [OK] to continue.12. Battery registration
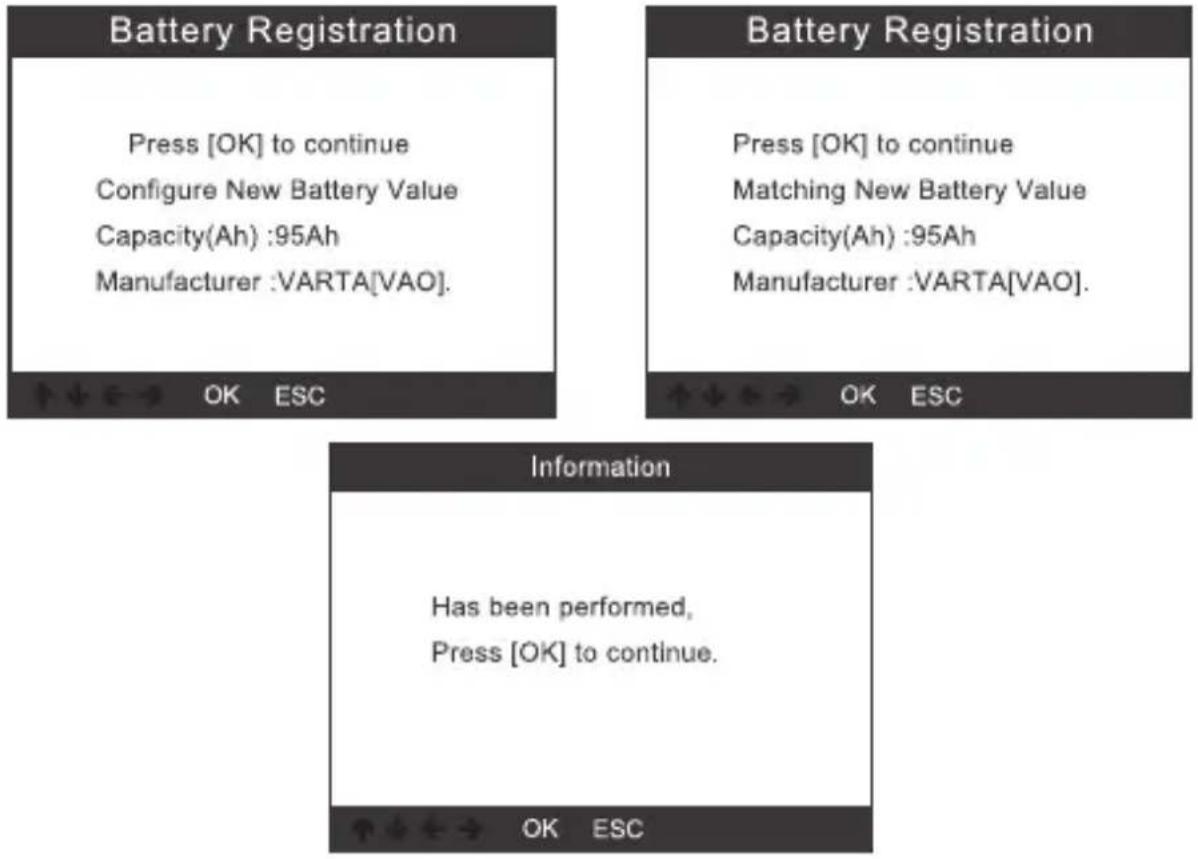
Select the option [BMS reset] and press the OK button (2). You will see the following screen.
text_image
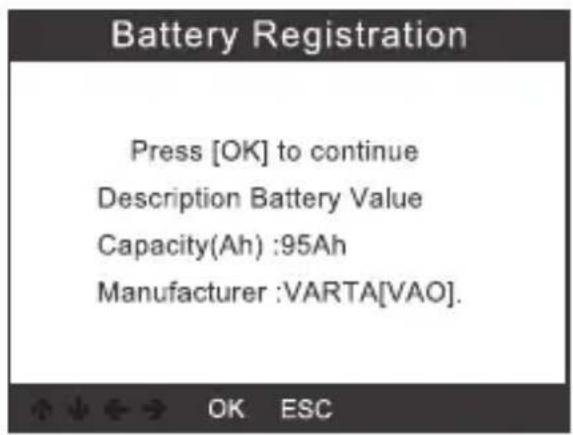
Battery Registration 0019-Gateway 0016-Battery Regulation 008C-Battery Energy Contr... 1/312.1 Press the OK button (2) again. The screen shows the old battery parameters. We recommend writing them down. Thus, you will always know the old battery parameters if those for the new battery are not available.
text_image
Battery Registration Press [OK] to continue Description Battery Value Capacity(Ah) :95Ah Manufacturer :VARTA[VAO]. OK ESC12.2 Select the capacity and manufacturer of the new battery.
| Select battery capacity |
| 95Ah |
| 110Ah |
| 68Ah |
| 75Ah |
| 92Ah |
| 105Ah |
| 115Ah |
| Select battery manufacturer |
| Moll[MLA] |
| VARTA[VAO] |
| JCI/JCB[JCB] |
| Exide[TU3] |
| JFF(Boading)/China[5D0] |
| Banner[BA2] |
| EPN[EPM] |

If the manufacturer is not listed, please select "Others".
12.2 Press the OK button (2) to continue.
text_image
Battery Registration Press [OK] to continue Configure New Battery Value Capacity(Ah) :95Ah Manufacturer :VARTA[VAO]. Battery Registration Press [OK] to continue Matching New Battery Value Capacity(Ah) :95Ah Manufacturer :VARTA[VAO]. OK ESC OK ESC Information Has been performed, Press [OK] to continue. OK ESC13. OBD II diagnostics
13.1 Reading codes
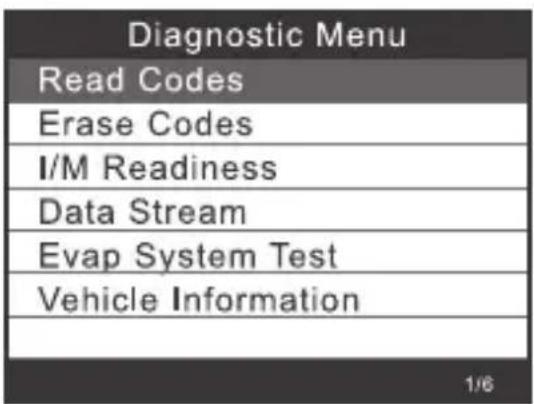
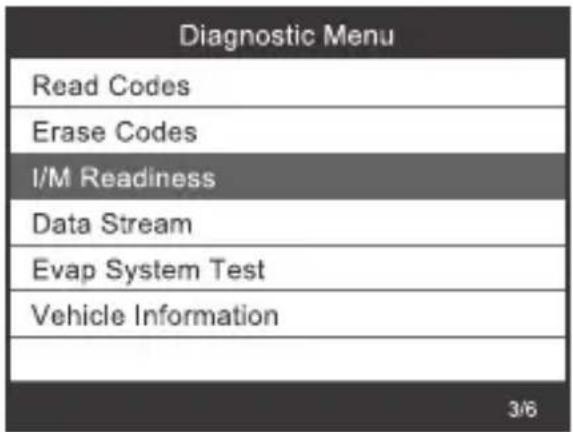
1) Select [Read Codes] in the diagnostics menu using the buttons (6) or (7) and press the OK button (2).
text_image
Diagnostic Menu Read Codes Erase Codes I/M Readiness Data Stream Evap System Test Vehicle Information 1/6In the absence of diagnostic fault codes, the display (1) shows that no (pending) codes are stored in the module. To return to the diagnostics menu, wait a few seconds or press any button.
2) Display DTCs and their definitions on the display (1).
| DTC | |
| P0123 | 1/6 |
| Generic | Pending |
| Throttle/Pedal Position Sensor /Switch A Circuit High | |
The display (1) shows the control unit number, the sequence of the DTCs, the total number of recognised codes and their type (depending on the manufacturer).
13.2 Clearing codes
1) Select [Erase Codes] in the diagnostics menu using the buttons (6) or (7) and press the OK button (2).
| Diagnostic Menu |
| Read Codes |
| Erase Codes |
| I/M Readiness |
| Data Stream |
| Evap System Test |
| Vehicle Information |
2) You will be prompted to confirm your selection.
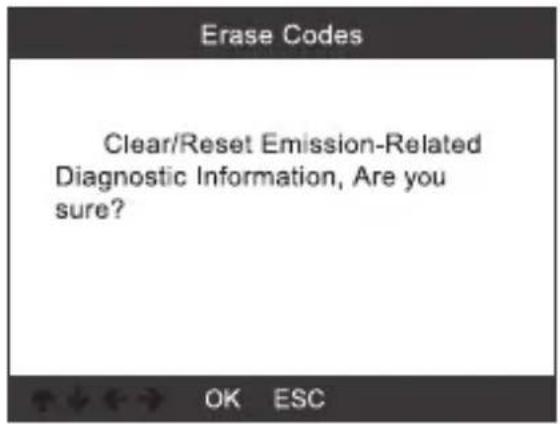
text_image
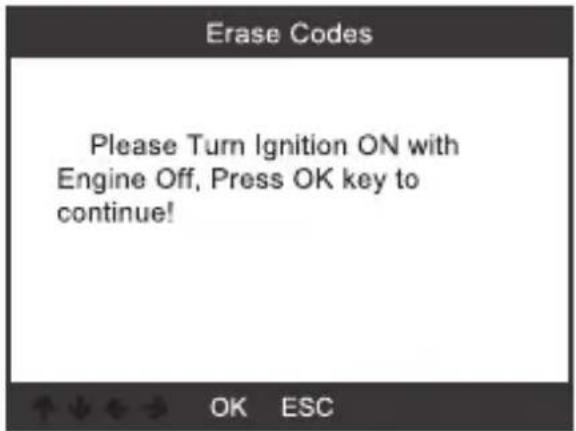
Erase Codes Clear/Reset Emission-Related Diagnostic Information, Are you sure? OK ESC3) Press the OK button (2) to confirm.
text_image
Erase Codes Please Turn Ignition ON with Engine Off, Press OK key to continue! OK ESC
text_image
Erase Codes Emission-Related Diagnostic Information has been cleared! OK ESCI/M refers to Inspection and Maintenance to comply with national emission standards. I/M shows whether the vehicle's emission control systems are working correctly and whether inspection and maintenance tests can be carried out.
text_image
Diagnostic Menu Read Codes Erase Codes I/M Readiness Data Stream Evap System Test Vehicle Information 3/6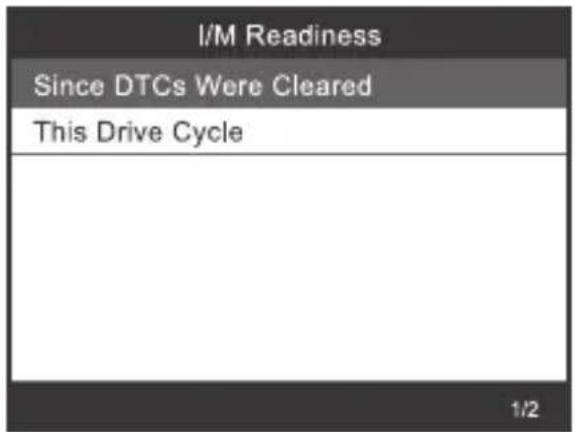
text_image
I/M Readiness Since DTCs Were Cleared This Drive Cycle 1/213.4 Data stream
The OBD II scan tool is a special diagnostic tool that communicates with the vehicle computer.
The scan tool displays live data in real time. This data includes values (v, temperature, speed, etc.) and status information (open loop, fuel system status, etc.) generated by vehicle sensors, switches and actuators.
Press the OK button (2).
| Diagnostic Menu |
| Read Codes |
| Erase Codes |
| I/M Readiness |
| Data Stream |
| Evap System Test |
| Vehicle Information |
| Datastream |
| View All Items |
| Select Items |
13.5 EVAP leak test

Perform this test to check the vehicle for unwanted evaporative emissions. This is not an exhaust emission check.
This function does not run this leak test but instead causes the vehicle's onboard computer to run the test.
The vehicle manufacturer is responsible for setting the automatic test termination criteria. Before using this function, consult the vehicle's repair manual for details.
| Diagnostic Menu |
| Read Codes |
| Erase Codes |
| I/M Readiness |
| Data Stream |
| Evap System Test |
| Vehicle Information |
| Evap System Test |
| Evaportive system leak test not supported |
13.6 Vehicle information
Select [Vehicle Information] and press the OK button (2). Information such as VIN (vehicle identification number), CID (calibration ID) and CVN (calibration verification number) will appear on the display (1).
| Diagnostic Menu |
| Read Codes |
| Erase Codes |
| I/M Readiness |
| Data Stream |
| Evap System Test |
| Vehicle Information |
| Vehicle Information |
| Vehicle Identification Number(VIN):LVSFBFAC94F020950 |
| Calibration Identifications(CID):000007550753 |
| Calibration Verification Numbers(CVN):B5073064 |
14. Tool setup
14.1 Language
Select [Language]: the following selection appears on the display (1):
| Tool Setup |
| Language |
| Beeper |
| Unit of Measure |
| Skin Style |
| Device Information |
| Language |
| English |
| Deutsch |
14.2 Beeper
Select [Beeper]: the following selection appears on the display (1):
| Tool Setup |
| Language |
| Beeper |
| Unit of Measure |
| Skin Style |
| Device Information |
| Beeper |
| OFF |
| ON |
14.3 Unit of measure
Select [Unit of Measure]: the following selection appears on the display (1):
| Tool Setup |
| Language |
| Beeper |
| Unit of Measure |
| Skin Style |
| Device Information |
| 3/5 |
| Unit of measure |
| Mertic |
| Imperial |
14.4 Skin
Select [Skin Style]: the following selection appears on the display (1):
| Tool Setup |
| Language |
| Beeper |
| Unit of Measure |
| Skin Style |
| Device Information |
| Skin Style |
| Sky Gray |
| Gem Blue |
14.1 Device information
Select [Device Information]: the following selection appears on the display (1):
| Tool Setup |
| Language |
| Beeper |
| Unit of Measure |
| Skin Style |
| Device Information |
| Device Information | |
| Software Version: | 01.42.000 |
| Library Version: | 01.24.000 |
| Serial Number:VOLTCRAFT20792200000005 | |
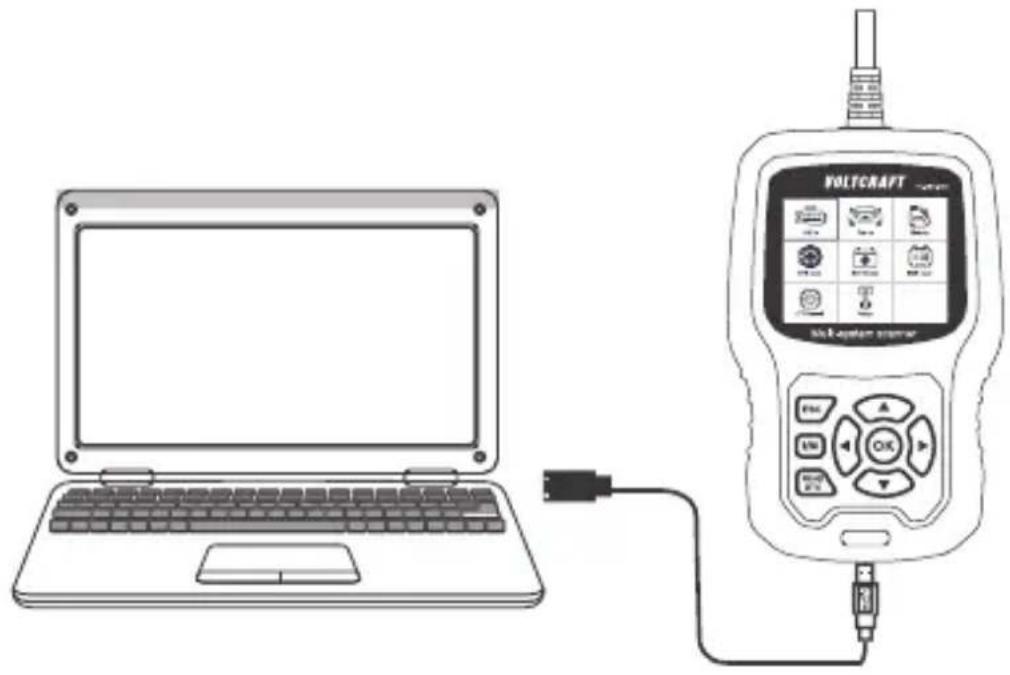
15. Software update
• Download the latest software version at www.conrad.com/downloads.
• Use the supplied USB cable to connect the unit to the computer.
natural_image
Line drawing of a laptop connected to a digital device labeled 'VOLTCAFT' with control buttons and ports (no text or symbols on the device itself)Windows 7
- When using Windows 7, you first need to install a driver.
• Proceed as shown in the picture below:

text_image
bin driver
- Click "driver" file


- Click "install driver.bat" to install the driver

text_image
bin driver README Update.exe3.Click "Update"
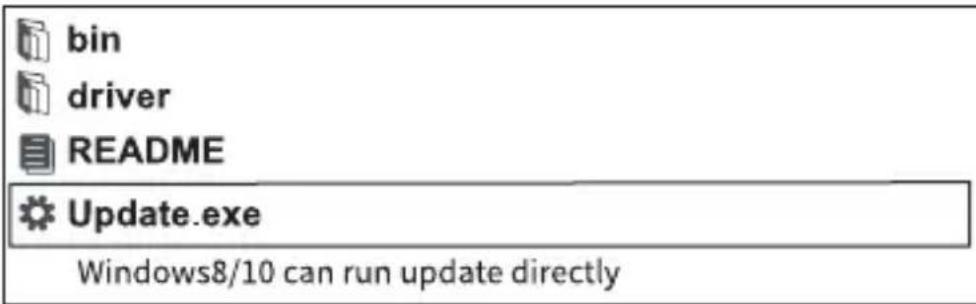
Windows 8/Windows 10
- When using Windows 8 and 10, you can install the software directly.
• Proceed as shown in the picture below:
text_image
bin driver README Update.exe Windows8/10 can run update directly16. Disposal

This symbol must appear on any electrical and electronic equipment placed on the EU market. This symbol indicates that this device should not be disposed of as unsorted municipal waste at the end of its service life.
Owners of WEEE (Waste from Electrical and Electronic Equipment) shall dispose of it separately from unsorted municipal waste. Spent batteries and accumulators, which are not enclosed by the WEEE, as well as lamps that can be removed from the WEEE in a non-destructive manner, must be removed by end users from the WEEE in a non-destructive manner before it is handed over to a collection point.
Distributors of electrical and electronic equipment are legally obliged to provide free take-back of waste. Conrad provides the following return options free of charge (more details on our website):
• in our Conrad offices
• at the Conrad collection points
- at the collection points of public waste management authorities or the collection points set up by manufacturers or distributors within the meaning of the ElektroG
End users are responsible for deleting personal data from the WEEE to be disposed of.
It should be noted that different obligations about the return or recycling of WEEE may apply in countries outside of Germany.
17. Troubleshooting
ProblemCauseRemedy
| Blank display Connection problem Plug the ODB II connector | correctly into the vehicle's OBD II interface. |
| No power supply Switch on the ignition of the vehicle. | |
| Malfunction during operation Vehicle not compatible Check whether your vehicle is in the list of compatible vehicles (note vehicle type and year of manufacture!) | |
18. Care and cleaning

Do not use aggressive cleaning agents, rubbing alcohol or other chemical solutions. They can damage the housing and can cause the product to malfunction.
Do not immerse the product in water.
• Always disconnect the product from the vehicle's OBD II interface before cleaning.
• Use a slightly damp cloth or a soft brush to clean the product.
19. Technical data
General information
Power supply ....8-18 V/DC (via OBD II interface)
Display 7.1 cm (2.8") colour LCD, 320 x 240 pixels
Connection cable ....111 cm
Storage temperature ......-20 °C to +70 °C / 0-90% relative humidity
Operating temperature ....0 °C to +55 °C / 0-90% relative humidity
Dimensions 155 x 98 x 33 mm
Weight 360 g
Supported protocols
OBD II CAN/J1850 PWM/J1850 VPW/ISO9141/KWP 2000
VW ....KWP1281/KWP2000/KWP1281CAN16/P2000CAN16/
CAN20/UDS
Supported vehicles
VW, Audi, Skoda and SEAT
• all passenger cars until 2022
VW commercial vehicles
• Caddy until 2018/Caddy pickup until 2002
• Crafter 2006-2017/Crafter NF 2017-2018
• Transporter 2003-2018
- Amarok 2010-2018
- Multivan 2003-2009
• TGE 2017-2018
Bugatti
• Veyron 2001-2016
- Chiron 2017-202
Bentley:
• New Continental GT 2012-2018
• Continental Supersports 2012-2018
• Continental Supersports Convertible 2012-2018
• Continental Flying Spur 2012-2019
• Continental Flying Spur Speed 2012-2019
• Continental 2004-2019
- Bentayga 2016-2019
• Mulsanne 2011-2019
• Brooklands 2009-2010
- Azure 2000-2010
Lamborghini
Cher cliente, cher client
France (email): technique@conrad-france.fr
text_image
QR code image containing encoded data, no visible human-readable texttext_image
I/M Readiness IGN Spark DTC 0 MIL PdDTC 0 MIS ∅ EVAP ∅ FUE ✓ AIR ∅ CCM ✓ O2S ✗ CAT ✓ HRT ✗ HCAT ∅ EGR ∅| Vehicle Selection |
| All Other Vehicles |
| Only for Crafter(LT3) 2006-2017 |
| Select Menu |
| Vehicle Scan |
| System Selection |
| Special Functions |
| 01-Version Information |
| Serve station code: 01 81 CD34 4C 04Coding: 7505 |
10.1.1.2 Cliquez sur [02-Read Fault Codes]
| Select Function |
| 01-Version Information |
| 02-Read Fault Codes |
| 03-Erase Fault Codes |
| 04-Read Datastream |
| 05-Basic Setting |
| 07-Adaptation |
| 08-Access Authorization |
| 02-Read Fault Codes |
| 1/4 |
| 01312 Drive train data bus |
text_image
Information Erase fault codes! Are you sure?![VOLTCRAFT VCOBD9610 - Cliquez sur [02-Read Fault Codes] - 1](/content/2026/04/608455/images/b5da5f5eb60b65d853ffd3b3ba73dd26ea7d22e64a85bc24bbce3cba85056f81.jpg)
text_image
Information Erase fault codes had success. Please wait 10 seconds, Turn ignition off and Switch on again. Read fault codes to verify.text_image
Input channel OK Delete 0 1 2 3 4 Input a channel number (0~255) 3/12 ↑↓←→ OK ESC| Special Functions CH:5 | |
| ASCLL Character | - - |
| ASCLL Characte | - - |
| Count | 300 |
| Count | 365 |
text_image
Input channel OK Delete 0 1 2 3 4 Input a channel number (0~255) 3/12 ↑↓←→ OK ESC![VOLTCRAFT VCOBD9610 - Cliquez sur [02-Read Fault Codes] - 2](/content/2026/04/608455/images/67c58213e5e1c21e64b89a8edb8b5f266a697480c055f6ac10c633323f03b6df.jpg)
text_image
Throttle Learning This function is not supported on this vehicle Note! When ten test function is abnormal,Please use the feedback function(tool setup)| 07-Adaptation |
| Input channel |
| Select Function |
| Input channel | |
| OK | 005 |
| Delete | Input a channel number(0~255) |
| 0 | |
| 1 | |
| 2 | |
| 3 | |
| 4 | |
| 3/12 ↑↓←→ OK ESC | |
| 07-Adaptation |
| This function is not supported on this vehicle |
| Note! |
| When ten test function is abnormal,Please use the feedback function(tool setup) |
| 07-Adaptation |
| feedback) to save the test records, Carry out vehicle test again, then use the upgrade tool to export record file. Mail the file at last. |
| Input channel | |
| OK | 005 |
| Delete | Input a channel number(0~255) |
| 0 | |
| 1 | |
| 2 | |
| 3 | |
| 4 | |
| 3/12 ↑↓←→ OK ESC | |
10.1.1.7 Access Authorization
| Select Function |
| 01-Version Information |
| 02-Read Fault Codes |
| 03-Erase Fault Codes |
| 04-Read Datastream |
| 05-Basic Setting |
| 07-Adaptation |
| 08-Access Authorization |
| 08-Access Authorization | |
| OK | |
| Delete | Login code (Enter five decimal digits) |
| 0 | |
| 1 | |
| 2 | |
| 3 | |
| 4 | |
| 3/12 ↑↓←→ OK ESC | |
10.1.2 Gateway
| Select System | |
| 0017-Dash Board | 4 |
| 0019-Gateway | 5 |
| 0061-Battery Regulation | 1 |
| Select Function |
| 01-Version Information |
| 02-Read Fault Codes |
| 03-Erase Fault Codes |
| 04-Read Datastream |
| 05-Basic Setting |
| 07-Adaptation |
| 08-Access Authorization |
10.1.3 Battery Regulation
| Select System | |
| 0017-Dash Board | 4 |
| 0019-Gateway | 5 |
| 0061-Battery Regulation | 1 |
| Select Function |
| 01-Version Information |
| 02-Read Fault Codes |
| 03-Erase Fault Codes |
| 04-Read Datastream |
| 05-Basic Setting |
| 07-Adaptation |
| 08-Access Authorization |
| Vehicle Selection |
| All Other Vehicles |
| Only for Crafter(LT3) 2006-2017 |
| Select Menu |
| System Scan |
| Manual Select |

text_image
Scanning...[3%] 0001-Engine Control Modu... 1/1| Select Menu |
| Vehicle Scan |
| System Selection |
| Special Functions |
| Special Functions |
| Service Reset |
| Throttle Learning |
| EPB ReplaceBrakePads |
| Diesel Engine Special Fun... |
| Steering Angle Learning |
| Tire Pressure Reset(TPMS) |
| Injector Adaptation |
text_image
Service Reset Service Reset Service Setting 1/2text_image
Flexible Interval Set Oil Change Service Distance Set Oil Change Service Time CH:45 Oil Quality 1/3| Select Maintenance Interval Type |
| Flexible Interval |
| Fixed Interval |
| Inspection Interval Setting |
| Fixed Interval |
| Set Oil Change Service Distance |
| Set Oil Change Service Time |
| CH:45 Oil Quality |
text_image
Information 1.Please turn the ignition ON with engine OFF. 2.Release the handbrake.text_image
Information Perform this function Are you sure? OK ESCtext_image
EPB ReplaceBrakePads Has been performed, Press [OK] to continue.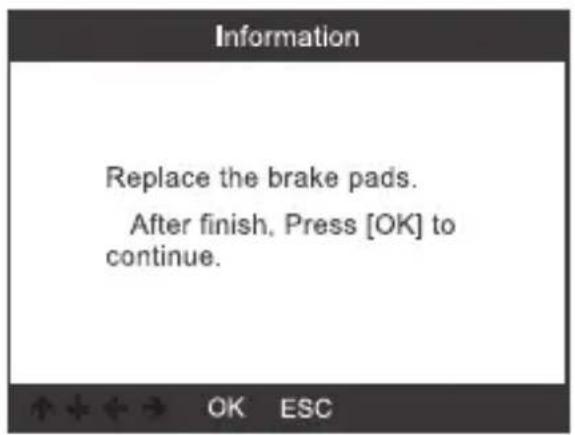
text_image
Information Replace the brake pads. After finish, Press [OK] to continue.
text_image
Information Please check complete retraction. Press [OK] to continue.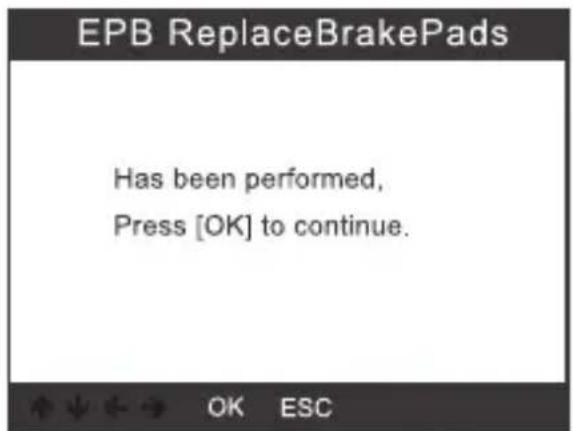
text_image
EPB ReplaceBrakePads Has been performed, Press [OK] to continue.text_image
Information Please check complete retraction. After check Press [OK] to continue.text_image
Information Perform this function Are you sure? OK ESCtext_image
EPB ReplaceBrakePads Has been performed, Press [OK] to continue.text_image
Information Please check complete retraction. Press [OK] to continue.text_image
Information Perform this function Are you sure? OK ESCtext_image
EPB ReplaceBrakePads Has been performed, press [OK] to continue.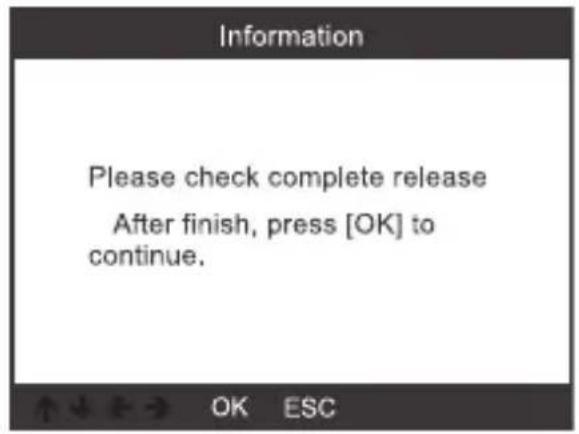
text_image
Information Please check complete release After finish, press [OK] to continue.text_image
Battery Registration 0019-Gateway 0016-Battery Regulation 008C-Battery Energy Contr... 1/3text_image
Battery Registration Press [OK] to continue Description Battery Value Capacity(Ah) :95Ah Manufacturer :VARTA[VAO]. ↑↓←→ OK ESC| Select battery manufacturer |
| Moll[MLA] |
| VARTA[VAO] |
| JCI/JCB[JCB] |
| Exide[TU3] |
| JFF(Boading)/China[5D0] |
| Banner[BA2] |
| EPN[EPM] |
text_image
Battery Registration Press [OK] to continue Configure New Battery Value Capacity(Ah) :95Ah Manufacturer :VARTA[VAO]. Battery Registration Press [OK] to continue Matching New Battery Value Capacity(Ah) :95Ah Manufacturer :VARTA[VAO]. Information Has been performed, Press [OK] to continue. OK ESC13. Diagnostic de l'OBD II
13.1 Lecture des codes
| DTC | |
| P0123 | 1/6 |
| Generic | Pending |
| Throttle/Pedal Position Sensor /Switch A Circuit High | |
text_image
Erase Codes Clear/Reset Emission-Related Diagnostic Information, Are you sure? OK ESCtext_image
Erase Codes Please Turn Ignition ON with Engine Off, Press OK key to continue! OK ESC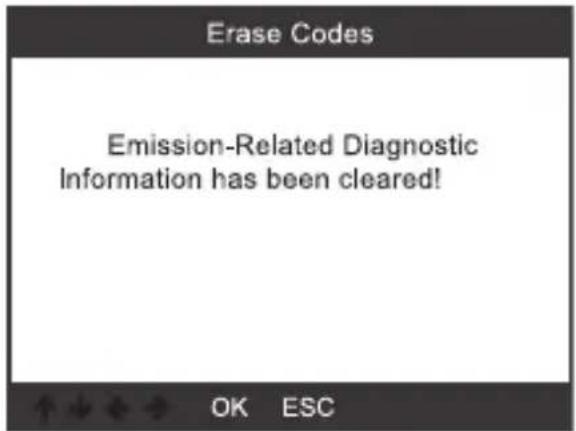
text_image
Erase Codes Emission-Related Diagnostic Information has been cleared! OK ESC13.3 Test d'aptitude I/M
text_image
I/M Readiness Since DTCs Were Cleared This Drive Cycle 1/2| Datastream |
| View All Items |
| Select Items |
| Evap System Test |
| Evaportive system leak test not supported |
| Tool Setup |
| Language |
| Beeper |
| Unit of Measure |
| Skin Style |
| Device Information |
| Language |
| English |
| Deutsch |
14.2 Signal sonore
| Tool Setup |
| Language |
| Beeper |
| Unit of Measure |
| Skin Style |
| Device Information |
| Beeper |
| OFF |
| ON |
| Tool Setup |
| Language |
| Beeper |
| Unit of Measure |
| Skin Style |
| Device Information |
| 3/5 |
| Unit of measure |
| Mertic |
| Imperial |
14.4 Skin (Habillage)
| Tool Setup |
| Language |
| Beeper |
| Unit of Measure |
| Skin Style |
| Device Information |
| Skin Style |
| Sky Gray |
| Gem Blue |
| Tool Setup |
| Language |
| Beeper |
| Unit of Measure |
| Skin Style |
| Device Information |
| 5.5 |
| Device Information | |
| Software Version: | 01.42.000 |
| Library Version: | 01.24.000 |
| Serial Number: | VOLTCRAFT20792200000005 |
text_image
Diagram showing a laptop connected to a voltage-controlled device with labeled ports and connection points.Windows 7
text_image
bin driver
- Click "driver" file


- Click "install driver.bat" to install the driver
text_image
bin driver README Update.exe3.Click "Update"
Windows 8 / Windows 10
text_image
bin driver README Update.exe Windows8/10 can run update directlytext_image
QR code image containing encoded data, no visible human-readable text
text_image
I/M Readiness IGN Spark DTC 0 MIL PdDTC 0 MIS ∅ EVAP ∅ FUE ✓ AIR ∅ CCM ✓ O2S ✗ CAT ✓ HRT ✗ HCAT ∅ EGR ∅| Vehicle Selection |
| All Other Vehicles |
| Only for Crafter(LT3) 2006-2017 |
| Select Menu |
| Vehicle Scan |
| System Selection |
| Special Functions |

| 01-Version Information |
| Serve station code: 01 81 CD34 4C 04Coding: 7505 |
10.1.1.2 Selecteer [02-Read Fault Codes]
| Select Function |
| 01-Version Information |
| 02-Read Fault Codes |
| 03-Erase Fault Codes |
| 04-Read Datastream |
| 05-Basic Setting |
| 07-Adaptation |
| 08-Access Authorization |
| 02-Read Fault Codes |
| 1/4 |
| 01312 Drive train data bus |
10.1.1.3 Selecteer [03-Erase Fault Codes] en druk op Toets OK (2)
![VOLTCRAFT VCOBD9610 - Selecteer [03-Erase Fault Codes] en druk op Toets OK (2) - 1](/content/2026/04/608455/images/827a72a0e5284ac3354e7441ef8c70116065bb14e19b83748bd060be99e01ff5.jpg)
text_image
Information Erase fault codes! Are you sure?![VOLTCRAFT VCOBD9610 - Selecteer [03-Erase Fault Codes] en druk op Toets OK (2) - 2](/content/2026/04/608455/images/45446d843355478a2dae849e47c956fbd895e4d1178bef559fd7f8e7142a460c.jpg)
text_image
Information Erase fault codes had success. Please wait 10 seconds, Turn ignition off and Switch on again. Read fault codes to verify.10.1.1.4 Selecteer [04-Read Datastream] en voer het getal 005 in.
![VOLTCRAFT VCOBD9610 - Selecteer [04-Read Datastream] en voer het getal 005 in. - 1](/content/2026/04/608455/images/2b20b28106243142d4c99ba93732ba5ad663cff80255ac6c283f14acd0ffb4c0.jpg)
text_image
Input channel OK Delete 0 1 2 3 4 Input a channel number (0~255) 3/12 ↑↓←→ OK ESC| Special Functions CH:5 | |
| ASCLL Character | - - |
| ASCLL Characte | - - |
| Count | 300 |
| Count | 365 |
text_image
Input channel OK Delete 0 1 2 3 4 Input a channel number (0~255) 3/12 ↑↓←→ OK ESC![VOLTCRAFT VCOBD9610 - Selecteer [04-Read Datastream] en voer het getal 005 in. - 2](/content/2026/04/608455/images/aca132d4156690e21fddd0608cdfa0da5ee88194300da9fb49868af449b05098.jpg)
text_image
Throttle Learning This function is not supported on this vehicle Note! When ten test function is abnormal,Please use the feedback function(tool setup)10.1.1.6 Selecteer [07-Adaptation] en dan [Input channel] en voer het getal 005 in.
| 07-Adaptation |
| Input channel |
| Select Function |
| Input channel | |
| OK | 005 |
| Delete | Input a channel number(0~255) |
| 0 | |
| 1 | |
| 2 | |
| 3 | |
| 4 | |
| 3/12 ↑↓←→ OK ESC | |
| 07-Adaptation |
| This function is not supported on this vehicle |
| Note! |
| When ten test function is abnormal,Please use the feedback function(tool setup) |
| 07-Adaptation |
| feedback) to save the test records, Carry out vehicle test again, then use the upgrade tool to export record file. Mail the file at last. |
| Input channel | |
| OK | 005 |
| Delete | Input a channel number(0~255) |
| 0 | |
| 1 | |
| 2 | |
| 3 | |
| 4 | |
| 3/12 ↑↓←→ OK ESC | |
10.1.1.7 Access Authorization
| Select Function |
| 01-Version Information |
| 02-Read Fault Codes |
| 03-Erase Fault Codes |
| 04-Read Datastream |
| 05-Basic Setting |
| 07-Adaptation |
| 08-Access Authorization |
| 08-Access Authorization | |
| OK | |
| Delete | Login code (Enter five decimal digits) |
| 0 | |
| 1 | |
| 2 | |
| 3 | |
| 4 | |
| 3/12 ↑↓←→ OK ESC | |
10.1.2 Gateway
| Select System | |
| 0017-Dash Board | 4 |
| 0019-Gateway | 5 |
| 0061-Battery Regulation | 1 |
| Select Function |
| 01-Version Information |
| 02-Read Fault Codes |
| 03-Erase Fault Codes |
| 04-Read Datastream |
| 05-Basic Setting |
| 07-Adaptation |
| 08-Access Authorization |
10.1.3 Battery Regulation
| Select System | |
| 0017-Dash Board | 4 |
| 0019-Gateway | 5 |
| 0061-Battery Regulation | 1 |
| Select Function |
| 01-Version Information |
| 02-Read Fault Codes |
| 03-Erase Fault Codes |
| 04-Read Datastream |
| 05-Basic Setting |
| 07-Adaptation |
| 08-Access Authorization |
| Vehicle Selection |
| All Other Vehicles |
| Only for Crafter(LT3) 2006-2017 |
| Select Menu |
| System Scan |
| Manual Select |

text_image
Scanning...[3%] 0001-Engine Control Modu... 1/1Selecteer [Special Functions]
| Select Menu |
| Vehicle Scan |
| System Selection |
| Special Functions |
| Special Functions |
| Service Reset |
| Throttle Learning |
| EPB ReplaceBrakePads |
| Diesel Engine Special Fun... |
| Steering Angle Learning |
| Tire Pressure Reset(TPMS) |
| Injector Adaptation |
text_image
Service Reset Service Reset Service Setting 1/2text_image
Flexible Interval Set Oil Change Service Distance Set Oil Change Service Time CH:45 Oil Quality 1/3| Select Maintenance Interval Type |
| Flexible Interval |
| Fixed Interval |
| Inspection Interval Setting |
| Fixed Interval |
| Set Oil Change Service Distance |
| Set Oil Change Service Time |
| CH:45 Oil Quality |
text_image
Information 1.Please turn the ignition ON with engine OFF. 2.Release the handbrake.11.1 Selecteer [EPB ReplaceBrakePads] en druk op toets OK (2).
![VOLTCRAFT VCOBD9610 - Selecteer [EPB ReplaceBrakePads] en druk op toets OK (2). - 1](/content/2026/04/608455/images/63d2712bc9800c57d2baf9e35d930a8670739c416d72f78a26e66835e578ada5.jpg)
text_image
EPB ReplaceBrakePads EPB ReplaceBrakePads Retraction BrakePump Release Brake Pump 1/3![VOLTCRAFT VCOBD9610 - Selecteer [EPB ReplaceBrakePads] en druk op toets OK (2). - 2](/content/2026/04/608455/images/525085a24b86f172eebb8cc2005ad14280136ca67e37681a0fe31688270a1956.jpg)
text_image
Information Perform this function Are you sure? OK ESCtext_image
EPB ReplaceBrakePads Has been performed, Press [OK] to continue.![VOLTCRAFT VCOBD9610 - Selecteer [EPB ReplaceBrakePads] en druk op toets OK (2). - 3](/content/2026/04/608455/images/a48f152ec19d25f331a881f2993a505c15ba8bd946b3160dead4b38bc0543f47.jpg)
text_image
Information Replace the brake pads. After finish, Press [OK] to continue.![VOLTCRAFT VCOBD9610 - Selecteer [EPB ReplaceBrakePads] en druk op toets OK (2). - 4](/content/2026/04/608455/images/7ea7ce26d8d1fc3ad79baa86648d703980dba37100e580acd2c5edc6596cfa8c.jpg)
text_image
Information Please check complete retraction. Press [OK] to continue.![VOLTCRAFT VCOBD9610 - Selecteer [EPB ReplaceBrakePads] en druk op toets OK (2). - 5](/content/2026/04/608455/images/bdb02c25a2c76152103f535603c59d3f34d07d3b9e2abd939f67f7fb68995855.jpg)
text_image
EPB ReplaceBrakePads Has been performed, Press [OK] to continue.text_image
Information Please check complete retraction. After check Press [OK] to continue.text_image
Information Perform this function Are you sure? OK ESCtext_image
EPB ReplaceBrakePads Has been performed, Press [OK] to continue.text_image
Information Please check complete retraction. Press [OK] to continue.text_image
Information Perform this function Are you sure? OK ESCtext_image
EPB ReplaceBrakePads Has been performed, press [OK] to continue.![VOLTCRAFT VCOBD9610 - Selecteer [EPB ReplaceBrakePads] en druk op toets OK (2). - 6](/content/2026/04/608455/images/3cfd847378f78bbe2ab3f2730c5b5882f45ef4039b1e13bb6b3bc2e85fbe1e80.jpg)
text_image
Information Please check complete release After finish, press [OK] to continue.12. Accuregistratie
text_image
Battery Registration 0019-Gateway 0016-Battery Regulation 008C-Battery Energy Contr... 1/3text_image
Battery Registration Press [OK] to continue Description Battery Value Capacity(Ah) :95Ah Manufacturer :VARTA[VAO]. OK ESC| Select battery manufacturer |
| Moll[MLA] |
| VARTA[VAO] |
| JCI/JCB[JCB] |
| Exide[TU3] |
| JFF(Boading)/China[5D0] |
| Banner[BA2] |
| EPN[EPM] |

text_image
Battery Registration Press [OK] to continue Configure New Battery Value Capacity(Ah) :95Ah Manufacturer :VARTA[VAO]. Battery Registration Press [OK] to continue Matching New Battery Value Capacity(Ah) :95Ah Manufacturer :VARTA[VAO]. OK ESC OK ESC Information Has been performed, Press [OK] to continue. OK ESC13. OBD II Diagnose
13.1 Codes uitlezen
| DTC | |
| P0123 | 1/6 |
| Generic | Pending |
| Throttle/Pedal Position Sensor /Switch A Circuit High | |
text_image
Erase Codes Clear/Reset Emission-Related Diagnostic Information, Are you sure? OK ESCtext_image
Erase Codes Please Turn Ignition ON with Engine Off, Press OK key to continue! OK ESC
text_image
Erase Codes Emission-Related Diagnostic Information has been cleared! OK ESCtext_image
I/M Readiness Since DTCs Were Cleared This Drive Cycle 1/213.4 Datastream
| Datastream |
| View All Items |
| Select Items |
13.5 EVAP-lektest

| Evap System Test |
| Evaportive system leak test not supported |
| Tool Setup |
| Language |
| Beeper |
| Unit of Measure |
| Skin Style |
| Device Information |
| Language |
| English |
| Deutsch |
14.2 Pieper
| Tool Setup |
| Language |
| Beeper |
| Unit of Measure |
| Skin Style |
| Device Information |
| Beeper |
| OFF |
| ON |
14.3 Meeteenheden
| Tool Setup |
| Language |
| Beeper |
| Unit of Measure |
| Skin Style |
| Device Information |
| 3/5 |
| Unit of measure |
| Mertic |
| Imperial |
14.4 Huid
| Tool Setup |
| Language |
| Beeper |
| Unit of Measure |
| Skin Style |
| Device Information |
| Skin Style |
| Sky Gray |
| Gem Blue |
| Tool Setup |
| Language |
| Beeper |
| Unit of Measure |
| Skin Style |
| Device Information |
| Device Information | |
| Software Version: | 01.42.000 |
| Library Version: | 01.24.000 |
| Serial Number:VOLTCRAFT20792200000005 | |
15. Software-update
text_image
Diagram showing a laptop connected to a voltage-controlled device with labeled buttons and portsWindows 7
text_image
bin driver
- Click "driver" file

- Click "install driver.bat" to install the driver

text_image
bin driver README Update.exe3.Click "Update"
Windows 8 / Windows 10
text_image
bin driver README Update.exe Windows8/10 can run update directly16. Verwijdering

Voeding....8-18 V/DC (via OBD II-interface)
Display ....7,1□cm(2,8“)□kleuren-LCD,□320□x□240□pixel
Copyright 2022 by Conrad Electronic SE.

This is a publication by Conrad Electronic SE, Klaus-Conrad-Str. 1, D-92240 Hirschau (www.conrad.com).
All rights including translation reserved. Reproduction by any method, e.g. photocopy, microfilming, or the capture in electronic data processing systems require the prior written approval by the editor. Reprinting, also in part, is prohibited. This publication represent the technical status at the time of printing.
Copyright 2022 by Conrad Electronic SE.

Copyright 2022 by Conrad Electronic SE.

Copyright 2022 by Conrad Electronic SE.
