60.2033.10 - Alarm clock radio TFA - Free user manual and instructions
Find the device manual for free 60.2033.10 TFA in PDF.

| Product type | Radio alarm clock |
| Brand | TFA |
| Model | 60.2033.10 |
| Housing dimensions | 107 x 83 x 160 mm |
| Weight (device only) | 221 g |
| Main power supply | Power adapter 9 V DC / 2.5 A (included) |
| Backup power supply | 2 AAA 1.5 V batteries (not included) |
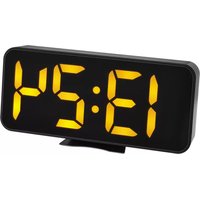
| Display type | White LED luminous digits |
| Brightness adjustment | 2 levels (LOW/HIGH) or automatic via light sensor |
| Alarm function | Yes, with 2-minute ascending alarm |
| Snooze function | Yes, 5 minutes repeat |
| Wireless charging (Qi) | Yes, 10 W with height-adjustable coil |
| USB charging | Yes, USB-A port (1 A) |
| Light sensor | Yes, for automatic brightness adjustment |
| Switches | ALARM ON/OFF, LIGHT LOW/AUTO/HIGH, QI CHARGER ON/OFF |
| Housing material | Plastic |
| Color | Black (estimated) |
| Cleaning | Soft damp cloth, no solvents |
| Safety | Do not repair yourself, use only the provided adapter, keep out of reach of children |
| Qi compatibility | All compatible smartphones and small tablets |
| Compliance | EU Directive 2014/53/EU |
| Warranty | 2 years (estimated) |
Frequently Asked Questions - 60.2033.10 TFA
User questions about 60.2033.10 TFA
0 question about this device. Answer the ones you know or ask your own.
Ask a new question about this device
Download the instructions for your Alarm clock radio in PDF format for free! Find your manual 60.2033.10 - TFA and take your electronic device back in hand. On this page are published all the documents necessary for the use of your device. 60.2033.10 by TFA.
USER MANUAL 60.2033.10 TFA
Thank you for choosing this instrument from TFA.
Before you use this product
Please make sure you read the instruction manual carefully.
- The operating instructions are enclosed with the device or can be downloaded at www.tfa-dostmann.de/en/service/downloads/instruction-manuals
This product should only be used as described within these instructions.
- Following and respecting the instructions in your manual will prevent damage to your instrument and loss of your statutory rights arising from defects due to incorrect use.
- Please take particular note of the safety advice!
- Please keep this instruction manual safe for future reference.
F Mode d'emploi
Digital alarm clock with induction charger

1. Delivery contents
Digital alarm clock
Power adaptor
- Instruction manual
2. Range of application and all the benefits of your new instrument at a glance
- Inductive charging station (10 W, according to Qi standard) and USB charging function (1 A) for mobile devices
- Height-adjustable charging coil for optimal charging position
- White LED digits with 2 brightness levels or adaptive brightness adjustment via light sensor
- Alarm with snooze function
- For all Qi enabled smartphones and for smaller tablets
- Also ideal as a holder during video calls or video conferences
Non-slip stand with 4 rubber pads
3. For your safety
- This product is exclusively intended for the range of application described above. It should only be used as described within these instructions.
- Unauthorised repairs, alterations or changes to the product are prohibited.

Caution!
Risk of electrocution!
- Plug the device only into a mains socket installed within your country's electrical safety regulations and with a correct mains voltage (see nameplate).
- The mains socket must be located near the equipment and it must be easily accessible.
- Unplug the device immediately if any fault occurs.
- The device and the power adapter must not come into contact with water or moisture. Suitable for indoor use only.
- Do not use the device if the housing or the power adapter are damaged.
- Operate the device out of reach of persons (including children) who cannot fully appreciate the potential risks of handling electrical equipment.
- Only use the supplied power adapter.
- Connect the lead to the device first and then plug the power adapter into the socket.
- Do not pull the plug out of the socket by its cable.
- Route the mains cable so it does not come into contact with sharp-edged or hot objects.

WARNING
- Keep this device and the batteries out of reach of children.
- Small parts can be swallowed by children (under three years old).
Digital alarm clock with induction charger

- Batteries contain harmful acids and may be hazardous if swallowed. If a battery is swallowed, this can lead to serious internal burns and death within two hours. If you suspect a battery could have been swallowed or otherwise caught in the body, seek medical help immediately.
- Batteries must not be thrown into a fire, short-circuited, taken apart or recharged. Risk of explosion!
- Low batteries should be changed as soon as possible to prevent damage caused by leaking. Make sure the polarities are correct. Never use a combination of old and new batteries together, nor batteries of different types.
- Avoid contact with skin, eyes and mucous membranes when handling leaking batteries. In case of contact, immediately rinse the affected areas with water and consult a doctor.

CAUTION
- Unauthorised repairs, alterations or changes to the product are prohibited.
- Do not expose the device to extreme temperatures, vibrations or shocks.
- Clean the device with a soft damp cloth. Do not use solvents or scouring agents.
- Protect the device from overheating and provide sufficient ventilation during operation. Make sure that the device is placed on a solid surface.
- If the mobile device becomes hot while charging or the battery is no longer charged, this is a sign of a defect. Disconnect the mobile device from the charging power source immediately.
- Remove in case your metallic phone cover and do not place any metal objects on the charging pad.
- Do not place any other objects on the charging pad.
- Remove the batteries and pull out the plug of the socket if the device will not be used for an extended period of time.
5. Elements
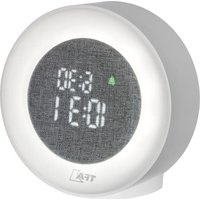
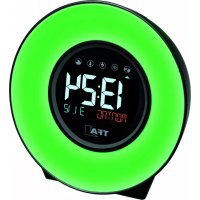
A:Front(Fig.1):
A 1: Light sensor
A2:Time
A 3: SNOOZE sensor button (appears only in the event of an alarm)
A4:Alarm symbol
A 5:Charging indicator light
A 6:Charging pad
B: Left side (Fig. 2):
B 1: ALARM ON/OFF switch
B2:SET button
C:Right side (Fig.3):
C1:button
C2:button
Digital alarm clock with induction charger GB
D:Back(Fig.4):
D 1: Control knob for adjusting the height of the charging coil
D 2: LIGHT LOW/AUTO/HIGH switch
D3:USB-A port
D 4: QI CHARGER ON/OFF switch
E: Bottom (Fig. 4):
E 1:Power adaptor jack DC 9V.2.5A
E 2: Battery compartment
-
Getting started
-
Remove the protective film from the display.
- Connect the attached power adapter to the alarm clock. Insert the power adapter pin into the device jack and connect the plug to a wall socket.
- The device will alert you with a beep and all LCD segments will be displayed for a short moment. 0:00 appears on the display.
The device is ready for use.
6.1 Insert the batteries
- The 2 x AAA batteries will operate as a backup power source in case of power failure.
- In pure battery operation, the display is activated briefly each time a button is pressed. For a permanent backlight, to use the charging function and to save battery life, use the supplied power adapter.
- Open the battery compartment and insert two new AAA 1,5 V batteries.
-
Close the battery compartment.
-
Operation
7.1 Time setting
- Press and hold the SET button for 3 seconds. The hour digit flashes on the display.
- Press the or button to set the hours.
- Press and hold the or button for fast mode.
- Confirm the setting with the SET button.
- Set the minutes in the same way.
- Confirm the setting with the SET button
- The display will show the current time. The colon between hours and minutes flashes every second.
- Press and hold the button for 3 seconds, the colon stops flashing.
7.2 Alarm time setting
- Press the SET button briefly.
The hour digit and the alarm symbol start flashing. - Press the or button to set the alarm hours.
- Confirm the setting with the SET button.
- Set the minutes in the same way.
- Confirm the setting with the SET button
The display will show the current time.
Digital alarm clock with induction charger

7.3 Activate alarm
- Slide the ALARM ON/OFF switch to the position ON.
The alarm is activated. The alarm symbol appears on the display.
7.4 Alarm clock function
- When the adjusted alarm time is reached, the alarm rings. The alarm symbol flashes. The SNOOZE sensor button is active and appears at the top right of the display.
- If the alarm is not stopped manually, the ascending alarm tone automatically turns off after two minutes and the alarm will be reactivated at the same set time on the following day. The alarm symbol remains on the display.
Press any button ( / / SET) or press and hold the SNOOZE sensor button for 3 seconds to turn off the alarm sound. - When the alarm rings, press the SNOOZE sensor button briefly and the snooze function is activated.
- SNOOZE will be flashing and the alarm will be interrupted for 5 minutes.
7.5 Deactivate alarm
- Slide the ALARM ON/OFF switch to the position OFF.
- The alarm function is deactivated. The alarm symbol and the SNOOZE sensor button disappear.
7.6 Display Light
- You can adjust the brightness in 2 steps (LOW or HIGH) with the LIGHT LOW/AUTO/ HIGH slide switch.
- If the automatic brightness adjustment is activated (position AUTO), the brightness is regulated via the light sensor, i.e. dim light switches on automatically as soon as the light sensor registers darkness.
-
Attention: Continuously illuminated display only works when using the power adapter. To temporarily activate the display light in pure battery operation, press any button.
-
Charging function
- Note: The charging function only works with the power adapter.
8.1 Inductive charging of your mobile phone
- Slide the OI CHARGER ON/OFF switch to ON.
- Place your mobile phone in the holder. Your phone should sit centred on the charging pad.
- Use the control knob to slide the charging coil into the ideal charging position.
- The white charging indicator light appears when your phone is successfully charging.
- The indicator light does not appear or a red LED flashes on the display if your device is not positioned correctly, or if your device is not compatible with the Qi standard. You may need to remove your phone cover.
- Compatibility may vary based on phone model. Please check your phone's manual for details.
Digital alarm clock with induction charger

8.2 Charging via USB
- This product also provides a USB charging port for devices that do not support wireless charging.
- Plug the USB-A cable (not included) into the USB port on the alarm clock and connect the other end to your mobile device. Make sure that the charging rate is suitable for your mobile device. Do not apply excessive force when connecting a USB cable. The USB plug fits only one way into the USB port.
9. Troubleshooting
Problem Solution
No display Operation with power adapter
Connect the device to the power adapter
Check the power adapter
Battery operation
Ensure the batteries' polarities are correct
Change the batteries
Press any button
No charging function
Connect the device to the power adapter
(wireless)
QI CHARGER ON/OFF switch to ON
Indicator light does not
Mobile device is not Qi compatible
appear or red LED flash
Use the control knob to slide the charging coil.
Remove metallic objects
Remove the cover
Use USB port
No charging function (USB)
Connect the device to the power adapter
Check the USB port connection
If your device fails to work despite these measures, please contact the retailer where you purchased the product from for advice.
10. Waste disposal
This product and its packaging have been manufactured using high-grade materials and components which can be recycled and reused. This reduces waste and protects the environment.
Dispose of the packaging in an environmentally friendly manner using the collection systems that have been set up.

Disposal of the electrical device
Remove non-permanently installed batteries and rechargeable batteries from the device and dispose of them separately.
This product is labelled in accordance with the EU Waste Electrical and Electronic Equipment Directive (WEEE).
Digital alarm clock with induction charger

This product must not be disposed of in ordinary household waste. As a consumer, you are required to take end-of-life devices to a designated collection point for the disposal of electrical and electronic equipment, in order to ensure environmentally-compatible disposal. The return service is free of charge. Observe the current regulations in place!

Disposal of the batteries
Never dispose of empty batteries and rechargeable batteries with ordinary household waste. They contain pollutants which, if improperly disposed of, can harm the environment and human health.
As a consumer, you are required by law to take them to your retail store or to an appropriate collection site depending on national or local regulations in order to protect the environment. The return service is free of charge.
The symbols for the contained heavy metals are:
Cd=cadmium, Hg=mercury, Pb=lead.
12. Specifications
Power consumption Power supply (included)
Input: 100-240V AC 50/60Hz 1.0A Max
Output: 9.0 V DC 2.5A, 22.5W
Average active efficiency: ≥ 85.96%
No-load power consumption: ≤ 0.10W
2 x 1.5 V AAA batteries (not included)
Use alkaline batteries
Charging output USB-A port (1A)
Transmission frequency 110KHz~148KHz
Wireless charger power output 10 W
Housing dimension 107× 83× 160mm
Weight 221 g (device only)
Digital alarm clock with induction charger

Cd = cadmium, Hg = mercury, Pb = plomb.