
ELITE 14 PRF0037991B - Range hood ELICA - Free user manual and instructions
Find the device manual for free ELITE 14 PRF0037991B ELICA in PDF.
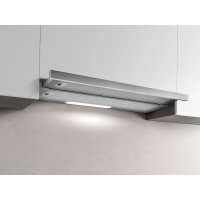


| Product type | Cooker hood |
| Brand | Elica |
| Model | ELITE 14 PRF0037991B |
| Usage version | Extractive (external evacuation) or filtering (internal recirculation) |
| Electrical supply | 230 V ~ 50 Hz |
| Number of speeds | 3 |
| Lighting | LED bulb 3 W, base E14, 230 V |
| Anti-grease filter | Metal filter, monthly cleaning (hand or dishwasher) |
| Active carbon filter (optional) | Replacement every 4 months in filtering version |
| Minimum safety distance (electric hob) | 50 cm |
| Minimum safety distance (gas or mixed hob) | 65 cm |
| Evacuation connection diameter | Same as flange (not supplied, to be purchased) |
| Control type | Control panel with switches for lights and speeds |
| Maintenance | External cleaning with damp cloth and neutral detergent, no abrasives or alcohol |
| Protection | Standardized circuit breaker for complete disconnection (if no accessible socket) |
| Compliance | EC directives: safety, performance, EMC |
Frequently Asked Questions - ELITE 14 PRF0037991B ELICA
User questions about ELITE 14 PRF0037991B ELICA
0 question about this device. Answer the ones you know or ask your own.
Ask a new question about this device
Download the instructions for your Range hood in PDF format for free! Find your manual ELITE 14 PRF0037991B - ELICA and take your electronic device back in hand. On this page are published all the documents necessary for the use of your device. ELITE 14 PRF0037991B by ELICA.
USER MANUAL ELITE 14 PRF0037991B ELICA
EN - Instruction on mounting and use
EN - Instruction on mounting and use
Closely follow the instructions set out in this manual. All responsibility for any eventual inconveniences, damages, or fires caused by not complying with the instructions in this manual is declined. This appliance is intended to be used in household and similar applications such as: staff kitchen areas in shops, offices, and other working environments; farm houses; by clients in hotels, motels, and other residential type environments; bed and breakfast type environments.
- It is important to conserve this booklet for consultation at any moment. In the case of sale, cession, or move, make sure it is together with the product.
- Read the instructions carefully: there is important information about installation, use, and safety.
- Do not carry out electrical or mechanical variations on the product or on the discharge conduits.
- Before proceeding with the installation of the appliance, verify that there are no damaged components. Otherwise, contact your dealer and do not proceed with the installation.
Note: The parts marked with the symbol "(*)" are optional accessories supplied only with some models or otherwise not supplied, but available for purchase.

Caution
- Before any cleaning or maintenance operation, disconnect the hood from the mains by removing the plug or disconnecting the mains electrical supply.
- Always wear work gloves for all installation and maintenance operations.
- This appliance can be used by children aged from 8 years and above and persons with reduced physical, sensory, or mental capabilities or lack of experience and knowledge if they have been given supervision or instruction concerning use of the appliance in a safe way and understand the hazards involved.
- Children shall not be allowed to tamper with the controls or play with the appliance.
- Cleaning and user maintenance shall not be made by children without supervision.
- The premises where the appliance is installed must be sufficiently ventilated, when the kitchen hood is used together with other gas combustion devices or other fuels.
- The hood must be regularly cleaned on both the inside and outside (AT LEAST ONCE A MONTH).
- This must be completed in accordance with the maintenance instructions provided. Failure to follow the instructions provided regarding the cleaning of the hood and filters will lead to the risk of fires.
- Do not flambe under the range hood.
- For lamp replacement use only lamp type indicated in the Maintenance/Replacing lamps section of this manual.
The use of exposed flames is detrimental to the filters and may cause a fire risk, and must therefore be avoided in all circumstances.
Any frying must be done with care in order to make sure that the oil does not overheat and ignite.
CAUTION: Accessible parts of the hood may become hot when used with cooking appliances.
- Do not connect the appliance to the mains until the installation is fully complete.
- With regards to the technical and safety measures to be adopted for fume discharging it is important to closely follow the regulations provided by the local authorities.
- The air must not be discharged into a flue that is used for exhausting fumes from appliance burning gas or other fuels.
- Do not use or leave the hood without the lamp correctly mounted due to the possible risk of electric shocks.
- Never use the hood without effectively mounted grids.
- The hood must NEVER be used as a support surface unless specifically indicated.
- Use only the fixing screws supplied with the product for installation or, if not supplied, purchase the correct screws type.
- Use the correct length for the screws which are identified in the Installation Guide.
- In case of doubt, consult an authorized service assistance center or similar qualified person.
WARNING!
- Failure to install the screws or fixing device in accordance with these instructions may result in electrical hazards.
- Do not use with a programmer, timer, separate remote control system or any other device that switches on automatically.
- This appliance is marked according to the European directive 2012/19/EC on Waste Electrical and Electronic Equipment (WEEE).
- By ensuring this product is disposed of correctly, you will help prevent potential negative consequences for the environment and human health, which could otherwise be caused by inappropriate waste handling of this product.
- The symbol on the product, or on the documents accompanying the product, indicates that this appliance may not be treated as household waste. Instead it should be taken to the appropriate collection point for the recycling of electrical and electronic equipment. Disposal must be carried out in accordance with local environmental regulations for waste disposal.
- For further detailed information regarding the process, collection and recycling of this product, please contact the appropriate department of your local authorities or the local department for household waste or the shop where you purchased this product.
Appliance designed, tested and manufactured according to:
- Safety: EN/IEC 60335-1; EN/IEC 60335-2-31, EN/IEC 62233.
- Performance: EN/IEC 61591; ISO 5167-1; ISO 5167-3; ISO 5168; EN/IEC 60704-1; EN/IEC 60704-2-13; EN/IEC 60704-3; ISO 3741; EN 50564; IEC 62301.
- EMC: EN 55014-1; CISPR 14-1; EN 55014-2; CISPR 14-2; EN/IEC 61000-3-2; EN/IEC 61000-3-3. Suggestions for a correct use in order to reduce the environmental impact: Switch ON the hood at minimum speed when you start cooking and keep it running for a few minutes after cooking is finished. Increase the speed only in case of large amount of smoke and vapor and use boost speed(s) only in extreme situations. Replace the charcoal filter(s) when necessary to maintain a good odor reduction efficiency. Clean the grease filter(s) when necessary to maintain a good grease filter efficiency. Use the maximum diameter of the ducting system indicated in this manual to optimize efficiency and minimize noise.
Use
The hood is designed to be used either for exhausting or filter version.

Extraction version
In this case the fumes are conveyed outside of the building by means of a special pipe connected with the connection ring located on top of the hood.
A
CAUTION!
The exhausting pipe is not supplied and must be purchased apart.
Diameter of the exhausting pipe must be equal to that of the connection ring.
#
CAUTION!
If the hood is supplied with active charcoal filter, then it must be removed.
Connect the hood and discharge holes on the walls with a diameter equivalent to the air outlet (connection flange).
Use a duct of the minimum indispensable length.
Use a duct with as few elbows as possible (maximum elbow angle: 90°).
Avoid drastic changes in the duct cross-section.
Attention! If the hood is supplied with carbon filter, then it must be removed.

Filtration version
The aspirated air will be degreased and deodorised before being fed back into the room.
In order to use the hood in this version, you have to install a system of additional filtering based on activated charcoal.
Attention! If the hood is not supplied with carbon filter, then it must be ordered and mounted.
Installation
The minimum distance between the supporting surface for the cooking equipment on the hob and the lowest part of the range hood must be not less than 50 cm from electric cookers and 65 cm from gas or mixed cookers.
If the instructions for installation for the gas hob specify a greater distance, this must be adhered to.
Electrical connection
The mains power supply must correspond to the rating indicated on the plate situated inside the hood. If provided with a plug, connect the hood to a socket in compliance with current regulations and positioned in an accessible area, after installation. If it is not fitted with a plug (direct mains connection) or if the plug is not located in an accessible area, after installation, apply a double pole switch in accordance with standards which assures the complete disconnection of the mains under conditions relating to over-current category III, in accordance with installation instructions.
WARNING!
Before re-connecting the hood circuit to the mains supply and checking the efficient function, always check that the mains cable is correctly assembled.
The hood is provided with a special power cable; if the cable is damaged, request a new one from Technical Service.
Mounting
Before beginning installation:
- Check that the product purchased is of a suitable size for the chosen installation area.
- Remove the charcoal (*) filter/s if supplied (see also relative paragraph). This/these is/are to be mounted only if you want to use the hood in the filtering version.
- Check (for transport reasons) that there is no other supplied material inside the hood (e.g. packets with screws ( ), guarantees ( ), etc.), eventually removing them and keeping them.
This hood is designed for fitting in a cabinet or on some other support.
Operation
The hood is fitted with a control panel with aspiration speed selection control and a light switch to control cooking area lights.
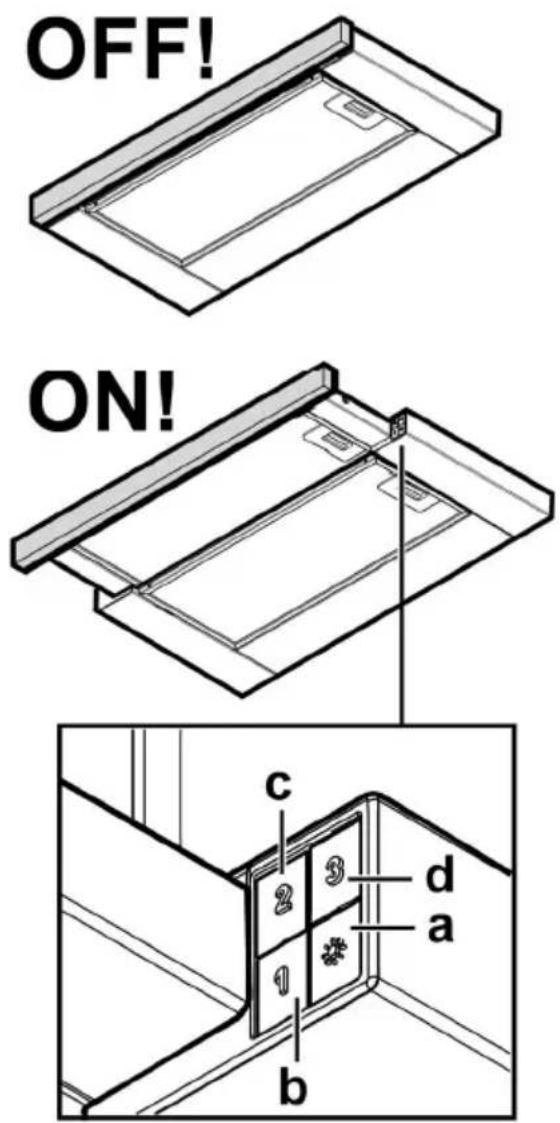
a. ON/OFF light switch b. Speed 1/OFF switch c. 2-speed selection d. 3-speed selection
Maintenance
Cleaning
Clean using ONLY the cloth dampened with neutral liquid detergent. DO NOT CLEAN WITH TOOLS OR INSTRUMENTS. Do not use abrasive products. DO NOT USE ALCOHOL!
Grease filter
Fig. 10-21
Traps cooking grease particles.
The grease filter must be cleaned once a month using non-aggressive detergents, either by hand or in the dishwasher, which must be set to a low temperature and a short cycle. When washed in a dishwasher, the grease filter may discolor slightly, but this does not affect its filtering capacity.
To remove the grease filter, pull the spring release handle.
Charcoal filter (filter version only)
Fig. 20
It absorbs unpleasant odors caused by cooking.
The saturation of the charcoal filter occurs after more or less prolonged use, depending on the type of cooking and the regularity of cleaning of the grease filter.
In any case it is necessary to replace the cartridge at least every four months.
The charcoal filter may NOT be washed or regenerated.
Remove the grease filters.
Apply one charcoal filter on each side and hook it onto the hood. Refit the grease filter.
Replacing lamps
Disconnect the appliance from the electricity.
Warning! Prior to touching the light bulbs, ensure they are cooled down.
Extract the drawer completely.
Remove the suction grill to access the lamp area.
Remove the damaged light and replace it with a new one (see the table below):
| Lamp | Power (W) | Socket | |
| 3 | E14 | ||
| Voltage (V) | Dimension (mm) | ||
| 230 | 55 (Light Center Length) | ||
| ILCOS D Code (according IEC 61231) | |||
| DRGSB/C/UB-3/27/1B-230-E14-55 | |||
Put the grill back.
If the lights do not work, make sure that the lamps are fitted properly into their housings before you call for technical assistance.
Extract the drawer completely.
Attention! Make sure the lamps are cold.
Remove the lamp cover.
Application of the corresponding measurement of the (indicated value of the scale):
Clean the grease filter regularly.
Only use neutral detergents. It is not recommended to use the dishwasher for the filter.
If the grease filter is not cleaned, it may become clogged, but this does not affect its filtering capacity.
To remove the grease filter, press the handle with the spring mechanism.
Active charcoal filter (only for filtering version)
Item no. 20
The instructions for use must be followed when operating.
The active carbon filter becomes saturated after approximately one year of use, depending on the type of cooking and how often the filter is cleaned.
In any case, it is necessary to replace the active carbon filter every four months or when the filter indicator shows that it is necessary.
It cannot be reused.
Remove the grease filter.
Place one active carbon filter on each side of the aspirator and secure them.
Reinstall the grease filter.
Replacing the halogen lamp
Disconnect the appliance from the power supply.
Warning! Before handling the halogen lamp, check that it has cooled down.
Remove the lamp cover frame.
To access the lamp, remove the aspirator grille.
Remove the damaged lamp and replace it with a new one (consult the table below):
| Лампа | Мошноct (W) | Контукт | |
| 3 | E14 | ||
| Напlexени (V) | Разmersр (mm) | ||
| 230 | 55 (Дължина на Чeнтыр на Светлина) | ||
| Код ILCOS D (B сьответостбVE c IEC 61231) | |||
| DRGSB/C/UB-3/27/1B-230-E14-55 | |||
Reinstall the grille.
If the hooks are not lit, check that they are installed correctly before contacting a specialist.
RO - Installation and use instructions
Parts of the extractor heater.
Do not connect the appliance to the electrical power supply until the installation is completely finished.
As regards technical and safety measures for the discharge of vapors, strictly follow the regulations provided by local competent authorities. - The extracted air must not be discharged into a flue used for exhaust fumes from appliances burning gas or other fuels. - Do not use or leave the extractor without correctly installed grilles, with the risk of electric shock. - Never use the extractor without the correctly installed grille! - The extractor must never be used as a support surface, unless specified in the manual. - Use only screws for fixing supplied with the product for installation or, if not supplied, check the correct type of screws. - Use the correct screw length indicated in the installation guide. In case of doubt, consult an authorized service center or qualified personnel.
WARNING!
- Failure to install the screws or fixing devices in accordance with these instructions may result in electrical hazards. Do not use the device with a programmer, timer, separate remote control, or any other device that switches on automatically.
This product is marked in accordance with European Directive 2012/19/EC on waste electrical and electronic equipment (WEEE).
By ensuring proper disposal of this product, you will help prevent potential negative consequences for the environment and human health.

The symbol on the product or on its packaging indicates that this product cannot be treated as household waste. Instead, it should be handed over to the appropriate collection point for the recycling of electrical and electronic equipment.
Disposal of this product must be carried out in accordance with local regulations on waste disposal. For more detailed information on the treatment, recovery, and recycling of this product,
please contact your local city office, your household waste disposal service, or the shop where you purchased the product.
The device has been designed, tested, and manufactured in accordance with:
- Safety: EN/IEC 60335-1; EN/IEC 60335-2-31, EN/IEC 62233.
- Performance characteristics: EN/IEC 61591; ISO 5167-1; ISO 5167-3; ISO 5168; EN/IEC 60704-1; EN/IEC 60704-2-13; EN/IEC 60704-3; ISO 3741; EN 50564; IEC 62301.
- EMC: EN 55014-1; CISPR 14-1; EN 55014-2; CISPR 14-2; EN/IEC 61000-3-2; EN/IEC 61000-3-3. To reduce the impact on the environment: turn on the hood at minimum speed when you start cooking and leave it running for a few minutes after you finish cooking. Increase speed only in case of large amounts of smoke and steam, and resort to higher speeds only in extreme situations. Replace the charcoal filters when necessary to maintain good odor reduction efficiency. Clean the grease filters when necessary to maintain good grease filter efficiency. Use the maximum diameter of the duct system, as indicated in this manual, to optimize efficiency and minimize noise.
Operation
The hood is designed for use in extraction mode (air exhaust to the outside) or in recirculation mode (air recirculation).

Using the extraction mode
In this mode, vapors are discharged outside through the exhaust pipe, connected to the connecting ring.
WARNING!
The exhaust pipe is not supplied and must be purchased separately.
The diameter of the exhaust pipe must match the diameter of the connecting ring.
WARNING!
If the hood is equipped with a charcoal filter, remove it.
Connect the hood to the exhaust pipe with a diameter corresponding to the air outlet opening (connecting flange).
Use a pipe with the minimum necessary length. Use a pipe with the fewest bends (maximum bend angle: 90°).
Avoid sharp changes in the pipe cross-section.
WARNING! If the hood is equipped with a charcoal filter, remove it.

Use in recirculation mode
The hood is designed to be used with a charcoal filter, which is available from your distributor. The exhaust air is purified and deodorized before it is returned to the room through the top grille.
Warning! If the hood is not supplied with a charcoal filter, install one before use.
Installation
The distance between the lower edge of the hood and the hob surface must be at least 50 cm for electric hobs, and at least 65 cm for gas or combination hobs.
If the installation instructions for the gas hob specify a greater distance, follow that.

Electrical connection
The voltage must correspond to the voltage indicated on the technical data plate located inside the appliance. If the hood is fitted with a plug, connect the plug to a suitable socket. The socket must comply with current regulations and be located in an accessible place. The socket can be switched on after installation. If the hood is not fitted with a plug (direct connection to the mains), or if the socket is not accessible after installation, use an approved two-pole switch that ensures complete disconnection from the mains under overvoltage category III, in accordance with installation instructions.

Warning!
Before connecting the electrical system of the hood to the power supply and checking its correct functioning, make sure that the power cable is correctly installed.
The hood has a special power cable; in case of damage, it must be ordered from the technical service department.
Installation
Before starting installation:
Check that the dimensions of the hood you purchased are suitable for the chosen installation location. - Remove the charcoal filters, if present (see the relevant section). Filters are installed only if you intend to use the hood in recirculation mode. Check that no objects have been left inside the hood during transport.
If any (e.g., bags of screws, warranty documents, etc.) are present, remove them and keep them.
The hood is attached to the kitchen cabinet or another piece of furniture that holds it.
Operation
The hood is equipped with a control panel for controlling the fan speed and switching on the work surface lighting.
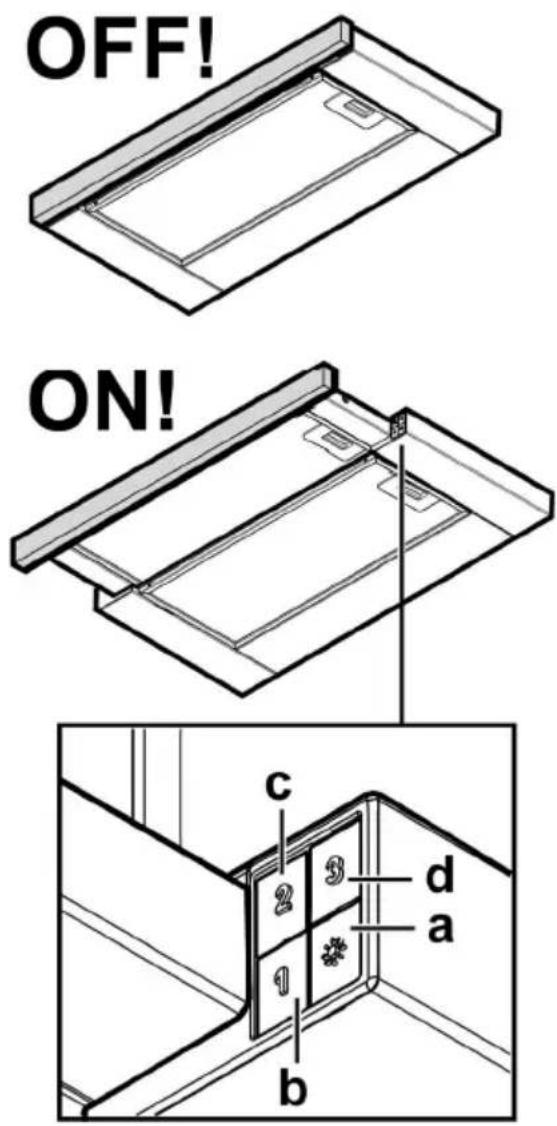
a. Lighting switch ON/OFF. b. Switch OFF/SPEED 1 c. Speed selector 2 d. Speed selector 3
Care
Cleaning
For cleaning, use only a special cloth moistened with a neutral liquid detergent. Do not use any instruments for cleaning. Do not use products containing abrasive materials. DO NOT USE ALCOHOL!
Grease filters
Fig. 10-21
They retain grease particles coming from cooking.
The filters should be cleaned monthly with non-abrasive detergents, by hand or in the dishwasher at low temperature and in an economical cycle.
Washing in the dishwasher may cause some discoloration of the grease filter, but its filtering characteristics remain absolutely unchanged.
To remove the grease filter, pull the spring-loaded handle towards you and detach the filter.
Charcoal filter (only in recirculation mode)
Fig. 20
YdaanrHn HnpnTHbIe 3aaxn KxHn.
HacbIeHne yroJIbHorO fIbItpa IpoIcxOAnIT no nCTeUHn 6oJIe Hn MeHee dIITeJIbHorO nepNoa 3KcNpyatauH, npedonpepeJemero TINOM KxHN N nepNOdUnHocTbIO OuchTKn XnpOBbIX fIbItpoB. B JIObOM cLyuae, 3aMeHnTe KapTpIqN NO KpaIHeMpe Upe3 KaXDbIe 4 Mecra.
YrOJIbHbI ΦnJIbTp HE nOДIeKHT MoIKe IIN pereHepaIIN.
CHIMMTE XNPOBOI QINbTp.
YCTaHOBnTe yrOJIbHbI ΦmIbTp Ha KaJyU CTOpOHy I POnDBecbTe eR K BbITJxKe.
YcTaHOBnTe MeTaNJIuYeCKNe QINbTpbl.
3aMeHa JAmn
OTKJIIOHTe np60p OT 3NEKTPOCeTn.
BhImaHne!IpeKJe Yem npKaCaTbcra K Iamnam y6eNTecb B TOM, UTO OHN OCTblnn.
PONHOCTbIO BBiHbTe BbIDBnKHyIO NaHeJIb.
CHMNTe BbITXKHyIO peWETKy, YTO6bl IMEt b DoCTyn K JAMNOUcKAM NOcBETKn.
BbIpyTne NOBpeKdEHHyIO nAmny n 3aMeHnTe ee HOBO (cM. npBedeHHyo HnKe Ta6nucy).
| Лампа | Мошность (BТ) | Цокль | |
| 3 | E14 | ||
| Наръжени (B) | Размер (MM) | ||
| 230 | 55 (ВыICOTa СВЕТОВОТо цHTра) | ||
| КоД ILCOS D (no систeme IEC 61231) | |||
| DRGSB/C/UB-3/27/1B-230-E14-55 | |||
YcTaHOBtBe BHOBB XINPOBBIE 0nIbTpbl NIN BbITKHyIO peWetKy.
Ecnn cnCTema noCBetKn He pa6oTaet, npOBepbTe KoppeKTHoCTb yCTaHOBKn Iamn B rHe3dax, npEeJe Yem 6paTntbcraB CEHTp TEXHueckoi NOMOUI.
Yitko doTpmyTece npBedeHx B daHOMy KepiBnU Tbi ihctpykui. Bnpo6hNk 3Himae 3 ce6e 6ydb-ky BiDnobidanbHicTb 3a HecnpabHocTi, 36ntkn a60 noXeky, 10 MoKe MaTn MicCe npn BnKOpNCtAHHi npncTroO BHaCNIOK HeBnKOHaHHI hCtpykui, npBedeHx B daHOMy KepiBnU Tbi. BnJHKn KObnak CnpoeKTOBaHn DnR BCMOKTyBaHHr dMMy Ta napy, 10 yTBOpHOCTbcN iD qac npriOTyBaHH IKi Ta npn3HaueHn LiWe dN rno6yTOBOr BOkOpNCtAHH..
Keep these instructions for future reference. In case of sale, before handing over the device, make sure that the instructions are together with the product. - Carefully read the instructions: they contain important information on installation, use, and safety. It is forbidden to use electric or mechanical devices in ventilation ducts. - Before starting installation, check that all components are free of defects and not damaged. Otherwise, contact the point of sale and stop the installation.
Note: Parts marked with an asterisk (*) are optional accessories and are supplied only with certain models, or are parts that are not included in the kit and need to be purchased separately.

Safety warnings
Before starting any cleaning or maintenance operation, disconnect the appliance from the electrical supply by unplugging it from the socket or switching off the main switch of the room.
-For all installation and maintenance operations, use work gloves. -The appliance can be used by children aged 8 and above and by persons with reduced physical, sensory or mental capabilities, or lack of experience and knowledge, if they are supervised or have been instructed on the safe use of the appliance and understand the hazards involved.
the dangers.
-Children must be supervised and must not play with the appliance. Cleaning and maintenance must not be performed by children without supervision. -The appliance must have sufficient ventilation when used together with other appliances that operate on gas or other fuels. The appliance must be cleaned frequently, both inside and outside (at least once a month), following the instructions in the maintenance manual. Failure to follow cleaning instructions and replacement of filters increases the risk of fire. It is strictly forbidden to cook over an open flame with the appliance. -For lamp replacement, use only the lamps specified in the maintenance/replacement section of the manual.
Using an open flame is dangerous and can cause fire, so it must be avoided in any case.
Installation must be carried out by qualified personnel to avoid fire hazards.
WARNING: When the hot surface is working, accessible parts may become hot.
Do not connect the appliance to the electrical grid until installation is fully completed.
- Regarding technical and safety measures for the use of the appliance, the standards of local competent authorities must be strictly followed.
- Do not use or operate the hood without correctly installed lamps with a risk of electric shock. Never use the hood without correctly installed grille! The hood must never be used against a surface, unless explicitly stated. Use the screws for fixing the hood with the product installation kit, supplied in the kit, and purchase screws of the correct type. Use the correct length of screws as indicated in the installation instructions.
- In case of doubt, consult an authorized service center or qualified personnel.
WARNING!
Improper installation of screws and devices for fixing in accordance with these instructions may lead to risks of electric origin. Do not use with a programmer, timer, separate remote control or any other device that turns on automatically.
This product is marked in accordance with European Directive 2012/19/EC, waste electrical and electronic equipment (WEEE). By ensuring proper disposal of this product, you will help prevent potential negative consequences for the environment and human health, which could otherwise be caused by inappropriate waste handling.

The symbol on the product or on its accompanying documentation indicates that this product must not be treated as household waste. It must be handed over to the appropriate collection point for the recycling of electrical and electronic equipment. Disposal must be carried out in accordance with local regulations for waste disposal. For more detailed information about the treatment, recovery and recycling of this product, please contact your local city office, your household waste disposal service or the shop where you purchased the product.
This product has been designed, tested and manufactured in accordance with:
- Safety: EN/IEC 60335-1; EN/IEC 60335-2-31, EN/IEC 62233.
- Performance: EN/IEC 61591; ISO 5167-1; ISO 5167-3; ISO 5168; EN/IEC 60704-1; EN/IEC 60704-2-13; EN/IEC 60704-3; ISO 3741; EN 50564; IEC 62301. EMC: EN55014-1; CISPR 14-1; EN55014-2; CISPR 14-2; EN/IEC61000-3-2; EN/IEC61000-3-3. Advice for correct use and environmental protection: Switch on the hood at minimum speed before starting to cook, and leave it running for a few minutes after finishing cooking. Increase the speed only in case of large amounts of smoke and steam, and use the boost function only in extreme cases. To maintain high efficiency of odor extraction, replace the charcoal filter(s) when necessary. To maintain high efficiency of the grease filter, clean the grease filter(s) when necessary. Use the maximum diameter of the ducting system as indicated in the instructions for optimal efficiency and minimal noise.
Use
The hood is designed for use in extraction mode, exhausting air outside, or in recirculation mode with recirculation of air.

Extraction version
Fill the oil tank through the drain pipe closed with a cap.
WARNING!
The drain pipe is not supplied, so it must be purchased separately.
The diameter of the drain pipe must match the diameter of the connecting ring.
WARNING!
If the exhaust hood has filters, they must be removed.
Attach the hood to the exhaust pipe and exhaust outlet with the same outlet diameter (connection limits).
Use the shortest possible exhaust duct. Use an exhaust duct with the minimum number of bends (maximum bend angle: 90°). Avoid sharp changes in the cross-section of the duct.
WARNING! If the exhaust is equipped with a carbon filter, it must be removed.

Version with filtration
Insert the plug into the electrical outlet and it will return to operation. To use the hood in this mode, it is necessary
to install a filter system with activated carbon.
WARNING! If the exhaust is not equipped with a carbon filter, install it before use.
Installation
The distance from the lower part of the exhaust hood to the cooking surface must be at least 50 cm for electric cookers, and 65 cm for gas and combination cookers.
Please take into account the heights indicated in the installation instructions.

Connecting to the electrical network
The voltage in the electrical network must comply with the characteristics indicated on the label located inside the product. If the kit includes a plug for connecting to the electrical network, connect the plug to a socket that complies with current standards and is located in an accessible place, which can be done after installation. If the plug is not included in the kit (direct connection to the electrical network) or the socket is not in an accessible place, also after installation, install a reliable bipolar switch that ensures complete disconnection from the network under overload conditions of category III, in full compliance with installation rules.

ATTENTION!
Before connecting the plug to the electrical network, check the correct operation, making sure that the network is installed correctly.
The power cord has a special grounding wire; in case of damage to the wire, contact the technical service.
Installation
Before installation:
- Check that the dimensions of the product you purchased are suitable for the chosen installation location. Remove the filter(s) if present (see also the relevant section). Reinstall the filter(s) if you intend to use the hood in recirculation mode. Check that no objects have been left inside the hood during transport (e.g., screws, bags with screws, warranty cards, etc.), and if so, remove them and keep them.
This hood must be installed on a wall element or other support system.
Operation
The hood is equipped with a control panel for suction speed and lighting control for the cooking surface.
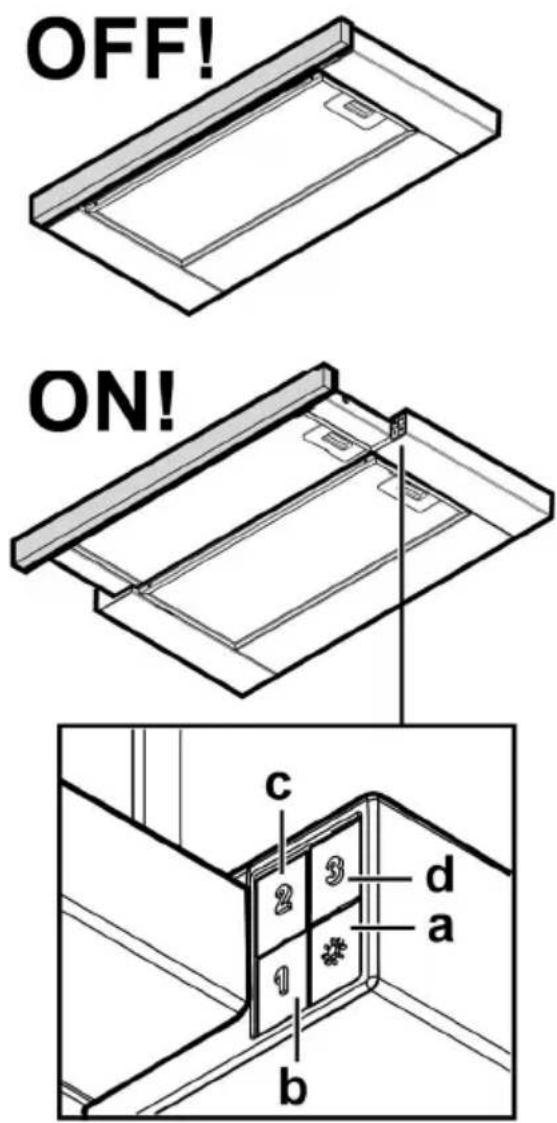
a. Light switch ON/OFF. b. Switch OFF/Speed 1 c. Speed selector 2 d. Speed selector 3
Then
Cleaning
Do not use special napkins, soaked in neutral detergent. Do not use detergents or instruments for cleaning!
Do not use detergents or abrasive materials. Do not use spray!
Grease filter
Fig. 10-21
Grease filters should be cleaned when they appear during cooking.
Clean thoroughly with a soft cloth, mild detergents, by hand or in the dishwasher at low temperature and with a short cycle.
When washing in the dishwasher, the metal grease filter may lose its color, but its characteristics with proper care do not change.
To remove the grease filter, pull the handle towards you.
Charcoal filter (only in recirculation mode) Fig. 20
Absorbs unpleasant kitchen odors.
Checking the charcoal filter for saturation is carried out after a shorter period of use depending on the type of kitchen and the regulation of the grease filter. In any case, it is necessary to replace the filter at least every two months.
Do not wash or regenerate.
Remove the grease filter.
Attach the charcoal filter to each side and
fix it until it clicks.
Install the filter.
Replacing the lamp
Install the device into the electrical outlet.
Warning! Before replacing the lamp, it is necessary to disconnect from the power supply.
Pull the plug completely out of the socket
to access the lamp compartment.
Pull out the lamp and replace it with a new one (see table below):
They are available in the following versions
(1) 100 W
(90° high beam) spotlight
1

- Since the area of triangle AOB is 1/2 * OB * AB = 1/2 * CD * 3
-2-EN/IEC 60335:1-EN/IEC 60335: 品 _ 一 J EN/IEC 62233,31
ISO;1-EN/IEC61591;ISO5167
EN/IEC;1-ISO 5168; EN/IEC 60704;3-5167
ISO 3741; EN;3-EN/IEC 60704;13-2-60704
.50564; IEC 62301
EN 55014-1; CISPR:((s)E) EMC
14-1; EN 55014-2; CISPR 14-2; EN/IEC 61000-
jL 3-2;EN/IEC61000-3-3

LIB0137581A Ed. 12/17
- EN - INSTRUCTION ON MOUNTING AND USE
- CAUTION
- WARNING
- USE
- EXTRACTION VERSION
- A
- FILTRATION VERSION
- INSTALLATION
- ELECTRICAL CONNECTION
- MOUNTING
- BEFORE BEGINNING INSTALLATION
- OPERATION
- MAINTENANCE
- CLEANING
- GREASE FILTER
- CHARCOAL FILTER (FILTER VERSION ONLY)
- REPLACING LAMPS
- ACTIVE CHARCOAL FILTER (ONLY FOR FILTERING VERSION)
- ITEM NO
- REPLACING THE HALOGEN LAMP
- RO - INSTALLATION AND USE INSTRUCTIONS
- PARTS OF THE EXTRACTOR HEATER
- USE IN RECIRCULATION MODE
- BEFORE STARTING INSTALLATION
- CARE
- GREASE FILTERS
- CHARCOAL FILTER (ONLY IN RECIRCULATION MODE)
- AMEHA JAMN
- SAFETY WARNINGS
- VERSION WITH FILTRATION
- CONNECTING TO THE ELECTRICAL NETWORK
- ATTENTION
- BEFORE INSTALLATION
- THEN
- CHARCOAL FILTER (ONLY IN RECIRCULATION MODE) FIG
- REPLACING THE LAMP
- THEY ARE AVAILABLE IN THE FOLLOWING VERSIONS
Brand : ELICA
Model : ELITE 14 PRF0037991B
Category : Range hood