
Bravo 20 S Aquafilter - Vacuum Cleaner THOMAS - Free user manual and instructions
Find the device manual for free Bravo 20 S Aquafilter THOMAS in PDF.
| Product type | Water and dust vacuum cleaner with injection-extraction function |
| Dimensions (L×W×H) | 380 x 380 x 470 mm |
| Empty weight | approx. 7.1 kg |
| Power supply | 220-240 V, 50/60 Hz |
| Power cord length | approx. 5 m |
| Clean water tank capacity | 3.5 L |
| Power consumption | See rating plate on the device |
| Main functions | Dry vacuuming, wet vacuuming, injection-extraction for cleaning carpets, rugs, upholstered furniture and hard floors |
| Filter types | Conical filter, AQUA filter (two parts), textile filter for fine dust, dust bag |
| Safety | Float valve shutting off suction when tank is full; mains disconnection before maintenance |
| Maintenance and cleaning | Empty, clean and dry the tank and filters after each use; never immerse the motor head |
| Supplied accessories | Carpet nozzle, upholstery nozzle, crevice nozzle, carpet and furniture injector-extractor, hard floor adapter, detergent tank, suction hose, tubes, etc. |
| Warranty | 24 months for domestic use, 12 months for commercial use (subject to conditions) |
| After-sales service | Contact the specialized dealer or THOMAS after-sales service |
Frequently Asked Questions - Bravo 20 S Aquafilter THOMAS
User questions about Bravo 20 S Aquafilter THOMAS
0 question about this device. Answer the ones you know or ask your own.
Ask a new question about this device
Download the instructions for your Vacuum Cleaner in PDF format for free! Find your manual Bravo 20 S Aquafilter - THOMAS and take your electronic device back in hand. On this page are published all the documents necessary for the use of your device. Bravo 20 S Aquafilter by THOMAS.
USER MANUAL Bravo 20 S Aquafilter THOMAS
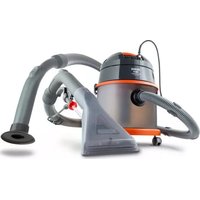
THOMAS BRAVO 20 BRAVO 20 S
AQUAFILTER
Gebrauchsanweisung · Instructions for Use · Mode d'emploi
Gebruiksaanwijing · Hasznalatiutasitas · Manualul deutilizare
PykoOoCTBO no 3KcNpyataunn - IHcTpykui 3 BnkOpncTAHH
| Appliance diagram /Part identification 3/12 | |
| Assembling the Appliance 4/5 | |
| Safety points 12 | |
| For the sake of the environment 13 | |
| Assembling the appliance 13 | |
| Dry vacuuming 13 | |
| Wet vacuuming 15 | |
| Spray extraction (shampooing) 15 | |
| If unexpected difficulties arise 17 | |
| Customer service | 17 |
| Technical data | 17 |
| Guarantee | 54 |
Before operating appliance for the first time

Please read through all of the information below carefully. The information provides important points for the safe use and the maintenance of the appliance. Please keep these operating instructions in a safe place and provide them to the next owner.
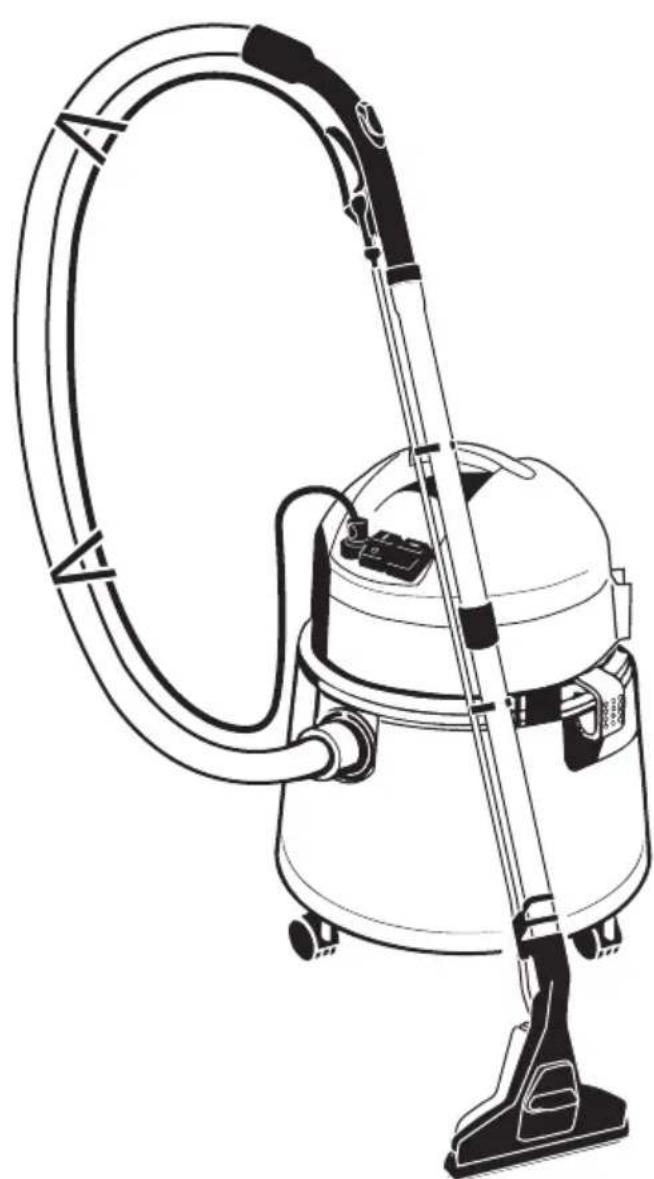
Part identification
| 1 = Collecting bin |
| 2 = Motor block |
| 3 = Snap fastener |
| 4 = Cover wheels |
| 5 = Quick coupling |
| 6 = On/Off switch |
| 7 = On/Off pump switch (illuminated) |
| 8 = Suction socket |
| 9 = Carrying handle |
| 10 = Mains cable |
| 11 = Suction control |
| 12 = Cleaning fluid hose (upper section) |
| 13 = Flexible hose |
| 14 = Suction tubes |
| 15 = Hose clips |
| 16 = Cut-off valve |
| 17 = Carpet spray extraction nozzle |
| 18 = Cleaning fluid hose (lower section) |
| 19 = Upholstery nozzle |
| 20 = Hard floor adapter |
| 21 = Carpet nozzle |
| 22 = Gap nozzle |
| 23 = Upholstery spray extraction nozzle |
| 24 = Cleaning fluid tank |
| 25 = Textile cleaning fluid concentrate (ProTex) |
| 26 = Siphon nozzle* |
| 30 = Taper filter |
| 32 = Stop valve, spray hose and clips |
| 33 = Tissue filter bag |
| 34 = AQUA filter* |
| 35 = Fine particle textile filter* |
| 36 = Suction hose for cleaning fluid |
| 37 = Suction tube |
| 38 = Suction tube - park position |
| 39 = Tube clips* |
* only THOMAS BRAVO 20S Aquafilter

Safety points
- THOMAS BRAVO is intended for household use.
The appliance must not be put into operation if:
the mains cable is damaged
the appliance shows clear signs of damage
the appliance has fallen or been dropped.
-
The voltage data on the appliance's rating plate must conform to the power supply. The nameplate is located on the backside of the appliance.
-
Only connect the appliance to a power socket with a 16A automatic circuit breaker.
-
Do not allow nozzles and tubes (when the appliance is switched on) to come within the proximity of the head - danger for eyes and ears, for example.
-
Do not vacuum noxious substances or corrosive or solvent liquids.
-
Never operate the appliance in rooms where inflammable materials are stored or where gases have formed.
-
Store the appliance and its attachments in a dry, clean and enclosed space.
-
Materials such as petrol, paint thinner and heating oil can form explosive gases or mixtures by being subjected to centrifugal air from the appliance.
-
Never vacuum hot ash or glowing objects.
-
Check before every use to be sure that you have correctly fitted the filters required for the specific application.
-
Do not vacuum toner dust! Toners such as those used in printers and copiers, can be electric conductors! Furthermore, it is possible that the appliance's filter system will not completely filter out toner dust, and in this way it can enter the air supply of the room.
-
Extreme care is required when vacuuming stair carpets with your appliance. Ensure that the vacuum cleaner stands firmly on the step and take care that the flexible hose is not stretched beyond its actual length. When using the vacuum cleaner on stairs, always ensure that you hold the appliance steady with one hand.
-
Do not leave the appliance unattended whilst it is switched on.
Always pull out the plug
-if the appliance malfunctions during operation
before cleaning and maintenance
- after use
when changing the filter.
This appliance can be used by children who are over 8 and by those with reduced physical, sensory or mental capabilities or lacking experience and/or knowledge given that they have been supervised or instructed in the safe use of the appliance and have understood the
resulting dangers. Children must not play with the appliance. Cleaning and user maintenance must not be undertaken by children who are not subject to supervision.
- Never unplug the appliance by pulling at the cable, but only by removing the plug directly from the socket.
- Ensure that the main cable is not exposed to either heat or chemical substances, nor that it is pulled across sharp edges or surfaces.
- Never repair damage to the appliance, to the accessories or to the cable (special cable required); have repairs done only by an authorised customer service station, because modifications to the appliance can pose a risk to your health. Ensure that only original spare parts and accessories are used.
- Do not expose the appliance to the elements, humidity or heating sources.
- Never aim the cleaning jet at people or animals, at electrical sockets or electrical appliances.
Chemicals such as the cleaning fluid concentrates should not be handled by children. - The functionality and complete effectiveness of the appliance can only be warranted if you use original THOMAS cleaning fluids.
- Persons with sensitive skins should avoid direct contact with the cleaning fluid.
- If cleaning fluid comes into contact with mucous membranes (eyes, mouth, etc.), immediately flush with water.
For sake of the environment
Do not just throw away packaging material and worn out appliances!
Appliance packaging:
- The packaging carton can be placed in the waste paper collection bin
- The plastic bag made of polyethylene (PE) should be placed in the appropriate disposal bin for recycling.
Appliance disposal at the end of service life:
- Appliance disposal in accordance with the local regulations but before doing so disconnect and cut off the mains plug.
The symbol on the respective product or its packaging indicates that this product must not be disposed of as household waste. Instead, it should be handed into the collection point for recycling electrical and electronic equipment.
By ensuring the proper disposal of this product, you will help to prevent potential adverse consequences for the environment and human health, which could otherwise be caused by inappropriate disposal of this product.
For more explicit information about recycling of this product, please contact your local town hall, your household waste disposal service or the shop where you purchased the product.
Assembly of castor wheels
A Undo the snap-on fasteners and lift the motor block.
B Push the castor wheels and the pegs into the base of the collecting bin until they snap into place.
Dry vacuuming
THOMAS BRAVO 20
After wet vacuuming, the appliance must be absolutely dry; dry off the flexible hose or tubes if necessary beforehand. Never dry vacuum without filters or with damaged filters.
Remove the cleaning fluid tank.
C Place the taper filter (30) on the underside of the motor head (2). Depending on the model in position 1 or 2 and lock with the rotary clips. In the case of stubborn dirt weak suction power the taper filter (30) can be washed out with clear water without adding washing detergents or cleaning agents. Make
sure that the filter is completely dry when using the vacuum cleaner the next time.
D Press the filter sack on the suction connection firmly and lay it against the wall of the collecting bin.
G Clip the hose for the cleaning fluid to the underside of the motor block.
H Place the motor block on top and secure it by means of snap-on fasteners.
J Connecting the flexible hose. Remove the hose by turning the hose connecting piece and withdrawing the hose.
Assemble the accessories you require. Connect the mains cable.
N Turn the appliance on with the On/Off switch. The pump switch (7) must not light up.
i Suction control (11, figure P) allows you to vary the suction power. Sliding air trap closed = full suction power Sliding air trap open = reduced suction power
THOMAS BRAVO 20S Aquafilter
Never use your AQUAFILTER appliance in dry vacuum mode without the Aquafilter, the fine particle textile filter and an appropriate water level. Do not vacuum up large quantities of particle dust, e.g. flour, cocoa powder, cement, etc.
K Remove the cleaning fluid tank.
E Connect up the two-piece AQUA filter, pushing it together until the two parts fit snugly, and push it firmly onto the suction socket. Note the marker guides! The AQUA filter has to snap into place on the floor of the suction canister and has to lie there evenly. Fill 2 litres of clear water into the collecting bin.
F Hang the fine particle filter in the collecting bin by turning down the top edge.
Clip the suction hose for cleaning fluid to the underside of the motor block.
C Place the taper filter (30) on the underside of the motor head (2). Depending on the model in position 1 or 2 and lock with the rotary clips. In the case of stubborn dirt weak suction power the taper filter (30) can be washed out with clear water without adding washing detergents or cleaning agents. Make sure that the filter is completely dry when using the vacuum cleaner the next time.
H Place the motor block onto the collecting bin and snap shut with snap-on fasteners.
J Connect flexible hose. Remove the hose by turning the hose connecting piece to the side and withdrawing the hose.
Assemble the desired accessories. Connect the mains cable.
N Switch on the appliance with the On/Off (6) switch. The pump switch (7) must not light up.
Suction control (11, figure P) allows you to vary the suction power.
- Sliding air trap closed = full suction power
- Sliding air trap open = reduced suction power
Cleaning and care of the AQUA filter system
For reasons of hygiene, empty, clean and dry the AQUAFILTER system and the collecting bin after each use. Dirty water and damp parts will promote the growth of bacteria and mildew.
Clean the fine particle filter - according to how dirty it is - with a dry or damp cloth. If it is very dirty, clean it out with clear water, without adding any detergents or cleaning fluids. Please make sure that the filter is completely dry before next using the vacuum cleaner.
Wet vacuuming

Step the float valve (40, fig. S) clean and accessible at all times. It automatically interrupts vacuuming when the collecting bin is full.

en vacuoming out containers in which the liquid level is higher than the top of the collecting bin and which have a larger volume than the capacity of the collecting bin, liquid can continue to be vacuumed beyond the capacity of the collecting bin if the float valve is closed.
In such cases, vacuum only in partial amounts and intermittently empty the collecting bin.
Lift the tube and flexible hose out of the liquid first and then turn off the appliance afterwards, in order to prevent an afterflow of liquid.

Open the snap-on fasteners and lift the motor block.

move the filters from the appliance, because they will otherwise be damaged (figures C and D). If your appliance is an AQUAFILTER appliance, remove the AQUA filter and the fine particle filter (figures E and F).
If the cleaning fluid tank is fitted, remove it (figure K).

Place the motor block onto the collecting bin and snap shut with snap-on fasteners.
Connect the mains cable.

Connect flexible hose. Remove the hose by turning the hose connecting piece to the side and withdrawing the hose.

lose the suction power control (11) on the handle.

Switch on the appliance with the On/Off (6) switch. The pump switch (7) must not light up.

er completion of wet vacuuming, please clean and dry the appliance and the accessories used.
Spray extraction

shampoo only carpets which can be cleaned wet.
Fine, hand-woven or non-colour-fast carpets should not be shampoed.
If the carpet has been shampooed before, it is possible that you will obtain a great deal of foam when you use THOMAS BRAVO for the first time.
If this is the case, switch off the appliance and empty the collecting bin.
Thereafter, in order to prevent excess foam, put 12 cup of vinegar into the collecting bin.
Excess foaming will not occur after you have thoroughly cleaned the carpet once with THOMAS cleaning concentrate, because it contains a special anti-foam substance.
Ensure that there is always liquid in the fresh water container when the spraying function is switched on, in order to avoid possible damage to the pump.
Carpet cleaning

Open the snap-on fasteners and lift the motor block.

Remove the lid of the cleaning fluid tank and fill the tank with THOMAS ProTex Cleaning Fluid.
See the bottle label for dosage instructions.
Use only lukewarm (max. 30^ ) water.
Replace the lid and insert the filled cleaning fluid tank into the appliance.

Take the suction hose for cleaning fluid out of its holder on the motor block.

Place the motor block onto the collecting bin such that the suction hose (36) is immersed all the way to the bottom of the cleaning fluid tank and is not bent.

Connect flexible hose. Remove the hose by turning the hose connecting piece to the side and withdrawing the hose.

Attach the retaining clips (15) at regular spaces along the suction hose (13). Then clip the spray hose (18) into the recesses in the retaining clips. Latch the spray lever (16) on the handle. To do this, push the plastic ribs on the spray lever into the recess on the handle. Make sure the spray lever is correctly locked (see marking).

Snap the spray hose (18) into the quick coupling (5) on the motor block.
Fit the carpet spray extraction (17) nozzle onto the suction tube.
Close the spray tube (12) of the spray nozzle using the quick-action coupling on the handle. To do this, hold the free end of the spray tube of the spray nozzle. Place this on the stop valve of the spray lever (16). Lock it by turning the bayonet catch to the right. Fasten the two retaining clips for the spray tube (39) to the telescopic wand. Clip the spray tube into the retaining clips.
Connect the mains cable.
N Switch on the appliance with the On/Off (6) switch. Switch on the pump switch (7).
Press the hook on the cut-off valve (16). Cleaning fluid spray will begin.
Before refilling the cleaning fluid tank, always empty the dirty water from the collecting bin.
Cleaning hard floors
Q Assemble hard floor adapter.
See "Carpet cleaning" procedure.
We recommend THOMAS ProFloor cleaning concentrate for cleaning hard floors.
Cleaning upholstery
For cleaning your upholstery or car seats, please use the upholstery spray extraction nozzle (23).
Take care not to apply too much liquid; depending on the upholstery sublayer, you may experience significant drying times.
R Assemble the upholstery spray extraction nozzle. Fasten the cleaning fluid hose by turning it. Fit the nozzle onto the handle.
Cleaning and care of the spray extraction system
K To care for the pump and valves properly, fill the cleaning fluid tank with clear water and insert it.
Connect the mains cable. Switch on the On/Off switch (6) as well as the pump switch (7).
Operate the spraying system, e.g. over a sink (disengage the hook on the cut-off valve (16)).
Before removing the cleaning fluid hose, engage the hook on the cut-off valve (16, figure P) in order to release the remaining pressure in the system, and then press the key on the quick coupling (5).
Remove mains cable!
Afterwards, clean and dry the appliance and the accessories you have used.
Never immerse the motor block in water!
Clean the motor block casing with a damp cloth and wipe dry.
Important tips
When wet vacuuming, always vacuum by drawing the carpet spray nozzle in straight parallel strokes across the surface towards you.
In order to avoid soiling the carpet again, you should not walk on shampooed carpets until they have dried.
i In order to achieve quicker drying of shampooed surfaces, it is helpful to remove residual liquid remaining in the carpet by vacuuming it again - without engaging the valve hook.
When cleaning parquet floors, please observe the instructions of the parquet floor manufacturer.
If unexpected difficulties arise
If your appliance does not operate to your satisfaction, you do not have to contact customer service straight away. Please check first as to whether the fault is due one of the following minor causes:
Dust escaping from suction sockets:
- Has the filter system been fitted in accordance with the instructions?
- Has an original THOMAS filter been used?
Gradual reduction in suction power:
- Are the pores of the tissue filter clogged up by dust or soot?
- Is the collecting bin full?
- Is there a blockage in the nozzle, extension tube or flexible hose?/Stretch the flexible hose while the appliance is switched on - this will loosen the obstruction.)
Water is coming out of the air expulsion openings of the appliance during vacuuming:
Is the float (figure S) blocked when vacuuming liquid and unable to operate?
- Was original THOMAS cleaning concentrate used for shampooing?
- Have AQUAFILTER and fine particle textile filter (according to model) been fitted according to the instructions?
Sudden reduction in suction power
- Has the float stopped the flow of air? This can happen if the appliance is standing at a slant or if the appliance falls over. Turn off the vacuum cleaner - the float will fall back into place - the appliance is ready for use again.
The motor does not function:
- Is there damage to the mains cable, plug or socket?
- Pull out the plug before checking.
- Never open the motor yourself!
No cleaning fluid is coming out:
- Is the pump switched on (switch (7) has to light up)?
- Clean the filter catch on the suction hose (36).
- Has the suction hose been correctly fitted in the cleaning fluid tank?
- Is the spray nozzle clogged? If the spray nozzle becomes clogged, lay the nozzle into water for a while and then blow strongly through it.
Customer Service:
Ask your dealer for the address or telephone number of your nearest THOMAS Customer Service.
Specify your model number and type when contacting your dealer - you will find these details on the rating plate.
To maintain the safety of your appliance, you should have repairs, especially on live parts, carried out by a trained electrician only. In the event of a fault, you should therefore approach your dealer or the THOMAS Customer Service directly.
Contact details are on the reverse side.
Technical data
| BRAVO 20 | BRAVO 20 S AQUAFILTER | |
| Type designation | 786/B | |
| Power supply | 220-240 V, 50/60 Hz | |
| Power consumption see nameplate | ||
| Power cord length (diameter) approx. .5 m | ||
| Appliance dimensions (L×W×H) | 380 x 380 x 470 mm | |
| Appliance weight, empty approx. .7 kg | approx. 7,1 kg | |
| Capacity of fresh water tank | 3,5 l | |
38 = noLoxHeHne "3anapKOBaHHo" BCacbIbAIOue Tpy6bl
39 = py6hble npyXHHbIe 3aXmbl
*)=TolbokdmaMoedTHOMAS BRAVO 20 S Aquafilter
Yka3aHnnoTexHnke6e3onacchoCTn
- IIbIeoc THOMAS BRAVO cnyxHt NcKNoHTeJIbHO dIgNcNoJIb3OBAHnB B DOMUHEm Xo3aYCTBe M DoJXeH O6CnykHBtbcr.
- Hn B KOem Cnyae He noJIb3OBAIbCp np6Opom, ecn:
-HeincpaBEn 3neKtpKa6ebb,
IIMEIOCTOeBnHbIe HcnpBaHOCTN,
-BbI HeaHHO yponnn npn6op.
HapxHe, yka3aHHO Ha 3abOcKo TbMnUKe np60pa, DIOJXHO COOTBETCTBOBAtb HApxHeHIO NITAOuEe CETn. HmHHaTbMnUkpaCpnoLoXeHa Ha 3dHe nnaHn YcTpoiCTBa.
- PnncoeHnHnTe npnbop TOnbKO K cTeBcO p03eTKe, KOtOpO 3aunueHa aBToMaTHuCeKm npeDoXpaHnteJeM Ha 16 A.
Hocdkn Tpy6kn npn BknoeHHOM np6ope He doJXhbl HoxoDntbCBAOIN3 rOIOBbl, TAK KAK HHOAE IMEETcR OAOCHCTb paHeHnA,OCo6EHORO rOa3 m ywei.
- PnpbOp He npirodeH dIy BCocbHaHn OAnChbIX IIN 3DopOBb, EKnx N coepxuux pactbopntel BceCTB.
- Pnp6op He doJXeH 3KcNpyATnPOBaTbC B NOMeUeHnx, B KOTOpbIX XpaHbC4 orHeONocBHe BeueCTBa Mnn O6pa3OBaIncb Ra3bl.
XpaHnTe np6op n ero npHnAeXHoCTn B cyxOM, NCTOM 3akpyTOM NOMEueHN.
BeueCTBa, KaK 6eH3nH, PAcTBOpHTeIN KpocOK N KOTenbHOe MACNo, MOyT npN Typ6yIn3aUIN C BCaCbIAEbIM BO3DyXOM 06pa3OBbBATb B3pbIOONACHBie Napblnn CMEcN.
HkoRaHeBCaBaiTeTopyUO30JyNnPiNpackaJIeHbIe npEmaTb.
- Ipea Kaxdbim NcnoB3OBAHmep np6opa npoBepbte, npabNbHO nn Hocxehbl He06xOIMMbIe 1nbltpbl.
HkoRa He BcBbAaTe paccBnabWnCkpcaaNn npoWok, KOtob NcNoIb3yETc, HAnpMep, B neaTHbIX yCTpoNCTBax N KOnPiobBaIbHbIX np6opax, MoXeT 6bIt bNeKtponpOIMbIM! Kpome TOrO, KpaCaNn npoWOk MoXeT He nONHO tOfHnbTpOBbIBaTbCnCTeMoN fHbTpOB nbIEcoCA nTAkMm O6pa3OM CHOBA nonaet B BO3dY NOMEuEHn.
- Pn y6opke IecTHHtTre6yetc0c06a octopoxhoctb. Bbl doJXhbl o6ecneHTb DOCTATOHO yCTOuHBOe NOLOXHe nPn6bpap. ⅢnHr He DoJxeh PoCTARHBATBCs 6Oone CBOe N3HaayabHOn DInHb. Bcerda npndepKNaBte np6bp odHOn pyko.
- HnKorda He octobraite 6e3 npncmoTa pa6oTaounn np6op
B Bo3pacte ot 8 let n cTapwe, a
TAKXe Jnua Co CHNXeHHbIMN 03NueCKMn,
CEHCOPHBIMN NIN MEHTaJIbHbIMN CnOCOBHOCTAMN,
JIb6O He 06IaIauoIe IocToaTOHbIM OIbITOM
N (n) 3HaHnA M, MOrY T NOJb3OBaTbcra
3TMM PbJIeCOCOM Pn TOM YcIOBm, YTO
OHn pa6OtaOT NOD npNCMOTpOM nIN 6bln
PpOHCTpyKTIPOBaHbI O 6e3OAnChOM ObpaUeHN
C pN6OpOM N OCO3HaJI CNB3aHHbIE C eRO
NCNoJIb3OBaHHeM ONaCHOCTN. Nrpatb c np6Opom
DeTAM 3aNPeUeHo. 3aHIMATbCry ONUCTKO
n 06cIyXuBaHHeM np6opa DeTAM 6e3
npncMOtpa 3aNPeUeHo.
3NeKtpoKa6eJb CnEyET OTKInOHTb OT cETH:
- npn nomexox BO Bpemra 60tbl,
- nepei KaXdoN UcTko N yXoDM,
IIOCLIENCNIOJIb3OBOHIN
- npn kaxdoi cmhe fnbtpa.
- Пи OTКлючим OT cetn HNKoIa He TAHnte 3a Ko6eIb, a TOnbKO 30 WTeNCEJIbHyIO BUNKy.
CneIe 3a Tem, TTo6bI 3JIeKtpokabeb npH6opa He noDBepran CBO3deICTBnIO NOBblHEHHbIX TEMpepatyp IN XMMUeCKNX KmIKoCTe, a TAKKe HE NepetraBcA qEe3 OcTpble Kpa JIN NOBepxHOCTN.
HkoIHa He pemOHnpuYte Camn HncnpaBHOCTn np6oPa, npHnADJIeXHoCTe nn 3JekTpoka6eY (Tpe6yETcOco6a npOBoka), a npedocabJte 3TO dNAtb TOnbKO MaCTepam yNoHMOueHHo Mactepckoi n O6CnyxHBAnIO KInHeTOB, NotOMy tTO n3MeHnHa Ha np6ope mOryt co3dABatb Yrpo3y BaWEMy 3IopobBu. CneIte 3a TeM,HTo6bl NcNoIb30BaJIncb TOnbKO opRnHnAbHbIe 3aHAcTHn INpHnADJIeXHOCTn.
He noDBeprAte np6op BO3eICTBnM nOOrNbIX ycNobu, Bnarn N IcTOHKnOB TeNIOBOro n3JyueHn. - HNKOrJa npn YnCTKe He HAnpOaBnaIte CtpyIO Ha JIoDeI nn XnBOThbIX, 3NeKTpopo3eTKN nn 3NeKTppon6opbl.
XMMKATb, KAK KOHcHTpaTb MOIOx CpeCTB, He DOJXHbI nonaTaB B pyKn DeTAM.
ToIbko npn HcnoB3OBAHnn opnHnHbHbIX MOUux CpeCTB
fnpMb THOMAS MoKet 6bItb oecneueHa yHKmHOaHbHOctb
Pn60pa n noHna MOuHOCTb BCacsbAHnn. - JIua c BocnpnMmHbON KOxEi DJIJXHbI H36eAtb npAmoro KOHTAKTa C pACTBOPOM MOUeero CpndTba.
- Ecnn MoIoum KOnuHETpAT nonaet Ha cnN3nCTbIe o6oNoKn (rna3a, pot n T. n.), to 3TN MecTa cneDyET cpa3y npomblb BDOJ.
Pdni okpyxaioe cyedbl
He bIbpaBbAte npocTo TAK yNakOBoHbM MATEpMaI N OTCnyKMBwne npnbopbl!
Ynakobka:
- YnakoobHbIKAPToH MoXHO cTaB B MaKyIaTpy;
- Паметилелену (PE) садаite B сборный nyHк дяперабotkn.
YtJn3aun npH6opa no okOHuaHH cpoKa cIyX6bI:
- YTHIN3Hpyte np6op corgaCHO MeCTHBIM PpeINHCnM, npeBapntelbHO OTe3AB BbIepHyTuO N3 p03eTKN 3NeKTPocETN BUNKy ceTEBOrO shHpa.
3TOT CMMBOI, «NpeueepKHytbMycOpHbI 6aK», Ha H3dennn HnHa erO ynaKOBKe O3HaQeT, YTO c N3dennm CneDyET o6paatbcr He KAK C obblHbIM MycopoM, a Heo6xOIMO CdaBbTe erO Ha c6opHbI nyHKT dIa
yTnH3aunn 3JIeKtpnuecknx n 3JIeKtpoHHbIx npn60pOB.
HadJIexaIeYtINn3aIeN daHHoro n3dIeBb BbBHeCe TcBb BKlad B 3aunTy OkpyXaIOSe Cpebl N 3doOpBb IIOe.
Henpabunbna ytnin3aounco3doet onacnoctb nra okpyxauoie cpebln 3dopobby IIOeI.
JaIbHeIyHnOpMaunO6ytnn3aun DaHHoro 3eJnna
BbMoKTeIOnyUHTbBaWcEM MyHnCnIaIHTe, BΦnpMe oCyIeCTBIAHOuE y BAc y6OpKy MyCopa NIM B MaIa3NHe, rDe Bbl Kynnn DaHHoe n3dJIne.
MOnTAXpyJIeBBbIXpoJINKOB

0tkpoTe 3aannpaioyIO 3aueIky I cHIMnTe rIoBHyIO qactb np6opa.

KpenkoBdabnte pyJIeBbIe poJINuN OCN BdoEKMocN.
CyxoebacbibaHne
THOMAS BRAVO 20

He npEbnapnteHoro npOceca MOKpOBO BCacbBAnH
npn6op DoJnxH 6bTb abcoHOTHO cyxM; npn Heo6xoDmocTn
TAkXe npEbnapTeHbHO cIeMyET npocyunTB uHaH n Tpy6Kn.
Orda He denaTe cyxHy y6Opky C nobpejddHbIM
fNbTpor Wnn 63 Hero.

CHMMITE6aKJnMnMOUoCeropeCTBa.

NcnoB3yIe KOHueckn fNbTp (30) COBMeCTHO 6yMaXbIM nbIe6OpHnKOM. TaKm O6pa3oM Bbl NpLyUHTe HAnLyUWee 3aepxahne nbIIN. 3akpenite KOHueckn fNbTp (30)
HA HIXHEI CTOPOHe rONOBKn MOTopa (2). 3aΦHKnpyTe NOBOPOTbIMN 30XHMOMN B N03.1 Nn2 (3ABNCNT OT MoDenn). B Cnyae CNbHbIX 3aRpa3HeHn Nn npn CHNXeHN KaucctBa y6opKn KOHNecKn FInbTp (30) npomblBaetcra WCTOn BOdo 6e3 Do6abHeHn MOUux CpeCTB. Peped HauJlOM cNeyHOuei y6opKn Y6eINTeCB T TOM, YTO ΦINbTp NIOHOCTBO IpOCox.
D Kpenko Hacadnte MeWok Dnla FmNbtpa Ha BCabBaHounn Wtuep n npnoKte K ctenke pe3epByapa.
G 3aHeknTe BCacbBOUuI WnAHr IJRA MOIOeO cpeCTBa HnXHe CTOpOHe rONOBHO uCTN np6opa.
H Hocadnte rnoOBHyu qactb npnbopa n 3aueJKNHTe 3aepnne 3aueJKN.
J NoCoeHnHTe BocbIbAOuMn IaHaHr. Ira ChTnA NOBEPHNTe ERO B CTOPOHY NOTCOEHNHTe.
MoHTpyyTe XeJaemblpe npHnOJIeXHOCTN. BCTABbTe WtEnceIbHyIO BNlyK BY PO3ETKy.
N BkHIOHTe np6op HxKATHE KHOKN DnB BKIOUHeHr/BBKIOUHeHr (6).BbIKHOHTeJIb HACOc7 He DoJnxH CBETtbcra.
i NOMOUBIO KHOPIKNI peryIINPOBANMA MOUHOCN (11, pnc. P) MOXHO 3MEHHTb MOUHOCTB BC6bBOHNIA.
- 甲6bep DonoHnTeBHoro noDCocBO3dyxo 30KpbT = NOHNO MOuHOCTb BCaCbBAHIN
- Wn6ep DOnONHHTeBHO NOcOCA BO3dyx OTKpyT = NOHJXEHHO MOUHOCTb BCOCBBAHIN
THOMAS BRAVO 20S Aquafilter
Hkoora npn cyxoi y6opke He noIb3yItecB Baunm np6opom Aquafilter 6e3 akBaФиNbItpa, ToHKoUncpeChORo TEKCTMbHoro fNtbpia n COOTBeTCTByHOuee 3anpaBKn BDOi.
He BcabsbAte 6oIbIe NcJIueCTBa ToHKoIncpeChoi nbln, HApP., MyKm, NopoOka KacKa, ZemHa T. n.
K CHaTb 6ak dIra MOHcero cpeCTBa.
E CoctbkoBAtBo ynpo aKBaΦnIbTp, coCTOaH3 2 HcTeH, Kpenko Hocadntb ero Ha BCacbBAHOuHm WtUep.
Pn3TOM CNEJNTe 3a MapKnpOBkoI.
Akaunbtp donxhen 6bItb 30uEKNHY Ha dHe BCacbIbHOoero pe3epByapa n pabHomehpo Jekatb Ha dHe.
3aeneite 2 nIHTpa uHcToB BOdb BO BCaCbBaHOuN 6ak.
F NyTEm NepeKlOdbaHnB BepxHero KpOa NODBeCHTb TOHKoDnCnepChbI TEKCTMbHbI OuBcCsbHOUeM pe3epByape.
G 3aueKHyb Ha HnXHei CToPOHe rOIOBHOJ qACTn np60pa BCacBBOUHmIHOJ mOHOero cpeCTBa.
C NcnoIb3yIte KOHueckn FInIbTp (30) COBMeCTHO C 6ymaxhbIM nbIe6OpHNKOM. TaKMM O6pa3OM Bbl NOJYHTe HAnlyUwee 3aepXaHHe nbl. 3akpeHnte KOHueckn FInIbTp (30) HnHXHe CTPOHE rOIOBKn MToTopa (2). 3aHnKcnpyTe NOBOPoTHbIM 3aXHMAMn B no3. 1nn 2 (3ABNCNT OT MOeJI). B cnyae CNlbHbIX 3aRpa3HeHH nn npn CHHXeHH KAcEcbq y6opkn KOHueckn FInIbTp (30) pOmbBaETc qHCTOn BOdoi 6e3 DoabJIeHHM MoIOxN cxedTB. NpeD hauJOM CNe dyIOeJ y6opkn Y6eINTECB TOM, YTO FInIbTp NOHOCbIO Ipocox.
Hacnntb roOBHyu Yactb np6opa n 3aueKHyt b 3anpaOnne 3oueKn.
J BCTABNTb BCacBBOUHn WIOHr. DnA CHaTHN CNEyET NOBepHyb B CTOPOHy COeINHeHne BCACBBOUHcero WIOHra N BByHTb ERO.
MoTHpyte XeJaeMbIe npHADnEHXoCTN. BcTAbbTe 7tencBHyO BNky 3NeKtpokabeB B po3eKy.
N BkHIOHTe npHOBp HxKATMeM KHOKN IINB KJIIOHcEHn/ BbIKIOHcHn (6).BbIKIOHTeNB HACoC (7) He DoJKeH CBeITbC.
i NOMOUsbHO KhoNk PeryuHPOBaHm MOUHcTn (11, pnc. P) MOXHO N3MeHrTB MOUHcTb BCQcbBOHm.
- 甲6ep DOnOJIHHTeIbHOro NODcOca BO3dyXa 3akpbT = NOHHAR MOUHOCTb BCACBBAHH
- Wn6ep DOnonHInTeIbHOro NoDCocBaO3DyXo OTKpbIT = NOHNXeHHaMOUHOCTb BCaCbIBAHN
Texnuecknyxoa3a cnTeMoN aKBaΦnIbTpα.
IIO TnHHeHueckm npuHHam cHCTemy aKBaHbTpau N BCAbsBaOUsn pe3epByap nocle KaXdoRo HcNoB3OBAHN CNeJyET ONOPOXHHTb, NOUcHTb N IpocuyNTb. Ipr3HaB ODa n MOKpbie Yacth 6laoropnTCTBYOT pa3MHoxEHNo 6akTeprn n rph6KOB.
ToHKoINCnepChbI TEKCTHbHbI ΦHbTp B 30BNCMOCTN OT CTENEHN 3aRpa3HeHH Hxho npotepeb cyoxnn CnerKa BnaxHo CYOKHO. Pnp CNbHom 3aRpa3HeHH erO cIeYET npombl TcHcTOn BOOn Be3 IO6abHeHH MOUux N uHCTaXnx CpeCTB. CpeNTe 3a Tem, YTObI npn cIeDyIOeM nCNOlb3OBAHn FbTp 6bl nONHOCTbIO npocyuhen.
Mokpoe BCacbIBaHne

OnnabKobBknanah (40, pnc. S)doJxeh Bcerda coJePaxtbcB YnCTote N CboOIOHO DBNrAeBcB npoxoe. OH abTomatueckn npepbBaet npoucc BCacbBAHna, ecnn BCacbBAIOUoN 6aK noHbI.
PnBcCabAHnN3 EMKoCTe, yPoBeHb XuKoCTN KOTopbIX HxOaNTcBblwe BepXHeRo KpaBcCabAoUero 6Ka, NObbEM KOTopbIX 60JIbIpepaOyero obEma nbIeococ, npn 3akpbTOM nonJABKObOM Knanahe XuKoCTb MoKeT n DaJe e 3ateKaTb BHyTpB.
B noo6hblx cnuyax cneyet oTcabibatb toIbko no qctramn B npomexytkax onopoxnryt bCacbIBaoum 6ak.
CnOaJN3BLeuH N3 XnKoCTN BCaCbBOHOUyTOpy6ky NnAnH N 3aTeM BbIKLIOHTb npHobp, YTObI npEDOTBPATNTb 3aTEKaHne XnKoCTN.

0TkpbItb 3aOpHbIe 3aUeIKN n ChrTa TOrIOBHyO uCht b npn6pa.

Bneby n3 np6oopa fNbTp, TAK KAK HnOe OH 6ydet nobpejdden (pnc. C u D). B np6obOB c akBaΦnbltpom HxKHO BbHyTb aKBaΦnblTp n ToHkOuNCnepChbI TeKCTnblHbI ΦNbTp (pnc. E u F).
EcIMMOHTIPOBAH6aKdIa MoIOUxxCpeCTB,TOeHO HXHO 3BNEy (PNC.K).

Hacadntb roIOBHyu qactb npnbopa n 3aueKHyt b 3anophie 3aueJKN.

BCTABNTb BCacsbHIOUm UIaHr.IIra CHaTnA cIeDyET NOBepHytB B CTOPOHy CoeIMHeHne BCacsbHOUoEro UIaHra N BbiHytb ERO.

3aKpbItb peryIaTOp moHocTn (11) Ha pyKoIrKe.

BkHIOHTe np6op HAXATmE M KHOKN IIN BKIIIOUeHNs/ BbIKIOUeHNs (6).BbIKIOUaTeIb HacoCa (7) He doJXeH CBETMbC.

CNE OKOHuaHna PPOuecca MOKporo BCacbBaHnnp6Op INcNoJIb3OBaHHbIe qACTN CNeDyET NocHTNb I npocuyNTb.
KCTparnpobAHne c paCnblJeHHem (MOKpoe BCacbIBAHne) KOBPOB N TBePdbIX NOJIOBbIX NOKpbITN

TNTb TOIbKO Te KOBpbl, KOToPbIe npnroDhl Dnla BnXhoY6OpKn.
ToHKne KOBpbI pyHoi pa6oTbI IIN KOBpbC HnPoHHbIMN KpaCKaMn He DoJXHbI NODBepratbc BIAxHOH YIcTe.
EcnKOBep paHee noBepraCn CnPKe c npMHeHnEM WAMnyH,To npN nepbOM nNoIb3ObaHH Nblncoca THOMAS BRAVO MoXET MeTb MeTo 06NJbHOe neHoO6pa3ObaHne.
TOrda npnbop cneayet BbIKIOHHTb N OnopoXHNTb BCacbBaHOUH 6aK.
YTO6bI N36ExaTb DaJIbHeJWeO neHoo6pa3OBaHNia, 06abBte 1/2 YauKu YKCyca BO BCacbBAIOUcN 6ak. NobbIeHHoe neHoo6pa3OBaHNe Oocne Ondopaa3OBo 06uei XmMuecko YnCTKn C npImeHHeMe MOUeero KOHcHTpTa fnpMbI THOMAS uKoJIOnHo, TAK KAc OH coJePKNT cNeuaJIbHbIe BeueCTBO, npEnrTCTByIOUne neHoo6pa3OBaHNIO.
Bo n36exAHne BO3MOxHOro NOBpeXeHnHaCocCa cnEInTe 3a Tem, YTObI npn BkIoUeyHoN yHKuHn opouEHn 6ak Ira CBexeB OBObl Bcerda 6bl HanoJIHeH.
YHCTKA KOBPOB

OtkpbItb 3anophble 3aueJKN n Chatb roJOBHyio qactb np6opa.

Cnryb KpbuKy c 6aka dny MooIeero cpeCTBa n 3aJIITb B 6ak MoIooee cpeCTBO THOMAS ProTex.
D03nPobKa yka3aHa Ha 3TNkTeK6yTbIKN.
HcnoIb3OBaTb TOnbKO CnerKa TennyIO BDOY (MaKc. 30^
Choba Hacadntb KpbIshky N BCTOBHTb B npnbop 6ok dnia MOoJero cpeCTBa.

BbHytB BcAcBbAouuMnIaHr IaMoUeO cpeCTBa n3 KpenneHn Ha roNoBHO uactn np6op.

TolOBHyIO YAcB npnbopa HacaHbT TAKM O6pa3OM, Yo6bl BCaCbBaHOuN mIaHr (36) 6bl NorpyxEHN DO camO rHa 6aKa dIra MOUeero CpeCTBa Hne nepeRn6anC.

Bctabntb Bcacbbaiou m wnaH. nra chra n Cneyet nobepHytb B ctopohy coednHeHne BCacbbaiooero WnaHn M bHytb erO.

3akpenite KInncbl (15) HA BCacbBaoiem WnaHre (13) HA PABHOM PACCTOHN Dpyr OT Dpyra. 3aTeM 3aueKnHTe pacblntelhbln wlnahr (18) B npdeymotpeHHble nIg Hero BbiEMKn B KInncax. 3aΦNKcPOBaTb paCblntelhbln pbuHr HA pykortke (12).ДЯ 3TORBOCTABNTB NpactMacCOBE pe6po HA pACblntelhHom pbuHare B Bblpe3 Ha pykortke. Y6eINTbcB TOM, TTo paCblntelhbln pbuHar 3aΦNKcPOBaH DoJXHBm O6pa3OM (CM.METky).

3aΦnKcnpoBaTb wTyuep wlnHaTn Ira nOdaHm MoIoUe rpeDCTBa (18) B 6bICTpopa3bemHom coedHInTeIe (5) Ha roNoBHO uactn npbopa.

HacnntbHa Bcabibaou ty6y KoBpoByo Hacdkny IopocntelbHorO kctparnoBaHna (17).

PpncoeHNHb paCnblntelHyTO ty6ky (12) Hacdkn DnBnAHOy 600pnNIO KpyKoTKe,NCNOB3y8 b6IcTPOpa3bEmhBIO CoEINHTeB.
Dn3TOO CnEDyET B3r8 CBO6OAnHKOHeu PaCnblntelHoH
TP6Kn HACADKn DnBnAHOy 600pnNIO HAeBero Ha
3aONOpHb KNANOH paCnblntelHoro pbHara (16).3aΦHKcnpOBatb
ero 6aHOHTbIM 3AMKOM, BpaQra 3AMOK BnpAO. 3aKpenTb DBe
KNINCbI DnPaCnblntelHbHO Tpy6Kn (39) HA TeJeCKOnueckO
tpye.BCTABNTb paCnblntelHyTO ty6ky B KNINCbI.
IopKnIOuHTe cTeBcO coeHNHTbHbN Ka6eNb (10).

Haxatb Ha KhoNky BkNooyehn/BykNooyehn (6) Hn noCbeHHy0 KhoNky BkNooyehn Hacocca (7).

Hoxatb pbyar Ha 3anopHom Knanane (16).
TOM paonblnepcr MOoee cpedCTBO.

eXe YEM BHOB6yET 3aONHeH 6ak dna MOIOUero CpeCTBa, BcERda CnBaIte rpa3HyO BOy n3 BCacbIAoUero 6aka.
YHCTKa TBepdIX NOIOBbIX NOKpbITn

MOHTNPOBAtb aanTep Ira TBepbix noIOBbIX nOKpItn. pdoK DeHCTBn yKa3aH B rIabe "UcTka IOBPOB".

YHCTKN TBEPbIX NOOBbIX NOKpbITM Mb peKOMeHyEM NOIb3OBaTbca KOHcHTpATom THOMAS ProFloor.
Ynctka MmKoMbeenn
Дячск BaewmЯгков Me6eHn HnCnEHN ABTomo6nna
MCnoJIb3yTe opocTeBHO-3KCTpKaKUnOHHyH HocdKy IJRA MrgkO
Me6eHn (23).

TeIeNTe 3a TEM, YTObI XNIOKCTN pAcNbJIaIOCb HE CINIWKO MHOrO, TAK KAK B 3ABNCMOCTN OT NODKIAQKN CNEyET CHITATbC4 C60Jee DINTeNBbHbIM BpEmEH NPOCBxAHn.

MOnTHPOBAtb opocntelbHO-3KCTpaKunOHHyo Hacdky dIy MArKoM Me6enn. BkpenTb 7nAnr dIy MoOeero cpeCTBa NOBOPOTm BOKpyr ocN. Hacadntb Hacdky Ha pykoTky.
Ynctka n yxod 3a opocntelbHo-ektpakunhoN cnCTeMoN

ДячNTKN HAcOCA N KlananHOB Cneayet HANOHNHTb YHCTO BDOJ 6aK DЯ MOUeero CpeCTBa H BCTABHTb ERO HA MecTo.
BCTABHTBpo3eTKByBnIKy 3JIeKTPoKa6eJRAHaxaTb HA KNONKY BKNIOUeyHr/BBKNIIOUeyHn (6), a TAKKe HA KNONKY BKNIOUeyHn HAcOca (7).

OpocHTeJIbHyIO ChCTeMy BkJIouyAtb, HAnp., Hau pAKOBHHo (Haxatb pbIyar (16) Ha 3anopHom KJIanahe).

Ipeed otKpenHnem WnHra Ira MoHooero CpeCTBa CHaHao HAO HOXATb PbHr HA 3AnOpHOM KAnOHe (16, PnC. P), YTO6bI PA3PnTb OCTatoHoe DOBHeHne B CNCTeme, 3Atem HOxATb KHONky Ho 6yctpoeJeCTByHOUeM CuenHnHm (5).
OToeMHHTb 3Jektpokabob ot cem! 3aTeM nouchntb n npocuyHtbpnp6op mncnbl30BOHHbIe npHADNEXHOCTN.
Hnkora He norpykaite B Body roJOBHyo qactb np6opa! Kopnyc motopa npotpnte BnXHO cyKOHKO n 3aTEM npocyWITE.
POne3HbI cOBETbl

ON BIAJHOH YNCTKe BCERdI NPOBOIDTe KOBPOBOI paCbIInTeJIbHOH HAcIKOH NO KOBpy NOnOcA 3a NOnOCB HAnpABNeHHK Ce6e.

To6bl BHOBB He 3aONaQKaTb KOBpy, Nocne YnCTKn XoNDtB NoHMM HxHNO ToBko TOrDa, KOrDa OHn YXe NOcOxnn.

O6blIOCTNb6bICTPO NOcBxHnO OuHcHHO NOBepXHOCTN, IMeET CmblTtAUteJIbHO ydaNTb OCTaTOHyHO Bnary NytEM NOBtOPHO BCacBHaHnBe3 HaxMaHnHa HpbYar Klanha.

nHCTKn npKeta Bam cneyet npndepxNBbctcyaKa3aHn N3ROTOBNTeN npKeta.
Pomoupb npn BO3MOxHbIX HEnoJQKAX
EcnB Bau np6op Bonpekn OxndaHnma m pa6oTaet HeydoBJeTbOpTeIbHo, to Bam He hyxho cpa3y o6paatbca B cnjx6by cepBcna. PoXayncto, npOBepbTe cchaJana, He yBnAeTcN n npuHnO HeNCnPabHOCTN KAKOHn6ydb nyctk:
Ecn npn BcacbBaann nbInb Bbictynaet HapyKy:
- PpabnIbHO JIN 3aKpePneHa CnCTema FInbTpOB HET JIN B HeH HenCnpabHocte?
- IcnoJb3yETcra Jn opurHnabHbIe HJbTp HpMbTHOMAS?
Ecm MooHocTh BCacbIBAHnna 3NaHTeJIbNo noHHKeHa:
He 3acopnncb nnpbphiNbtpa ToHKoundpechno nbIbjo?
He nepenonHEn Nm MeoK dJa 6yMaXHoTo ΦnbTa?
He 3acopenbl nI rpa3bIO hAcdaK, Tpy6a nn BcscbBAHOu nn IJnH? (PpN BkIIOHcHOM npNope pactHnte BCscBbAOu nn IJnH, 3TO cnooc6CTByET paCCNa6NeHHIO np6Kn.)
Ecn npn BcacbHaHH N Bbictynaer Boda n3 Bbinyckhblx OTBepctn npbopa:
He 366nokupoboh n np BocbBOHm XndKoCTn nonabok (pnc. S) H He MoXeT cpaBtBAtb?
- NcnoIb3OBAJcR JIN npn MOKPOM BCaCbBAHmOpunHHaJIbHbIMoHOuN KOHcHTpTΦnMbTHOMAS?
EcnBhe3anHO CHH3nJaCb MOuHocTh BCaCbIBAHNA:
He nepekepbI JIN nonnabkoBbI Klanah BcacbBaemb I Bo3dyx?3To MoKET CnyHtbcr npn 3KCTpeMaJIbHOM BEPTNKaJIbHOM nNOJKeHm Hnn npn onpOKuDlbAHm npnbopa. Nblncoc BbIKNoHTb - nonnaBok naaet BnH3 - npnbop cHOba rotob K pa6ote.
Ecmn Motop He pa6oTaer:
BnpaKe nn Ka6eB,StenCebHn BnKa n po3etKa?
- Ipeed npOBepKoBbHytB tTeNCbHyU BnKy n3 po3eTK.
HnKoHa He BCKpbBaIte MOTOPcAm!
Ecn He Bbctynae Moouaag XnKoctb:
BknHoueHnHaoc(7)PiOcBETKaHaKHOkneDOnJXHaCBETNb.
-Почист b cnto BCacbBIOUeTo ΦHbtpa Ha BCacbBIOUeM shanre (36).
- Правильно Ль lexнв BCacbBIOUngm WlaHr B bake Дя моюцero cpeictBa?
He 3acopnacb nn opocntelbna HacaKa? Ecnn 3acopnacb opocntelbna HacaKa, to e e Ha HeKOTOpoe BpemcIeNyet nOmeCTNb B Body. 3aTEM OCHOBATEbHo npOpytB.
CepBnchao CJyX6a
06paaetaecb KaBawemyToprobomynpctabnteHIO,KOTopbI TAKKe OxOTHo npedocABNT Bam aDpeCa HmHomepa TelefoHOB OTBeCTBEHHOnIgBa cepBuchoh cnYk6bI hPmbl THOMAS.
Ioxaanynta, npn 3tOM Bcerda coo6uaine daHHbIe, yka3aHHbIe Ha 3abodckoi Tabmue BaWero nbilecoca.
Для подөрхань долхнору уровь 6e3oanchoctn Baшero пибopa ремont пибopa и осobehno erо тokонровдэших узлOB долхен побODNTbс только сецhalnstamn-электphkamn. ПOTOMY B clyuae HencnPabHocTH Bbl doлжнbl obpaцatbсг K Baшemy toproBOMy ppeCTabHTeHIO nIIN pprmo B cepBnchHyO clyx6by φнрмbl THOMAS.
KohtakThbIe daHHbIe yKa3aHbI Ha o6oPoTe.
Data n3FOTOBJENHn:
Ipeed nepuMM BnKOpNCTaHHaM

YBaXHo npOHTaIte HabeDeny HnXue iHOpMaIIO. MoBa Ie npo BaXnBi Bka3IBKn 0oDo 6e3neKn, BnKOpNCTaHHa TaTexHiCyHoro 06CnyroBvBaHHa npHeTPO. 36epiraTe IHcTyKciIO B HaIiHOMy Micci. Y pa3i nepeaqi npHeTPO IHoMy KopNCTyBaay, nepeaIte NOMy IHcTyKciIO.
Ha3Bn detae
| 1 = Контейнера |
| 2 = Кршka Двигуна |
| 3 = Фikсатор |
| 4 = Колitsаразka |
| 5 = Швашикорозимни з'энуньч |
| 6 = Вимкич |
| 7 = Вимкич насанca (з пдсвочеваням) |
| 8 = BCMOKТУВальни потубок |
| 9 = Ручка дая посяпесеня |
| 10 =Елект presupни кабелы |
| 11 = Perugларов потужності BCMOKТУВалнaya |
| 12 = Гунka Трубka дая мйного заconsы (BERXHAЧASTNHA) |
| 13 = Гунka BCMOKТУВальни слалг |
| 14 = BCMOKТУВальни потубka |
| 15 = Зат�сakч diу Гункоi потубки |
| 16 = Запирни Клиан |
| 17 = Насада дая пльвериизацiiюного очselfени маймib |
| 18 = Гунka Трубka дая мйного заconsы (нжня чостиha) |
| 19 = Насада дая м'якinx меблib |
| 20 = АдANTер дая пidлоги 3 Тberдим порпTTМ |
| 21 = Насада дая калимib |
| 22 = Уллинна на садда |
| 23 = Насада дая пльвериизацiiюного очselfени м'якnx меблib |
| 24 = Розерbyap дая мйного заconsы |
| 25 = Концentрат мйчого заconsы дая Текст�ьнх Виробiv (ProTex) |
| 26 = Сфонна на садда* |
| 30 = Конуconodобни рcfьт |
| 32 = Запирни Калан, розимловальнишалг i Клincn дая BCMOKТУВальнишалгу |
| 33 = Палерobини рcfьт-miшok |
| 34 = Akbaфільт* |
| 35 = Таиминни рcfьт дая дрибогого плу* |
| 36 = Гунka BCMOKТУВальни Трубka дая мйногого заconsы |
37 = TpIMMau BCMOKTOBJIbHOI Tpy6KN
38 = KpɪnJIeHŋHЯ ᵋЯ BCMOKТВаьHoI Tpy6ки nɪd Yac napkyBaHŋH
39 = 3atnckaaytpy6ok
*) TijbKN B Modeni THOMAS BRAVO 20 S Aquafilter

Bka3iBkn 3 texhikn 6e3nekn
THOMAS BRAVO npn3HueHH nBnKOpCTAHn TINbKn B DomaHix yMOBX.
YkoDHompya3IHeBMNKaTe npctpi,Kko
- nozkdojeho eJeKtpnHnn Ka6ebIb;
- npiCTpiMaBvDmMi N0wKoJKeHHa;
- npiCpiBnab.
Hanyra,3a3haeHa Ha fipMoBti Ta6nmu, MaB iDnobatn Hany3i B mepexi. PaonoptHa Ta6nuk po3taowbaHa Ha 3aHni naHeni npncpo.
- PncoeHnHne np6op TOnbKO K cTeB0n po3etke, KOtopo 3oUuueHa aBtOMaTHueckm npedoxpaHntenem Ha 16 A.
He niohcbe Hacdkn Ta Tpy6kn Do rnoBn, kOn npncpiyBIMKHeo - icHy e He6e3neKa TpaBMyBaHHa, Oco6blBO dna ouen i Byx.
- Pnctpi He MoXHa BnKOpNCTOBYBAtn Ira 36npaHHe6e3neHnx Ira 3doob' Ta Idknx peOuH, a TAKOX TOKNX peOuH, IIO MICTATb PO3HHKN.
- Pnctpi He MoXHa BnKOpNCTOByBatn B npMiuueHHx, De 36epiraTbcra JERko3aMMCTi MATEPIAIO O60 YTBOPHOITbcg Bb6yxOHe63neuHi r3n.
36epiraTe npictpi i Ioro npnilaDra B cyxomy, uCTOMy, 3akpntomy npmiueHHi.
Taki peoOBHH, k6 6eH3HH, po3HHNK dIa foap6 i piKe naHBO, Moxytb yHacnIOK 3abHXpeHHy YTBOPOBATu B6yXoe3neHy npuy cn Cmii 3 NOBITpAm, kE BCMOKTyETcbr.
3660pOHe 36upaTn rapuHnn noni Ta po3neHn npedmetn.
- Ipea KoxHb BnKOpCTaHHa NpeBiprTe, H npabNbHO BCTABHeHO Heo6xDi Hi jInbtpn.
Ipnctpi He MoXHa BnKOpNCTOByBAtn Ia 36npaHnToHepa. Tohep, knn BnKOpNCTOBycTbCn, HApNKJnA, y npHTepax a6o KonIOBaIbHNx anapatax, MoXe npOBODHT eNEkTpHn CTpy! Kpm toro, Tohep MoXe He nobHicTHo BiDfInbTyBaTnc 3 fInbtpyBaIbHOi CNTem Nnloocca i, Jk HacNIdoK, NOBepHyTnc B nobITpr npMlueHHa Ype3 BCMOKTyBaIbHN BeHTnlTOp.
Heo6xHa ooc6nBa yBra n iD qac np6bpHnH cxOiB. POn6aTe npo 3a6e3neHnH DOCTaTHb0I CTIKoCTpTO. HnyKn WnAnr He MoXHa po3TAYB0N. 3abXm TpMaIte npcTpi Ondie pykoio.
Hikon He 3aunwai Te BBIMKHeHH npncptpi 6e3 Hargny.
Ie npctpii Do3BOJeHO BnKOpNCTOByBaTu
ITM Bi 8 pokIB Ta ocobam 3 obmexehmN
f3HMM, ceHCOPHMn a6o po3ymOBmN
3DIOHOCTaMn, 6paKOM IOCBiPy Ta /a6o 3HaHb 30
yMOBn, 30 HMM 3dINCHIOETbcra HaJIa d a6o
ix 6bylo npoiHCTpykTOBAHO 5OIO 6e3neuHoro
BnKOpNCTAHn npcTpoIO I BOHn 3pOzmyiN
HaBHi He6e3neKn. DITM He MoXHa rpatncra
3 npcTPOeM. DITM 6e3 HargJy DOpocJnx
3a6opOHeHO OChUyBatn npcTpi T a npoBoJNTn
poBtN 3TexHicHo 06ClyroBvBaHHa, 3a
aki BIDNOBidae KOpNCTyBaY.
Heo6xidno BnHnTn 1tncBHy Bnky 3 pO3ETK:
- y pa3i HENoJIoK nIu cAoc po60Tu,
- nepei npoBeHnHm onepaui 3 ouuHnHa Ta DOrny,
nCnBnKOpNCHnR,
- nii yac koxhoi 3amHn fibtpa.
Hikon He BnTaryte Bnky 3 po3eKn 3a Ka6enb. Bepitbcra TInbkn 30 BNky.
- Bepexitb eIeKtpnHnn Ka6eIb BiD BnJIbBy BnCOkHX TemNepaTp To ximiuHnx piinH. He npoknaaute noro yepe3 roctpi kpaia.
Ypa3i nowkoJxHn npictpo, npnilaIa a6o eJeKtpnHoro Koben (KoJn notpi6Ha 30miHa) He BnKohyIte peMOHT camocTInHO.3BepHItbCa do ABtOpN3ObaHOro cepBICHOro ceHTpy, TOMy 10 MoNphiKaizipnctpoMoKe 6ytN He6e3NeuHO dJa BAWOrO 3dopoB'BnKopNcTObyIte Imwe opnirHJIbHi 3aNCHTu Tp npnilaIa.
- Bepexitb npicpii BiB BnNBy noroDnX yMOB, BOIOn T a DxepeI tenla.
He cnpraMOByTe OuHbBn HcpyMinb Ha IHOe, TBAPNH, WtencelbHi po3ETKn Ta eJekTpOpnPnadi.
- Bepexitb bID dITEH xIMiHi peOBNH, TAKI JK KOHcHTpaT MIOUHX 3ac06IB.
- Hanexhe fYHKIOHyBAHH npICTpoHO Ta eEeKTHBHCtB OMHueHHrapaHTOBaHO NIIe 3a yMOBN BnKOpCTAHH φipMOBX MNoHx3acobIB THOMAS.
Oco6am i3 yTnBOIO uKipoi CnID yHKATN KOHTAKTY 3 MIOHm p03HOM.
- Y pa3i notpanlaHHKoHcHTp4y dIy npnroTyBaHH MHOYOPO3uHy Ha cIm3OBy o6IoHky (B oci, pot toio) Heo6XiHoHERaHNO pOMTN yIKoJKeHe Micce BDOHO.
3axnct doBknJna
He BnKndaTe BnKOpunctaHni nakyBaIbHi MATEpiaHn Ta npncTroPpa3oM i3 no6yTOBm CMITTAM!
Ynakobka npctpo:
- NaKyBaIbHn KApToH MoXHa 3dAn Do nyHKTy npNIOy MaKyIaTpy.
- Plaket i3 nonietneneHy (PE) moxHa 3dATn Ha nepepo6ky do nyHKty npHMy BTOPHHOI CPOBHN.
YtJiaaia npctpoicnna 3akinueHH ctpok cyx6n:
- Ytni3yte npncpti Bijnobidno do MicuebHex HopM. 3a3dneriBb Bnmitb BNky 3 po3ekn Ta Bijnipixte II Bid Ka6eIIO.

LcH CmBbON Ha Bnpo6i a6o Noro ynaKobu Bkazye Ha Te, 10 cEe Bnpi6 He MoXHa Ytni3yBaTu NK 3BuAHi nObytobi BiXoN. Noro cnId 3aTn Ha nepepO6ky Do nyHKTy npniomy eJeKtpnHnx Ta eJeKtpOnHHx npNJadIB.
Pobn Bhecok npabnlbHy ytni3aio zuoro bnp6y, BN niknyTecb npo DOBkllra Ta 3dopOB'a IIOde. HnpabnlbHa ytni3aia ctABNTb nid 3arpo3y DOBkllra Ta 3dopOB'a IIOde.
Iopalbuy iHOpmaio npO ytniauio zufo Bnpo6y moxHa OTPMATN Bmicki aDMiHictpaui, y Komnaiix, kKi BiNobiaotb 30 BnBe3EHc mittra, abo B Mara3HHi, de 6yno npndao Hnpi6.
MONTAX KOJIiUaTOK
A Po36nokyute fikcatop i 3himitb KpniuKy ABnryHO.
B JilbHO BCTABTE KOJIUATKa 6oNTn B DnHmE KOHTeHepa.
Cyxe npn6npaHna
THOMAS BRAVO 20
IicnnonepHbOBOJorO npn6pauHH npnctpiMae nobHcTIO BucoxHyTN;3a Heo6xHocTi TAKOX CNID BcunHTN rhykM WAnr a60 Tpy6ky.
3a6bOpHeNo npoBouHTn cyxe npHbpaHHa 3 nowkoJxehmN fInbtpamn.
K BnmiB pe3epByap dna MnHoro 3acoby.
0kpim panepoboro fibtpa-mioka BHKopncTobyte KOhyconoio6Hn fibtp (30).Ue 3abe3neuHTb Kpaue yTPmAHnna. P03micitb KOhyconoio6Hn fibtp (30) HnKhbomy 6oic kpwn DnHyHa (2).3aJexHo bI modJI 3aikcyte nooxeHH 1 a6o 2 3a donomoroo 3atncKhoro kInbya.Y pa3i cnlbHoro 3abpydHeHH a6o 3meHweHO
notyxhocti BCMOKTyBaHHa MOxHa Ipomntu KOHYcoNoi6Hn Iinbtp (30) nCTOIO BOIO 6e3 IOdABHHa MmHNHX i OunyBaIbHnx 3ac06ib. Ipeed HactynHM BnKOpNCtAHnM fInbtpa nepekoHaiTeC, uo BiH NobHiCTU cyxn.
D ⅢinbHo hacyhBe thi- Miok Ha BcMoKTyBaIbHn natpy6ok i po3MictiB Horo Ha CTiHci KOHTeHepa.
G 3akpinitb rhyky BcMOKtyBaJIbHy Tpy6ky Ira MMIOHO 3ac06y Ha HnXhBomy 6oCi KpUkN DnBnyHa.
H cyahobitb Kpnuky Dnurya Ta 3a6nokyTe fikcatop.
J PnEHaHte rHyKm BCMOKTyBaIbHm IlaHr. 5o6 Bi'EdHtM, NOBepHtB BCMOKTyBaIbHm nATpy6ok y 6ik i BNTaRHiTb.
YCTaHOBiBt noTpi6He npnlaJa.
BCTABTE WTeNceMbHy BUnKy B po3eTky.
N YBIMKhitb npnctpi 3a donomoro BUMNKoay (6).BUMNKaHACOCA7HeMaCCBITNCRA.
30 DOnOMoroIPO peryJnToppa notyxHocTi BCMOKTyBAHH (11, pnc. P) moxHa 3miHOBATn notyxHicTh BCMOKTyBAHH:
-3acnHkyIpynoaquiOoatKOBORo nobiptpa 3akpnto = NOBHO NOTyXHICTb BCMOKTyBOHHN;
-3ocnHkyIpaNoaOJdoatKOBOro nobitrpaBikpnto= 3MeHweHaNOTyXhICTbBCMOkTyBaHH.
THOMAS BRAVO 20S Aquafilter

BopohHO BmOpCTOByBatn npntpim 3 AkBaΦijbTpom Jny cyXoro npnbpaHn6e3 AkBaΦijbtpa, TKAHNHHoO fIbTpA. Jn Dpi6Horo nJiy BiINOBiHoro 3ANOBHeHH BDOHO.
He 36npaIte y BeINKnx KInbKOCTx Dpi6Hn nn, HAnpNKlaI, bopoHo, KaKaO-nopoWok, ZemEHT ToIo.

MIMITb pe3epByap dIa MMIOHOrO 3acOby.

'eHaHte 2 Detani aKBaipnbtpa Ondy 3 OndHO do ynpOy ta IIbHO HacyhBe aKBaipnbTp Ha BCMOKtyBaJIbHN NATpybok.
3BeTRe yBary Ho MapkyBaHHa.
Akaipbtp MaB BbiTN B naHn BCMOKtyBaIbHoro 6ap6aHa i pibHomipHO po3aWByatnc Ha dHi.
Hannite 2 litprn uchtoi BODy y KOHTeHep dny 360py nny.
F YctaHObitbTKAHHHHnΦIbTp DnA npi6HOro nny,3akpinBmN Ioro BepxHn Kpa 3a BCMOKTyBaIbHn KOtheHep.
G 3akpinitb rhyky BcMOKtyBaIbHy Tpy6ky IJIa MMHOOro 3ac06y Ha HnXhBomy 6oui KpUwKn DnHryHa.
Okpim nanepoboro fInbtpa-Miuka BnKOpncToByte KOhyconoDi6Hm fInbtp (30).Ue 3abe3neuHb Kpaue yTpmaHHa Nnly. Po3micItb KOhyconoDi6Hm fInbtp (30) HnXhBomy 6ozi KpuuKn DnRyHa (2).3aneXho BiJ moJeI 3oikcyte nIoXeHHra 1 a6o 2 3a DonomOrO 3atckHoro kInbca. Y pa3i CnIbHoro 3a6pydHeHHa 6o 3MeHseHOI NOTxHoCTI BCMOKTyBaHHa MoXHa IpOMHTN KOhyconoDi6Hm fInbtp (30) uCtOIO BDOIO 6e3 DoqABAHHRA MmHNIX i OOnuBaJIbHHx 3acobIB. Ipeed HactynHM BnKOpncTahHm fInbtpa nepeKohaiTeCA, UO BIN NOBHcTIO cyHm.
HCTaHOBITb KpMkUyDnRyHa Ta 3a6NokyIte fikcatop.
J PnueHnoTe rhyckn BCMOKTyBaIbHn IinaHr. 6o6 BiE'EnHaTn Horo, noBepHtB BCMOKTyBaIbHn natpy6ok y 6ik i BntraHrtb.
Yctahobit noptiphe npnaia.
BCTABTe 1tEnceIbHy BnIKy Bpo3eTKy.

YbIMKHTb npnCTpi 3a donomoroIO BmNKca (6).BmmKaHococ (7) He MaE CBITINc.
3a donomoropepyraTopo notyxhocti BCMOKyBOHHa (11, pnc.P)MOxHa 3miHOBATn notyxHICTb BCMOKyBOHHa:
-3acnHkyIpynoaqiDooatKOBoro nobitpr3akpnto = NOBHa notyXhICTb BCMOKtYBOHHr;
-3acnHkyIpynoaQiDQaTkoBOroNoBITpyBiKpTuO= 3MeHweHaNOTyXHcTBBCMOKtYBaHHra.
OuueenHn chtemn akBaphi np n dornia 3a Heo

MipkybaHb ririEHN CnCTemy akBaΦinbTpTa BCMOKtyBaIbHn KOHTeHep cnid cnopoXHOBATN, OvHcyBaTH n BnCyUyBaTH nicra KoxHoRO BHKOpNCtAHHa.
bpydha BOa Ta Bonori Detani cnpnaio TB po3MHoxeHHIO 6aktepi Ta rpn6kIB.
3aIexHo BID CTyneHn 36pydHeHH npotpiTb TKAHHHN H iInbTp dIy dpHoro nIy cyxHO a6o BONOrO TKAHHO. Y pa3i cINbHoro 36pydHeHH npomMte YnCTOIO BDOIO be3 DoabAHn MmHNix i OunSyBaJIbHNx 3ac0ib. Ipeed NaCTynHM BKNOpNCtAHnM fInbTp a nepeKaHaTeC, 10 bi NOBHicTIO cyxN.
36ip piDnH

CπiKyIe 3a TMM, ΜιΟ nonλακOBm KλαπaH (40, pnc. S) 3aBXn6yB yNCTM i pyxOMm. BIn aBtOMaTHO 3ynHRe BCMOKTyBOHHRA, KOJI N 3aONOBHOETbCRA KOHTeHep Ira 6pydHoi BOIM.
IiJ Yac BiKaUyBaHnB BMCTy KOHTeHepiB, pIBeHb piDnHn B JkXn Bnui, HIX BePxHi Kpai KOHTeHepa IJIg 6pydHO BoN, i BMICT JkNX nepeBnUye MICTKICTb KOHTeHepa IJIg 6pydHO BoN, piDnHa MoKe npoDobKyBatn TeKTn i nCra 3akpTTa nonPabKBoBOrO klanha.
Ytaknx Bnndkax cnid Biikayybatn Imwe yactkobi Kilbkocti nac BiD acy cnoopxHrtn KOthEnep dna 6pydhoi Bodn.
Cnoatky Bnmitb BcmoKtyBaIbHy Tpy6ky Ta rhycky Tpy6ky 3 piHH, a Notim BmKhItb npictpi, u06 yHmKHTn noaIbWoTO 3aJIbHaHH pIHH.

036IokyTe fikcatop i 3HimItb KpnuKy DnBryHa.

imtb fInbtpn 3 npctpOIO, uo6 yHnKHytn ix
noWKoJxehnra (pnc. CiD). Y pa3i BnKOpNCTaHHy npctpoIB
i3 aKBaΦinbTpom notpi6HO BnHHTn aKBaΦinbTp i TKAHNHH
fiIbTp dnn dp6Horo nny (pnc. E iF).
KIO BCTAOHOBJIeHO pe3epByop dIy MInOHO 3acOby, NOro Notpi6HO BnHrtn (pnc. K).

VctaHObit KpniKky DnHyHa Ta 3abNokyIte fikcatop. Tabte wTencelbHy BnKy B p03ETky.

IpneDnae rHyckn BCMOKTyBaIbHn IaHaHr. 5o6 Bi'd'EnHn Horo, NOBepHiB BCMOKTyBaIbHn nATpy6ok y 6ik i BNTaRHiTb.

BakpnepepynTopnoTyXHOCTBCMOKtyBaHHa11Ha pykoarui.

YbIMKhitb npnctpii 3a donomoroB Bmmkaq (6).BmmkaHacoc (7) He MaC CBITNCRA.

Tn 3akHHeHH BONOrO np6npaHH OunchItb Ta BncyUitb npctpi i BnkOpNCtane npnaed.
IyIbBepn3auiHe oUuHnn
(Bolore npn6npaHna)Knlmib i nIjorn
3 TBepdIM NOKPHTTAM

Moxha YnCTATNI NsIe KNIMN, npDAtHi IpR BONorO YmUeHH.
NikatHi KINMM pyHooPi 06oTH Ta KINMM 3 HeCtiKoIO
φap6oHneiixxoydTnBoloroQHHN.
KU KUNIM Bxe OUYBAN 3 BUKOPUCTAHNc CneiaJbHOro
WAMNYHO, To nic Neporo OUYeHHa KUNIMA 3
BUKOPCTAHNc MNILOCoc THOMAS BRAVO MOxNBE HAdmipHe
NIHOYTBOpEHn.
Y TAKOMy pa3i notpi6Hb BmKHyT npncpti Ta cnopoxHHT KOHTeHep dny 6pydHO BoN.
Uo6 yHnKHytn noaIbWoO nHOyTBOpEHn, BmTe y KOHTeHep 6pyHoI BoN 1/2 qauKn Otu.
Hdmpnoro niooytbopeHH He 6yde Bxke nicna Ondhopo3OBorO BOIORO OuHueHH 3 KOHcHTpOM dIra npiroTOBHH MIOOHOro po3HH THOMAS, ockibkn Bih Micntb cneiaJIbHi doabKn, kni nepeKoJXaOTb niooytbopeHHO.
KoIIu BBIMKHeHO yHKUIO po3aHIOBAAHn, cnIkyute, uO6 y pe3epByapi Ira YnCtoI BoH 3aBXdN 6yNa pIDHa, uO6 yHKnHyTH noXKOJKeHH naocca.
OuHueHHKnHmB

036bokyutheikcatop i 3Himtb kpiukyDnBnyHa.

Bhimt KpniKky 3 pe3epByapa Ira MMIOHO 3acO6y i 3aIInTe B HbO r MIOUH 3ac6 THOMAS ProTex.
Bka3iBKn 3do3yBaHHH DnB. Ha etNKeTci Ha nnAa.
BnKopncroByte nomipho tenIy body (MaKc. 30 °C).
3HOBy BCTaHOBitb KpMkUy i BCTaBte 3aONBHeHn pe3epByop dIra MNIOHO 3acO6y B npNCptpi.

3HIMITb rHyky BCMOKtByaIbHy Tpy6ky IJRA MNIOyO 3ac06y 3 TpMaHa Ha Kpnuiz DnBryHa.

CTAHOBITb KPNWKy DBNYHa TAKN M YNHOM, 0o6 RHYKA BCMOKTByBaJIbHa Tpy6ka (36) DoXOINa Do nHa pe3epByapo dIra MMnHO rO 3acoby i He 3rHnAoc.

IpnEHaHte rHyckn BCMOKTyBaIbHn ⅡnaHr. Ⅲo6 BiD'EnHATn Horo, NOBepHItb BCMOKTyBaIbHn nATpybok y 6ik i BNTaRHTb.

BCTABTe 3anipHm Knanah y BiDnOBiHm OTbip Ha BCMOKTyBaIbHomy IJAHry. BCTABTe pyKoAryy BCMOKTyBaIbHm
WnAHr 3aΦikcyte rHyky Tpy6ky dIy MIOOYO 3acOBy HBCMOKTYBAlbHOMy WnOHry 3a DOnOMOrO INaCTNKOBHX 3aTnCKaYIB.
N BCTABTE rHyky Tpy6ky dIa MMIOHO 3acOby B WBNKOp03HIMHH 3'cNDyBaH KaPnUz IDbRyHa Do fikcaii.
0 PnEHaHte Hacdky Ira NylbBepn3auiHoro Ounuehna KINIMIB DO BCMOKTyBaIbHoro ⅢnHaHa.
P PnpnEHaHrTe rHyKy Tpy6ky dRn MmOHoro 3ac06y HacAnKn dRn nyIbBepn3auiHoro OuHueHHo Do 3anipHoro Klanana i 3aikcyte nobopoTOM. BCTABTe rHyKy Tpy6ky dRn MmOHoro 3ac06y BV TpMaHr rHyKoi Tpy6kn Ha BCMOkTyBaIbHOMy IuaHry abo, RaUO BCMOKTyBaIbHi Tpy6kn Bnpo6nHi 3 HepxabiooI CTJI, 3aikcyte 30 DOnomOrHO MeHux 3atNCKaHIB (39) HA BCMOkTyBaIbHi Tpy6i.
BCTABTE WTeNCbHy BnKy B po3eTky.
N YBIMKHTb npnctpi 3a DOnOMOIO BUMNKOa (6)i Hococ - 30 DOnOMOIO BUMNKOHO HOCoca 3 NiDCBIyBaHHm7).
P Hatachitb Baxijb Ha 3anipHomy Klanani (16).Mnooh 3acio 6ynde po3npnckyBatnc.
Ipeep noBtropHm 3aOBHeHHp e3epByapa InmaHoro 3acO6y 06ob'zKOBO BnHne 6pydHy Boy i3 KOHTeHepa nn 6pydHOI BOH.
Ouueennna nipn3 TbepHm NOKpTTTAM
Q YctaHObitb aanTeP nIINr 3 TBepnM NOKpTTM.
Iopraok dii duB. B po3di (OunueHH Knnmib).
I OCHUeHH NIOIOTN TBEPMM NOKPITTM PEKOMEHIOBHO BIKOPCTOBYBATN KOHcHTpat THOMAS ProFloor.
OuHnEHHaM'kHX Me6JIb
Дячшения M'якх Me6nib a60 CBTOMO6iNbHOrO CndiHnB NKOPNCTOBYIte Hacdky dny NylbBepn3auiHOro OuHcHnH M'knx Me6nib (23).
He BnKOpHcTObyIe 3a6arato pIDHH. BpaxOByIte, 10 yacc cyuHHra 3aJIexNtB BiM MATEPIany OCHOBn.
R YctahOBiB HacaIky InyIbBepn3auizHOrO OuHueHHa'M'KHX Me6nIB. 3oikcyte rhycky trp6ky Ira MmHoro 3acoby, nobepHyBwn II. BcTaHOBtB HacaIky Ha pykoRTky.
OuHsEHHa cHcTeMn npIbBepH3auiHoro ouHsEHHa Ta DOrJIa 3a Heo
KДЯ DORJIy 3a HAcOCm i KJANAHAMn 3anOBHITb pe3epByap dJa MmHoro 3acO6y YHCTOIO BDOHO I BCTABTe B npCtpii.
BCTABTE WTeNceIbHy BnIKy B po3eTKy, yBIMKhitb npHcTpi 3a DOnOMoroIO BmHKaQa (6) i Hacoc - 3a DOnOMoroIO BmHKaQa Hacocq (7).
P YbIMKhitb CHTeMy po3nHIOBANHa, HAnpHKlaD, Ha MmikoO (HatncHtB Baxilb Ha 3anipHomy Klanani (16)).
N Ipeep BID'EDHANHr HryKoI Tpy6Kn DnA MmHoro 3acoby HATNCiB Baxijb 3anipHoro KnanHa (16, pnc. P), uO6 cKNHyTn 3aIIuSKOBNI TCK y CnCTeMi, a Notim HATNCiB KHONKy Ha WbNDKOp03HIMHomy 3'EDHyBaHi (5).
Bnmitb wntencelbHy Bnky 3 po3ek!
Piicna cbo r oocitb Ta BncywiB npicti i Bnkopctane npnndra.
3a6oponeho 3ahypobatn KpnknydByy Body!
Ipoptipb Kopnyc DnBurya BONORO TKAHNOIO i Bucyiwitb.
BaxJnBi 3ayBaXeHn
iPiIyacBONOrO npN6pHnHa 3aBXnNepeCyBaIte po3nnIOBAJIbHy Hocdky IaKKnIMIB y HApPmKy Do ce6e, pyXaIOH II CMyra 3a CMyTOHO.
6 yHnKHyTH HOBO 306pydHeHHa, nepei noaIbIIM BHKOpNCTAHHM OuHcEHNX KINMMIB CIIID 3aYeKaTN, NOKI BOHN BUCOXHYtB.
i6 npnCKOpHTBnCnXoHHOuHHeHX NOBepxOHb, 0uINbHO 3i6pATN 3aHNOK BOrN 3a DOnOMoHO NOBtOPHO BCMOKTyBaHH (6e3 HATNCKAHH BAXeJRA PO3nHOBaHBOr KnaHa).
iHnueHHnapkeHoi iNIOI nOtpmMyTecb IHcpykui Bnp6Hka npKeTy.
YcyhenHn HenoJadok
Kaio Bai npicpii He npaoe HaneXHm YHOM, He notpi6ho Biip3y 3Beptatncd o cepbichoro ceHTpy. Cnoatky nepebiTe, Hne NOB'3aHa q HeNoJaKa 3 He3HaUHOIO npuHNO.
Kuio nH BxOHTb nd aC BCMOKTyBaHHa:
- Yu npabunbHo npueDHaHO cnCTemy fInbtpa i YH Hemae B hi dephiektib?
- Yn BHKOpNCToBvBaBCO opriHaJIbHNI φiIbTp THOMAS?
KoJn noryxHcIb BCMOKTyBaHHa NOctynoBO 3MeHswyetbc:
- He 3a6noKoBaH o npn fiNbtpa dpi6Hm nIom?
- He 3anobheo nanepobn fijbtp-miok?
- He 3a6nokobao Hacay, noobjybalbny Tpy6ky a60 rhyckn BcMOkTyBaIbHn IlaHr 6pyoM? (P03TgHITb rhyckn BcMOkTyBaIbHn IlaHr, KOJI npCtpiYbIMKHeHO, - po3TgYBaHH BmBilbHre 3aCmueHH.)
KIO nI qac BcMOKtYBaHHa 3 BnNyCKHx OTBopIB npHCTpoB BHTiKae BOda:
- He 3abokobho nonlabok (pnc. S) nic yac BcmoKtyBaHH pIDHH, TAK, IIO BIN HE MOKE cnpaouboByatn?
- YN BUKOPUCTOBYBABCAI JI BAIOORO npINbpaHnOpIRIHbHNI KOHcHTpAT IJN pnpOTyBOHHM MNOOHOro po3uHNY THOMAS?
KoHn noTyXhNtcbMOKTyBaHHra panTOBO 3MeHwYETbca:
- Yn He 3ynHMB nonNoBKOBI Klonanh BCMOKTyBOHH NOBITp? Lc MoXe CTATNCB p3i CNbHorO Haxmny a6o nepeKnDaHH npCTPO. BumKnHtB nIIOOC; nonNoBok onyctntbcr, i npCTpi 3HOBy 6yde roTobM Do p60TN.
KoHn DBrHyn He npauoc:
- Cnpabhi Ka6eIb, WTeNceIbHa BnIka i po3eTka?
- Npeep nepeBipko BnMItb WtencelHy BNJIky 3 p03eTKN.
- YxodHomy pazi He BiiKpNBaTe DbNHyc CamOCTiHo!
Kxho He BHXoDHTb MmHn np03yH:
- 甲 BBIMKHEHO HACOC (BIMNKAY (7) MAE CBITNTCA)?
OuHCTIb ciHaCTn fInbTp BCMOKTyBaHHa Ha rHyKOMy BCMOKTyBaJIbHOM IJAHry (36). - Yu npabunbHo onyuueho rHyky BCMOKTybaIbHy Tpy6ky B pe3epByap dny MMHO 3ac06y?
- He 3abokobao hpo3nIIOBbHy hacay? Kkuo po3nnIOBaIbHy hacay 3abokOBaHO bpydOm, onyctitb II y BOy Ha deekn Yac. Ncna zboro eheprinno npodyte II.
Cepbvichn ueHtp
3BepHItbca Do dInnepa, y AkoTo Bn npnd6aHn npncptpi, i BIn oxohe HAdactb Bam aDpcy abo TelefoHHn Homep BiINOBiHoro cepbicHoro ceHTpy THOMAS.
IiD yac 3BepHeHHa CIIH HApTu Bci DaHi, 3a3HaYeHi Ha fipMOBI TabnuiPiNococa.
Ii niTpHmHa 6e3neHoro CTany npHcTpoHO Heo6xio,
06 yci pemOnTHi po6OHN, oc6bHBO HA cTpymonpOBDHX
yactnHex, BHKOHyBaHnca NHee phaxibzma. Y pa3i
BHHKHeHHa HecnpabNocTe 3BepHitbc4do dHlepA, y koro
BN npu6bn npucpi, a6o 6e3nocepeHbo do cepBicHoro
centpy Thomas.
Kohtakthi dai MoxHa 3HaHTn Ha 3Bopoti.
TexhiHxapaKTepeNtHKMoeJeI
Independently of the legal guarantee obligations of the dealer arising from the sales contract, we - Robert Thomas Metall- und Elektrowerke & Co. KG - Hellerstrasse 6, D-57290 Neunkirchen - offer the following guarantee on the appliance according to the conditions below:
- The guarantee period is 24 months from the day of delivery to the first end user. This period is limited to 12 months for commercial use or equivalent operational demands. To pursue a claim, proof of purchase must be submitted.
- Within the guarantee period we will rectify all substantial, verifiable functional inadequacies due to faulty design or material defects by either repairing the defective parts or replacing them at our discretion; the exchanged parts then become our property. The guarantee does not extend to easily broken parts such as glass, plastic, lights. Batteries and rechargeable batteries which are faulty or whose service life has been shortened as a result of normal wear, battery ageing or improper handling, are not covered by the guarantee either. Defects must be reported to us immediately upon detection within the guarantee period. During the guarantee period, the cost of labour and of spare parts needed to rectify the malfunctions will not be billed. In the case of unwarranted claims against our customer service centre, the costs incurred will be charged to the customer. Repair work at the customer's location or installation site can only be requested in the case of large appliances. Other appliances must be sent to our nearest customer service centre, authorised repair shop, or to the factory.
- There is no guarantee obligation in the case of minor deviations from product specifications which do not affect the value or usability of the product caused by chemical or electro-chemical effects, or by water, or damage generally resulting from abnormal ambient conditions. In addition, no guarantee claims are accepted for damage resulting from normal wear and tear, or from non-observance of the user manual or inappropriate use.
- Any claim under guarantee is also void if persons not authorised by us undertake any modifications or repairs to the appliance.
- Guarantee services neither extend nor renew the guarantee period for the appliance or any installed replacement parts: the guarantee period for installed replacement parts ends along with the guarantee period for the entire appliance.
- Additional or other claims, particularly those for compensation for damage caused outside of the appliance - providing there is no legally stipulated liability for this - are excluded.
We also offer you our customer service beyond the expiry of your guarantee period. Please consult your dealer or contact our customer service department directly.
Subject to technical modifications.
GARANTIE

E-mail: be-service@robert-thomas.net
www. robert-thomas.net
Hungary:
Wellbrand Kft.
Soroksari 94-96
1095 Budapest, Hungary
Tel. +36 (0) 1 2195435
Fax +36 (0) 12195436
E-mail: raktar@wellbrand.hu
www.thomas.hu
service@thomahu
Schweden:
Olsson & Co.
Toms Byvag 42 - 43033 Fjiras
Tel. +46 (0) 31 - 910085
Fax +46 031-015290
E-mail:chr.olsson@telia.com
Österreich:
Pölz GmbH
Brunner Straße 5 - A-1210 Wien
Tel. +43 (0) 1/2785365
Fax +43 0)1/27853655
E-mail: info@poelz.co.at
www.poelz.co.at
Erwin Reicher
Hochenegg 17 - A-8262 IIz
Tel. +43 (0) 3385 583
Fax +43 0)338558389
E-Mail: thomas.service@gmx.at
E-mail: ru-service@robert-thomas.net
https://thomass.ru/support/service
Ukraine:
THOMASUA
01013, M. KIIB, ByJ. BydJIHNyCTPII, 5
ten.: (050) 533 68 88
BekouotbHa KOhcyntua
no ten.: (050) 333 95 48
Email: ua-service1@robert-thomas.net
service@thomas.ug
www.thomas.ua
Kasachstan:
HIN "THOMAS - cepBmC"
Pecny6nka Ka3axctan·050035, r.Amatobl, yI. UenetkoBa 117
Te. + 7 (727) 327 25 45
+7(727)2496819
E-mail: kz-service@robert-thomas.net

www. robert-thomas.net


- THOMAS BRAVO 20 BRAVO 20 S
- Before operating appliance for the first time
- Part identification
- Safety points
- For sake of the environment
- Appliance packaging:
- Appliance disposal at the end of service life:
- Assembly of castor wheels
- Dry vacuuming
- THOMAS BRAVO 20
- THOMAS BRAVO 20S Aquafilter
- Cleaning and care of the AQUA filter system
- Wet vacuuming
- Spray extraction
- Carpet cleaning
- Cleaning hard floors
- Cleaning upholstery
- Cleaning and care of the spray extraction system
- Never immerse the motor block in water!
- Important tips
- If unexpected difficulties arise
- Dust escaping from suction sockets:
- Gradual reduction in suction power:
- Water is coming out of the air expulsion openings of the appliance during vacuuming:
- Sudden reduction in suction power
- The motor does not function:
- No cleaning fluid is coming out:
- Customer Service:
- Technical data
- Yka3aHnnoTexHnke6e3onacchoCTn
- B Bo3pacte ot 8 let n cTapwe, a
- Pdni okpyxaioe cyedbl
- Ynakobka:
- YtJn3aun npH6opa no okOHuaHH cpoKa cIyX6bI:
- MOnTAXpyJIeBBbIXpoJINKOB
- CyxoebacbibaHne
- Texnuecknyxoa3a cnTeMoN aKBaΦnIbTpα.
- Mokpoe BCacbIBaHne
- KCTparnpobAHne c paCnblJeHHem (MOKpoe BCacbIBAHne) KOBPOB N TBePdbIX NOJIOBbIX NOKpbITN
- YHCTKA KOBPOB
- YHCTKa TBepdIX NOIOBbIX NOKpbITn
- Ynctka MmKoMbeenn
- Ynctka n yxod 3a opocntelbHo-ektpakunhoN cnCTeMoN
- POne3HbI cOBETbl
- Pomoupb npn BO3MOxHbIX HEnoJQKAX
- Ecn npn BcacbBaann nbInb Bbictynaet HapyKy:
- Ecm MooHocTh BCacbIBAHnna 3NaHTeJIbNo noHHKeHa:
- Ecn npn BcacbHaHH N Bbictynaer Boda n3 Bbinyckhblx OTBepctn npbopa:
- EcnBhe3anHO CHH3nJaCb MOuHocTh BCaCbIBAHNA:
- Ecmn Motop He pa6oTaer:
- Ecn He Bbctynae Moouaag XnKoctb:
- CepBnchao CJyX6a
- Ipeed nepuMM BnKOpNCTaHHaM
- Ha3Bn detae
- Bka3iBkn 3 texhikn 6e3nekn
- 3axnct doBknJna
- Ynakobka npctpo:
- YtJiaaia npctpoicnna 3akinueHH ctpok cyx6n:
- MONTAX KOJIiUaTOK
- Cyxe npn6npaHna
- OuueenHn chtemn akBaphi np n dornia 3a Heo
- 36ip piDnH
- IyIbBepn3auiHe oUuHnn
- (Bolore npn6npaHna)Knlmib i nIjorn
- TBepdIM NOKPHTTAM
- OuHueHHKnHmB
- OuHsEHHa cHcTeMn npIbBepH3auiHoro ouHsEHHa Ta DOrJIa 3a Heo
- BaxJnBi 3ayBaXeHn
- YcyhenHn HenoJadok
- Kuio nH BxOHTb nd aC BCMOKTyBaHHa:
- KoJn noryxHcIb BCMOKTyBaHHa NOctynoBO 3MeHswyetbc:
- KIO nI qac BcMOKtYBaHHa 3 BnNyCKHx OTBopIB npHCTpoB BHTiKae BOda:
- KoHn noTyXhNtcbMOKTyBaHHra panTOBO 3MeHwYETbca:
- KoHn DBrHyn He npauoc:
- Kxho He BHXoDHTb MmHn np03yH:
- Cepbvichn ueHtp
- TexhiHxapaKTepeNtHKMoeJeI
- GARANTIE
- Hungary:
- Schweden:
- Österreich:
- Ukraine:
- Kasachstan:
Brand : THOMAS
Model : Bravo 20 S Aquafilter
Category : Vacuum Cleaner