
Boxer - Vacuum Cleaner THOMAS - Free user manual and instructions
Find the device manual for free Boxer THOMAS in PDF.
| Product type | Vacuum cleaner with wet and dry vacuum-wash function |
| Brand | Thomas |
| Model | Boxer |
| Power supply | Mains 230 V ~ 50 Hz (see rating plate) |
| Main functions | Suction of dry materials, liquid suction, vacuum-wash (carpets, rugs, hard floors, upholstered furniture) |
| Filtration | Cartridge filter + dust bag (for dry vacuuming) |
| Tank capacity | Not specified (estimated: about 20 L) |
| Included accessories | Vacuum-wash nozzle for carpets/rugs (with hard floor adapter), upholstery nozzle, universal nozzle, pet hair nozzle, crevice tool, dusting brush, detergent hose, etc. |
| Weight | Not specified |
| Dimensions (L x W x H) | Not specified |
| Noise level | Not specified |
| Suction power | Adjustable (secondary air slider) |
| Automatic shut-off for liquid suction | Yes (float valve) |
| Maintenance and cleaning | Clean the cartridge filter regularly, empty the dust bag, rinse the tank after wet use, clean the pump with clear water |
| Safety | Do not vacuum harmful, hot, or flammable substances. Disconnect before maintenance. Use by children aged 8 and above under supervision. |
| Spare parts and repairability | Dust bag, cartridge filter, hose, nozzles, detergent tank. Repairs entrusted to after-sales service. |
| Warranty | 24 months (12 months for professional use) |
| General information | Instruction manual available in multiple languages. Use of THOMAS detergent is recommended. |
Frequently Asked Questions - Boxer THOMAS
User questions about Boxer THOMAS
0 question about this device. Answer the ones you know or ask your own.
Ask a new question about this device
Download the instructions for your Vacuum Cleaner in PDF format for free! Find your manual Boxer - THOMAS and take your electronic device back in hand. On this page are published all the documents necessary for the use of your device. Boxer by THOMAS.
USER MANUAL Boxer THOMAS
natural_image
Line drawing of a vacuum cleaner with attached tubing and control panel (no text or symbols)Inhalt Seite
D
Appliance diagram/Part identification 3/11
Assembling 4/5
Safety points 11
For the sake of the environment 12
Assembling the appliance 12
Dry vacuuming 12
Wet vacuuming 13
Spray extraction (shampooing) 13
If unexpected difficulties arise 14
Customer service 15
Guarantee 41
Table des matières
F
Page
natural_image
Diagram of a device with coiled cable and labeled component (no text or symbols beyond label)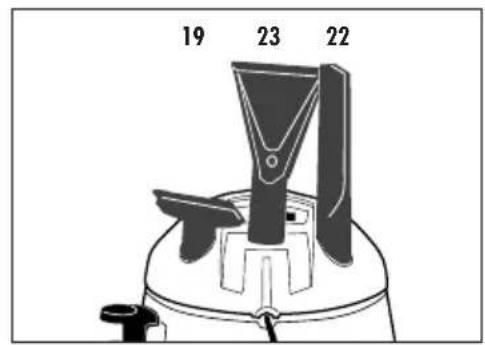
Montageabbildungen • Assembling the Appliance • Illustrations pour le montage Montageafbeeldingen • Szerelési ábrák • Figuri montaj • Rysunki montażowe
natural_image
Diagram of a portable air purifier with a curved arrow indicating rotation (no text or symbols)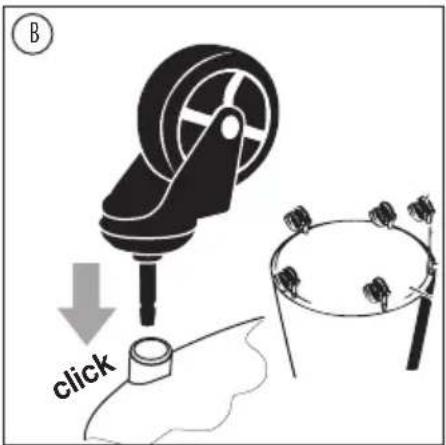


natural_image
Diagram of a vacuum cleaner with directional arrows indicating motion (no text or symbols)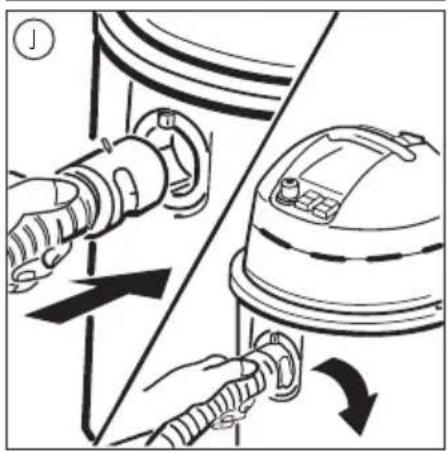
natural_image
Diagram showing hand operating a hose to lift a device, with directional arrows indicating motion (no text or symbols)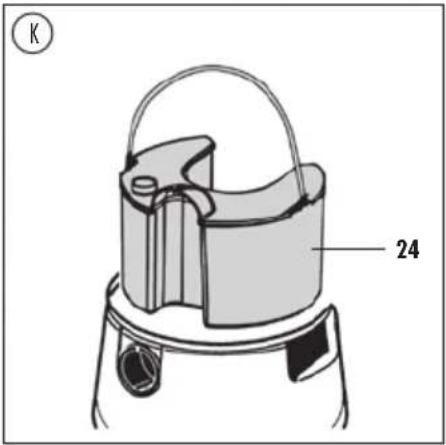
Montageabbildungen • Assembling the Appliance • Illustrations pour le montage Montageafbeeldingen • Szerelési ábrák • Figuri montaj • Rysunki montażowe
natural_image
Technical line drawing of a mechanical device with a lever and base mount (no text or symbols)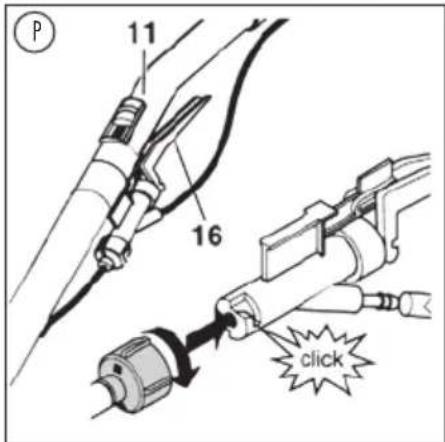

Before operating appliance for the first time

Please read through all of the information below carefully. The information provides important points for the safe use and the maintenance of the appliance. Please keep these operating instructions in a safe place and provide them to the next owner.
Part identification
| 1 = Collecting bin |
| 2 = Motor block |
| 3 = Snap fastener |
| 4 = Cover wheels |
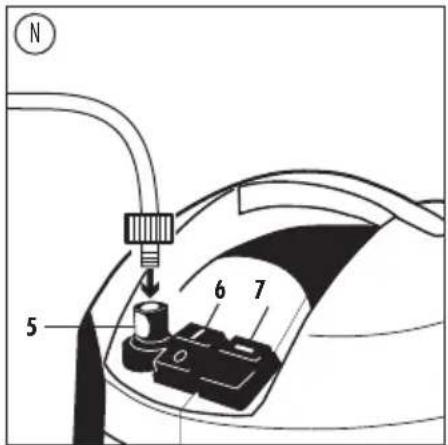
| 5 = Quick-action coupling |
| 6 = Main On/Off switch |
| 7 = On/Off pump switch (illuminated) |
| 8 = Suction port |
| 9 = Carrying handle |
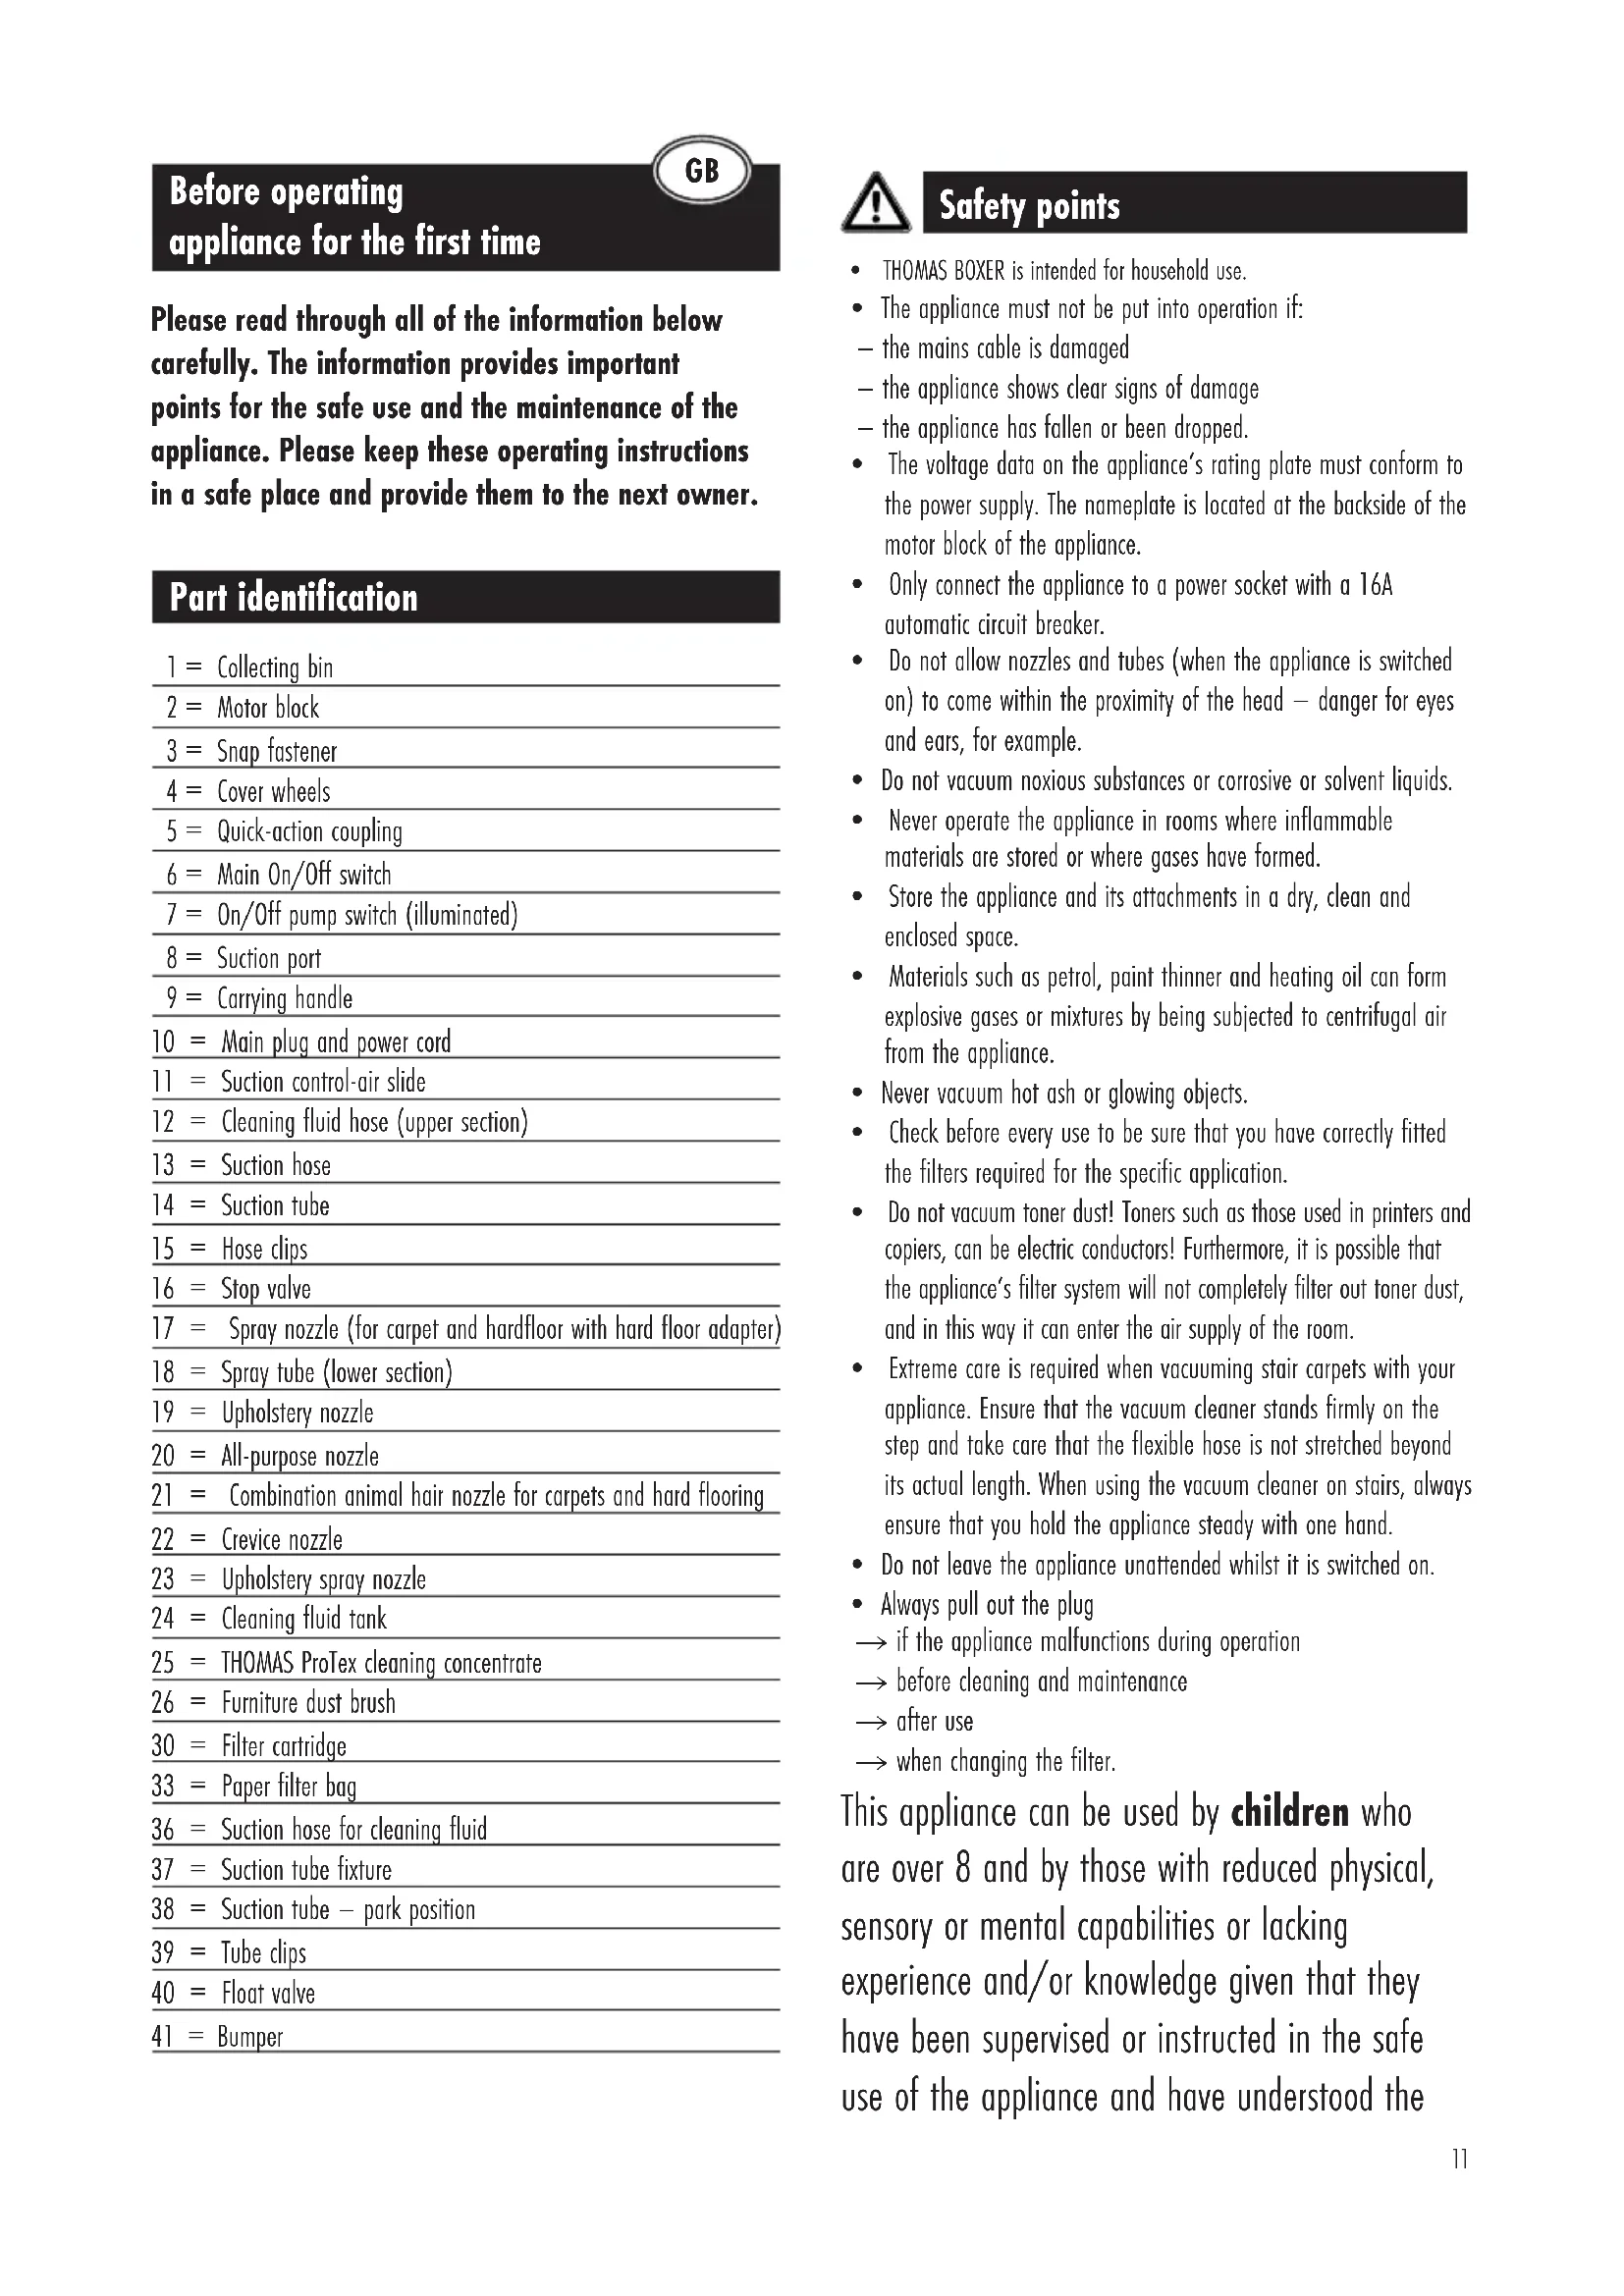
| 10 = Main plug and power cord |
| 11 = Suction control-air slide |
| 12 = Cleaning fluid hose (upper section) |
| 13 = Suction hose |
| 14 = Suction tube |
| 15 = Hose clips |
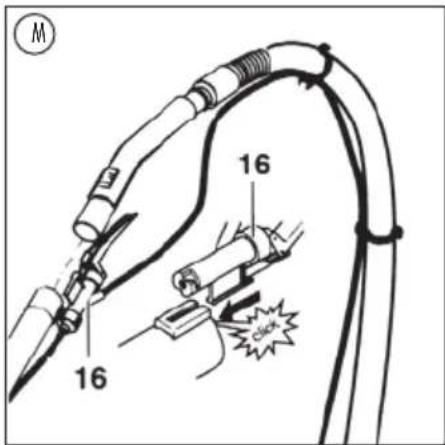
| 16 = Stop valve |
| 17 = Spray nozzle (for carpet and hardfloor with hard floor adapter) |
| 18 = Spray tube (lower section) |
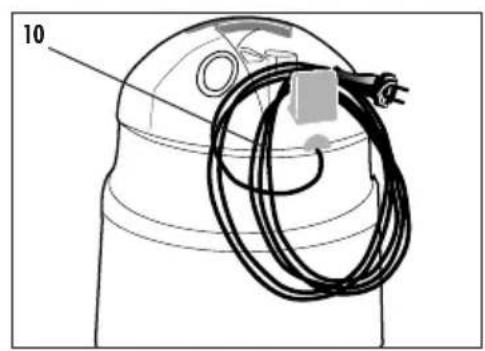
| 19 = Upholstery nozzle |
| 20 = All-purpose nozzle |
| 21 = Combination animal hair nozzle for carpets and hard flooring |
| 22 = Crevice nozzle |
| 23 = Upholstery spray nozzle |
| 24 = Cleaning fluid tank |
| 25 = THOMAS ProTex cleaning concentrate |
| 26 = Furniture dust brush |
| 30 = Filter cartridge |
| 33 = Paper filter bag |
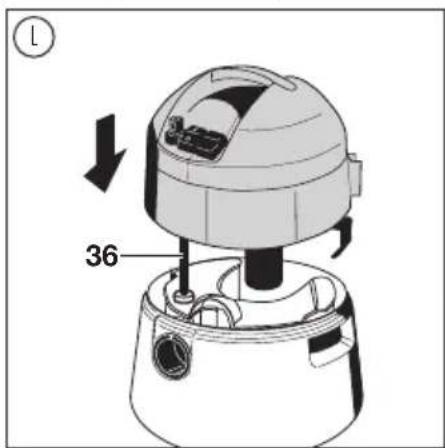
| 36 = Suction hose for cleaning fluid |
| 37 = Suction tube fixture |
| 38 = Suction tube - park position |
| 39 = Tube clips |
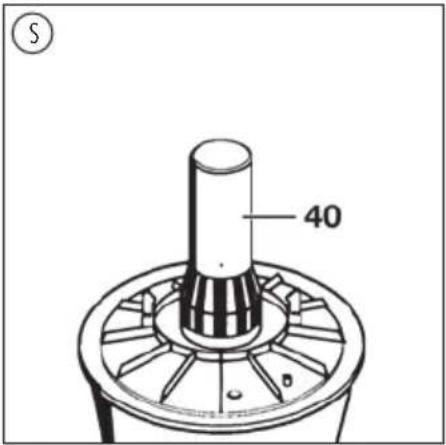
| 40 = Float valve |
| 41 = Bumper |

Safety points
• THOMAS BOXER is intended for household use.
• The appliance must not be put into operation if:
- the mains cable is damaged
— the appliance shows clear signs of damage
— the appliance has fallen or been dropped.
- The voltage data on the appliance's rating plate must conform to the power supply. The nameplate is located at the backside of the motor block of the appliance.
- Only connect the appliance to a power socket with a 16A automatic circuit breaker.
- Do not allow nozzles and tubes (when the appliance is switched on) to come within the proximity of the head — danger for eyes and ears, for example.
- Do not vacuum noxious substances or corrosive or solvent liquids.
- Never operate the appliance in rooms where inflammable materials are stored or where gases have formed.
- Store the appliance and its attachments in a dry, clean and enclosed space.
- Materials such as petrol, paint thinner and heating oil can form explosive gases or mixtures by being subjected to centrifugal air from the appliance.
• Never vacuum hot ash or glowing objects.
- Check before every use to be sure that you have correctly fitted the filters required for the specific application.
- Do not vacuum toner dust! Toners such as those used in printers and copiers, can be electric conductors! Furthermore, it is possible that the appliance's filter system will not completely filter out toner dust, and in this way it can enter the air supply of the room.
- Extreme care is required when vacuuming stair carpets with your appliance. Ensure that the vacuum cleaner stands firmly on the step and take care that the flexible hose is not stretched beyond its actual length. When using the vacuum cleaner on stairs, always ensure that you hold the appliance steady with one hand.
- Do not leave the appliance unattended whilst it is switched on.
• Always pull out the plug
→ if the appliance malfunctions during operation
→ before cleaning and maintenance
→ after use
→ when changing the filter.
This appliance can be used by children who are over 8 and by those with reduced physical, sensory or mental capabilities or lacking experience and/or knowledge given that they have been supervised or instructed in the safe use of the appliance and have understood the
resulting dangers. Children must not play with the appliance. Cleaning and user maintenance must not be undertaken by children who are not subject to supervision.
- Never unplug the appliance by pulling at the cable, but only by removing the plug directly from the socket.
- Ensure that the main cable is not exposed to either heat or chemical substances, nor that it is pulled across sharp edges or surfaces.
- Never repair damage to the appliance, to the accessories or to the cable (special cable required); have repairs done only by an authorised customer service station, because modifications to the appliance can pose a risk to your health. Ensure that only original THOMAS spare parts and accessories are used.
- Do not expose the appliance to the elements, humidity or heating sources.
- Never aim the cleaning jet at people or animals, at electrical sockets or electrical appliances.
- Chemicals such as the cleaning fluid concentrates should not be handled by children.
- The functionality and complete effectiveness of the appliance can only be warranted if you use original THOMAS cleaning fluids.
- Persons with sensitive skins should avoid direct contact with the cleaning fluid.
- If cleaning fluid comes into contact with mucous membranes (eyes, mouth, etc.), immediately flush with water.
For sake of the environment
Do not just throw away packaging material and worn out appliances!
Appliance packaging:
- The packaging carton can be placed in the waste paper collection bin.
- The plastic bag made of polyethylene (PE) should be placed in the appropriate disposal bin for recycling.
Appliance disposal at the end of service life:
- Appliance disposal in accordance with the local regulations.
The symbol on the respective product or its packaging indicates that this product must not be disposed of as household waste. Instead, it should be handed into the collection point for recycling electrical and electronic equipment.
By ensuring the proper disposal of this product, you will help to prevent potential adverse consequences for the environment and human health, which could otherwise be caused by inappropriate disposal of this product.
For the current disposal options, please ask your dealer or local authorities.
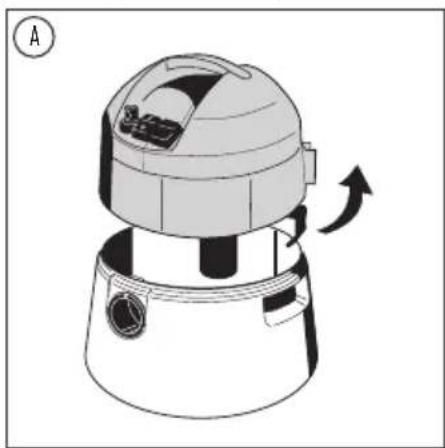
Assembly of castor wheels
A Undo the snap-on fasteners and lift the motor block.
B Push the castor wheels and the pegs into the base of the collecting bin until they snap into place.
Dry vacuuming
After wet vacuuming, the appliance must be absolutely dry; dry off the flexible hose or tubes if necessary beforehand. Never dry vacuum without filters or with damaged filters.
K Remove the cleaning fluid tank.
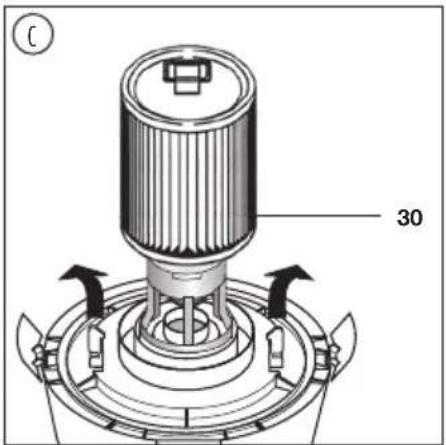
Use the filter cartridge (30) in addition to the paper filter sack. By doing this you achieve the best retention of the residue dust. Fit the filter cartridge (30) at the bottom side of the motor block (2). Secure with the turning clips. In cases of heavy soiling or diminishing suction performance, the cartridge filter (30) can be gently tapped or cleaned using a soft hand brush. Be very careful not to damage the filter ribs.
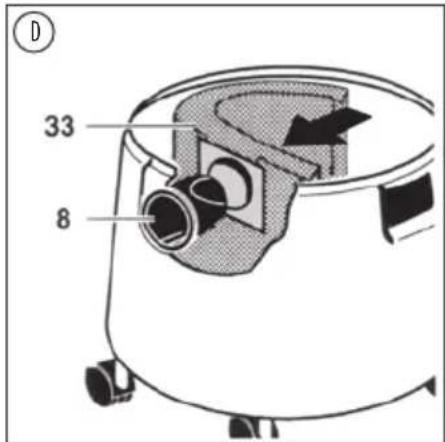
D Press the filter sack (33) on the suction connection firmly and lay it against the wall of the collecting bin.
⑧ Clip the hose for the cleaning fluid to the underside of the motor block.
H Place the motor block on top and secure it with the snap fasteners (3).
Connecting the suction hose. Remove the hose by turning the hose connecting piece and withdrawing the hose.
Assemble the accessories you require.
Connect the power cord.
N Turn the appliance on with the On/Off switch. The pump switch (7) must not light up.
To select your suction power level use the air slide (11, figure P):
- Air slide closed = full suction power
— Air slide open = reduced suction power
Wet vacuuming

ays remove the filter assembly (figure C, D) before starting wet vacuuming, since otherwise the filter assembly will be ruined.
Do not forget to unplug the power cord before removing the motor housing (2) from the tank.
Keep the float valve (40, fig. S) clean and accessible at all times. It automatically interrupts vacuuming when the collecting bin is full.

When vacuuming out containers in which the liquid level is higher than the top of the collecting bin and which have a larger volume than the capacity of the collecting bin, liquid can continue to be vacuumed beyond the capacity of the collecting bin if the float valve is closed.
In such cases, vacuum only in partial amounts and intermittently empty the collecting bin.
Lift the tube and flexible hose out of the liquid first and then turn off the appliance afterwards, in order to prevent an afterflow of liquid.

Open the snap fasteners and lift the motor block.

move the filters from the appliance, because they will otherwise be damaged (figures C and D).
If the cleaning fluid tank is fitted, remove it (figure K).

Place the motor block onto the collecting bin and close the snap fasteners.
Connect the power cord.

Connect flexible hose. Remove the hose by turning the hose connecting piece to the side and withdrawing the hose.

Close the air slide of the suction power control (11) on the handle.

Switch on the appliance with the On/Off (6) switch. The pump switch (7) must not light up.

er completion of wet vacuuming, please clean and dry the appliance and the accessories used.
Spray extraction (shampooing)

ke sure that everything you intend to wet-clean or shampoo is suitable for this procedure. Never wet-clean or shampoo fine, hand-woven or non-coloured-fast carpets.
If the carpet has been shampooed before, it is possible that you will obtain a great deal of foam when you use THOMAS BOXER for the first time.
If this is the case, switch off the appliance and empty the collecting bin.
Thereafter, in order to prevent excess foam, put 12 cup of vinegar into the collecting bin.
Excess foaming will not occur after you have thoroughly cleaned the carpet once with THOMAS cleaning concentrate, because it contains a special anti-foam substance.
Ensure that there is always liquid in the fresh water container when the spraying function is switched on, in order to avoid possible damage to the pump.
Carpet cleaning
A Open the snap-on fasteners and lift the motor block.
Remove the lid of the cleaning fluid tank and fill the tank with THOMAS ProTex cleaning concentrate.
See the bottle label for dosage instructions.
Use only lukewarm (max. 30 °C) water.
Replace the lid and insert the filled cleaning fluid tank into the appliance.
G Take the suction hose for cleaning concentrate out of its holder on the motor block.
L Place the motor block onto the collecting bin such that the suction hose (36) is immersed all the way to the bottom of the cleaning fluid tank and is not bent.
J Connect flexible hose. Remove the hose by turning the hose connecting piece to the side and withdrawing the hose.
M Insert the stop valve into its receptacle on the suction tube. Snap the handle into the suction tube and fasten the cleaning fluid hose to the flexible hose by means of the plastic clips.
N Snap the cleaning fluid hose into the quick coupling (5) on the motor block.
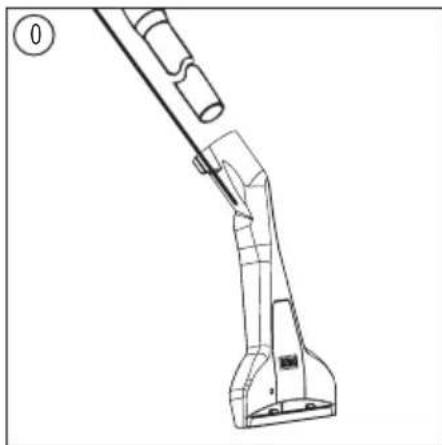
0 Fit the carpet spray extraction nozzle onto the suction tube.
Place the cleaning fluid hose of the carpet spraying nozzle onto the stop valve (16) and lock it in place by turning it. Press the cleaning fluid hose into the hose receptacle on the suction tubes and fasten it to the tube with the tube clips (39). Connect the mains cable.
N Switch on the appliance with the On/Off (6) switch. Switch on the enlightened pump switch (7).
P Press the lever of the stop valve (16) on the handle. Cleaning fluid spray will begin.
Before refilling the cleaning fluid tank, always empty the dirty water from the collecting bin.
Cleaning hard floors
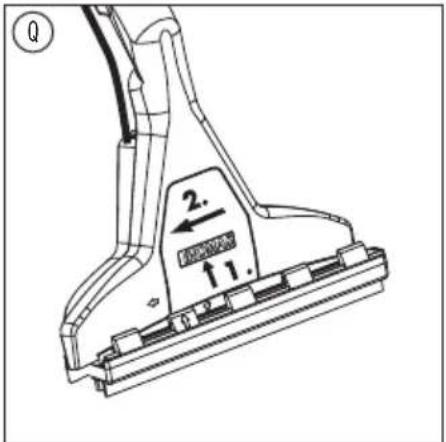
Q Assemble hard floor adapter.
See "Carpet cleaning" procedure.
We recommend THOMAS ProFloor cleaning concentrate for cleaning hard floors.
Cleaning upholstery
For cleaning your upholstery or car seats, please use the upholstery spray extraction nozzle (23).
Take care not to apply too much liquid; depending on the upholstery sublayer, you may experience significant drying times.
R Assemble the upholstery spray nozzle. Fasten the cleaning fluid hose by turning it. Fit the nozzle onto the handle.
Cleaning and care of the spray extraction system
K To care for the pump and valves properly, fill the cleaning fluid tank with clear water and insert it. Connect the mains cable. Switch on the On/Off switch (6) as well as the pump switch (7).
P Operate the spraying system, e.g. over a sink (disengage the lever of the stop valve (16)).
Before removing the cleaning fluid hose, engage the lever of the cut-off valve (16, figure P) in order to release the remaining pressure in the system, and then press the key on the quick coupling (5).
Remove the power cord!
Afterwards, clean and dry the appliance and the accessories you have used.
Never dip the motor block in water!
Clean the housing cover of the motor block casing with a damp cloth and wipe dry.
Important tips
When wet vacuuming, always vacuum by drawing the carpet spray nozzle in straight parallel strokes across the surface towards you.
In order to avoid soiling the carpet again, you should not walk on shampooed carpets until they have dried.
In order to achieve quicker drying of shampooed surfaces, it is helpful to remove residual liquid remaining in the carpet by vacuuming it again — without engaging the valve hook.
When cleaning parquet floors, please observe the instructions of the parquet floor manufacturer.
If unexpected difficulties arise
If your appliance does not operate to your satisfaction, you do not have to contact customer service straight away. Please check first as to whether the fault is due one of the following minor causes:
Dust escaping from suction sockets:
- Has the filter system been fitted in accordance with the instructions?
- Has an original THOMAS filter been used?
Gradual reduction in suction power:
- Are the pores of the tissue filter clogged up by dust or soot?
- Is the collecting bin or the paper filter bag full?
- Is there a blockage in the nozzle, extension tube or flexible hose?/Stretch the flexible hose while the appliance is switched on — this will loosen the obstruction.)
Water is coming out of the air expulsion openings of the appliance during vacuuming:
- Is the float (figure S) blocked when vacuuming liquid and unable to operate?
- Was original THOMAS cleaning concentrate used for shampooing?
Sudden reduction in suction power
- Has the float stopped the flow of air? This can happen if the appliance is standing at a slant or if the appliance falls over. Turn off the vacuum cleaner — the float will fall back into place — the appliance is ready for use again.
The motor does not function:
- Is there damage to the mains cable, plug or socket?
- Pull out the plug before checking.
- Never open the motor yourself!
No cleaning fluid is coming out:
- Is the pump switched on (switch (7) has to light up)?
- Clean the filter catch on the suction hose (36).
- Has the suction hose been correctly fitted in the cleaning fluid tank?
- Is the spray nozzle clogged? If the spray nozzle becomes clogged, lay the nozzle into water for a while and then blow strongly through it.
Customer Service
Ask your dealer for the THOMAS customer service centre in your area.
Please also provide the information on the nameplate of your THOMAS BOXER.
To maintain the safety of the appliance, only have repairs, particularly those on live components, performed by qualified electricians.
In the event of a malfunction, consult your specialist dealer or contact the factory customer service directly.
Irrespective of any guarantee obligations given by the dealer in the sales contract, we undertake to guarantee this appliance on the following conditions:
-
The guarantee is valid for a period of 24 months from the date of delivery to the first retail purchaser. In the case of industrial use or similar employment of the appliance, the guarantee period is reduced to 12 months. Proof of the date of purchase, e. g. presentation of the sales receipt, is required when making a claim on the guarantee.
-
Within the guarantee period, we undertake to remedy all functional defects, which have evidently arisen from faulty workmanship or materials, by repair or replacement of the faulty pans according to our choice. We assume possession of the defective parts thus replaced.
The guarantee does not apply to easily breakable parts, such as glass, plastics, lamps. Batteries and rechargeable batteries which are faulty or whose service life has been shortened as a result of normal wear, battery ageing or improper handling, are not covered by the warranty either.
Any defects established should be reported to us immediately during the guarantee period.
Neither the replacement parts necessary for the repair of any functional defects occurring during the guarantee period, nor the labour costs incurred thereby, will be charged. If unjustified claims are made on our service department, any costs associated therewith will be charged to the customer.
Demands for repair work to be carried out in the customer's home or wherever the appliance is installed can only be complied with in the case of large appliances. All other appliances are to be submitted to our nearest service branch or authorized service agent or else sent to the factory.
- The guarantee does not apply to minor discrepancies, which are immaterial for the value and operating efficiency of the appliance, nor does it apply to damages arising from chemical or electro-chemical reactions with water or in general through anomalous environmental conditions. No claims can be made on the guarantee for damages occurring as a result of normal wear and tear, non-observance of the operating instructions or improper use.
- The guarantee will be invalidated if modifications or repairs are carried out on the appliance by any persons other than those authorised by us to do so.
- Repairs and/or replacements carried out under the guarantee do not give rise to the extension or renewal of the guarantee period of either the appliance or the fitted replacement parts: the guarantee period of fitted replacement parts ends at the same time as that of the whole appliance.
- More extensive orotherclaims, particularly those for compensation for damages arising outside of the appliance, are exclusive, so far as a coercive liability has not been decreed by law.
Our after-sales services are also available after the expiry of the guarantee period. Please contact your dealer or our Customer Service Department directly.
Right to technical changes reserved.
GARANTIE
www.robert-thomas.net
United Kingdom:
Atlas Refurb & Repair Ltd.
8&9 Etruria Way
Bilston
West Midlands
WV14 7LH
Phone 01902 290 362
E-Mail: Thomasenquiries@atlas-refurb.co.uk
Polska:
APRA Serwis Sp. z o.o.
www.robert-thomas.net


- Inhalt Seite
- D
- Table des matières
- F
- Page
- Before operating appliance for the first time
- Safety points
- For sake of the environment
- Appliance packaging:
- Appliance disposal at the end of service life:
- Assembly of castor wheels
- Dry vacuuming
- Wet vacuuming
- Spray extraction (shampooing)
- Carpet cleaning
- Cleaning hard floors
- Cleaning upholstery
- Cleaning and care of the spray extraction system
- Never dip the motor block in water!
- Important tips
- If unexpected difficulties arise
- Dust escaping from suction sockets:
- Gradual reduction in suction power:
- Water is coming out of the air expulsion openings of the appliance during vacuuming:
- Sudden reduction in suction power
- The motor does not function:
- No cleaning fluid is coming out:
- Customer Service
- GARANTIE
- United Kingdom:
- Polska:
Brand : THOMAS
Model : Boxer
Category : Vacuum Cleaner