BS1500T - Endoscope VOLTCRAFT - Free user manual and instructions
Find the device manual for free BS1500T VOLTCRAFT in PDF.
| Product Type | Digital Endoscope |
| Brand | Voltcraft |
| Model | BS1500T |
| Dimensions (device without case) | Approx. 125 x 240 x 50 mm |
| Weight (device with case, SD card and battery) | Approx. 630 g |
| Power Supply | Rechargeable LiPo battery or mains adapter 100‑240 V AC / 5 V DC, 2 A |
| Display | Integrated TFT screen |
| Recording Media | SDHC memory card (max. 32 GB, supplied 4 GB) |
| Photo Format | JPEG, max. 640 × 480 pixels |
| Video Format | ASF, max. 640 × 480 pixels, MPEG4 compression |
| Video Output | PAL and NTSC via supplied AV cable |
| Connectors | 8-pin connector for endoscope camera, mini USB 1.1, power input, 3.5 mm AV output jack, SDHC slot |
| Main Functions | Photo capture, video recording, digital zoom, image rotation, photo comparison, distance counter, adjustable LED lighting |
| Operating Temperature | -20 °C to +60 °C |
| Charging Temperature | 0 °C to +40 °C |
| Maintenance and Cleaning | Clean with a dry cloth; for the lens, use the supplied cleaning kit. Do not immerse the base unit. |
| Safety | Use only for inspection of de-energized installations; do not expose to moisture; do not look directly into the LED beam. |
| Package Contents | Base unit, AV cable, LiPo battery, 4 GB SDHC card, mains adapter, cleaning kit, protective case, carrying case, mini USB 2.0 cable, instruction manual |
Frequently Asked Questions - BS1500T VOLTCRAFT
User questions about BS1500T VOLTCRAFT
0 question about this device. Answer the ones you know or ask your own.
Ask a new question about this device
Download the instructions for your Endoscope in PDF format for free! Find your manual BS1500T - VOLTCRAFT and take your electronic device back in hand. On this page are published all the documents necessary for the use of your device. BS1500T by VOLTCRAFT.
USER MANUAL BS1500T VOLTCRAFT
Copyright 2021 by Conrad Electronic SE.

Legal Notice
This is a publication by Conrad Electronic SE, Klaus-Conrad-Str. 1, D-92240 Hirschau (www.conrad.com). All rights including translation reserved. Reproduction by any method, e.g. photocopy, microfilming, or the capture in electronic data processing systems require the prior written approval by the editor. Reprinting, also in part, is prohibited. This publication represents the technical status at the time of printing.
Copyright 2021 by Conrad Electronic SE.

Information legales
Copyright 2021 by Conrad Electronic SE.

Colofon
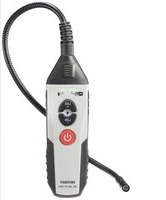
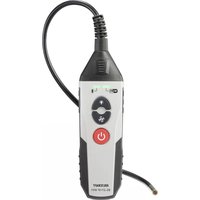
BS-1500T Endoscope Basic Unit
Item No. 1340787 Page 23 - 44
F Notice d'emploi
Appareil de base - endoscope BS-1500T
- Introduction 25
- Symbol explanation, labels 26
- Intended use 26
- Scope of delivery 27
- Safety information 27
a) General information 27
b) Rechargeable battery 28
- Operating elements 30
-
Display 32
-
Commissioning 33
a) Inserting the rechargeable battery. 33
b) Charging of rechargeable battery 33
c) Inserting the SDHC memory card. 34
d) Connection of an endoscope camera 34
e) Switching the device on and off 35
f) Setting the camera lighting 35
- Configuration 36
a) Setting the language. 36
b) Setting of date and time. 36
c) Automatic power-off. 37
d) Setting the video format. 37
e) Deleting all pictures and videos 37
f) Distance counter. 37
- Operation 38
a) Recording photos 38
b) Recording videos 38
c) Displaying photographs and videos 39
d) Deleting photographs and videos 39
e) Comparing pictures 40
f) Digital zoom. 40
g)Turning the display 40
Page
- PC Connection 41
- Using the video output 41
- Resetting to the factory settings 42
- Troubleshooting 42
- Maintenance and care 43
- Disposal 43
a) General information 43
b) Rechargeable battery 43
- Technical data 44
a) Endoscope basic device 44
b) Mains unit 44
1. INTRODUCTION
Dear Customer,
Thank you for making the excellent decision to purchase a Voltcraft® product.
Volkcraft® - This name stands for above-average quality products in the areas of measuring, charging and grid technology, characterised by technical competence, extraordinary performance and permanent innovation.
Whether you are an ambitious hobby electronics technician or a professional user - a product of the Voltcraft® brand family will provide you the best solution for even the most sophisticated of tasks. Special features: We offer the sophisticated technology and reliable quality of our Voltcraft® products at a near-unbeatable price/performance ratio. We lay the groundwork for long, good and successful cooperation.
Enjoy your new Voltcraft® - product!
All company names and product names are trademarks of their respective owners. All rights reserved.
If there are any technical questions, please contact:
www.conrad.com/contact
Latest Operating Instructions
The latest edition of these operating instructions is available for download from our website at all times.
2. SYMBOL EXPLANATION, LABELS

This symbol is used when your health is at risk, e.g. from an electric shock.

The exclamation mark in a triangle indicates important notes in these operating instructions that must be observed strictly.

The "arrow" symbol indicates that special advice and notes on operation are provided.
3. INTENDED USE
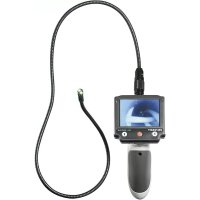
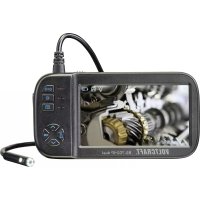
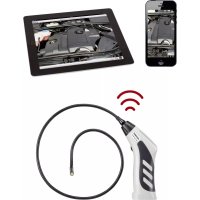
The endoscope basic device is a visual aid for optical troubleshooting and inspection at powered-down systems and facilities in connection with a separately available endoscope camera.
The camera picture is displayed on the installed TFT screen. Recorded pictures or videos can be transmitted via the memory card, USB or the video output.
The lighting at the tip of a matching endoscope camera can be controlled smoothly with this endoscope basic device.
The product must not be exposed to humidity or submersed.
The voltage is supplied via the LiPo battery or the enclosed plug-in mains unit.
A matching endoscope camera, such as the 1214310, can be found in our online shop, on the product website under the accessories section.
Operation in explosive atmospheres or use with persons and animals is not permissible.
Any other use than described above may damage the product and poses additional dangers.
Read these operating instructions completely and attentively; they contain a lot of important information on configuration. Always observe the safety information!
This product complies with the statutory national and European requirements.
4. SCOPE OF DELIVERY
Endoscope basic device BS-1500T
- LiPo battery
Power adapter
Rubber protection sleeve
- Mini-USB2.0-cable
AV-cable (2x cinch to 3.5" jack plug)
4 GB SDHC-memory card
- Cleaning set
Case
- Operating instructions
Up-to-date operating instructions
Download the latest operating instructions at www.conrad.com/downloads or scan the QR code shown. Follow the instructions on the website.

5. SAFETY INFORMATION

The guarantee/warranty will expire if damage is incurred resulting from non-compliance with the operating instructions! We do not assume any liability for consequential damage!
We do not assume any liability for property damage or personal injury caused by improper use or non-compliance with the safety instructions! In such cases the guarantee/warranty will expire!
Dear Customer,
The following safety information is intended not only for the protection of your health but also for the protection of the product.
Therefore, read this chapter very carefully before taking the product into operation!
a) General information
-
The unauthorized conversion and/or modification of the product is inadmissible for safety and approval reasons.
-
The mains unit is constructed pursuant to protection category II.
- The mains socket for the plug-in mains unit must be close to the device and easily accessible.
- The plug-in mains unit is only suitable for dry, closed rooms. Do not expose it to direct sunlight, heat, cold, dampness or wetness; otherwise, it will be damaged.
Moreover, there is the risk of a fatal electric shock!
- Do not pull the plug-in mains unit from the mains socket by pulling the cable.
- If the mains unit is damaged, do not touch it. Danger to life from electric shock!
First deactivate all sides of the mains socket to which the plug-in mains unit is connected (e.g. switch off the respective fuse or turn out the fuse. Then deactivate the associated FI protection switch). Only then pull the plug-in mains unit from the mains socket and take the product to a specialist workshop.

- The endoscope basic device is not water-tight and therefore cannot be used underwater. Protect the basic device from splash water.
- The endoscope must only be used for inspection in powered-down systems. The head of a matching endoscope camera head is made of metal and can cause short circuits.
For reasons of safety, switch off the power each time before cleaning.
-
If an optional camera is lit by LEDs, never look into the LED beam directly or with visual instruments.
-
Do not place any open sources of fire, such as burning candles, on the device.
-
The product is maintenance-free for you. Servicing or repair must only be carried out by a specialist or specialist workshop. The product contains no parts that require servicing by you. Therefore, do not open it.
- Protect the product from direct solar radiation, strong heat (>60^) , cold (< -20^) , vibrations or mechanical stress.
- The product is not a toy and must be kept out of reach of children. The product contains small parts and rechargeable batteries.
- Do not leave packaging material unattended. It may become a dangerous toy for children.
- Handle the product with care. It can be damaged by impact, blows or when dropped even from a low height.
- If there are any questions that are not answered in this operating manual, contact our technical support or another expert.
b) Rechargeable battery
-
Keep the rechargeable battery of the product out of reach of children.
-
Do not leave the rechargeable battery lying around openly. There is a risk of it being swallowed by children or pets. If swallowed, consult a doctor immediately. Danger to life!
- Leaking or damaged batteries/rechargeable batteries can cause chemical burns to skin when touched without the use of adequate protective gloves.
- Replace a defective rechargeable battery with a new one or remove it as soon as possible. A defective rechargeable battery may leak and damage the device!
- If not used for a longer period (e.g. in case of storage), remove the inserted rechargeable battery. There is a danger of old rechargeable batteries leaking, which causes damage to the product. Loss of guarantee/warranty!
- Always observe the correct polarity (plus/+ and minus/-) when inserting the rechargeable battery. Connecting the battery incorrectly will not only damage the product but also the rechargeable battery. There is a danger of fire and explosion.
- The rechargeable battery must never be short-circuited, disassembled or thrown into fire. There is a danger of explosion!

recharge the rechargeable battery when it is intact and undamaged. If the outer isolation of the rechargeable battery is damaged or the battery is deformed or bloated, it must not be charged. There is acute danger of fire or explosion!
- Charge the enclosed rechargeable battery only in the endoscope basic device; never use any other chargers.
- If you are not using the endoscope for an extended period (e.g. during storage), charge the battery at the latest every 3 months to avoid deep discharge. Deep discharge will damage the rechargeable battery permanently!
- Never damage the rechargeable battery covering, do not cut the foil cover, do not probe the rechargeable battery with sharp objects. There is a risk of fire and explosion!
- Read chapter "Disposal" about the environmentally friendly disposal of the rechargeable battery.
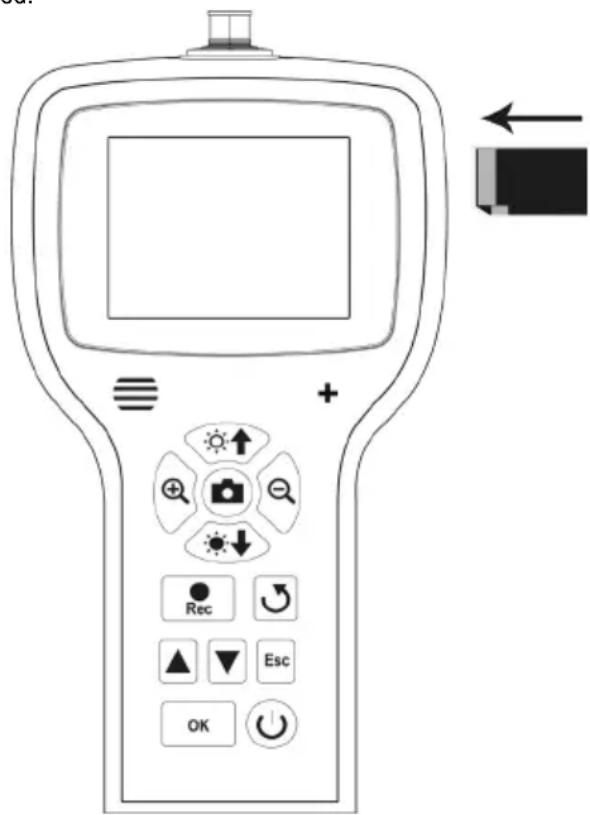
6. OPERATING ELEMENTS
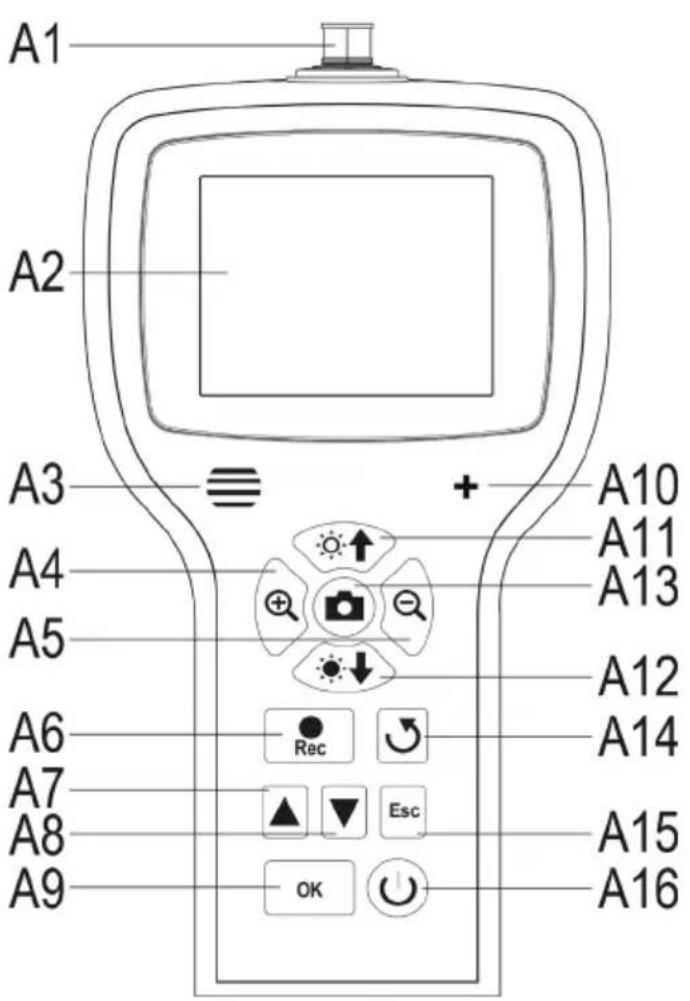
A1 Camera connection; 8-pin
A2 Display
A3 Speakers
A4 Enlarging displayed picture (zoom +)
A5 Reducing displayed picture (zoom -)
A6 Button for recording video; down when setting date/time, starting/pausing a video
A7 Up in the menu; scrolls through the recorded pictures and videos (previous)
A8 Down in the menu; scrolls through the recorded pictures and videos (next)
A9 Opening the menu; selection/confirmation in the menu
A10 Microphone
A11 Increasing brightness of the LED camera lighting; increasing volume in playback mode
A12 Reducing brightness of the LED camera lighting; reducing volume in playback mode
A13 Recording button for photograph; up when setting date/time
A14 Button to turn the displayed picture
A15 Back in the menu
A16 On/off button
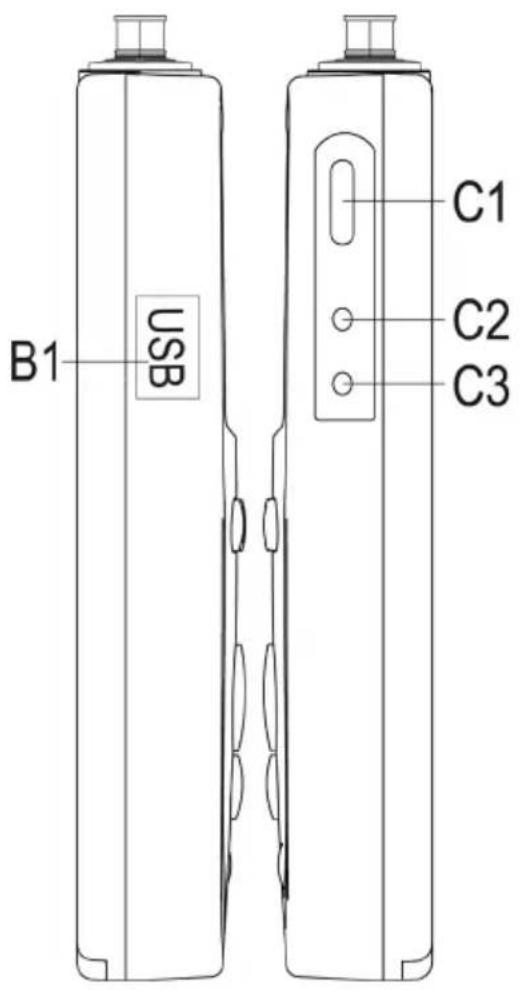
B1 Mini-USB1.1 connection
C1 SDHC card slot
C2 Video output
C3 Connection for the plug-in mains unit
7. DISPLAY
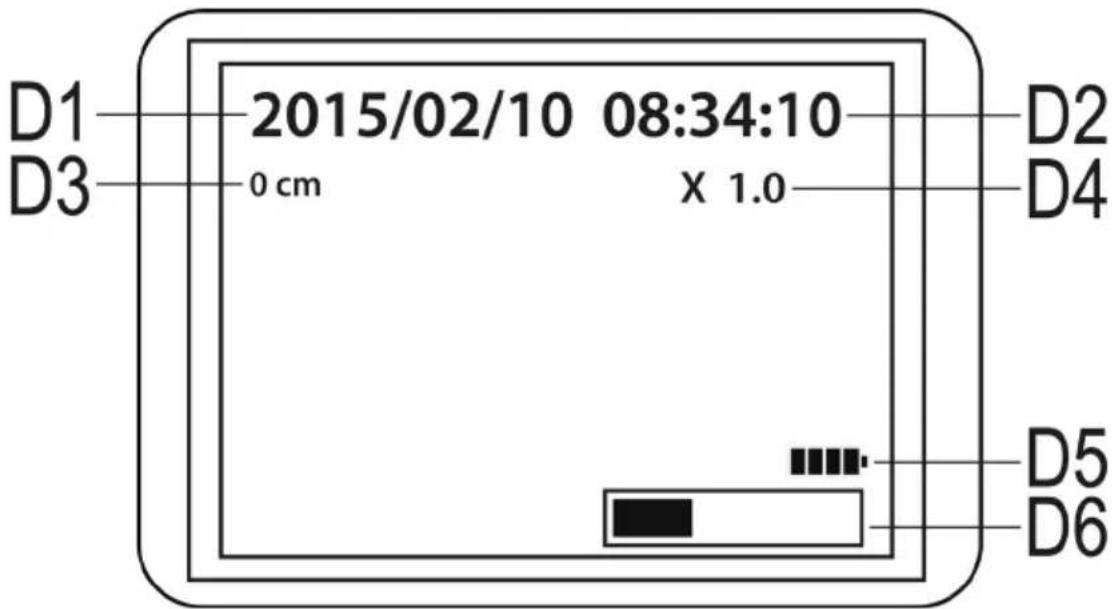
D1 Date
D2 Time
D3 Distance inspected with the camera so far
D4 Currently set zoom factor
D5 Rechargeable battery display
D6 Display of the occupied memory on the SD card
a) Inserting the rechargeable battery
If the LiPo rechargeable battery is enclosed separately, you need to insert it first before you can use the device. If the rechargeable battery is already inserted, you can skip this step for initial commissioning and continue with item b).
- First, open the battery lid of the endoscope basic device. It is attached on the rear in the lower part of the housing.
- For this, push the lever towards the battery lid and then take out the lid.
- Take the LiPo rechargeable battery and connect the plug of the rechargeable battery to the socket of the endoscope basic device. Always ensure correct polarity.
- Carefully push the cable into the opening until the plug disappears.
- Now insert the rechargeable battery in the compartment.
- Last, close the battery compartment lid again. For this, insert the little guide at the bottom into the intended slot and push the lid closed until it latches.
- The rechargeable batteries are now inserted.

If you want to replace the LiPo rechargeable battery, take out the old rechargeable battery carefully before you insert the new one.
Pull the connection cable through the opening until the plug is exposed and disconnect the plug connection.
Use only the genuine rechargeable battery.
b) Charging of rechargeable battery

Please also observe that the ambience temperature is not less than 0^ or more than +40^ while charging. This may damage the product and the rechargeable battery.
Proceed as follows to charge the rechargeable battery.
- Pull out the rubber seal on the right side of the product and fold it to the side.
- Connect the output of the plug-in mains unit to the input socket C3 of the endoscope basic device.
- Plug the mains unit into a mains socket.
- Charging starts automatically.

The product is ready for operation even during the charging process.
If you switch on the device while it is being charged (see chapter 8 e)), a charging display D5 appears at the lower right of the display. Once it shows 4 bars, the rechargeable battery is fully charged.
c) Inserting the SDHC memory card
You can record pictures and videos with the BS-1500T. They are saved on the SDHC-card. The enclosed card has a storage capacity of 4 GB. Cards with up to 32 GB are supported.
Now insert the memory card into the endoscope basic device.
Before starting, switch off the device and disconnect the plug-in mains unit if connected.
- As when charging the rechargeable battery, pull out the rubber cover on the right and fold it to the side.
- Push the card into the memory card slot C1 until it latches.
The contacts must point to the top and to the left as shown on the right.

To remove the memory card again, switch off the BS-1500T first. Push the card to unlatch it and then pull it from the slot.
d) Connection of an endoscope camera
Now connect a compatible endoscope camera (e.g. the 1214310) to the BS-1500T.
It is possible that an adapter or adapter cable is needed to connect the camera to the basics device. If this is the case with your camera, just plug the adapter between the endoscope basic device and the camera.
To connect a compatible camera to the 8-pin plug of the BS-1500T, proceed as follows.
- If you have switched on the device, switch it off again at first (chapter 8 e).
- Push the 8-pin plug of the camera onto the connection A1 of the BS-1500T. The proper orientation can be told by the guide in the plug. For the endoscope basic device, it points to the front.
When pushing on, ensure that you do not bend or break off any pins.
- Turn the closure of the camera plug clockwise until it is tightened hand-tight.
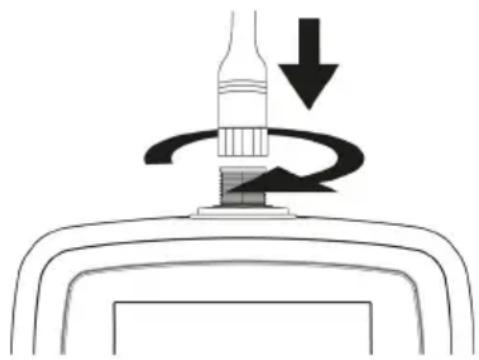

To remove the camera again, switch off the BS-1500T first and screw open the metal closure again (turn counter-clockwise). Then remove the camera.
e) Switching the device on and off
- To switch on the endoscope basic device, push the on/off button A16 for 3 to 5 seconds.
Then release the button. The device will start about one second later and indicate this in the display.
When starting is completed, the device is in preview mode. This means that the current camera picture, the set date (D1) and the time (D2), as well as the meter display (D3) are shown.
At the lower right of the display, you will also see the display for the battery charge(D5). If the battery charge is too low, charge the rechargeable battery before continuing.
A bar (D6) is shown just below, indicating the remaining capacity of the memory card. To show the bar again, push the button "Esc" (A15).
- To switch off the endoscope basic device, push the on/off button A16 again for 3 to 5 seconds. Once the display goes out, the device is off.
- If no input is made for some time, the endoscope will switch off on its own. The time can be set in the menu. Observe chapter 9. c).
f) Setting the camera lighting
To be able to use the endoscope in absolutely dark areas as well, the BS-1500T has an integrated dial for the LED lighting installed in the camera head.
- Push the button A11 (button with the sun and the arrow up) to increase brightness.
- To reduce brightness, push the button A12 (button with the sun and the arrow down).
- Set the lighting so that the picture displayed is recognisable well.
In narrow tubes or similar, it may be of advantage to reduce lighting slightly to prevent reflections and too bright pictures.
The following configuration items can be found in the setting menu.
- To enter the settings menu, push the button "OK" (A9) with the device switched on.
- Leave the menu by pushing the button "Esc" (A15).
- Navigate through the menu items with the two arrows A7 (up) and A8 (down).
- The desired menu item is selected with the button "OK" (A9).
- If no input is made for a few seconds, the menu is closed again automatically.
a) Setting the language
- Navigate (A7/A8) to the menu item "LANGUAGE" and open it (A9).
If you have already switched on the device and changed the language then, the menu item is named accordingly differently.
- Select the desired language (A7/A8) and confirm with "OK" (A9).
- The menu is closed automatically and the display returns to preview mode.
b) Setting of date and time
We recommend setting the date and time before your record pictures or videos. You can display the date and time in the picture or video as desired.
- Navigate (A7/A8) to the menu item "DATE/TIME SETUP" and open it (A9).
- Specify the date format first.
For this, open the item "DATE FORMAT".
Select your preferred format and confirm with "OK" (A9).
Possibly formats: yyyy/mm/dd; mm/dd/yyyy; dd/mm/yyyy (yyyy=year; mm=month; dd=day)
- Next, specify the format of the time.
For this, open the item "TIME FORMAT".
Select either 12 hours or 24 hours and confirm with "OK" (A9).
- Now set the date and time.
For this, open the item "SETUP".
Set all values correctly in sequence. You can set the value with the buttons A6 (reduce value) and A13 (increase value). Use the two arrows A7 and A8 again to navigate through the individual setting fields.
When everything is set, select whether the date and time is to be displayed on the recorded pictures and videos.
For this, switch the function on or off. If the item "DISPLAY" is followed by "ON", the date and time are displayed; if it is "OFF", they are not.
- The button "Esc" (A15) returns you to the main menu.
c) Automatic power-off
With this function, you can set the time after which the device automatically powers off if no recording is running or a button is pushed.
- Navigate (A7/A8) to the menu item "AUTO POWER OFF" and open it (A9).
- Select the desired time (A7/A8) and confirm with "OK" (A9).
If you choose "DISABLE", the function is off.
The following times are available (in minutes): 5, 10, 15, 20
- The menu is closed automatically and the display returns to preview mode.
d) Setting the video format
To set the video format for using the video output, proceed as follows.
- Navigate (A7/A8) to the menu item "VIDEO FORMAT" and open it (A9).
- Select either "PAL" or "NTSC" (A7/A8) and confirm with "OK" (A9).
- The menu is closed automatically and the display shows the standard display.

PAL is the European TV standard. NTSC is mostly used in North America. The standard you use depends on the TV you have.
e) Deleting all pictures and videos
To delete all recorded pictures and videos from the inserted memory card, proceed as follows.
- Navigate (A7/A8) to the menu item "DELETE ALL" and open it (A9).
- Select "YES" (A7/A8) and confirm with "OK" (A9).
- The menu is closed automatically and the display shows the standard display.
All pictures and videos that are in the recording folder "100DCSCIM" are then deleted. The "100" at the beginning of the folder may also change. The recording folder is in the folder "DCIM" on the memory card.
f) Distance counter
The endoscope has a function integrated with which you can determine the length of the object that you are inspecting with your camera.
When the function is active, the length is displayed in the display (D3).
- To configure the function, navigate (A7/A8) to the menu item 'LENGTH MEASURE" and open it (A9).
- The menu item "RESET" resets the currently displayed length.
Open the item with "OK" (A9), switch (A7/A8) to "YES" and confirm again with "OK" (A9).
- The displayed unit (cm, m, inch, feet) can be selected in the submenu "UNIT".
- You can switch the function on and off in the item "Disable/Enable".
10. OPERATION
a) Recording photos
- To record an individual picture with the camera, simply push the button A13 in preview mode.
Keep the connected camera as calm as possible to receive a good recording.
- Furthermore, you can record a screenshot while playing back (see chapter 10 c) or recording (see chapter 10 b) a video.
Push the button A13 again while the video is played back or the recording is running.
- All recorded pictures are saved in JPG format, in the sub folder "100DCSCIM". The "100" at the beginning of the folder may also change. The recording folder is in the folder "DCIM" on the memory card.
The file names are numbered consecutively.
b) Recording videos
To record a video, proceed similarly as for recording a photograph.
- In preview mode, push the button A6 to start the recording.
The two icons for video recording appear in the upper left of the display. The current recording time is displayed on the lower left.
- Push the button A6 again to terminate the recording.
The recorded videos are saved like photographs in the folder "100DCSCIM". They are saved in the format ASF
c) Displaying photographs and videos
- To get to the display mode for photographs and videos, push either the button A7 or A8.
The last recording is always displayed first.
- Here, you can use the two arrows A7 and A8 to scroll through the recordings. The button A8 scrolls up and the button A7 scrolls down.
- The pictures and videos are marked with two different icons. They are displayed at the upper left of the display.
Symbol for photographs: Symbol for videos:


- To play back a video, push the button "Rec" (A6).
To pause the video, push the button A6 again.
When the video is paused, you can also switch to the next photograph or video with the arrows A7 and A8.
- The volume for playback of a video can be set with the two buttons A11 (louder) and A12 (quieter). However, this only works in display mode. When the endoscope switches back to preview mode, these two buttons adjust the LED lighting of the camera.
d) Deleting photographs and videos
- If you want to delete a specific photograph or video, push the button "OK" (A9) while displaying the respective photograph or video.
Use one of the two buttons A7 or A8 to switch to "YES" and confirm again with the button "OK" (A9).
To cancel deletion, push "OK" (A9), while "NO" is selected.
e) Comparing pictures
You can select two of your recorded pictures and display them side by side for comparison.
- Select the first photograph with one of the two arrows A7 or A8.
- Push the button A4 (magnifying glass with the +). The display shows "Dualdisplaystate1".
- Now select the second photograph again with one of the two arrows A7 or A8.
- Push the button A5 (magnifying glass with the -). The display shows "Dualisplaystate2".
- To show the two selected pictures side by side on the display, push the button A14.
- To leave dual display, push the button "Esc" (A15).
f) Digital zoom
In preview mode, you can digitally enlarge the pictures.
- To enlarge them, push the button A4, to reduce their size, push the button A5.
- You can enlarge a picture up to twice its size (2.0) in steps of 0.1. The current size is indicated on the display (D4).
- If you record a picture or video now, this will be done with the set zoom factor.
g) Turning the display
You can turn the displayed picture in preview mode.
- For this, push the button A14.
- The display is turned counter-clockwise to the left by 90^ at each push.
- When you push the button for the fourth time, the original picture will be displayed again.
11. PC CONNECTION
To transfer the recorded pictures and videos to a computer, you can connect your endoscope basic device to your PC directly via USB.
Of course, there is the alternative option of removing the SD memory card from the device to transfer the pictures and videos from the card reader to your computer.
Proceed as follows:
- Switch on the endoscope.
- Connect the USB cable to the mini-USB-socket B1 of the endoscope basic device.
- Connect the other end of the USB cable to a free USB port of your PC.
- The BS-1500T now acts as a card reader and your computer will recognise the memory card as a removable drive.
- You can now copy files from the SD card onto the PC.
12. USING THE VIDEO OUTPUT
Before you can use the video output, you always must have set the proper video format as described in chapter 9 d). Also observe the operating instructions for your TV.
- First connect the 3.5mm jack plug of the enclosed video cable to the AV socket C2 of the endoscope basic device.
- The yellow cinch plug transmits the video signal. Connect it to the video input socket of your TV.
- Connect the white cinch plug that transmits the audio signal to the corresponding cinch audio input of your TV.
- Switch on the endoscope.
- Open the setting menu (A9) and navigate to the item "VIDEO OUTPUT".
- Push the button "OK" (A9), to switch the picture from the display of the endoscope to your TV.
- To terminate display on your TV, open the menu again and confirm with "OK" while the item "VIDEO OUTPUT" is selected (A9).
Alternatively, disconnect the video cable between the endoscope and your TV.
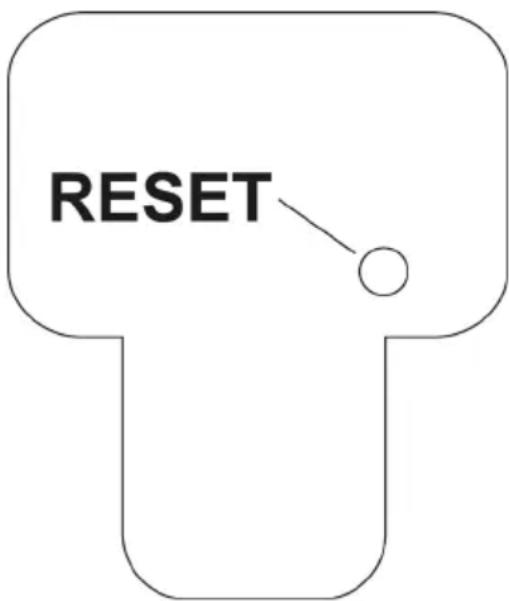
13. RESETTING TO THE FACTORY SETTINGS
- To reset the endoscope to factory settings, switch it on first.
- Wait until starting is completed and the regular display with date, time and battery display appears.
- Use a thin object, e.g. a paper clip, to carefully push the Reset button recessed in the rear.
- Once the display turns black, let go of the button.
- The endoscope basic device restarts and is then reset to factory settings.

Resetting does not delete any pictures or videos from the memory card.
14. TROUBLESHOOTING
In purchasing the endoscope, you have acquired a product designed to the state of the art and operationally reliable. Nevertheless, problems or errors may occur. Therefore, we would like to describe to you how to remove possible interferences.
The endoscope does not work; nothing is shown on the display:
- The rechargeable battery may be flat. Charge it as described in chapter 8. b).
- Check if the rechargeable battery is connected to the device.
- Reset the device to factory settings as described in chapter 13.
The preview mode is not displayed after activation. You can see only writing:
- Check that your endoscope camera is properly connected to the endoscope basic device.
- Switch off the endoscope, wait for a few seconds and then switch it on again.
- Reset the device to factory settings as described in chapter 13.
No photographs or videos can be recorded:
- Check if the SD card is properly inserted.
- The writing protection of the SD card may be active (small slider at the card is set to "LOCK"). Switch off the write protection and try again.
- The SD card may be full. Check this by either connecting the endoscope to a computer by USB or using the display bar D6. Delete some recordings if necessary.
- The SD card partition may be damaged. Format the card with your computer.
- The SD card may be defective. Check the endoscope with another SD card.
15. MAINTENANCE AND CARE
The product is maintenance-free for you. Never take it apart or open it (except for the procedure as described in these operating instructions for inserting or replacing the rechargeable batteries). Repair or maintenance work must be carried out by a specialist.
A dry, soft and clean cloth is sufficient for cleaning the outside.
Never submerge the endoscope basic device in water.
Flush the optional endoscope camera thoroughly with clean water after each use in liquids and dry it off before returning the product to the case.
Use the enclosed cleaning set, a small brush or a cotton swab to clean the camera lens.
Never use any aggressive cleaning agents or chemical solutions. They may damage the surface of the casing (discolourations).
16. DISPOSAL
a) Product

Remove
Electronic devices are recyclable waste and must not be disposed of in the household waste. At the end of its service life, dispose of the product in accordance with applicable regulatory guidelines.
any inserted batteries and dispose of them separately from the product..
b) Rechargeable battery

You as the end user are required by law (Battery Ordinance) to return all used batteries. Disposing of them in the household waste is prohibited.
Contaminated batteries are labeled with this symbol to indicate that disposal in the domestic waste is forbidden. The designations for the heavy metals involved are: Cd = Cadmium, Hg = Mercury, Pb = Lead (name on batteries, e.g. below the trash icon on the left).
Used batteries can be returned to collection points in your municipality, our stores or wherever batteries are sold. You thus fulfill your statutory obligations and contribute to the protection of the environment.
17. TECHNICAL DATA
a) Endoscope basic device
Operating voltage .5V/DC
Power consumption.. Max. 2250 mA
Rechargeable battery. Rechargeable Li-polymer rechargeable battery, 3.7 V/DC, max. 2500 mA
Display. 8.89 cm (3.5") TFT-monitor; max. 320 x 240 pixels
Connections.... Connection for endoscope camera 8-pin; Mini-USB1.1-port; connection for the plug-in mains unit; AV-output 3.5mm jack plug; SDHC-memory card slot
Storage medium. 4 GB SDHC-memory card (enclosed) max. 32 GB (speed min. class 4)
Video output (AV) PAL & NTSC
Picture format.JPG; max. 640 x 480 Pixel
Video recording format.. ASF; max. 640 x 480 Pixel
Video compression format.........MPEG4
Dimensions (W x D x H) approx. 125 x 240 x 50 mm (device without rubber protection sleeve); approx. 440 x 330 x 125 mm (case)
Weight approx. 630 g (only device incl. rubber protection sleeve, SD card and rechargeable battery)
Ambient temperature. -20 °C to +60 °C (in operation)
0^ to +40^ (while charging)
b) Mains unit
Input Voltage. 100 - 240V AC, 50/60 Hz
Input current .0.3A
Connection .Euro Plug
Output. 5V DC
Output current. 2A
Connection.Hollow plug 3.5× 1.35× 9mm
TABLE DES MATIÈRES
Page
Chere cliente, cher client,
Vouavesprusone trésbondecisionenachetant unproduit Voltcraft etnousyouenremercions.
France (email): technique@conrad-france.fr
Chere cliente, cher client,
Tension de service. 5 V/CC
Courant absorbé. Max. 2 250 mA
Batterie . Batterie rechargeable lithium-polymere, 3,7 V/CC, max. 2 500 mA
Écran ... Écran TFT 8,89 cm (3,5") ; max. 320 x 240 pixels
2. VERKLARING VAN SYMBOLEN, OPSCHRIFTEN