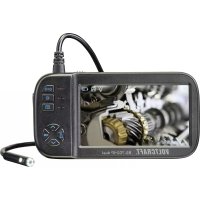
BS20 WIFI - Endoscope VOLTCRAFT - Free user manual and instructions
Find the device manual for free BS20 WIFI VOLTCRAFT in PDF.
| Brand | Voltcraft |
| Model | BS20 WIFI |
| Product type | Endoscope |
| Dimensions (W x D x H) | approx. 40 x 176 x 132 mm |
| Weight (without batteries) | approx. 275 g |
| Power supply | 4 AA batteries |
| Battery life | approx. 2.5 hours |
| Sensor | 1/9" VGA CMOS |
| Maximum resolution | 640 x 480 pixels (VGA) |
| Frame rate | 30 FPS |
| Lighting | 4 white LEDs, adjustable |
| Focus distance | 30 mm to infinity |
| Gooseneck length | approx. 85 cm |
| Camera head diameter | 8.0 mm |
| Gooseneck bending radius | max. 45 mm |
| Connectivity | WLAN IEEE802.11b/g/n 2.4 GHz, WPA2 |
| WLAN range | max. 18 m in free space |
| Protection (gooseneck) | IP67 |
| Compatible devices | Apple iOS 4.1+ and Android 2.3.5+ |
| Package contents | Endoscope, magnet, mirror, hook, smartphone holder, case, instruction manual |
Frequently Asked Questions - BS20 WIFI VOLTCRAFT
User questions about BS20 WIFI VOLTCRAFT
0 question about this device. Answer the ones you know or ask your own.
Ask a new question about this device
Download the instructions for your Endoscope in PDF format for free! Find your manual BS20 WIFI - VOLTCRAFT and take your electronic device back in hand. On this page are published all the documents necessary for the use of your device. BS20 WIFI by VOLTCRAFT.
USER MANUAL BS20 WIFI VOLTCRAFT
www.business.conrad.at
text_image
A1 A2 A3 A4 A5 A6natural_image
Line drawing of a mechanical device with internal components and mounting holes (no text or symbols)natural_image
Technical line drawing of a mechanical component with cutouts and mounting holes (no text or symbols)text_image
Vertical UI panel with icons for camera, record, play back, and gear icon
text_image
Warning Are you sure to restore factory settings? YES NO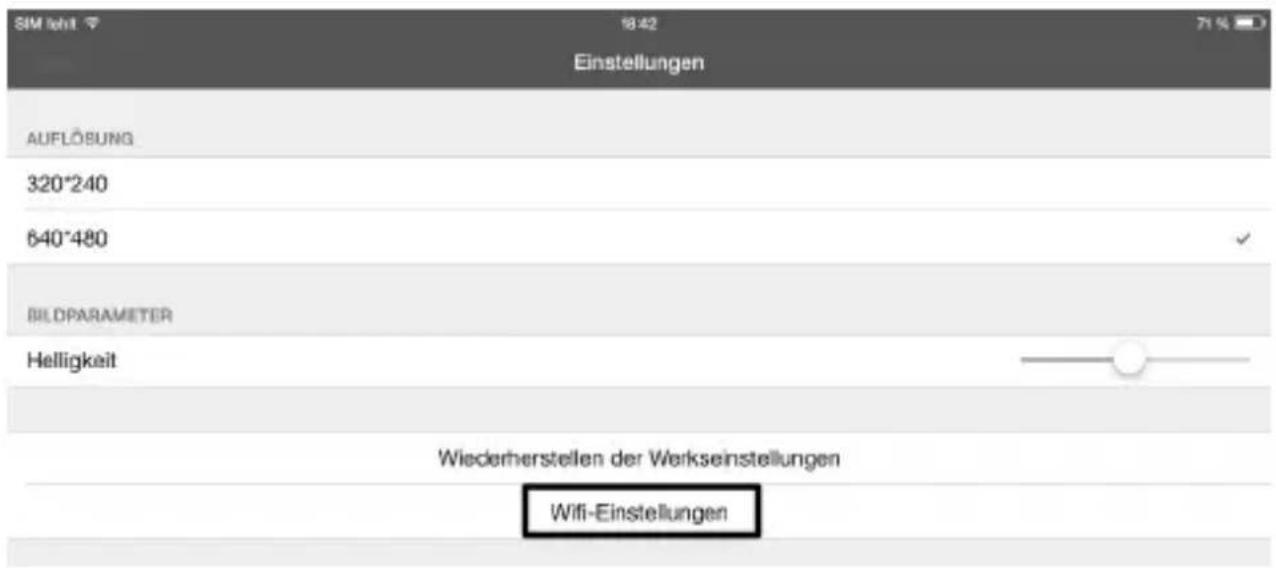
text_image
User interface buttons including gear, camera, record, and play back iconsnatural_image
Blank grayscale image with no visible text, symbols, or discernible featurestext_image
Vertical UI panel with icons for camera, record, play button, and gear icon
text_image
SIM ioh1 18:43 Wiedergabe Copy to Album Löschen Clear all files DATIDLISTE 2015_05_10_18_43_25.mov Größe der Date:1.69MB Datum:2015-05-10 18:43:25 Dauer:00:00:05natural_image
Blank grayscale image with no visible text, symbols, or identifiable objectstext_image
Setting Wi-Fi Setting Resolution Setting Brightness Setting Closetext_image
Wi-Fi Setting SSID Cur Password New Pwd(8) iSNAKESCOPE OK Canceltext_image
Setting Wi-Fi Setting Resolution Setting Brightness Setting Closetext_image
Setting Wi-Fi Setting Resolution Setting Brightness Setting Closetext_image
Brightness Setting 7 8 9 OK Canceltext_image
Setting Brightness Setting Reset to Default About Closetext_image
Reset Setting The device will restore factory defaults then reboot, are you sure ? OK Canceltext_image
Setting Brightness Setting Reset to Default About CloseBedienung:
natural_image
Blank grayscale image with no visible content, text, or symbolsnatural_image
Blank grayscale image with control buttons and UI elements (no readable text or symbols)natural_image
Blank grayscale image with no visible text, symbols, or identifiable objectstext_image
2015_05_10_16_52_59.movtext_image
/storage/emulated/0 RecordVideo iSNAKESCOPE PhotoEditor SMemo DCIMnatural_image
Three-panel image showing mechanical components: a clamp, a ring clamp, and a needle-like tool with a tip (no text or symbols visible)Schutzgrad .....IP67 (nur Schwanenhals)
Sensor 1/9" VGA CMOS
Framerate ....30 FPS
Bildformat ......JPG
Video Streaming Format ......MJPG
- Introduction......30
- Explanation of symbols, labels....31
- Intended use....31
- Scope of delivery....32
- Safety information .... 32
a) General information....33
b) Batteries 34
- Operating elements 35
- Inserting and replacing the batteries 36
- General operation....37
a) Switching the device on and off 37
b) Setting the camera lighting....37
- Installing the app ....38
a) Apple iOS 38
b) Android ™ 38
- Connecting to the Endoscope .... 39
a) Apple iOS 39
b) Android ™ 40
- Operation via the app ....41
a) Apple iOS 41
b) Android ™ 45
- Attachments ....51
- Resetting to the factory settings 52
- Troubleshooting....52
- Maintenance and care....53
- Disposal....54
a) General information....54
b) Batteries 54
- Declaration of conformity (DOC) 54
- Technical data ....55
1. INTRODUCTION
Dear Customer,
Thank you for making the excellent decision to purchase a Voltcraft® product.
Voltcraft® - This name stands for above-average quality products in the areas of measuring, charging and grid technology, characterised by technical competence, extraordinary performance and permanent innovation.
Whether you are an ambitious hobby electronics or a professional user - a product of the Voltcraft® brand family will provide you with the best solution for even the most sophisticated of tasks. Special features: We offer the sophisticated technology and reliable quality of our Voltcraft® products at a near-unbeatable price/performance ratio. We lay the groundwork for long, good and successful cooperation.
Enjoy your new Voltcraft® product!
All company names and product names are trademarks of their respective owners. All rights reserved.
If there are any technical questions, please contact:
International: www.conrad.com/contact
United Kingdom: www.conrad-electronic.co.uk/contact
Latest Operating Instructions
The latest edition of these operating instructions is available for download from our website at all times.
- Open www.conrad.de in your web browser.
- Navigate to the product page of your product. For this, just enter the order number in the search bar.
- Switch to the tab "Downloads".
- Download the required operating instructions.
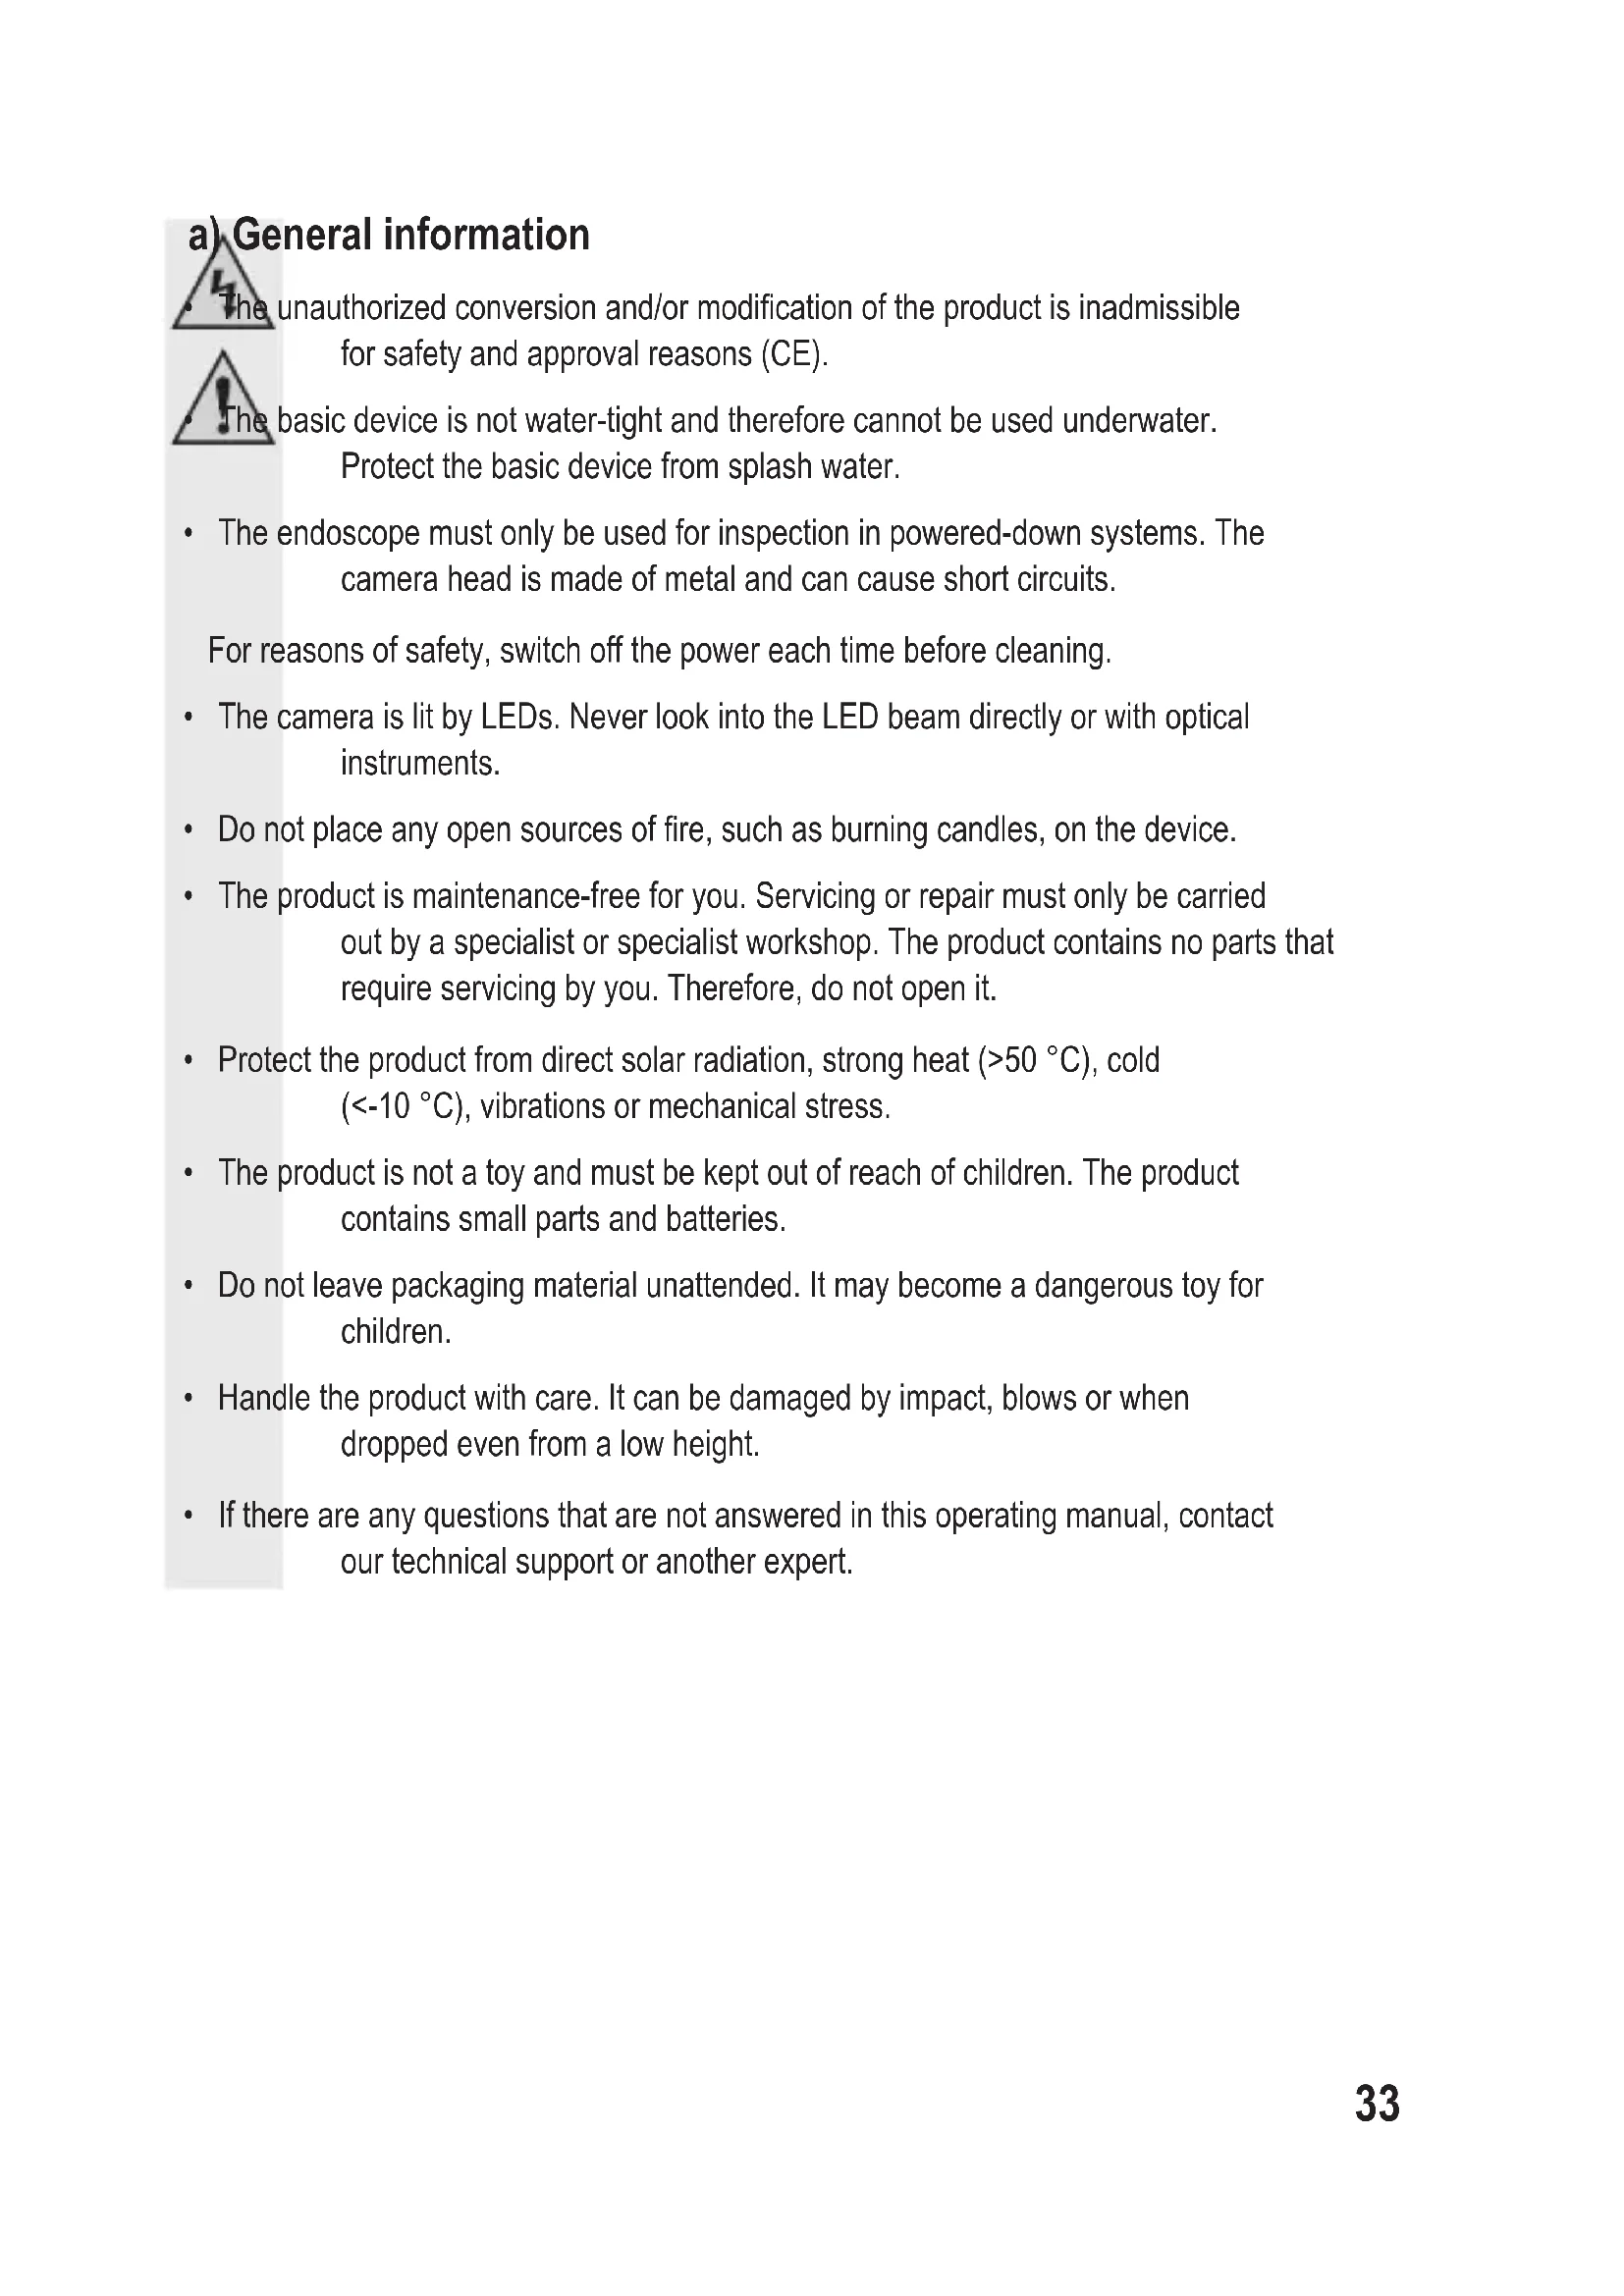
2. EXPLANATION OF SYMBOLS, LABELS

This symbol is used when your health is at risk, e.g. from an electric shock.

The exclamation mark in a triangle indicates important notes in these operating instructions that must be observed strictly.
→ The “arrow” symbol indicates that special advice and notes on operation are provided.
3. INTENDED USE
The endoscope is a visual aid for optical troubleshooting and inspection at powered-down systems and facilities. Operation in explosive atmospheres or use with persons and animals is not permissible.
The swan-neck camera is water-tight (IP67) and suitable for use in watery liquids (no acids or lye). The basic device must not be exposed to humidity or submersed.
The lighting at the tip of the camera can be adjusted.
The picture is displayed with an app via an Apple iPhone, iPad or via an Android ^™ Smartphone or tablet. Pictures and video recordings can be saved and played back on the display device.
The signal transmission between your mobile device and the endoscope takes place via WiFi.
The voltage is supplied via 4 AA batteries.
Any other use than described above may damage the product and poses additional dangers.
Read these operating instructions completely and attentively; they contain a lot of important information on configuration. Always observe the safety information!
This product complies with the statutory national and European requirements.
4. SCOPE OF DELIVERY
- Endoscope
- Magnet
- Mirror
- Hooks
- Smartphone holder
- Case
- Operating instructions
5. SAFETY INFORMATION

The guarantee/warranty will expire if damage is incurred resulting from non-compliance with the operating instructions! We do not assume any liability for consequential damage!
We do not assume any liability for property damage or personal injury caused by improper use or non-compliance with the safety instructions! In such cases the guarantee/warranty will expire!
Dear Customer,
The following safety information is intended not only for the protection of your health but also for the protection of the product.
Therefore, read this chapter very carefully before taking the product into operation!
a) General information
unauthorized conversion and/or modification of the product is inadmissible for safety and approval reasons (CE).

basic device is not water-tight and therefore cannot be used underwater. Protect the basic device from splash water.
- The endoscope must only be used for inspection in powered-down systems. The camera head is made of metal and can cause short circuits.
For reasons of safety, switch off the power each time before cleaning.
- The camera is lit by LEDs. Never look into the LED beam directly or with optical instruments.
- Do not place any open sources of fire, such as burning candles, on the device.
- The product is maintenance-free for you. Servicing or repair must only be carried out by a specialist or specialist workshop. The product contains no parts that require servicing by you. Therefore, do not open it.
- Protect the product from direct solar radiation, strong heat (>50 °C), cold (<-10 °C), vibrations or mechanical stress.
- The product is not a toy and must be kept out of reach of children. The product contains small parts and batteries.
- Do not leave packaging material unattended. It may become a dangerous toy for children.
- Handle the product with care. It can be damaged by impact, blows or when dropped even from a low height.
- If there are any questions that are not answered in this operating manual, contact our technical support or another expert.
b) Batteries
Batteries have no place in the hands of children.
• Do not leave any batteries lying around openly. There is a risk of batteries being swallowed by children or pets. If swallowed, consult a doctor immediately. Danger to life!
- Leaking or damaged batteries may cause chemical burns to skin when touched. Use adequate protective gloves in this case.
- Make sure that the polarity is correct when inserting the batteries (pay attention to plus/+ and minus/-).
- Batteries must not be short-circuited, taken apart or thrown into fire. There is a danger of explosion!
- Never recharge normal (non-rechargeable) batteries. There is a danger of explosion!
- Replace an empty battery as soon as possible against a new one or remove the used-up battery. An empty battery may leak and damage the device!
- If not used for a longer period (e.g. in case of storage), remove the inserted batteries There is a danger of old batteries leaking, which causes damage to the product. Loss of guarantee/warranty!
• Always replace the entire set of batteries, only use batteries of the same type and by the same manufacturer with the same charge status (do not mix charged with partially charged or empty batteries).
- Read the “Disposal” chapter for instructions on environmentally sustainable disposal of batteries.

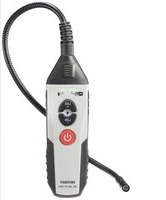
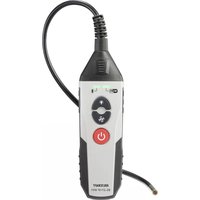
6. OPERATING ELEMENTS

text_image
A1 A2 A3 A4 A5 A6A1 Camera head
A2 Swan neck
A3 LED is lit green: the endoscope is activated
LED is lit green and red: The batteries are flat.
LED slowly flashes green: The WiFi access point is prepared.
LED quickly flashes green: A device is connected to the WiFi access point.
A4 On/off switch; lighting controller
A5 Recessed button reset
A6 Battery compartment
7. INSERTING AND REPLACING THE BATTERIES
Before you can use the product, you need to insert the batteries. 4 AA batteries are needed for operation. This description also applies if you have to replace the batteries.
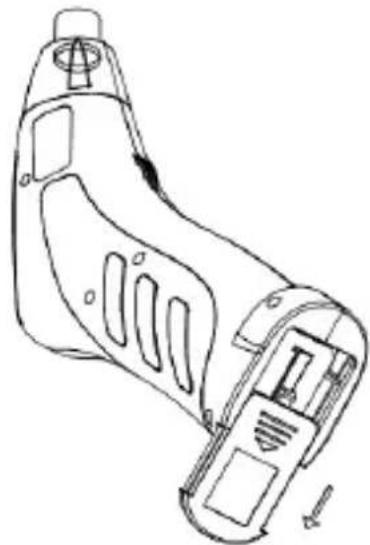
- First, open the battery lid of the endoscope. It is located at the bottom of the handle.
For this, push the lid away to the back in the direction of the arrow.
natural_image
Technical line drawing of a handheld device with internal components and mounting holes (no text or symbols)- Next, remove the battery compartment. Just pull it out of the housing.

natural_image
Technical line drawing of a mechanical component with cutouts and mounting holes (no text or symbols)- If you want to replace the batteries, remove the old batteries first.
- Then insert 4 new AA batteries into the battery compartment.
Always ensure correct polarity. How to insert the batteries is marked in the battery compartment by illustrations.

flowchart
graph LR
    A["Input Block 1"] --> B["Central Device"]
    C["Input Block 2"] --> B
    D["Input Block 3"] --> B
    B --> E["Output Block 1"]
    B --> F["Output Block 2"]
    B --> G["Output Block 3"]
- Finally, push the battery compartment back into the handle and close the battery compartment lid again.
Insert it into the guide and push it forward until it latches.
natural_image
Technical line drawing of a handheld device with internal components and an external component (no text or symbols)- This completes insertion or replacement of the batteries.
a) Switching the device on and off
- Turn the on/off switch (A4) in the direction of the battery compartment until you hear a click. The endoscope is switched on and the green LED (A3) will light up.
• To switch the endoscope off again, turn the on/off switch (A4) towards the swan neck until you hear the click again. The endoscope is switched off and the green LED (A3) will go out.
b) Setting the camera lighting
- Switch on the endoscope.
- Turn the controller (A4) towards the battery compartment to increase lighting and towards the swan neck to reduce lighting.
→ The app is continually developed further and improved. Therefore, we recommend checking whether an update may be available from time to time.
a) Apple iOS
The app can be used with all Apple iPads from the first generation onwards and from the iPhone 3GS onwards. At least iOS 4.1 or higher must be installed.
- The app for iOS is available via iTunes or in the App Store under the name of "WiFi endoskop".
→ For installation you require your Apple ID and password. An Apple ID can be set up free of charge via the Apple website, in iTunes or via your Apple device.
- Open the App Store or Store in iTunes and enter "WiFi endoskop" in the search field.
- Download the app and install it on your Apple device.
Follow all instructions in this.
If you are asked to do so, enter your Apple ID and the associated password.
- Once the installation is completed, you will find the link on the device desktop.
b) Android™
The Android ^™ app can be used with all Smartphones and tablets on which at least Android ^™ 2.3.5 is installed.
- The app for Android™ is available in the Play Store of Google under the name “WiFi endoskop”.
→ The installation requires a Google account. You can set this up free of charge on the website of Google.
- Open the Play Store on your device and enter "WiFi endoskop" in the search field.
- Download the app and install it on your Smartphone or tablet.
Follow all instructions in this.
Enter your Google account data when you are asked to do so.
- Once the installation is completed, you will find the link on the device desktop.
10. CONNECTING TO THE ENDOSCOPE
The connection between your device and the endoscope is established via WiFi. For this, a WiFi access point is provided on the endoscope. In the delivery condition, it is called “WiFi endoskop”. It is encrypted with WPA2. The associated password is “12345678” (without quotation marks).

Observe the following; When your mobile device is connected to the endoscope, your normal WiFi network will be temporarily unavailable. This means that you cannot access the Internet via WiFi during this time.
This of course has no influence on your mobile network (UMTS, LTE).
- Before you can establish the connection, switch on the endoscope (A4) first.
- The green LED at the device lights up for approx. 3 seconds first, then flashes very quickly for approx. 3 seconds and finally remains lit again for some time.
- Once the starting process is completed and the WiFi access point is running, the LED will flash green slowly.
- Now you can connect your mobile device to the camera.
a) Apple iOS

We describe the configuration based on an iPad with iOS 8.3. However, it is identical for any other supported Apple device. If you use an older version of iOS there may, of course, be slight deviations.
- Open the settings on your iPad (gear icon).
- Navigate to the menu item WiFi and tap it.
- After a brief search, the WiFi network "WiFi endoskop" should be displayed.
- Tap it to connect your iPad to the WiFi.
- Enter the password "12345678" (without quotation marks) when prompted.
- Once the connection has been established, the green LED at the endoscope will flash quickly. Now you can close the settings window and start the app "WiFi endoskop". For this, tap the corresponding button.
b) Android™
We describe the configuration based on an Android ^TM Smartphone with Android ^TM 4.4.2. However, it is almost identical on any other supported device.
- Open the settings on your Smartphone (gear icon).
- Navigate to the menu item Connections and then to the item WiFi. Tap it to open the menu.
- After a brief search, the WiFi network "WiFi endoskop" should be displayed.
- Tap it to connect your Smartphone to the WiFi.
- Enter the password "12345678" (without quotation marks) when prompted.
- Once the connection has been established, the green LED at the endoscope will flash quickly. Now you can close the settings window and start the app "WiFi endoskop". For this, tap the corresponding button.
We describe the configuration based on an iPad with iOS 8.3. If you use an older version of iOS there may, of course, be slight deviations.
Settings in the app:
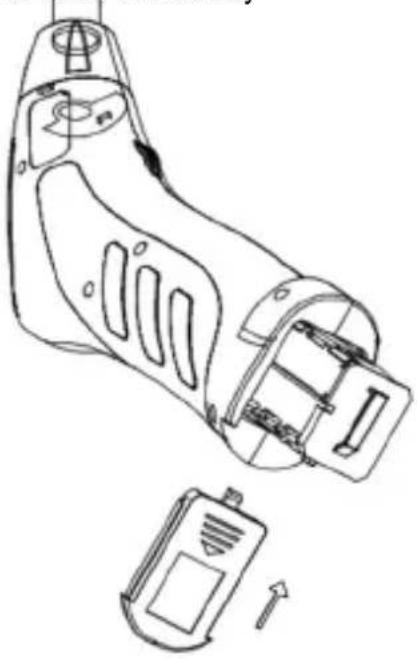
- Once you have opened the app, first adjust the setting For this, tap the gear symbol.
text_image
User interface buttons including music player, camera, record, and play back with icons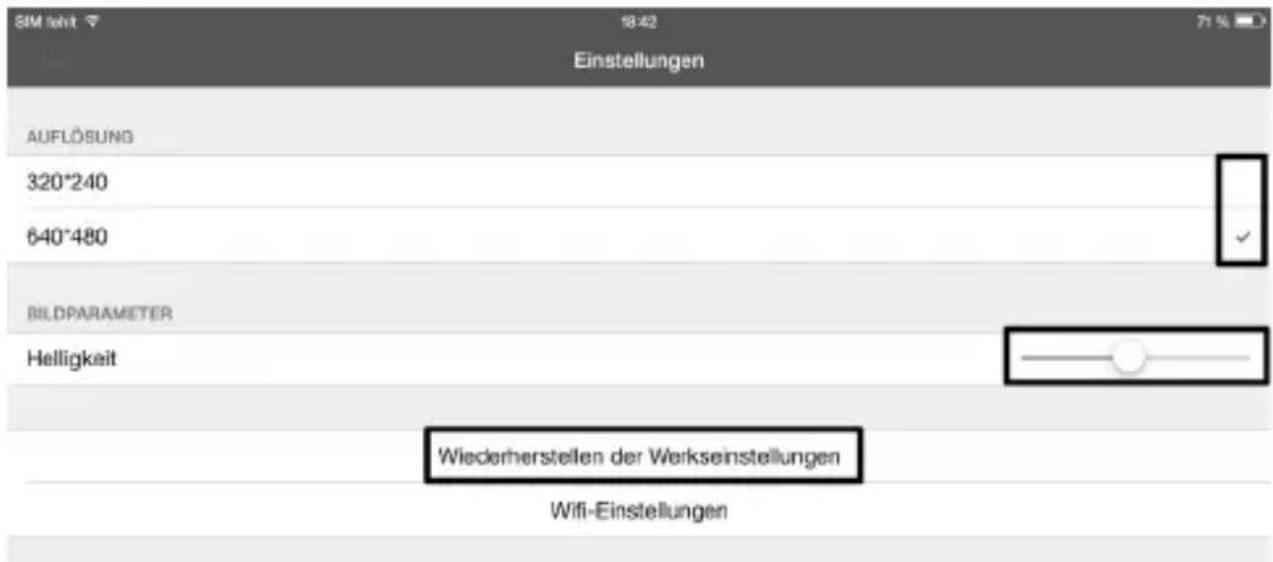
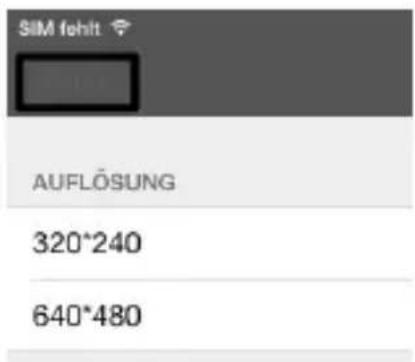
• Here, you can set the resolution for photographs and videos at the very top.
Just tap the desired resolution. The blue check mark shows the selected resolution.
- You can set the brightness easily with the slider.
- To reset the app to standard settings, tap Recover factory settings.
- Confirm this by tapping "YES".

text_image
Warning Are you sure to restore factory settings? YES NO
- To change the WiFi settings of the endoscope, tap WiFi settings.
- If you want to change the name of the WiFi, enter the desired new name in the field behind "SSID".
Once you can tap the field, the keyboard of your iPad will usually open automatically.
Enter the new password with at least 8 characters in the password field.

text_image
Wifi-Einstellungen SSID iSNAKESCOPE Password Ok stornierenConfirm with "OK".
- To leave the settings, tap the blue button "Video" in the upper left.
- To generate a photograph of the current camera view, simply tap the icon with the camera (second from above).
The image is automatically saved in the image on your iPad.
- If you want to generate a video, simply tap the button "RECORD".
- You can see that the recording is running by the red display at the upper left (time) and the red dot at the lower left.
To terminate the recording, tap "STOP".

text_image
User interface buttons including gear, camera, record, and play button with icons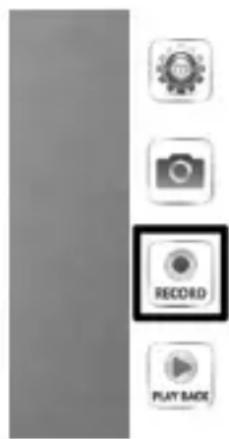
natural_image
Blank gray image with no visible content, text, or symbols- To view the video or the recorded pictures, tap "PLAY BACK".

• To view a video, just tap it.
- You have 3 buttons left at the upper right. With the first, you can add a video to the album. With the second, you can delete a video. The button on the far right deletes all files.
- To return to the main screen of the app, tap the blue button in the upper left "Video".
b) Android™
→ We describe the configuration based on an Android ^TM Smartphone with Android ^TM 4.4.2.
Settings in the app:
- Once you have opened the app, first adjust the setting.
For this, tap the gear symbol.

natural_image
Blank grayscale image with no visible text, symbols, or identifiable objects- Now tap the menu "Wi-Fi Setting" to change the WiFi settings and the password of the endoscope.

text_image
Setting Wi-Fi Setting Resolution Setting Brightness Setting Close- If you want to change the name of the WiFi, enter the desired new name in the field behind "SSID".
Once you can tap the field, the keyboard of your Smartphone will usually open automatically.
Enter the current WiFi password in the field "Cur Password" (at delivery: "12345678", without quotation marks).
Enter the new password with at least 8 characters in both windows for "New Pwd(8)".
Confirm with "OK".

text_image
Wi-Fi Setting SSID iSNAKESCOPE Cur Password New Pwd(8) OK Cancel- Next, you can change the resolution. Tap the button "Resolution Setting".

text_image
Setting Wi-Fi Setting Resolution Setting Brightness Setting Close- Change the resolution and confirm it with "OK"

text_image
Resolution Setting 320*240 640*480 OK Cancel- Now, if desired, set the brightness. For this, tap the button "Brightness Setting".

text_image
Setting Wi-Fi Setting Resolution Setting Brightness Setting Close- Select the matching brightness level from 1 to 15 (e.g. 9) and tap it. The green dot should then be behind the brightness chosen by you.
Confirm with "OK" again.

text_image
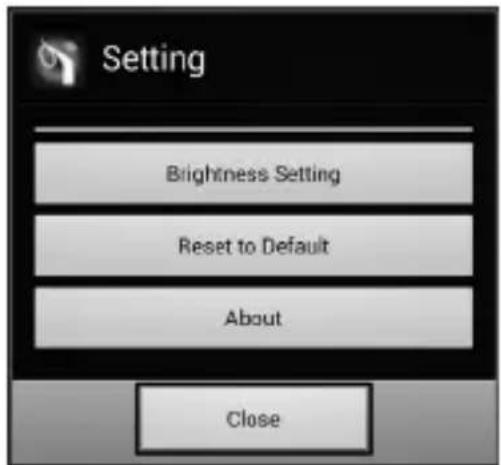
Brightness Setting 7 8 9 OK Cancel- If you want to reset the app to the standard settings, tap "Reset to Default".

text_image
Setting Brightness Setting Reset to Default About Close- Confirm with "OK".

text_image
Reset Setting The device will restore factory defaults then reboot, are you sure ? OK Cancel- To call information on the app, tap the button "About".
- To complete the settings, tap the button "Close" below.
text_image
Setting Brightness Setting Reset to Default About CloseOperation:
- To generate a photograph of the current camera view, simply tap the icon with the camera (second from above).
The picture is saved automatically.
- If you want to generate a video, simply tap the button "RECORD".
- You can see that the recording is running by the red display at the upper left (time) and the red dot at the lower left.
To terminate the recording, tap "STOP".
- To view a video or the recorded pictures, tap "PLAY BACK".

natural_image
Blank grayscale image with no visible text, symbols, or identifiable objects
natural_image
Blank grayscale image with no visible text, symbols, or identifiable objects
natural_image
Blank grayscale image with UI control buttons (no readable text or symbols)
natural_image
Blank grayscale image with no visible text, symbols, or identifiable objects- The tab "VideoList" will show you all recorded videos. To play one of them, just tap the corresponding video.

text_image
Return VideoOut PicturesOut Delete 2015_05_10_16_52_59.mov- If you switch to the tab "PictureList" you will see all the photographs saved. To view, tap the desired photograph.

text_image
2015_05_10_16_52_49.jpg 2015_05_10_16_43_03.jpg 2015_05_10_16_43_00.jpg- In the tab "Delete", you can delete the corresponding file by tapping the respective waste bin icon.
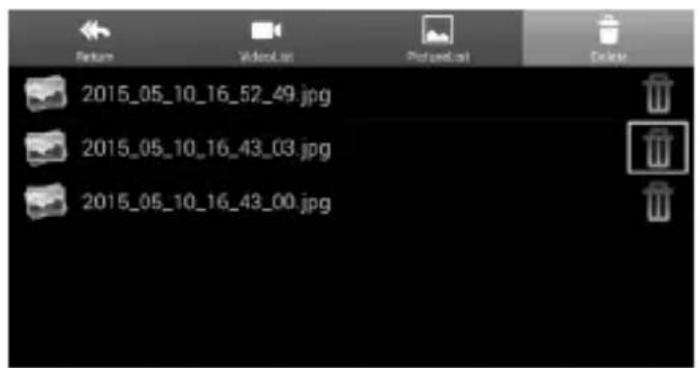
text_image
2015_05_10_16_52_49.jpg 2015_05_10_16_43_03.jpg 2015_05_10_16_43_00.jpg- The videos are saved on your device in the folder "RecordVideo" and the pictures in the folder "WiFi endoskop".
To access the folders in the master directory, open your file manager.

text_image
/storage/emulated/0 RecordVideo iSNAKESCOPE PhotoEditor SMemo DCIM• Here, you can view, copy, delete, send or download the pictures onto your computer normally, just like any other data.

text_image
/storage/emulated/0/iSNAKESCOPE 2015_05_10_16_52_49.jpg 2015_05_10_16_43_03.jpg 2015_05_10_16_43_00.jpg12. ATTACHMENTS
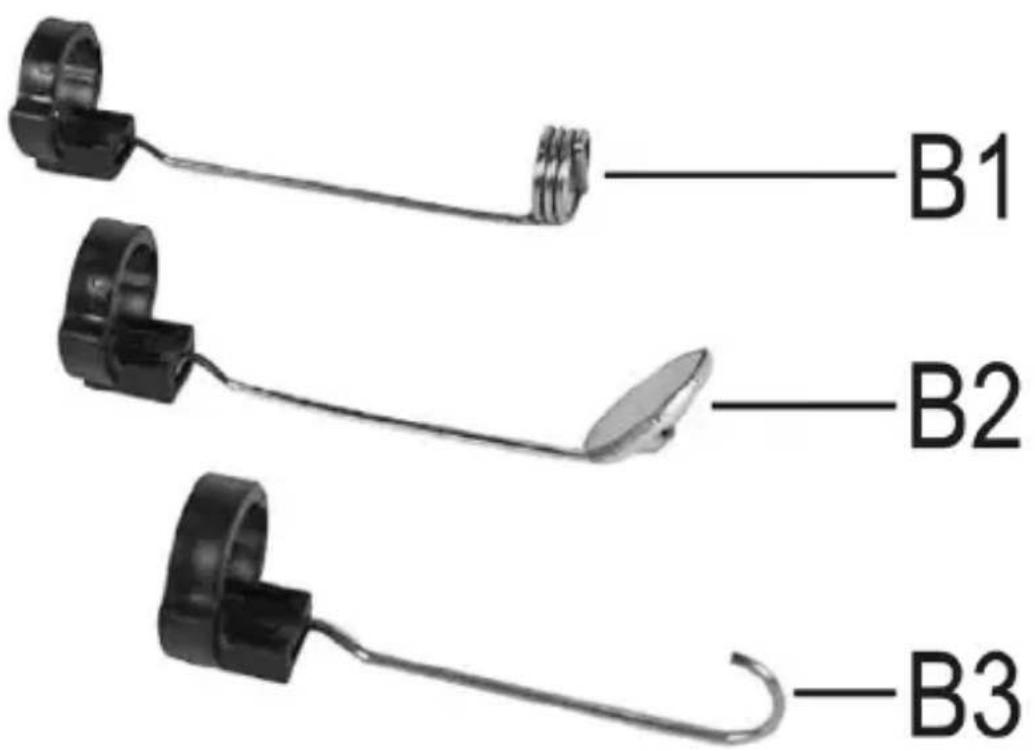
The scope of delivery contains three different attachments.
text_image
B1 B2 B3B1 Magnet
B2 Mirror
B3 Hooks
Proceed as follows to install an attachment on the camera head:
- Place the open plastic ring in the guide at the camera head.
Then close the closure. It must latch properly.
If the attachment is properly installed, you can turn it but not push it back or forwards.
• To remove the attachment again, just open the closure.

natural_image
Three-panel image showing mechanical components: a looped clamp, a ring clamp, and a handheld tool with a tip (no text or symbols visible)13. RESETTING TO THE FACTORY SETTINGS
- To reset the endoscope to factory settings, switch it on.
- Wait until the starting process has been completed and the green LED (A3) flashes slowly.
- Push the Reset button placed recessed below the on/off switch with a thin, pointy object, such as a paper clip, for approx. 10 seconds.
- Once you release the button again, the endoscope starts again and then is reset to factory settings (SSID "WiFi endoskop", password "1245678").
14. TROUBLESHOOTING
In purchasing the endoscope, you have acquired a product designed to the state of the art and operationally reliable. Nevertheless, problems or errors may occur. Therefore, we would like to describe to you how to remove possible interferences.
The endoscope does not work:
- The batteries may be empty. Remove the battery compartment and check the batteries. Replace them if necessary.
The endoscope WiFi is not displayed:
- Check if the green LED (A3) is flashing slowly.
- Switch off the endoscope, wait for a few seconds and then switch it on again.
- Reset the endoscope to factory settings with the reset button.
The endoscope cannot be connected to the WiFi:
- Check if the green LED (A3) is flashing slowly.
- Switch off the endoscope, wait for a few seconds and then switch it on again.
- Now remove the connection from the settings of your mobile device and re-establish the connection.
For an Apple device, tap the blue info button behind the corresponding network for this and then ignore the network.
For Android ^TM , tap the saved WiFi network and then tap remove.
- Reset the endoscope to factory settings with the reset button.
The app cannot be started:
- Check if the app has been installed properly. Uninstall the app and re-install it.
Videos and photographs cannot be saved:
- Check the access rights of the app on your mobile device.
15. MAINTENANCE AND CARE
The product is maintenance-free for you. Never take it apart or open it (except for the procedure as described in these operating instructions for inserting or replacing the batteries). Repair or maintenance work must be carried out by a specialist.
A dry, soft and clean cloth is sufficient for cleaning the outside.
Never submerge the basic device in water.
Flush the swan-neck camera thoroughly with clean water after each use in liquids and dry it off before returning the product to the case.
Use a small brush or a cotton swab to clean the camera lens.
Never use any aggressive cleaning agents or chemical solutions. They may damage the surface of the casing (discolourations).
16. DISPOSAL
a) General information
Electronic devices are recyclable waste and must not be disposed of in household waste!
At the end of its service life, dispose of the product according to the relevant statutory regulations.
Remove any inserted batteries and dispose of them separately from the product.
b) Batteries
You as the end user are required to return all used batteries/rechargeable batteries by law (Battery Ordinance). Disposing of them in household waste is prohibited!
Batteries that contain any hazardous substances are labelled with the adjacent icon to indicate that disposal in domestic waste is forbidden. The descriptions for the respective heavy metals are: Cd=cadmium, Hg=mercury, Pb=lead (the names are indicated on the battery/rechargeable battery e.g. below the rubbish bin symbol shown on the left).
You can return used batteries free of charge at the official collection points of your community, in our stores, or wherever batteries are sold!
You thus fulfil your statutory obligations and contribute to the protection of the environment.
17. DECLARATION OF CONFORMITY (DOC)
The manufacturer hereby declares that this product complies with the essential requirements and regulations and all other relevant provisions of the 1999/5/EC directive.

The compliance statement for this product is available at www.conrad.com.
18. TECHNICAL DATA
Operating voltage ....6 V/DC; 4 AA batteries (not included)
Power consumption ......Max. 250 mA
Operating time ....approx. 2.5 hours per battery set
Protection degree ......IP67 (swan neck only)
Sensor 1/9" VGA CMOS
Resolution max. 640 x 480 pixels (VGA)
Frame rate 30 FPS
Picture format ......JPG
Video streaming format ......MJPG
Camera lighting ....4 white LEDs
Focussing ....30 mm to endless
WiFi ......IEEE802.11b/g/n; 2.4 GHz
Encryption ......WPA2
WiFi range ......max. 18 m in the open field
Dimensions ....approx. 40 x 176 x 132 mm (W x L x H)
Length of swan neck ....approx. 85 cm ±2 cm
Camera diameter (head) .....8.0 mm
Bending radius ....max. 45 mm (swan neck)
Weight ....approx. 275 g (without batteries)
Operating conditions ......temperature 0 °C to 45 °C, humidity 15% to 85% relative
Storage conditions ......temperature -10 °C to 50 °C, humidity 15% to 85% relative
Supported devices ...... Apple from iPad, iPad Mini, iPhone 3GS (or higher) with iOS
4.1 or higher; Smartphones and tablet with Android™ 2.3.5 or higher
TABLE DES MATIÈRES Ⓕ
Page
France (email): technique@conrad-france.fr
text_image
A1 A2 A3 A4 A5 A67. MISE EN PLACE/REEMPLACEMENT DES PILES
natural_image
Line drawing of a mechanical device with internal components and mounting holes (no text or symbols)natural_image
Technical line drawing of a mechanical component with cutouts and mounting brackets (no text or symbols)natural_image
Technical line drawing of a handheld device with internal components and a separate battery pack (no text or symbols)text_image
User interface buttons including camera, record, play back, and gear icon with Chinese labels
text_image
Warning Are you sure to restore factory settings? YES NO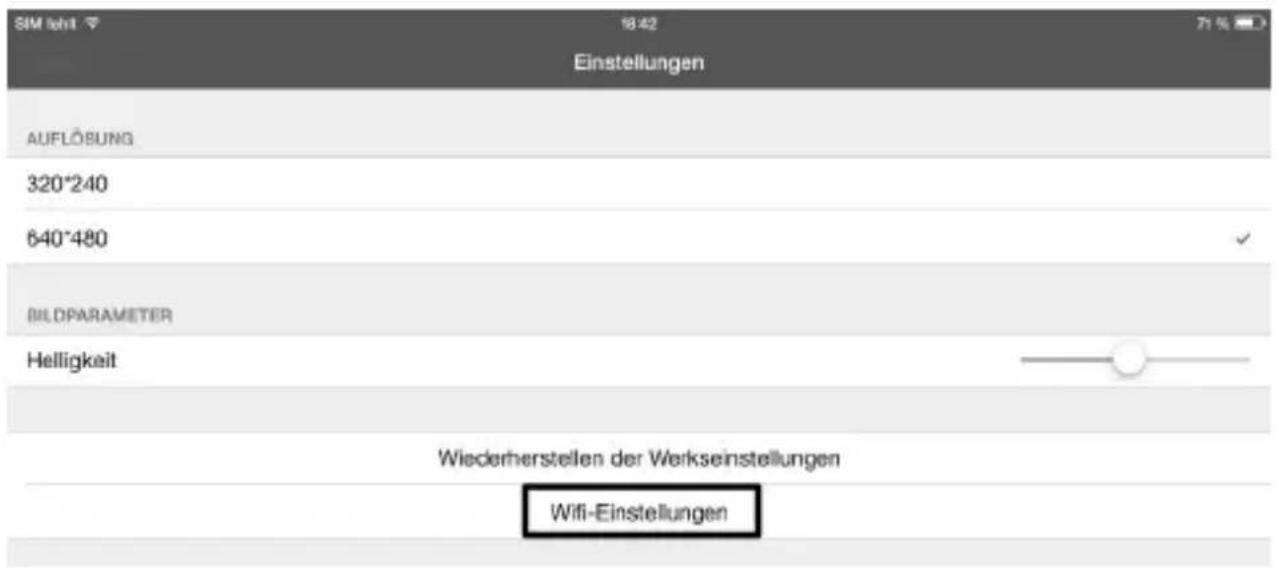
text_image
Vertical UI panel with icons for camera, record, play back, and gear symbolsnatural_image
Blank gray image with no visible content, text, or symbolstext_image
Vertical UI panel with icons for camera, record, play button, and gear icon
text_image
SIM ioh1 18:43 Wiedergabe Copy to Album Löschen Clear all files DATIDLISTE 2015_05_10_18_43_25.mov Größe der Date:1.69MB Datum:2015-05-10 18:43:25 Dauer:00:00:05natural_image
Blank grayscale image with no visible content, text, or symbolstext_image
Setting Wi-Fi Setting Resolution Setting Brightness Setting Closetext_image
Wi-Fi Setting SSID Cur Password New Pwd(8) iSNAKESCOPE OK Canceltext_image
Setting Wi-Fi Setting Resolution Setting Brightness Setting Closetext_image
Setting Wi-Fi Setting Resolution Setting Brightness Setting Closetext_image
Brightness Setting 7 8 9 OK Canceltext_image
Setting Brightness Setting Reset to Default About Closetext_image
Reset Setting The device will restore factory defaults then reboot, are you sure ? OK Canceltext_image
Setting Brightness Setting Reset to Default About CloseUtilisation :
natural_image
Blank grayscale image with no visible content, text, or symbols
natural_image
Blank grayscale image with no visible content, text, or symbols
natural_image
Blank grayscale image with UI control buttons at top and bottom (no readable text or symbols)
text_image
Play Made RECORDtext_image
Return VideoList PictureList Delete 2015_05_10_16_52_59.movtext_image
/storage/emulated/0 RecordVideo iSNAKESCOPE PhotoEditor SMemo DCIMnatural_image
Three-panel image showing mechanical components: a clamp, a ring clamp, and a needle-like tool with a tip (no text or symbols visible)13. RÉINITIALISATION AVEC LES RÉGLAGES D'USINE
Tension de service ....6 V/CC ; 4 piles AA (non fournies)
Courant absorbé ....max. 250 mA
2. VERKLARING VAN SYMBOLEN, OPSCHRIFTEN
text_image
A1 A2 A3 A4 A5 A6A1 Camerakop
A2 Zwanehals
A3 LED licht groen op: de endoscoop is ingeschakeld
natural_image
Technical line drawing of a handheld device with internal components and mounting holes (no text or symbols)natural_image
Technical line drawing of a mechanical component with cutouts and mounting holes (no text or symbols)natural_image
Technical line drawing of a handheld device with internal components and an external component (no text or symbols)text_image
Vertical UI panel with icons for camera, record, play back, and gear icon
text_image
Warning Are you sure to restore factory settings? YES NO
text_image
User interface buttons including camera, record, and play button with iconsnatural_image
Blank gray image with no visible content, text, or symbolsnatural_image
Blank grayscale image with no visible content, text, or symbolstext_image
Setting Wi-Fi Setting Resolution Setting Brightness Setting Closetext_image
Wi-Fi Setting SSID Cur Password New Pwd(8) iSNAKESCOPE OK Canceltext_image
Setting Wi-Fi Setting Resolution Setting Brightness Setting Closetext_image
Setting Wi-Fi Setting Resolution Setting Brightness Setting Closetext_image
Brightness Setting 7 8 9 OK Cancel- Als u de standaardinstellingen van de app wilt herstellen, klikt u op „Reset to Default“.

text_image
Setting Brightness Setting Reset to Default About Closetext_image
Reset Setting The device will restore factory defaults then reboot, are you sure ? OK Canceltext_image
Setting Brightness Setting Reset to Default About CloseBediening:
natural_image
Blank grayscale image with no visible content, text, or symbols
natural_image
Blank grayscale image with no visible text, symbols, or identifiable objects
natural_image
Blank grayscale image with no visible text, symbols, or identifiable objects
natural_image
Blank grayscale image with no visible text, symbols, or identifiable objectstext_image
2015_05_10_16_52_59.movtext_image
/storage/emulated/0 RecordVideo iSNAKESCOPE PhotoEditor SMemo DCIMnatural_image
Three-panel image showing mechanical components: a clamp, a ring clamp, and a pen tip with a pointed tip (no text or symbols visible)Framerate ....30 FPS
Fotoformaat ......JPG
Video Streaming Format ......MJPG
Cameraverlichting ....4 witte LED's
Zoom 30mm tot oneindig
WLAN ......IEEE802.11b/g/n; 2,4 GHz
Codering ......WPA2
WLAN-bereik ....max. 18 m in open veld
Afmetingen ......ca. 40 x 176 x 132 mm (B x D x H)
Lengte zwanehals ....ca. 85 cm ±2 cm
Cameradiameter (kop) 8,0 mm
Buigradius ....max. 45 mm (zwanehals)
© Copyright 2015 by Conrad Electronic SE.
GB Legal Notice
This is a publication by Conrad Electronic SE, Klaus-Conrad-Str. 1, D-92240 Hirschau (www.conrad.com).
All rights including translation reserved. Reproduction by any method, e.g. photocopy, microfilming, or the capture in electronic data processing systems require the prior written approval by the editor. Reprinting, also in part, is prohibited. This publication represents the technical status at the time of printing.
© Copyright 2015 by Conrad Electronic SE.
© Copyright 2015 by Conrad Electronic SE.
NL Colofon
© Copyright 2015 by Conrad Electronic SE. V3_0615_02/VTP