
FIDC X265 - Built-in oven CANDY - Free user manual and instructions
Find the device manual for free FIDC X265 CANDY in PDF.
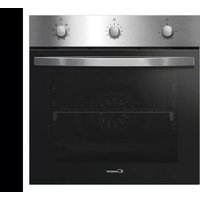
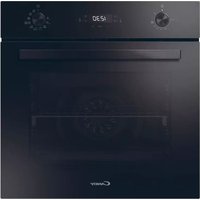
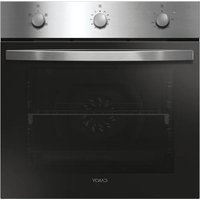
| Product type | Built-in oven |
| Brand | Candy |
| Model | FIDC X265 |
| Supply voltage | 220-240 V ~ |
| Maximum power | Not specified (refer to the label) |
| Display | LCD with touch controls |
| Cooking modes | Conventional, Bottom heat, Conventional + steam, Grill, Grill + rotisserie, Natural convection with rotisserie |
| AquaClean function | Yes (steam cleaning) |
| Rotisserie | Yes (removable) |
| Cooking probe | Yes (removable) |
| Racks and trays | Metal rack, drip tray, Airfry tray (depending on model) |
| Telescopic guides | Depending on model |
| Catalytic panels | Depending on model (replacement after 3 years) |
| Child safety | Yes (touch lock) |
| Automatic shut-off | Yes (after 20 min in standby or off) |
| Standby consumption | 0.8 W (with display) |
| Off consumption | 0.5 W |
| Interior light | Replaceable bulb (class G) |
| Manual cleaning | Water and mild soap, no abrasives |
| Weight | Not specified |
| Dimensions (w x h x d) | Not specified |
Frequently Asked Questions - FIDC X265 CANDY
User questions about FIDC X265 CANDY
0 question about this device. Answer the ones you know or ask your own.
Ask a new question about this device
Download the instructions for your Built-in oven in PDF format for free! Find your manual FIDC X265 - CANDY and take your electronic device back in hand. On this page are published all the documents necessary for the use of your device. FIDC X265 by CANDY.
USER MANUAL FIDC X265 CANDY
General Instructions
Product description
Display description
Cooking Modes
General notes on cleaning
Maintenance
Troubleshooting
Installation
Safety Indications
- During cooking, moisture may condense inside the oven cavity or on the glass of the door. This is a normal condition. To reduce this effect, wait 10-15 minutes after turning on the power before putting food inside the oven. In any case, the condensation disappears when the oven reaches the cooking temperature.
- Cook the vegetables in a container with a lid instead of an open tray.
- Avoid leaving food inside the oven after cooking for more than 15/20 minutes.
- WARNING: the accessible parts can become hot when the oven is in use. Young children should be kept at a safe distance.
- WARNING: the accessible parts can become hot when the grill is in use. Children should be kept at a safe distance.
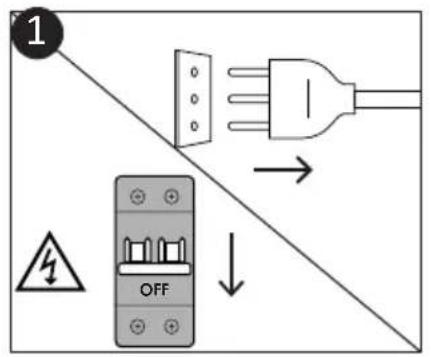
- Disconnect the appliance from the mains electricity supply before carrying out any work or maintenance.
- WARNING: in order to avoid any danger caused by the accidental resetting of the thermal interruption device, the appliance should not be powered by an external switching device, such as a timer, or be connected to a circuit that is regularly switched on and off.
- Children under 8 should be kept at a safe distance from the appliance if not continuously supervised.
- Children should not play with the appliance.
- The appliance can be used by those aged 8 or over and by those with limited physical, sensorial or mental capacities, without experience or knowledge of the product, only if supervised or provided with instruction as to the operation of the appliance, in a safe way with awareness of the possible risks.
- Cleaning and maintenance should not be carried out by unsupervised children.
- Do not use rough or abrasive materials or sharp metal scrapers to clean the oven door glasses, as they can scratch the surface
and cause the glass to shatter.
- The oven must be switched off before removing the removable parts. After cleaning, reassemble them according the instructions.
- Only use the meat probe recommended for this oven.
- Do not use a steam cleaner or high pressure spray for cleaning operations.
- WARNING: the appliance and accessible parts become hot during use. Be careful not to touch any hot parts.
- WARNING: ensure that the appliance is switched off before replacing the bulb, to avoid the possibility of electric shocks.
- IF THE OVEN IS PROVIDED BY THE MANUFACTURER WITHOUT PLUG:
THE APPLIANCE MUST NOT BE CONNECTED TO THE POWER SOURCE USING PLUG OR SOCKETS, BUT MUST BE DIRECTLY CONNECTED TO THE SUPPLY MAINS. The connection to the power source must be carried out by a suitably qualified professional. In order to have an installation compliant to the current safety legislation the oven must be connected only placing an omnipolar breaker, with contact separation compliant to the requirements for overvoltage category III, between the appliance and the power source. The omnipolar breaker must bear the maximum connected load and must be in line with current legislation. The yellow-green earth cable should not be interrupted by the breaker. The omnipolar breaker used for the connection must be easily accessible when the appliance is installed.
The connection to the power source must be carried out by a suitably qualified professional considering the polarity of the oven and of the power source.
The disconnection must be achieved incorporating a switch in the fixed wiring in accordance with the wiring rules
- IF THE OVEN IS PROVLED BY THE MANUFACTURER WITH PLUG:
The socket must be suitable for the load indicated on the tag and must have ground contact connected and in operation. The earth conductor is yellow-green in colour. This operation should be carried out by a suitably qualified professional. In case of incompatibility between the socket and the appliance plug, ask a qualified electrician to substitute the socket with another suitable type. The plug and the socket must be conformed to the current norms of the installation country. Connection to the power source can also be made by placing an omnipolar breaker, with contact separation compliant to the requirements for overvoltage category III, between the appliance and the power source that can bear the maximum connected load and that is in line with current legislation. The yellow-green earth cable should not be interrupted by the breaker. The socket or omnipolar breaker used for the connection should be easily accessible when the appliance is installed.
The disconnection may be achieved by having the plug accessible or by incorporating a switch in the fixed wiring in accordance with the wiring rules.
- If the power cable is damaged, it should be substituted with a cable or special bundle available from the manufacturer or by contacting the customer service department. The type of power cable must be H05V2V2-F. This operation should be carried out by a suitably qualified professional. The earth conductor (yellow-green) must be approximately 10 mm longer than the other conductors. For any repairs, refer only to the Customer Care Department and request the use of original spare parts.
- Failure to comply with the above can compromise the safety of the appliance and invalidate the guarantee.
- Any excess of spilled material should be removed before cleaning.
-
A long power supply failure during an occurring cooking phase may cause a malfunction of the monitor. In this case contact customer service.
-
The appliance must not be installed behind a decorative door in order to avoid overheating.
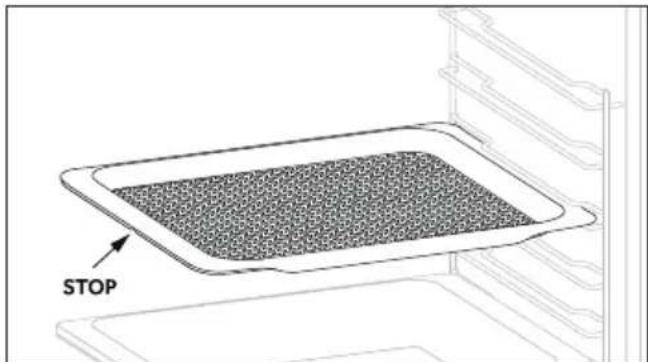
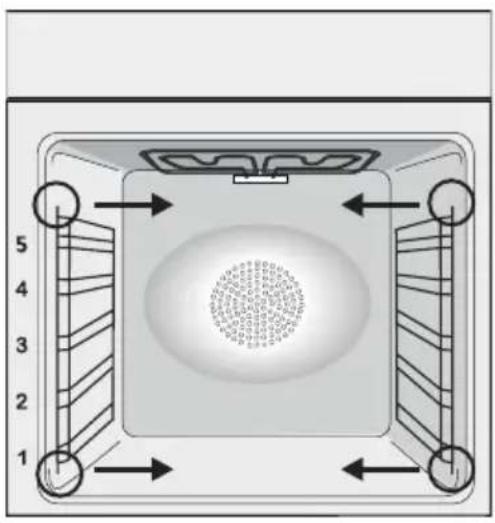
- When you place the shelf inside, make sure that the stop is directed upwards and in the back of the cavity. The shelf must be inserted completely into the cavity.
- When inserting the grid tray pay attention that the anti-slide edge is positioned rearwards and upwards.
- WARNING: Do not line the oven walls with aluminium foil or single-use protection available from stores. Aluminium foil or any other protection, in direct contact with the hot enamel, risk melting and deteriorating the enamel of the insides.
- WARNING: Never remove the oven door seal.
- CAUTION: Do not refill the cavity bottom with water during cooking or when the oven is hot.
- No additional operation/setting is required in order to operate the appliance at the rated frequencies.
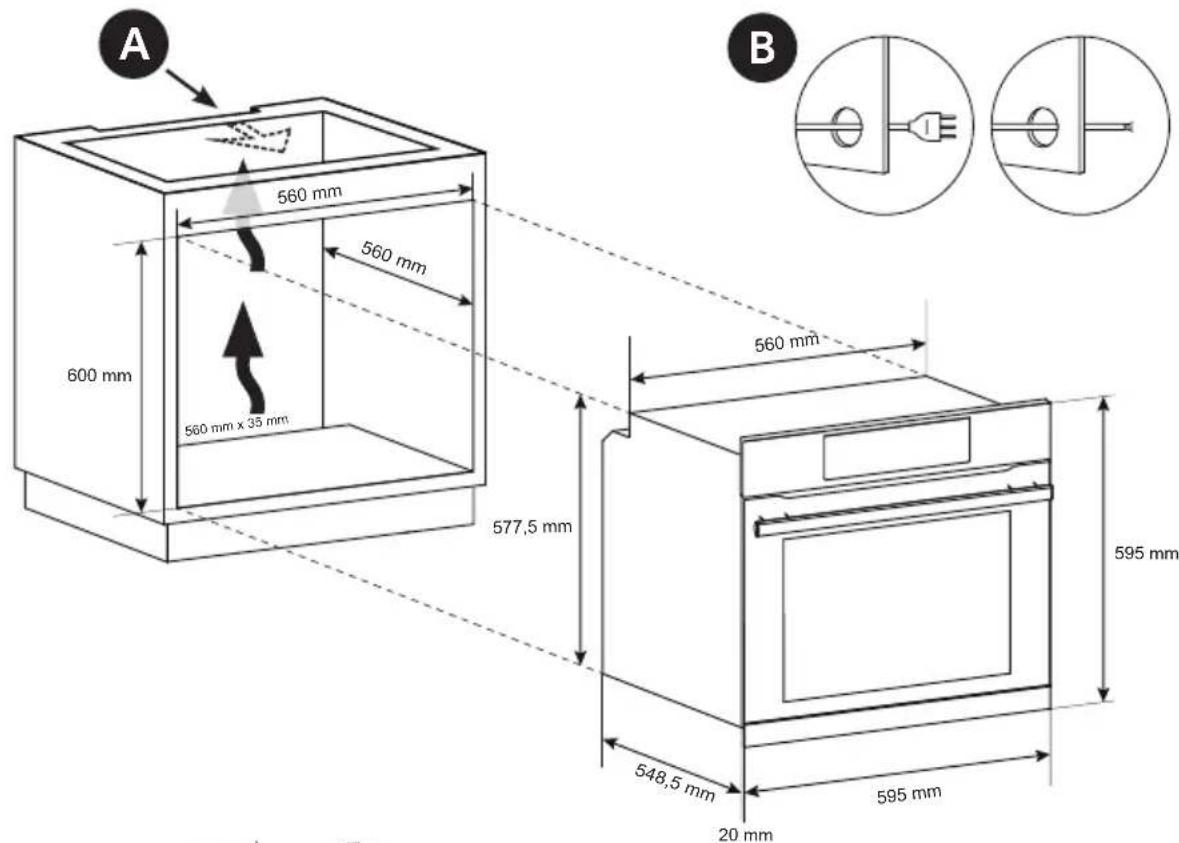
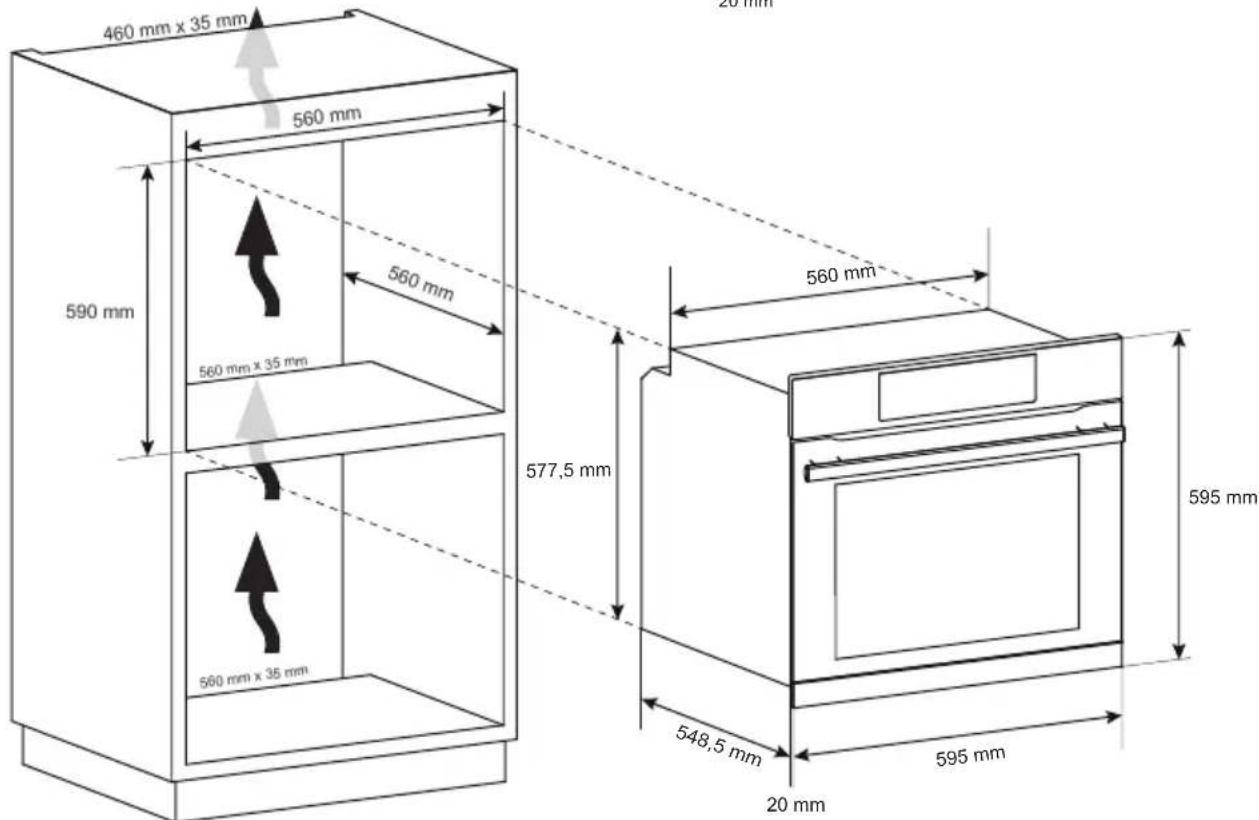
- The oven can be located high in a column or under a worktop. Before fixing, you must ensure good ventilation in the oven space to allow proper circulation of the fresh air required for cooling and protecting the internal parts. Make the openings specified on last page according to the type of fitting.
- WARNING: Do not place food directly on the oven racks. Always use parchment paper and/or suitable baking trays or pans.
General Instructions
We thank you for choosing one of our products. For the best results with your oven, you should read this manual carefully and retain it for future reference. Before installing the oven, take note of the serial number so that you can give it to customer service staff if any repairs are required. Having removed the oven from its packaging, check that it has not been damaged during transportation. If you have doubts, do not use the oven and refer to a qualified technician for advice. Keep all of the packaging material (plastic bags, polystyrene, nails) out of the reach of children. When the oven is switched on for the first time, strong smelling smoke can develop, which is caused by the glue on the insulation panels surrounding the oven heating for the first time. This is absolutely normal and, if it occurs, you should wait for the smoke to dissipate before putting food in the oven. The manufacturer accepts no responsibility in cases where the instructions contained in this document are not observed.
NOTE: the oven functions, properties and accessories cited in this manual will vary, depending on the model you have purchased.
Safety Indications
Only use the oven for its intended purpose, that is only for the cooking of foods; any other use, for example as a heat source, is considered improper and therefore dangerous. The manufacturer cannot be held responsible for any damage resulting from improper, incorrect or unreasonable usage.
The use of any electrical appliance implies the observance of some fundamental rules:
- do not pull on the power cable to disconnect the plug from the socket;
- do not touch the appliance with wet or damp hands or feet;
- in general the use of adaptors, multiple sockets and extension cables is not recommended;
- in case of malfunction and/or poor operation, switch off the appliance and do not tamper with it.
Electrical Safety
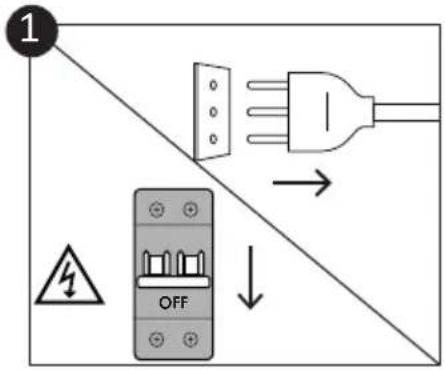
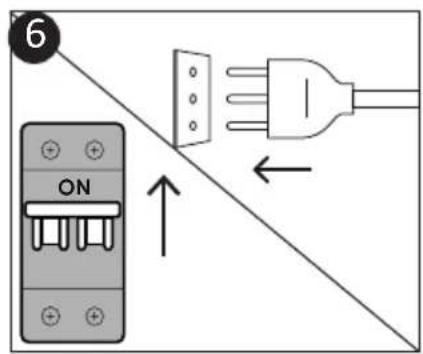
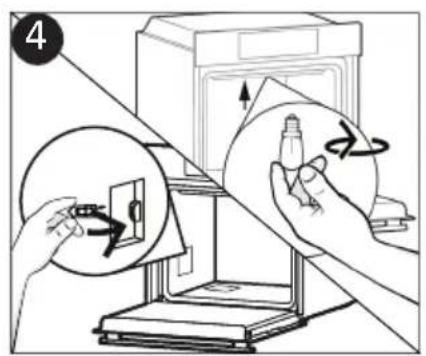
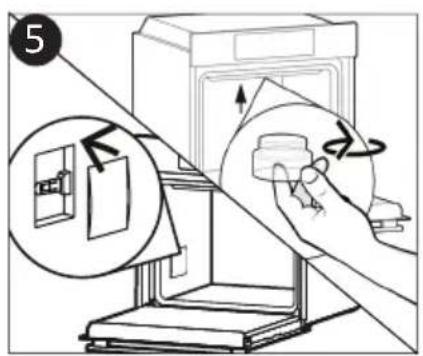
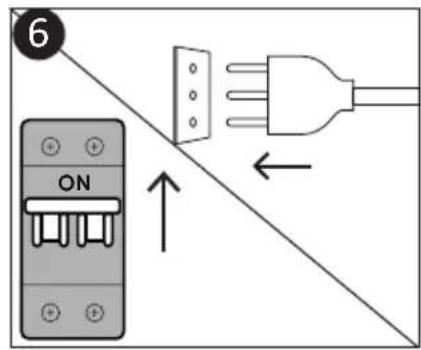
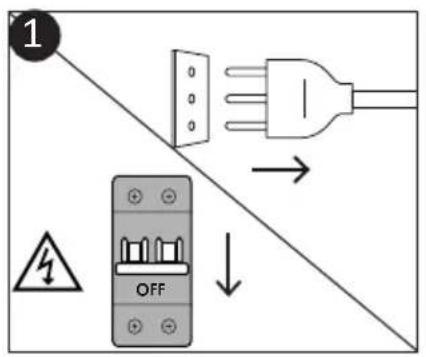
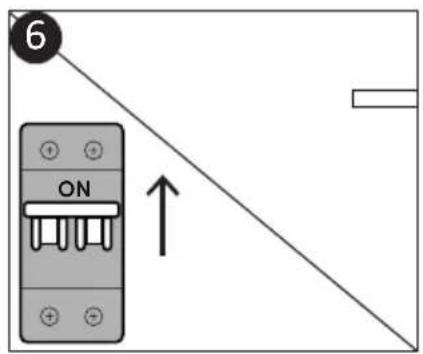
ENSURE THAT AN ELECTRICIAN OR QUALIFIED TECHNICIAN MAKES THE ELECTRICAL CONNECTIONS. The power supply to which the oven is connected must conform with the laws in force in the country of installation. The manufacturer accepts no responsibility for any damage caused by the failure to observe these instructions. The oven must be connected to an electrical supply with an earthed wall outlet or a disconnector with multiple poles, depending on the laws in force in the country of installation. The electrical supply should be protected with suitable fuses and the cables used must have a transverse section that can ensure correct supply to the oven.
CONNECTION
The oven is supplied with a power cable that should only be connected to an electrical supply with 220-240 Vac power between the phases or between the phase and neutral. Before the oven is connected to the electrical supply, it is important to check:
- power voltage indicated on the gauge;
- the setting of the disconnector.
The grounding wire connected to the oven's earth terminal must be connected to the earth terminal of the power supply.
WARNING
Before connecting the oven to the power supply, ask a qualified electrician to check the continuity of the power supply's earth terminal. The manufacturer accepts no responsibility for any accidents or other problems caused by failure to connect the oven to the earth terminal or by an earth connection that has defective continuity.
NOTE: as the oven could require maintenance work, it is advisable to keep another wall socket available so that the oven can be connected to this if it is removed from the space in which it is installed. The power cable must only be substituted by technical service staff or by technicians with equivalent qualifications.
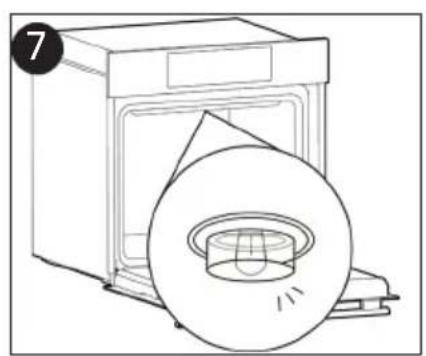
A low light around the central main switch could be present when the oven is off. This is a normal behavior. I can be removed just turning the plug upside down or swapping the supply terminals.
Recommendations
After each use of the oven, a minimum of cleaning will help keep the oven perfectly clean. Do not line the oven walls with aluminium foil or single-use protection available from stores. Aluminium foil or any other protection, in direct contact with the hot enamel, risks melting and deteriorating the enamel of the insides. In order to prevent excessive dirtying of your oven and the resulting strong smokey smells, we recommend not using the oven at very high temperature. It is better to extend the cooking time and lower the temperature a little. In addition to the accessories supplied with the oven, we advise you only use dishes and baking moulds resistant to very high temperatures.
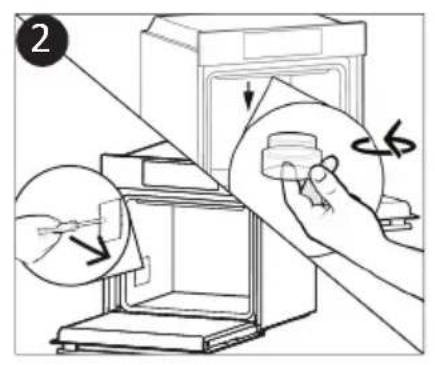
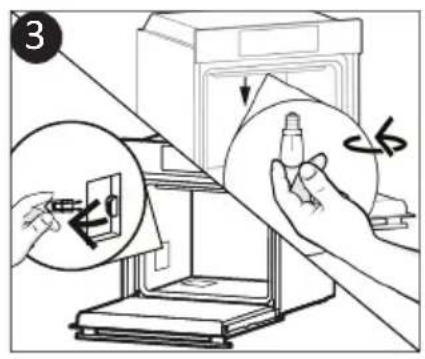
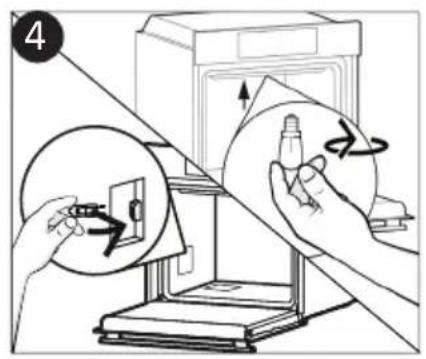
Installation
The manufacturers have no obligation to carry this out. If the assistance of the manufacturer is required to rectify faults arising from incorrect installation, this assistance is not covered by the guarantee. The installation instructions for professionally qualified personnel must be followed. Incorrect installation may cause harm or injury to people, animals or belongings. The manufacturer cannot be held responsible for such harm or injury.
The oven can be located high in a column or under a worktop. Before fixing, you must ensure good ventilation in the oven space to allow proper circulation of the fresh air required for cooling and protecting the internal parts. Make the openings specified on last page according to the type of fitting.
First Use
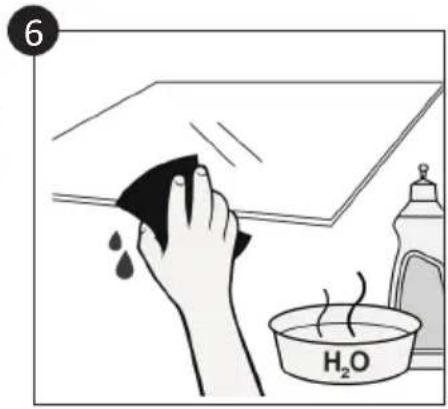
PRELIMINARY CLEANING; Clean the oven before using for the first time. Wipe over external surfaces with a damp soft cloth. Wash all accessories and wipe inside the oven with a solution of hot water and washing up liquid. Set the empty oven to the maximum temperature and leave on for about 1 hour, this will remove any lingering smells of newness.
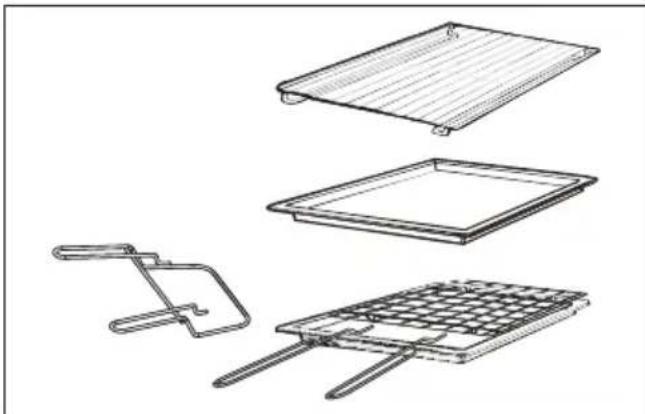
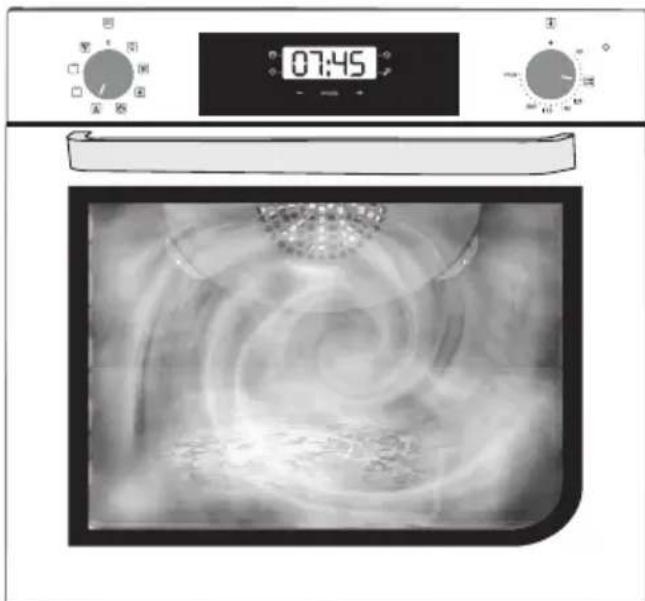
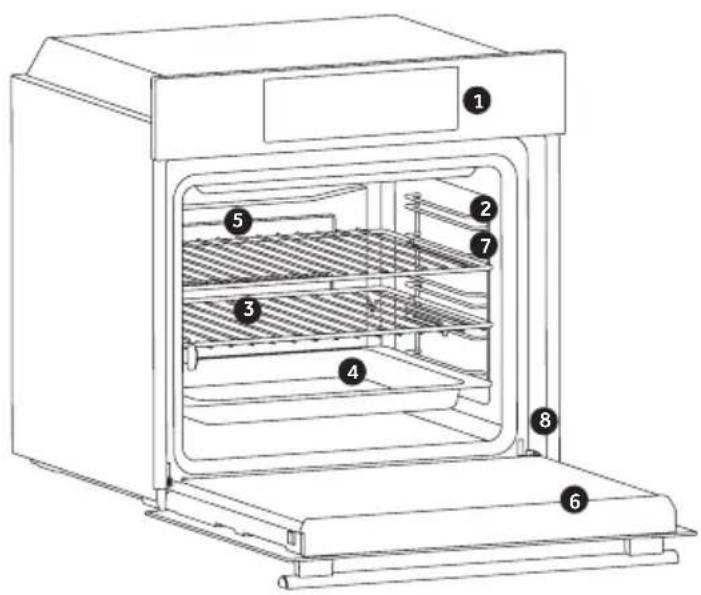
Product description
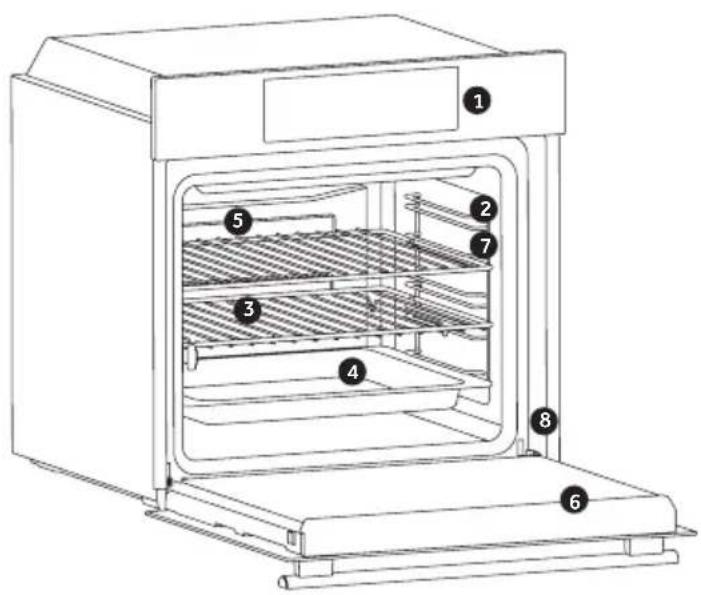
- Control panel
- Shelf positions (lateral wire grid if included)
- Grids
- Trays
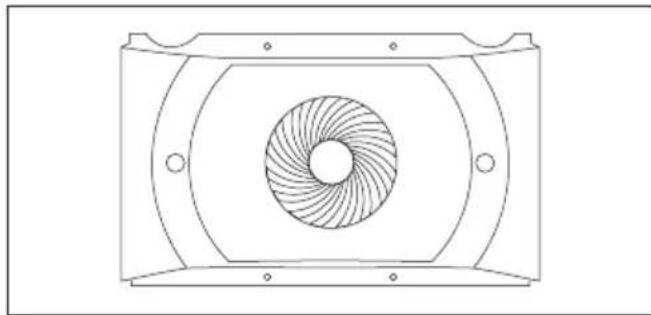
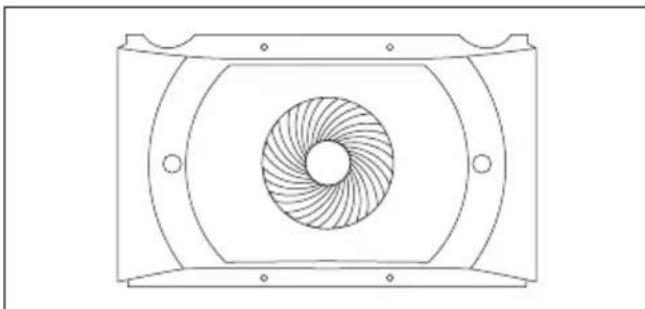
- Fan (if present)
- Oven door
- Lateral wire grids (if present: only for flat cavity)
- Serial number
Write here your serial number for future reference.
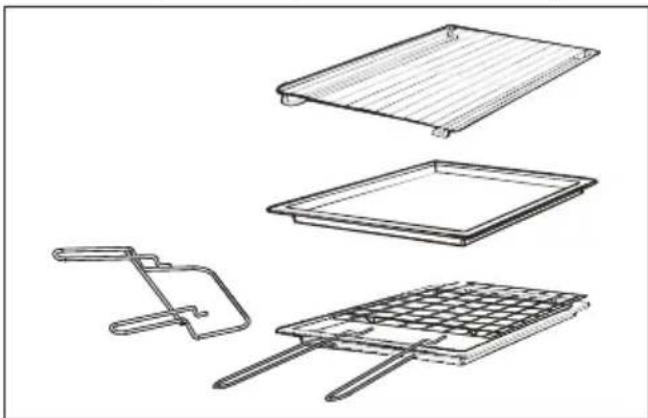
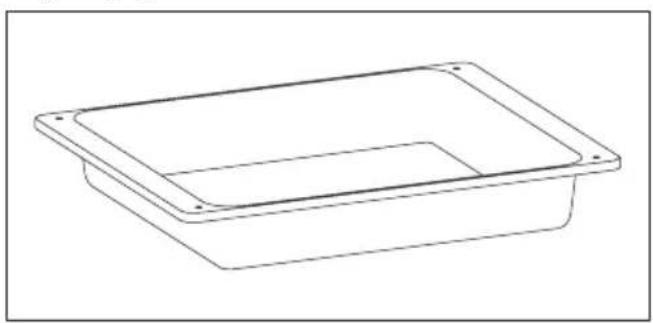
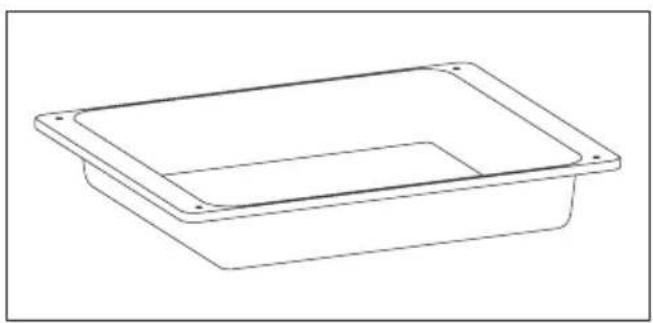
ACCESSORIES (depends on model)
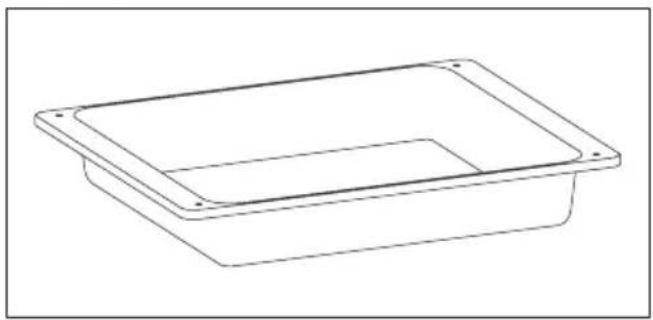
Drip tray
The dripping pan collects the residues that drip during cooking
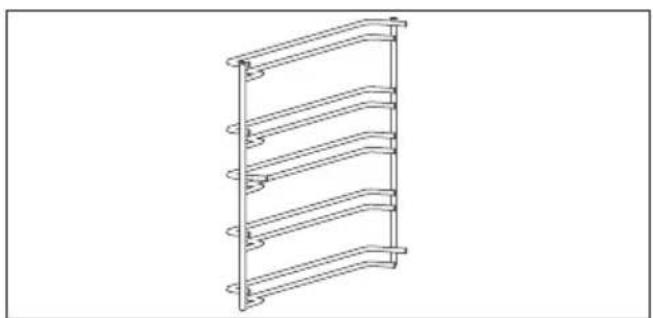
Lateral wire grids (only if present)
Located on both sides of the oven cavity, holds metal grills and drip pans.

Metal grid
The oven racks are not suitable for direct contact with food. Please use appropriate baking trays or baking paper.
Telescopic guides (only if present)
Two guide rails which facilitate the cooking status check as they allow easily the extraction and repositioning of trays and grids inside the oven cavity.
NOTE: Do not place food directly on the oven racks. Always use parchment paper and/or suitable baking trays or pans.
Meat probe (only if present)

Measures the internal temperature of food during cooking. Insert into the hole on the top of the cavity. Should be inserted while oven is cool.
WARNING:
- Do not preheat or start cooking before properly inserting the meat probe.
- Do not try to insert the meat probe in frozen food.
Catalytic panels (only if present)
Special panels coated with enamel, made with a microporous structure to turn fat into gaseous elements that are easy to remove. Replace after 3 years of use (at 2/3 cooking cycles per week).
Softclose (only if present)

Hinges which ensure an automatic soft and smooth movement during the closing phase of the oven door.
Turnspit (only if present)
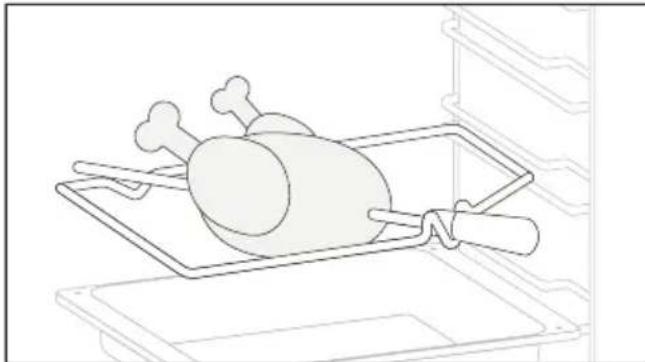
No pre-heating is required for rotisserie cooking. Cooking with the door closed.
- Unscrew the hooks
- Insert the spit into the meat to be cooked
- Secure the meat with the hooks
- Tighten the screws
- Insert the spindle into the hole where the motor is located.
- Remove the handle and use it at the end of cooking to avoid burn when taking the food out of the oven
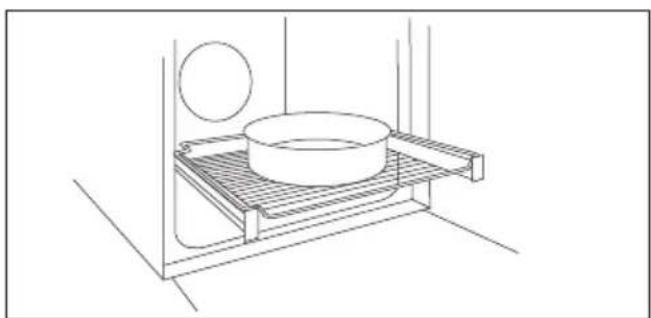
Grill pan set (only if present)
The simple shelf can take moulds and dishes.
The tray holder shelf is especially good for grilling things.
Use it with the drip tray.
The special profile of the shelves means they stay horizontal even when pulled right out. There is no risk of a dish sliding or spilling.
The drip tray catches the juices from grilled foods. It is only used with the Grill, Rotisserie, or Fan Assisted Grill; remove it from the oven for other cooking methods.
Never use the drip tray as a roasting tray as this creates smoke and fat will spatter your oven making it dirty.
The tray holder
The tray holder shelf is ideal for grilling. Use it in conjunction with the drip tray. A handle is included to assist in moving the both accessories safely. Do no leave the handle inside the oven.
Chef panel (only if present)
An air conveyor that increases air circulation inside the oven. This enables improved cooking performance, more even cooking of food at all temperatures, shorter cooking times and, lastly, an even temperature distribution inside the oven.
Airfry Tray (only if present)
The air fry tray ensures that hot air reaches the food evenly and tridimensionally, resulting in a crispier exterior while maintaining tenderness inside. A baking tray can be optionally placed at L1 to collect juices or breadings.
Low power consumption data according to Commission Regulation (EU) 2023/826 Power consumption of the product in standby mode condition with information or status display: 0,8 W Period after which the equipment reaches automatically standby mode condition with information or status display: 20 min
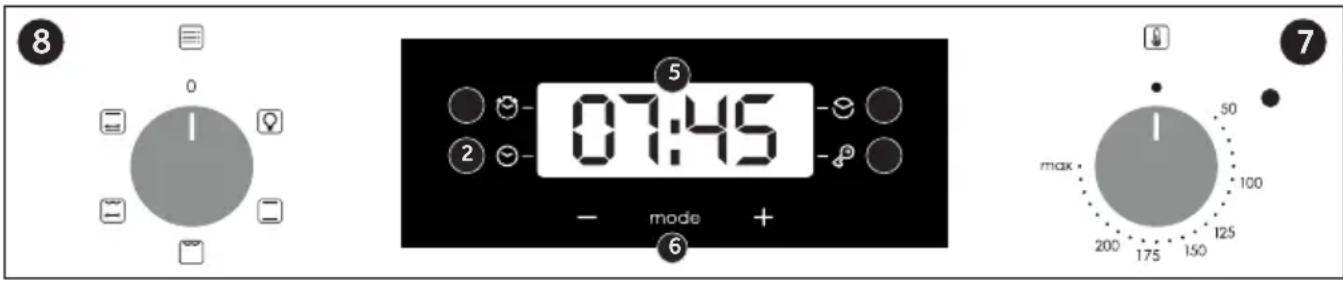
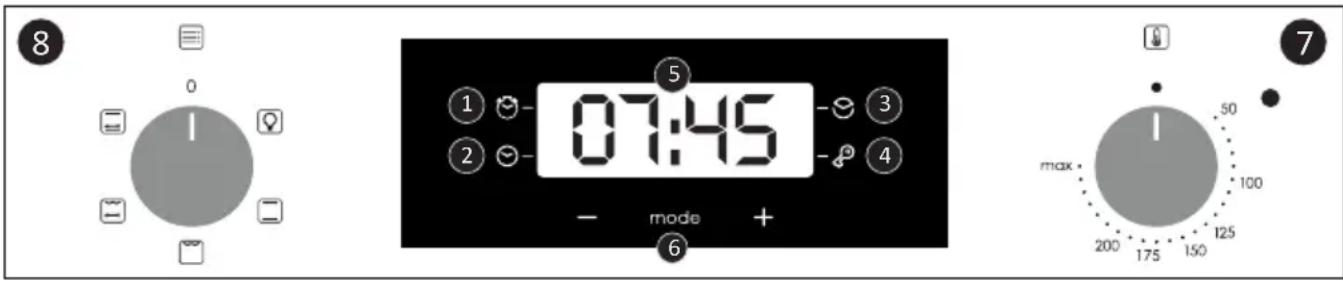
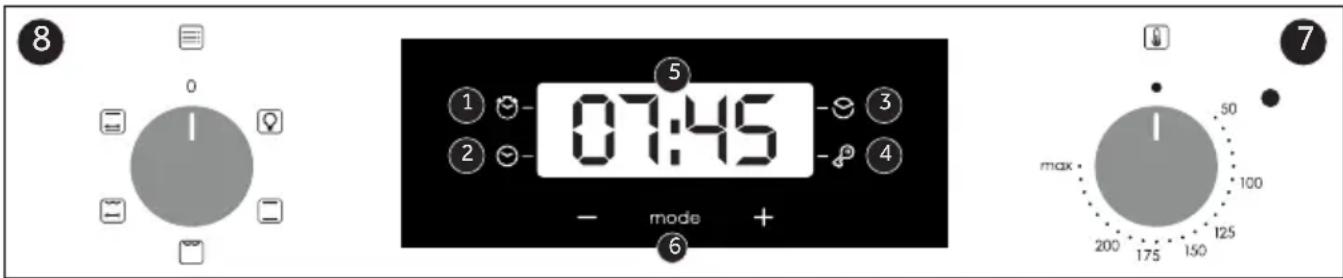
- Minute minder
- Clock setting
- Cooking time
- Child Lock
- Temperature or clock display
- LCD display adjustment controls
- Thermostat selector knob
- Function selector knob
WARNING: the first operation to carry out after the oven has been installed or following the interruption of power supply (this is recognizable the display pulsating and showing 12:00) is setting the correct time. This is achieved as follows.
- Push the central button 4 times
- Set time with "-" +" buttons.
- Release all buttons.
ATTENTION: The oven will only operate providing the clock is set.
Use of touch control clock programmer (depends on model)
| FUNCTION HOW | TO ACTIVATE | HOW TO DEACTIVATE | WHAT IT DOES WHY | IT IS NEEDED |
| KEY LOCK | ·Child Lock function is activated by touching Set (+) for a minimum of 5 seconds. From this moment on all other functions are locked, LED of child lock turn on, the display will flash STOP and present time intermittently | Child Lock function is deactivated by touching touchpad Set (+) again for a minimum of 5 seconds. From this moment LED of child lock turn off and all functions are selectable again. | ||
| MINUTE MINDER | ·Push the central button 1 times ·Press the buttons “-” “+” to set the required time ·Release all the buttons | ·When the set time as elapsed an audible alarm is activated (this alarm will stop on its own, however it can be stopped immedi-dately by pressing the button) SELECT. | ·Sounds an alarm at the end of the set time. ·During the process, the display shows the remaining time. | ·Allows to use the oven as alarm clock (could be activa-ted either with operating the oven or with out operating the oven) |
| COOKING TIME | ·Push the central button 2 times ·Press the buttons “-” or “+” to set the lenght of cooking required ·Release all buttons ·Set the cooking function with the oven function selector | ·Push any button to stop the signal. Push the central button to return to the clock function. | ·It allows to preset the cooking time required for the recipe chosen. ·To check how long is left to run press the SE-LECT button 2 times. ·To alter/change the preset time press SELECT and “-” “+” buttons. | ·When the time is elapsed the oven will switch off automatically. Should you wish to stop cooking earlier either turn the function selector to 0, or set time to 0:00 (SELECT and “-” “+” buttons) |

1
2

1
2
1
F
CANDY
2
Low power consumption data according to Commission Regulation (EU) 2023/826
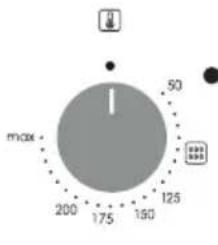
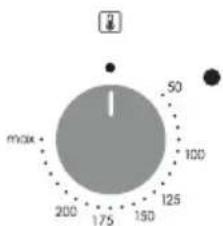
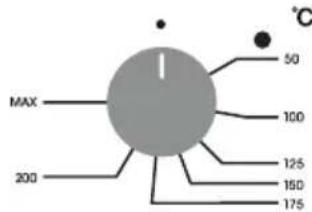
- Function selector knob
- Thermostat selector knob
| Symbol | T°C default | T°C range | Function |
| LAMP: Turns on the oven light. | |||
| 220 50÷ MAX | *CONVENTIONAL: Both top and bottom heating elements are used. Preheat the oven for about ten minutes. This method is ideal for all traditional roasting and baking. Place the food and its dish on a shelf in mid position. | ||
| 210 50÷ MAX | BOTTOM HEATING: Using the lower element. Ideal for cooking all pastry based dishes. Use this for flans, quiches, tarts, pate and any cooking that needs more heat from below | ||
| 220 50÷ MAX | CONVENTIONAL + STEAM: Both top and bottom heating elements are used. Preheat the oven for about ten minutes. This method is ideal for all traditional roasting and baking. Place the food and its dish on a shelf in mid position. This function also provides steam-assisted cooking, which requires adding 100ml of water in the cavity when the oven is cold and turning the knob to this function. Do not use preheating for this feature. Steam mode can be used to obtain a crispier crust and a glossier surface for, especially bakeries. | ||
| 230 50÷ MAX | GRILL: Ideal for big quantities of sausages, steaks and toast bread. The entire area below the grill element becomes hot. Use with the door closed. Turn food two thirds of the way through cooking (If necessary). When grilling toasts, use max temperature in shelf position 5 without preheating. | ||
| 220 50÷ MAX | GRILL + TURNSPIT: the turnspit is used with the door closed. The heating temperature can be modified as needed. It is best to cook only medium-sized pieces on the turnspit. Ideal for rediscovering all the flavors of old-fashioned rotisserie. Preheating is not done for turnspit cooking. | ||
| 220 50÷ MAX | NATURAL CONVECTION WITH TURNSPIT: The bottom and top heaters of the oven are in operation. It's cooking traditional suitable for roasts and poultry, and not requiring the addition of fat. |

Scan the QR code and discover how to use it at best to prepare your favourite recipes.
General notes on cleaning
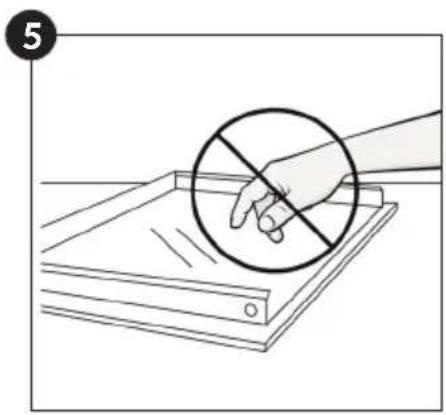
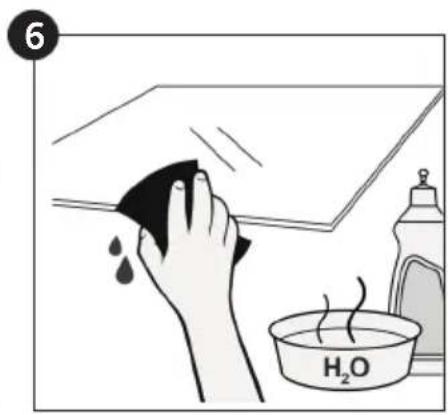
The lifecycle of the appliance can be extended through regular cleaning. Wait for the oven to cool before carrying out manual cleaning operations. Never use abrasive detergents, steel wool or sharp objects for cleaning, so as to not irreparably damage the enamelled parts. Use only water, soap or bleach-based detergents (ammonia).
GLASS PARTS
It is advisable to clean the glass window with absorbent kitchen towel after every use of the oven. To remove more obstinate stains, you can use a detergent-soaked sponge, well wrung out, and then rinse with water.
OVEN WINDOW SEAL
If dirty, the seal can be cleaned with a slightly
damp sponge.
ACCESSIONS
Clean accessories with a wet, soapy sponge before rinsing and drying them: avoid using abrasive detergents.
DRIP PAN
After using the grill, remove the pan from the oven. Pour the hot fat into a container and wash the pan in hot water, using a sponge and washing-up liquid.
If greasy residues remain, immerse the pan in water and detergent. Alternatively, you can wash the pan in the dishwasher or use a commercial oven detergent. Never put a dirty pan back into the oven.
Maintenance (depends on model)
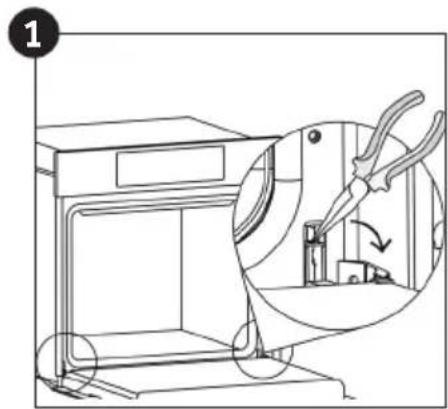
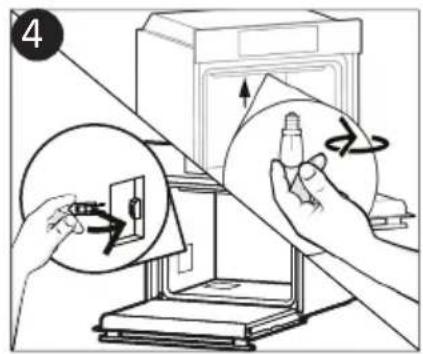
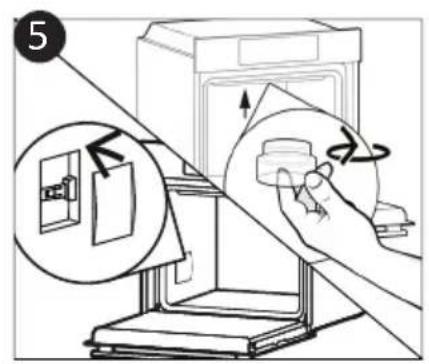
REMOVAL AND CLEANING OF THE SIDE RACKS
-
Remove the wire racks by pulling them in the direction of the arrows (see below)
-
To clean the wire racks either put them in the dishwasher or use a wet sponge, ensuring that they are dried afterwards.
-
After the cleaning process install the wire racks in reverse order."
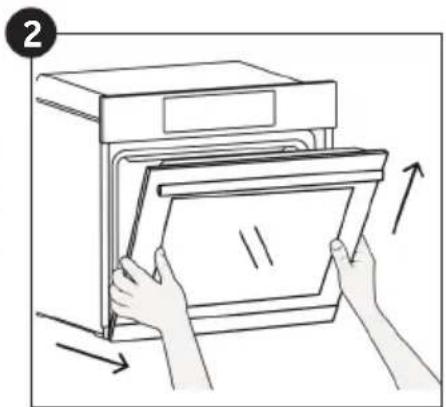
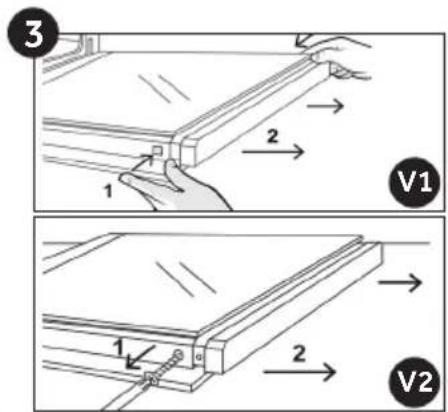
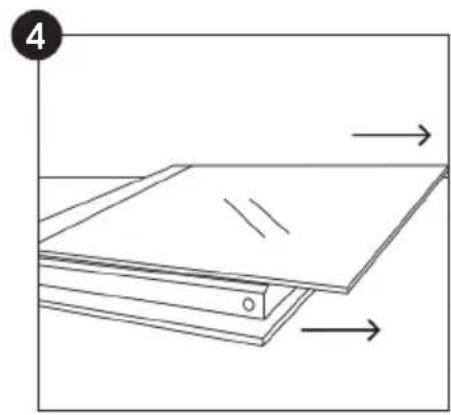
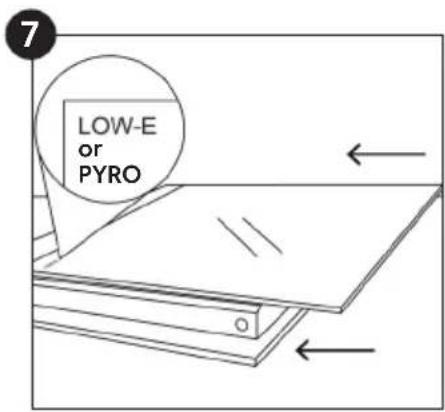
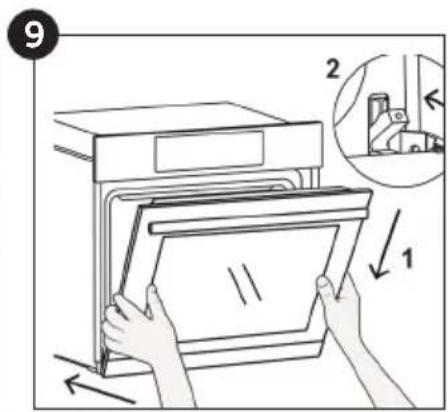
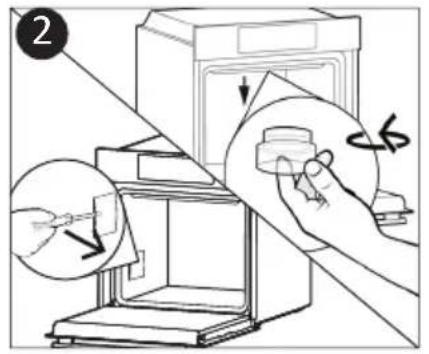
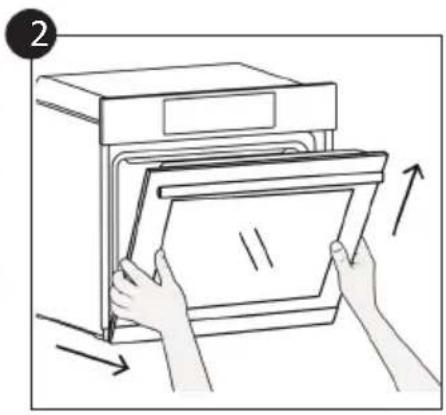
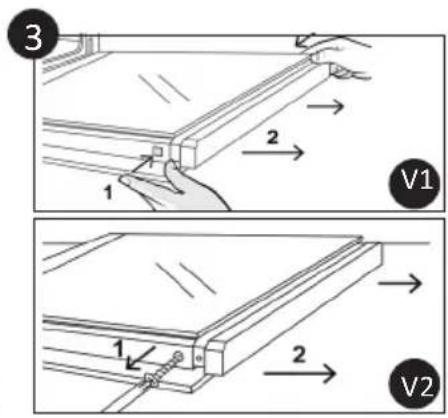
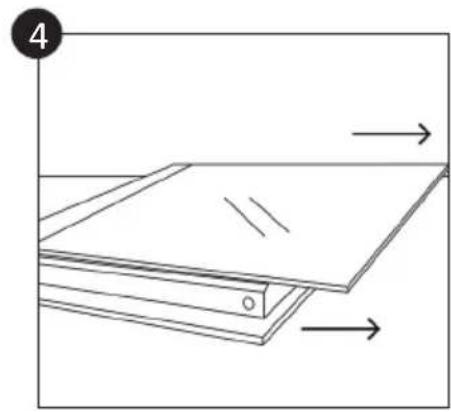
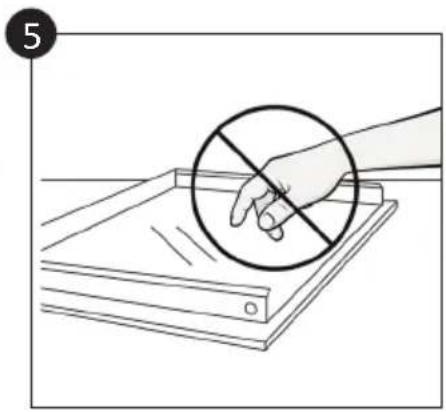
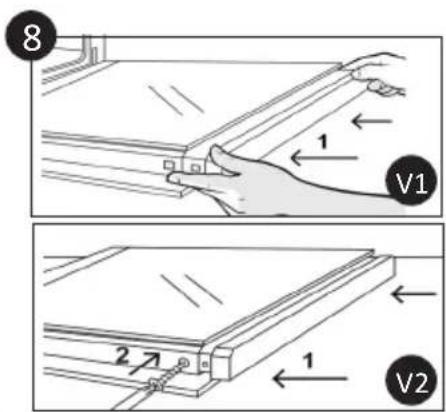
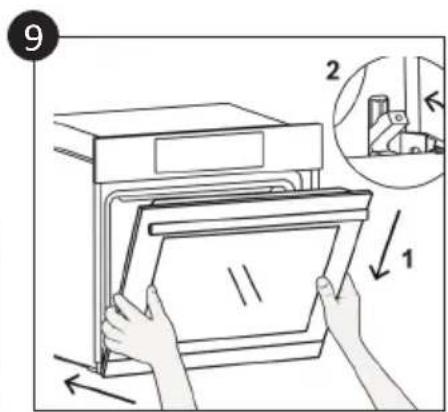
Removal and Cleaning of the Glass Door (depends on model)

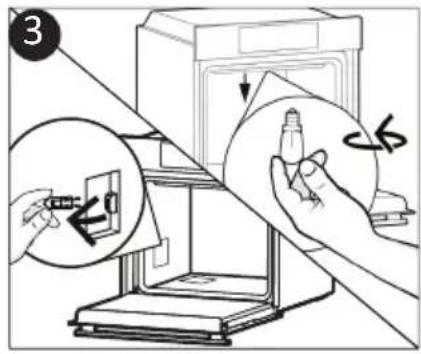
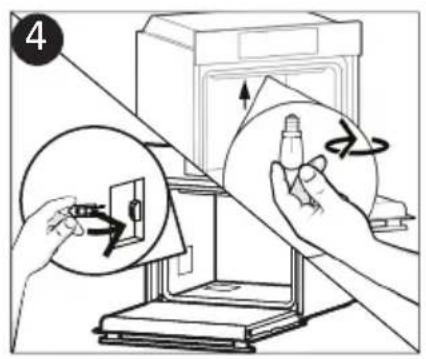
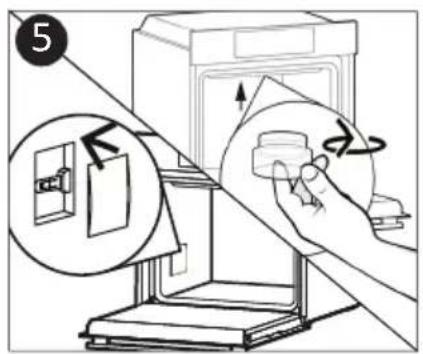
Changing the Bulb (depends on model)
- Disconnect the oven from the mains supply.
- Undo the glass cover, unscrew the bulb and replace it with a new bulb of the same type.
- Once the defective bulb is replaced, replace the glass cover.
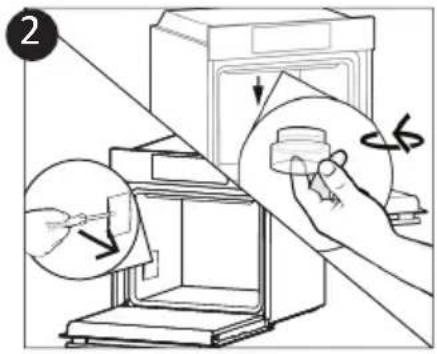
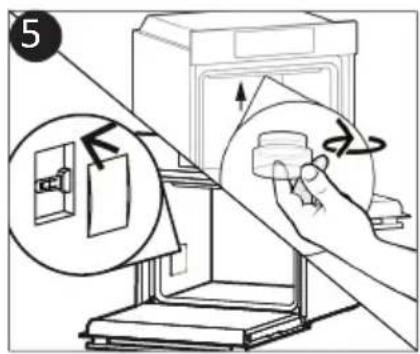


This product contains one or more light sources of energy efficiency class G (Lamp) * In case of issue with this lamp, contact the customer service
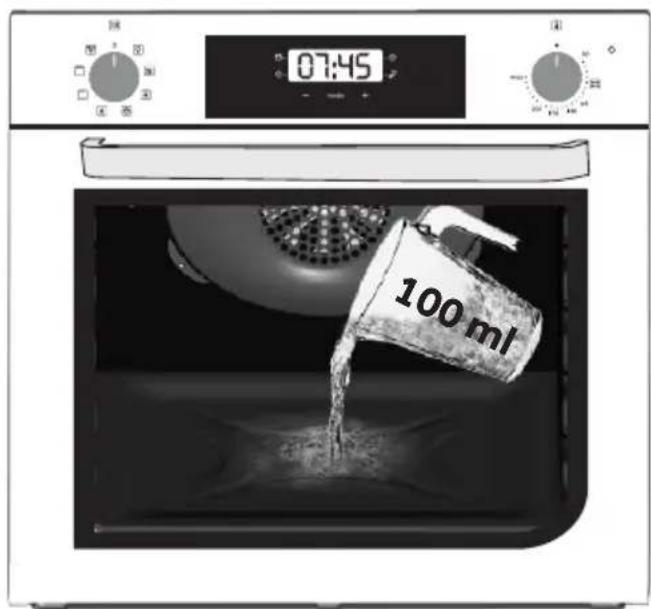
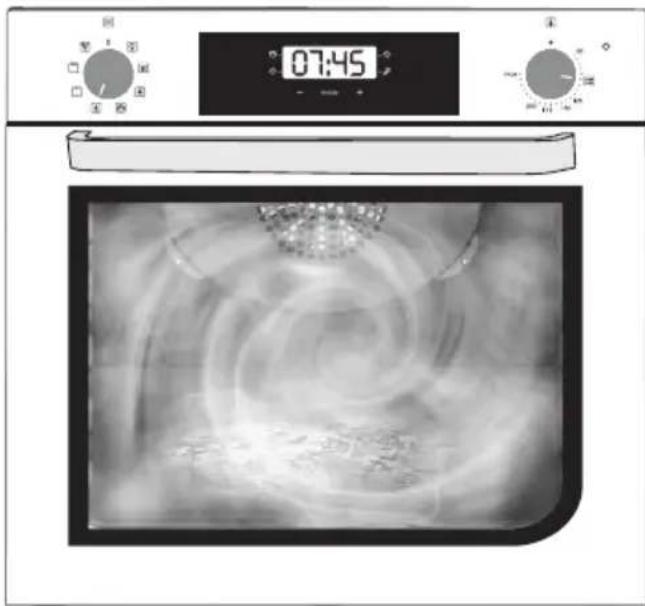
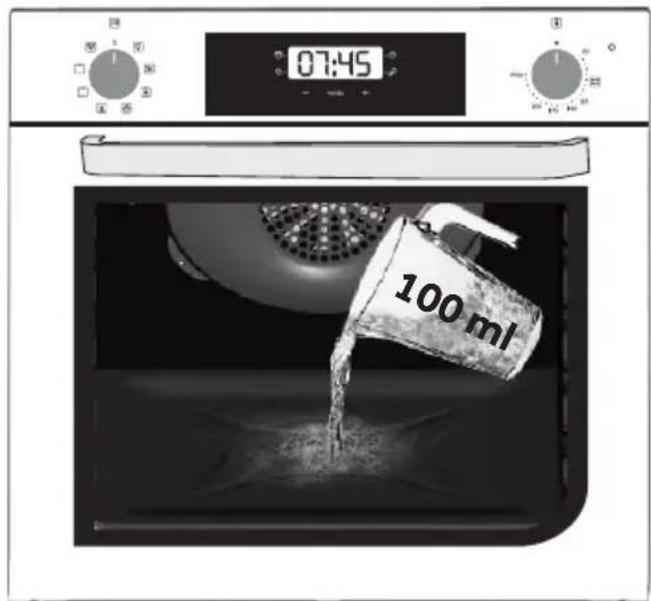
Aquactiva Function (depends on model)
The Aquactiva procedure uses steam to help remove remaining fat and food particles from the oven.
- Pour 100ml of water into the Aquactiva container at the bottom of the oven.
- Set the oven function to Bottom + Fan heater (
- Set the temperature to the Aquactiva icon
- Allow the program to operate for 20 minutes.
- After 20 minutes switch off the program and allow the oven to cool down.
- When the appliance is cool, clean the inner surfaces of the oven with a cloth.
Warning: Make sure that the appliance is cool before you touch it.
Care must be taken with all hot surfaces as there is a risk of burns.
Use distilled or drinkable water.
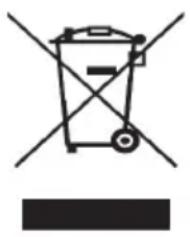
Waste management and environmental protection
This appliance is labelled in accordance with European Directive 2012/19/EU regarding electric and electronic appliances (WEEE). The WEEE contain both polluting substances (that can have a negative ef
fect on the environment) and base elements (that can be reused). It is important th
WEEE undergo specific treatments to correctly remove and dispose of the pollutants and recover all the materials. Individuals can play an important role in ensuring that the WEEE do not become an environmental problem; it is essential to follow a few basic rules:
-
the WEEE should not be treated as domestic waste;
-
the WEEE should be taken to dedicated collection areas managed by the town council or a registered company.
In many countries, domestic collections may be available for large WEEEs. When you buy a new appliance, the old one can be returned to the vendor who must accept it free of charge as a one-off, as long as the appliance is of an equivalent type and has the same functions as the purchased appliance.
SAVING AND RESPECTING THE ENVIRONMENT
Where possible, avoid pre-heating the oven and always try to fill it. Open the oven door as infrequently as possible, because heat from the cavity disperses every time it is opened. For a significant energy saving, switch off the oven between 5 and 10 minutes before the
planned end of the cooking time, and use the residual heat that the oven continues to generate. Keep the seals clean and in order, to avoid any heat dispersal outside of the cavity. If you have an electric contract with an hourly tariff, the "delayed cooking" programme makes energy saving more simple, moving the cooking process to start at the reduced tariff time slot.
Troubleshooting
| Problem Possible cause Solution | ||
| the oven does not heat up | The clock is not set Set the clock | |
| The oven does not heat up | A cooking function and temperature has not been set | Ensure that the necessary settings are correct |
| No reaction of the touch user interface | Steam and condensation on the user interface panel | Clean with a microfiber cloth the user interface panel to remove the condensation layer |
Installation
EN If the oven does not have a cooling fan, create an opening 460mm× 15mm
EN If the furniture is coverage with a bottom at the back part, provide an opening for the power supply cable.
EN The manufacturer will not be responsible for any inaccuracy resulting from printing or transcript errors contained in this brochure. We reserve the right to carry out modifications to products as required, including the interests of consumption, without prejudice to the characteristics relating to safety or function.
Airfry Tray (si present)

Special panels coated with enamel, made with a microporous structure to turn fat into gaseous elements that are easy to remove. Replace after 3 years of use (at 2/3 cooking cycles per week).
Use of touch control clock programmer (depends on model)
- Disconnect the oven from the mains supply.
- Undo the glass cover, unscrew the bulb and replace it with a new bulb of the same type.
- Once the defective bulb is replaced, replace the glass cover.


The air fry tray ensures that hot air reaches the food evenly and tridimensionally, resulting in a crispier exterior while maintaining tenderness inside. A baking tray can be optionally placed at L1 to collect juices or breadings.
- Disconnect the oven from the mains supply.
- Undo the glass cover, unscrew the bulb and replace it with a new bulb of the same type.
- Once the defective bulb is replaced, replace the glass cover.
Tento produit obsahuje jeder alebo viac svetelnych zdrojov s energetickou triedou G (lampa). *V pripade problemu s touto lampou kontaktujte zákaznicky servis.
TJIaBeH roTbA NaHeI (cAmO aKO e HAnuYeH)
Bb3dyweH KOHBeHep, KOITo yBelenuHaBa
UnpkylaunraHa Bb3dyxa BB fypHaTa. Toba
No3BOJRA NoO6peHa npOn3BOJNTeJIHOCT Ha
rotBeHe, NO-paBHomepHo rotBeHe Ha xpaHaTa
Pn BCaKBr TeMnepaTpyn, No-KpaTKn
BpeMeHa 3a rotBeHe H, HApA, paBHomepHo
pa3npedeJeHne Ha TeMnepaTypa Ta BB
fypHaTa.
Taba Airfry (cAmO aKO e HaJIuHEn)

Tabata 3a Bb3dUshno nbpKeHe rapaHTnpa, ye ropeuT Bb3dyx DOCTnra DO
XpaHa paBHomepHo I TpuH3MepeHo, KOeTO BOJINo NO-XPyNkBa BbHNoHoc, KaTo CbUeBpeMeHHO 3ana3Ba HeKHOCT OTbTpe. No XeJaHne MoKe Na Ce NoCTaBn TaBa 3a NeueHe
L1 3a cb6upaHe Ha cOKOBe nIi naHnpOBka.
KomnJIeKrIprnTtRan (cAmO aKO e HaJIuYeH)
06nKHOBeHHaT pafoMKe da nOeMe fOpMN CbdoBe.
PaΦTbT 3a Ibpxa H a TaBa e oco6eH OoXoJU, 3a neueHe Ha HeuHa ckapa.
I3noJ3BaIeToC BaHnUkKaTa 3a OTueKdaHe.
CneuHaHnT npoHn Ha paTOBeTe 03HaVaBa, ye Te octaBat XOpN3OHTaHn DOpN KOraTo ca n3DbpNaHn HnpaBO. Hama pNcK CbIbT Da ce Pb3He nn pa3JIee.
Tabata 3a cb6bpahe Ha cokobete OT neeHN Ha ckapa Hxpani. N3noJ3Ba ce caMo C rpnI, rpnI nnr npIn C BeHTnlaTOp; INBaJeTe ro ot fypHaTa 3a dpyr MeToDi HA rOTBeHe.
HnKora He n3no13BaIte TaBaTa 3a OTcEJaHe KaTo TaBa 3a neueHe, Tb' KaTO TOBa Cb3DaBa DMM Ma3HnHa ige ONpbCKA VpHATA BN, PpaBeyKn y MPcbHa.
DpkaHTHaTa6Jata
Paft3aIbpaHaTaBaeIealeH3aNehe Ha cka. H3noJI3BaIte ro 3aeIHO C BaHnUkata 3a otEJaHe.BKIOUcHHe aDpbKka 3aNoIOnMaHa He 6eOJACHOTo npMeCTBaHe Ha DbTa Akcecoapa.He OCTABYTe dpBKKata BBfypHaT.
Даннза Ниска Консуразина eнергьсыласно Perлament (EC) 2023/826 ha Komиета
KoHcymnpaHa MouHocT Ha npOdykTa B CbCTOAH He pekm Ha rTOBHOCT c HOpMaunn nn DnCnne 3a cbctOAHneTo:0,8 W
IepnoD, cneI KOyTO o6OpdyBaHeTo aBtOMaTHUHO DOCTnra CbCTOAHne Ha peXIM HA rTOBHOCT C HΦOpMaunn nn Dncnle 3a CbCToHneTO: 20 MmH
- TaMep
- HactpoNka Ha yacobnka
3.Прдьжнтелнос Ha rotbeHeto
4.3aklouvahe cpeuy da - ПокаЗвано Temперараза плчасовнka
- YnpabIeHne Ha hAcTroPoiKnte Ha LCD dncnla
- Konue 3a peyunpahe Ha Tepmoctata
- Konque 3a n36op Ha yHKun
BHIMAHHE: nbpBaTa Oepaun 3a n3BbPwBaHe CLeq KaTo fypHaTa e 6nla HnctaInpaHa nn CLeq npeKbcBaHe Ha 3axpaHbaHeto (TOBa ce pa3no3HaBa OT MInaHeto Ha DnCnJe) e 3aDabAHeTo Ha npabNlHOTo BpeMe. TOBa ce NocTnRa, KaKTo CneDbA:
- HaTncheTe ueHtpaJIHHa 6bToH 4 nbTu
3aJaTe BpeMeTo C"-"+" 6yToHn. - Ocbo6oTe BCnUKN 6yToHn
BHIMAHHE:Фурнataш pa6OTn cmo npu yCIOBHe Ye YacOBHKnbTe HAcTpoeH.
I3noI3BaHe Ha yacOBHnKOB nporpaMaTOp 3a ceH3OpHO ynpabLeHne (3aBnCn OT MoJeLa)
| Функция KAK | ДА AKТИВИРAME KAK ДА ИЗКIIПОЧNTЕ KAKBO ПIPABИ 3А KAKBO CE ИЗПОЛЗВА | |
| ЗАКПЮЧBAHE | Φункцията 3a зakлочвае За Deça se acтвира с натусяне Ha Set (Hастroybaе) (+) 3a MNHNUMY 5 ceунд. OT TOЗМ МОмeNT haTaTbK ВSCИКД дугп Функши有很大 са зakлочени, сбetoДиоДьТ ЗА „зakлочвае срешу deça" se ВКлочь, Н ДиSCПLEЯ有很大 поимигь „STOP" и有很大 соказь ВретeTo Ha пекьсваня. | Φункцията 3a зakлочвае За Deça se deзakтвира чpezнacнacнe Ha Tьчпадa Set (Hастroybaе) (+) OTHOBO ЗамнIMУM 5 ceунд. OT TOЗ МOMeNT СБЕТОДIVODITE Na "Зakлочвае срешу Deça" се ИЗКПЮЧВAT И BCИЧКIN Функши могот有很大 bьдат ИЗбразни OTHOBО. |
| МИНΥTEH ТайМЕР | Нат SCHTe Zeentpaillnig Бутон 1 nbTи Нат SCHTe 6byToHnite “-”“+”, за наauthponite нжното врeme. ОсвобodeTe BCSUKN БуToHn | Когато ЗададенOTO врeme Изтесу, Звухова аларma СинhalinЗрma кра. След{kato se akтвира, Таши ларma有很大 спpe самостюгелно, Н можete дд有很大 спрete Вedingara чeze Нат SCHTe Ha有很大 OT БуToHnite. |
| COOKING TIME | •achatсete центалпь 6byToN 2 nbTи •achatсete 6byToHite "-" ил "+", 3a за ЗададeTe HeобхODIMмatura prodxbлжITEлгост на rotBVEne •ОсвобodeтЕ BCYчКи 6byToN •ЗададeTe ФуннциЯТа зa rotBVEne сыс сеileKTорpa на фуннцияТа на Фурнata | •achatсete 6byToHа, 3a за спгетe сигнala. achatсete цentалпь 6byToN, за за се bByPte КьМ КлиочкATA Фуннция. | •Позвolyава праздварително ЗадаВанe На Вретeо 3a rotBVEne, HeobxOДМо 3a Избраната pecenta. •За за пrobерпite КOLko Вретe отaba дa рабOTи, achatсete 6byToHа ИЗБО 2 nbTи. •За за пromerenite праздваритelно ЗадаDEHOTо Вретe, achatсete 6byToHite ИЗБОп "-" "+"". | •Korato Вретeо ИЗteу, фурната сиес ИЗКILQUHи abTomатию. Ако щедае дa спгетe rotBVEne lo-paHOи Задыртete сеileKTорра на Фуннци ио,InsилдайтЕ Вретe на 0:00 (BуToHиИЗБОп "-" "+" |
| 1 | 2 |
| 1 |
| 2 | F | CANDY | 1 MAX 100 125 150 175 |
Ako octaHaT Ma3Hn OCTaTbU, NOtoneTe Taba T BbB Boda N DeTepreHT. Dpyra Bb3MOxHOCT e Da n3MneTe Taba T CbDOMNHaTa MaUNHa NIN Da n3NoJ3BaTe O6NKHOBeH DeTepreHT. Hkora He NoctabRyTe Mpbcha TaBa 6paTHo BbB cyphata.
POndprbKka (3aBnCn OT MoJeNa)

HCTpyKun 3a CBAJHe n NOUcTBaHe Ha cTpaHnHnTe CTOJKN
1.ИЗвадеTe MeТанНeСКApи,ΚΑΤΟ ΓΙΝΙЗДБρΝaTe NO NOCOKaHa CTpeIKNTe (ВИЖ ПО-ДОЛY).
-
3a da nouchte MeTaHnTe cKapn rN nocTaBete BCbDOMnHaTamaunHa Nn N3noJ3BaIe BnaJHa r6a, a Cnei TOBa ce yBepTe, ye ca nOcUweHn.
-
CJIeI NOUcTBAHe NocTaBete MeTaHInTe cKapN B O6paTHnpeI.
CmraHa Ha Kpykata (3aBnCn OT MoJeIa)
1.ИзклочeteфурнataOTeileKtpnueckaTмpeжа.
2. Pa3BnTe CbKlEnHnaK, pa3BnTe Kpykata n a CMeHeTe c HOBa Kpyka OT cbuHa TnI.
3. CneI KaTo CMeHInTe DeΦeKTHaTa KpyuKa, CMeHeTe CTbKLeHnKaNaK.
To3n npOdyKT cbIbpxka eINH nII NOBue H3TOUHN Ha CBeTInHa OT KlaC Ha eHeprnHa eFekTnBHOCT G (lanma) * B clyuayn Ha npo6IeM c Ta3n lamna, CBbpxKeTe ce cOTdela 3a o6cnykBaHe Ha KIneHTN
Aquactiva yHKzna (3abncn OT moJeIa)
IpoueypaTa no Aquactiva n3noJ3Ba npa, 3a da ce noDnOMrHe npemaxBaHTo Ha Ma3HHn I xpaHHTeHNuactnUOn OT cypHaTa.
1.N3JeTe 100 Ml BOnBa B KOHTeHepa 3a Aquactiva Ha DbHOTo Ha cyphHaTa.
2.3aJaTe ΦyHKuIra Ta Ha φypHaTa Ha OJLeH + BeHTnlaTOp (L
3. HacTpoIe TempepaTa Aquactiva icon.
4. OctaBeTe nporpaMaTa da pa6OTn 20 mHyTN.
5.Cnei 20 MInHyTu IN3KInOueTe nporpaMaTa N OCTaBeTe yypHaTa Da n3CTnHe.
6. Korato ypeDbT ce oxlaDi, noocTe Te BbTpHnTE NOBbpxHOCTNa yphata c Kbpna.
PpeynpeKdene: YBepeTe ce, ye ypeTb T nCTnHaI, npeDn da ro DOOKocheTe.
Tp6Ba Da ce BnMaBa C BCnKn Iopeu NOBbpxHOCTN, Tb KATO CbIeCTByBa pNCK OT n3rapaHe.
H3noJI3BaIte DeCTnIIIPAHa nn IIITeYHa BOda.
To3n ypeJe e Mapknipan cblacho
eBponeNcKa DnpeKtNba
2012/19/EO 3a OTnaDbuN ot
eIekTpnuEcko N eIekTpoHNO
obOpyDbaHe (WEEE). WEEE
cbDbpJka eINHObpeMeHHO
3aMbpcraBaun cy6ctahnn
(KONTO MORAT Da OKaKaT OTPnCaTeJHOBb3dEiCTBVe Bbpxy OkJHaTa CpeJa) N OCHOBHNI KOMNoHEHTN (KoTOMorat Da Ce n3noJ3BaT NOBtOpHo).BaJHo e WEEE Da 6bDaT o6pa6OteHn PO CneuΦuHn HauHHn C orpJeI npabINHOTo OTcPaHbAHe I N3XBbPJIHeTo Ha BCnUKN 3aMbPCiTeJI N Bb3BbPsAHeTo IN peuKlnpaHe Ha BCnUKN MaTePnaJI. OTdEnHnte INDnBnM MoRt Do OKaKaT BaJHa polJ,OCnpyraBnKn,Ye WEEE Hma Da cTaHaT npo6JIem 3a OKoJHaTa CpeJa; BaJHo e Da 6bDaT CJIeDbAHN HAKO OCHOBHNI PpaBnla:
- WEEE He Tp8Ba Da 6bDaT TpeTnpaHn KaToDOMaKNHcN OTNaDbuN.
WEEE Tp6Ba Da 6bDaT npedabaHn B CbOTBeHTHe c6bpaTeJHn NyHKTOBe, UnpablaBAn OTo6uHaTa Hn peHcTpnpaHn KOMPahn. BMHOrO DbpKAbN,3a rOleMn WEEE, MoKe Da ce npedna Ta cb6upaHe OT DomOBete.
Korato KynyBaTe HOB ypei, CtapnT MoKe
da 6bnde BbpHAT Ha TbpROBeca, KOIto Da ro npn6pePe 6e3PnATho Ha 6a3a eNHO-KbM eNHO, DOkato ObOpyDBAHeTo e OT cbuINr TINMa CbUInTe yHKcNn KaTO DOCTaBeHOTO obOpyDBAHe.
CNECTBAHE HA EHEPTN N ONA3BAHE HA OKOJIHATA CPEDA
Korato e Bb3MOxHNO n36rBaIte npedBapnteJIHOTo 3aRpaHe Ha yprHata. No BpeMe Ha rotBeHe OTBapnTe BpTaTa Ha yprHata Bb3MOxHNo Hau-MaLko, 3aOTo npi BCaKO OTBapnHe ce r6bTOnlInHa. 3a 3NaHTeJHa IKOHOMnHa eHepnHa n3KIOUcTe yprHata 5-10 MInHyTN ppeN PAnHpAHH T KpaN Ha BpeMeTO 3a RotBeHe N3PON3BaIte OCTaTBuHaT a TOnlHa, KOaTO yprHata npoDbJkAba Da TReHepnPa. 3a da N36BerHeTe 3aYb6a Ha TOnlHa NODbpKaIte YnCTn N B peN UplbTHeHnTa Ha yprHata. Ako IMaTe pa3NIuHN TaPnN 3a eNeKTPnuEckata eHepnN I3PON3BaIte OTLOKeHnT CTapT, 3a Da CTapTnpaTe rotBeHeTo Ha no-HnCKaTa TaPnFa.
USTEDA ENERGIJE I BRIGA ZA OKOLIS
Ukoliko je moguce, izbjegavajte nepotrebno za grijavanje prazne pećnice. Vrata otvarajte što je manje moguce, kako biste smanjili gubitak topline iz unutrašnjosti. Za značajnu ušedu energia, isključite pećnicu 5 do 10 minuta prije planiranog zavrěsétka pećenja i iskoristite preostalu toplinu pećnice. Održavajte brtvce Čistima i pripazite da su pravilno učvrěscene, kako biste izbjegli gubitak topline. Ukoliko imate dvotarifno brojilo, iskoristite funkcjju odgode početka pećenja za period jeftinije elektríne energia.
Rješavanje problema
| Problem Mogući | Uzrok Rješenje | |
| Pećnica se ne zagrijava Sat | nije postavljen Postavite sat | |
| Pećnica se ne zagrijava | Nisu postavljeni funkcija kuhanja i temper-atura | Pobrinite se da su potrebne postavke pravilne |
| Dodirno korisničko sučelje ne reagira | Para i kondenzacija na ploči korisničkog sučelja | Ploču korisničkog sučelja očistite kr-pom od mikrovlakana kako biste uklonili kondenzirani sloj |
Montaža
HR Ako pecnica nema rashladni ventilator, ostavite prolaz. 460mm× 15mm
Hinges which ensure an automatic soft and smooth movement during the closing phase of the oven door.
y BnpaKny HecnpaBHOCTI Ta/Un HeBiIDNoBIHOI PO6OTN, BmKHiTb I npilaI He HamaraTeCra BipeMOHTyBaTN Ioro.
Hεκτρικήσφάλεια
SIIOYPEYTEITE OTI OAE ΩI HAEKTPIKE ΣYNΔEΕΙ ΠINONTAI ANO ENA HAEKTPOAΟΤΟ H IΠΤΟΙΗΜΕΝΤΕΝΑΚΟ.
To kaawio trophiociae to onoio ouvdeetai o oupvoic npenei va anpoi tic npoutoeoeic tnc ioovac vuotheoiac otnv xwpa tonohtnonc. O kataokuaotn cdev fepei kaima anolutwc eunv yia tuxov zetaiaou exi npokanthetai ano untnpnon autowv twv odnyiwv. O oupvoic npenei va evai ouvdeltaevoc oe ia npoxn nkeptikou peuatoc me yieuwcvn pica toixou n eva noaanlo aofaiaoliakontn, avaloya me tnv ioxuova vuotheoi aonv wpa tonohtnonc. H trophiosia tou nektpko'puuatoc th npenei va npoostateueetai e kataaanee c aofaaleiec kal ta kawlaiaou xpnoanoivtai npenei va exouv diatoum n onoiva eyyuaatai tnv owotn trophiosia tou oupvou.
SYN△E∑H
O foópvoc trofoodotetai με éva kaλδio trofoodoiac to onoio θα πéπει α εival ouvδeδeévo móvo με μia npoxn nλektpiokou pεμatoc με 220-240 Vac 50 Hz μεtaεu twv φαeewν n μεtaεu tnc φáonc kai tou ouδetepou.Πpiv ouvδeθει o foópvoc με tnv npoxn nλektpiokou pεμatoc, εival onμavtkó va ελéyεte:
- tyn taon nou unoδekvuetal επανω σto opyavo μεtpnong,
To kaIomega tnc yeiomega nou ouvdelta tai oTov akpodelta tnyiomega tou foypovu npene i va eivau ouvdedeltaevo meTov akpodelta tnc yeiomega tnc npoxn cNkctpikou pmuatoc.
PPOEIANOIOH
Ipv ouvdeoetov foopvo e tv npoxn nkeptkou peuatoc, nntote ano eva niotoonnevo nektpoloyo va eleyeitnv ouvexia tou akpoedktn tc syiowcn tnc npoxnc nkektkoou epuatoac. O kataokeuaotnc dev fepei kaia anolutwca uovyn ia tuxov atuxmuata n aaaa npoalma npokanov ao tv amelia ouvdeoc tou pfovpuou e tv akpoedktn tc syiowcn n aoia ouvdeon e tv veyiwan noia exi elattomegaatikn ouvexia.
\SHEMEI : oyw tou oti o oupvoc npoei va pouothei eitoupyia ouvtnpnonc, a evai va iatnpite iaheou n a n ia npia toixou etoi wote va npoei va ouvsethetai autiv o oupvoc av a aipveei ano tov xwpo o'tov onio eiva tonoetnevo. To kawdo tpofoosioac npenei va avtikaiotatai mvo ano npoownikoc tnctexviknc unnpoeiac n ano texvikouc ev avtioiexc πiotonoiieic.
Otau eiva oBnoToC o foovoc mopei va unapxei eva a0evc fwc yupw ano tov kevtipko kupio diakontn. Autoeivai anoluta fuoioloyko. Mnopei va 0nei anla yupicovtac avanoda tnv npia tnc oukeunc n aaizovtac theon metau twv akpoedektwpfoodoiac.
Yπoδεiξεις
REMOVAL AND CLEANING OF THE SIDE RACKS

Airfry paplate (tikai tad, jair)
Airfry paplate nodrošina, ka karstais gaiss vienmérigi un trisdimensionali sasniedz ďdienu, iegustot kraukskigu arpusi, vienlaikus saglabajot iekspusi maigu. Papildu izveles iespeja ir novietot cepşanas paplati L1 limeni, lai savaktusulas vai maizes drupaças.
Zema energijas paterina dati saskaña ar Komisijas Regulu (ES) 2023/826
Izstradajuma enerigijas paterinsgaidstaves rezimar informacijas vai statusa displeju: 0,8 W
TARVIKUD (soltub mudelist)
Tilgakoguja
Pirni vahetamine (soltub mudelist)
TILBEHØR (depends on model)Drypbakke
- Betjeningspanel
- Pladepositioner (tvaergaende tradrist, hvis inkluderet)
- Riste
- Bradepander
- Ventilator (hvis til stede)
6.Ovndor - Tvaergaende tradgitre (hvis til stede: kun for fladt ovnum)
8. Seriennummer
Indsamler rester, der drypper, när maden tilberedes på grillen.
- Safety Indications
- General Instructions
- Electrical Safety
- CONNECTION
- WARNING
- Recommendations
- Installation
- First Use
- Product description
- ACCESSORIES (depends on model)
- Meat probe (only if present)
- Catalytic panels (only if present)
- Softclose (only if present)
- Turnspit (only if present)
- Grill pan set (only if present)
- The tray holder
- Chef panel (only if present)
- Airfry Tray (only if present)
- Use of touch control clock programmer (depends on model)
- General notes on cleaning
- GLASS PARTS
- OVEN WINDOW SEAL
- ACCESSIONS
- DRIP PAN
- Maintenance (depends on model)
- REMOVAL AND CLEANING OF THE SIDE RACKS
- Removal and Cleaning of the Glass Door (depends on model)
- Changing the Bulb (depends on model)
- Aquactiva Function (depends on model)
- Waste management and environmental protection
- SAVING AND RESPECTING THE ENVIRONMENT
- Airfry Tray (si present)
- Taba Airfry (cAmO aKO e HaJIuHEn)
- KomnJIeKrIprnTtRan (cAmO aKO e HaJIuYeH)
- DpkaHTHaTa6Jata
- Даннза Ниска Консуразина eнергьсыласно Perлament (EC) 2023/826 ha Komиета
- I3noI3BaHe Ha yacOBHnKOB nporpaMaTOp 3a ceH3OpHO ynpabLeHne (3aBnCn OT MoJeLa)
- POndprbKka (3aBnCn OT MoJeNa)
- HCTpyKun 3a CBAJHe n NOUcTBaHe Ha cTpaHnHnTe CTOJKN
- CmraHa Ha Kpykata (3aBnCn OT MoJeIa)
- Aquactiva yHKzna (3abncn OT moJeIa)
- CNECTBAHE HA EHEPTN N ONA3BAHE HA OKOJIHATA CPEDA
- USTEDA ENERGIJE I BRIGA ZA OKOLIS
- Montaža
- Hεκτρικήσφάλεια
- SIIOYPEYTEITE OTI OAE ΩI HAEKTPIKE ΣYNΔEΕΙ ΠINONTAI ANO ENA HAEKTPOAΟΤΟ H IΠΤΟΙΗΜΕΝΤΕΝΑΚΟ.
- SYN△E∑H
- PPOEIANOIOH
- Yπoδεiξεις
- Zema energijas paterina dati saskaña ar Komisijas Regulu (ES) 2023/826
- TARVIKUD (soltub mudelist)
- Pirni vahetamine (soltub mudelist)
Brand : CANDY
Model : FIDC X265
Category : Built-in oven