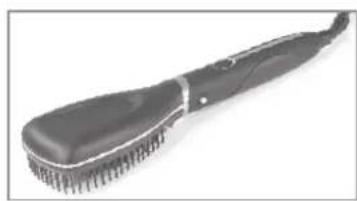
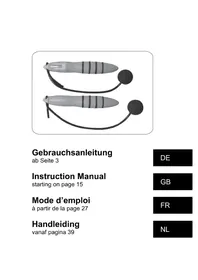
03996 - Electric hair styling device VitalMaxx - Free user manual and instructions
Find the device manual for free 03996 VitalMaxx in PDF.

| Product type | Electric hair styling appliance (multifunctional hair styler) |
| Brand | VitalMaxx |
| Model | 03996 (JF-502) |
| Power supply | 220 – 240 V ~ 50/60 Hz, 45 – 50 W |
| Heating temperature | 160 – 180 °C |
| Protection class | II |
| Main functions | Curling iron, straightening iron, crimping iron, smoothing brush, volumizing brush, curl spiral |
| Included accessories | Curling iron (with clamp), 2 heating plates (flat and wavy), spiral, volumizing brush, smoothing brush, clamp for straightening/crimping iron |
| Use | On dry hair, household use only |
| Care and cleaning | Unplug and let cool; wipe with a soft damp cloth; do not immerse in water |
| Safety | Do not use near bathtubs or showers; risk of burns; keep out of reach of children under 8 years |
| Spare parts and repairability | Use only original accessories; contact customer service for repairs; do not repair yourself |
| Customer service | DS Produkte GmbH, +49 38851 314650 |
| Cord length | Not specified (estimated: approx. 1.8 m) |
| Weight | Not specified (estimated: approx. 400 g) |
Frequently Asked Questions - 03996 VitalMaxx
User questions about 03996 VitalMaxx
0 question about this device. Answer the ones you know or ask your own.
Ask a new question about this device
Download the instructions for your Electric hair styling device in PDF format for free! Find your manual 03996 - VitalMaxx and take your electronic device back in hand. On this page are published all the documents necessary for the use of your device. 03996 by VitalMaxx.
USER MANUAL 03996 VitalMaxx
natural_image
Three black hair curling stationers with different designs and accessories, displayed against a white background (no text or symbols visible)03996
DE EN FR NL
Bedienungsanleitung
ab Seite 3
Instruction manual
starting on page 12
Mode d'emploi
www.service-shopping.de
natural_image
Two black hair curlers with clips, shown against a white background (no text or symbols visible)
natural_image
Close-up of a black hair brush with bristles (no text or symbols visible)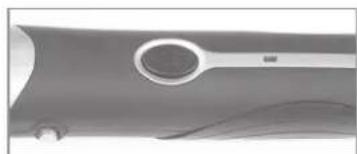
natural_image
Close-up of a mechanical component with a central circular feature and a metallic handle (no visible text or symbols)natural_image
Black-and-white photo of a woman holding a hairdryer, smiling (no text or symbols visible)natural_image
Close-up of a metallic mechanical component with two protruding blades and arrows pointing to features (no text or symbols visible)natural_image
Close-up of a mechanical clamp or clip assembly with directional arrows indicating force or movement (no text or symbols visible)natural_image
Close-up of a pair of hair curling iron (no text or symbols visible)natural_image
Black-and-white photo of a smiling woman holding a curling iron, no text or symbols visiblenatural_image
Close-up of a pair of metal pliers or cranes (no text or symbols visible)natural_image
Black-and-white photo of a woman styling her long hair with a comb (no text or symbols visible)natural_image
Black-and-white photo of a woman styling her hair with a curling iron (no text or symbols visible)natural_image
Two hair curling tools with coiled spring and cord (no text or symbols visible)natural_image
Black-and-white portrait of a woman holding a hair curling iron (no text or symbols visible)natural_image
Black-and-white photo of a smiling woman holding a curling iron, no text or symbols visibleSafety Instructions 13
Items Supplied 15
Overview of the Main Unit 16
Basic Use 16
Using Attachments 17
Care and Storage 19
Troubleshooting 20
Technical Data 20
Disposal 20
Dear Customer,
We are delighted that you have chosen this multifunctional hair styler.
Before using the device for the first time, please read these operating instructions carefully and keep them for future reference and other users.
The manufacturer and importer do not accept any liability if the information in these operating instructions is not complied with.
If you have any questions about the device and about spare parts/accessories, contact the customer service department via our website:
www.service-shopping.de
Explanation of the Symbols


Danger symbols: These symbols indicate risks of injury. Read through the associated safety notices carefully and follow them.
WARNING: Do not use this device near a bathtub, shower or any vessel containing water.
Protection class II
Read operating instructions before use!
Supplementary information
Explanation of the Signal Words
DANGER warns of serious injuries and danger to life
WARNING warns of possible serious injuries and danger to life
CAUTION warns of slight to moderate injuries
NOTE warns of damage to property
Intended Use
- This device is intended to be used exclusively for shaping human head hair. It is not suitable for synthetic wigs.
- Only suitable for use on dry hair.
- Only suitable for use in closed indoor rooms.
- This device is for personal use only and is not intended for commercial applications.
- Use the device only for the intended purpose and as described in the operating instructions. Any other use is deemed to be improper. Incorrect operation and incorrect handling may cause faults with the device and cause injury to the user.
- The following are excluded from the warranty: all defects caused by improper handling, damage or unauthorised attempts at repair. This also applies to normal wear and tear.
Safety Instructions
This device may be used by children aged 8 and over and by people with reduced physical, sensory or mental abilities or a lack of experience and/or knowledge if they are supervised or have received instruction on how to use the device safely and have understood the dangers resulting from failure to comply with the relevant safety precautions.
■ Children must not play with the device.
- Cleaning and user maintenance may not be performed by children, unless they are supervised.
■ Children younger than 8 years of age and animals must be kept away from the device and the mains cable.
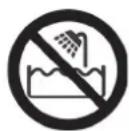
WARNING: Do not use this device near a bathtub, shower or any vessel containing water.
Never use while bathing or showering!
- The device must always be disconnected from the mains power when it is left unattended and before assembling, disassembling or cleaning the device.
- Do not make any modifications to the device. Also do not replace the mains cable yourself. If the device, the mains cable or the mains plug of the device is damaged, they must be replaced by the manufacturer, customer service department or a specialist workshop in order to avoid any hazards.

DANGER – Danger of Electric Shock from Water
- Use and store the device only in closed rooms. Do not operate the device in rooms with high humidity.
- Never immerse the device in water or other liquids! Ensure that the device, the mains cable and the mains plug cannot fall into water or become wet.
- Should the device fall into water, switch off the power supply immediately. Do not attempt to pull the device out of the water while it is still connected to the mains power!
- Never touch the main unit, mains cable or mains plug with wet hands when these components are connected to the mains power.

WARNING – Danger of Fire
- Do not use the device in rooms containing easily ignitable or explosive substances.
- Keep combustible materials, e.g. cardboard, plastic or paper, away from the device and never place the device down on combustible objects or surfaces during and after operation.
■ Unwind the mains cable fully before connecting up the device.

CAUTION – Danger of Injury
- Danger of burns! The heating rod and the attachments will become hot during use! Be careful when handling the device. Only ever hold the device by the handle.
- Danger of tripping! Make sure that the connected mains cable does not present a trip hazard.
NOTE – Risk of Damage to Material and Property
- Only connect the device to a properly installed plug socket. The socket must also be readily accessible after connection so that the connection to the mains can quickly be isolated. The mains voltage must match the data on the rating plate of the device.
■ The device must be switched off when inserting or removing the mains plug.
■ Make sure that the mains cable is not squashed, bent or laid over sharp edges and does not come into contact with hot surfaces (e.g. of the device). - Switch off the device and pull the mains plug out of the plug socket if an error occurs during operation or before a thunderstorm.
- When the mains plug is removed from the plug socket, always pull on the mains plug and never the mains cable.
- Do not pull or carry the device by the mains cable. Never wrap the mains cable around the device.
Use only original spare parts from the manufacturer. If accessory parts which are not authorised by the manufacturer are used, all warranty and guarantee claims are void.
■ Never place any heavy objects on the device, the mains cable or the mains plug. - Protect the device from other heat sources, naked flames, sub-zero temperatures, persistent moisture, wet conditions and impacts.
- Do not use the device if it has malfunctioned, fallen or been dropped in water. Have it checked in a specialist workshop before using it again.
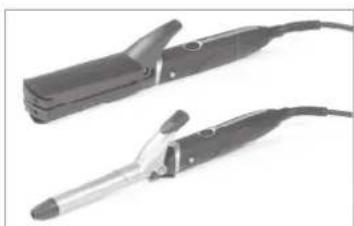
Items Supplied

PLEASE NOTE!
■ WARNING – Danger of Suffocation! Keep children and animals away from the packaging material.
■ Never remove the rating plate and any possible warnings!
Unpack all parts and check the items supplied for completeness and any transport damage. Remove any stickers and film. If you find any damage to the device, do not use it (!), but contact our customer service department.
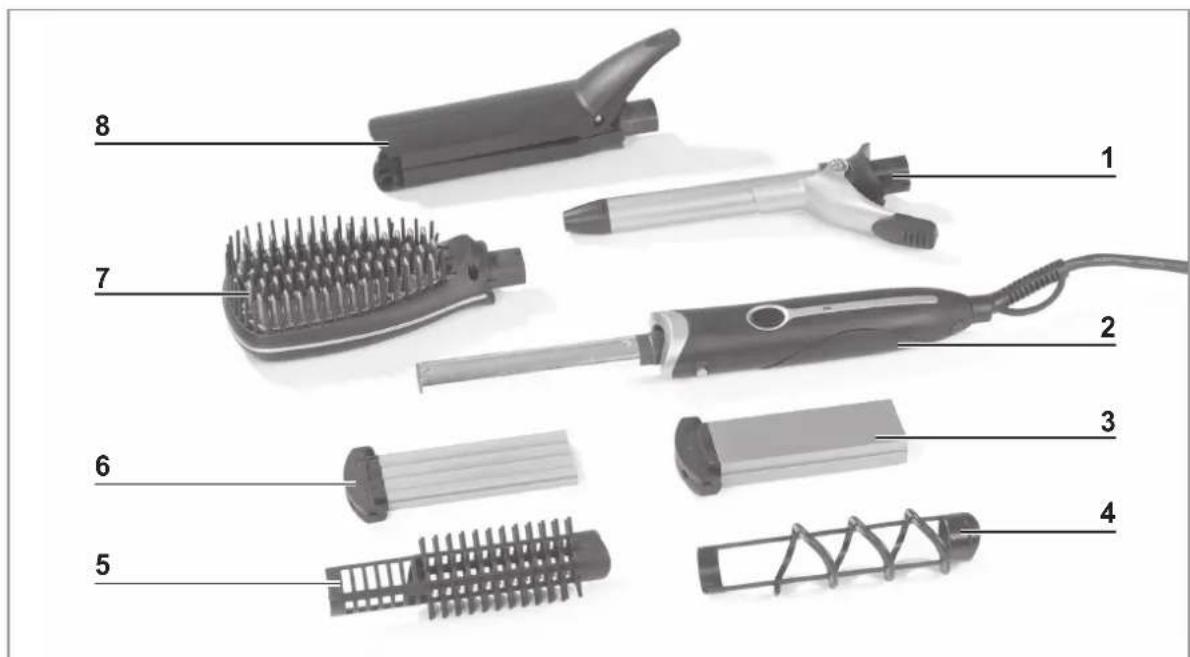
text_image
1 2 3 4 5 6 7 81 Curling iron (with curling tongs)
2 Main unit
3 Heating plate, high
4 Spiral
5 Volume brush
6 Heating plate, fl at
7 Straightening brush
8 Hair straightener and crimping tongs
- Operating instructions
Overview of the Main Unit

text_image
9 10 11 12 13 149 Heating rod
10 On / Off button
11 Operating lamp
12 Mains cable
13 Eyelet for hanging up
14 Release button for the attachments
Basic Use

PLEASE NOTE!
Before the attachments are fitted or removed, ensure that the mains plug has been pulled out and the device is cool.
■ CAUTION – Danger of Burns! The attachment becomes hot during use. Only hold the device by the handle. Keep the attachment away from the face, in particular the eyes. Also maintain a safe distance between the head and attachment of at least 3 – 5 cm.
■ The hair should be washed and dry or only slightly damp.
The basic use of the device is explained at this point. The individual attachments will be addressed in the next chapter.
natural_image
Two black hair curlers with attached wires, shown against a white background (no text or symbols visible)
natural_image
Close-up of a black hair brush with textured bristles (no text or symbols visible)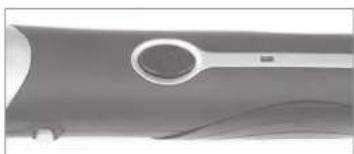
natural_image
Close-up of a metallic tool interacting with a circular component (no visible text or symbols)- Place the attachment you want onto the heating rod (9). It must engage easily. Do not apply any force! When placing on the curling iron (1) and the hair straightener and crimping tongs (8), make sure that the lever is on the same side as the On / Off button (10).
The straightening brush (7) is placed on so that the smooth back (and not the bristles) is on the same side as the On / Off button.
To take off the attachments, press the release button (14) and pull the attachment off the heating rod at the same time.
- Fully unwind the mains cable (12). Connect the mains plug to an easily accessible plug socket.
-
To switch on the device, press the On / Off button. The operating lamp (11) starts to light and the attachment is heated up.
-
Meanwhile thoroughly comb through the hair. There must not be any knots in the hair. We recommend using a heat protection spray to protect the hair.
- Once the attachment has heated up, you can start using it: Partition off the top hair and start with the bottom strands of hair. Shape each strand individually with the attachment until the result is satisfactory. Do not hold the hot attachment in one spot for too long! This could damage the hair.
- To switch off the device, press the On/Off button again. The operating lamp (11) goes out.
- Pull the mains plug out of the plug socket and allow the attachment to cool down if the device is no longer being used or before the attachment is replaced.
- Allow the hair to cool and only then style it with a comb or brush if necessary.
Using Attachments
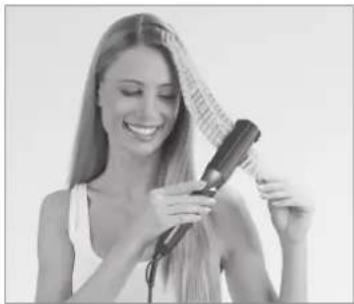
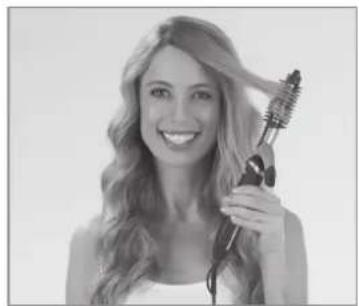
Straightening Brush
Use only heat protection and do not use any other styling products such as hair spray, gel or mousse! These can stick to the straightening brush (7).

natural_image
Black-and-white photo of a woman holding a hairbrush, smiling (no text or symbols visible)- Divide the hair up into sections.
- Move the straightening brush slowly through the sections of hair so that each area of hair is exposed to the heat for no more than two seconds. Do not touch the scalp!
- Brush the respective section of hair in several goes to achieve a good end result without damaging the hair by dwelling on one spot for too long.
Inserting Heating Plates
- Open the the hair straightener and crimping tongs (8) (Press together the lever and shaft.).
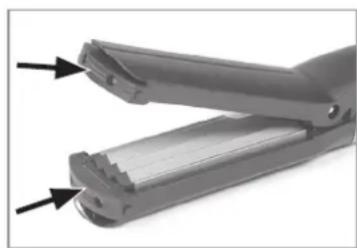
natural_image
Close-up of a metallic mechanical tool with two metal clamps and arrows pointing to features (no text or symbols visible)-
Hold the heating plates (3 + 6) by the plastic handle and slide them into the rails of the tongs. Note the following when doing this: The heating plates are of different heights and must be plugged into the matching half of the tongs. Do not apply any force! They must slide in easily and be heard to engage in place. If this is not the case, try the other half of the tongs.
-
To pull the heating plate out of the tongs, press the two release buttons on the side of the plastic handle.
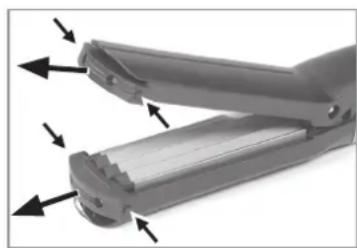
natural_image
Close-up of a mechanical tool with directional arrows indicating movement or force (no text or symbols visible)Crimping Tongs
For optimum results, work on smooth hair or hair that has previously been straightened.
natural_image
Close-up of a pair of hair curlers (no text or symbols visible)To create small curls in the hair, place both heating plates into the tongs so that the curled sides are resting on one another.
natural_image
Black-and-white photo of a smiling woman holding a curling iron, no text or symbols visible- Partition off and tauten strands of hair.
- Open the tongs, insert the strand at the highest point and close the tongs. Hold them in position for a few seconds.
- Open the tongs and then start again a little lower on the curl that has been created. Repeat until the hair is as curly as you want.
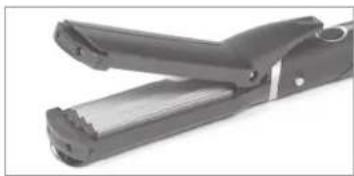
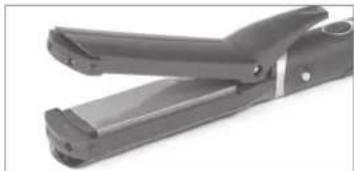
Straightener Tongs
natural_image
Close-up of a pair of black metal pliers or crimpets (no text or symbols visible)To straighten the hair, place both heating plates into the tongs so that the smooth sides are resting on one another.

natural_image
Black-and-white photo of a woman brushing her hair with a brush (no text or symbols visible)- Partition off and tauten strands of hair.
- Open the tongs, insert the strand at the highest point and close the tongs.
- Allow the tongs to glide down to the tips of the hair with a flowing movement.

To make frizzy hair softer, place the crimping tongs on the lengths and leave the hair curly at the base. This will preserve the volume.
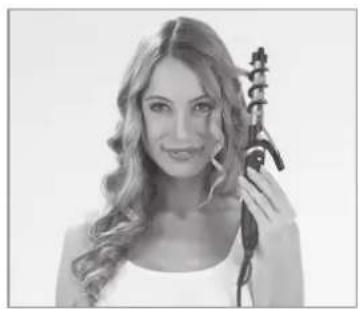
Curling Iron

natural_image
Black-and-white photo of a woman styling her hair with a curling iron (no text or symbols visible)- Separate off a strand of hair. Take thin strands of hair for small and flexible curls and thicker strands for soft, flowing curls.
- Press the lever to open the curling tongs of the curling iron (1). Place the tip of the strand into the curling tongs and release the lever. This fixes the strand in place.
- Rotate the curling iron and wind the strand evenly around it. Keep twisting the hair up to the point at which the curls should begin. Make sure that the curling iron does not come into contact with the scalp.
- Hold the curling iron in position for a few seconds.
- Then open the curling tongs and pull out the curling iron.
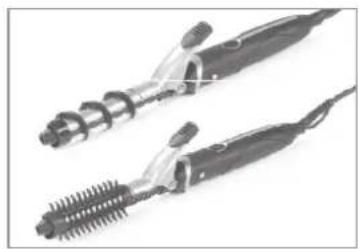
Spiral and Volume Brush
There are two extra attachments for the curling iron (1): The spiral (4) for tight, sharp curls and the volume brush (5) for soft curls.
natural_image
Two hair curlers with coiled springs and cord-like handles, shown against a plain background (no text or symbols visible)The spiral or the volume brush are placed on the curling iron as far as they will go. When you do this, make sure that the longer end of the spiral / volume brush does not rest on the curling tongs.
To take off the spiral / volume brush, open the curling tongs and turn the spiral / volume brush a little to release it from its locked position.
natural_image
Black-and-white portrait of a woman with curly hair holding a curling iron (no text or symbols visible)Using the spiral: Clamp individual thin strands of hair in the curling tongs and then wrap them around the curling iron. The strands will be placed in the grooves of the spiral. This will keep them narrow and curl them evenly. Hold them in position for a few seconds, then carefully unwind.
natural_image
Black-and-white photo of a smiling woman holding a curling iron, no text or symbols visibleUsing the volume brush: Wind individual strands of hair around the brush, hold them in position for a few seconds and then gently unwind.
Care and Storage

PLEASE NOTE!
Before commencing the cleaning, note the safety instructions in the "Safety Instructions" chapter!
■ Never rinse the device with water and never immerse it in water or other liquids. Never clean the device with a steamer.
- Do not use any sharp or abrasive cleaning agents or cleaning pads to clean the device. These could damage the surfaces.
We recommend cleaning the attachments after each use so that no hairs or residues of styling products etc. can accumulate on them.
- Disconnect the device from the mains power and allow it to cool down completely before cleaning it.
-
Remove hair and fluff from the brushes. Wipe down the curling iron (1) and the heating plates (3 + 6) with a soft, damp cloth to remove any possible residues (e.g. of hair-care products).
-
Wipe down the main unit (2) with a slightly damp cloth if necessary and then dry it with a soft cloth.
- Keep the device out of the reach of children and animals in a dry, frost-free place that is protected from the sun.
Troubleshooting
If the device does not work properly, check whether you are able to rectify the problem yourself. If the problem cannot be solved with the steps that are listed, contact the customer service department.

Do not attempt to repair a defective electrical device yourself!
Problem Possible cause / solution
| The device does not work. | • Is the mains plug inserted in the socket correctly? Correct the fi t of the mains plug.• Is the plug socket defective? Try another socket.• Check the fuse of the mains connection. |
| Smell produced | • When the device is fi rst used: A smell often develops when new devices are fi rst used. The smell should disappear once the device has been used several times.• The device has already been used: Is there any contamination on the attachments? Switch off the device, allow it to cool down and clean it in the manner described in the "Cleaning and Storage" chapter. |
Technical Data
Article number: 03996
Model number: JF-502
Voltage supply: 220 – 240 V \~ 50 – 60 Hz
Power: 45 – 50 W
Temperature: 160 – 180°C
Protection class: II


Customer Service / Importer:
DS Produkte GmbH
Am Heisterbusch 1
19258 Gallin
Germany
Tel.: +49 38851 314650
(Calls to German landlines are subject to charges. The cost varies depending on the service provider.)
Disposal

Dispose of the packaging material in an environmentally friendly manner and take it to a recycling centre.
Dispose of the device in an environmentally friendly manner at a recycling centre for used electrical and electronic devices. It should not be disposed of in the regular domestic waste. More information is available from your local authorities.
Contenu
www.service-shopping.de
natural_image
Two black hair curlers with metal clips, shown against a white background (no text or symbols visible)natural_image
Close-up of a black hairdryer brush with textured bristles (no text or symbols visible)natural_image
Close-up of a metallic tool interacting with a circular component (no visible text or symbols)natural_image
Black-and-white photo of a woman holding a hairbrush, smiling (no text or symbols visible)natural_image
Close-up of a mechanical tool with two metallic blades and a central handle, showing alignment arrows (no text or symbols)natural_image
Close-up of a mechanical device with directional arrows indicating movement or force (no text or symbols visible)natural_image
Close-up of a pair of hair curlers with metal bands (no text or symbols visible)natural_image
Black-and-white photo of a smiling woman holding a hair curling iron, no text or symbols visiblenatural_image
Close-up of a pair of black metal pliers or crimpers (no text or symbols visible)natural_image
Black-and-white photo of a woman brushing her hair with a comb (no text or symbols visible)natural_image
Black-and-white photo of a woman styling her hair with a curling iron (no text or symbols visible)natural_image
Two hair curling tools with coiled spring and cord (no text or symbols visible)natural_image
Black-and-white portrait of a woman holding a hair curling iron (no text or symbols visible)natural_image
Black-and-white photo of a smiling woman holding a curling iron, no text or symbols visiblewww.service-shopping.de
WAARSCHUWING – Brandgevaar
natural_image
Two black hair curlers with metal clips, shown against a plain white background (no text or symbols visible)