
Nova SWA20U1XA - Generator HARVIA - Free user manual and instructions
Find the device manual for free Nova SWA20U1XA HARVIA in PDF.
| Product type | Steam generator for hammam |
| Brand | Harvia |
| Model | Nova SWA20U1XA |
| Power supply | 230 V ~ 50 Hz, 3 kW |
| Water supply pressure | 200 - 400 kPa (2 - 4 bar) |
| Water tank capacity | Approximately 0.6 L |
| Adjustable temperature range | 30 - 55 °C |
| Maximum operating time | 1 to 12 hours (adjustable) |
| Control panel type | Xenio WiFi (touch, backlit) |
| Connectivity | WiFi via MyHarvia app |
| Main functions | Steam generation, lighting (max 100 W), ventilation (max 100 W), timer programming, child lock, dehumidification |
| Safety | Overheat fuse, water level sensor, frost protection (via installation) |
| Compatibility | Hammam Harvia Nova |
| Delivery contents | Control panel, data cable 5 m, power cable 5 m, handheld shower, ceiling shower head, steam shower column, wall brackets, screws and plugs, steam generator, instructions |
| Warranty | 2 years (domestic use), 1 year (leisure center), 3 months (institutes) |
| Maintenance | Descaling with citric acid, cleaning of water level sensor |
| Spare parts | Available from the manufacturer (water filter HWF01S, scented liquids) |
| Protection class | Splash-proof control panel |
Frequently Asked Questions - Nova SWA20U1XA HARVIA
User questions about Nova SWA20U1XA HARVIA
0 question about this device. Answer the ones you know or ask your own.
Ask a new question about this device
Download the instructions for your Generator in PDF format for free! Find your manual Nova SWA20U1XA - HARVIA and take your electronic device back in hand. On this page are published all the documents necessary for the use of your device. Nova SWA20U1XA by HARVIA.
USER MANUAL Nova SWA20U1XA HARVIA
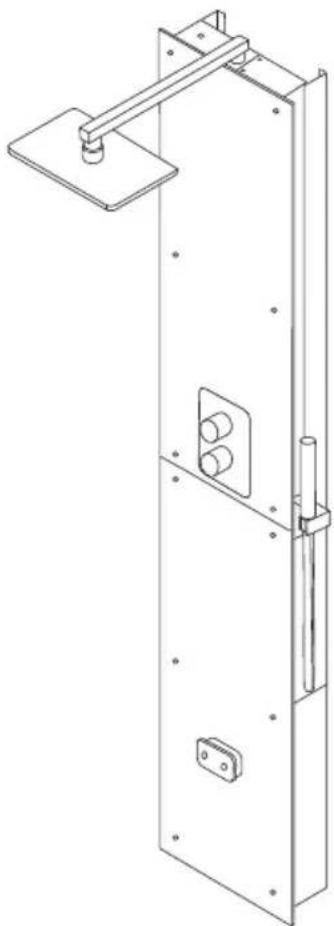
Harvia Nova Steam Shower Column SWA20U1XA / SWA30U1XA / SWA20U1XAC
FI Höyrysuihkupaneelin asennus- ja käyttöohje
SV Monteringsanvisning och användning av Ångduschpanel
EN Steam Shower Column Instructions for Installation and Use
DE Installations- und Gebrauchsanleitung für die Dampfduschsäule
ES Instrucciones de instalación y uso de la columna de ducha de vapor
IT Istruzioni per l'installazione e l'uso della colonna doccia a vapore
FR Instructions d'installation et d'utilisation de la colonne de douche à vapeur
NL Instructies voor installatie en gebruik van de stoomdouchekolom
natural_image
Technical line drawing of a mechanical door assembly with mounting bracket and internal components (no text or symbols)

FI SISÄLLYS
Delivery contents.... 3
Warnings and notes.... 6
Instructions for installation.... 12
Operating instructions....50
Maintenance....54
Spare parts....92
Guarantee....94
DE INHALT
√ Xenio Control panel
√ Control panel data cable 5 m
√ Supply cable with plug 5 m
√ Hand shower
√ Ceiling shower head
√ Steam shower column
√ Steam shower column wall brackets
√ Mounting screws and nylon plugs,
√ Steam generator
√ Instructions for Installation and Use
DE: Lieferumfang
READ THE WARNINGS AND MANUAL CAREFULLY BEFORE USING THE PRODUCT!
This installation and user manual is intended for the owner or the person in charge of the steam room and the product, as well as for the person in charge of the installation of the product. After completing the installation, the person in charge of the installation should give these instructions to the owner of the product or to the person in charge of its operation. Please read more instructions for installation, use and recycling from www.harvia.com. (Original user manual from manufacturer)

WARNING!
- The steam generator is meant for warming the steam room to a bathing temperature. It is not to be used for any other purpose.
- Check the device for visible damage before installing and using the device. Do not use damaged device.
- Steam nozzle of the steam generator became scalding hot when in use. Do not touch it with bare hands.
- Steam from the steam nozzles is scalding hot. Be careful not to burn your skin.
- Do not take electric devices into the steam room.
- Make sure the steam room dries properly after use.
- If the supply cord is damaged, it must be replaced by the manufacturers' service person or a similarly qualified person to avoid a hazard.
- All maintenance that requires special skills must be performed by a trained professional.
- This device is allowed to use by 8 years old or older children and persons with reduced physical, sensory, or mental capabilities, or persons with lack of experience and knowledge, if they are supervised or they have been instructed to use the device safely and if they are aware of the dangers involved.
- Children should not play with the device. Children should not clean or do any maintenance operations to the device without supervision.
- Do not stay in an unventilated steam room for more than 2 hours at a time.
- Do not press the overheating protection reset button before the cause of the fault has been found. Only persons authorised to carry out electrical installations can reset the overheat protector, unless otherwise stated in the instruction's manual.
- Do not use any other electrical equipment that generates steam or moisture for the steam room.
- Before maintenance, unplug the device and close the water shut-off valves.
CAUTION!
- Do not install the device in a space where it may freeze or be exposed to harmful substances. The space must be equipped with a floor drain for the removal of water.
- Clean the steam room regularly.
- Clean the product by using a lightly moistened cloth. Use only mild cleaning agents, never solvents or corrosive chemicals.
- This product should not be disposed of with general household waste. When recycling your product, take it to your local collection facility or contact the place of purchase.
EN: Prior to Installation
Before installing the steam shower column, read the instructions for installation and check the following:
- The steam shower column power must be suitable in terms of the steam room volume. Check the recommended minimum and maximum volumes for each steam generator and wall material » table Installation details
- The supply voltage must be suitable for the steam shower column.
- The fuses must comply with regulations.
- The steam shower column must be installed in a place where the minimum safety distances are observed » Dimensions and safety distances
- The steam shower column must be installed in a place as described in the instructions » Installation location and mounting
DE: Vor der Montage
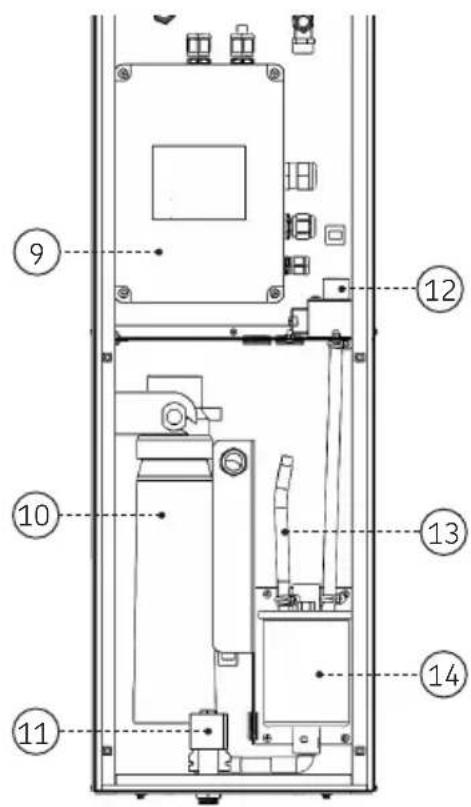
- Ceiling shower head
- Temperature sensor
- Shower space glass
- Hand shower
-
Glass for technical space
-
Steam nozzle
- Fragrance channel
- Protective earthing socket
(SCHUKO), rubber cable 5 m -
Electrical housing 14. Steam generator
-
Water filter (extra part)
- Solenoid valve (water outlet)
- Solenoid valve (water intake)
- Service hose
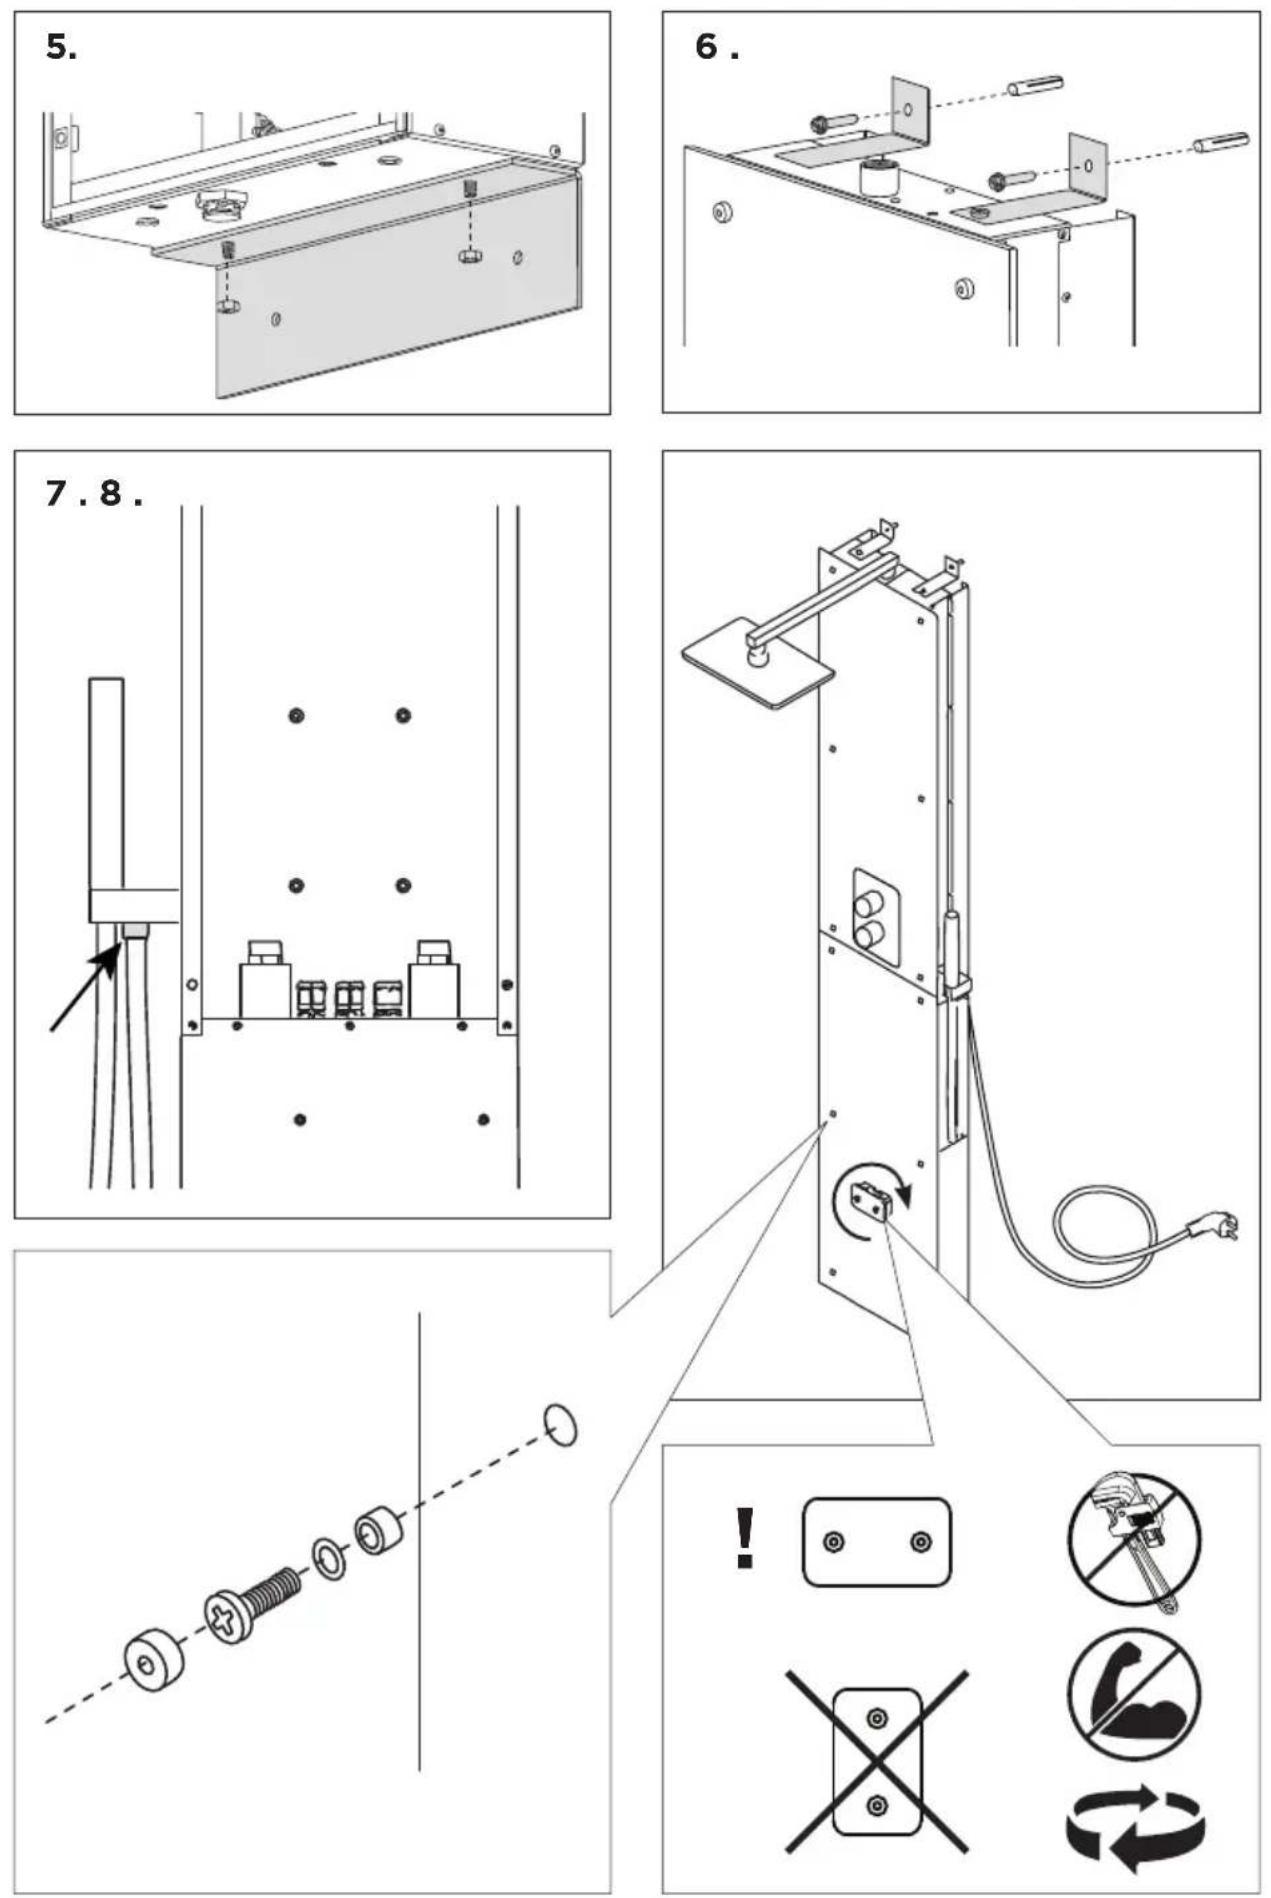
EN: Installation location and mounting
A steam shower column may not be installed in a space where it may freeze or be exposed to harmful substances. The space must be equipped with a floor drain for the waste water.
The installation of this steam shower column in a Harvia Nova steam shower cabin is found in the steam shower cabin's installation instructions.
See figures » Installation of steam shower column
- Place the lower wall bracket in the desired place and mark the positions of the holes. Drill 8-mm holes for the nylon plugs, and insert the plugs in the holes. Screw on the lower wall bracket.
- Screw on the upper wall brackets on the steam shower column with M6 screws. Lift the steam shower column over the lower wall bracket, and mark the positions of the holes further up on the wall. Lift off the steam shower column. Drill 8-mm holes for the nylon plugs, and insert the plugs in the them.
- Screw on the ceiling shower pipe and the shower head.
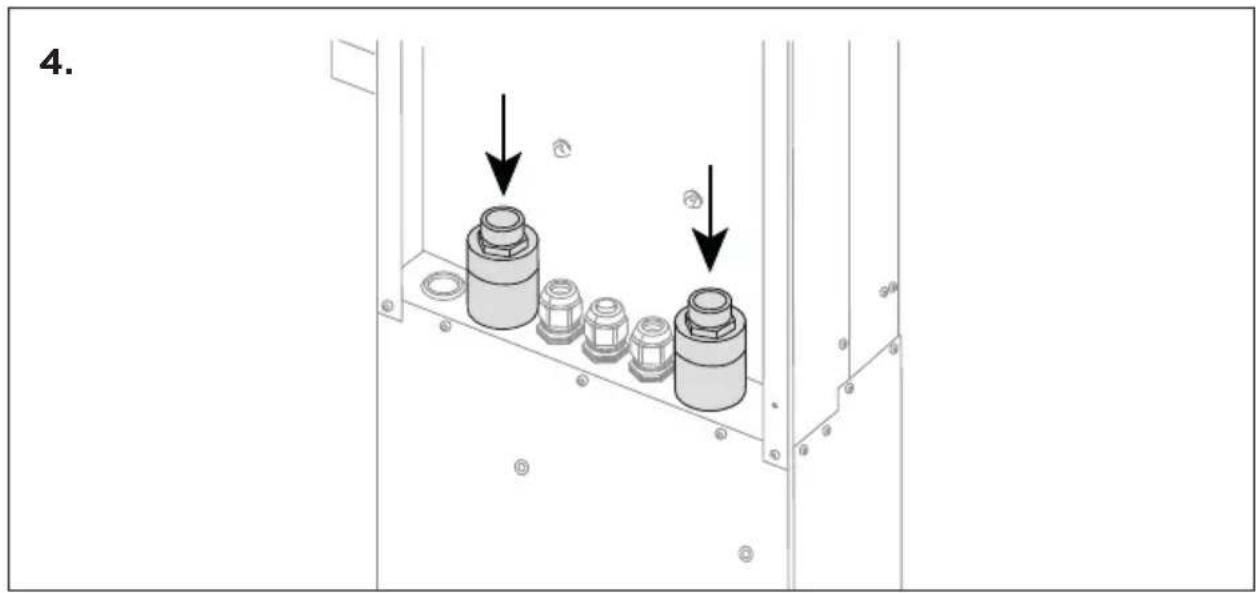
- Connect the water pipes in the 3/4" connections. (cold = blue and hot = red) Ensure waterproofness. If you are installing lights and/or a fan as an accessory, the cables must be run at this point inside the steam shower column. Only one cable sealing clamp feedthrough has been made for one cable. If you need a feedthrough for another cable, you have to add an M20 cable sealing clamp in place of the rubber plug.
- Lift the steam shower column back over the lower bracket and fix the M6 nuts on the screws that go through the lower bracket.
- Screw on the upper wall brackets.
- Connect the hand shower hose to the screw-type coupling found under the hand shower bracket.
- Fix in place the technical space glass and steam nozzle. Do not tighten the steam nozzle too much, instead, leave in the horizontal position as shown in the figure.
- Connect the control panel's data cable and install it in a suitable place (» Installing the control panel)
- Plug in the steam shower column into the mains.
natural_image
Technical line drawing of a metal bracket with bolt holes and mounting holes (no text or symbols)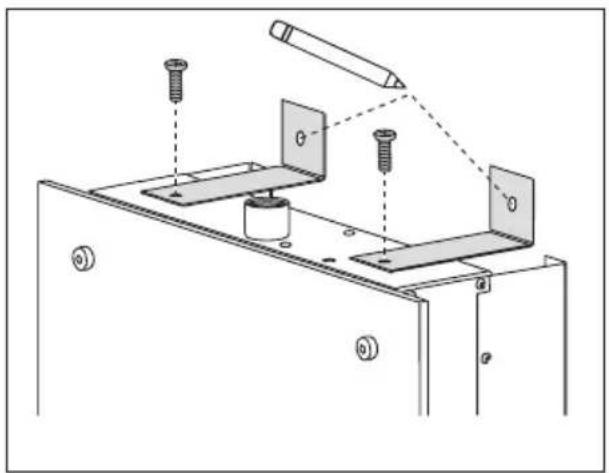
natural_image
Technical diagram of a mechanical assembly with screws and plates, no visible text or symbols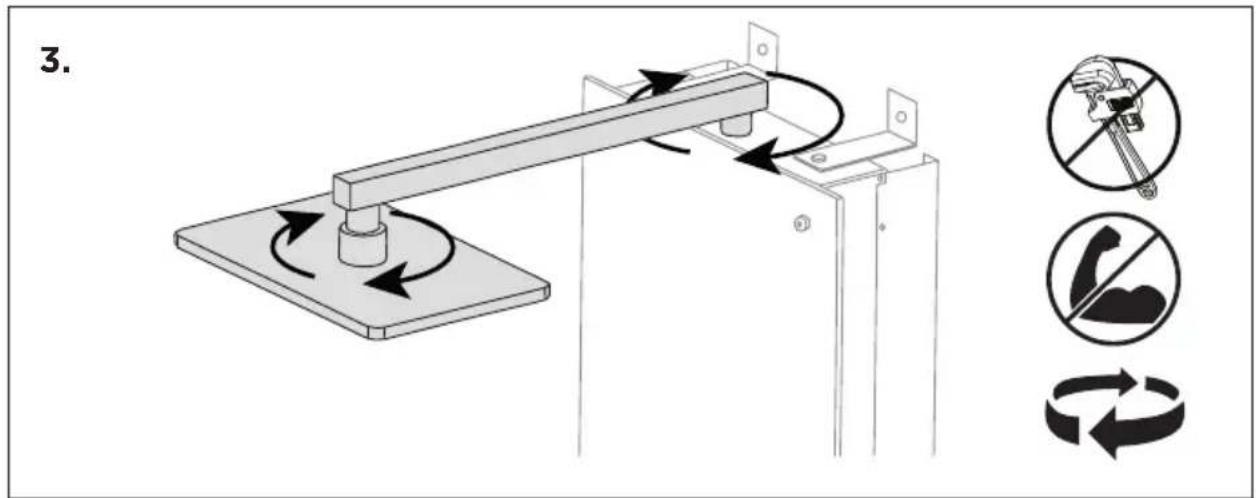
EN: Water supply and discharge water connections
- The water supply's 3/4" connections are behind the steam shower column panel, and they are equipped with check valves.
- Connect the cold water to the connector marked in blue, and the hot with the red.
- The supply water pressure must be 200...400 kPa/2.0...4.0 bar.
- The waste water connection is located at the bottom part of the steam shower column. The water exits the steam generator 30 minutes after it has been shut down.
EN: Electrical Connections
- The steam shower column is equipped with a plug connector. It must be possible take out the plug after installation.
- If the mains cord is damaged, either the manufacturer or the manufacturer's maintenance representative or other qualified person must change it to prevent any hazards.
- Electrical work during maintenance and extra work (the light and fan are installed afterwards) may only be performed by a qualified electrician in accordance with applicable regulations. National regulations must be complied with.
- Earthed devices must be permanently connected to a fixed wiring system. The device must be powered through a residual current device, with a rated current of no more than 30 mA.
• See figure » Electrical connections
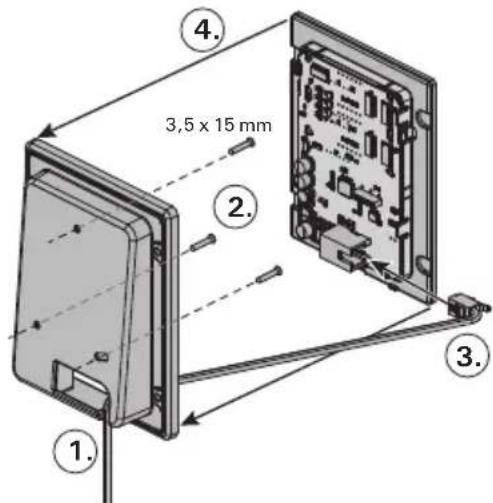
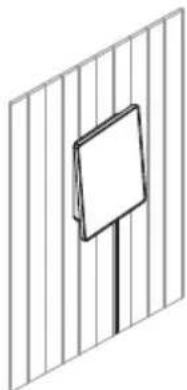
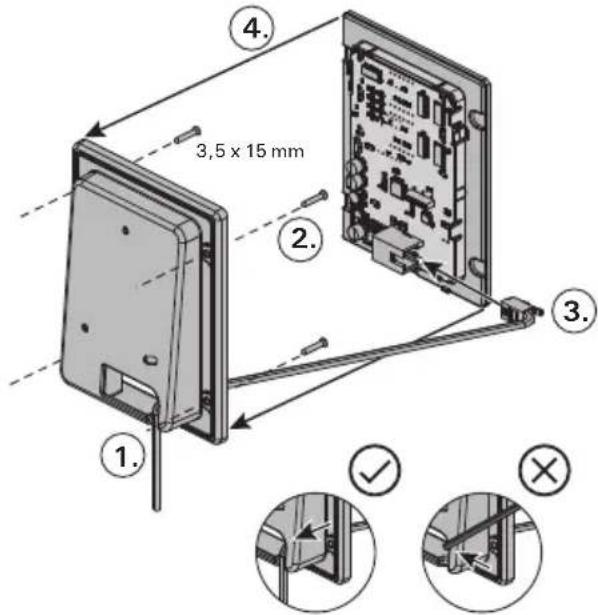
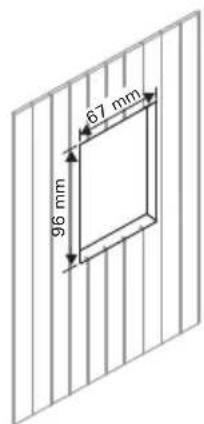
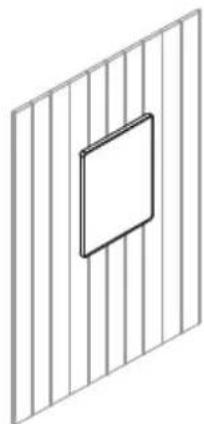
EN: Installing the control panel
- The control panel is splash-proof, and operates at a low voltage. The control panel may be installed in a dry space, in a washroom, dressing room or living space. The panel may not be installed in the steam room.
- If there are conduits (with a diameter of 30 mm) in the wall structures, the data cable to the control panel can be hidden, but otherwise perform a surface mounting.
• See figure » Installing the control panel
natural_image
Diagram showing a tool interacting with a rectangular electronic device (no text or symbols present)
natural_image
Illustration of a rectangular electronic component with a handle, resembling a battery or socket (no text or symbols)
Pinta-asennus / Ytmontering / Surface mounting / Aufputzmontage / Montaje de la superficie / Montaggio su superficie / Montage en saillie / Oppervlakmontage
natural_image
Simple line drawing of a fence with a blank signpost (no text or symbols)Upotusasennus / Infälld montering / Flush mounting / Unterputzmontage / Montaje empotrado / Montaggio a incasso / Montage affleurant / Inbouwmontage
natural_image
Pure geometric diagram of a 3D grid with a centered square (no text or symbols)Fl: Lisävarusteet
- Lighting and fan: You can also install lighting and a fan for the steam shower column. These can be used from the control panel.
- Water filter: Tap water may contain impurities, such as lime, which may accumulate in the steam generator's interior. To prevent this and to extend the life of the steam shower column, we recommend that you use a Harvia HWF01S water filter.
- Steam fragrances: Fragrance added in the fragrance channel will feed the fragrance into the steam created by the steamer. For optimal experience we recommend Harvia fragrance liquids (Harvia Sauna and fragrance liquid set SAC25100). Note: Do not use any other than fragrance liquid designed for vaporisers.
DE: Zubehör
natural_image
Pure diagram of a rectangular frame with circular arrows and a central circular symbol, no text or labels present.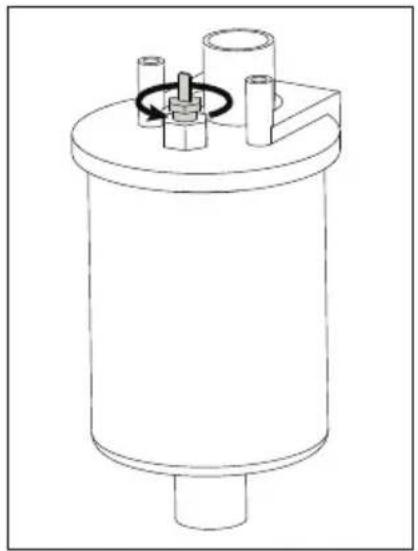
natural_image
Technical line drawing of a cylindrical mechanical component with internal components and a central hub (no text or symbols)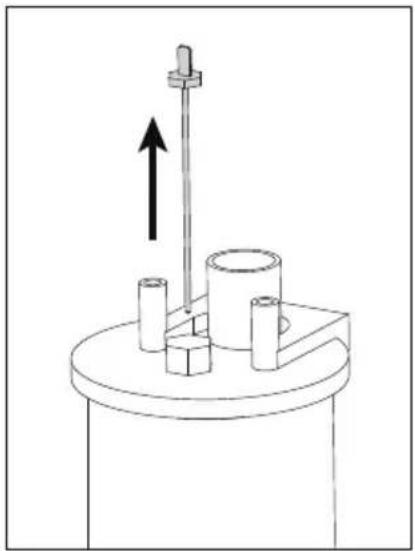
natural_image
Mechanical assembly diagram showing a rotating shaft with an upward arrow, mounted on a cylindrical base (no text or symbols)Kalkinpoisto
natural_image
Technical line drawing of a mechanical assembly with internal components and a close-up view showing a bolted part (no text or symbols present)Bruksanvisning
natural_image
Pure diagram of a rectangular frame with circular arrows and a central circular symbol, no text or labels present.
natural_image
Technical line drawing of a cylindrical mechanical component with internal components and a rotating arrow (no text or symbols)
natural_image
Mechanical setup with a vertical rod and cylindrical components mounted on a base, no visible text or symbolsAvkalkning
natural_image
Technical line drawing of a mechanical assembly with internal components and a close-up view showing a bolted part (no text or symbols present)Using the Steam Shower Column
Before starting the device, make sure that there are no objects in the steam room that do not belong there.
Make sure that the steam vents freely from the nozzle. Open the water supply pipe valve.
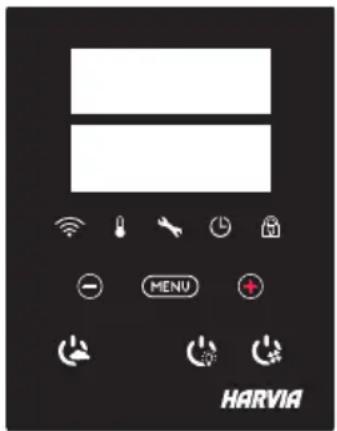
The steam generator is equipped with a separate control panel. The device is in standby mode when the buttons on the control panel are lit. If the buttons do not light up, check that the main switch is turned on.
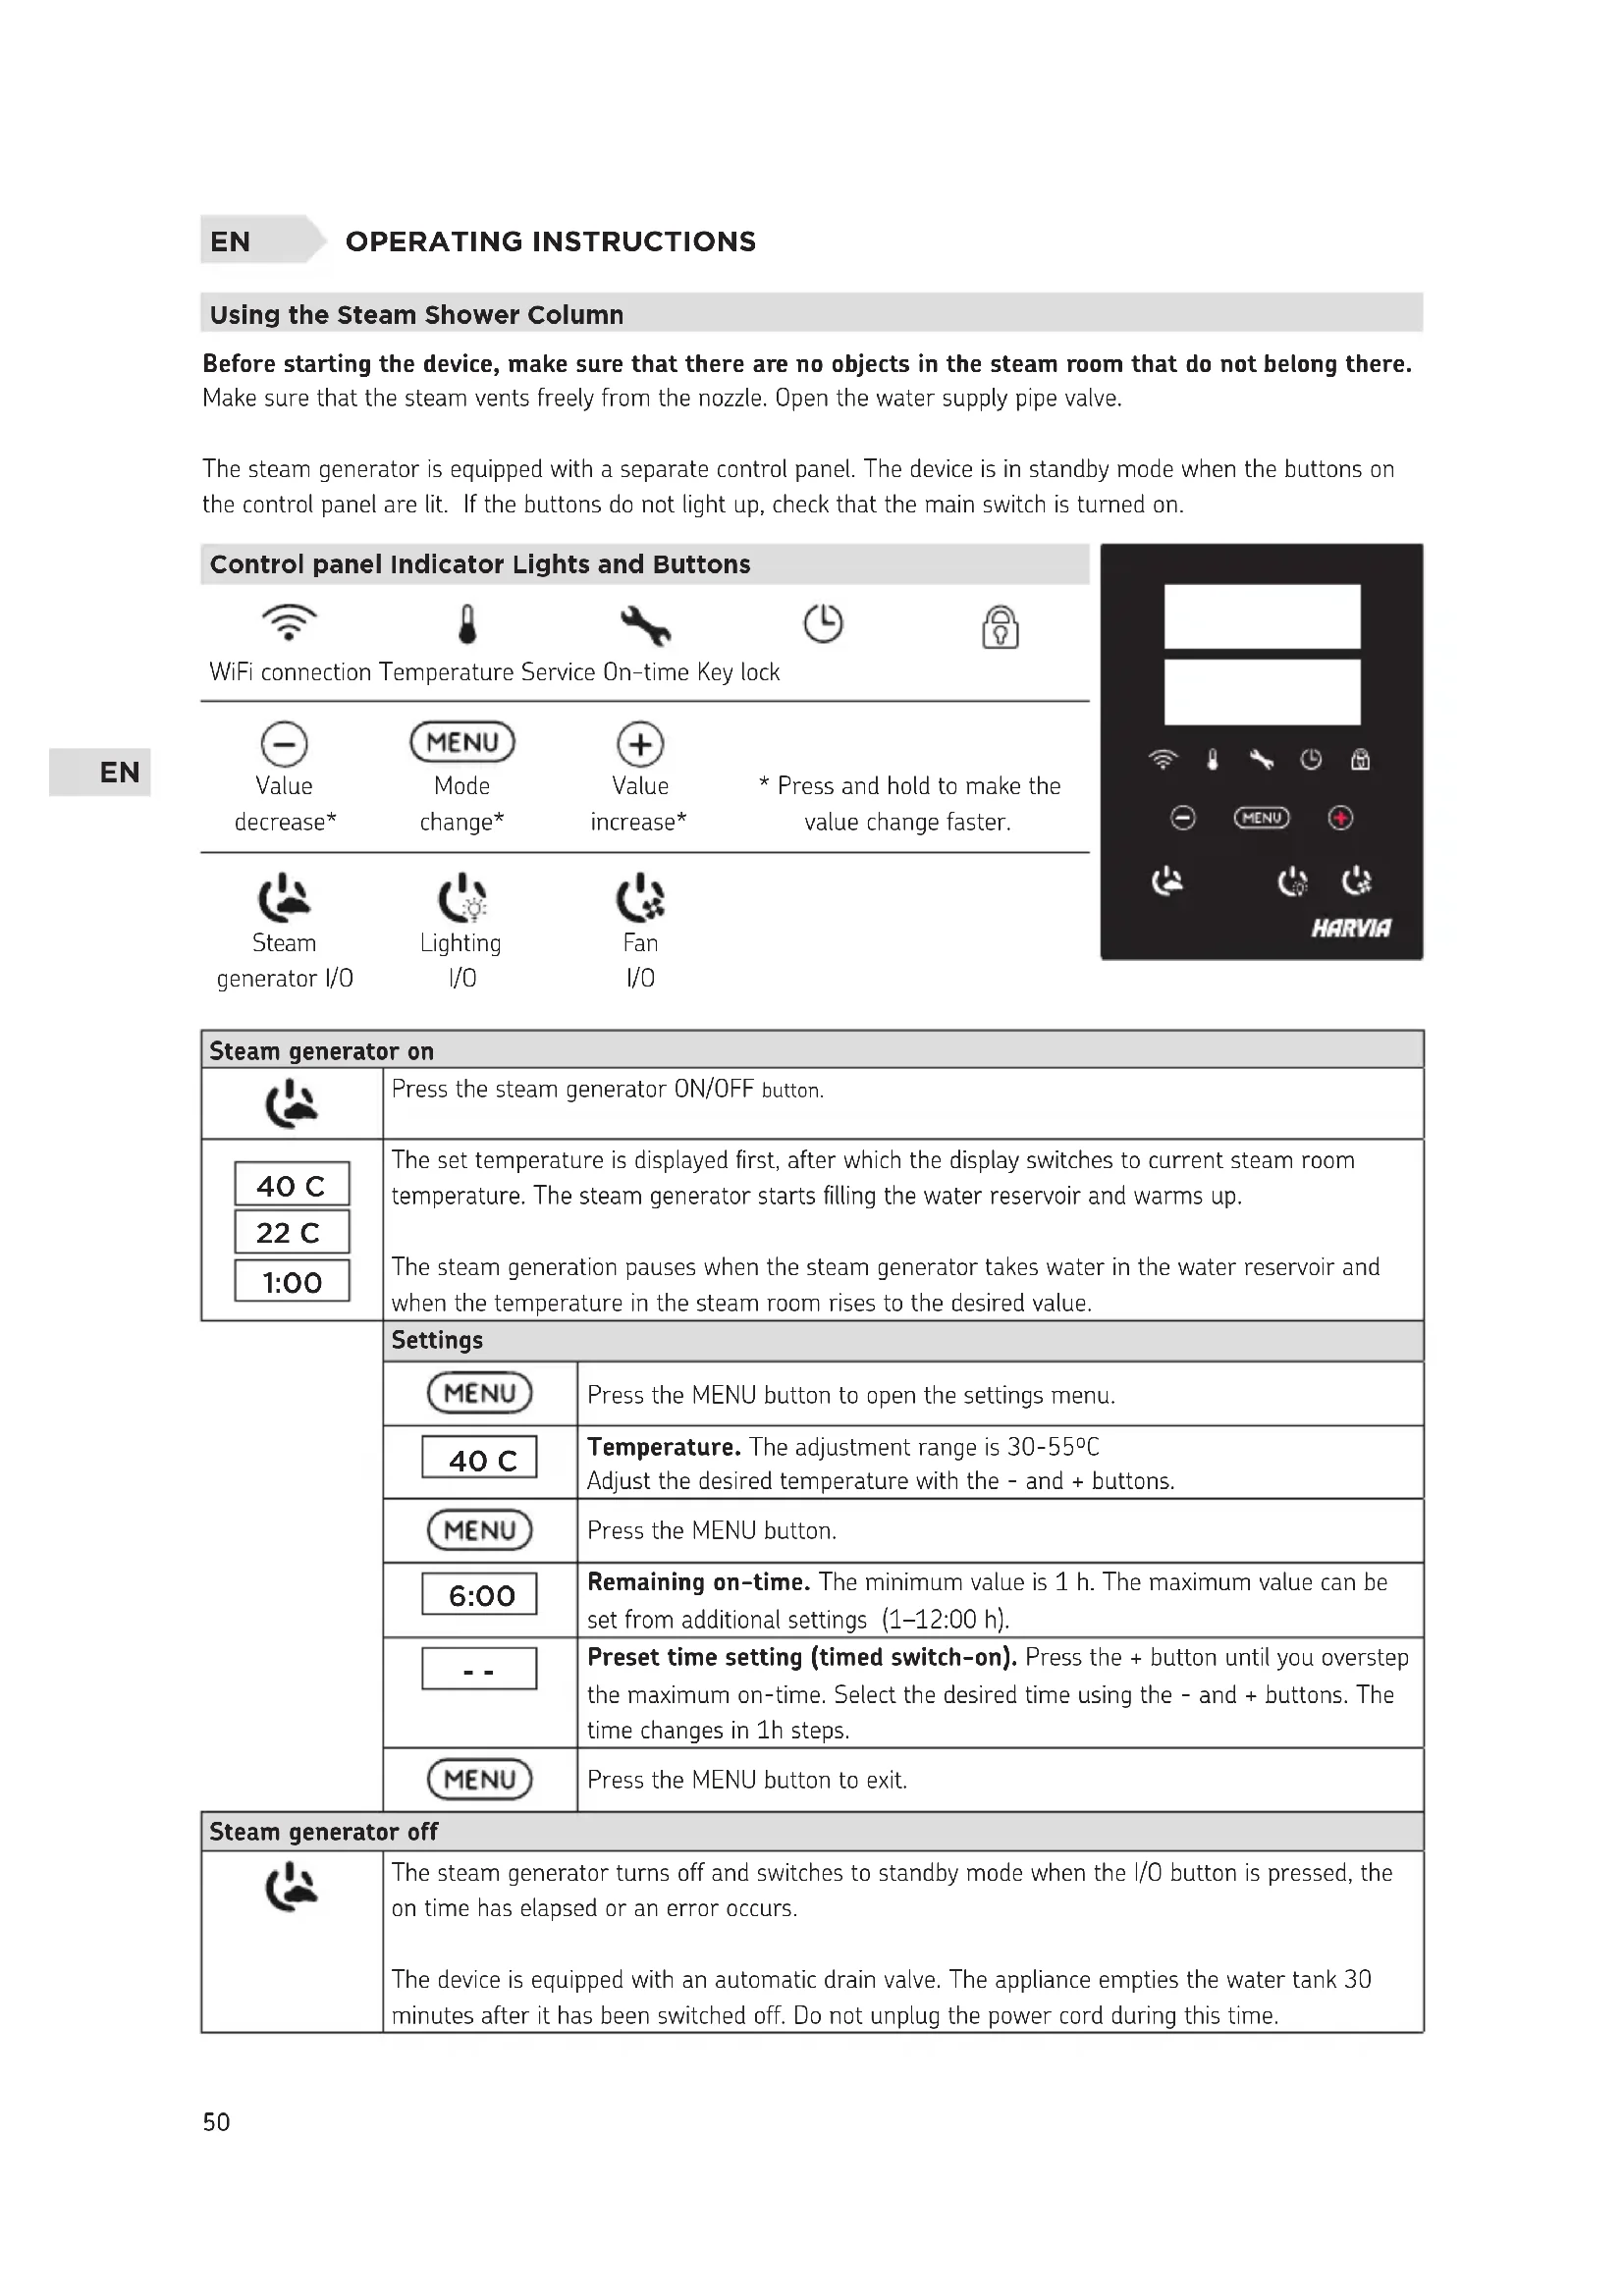
Control panel Indicator Lights and Buttons
| WiFi connection Temperature Service On-time Key lock | |||
| Value decrease* | MENU Mode change* | Value increase* | * Press and hold to make the value change faster. |
| Steam generator I/O | Lighting I/O | Fan I/O | |
| Steam generator on | ||
 | Press the steam generator ON/OFF button. | |
 | The set temperature is displayed first, after which the display switches to current steam room temperature. The steam generator starts filling the water reservoir and warms up.The steam generation pauses when the steam generator takes water in the water reservoir and when the temperature in the steam room rises to the desired value. | |
| Settings | ||
| MENU | Press the MENU button to open the settings menu. | |
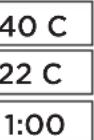
| 40 C | Temperature. The adjustment range is 30-55°CAdjust the desired temperature with the - and + buttons. | |
| MENU | Press the MENU button. | |
| 6:00 | Remaining on-time. The minimum value is 1 h. The maximum value can be set from additional settings (1-12:00 h). | |
| -- | Preset time setting (timed switch-on). Press the + button until you overstep the maximum on-time. Select the desired time using the - and + buttons. The time changes in 1h steps. | |
| MENU | Press the MENU button to exit. | |
| Steam generator off | ||
 | The steam generator turns off and switches to standby mode when the I/O button is pressed, the on time has elapsed or an error occurs.The device is equipped with an automatic drain valve. The appliance empties the water tank 30 minutes after it has been switched off. Do not unplug the power cord during this time. | |
| Additional settings | |
| [IMAGE] | Open the settings menu by simultaneously pressing the -, MENU and + buttons. Press for 5 seconds. Note! Buttons are not lit when the control unit is in standby mode. |
| S-011:00 | Maximum on-time. The maximum on-time can be changed with the buttons - and+. The range is 1–12 hours (factory setting 1h). |
 | Press the MENU button |
S-02 | Memory for power failures. Options after a power failure are:ON1: The device restarts. Timer continues from where it was before power failure.ON2: The device restarts. Timer resets.OFF: The unit does not restart after a power failure.Note! Safety regulations for power failure memory vary by region. |
 | Press the MENU button |
S-05 | Total operating hours. The display shows how many hours the device has been operating. |
| MENU | Press the MENU button |
 200 200 | Service cycleThe display shows how many hours ago the service has been done. Reset counter after service by pressing button - for 5 seconds. Service time can be changed by pressing - and + at the same time. |
 | Press the MENU button |
S-07 | Manual water controlYou can add and discharge water with the - and + buttons e.g. when cleaning water reservoir, troubleshooting or in service. |
| MENU | Press the MENU button |
 | Temperature unitChange the setting with the - and + buttons.CELS (Celsius)FAHr (Fahrenheit) |
 | Press the MENU button |
S-10 | DehumidifyingWhen the dehumidifying mode is on, dehumidifying interval will begin when the steam generator is switched off. Length of the dehumidifying period is 1 h.OFF > Dehumidifying OFFON > Dehumidifying ON |
 | Press the MENU button |
| S-11 | Display brightnessUse the - and + buttons to adjust the dispaly brightness. |
 | Press the MENU button |
 | WIFI connectionConnect control panel to WiFi network by using the MyHarvia application. Change the setting with the - and + buttons. See MyHarvia application for more detailed instructions.OFF >The WiFi connection is off(WiFi indicator light on the control panel is off ).On > The WiFi connections is on(WiFi indicator light is lit in the control panel).COnn > Connect mode is active. |
 | Press the MENU button. The control unit switches to standby mode. |
| Lighting | ||
 | Lighting of the sauna/steam room can be wired so that it can be controlled from the control panel. (max. 100W/230 V ~). Switch the lights on / off by pressing the control panel button. | |
| Ventilation | ||
 | If there is a fan installed in the sauna/steam room, it can be turned on and off from the control panel (max. 100W/230 V ~). Switch the fan on / off by pressing the control panel button. | |
| Control panel key lock | ||
 | Press and hold the steam generator and light buttons for three seconds. Key lock can be activated only in standby mode. Key lock also prevents remote start. | |
| Factory Reset | ||
| [WCAB] 5s | When the control panel is in standby mode, press and hold the steam generator, lights, and fan buttons for 5 seconds. | |
 | Status message rSt OFF is displayed. Press + to change reset status to ONPress the MENU to perform factory reset | |
| MENU | ||
Fragrance channel (on top of the steam nozzle)
Add scent to the fragrance channel and it will feed the scent into the steam produced by the evaporator. Use only scents intended for evaporator use. Follow the instructions on the package.
Remote use
Steam generator can be controlled remotely with MyHarvia application once the connection has been established. Remote control is possible when "rc on" is displayed on the control panel.
Pre-set time setting (timed switch-on): If the device is set to start with the pre-set time function, it cannot be controlled remotely. Once the device is turned on, it can be turned off with the remote control.
Dehumidifying: when the heater is turned off remotely and dehumidifying is enabled, dehumidifying starts and cannot be stopped remotely.
Power saving mode: If no buttons are pressed in 30 minutes, power saving mode is activated. Only the steam generator button light is lit (status message "rc on" is displayed, if remote use mode is active).
FOTA (Firmware Over the Air): The Xenio WiFi control panel has a feature that automatically downloads the latest firmware to the control panel.
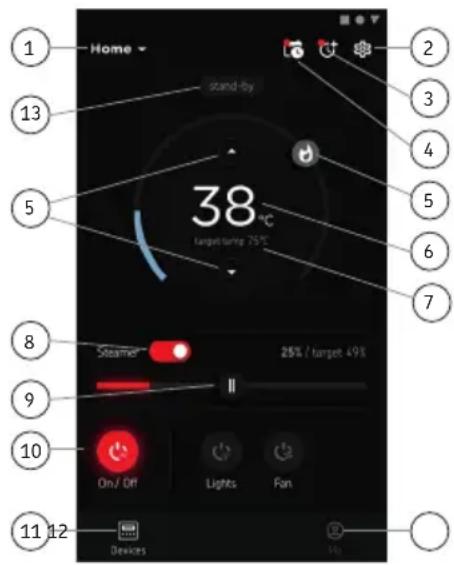
MyHarvia Mobile Application
MyHarvia is a mobile application that allows you to remotely control the functions of Xenio WFfi control panel. With MyHarvia mobile app you can:
- Turn on and off the device.
- Switch accessories on and off (lights, ventilation).
- Set and monitor temperature.
- Set and monitor humidity.
• See the status information. - Set a scheduled start.
There is no limit to the number of devices you can connect to the MyHarvia application. With the mobile app you can control several saunas and/or steam rooms with Xenio WiFi control panel, for example, one in your home and the other in your summer cottage.
MyHarvia main view:
- Device menu
- Device settings
- Timed start
- Week clock
- Adjusting sauna temperature
- Current sauna temperature
- Target temperature
- Steam generator ON / OFF
- Humidity adjustment
- Functions ON / OFF
- Devices
- User profile and settings
- Status / Error messages
Note! Available buttons depend on the features of the controlled device.
Installing the MyHarvia application:
- Download MyHarvia mobile app from the app store (Google Play / App Store)
- Create and register MyHarvia-account.
- Sign in to your MyHarvia-account.
Note! MyHarvia is not available for download in all countries due to local restrictions.
Connecting MyHarvia and Xenio WiFi control panel
First device is installed right after you sign into your account. Follow the instructions of your mobile application. Later you can pair new devices by selecting the "+ Add new" from the Home menu. Follow the instructions of your mobile application.
EN
MAINTENANCE
Steam generator maintenance

Maintenance indicator light starts blinking when 200 hours has passed from the previous service. You can adjust the time in the SET6 menu.

Before maintenance, unplug the device and close the water shut-off valves!
User can perform the following maintenance operations:
• cleaning the water level sensor
- decalcification

All other maintenance must be left to professional maintenance personnel.
Steam generators in community, institution and such use must be serviced thoroughly at least twice a year (checking and cleaning the reservoir, heating elements and the water level sensor).
Water quality requirements
| Water properties Effect Recommendation | ||
| Humus concentration Colour, taste, precipitates <12 mg/l | ||
| Iron concentration Colour, odour, taste, precipitates <0,2 mg/l | ||
| Manganese (Mn) concentration Colour, odour, taste, precipitates <0,10 mg/l | ||
| Hardness: most important substances are magnesium (Mg) and lime, i.e. calcium (Ca) | Precipitates Ca: <100 mg/ | |
| Chloride-containing water Corrosion Cl: <100 mg/l | ||
| Chlorinated water Health risk | Forbidden to use | |
| Seawater | Rapid corrosion | Forbidden to use |
| Arsenic and radon concentration | Health risk | Forbidden to use |
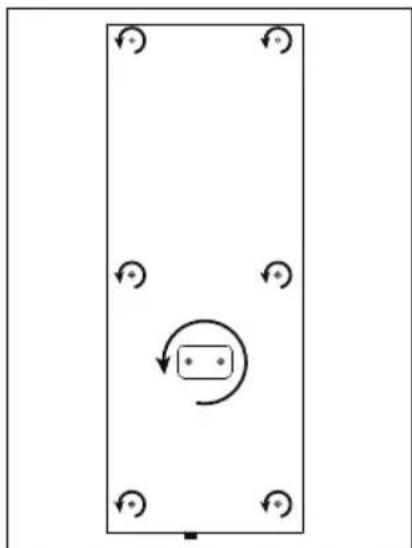
Cleaning the water level sensor
Remove any limescale by wiping or, if necessary, sanding with fine sandpaper. Remove the steam nozzle by turning it counterclockwise. First, remove the protective caps of the mounting screws of the glass and then remove the screws. Remove the glass carefully. Loosen the nut of the water level sensor and clean the sensor.
natural_image
Simple diagram of a rectangular frame with four circular arrows and a central circular arrow, no text or symbols present.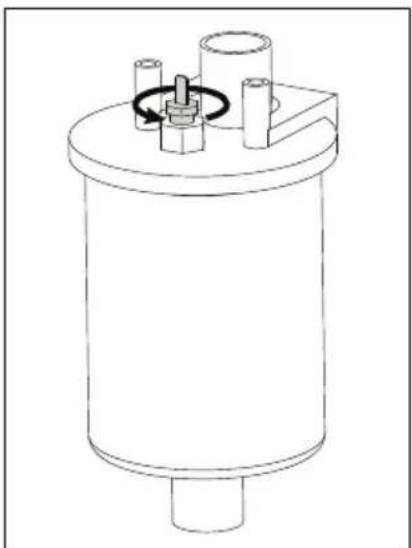
natural_image
Technical line drawing of a cylindrical mechanical component with internal components and a rotating knob (no text or symbols)
natural_image
Mechanical diagram showing a rotating shaft with an upward arrow, mounted on a cylindrical base (no text or symbols)Descaling
Tap water contains impurities, such as lime, which may accumulate inside the steam generator and form clogs over time. The amount of lime in the water (hardness), and consequently the need for descaling, varies from region to region. If the tap water is hard, it is advisable to install a water filter on the inlet side of the steam generator. The water filter HWF01S for the steam shower column is sold separately. See »Water-quality requirements.
Descaling with a citric-acid solution
The vapour produced by the citric-acid solution is harmless. In addition to citric-acid solution, other substances can be used for descaling as well. Always follow the instructions on the package.
- Mix 50–80 g of citric acid with one litre of water.
- Turn the steam generator on and let it run for 10 minutes.
- Unplug the steam generator
- Remove the nozzle of the steam shower column and the glass for the technical space (see Cleaning the water level sensor)
- Remove the plug at the end of the service hose and pour the citric-acid solution into the water tank. Note: The capacity of the water tank is about 0.6 litres. Put the plug of the service hose back on and replace the nozzle and the glass for the technical space.
- Plug the steam generator back in. If the memory for power failures is on, the device will start automatically.
- Turn the steam generator on and let it run for 10 minutes.
- Turn the steam generator off and wait for 30 minutes.
Cleaning the steam nozzle
The steam nozzle can be cleaned with a mild soap solution.
Troubleshooting
If an error occurs, the control panel will show a device number and an error message, which helps troubleshooting the cause for the error.

The user can check only the points marked with an asterisk (*). All other maintenance must be done by professional maintenance personnel.
| E1 | Temperature sensor's measuring circuit broken. Check the wiring and connections from connectors to the sensor. |
| E2 | Temperature sensor's measuring circuit short-circuited. Check the wiring and connections from connectors to the sensor. |
| E3 | Overheat protector's measuring circuit broken. Press the overheat protector's reset button. Check the wiring and connections from connectors to the overheat protector's sensor. |
| E5 | Water level low. Check if there is water in the measurement cup. Check the water inlet*, solenoid valve, discharge valve, and the water level sensor. |
| E7 | There is still water in the reservoir even rinsing and discharging has been done. Check if there is water in the measurement cup. Check discharge valve and the water level sensor. |
| E9 | Connection failure between the control panel and the steam generator. Check the cable and the connectors. |
| E10 | Water reservoir empty after rinsing. Check if there is water in the measurement cup. Check the water inlet*, solenoid valve, discharge valve, and the water level sensor. |
| E11 | Water reservoir full when starting the filling (starting, stopping, rinsing cycle). Check the discharge valve and the water level sensor. |
| E13 | Too many fillings within five minutes. Check the water inlet*, flow rate*, solenoid valve, discharge valve and the water level sensor. |
| E14 | Sufficient water level has not been reached within 10 minutes after the device has been turned on. Clean the measurement cup and check the wiring. |
| E15 | Sufficient water level won't be reached when vaporising. Check the water inlet* and discharge valve. |
 | WiFi indicator light is off: WiFi connection is off in the S-CO setup menu. |
| WiFi indicator light is on: WiFi connection is on. Connections to the router and MyHarvia cloud are working. | |
| WiFi indicator light flashes 3 times in a row: WiFi connection is on, but connection to MyHarvia cloud fails. Check your internet connection*. Try restarting your router*. | |
| WiFi indicator light flashes every 5 seconds: The Wi-Fi connection is on, but the wifi connection between the control panel and the router fails. Try fixing the connection by turning off and on the WiFi connection in the control panel S-CO setup menu*. | |
 | Maintenance indicator light starts blinking when 200 hours has passed from the previous service. Perform service. Reset counter after service. |
| Several errors: Error messages run in the display. | |
| Water reservoir smells like the fragrance: Check that fragrance doesn't flow to the water reservoir from the steam pipe. | |
| Control panel disfunction: » Factory Reset | |
Resetting the overheat protector

The reason for the going off must be determined before the button is pressed. The overheat protector may be reset only by a professional maintenance person.
flowchart
graph TD
    A["Start"] --> B{Condition}
    B --> C["Process"]
    C --> D["End"]
    style C fill:#f9f,stroke:#333,stroke-width:2px
    note right of C
        1.2
    end
natural_image
Technical line drawing of a mechanical assembly with internal components and a close-up view showing a bolted part (no text or symbols present)natural_image
Pure diagram of a rectangular frame with circular arrows and a central circular symbol, no text or labels present.
natural_image
Technical line drawing of a cylindrical mechanical component with internal components and a rotating knob (no text or symbols)
natural_image
Mechanical setup diagram showing a rotating shaft with upward force arrow and three cylindrical components mounted on a base (no text or symbols)Entkalkung
flowchart
graph TD
    A["Start"] --> B{Loop}
    B --> C["Process"]
    C --> D["End"]
    style C fill:#f9f,stroke:#333
    note right of C: Loop arrow pointing inward to bottom-right corner
    note left of C: Rightward arrow pointing inward to bottom-left corner
natural_image
Technical line drawing of an industrial control panel with internal components and a close-up view showing a bolted component (no text or symbols present)natural_image
Simple diagram of a rectangular frame with four circular arrows and a central circular arrow, no text or symbols present.
natural_image
Technical line drawing of a cylindrical mechanical component with internal components and a rotating knob (no text or symbols)
natural_image
Mechanical setup with a rotating shaft and cylindrical components mounted on a base (no text or symbols visible)Descalcificación
natural_image
Technical line drawing of an industrial control panel with internal components and a close-up view showing a bolted component (no text or symbols present)Installing the MyHarvia application
- Download MyHarvia mobile app from the app store (Google Play / App Store)
- Create and register MyHarvia-account.
- Sign in to your MyHarvia-account.
Note! MyHarvia is not available for download in all countries due to local restrictions.
Connecting MyHarvia and Xenio WiFi control panel
First device is installed right after you sign into your account. Follow the instructions of your mobile application. Later you can pair new devices by selecting the "+ Add new" from the Home menu. Follow the instructions of your mobile application.
natural_image
Pure diagram of a rectangular frame with circular arrows and a central arrow, no text or symbols present.
natural_image
Technical line drawing of a cylindrical mechanical component with internal components and a rotating knob (no text or symbols)
natural_image
Mechanical setup with a rotating rod and cylindrical components mounted on a base (no text or symbols visible)Decalcificazione
Cleaning the steam nozzle
natural_image
Technical line drawing of a mechanical assembly with an inset showing a component detail (no text or symbols)Control panel Indicator Lights and Buttons
Installation de l'application MyHarvia
Note! MyHarvia is not available for download in all countries due to local restrictions.
natural_image
Pure diagram of a rectangular frame with circular arrows and a central circular symbol, no text or labels present.
natural_image
Technical line drawing of a cylindrical mechanical component with internal components and a rotating knob (no text or symbols)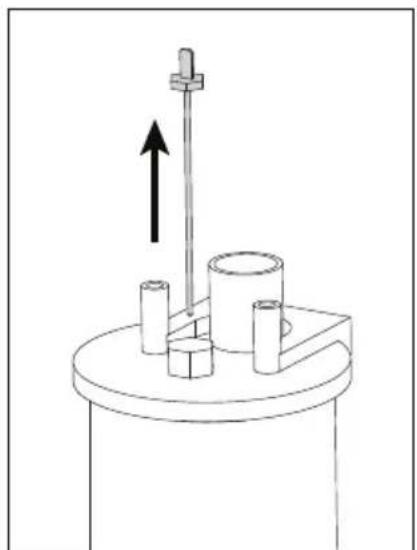
natural_image
Simple line drawing of a mechanical setup with a vertical rod, cylindrical components, and an upward arrow (no text or symbols)Détartrage
natural_image
Technical line drawing of an electrical enclosure with internal components and a close-up view showing a bolt installation detail (no text or symbols present)natural_image
Simple diagram of a rectangular frame with four corner circular arrows and a central circular arrow, no text or symbols present.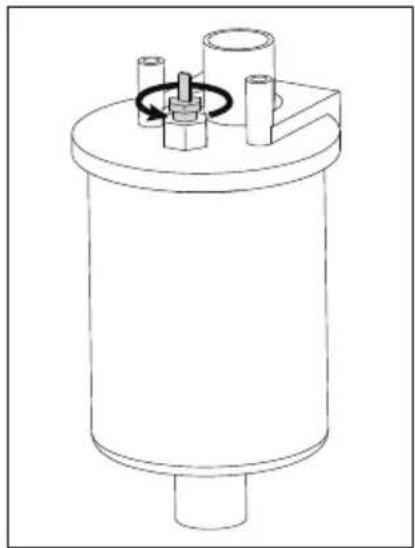
natural_image
Technical line drawing of a cylindrical mechanical component with internal components and a central hub (no text or symbols)
natural_image
Mechanical assembly diagram showing a rotating shaft mounted on a cylindrical base with three cylindrical components and an upward arrow indicating motion (no text or symbols)Ontkalken
natural_image
Technical line drawing of a mechanical assembly with internal components and a close-up view showing a bolted component (no text or symbols present)- The guarantee period for steam generators and control equipment used by families is two (2) years.
- The guarantee period for steam generators and control equipment used in community steam rooms is one (1) year.
- The guarantee period for steam generators and control equipment used by institutions is three (3) months.
- We recommend to use only the manufacturer's spare parts.
- The warranty is void if the quality requirements stated in the instructions are not met, the appliance is not serviced or maintained as described in the instructions and/or if the appliance is not installed as described in the instructions.
DE: Garantie
- Harvia Nova Steam Shower Column SWA20U1XA / SWA30U1XA / SWA20U1XAC
- FI SISÄLLYS
- DE INHALT
- DE: Lieferumfang
- READ THE WARNINGS AND MANUAL CAREFULLY BEFORE USING THE PRODUCT!
- WARNING!
- CAUTION!
- EN: Prior to Installation
- Before installing the steam shower column, read the instructions for installation and check the following:
- DE: Vor der Montage
- EN: Installation location and mounting
- See figures » Installation of steam shower column
- EN: Water supply and discharge water connections
- EN: Electrical Connections
- EN: Installing the control panel
- Fl: Lisävarusteet
- DE: Zubehör
- Kalkinpoisto
- Bruksanvisning
- Avkalkning
- Using the Steam Shower Column
- Fragrance channel (on top of the steam nozzle)
- Remote use
- MyHarvia Mobile Application
- MyHarvia main view:
- Installing the MyHarvia application:
- Connecting MyHarvia and Xenio WiFi control panel
- EN
- MAINTENANCE
- Steam generator maintenance
- Before maintenance, unplug the device and close the water shut-off valves!
- All other maintenance must be left to professional maintenance personnel.
- Cleaning the water level sensor
- Descaling
- Descaling with a citric-acid solution
- Cleaning the steam nozzle
- Troubleshooting
- Resetting the overheat protector
- Entkalkung
- Descalcificación
- Installing the MyHarvia application
- Decalcificazione
- Installation de l'application MyHarvia
- Détartrage
- Ontkalken
- DE: Garantie
Brand : HARVIA
Model : Nova SWA20U1XA
Category : Generator