FVSD 2900 TC - Vacuum packaging machines Fulgor Milano - Free user manual and instructions
Find the device manual for free FVSD 2900 TC Fulgor Milano in PDF.

| Product type | Vacuum packaging machine |
| Brand | Fulgor Milano |
| Model | FVSD 2900 TC |
| Dimensions (machine body) | 444 x 457 x 202 mm (L x D x H) |
| Dimensions (built-in element) | 557 x 555 x 230 mm |
| Vacuum chamber dimensions | 303 x 293 x 110 mm (L x D x H) |
| Vacuum chamber volume | 7.65 liters |
| Sealing bar length | 260 mm |
| Maximum bag size | 25 x 35 cm |
| Net weight | 25.90 kg |
| Power supply | 220-240 V, 50/60 Hz, 350 W, 10 A fuse |
| Pump type | Oil vacuum pump, flow rate 4 m³/h |
| Achievable final vacuum | 0 - 20 mbar |
| Chamber material | High-strength thermoplastic |
| Housing material | Stainless steel |
| Lid material | 8 mm tempered glass with anti-shatter film |
| Programs | 4 (storage, cooking, short jars, long jars) |
| Controls | Capacitive 4-key panel |
| Drawer guide capacity | 30 kg maximum |
| Maximum ambient temperature | 35 °C |
| Pump oil | ORV40 |
| Oil change interval | Every 2500 cycles |
| Warranty | 24 months |
Frequently Asked Questions - FVSD 2900 TC Fulgor Milano
User questions about FVSD 2900 TC Fulgor Milano
0 question about this device. Answer the ones you know or ask your own.
Ask a new question about this device
Download the instructions for your Vacuum packaging machines in PDF format for free! Find your manual FVSD 2900 TC - Fulgor Milano and take your electronic device back in hand. On this page are published all the documents necessary for the use of your device. FVSD 2900 TC by Fulgor Milano.
USER MANUAL FVSD 2900 TC Fulgor Milano
| FULGOR MILANO | |
| FVSD 2900 | |
| CASSETTO SOTTOVUOTO | IT MANUALE D'USO E INSTALLAZIONE |
| BUILT-IN VACUUM DRAWER | EN INSTRUCTIONS FOR USE AND INSTALLATION |
| TIROIR SOUS-VIDE | FR MANUEL D'UTILISATION ET INSTALLATION |
| VAKUUMIERSCHUBLADE | DE GEBRAUCHSANWEISUNG UND MONTAGEANLEITUNGEN |
| ENVASADORALVACIO EN CAJON | ES MANUAL DE USO Y DE MONTAJE |
| GAVETA DE EMBALO A VÁCURO | PT MANUAL DE USO E INSTALAÇÃO |
- BUSTEPERCOTTURA (in OPA/PP).
GUIDA RICERCA GUASTI
SAFETY PRECAUTIONS AND WARNINGS
- This product complies with current safety regulations. Improper use can in any case cause personal injury and/or damage to property.
- This manual is an integral part of the product and supplies all indications necessary for correct installation, use and maintenance of the appliance to avoid the dangers that could cause personal injury and/or damage to property. The manufacturer is not liable for damage resulting from failure to comply with these instructions.
- The user and installer must read this manual carefully and always make reference to it. Moreover, it must be kept in a place that is known and easily accessible and must also be delivered to any future users.
Intended use
- This appliance is solely intended for normal household use.
- It must not be used in outdoor environments.
- The appliance is only intended for the use for which it was designed, i.e. for vacuum packing foodstuffs.
- All other use must be considered improper and potentially dangerous.
- Under no circumstances place live foods (shellfish etc.) under vacuum.
- This appliance is not suitable for use by persons with reduced physical, sensorial and mental capacities, or unskilled persons, unless they are supervised and trained regarding use of the appliance by a person responsible for their safety. Such persons may only use the appliance without supervision if it has been explained to them how to proceed and if they are able to do so in complete safety. It is important that they are able to recognise and understand what dangers may arise from incorrect use of the appliance.
Children
- Keep children below the age of eight away from the appliance or constantly supervise them.
- Children over the age of eight may only use the appliance without supervision if it has been explained to them how to proceed and if they are able to do so in complete safety. It is important that they are able to recognise and understand what dangers may arise from incorrect use of the appliance.
FULGOR
- Supervise children who may be in the immediate vicinity of the tray. Do not allow children to play with it.
- Keep children away from the appliance until the sealing head and the sealing line have cooled in order to avoid any risk of scalding.
- The packaging material (plastic bags, polystyrene parts, etc.) must be kept out of the reach of children as they are a potential source of danger.
- Scrap the appliance following local Standards regarding disposal of waste and take it to appropriate collection points. Do not leave it unguarded even for just a few days as it is a source of danger to children.
Technical safety
- Installation work and extraordinary maintenance or repairs performed below standard can cause serious hazards for the user. Ensure this type of intervention is only performed by qualified personnel authorised by the manufacturer.
- Pay particular attention to the general conditions of the lid (presence of cracks, chips, scratches and deep marks). Possible damage could cause an implosion with serious danger to the user. Never use the appliance if the lid is damaged.
- An oil vacuum pump is installed in the appliance. Never tilt or overturn the device to prevent the oil overflowing.
- Correct operation of the appliance is only guaranteed if it is connected to legally compliant electrical systems with absolute correspondence (voltage, frequency) with the data shown on the appliance data plate. In case of uncertainty arrange for the system to checked by a qualified electrician.
- Electrical safety is only guaranteed if the device is connected to a compliant earthing system. Make sure that this fundamental safety condition is confirmed. In case of uncertainty arrange for the system to be checked by a qualified electrician.
- Multiple sockets or extension cords do not guarantee the required level of safety (fire hazard). Therefore do not connect the appliance using these types of devices.
- Touching or altering electrical or mechanical components can result in injury and equipment failure. Never open the appliance casing.
-
If the power supply cable is damaged, it must be replaced by an authorised after-sales centre.
-
When removing the plug or if the cord is not provided with a plug, make sure the appliance is connected to the electrical mains by a qualified electrician.
- If anomalies are noticed of the appliance (e.g. the electric power supply cable is damaged of the control panel does not work) do not use the machine and inform your authorised support centre immediately.
- Do not use the appliance with wet hands or where there is any contact with water.
- The right to warranty is invalidated if the tray is not repaired by an authorised support centre.
- Only replace any broken or defective parts with original spare parts supplied by your dealer.
- In the event of a power outage during the vacuuming process, the vacuum state is maintained in the chamber and the lid cannot be opened. Never attempt to open the lid by force or with the use of tools. Once electrical power is restored it will again be possible to open the lid.
- To perform work of extraordinary maintenance, installation and repair, disconnect the appliance from the electrical mains and remove the plug from the electrical socket. If the plug is not accessible, turn off the electrical system to which the appliance is connected via the corresponding main switch. Before performing any works of repair or installation, make sure that the appliance is effectively disconnected from the mains.
- On scrapping, cut the power supply cable and make the appliance unusable by removing the lid, in a way that children cannot close themselves inside the appliance.
Correct use
- Scalding hazard! After the bag sealing process, the sealing bar and the sealing area of the bag itself are very hot. Do not touch the sealing bar or the sealing line immediately after the sealing process.
- Fire hazard! Do not store materials or substances that are easily flammable in the immediate vicinity of the tray.
- The slides have a maximum capacity of 30kg . Do not overload or lean on the open tray as this could damage the slides.
FULGOR
- Any damage to the lid could cause an implosion. Do not place any objects on the lid and avoid striking its surface with any object. In case of accidental impact with the lid, carefully inspect it for damage. If in doubt, contact the authorised technical support centre.
- Do not use the appliance or lid as a work surface, for support or for cutting.
- Install the tray in such a way that it is possible to completely extract the tray and to ensure the lid can be fully opened. Only in this way is it possible to supervise the vacuum chamber at each phase and to avoid entering into contact with the sealing bar and the sealing line when these are still hot.
- Always pack foods when they are sufficiently cold; products cooled to 3^ provide the best preservation results. Furthermore, the formation of vapours is avoided which may cause problems with functioning of the tray. Monitor the vacuum process carefully and where the formation of bubbles in the liquid is noticed, prevent leakage prior to sealing.
- If liquids reach the pump suction, the latter can become damaged.
- Before using containers or vessels of any type, make sure that they are sufficiently robust to withstand the degree of vacuum including when placed in a refrigerator, thereby preventing an implosion that could be dangerous to the user.
- Never close the tray during operation as this would prevent ventilation of the appliance. Only close the tray when the appliance is completely cooled.
Cleaning and maintenance
- To clean the appliance only use damp cloths and non aggressive disinfectants and detergents. Do not use abrasive sponges or cloths to avoid damaging the stainless steel surfaces and the cover surfaces.
- Water or steam could reach live parts and cause a short circuit. Never use running water or steam cleaning equipment.
- Periodically run the oil dehumidification cycle of the vacuum pump in order to reduce internal corrosion caused by the aspiration of vapours or liquids.
- Cleaning and user maintenance shall not be made by children without supervision.
WARRANTY
All FULGOR MILANO products are normally subjected to severe quality and functional checks before installation to ensure safety and in the interests of our Clients.
COVER
All FULGOR MILANO products are covered by a warranty for manufacturing and machining defects, and we undertake to replace parts found to be defective by the manufacturer free of charge.
DURATION
FULGOR MILANO products for professional use come with a 24-month warranty from the date indicated on the purchase document.
GENERAL CONDITIONS
According to the FULGOR MILANO warranty:
a) The warranty gives exclusive rights for free replacement of components acknowledged as defective by FULGOR MILANO or our authorized representative.
b) FULGOR MILANO's responsibility is limited exclusively to replacing parts found to be defective; we shall not acknowledge claims for any other kind of damage.
c) The Client is entirely responsible for returning disputed and/or defective parts to the FULGOR MILANO office, and all transport charges for delivering the parts.
d) Parts subject to normal wear are excluded from the warranty.
e) Repairs, if any, do not in any manner lead to extension of the warranty.
TERMINATION
Apart from the normal validity period, the warranty will immediately lapse in the following cases:
a) Appliance nameplate tampered with, altered in any manner or removed without informing the manufacturer immediately.
b) Modifications on the appliance or its parts without written authorization from the manufacturer. Tampering with the appliance or its parts, apart from invalidating the warranty, will free FULGOR MILANO of all liability for all damage to persons, animals or objects.
c) Failure to respect the indications in this Manual.
d) Using the appliance for purpose other than that specified in this Manual.
e) Damage or accident to the appliance deriving from outside factors.
f) Conduction, repair and/or maintenance operations carried out by untrained personnel.
INDEX
USER
RECOMMENDATIONS FOR PROTECTING THE ENVIRONMENT 62
DECLARATION OF CONFORMITY 62
BEFORE USING FVSD 2900 63
PRELIMINARY CLEANING OF THE VACUUM CHAMBER AND THE LID
DESCRIPTION OF THE APPLIANCE 64
NOTIONS REGARDING THE POSSIBLE OPERATIONAL METHODS
VACUUM CYCLES FOR BAGS 65
VACUUM CYCLES IN CONTAINERS 65
MAINTENANCE CYCLES 65
NOTIONS REGARDING VACUUM PACKING BAGS 66
NOTIONS REGARDING THE VACUUM PACKING CONTAINERS 67
NOTIONS REGARDING PRESERVATION OF FOODS 68
INDICATIVE PRESERVATION TIMES 68
PREPARATION: USING VACUUM PACKING BAGS 69
PREPARATION: USING VACUUM PACKING CONTAINERS 70
CONTROL PANEL 71
FUNCTIONING 72
SWITCH-ON 72
VACUUM CYCLE FOR PRESERVATION 72
VACUUM CYCLE FOR COOKING 74
VACUUM CYCLE FOR JARS - BRIEF 75
VACUUM CYCLE FOR JARS - LONG 76
NO-LOAD CYCLE FOR TRAYS WITH CONTAINER OUTSIDE OF THE CHAMBER 78
INTERRUPTION OF THE CYCLE IN PROGRESS 78
SIGNALS AND WARNINGS 79
PUMP OIL REPLACEMENT NECESSARY WARNING 79
INSUFFICIENT VACUUM SIGNAL 80
TEMPORARY INTERRUPTION OF THE ELECTRIC POWER SUPPLY 80
WARNING REGARDING ROUTINE MAINTENANCE 81
ELEMENTARY SAFETY STANDARDS 81
CLEANING EXTERNAL SURFACES 81
CLEANING VACUUM CHAMBER 82
CLEANINGLID 82
CLEANING THE SEALING BAR 83
DEHUMIDIFYING CYCLE OF PUMP OIL 84
PERIODS OF INACTIVITY 84
MALFUNCTIONING 84
TROUBLESHOOTING GUIDE 85
USEFUL NOTES 87
INSTALLER
INSTALLATION STANDARDS 90
WARNING FOR THE INSTALLER 90
FOREWORD 90
TRANSPORT AND HANDLING 93
ELEMENTARY SAFETY STANDARDS 94
INSTALLATION 94
PLATE DATA 94
ELECTRIC CONNECTION 96
MINIMUM CLEARANCE OF THE INSTALLATION COMPARTMENT
AND OPENING FOR VENTILATION 97
TOPPING UP OF OIL AND PUMP EXHAUST FILTER REPLACEMENT
(IN CASE OF OIL SPILL IN TRANSIT) 101
ENVIRONMENT TEMPERATURE AND FRESH AIR 103
SAFETY AND CONTROL SYSTEMS 103
TECHNICAL DATA 104
FULGOR
ENGLISH


USER
RECOMMENDATIONS FOR PROTECTING THE ENVIRONMENT
1) PACKAGING:
The packaging material is 100% re-cyclable and is marked with the re-cycling symbol. Follow local Standards regarding disposal. The packaging material (plastic bags, polystyrene parts, etc.) must be kept out of the reach of children as they are a potential source of danger.
2) SCRAPPING/DISPOSAL:
The appliance has been made with material that can be re-cycled. This appliance is marked in compliance with the 2002/96/EC European Directive, Waste Electrical and Electronic Equipment (WEEE). By making sure that this appliance is scrapped correctly, you contribute to preventing the potential negative consequences on the environment and health.
The symbol on the appliance or on the accompanying documentation indicates that as the product must be treated separately from domestic waste, at the end of its life span it must be taken to a collection site for electric and electronic appliances.
On scrapping, cut the power supply cable and make the appliance unusable by removing the lid, in a way that children cannot close themselves inside the appliance.
Scrap the appliance following local Standards regarding disposal of waste and take it to appropriate collection points. Do not leave it unguarded even for just a few days as it is a source of danger to children.
For further information regarding treatment, recovery and re-cycling of this appliance, contact the suitable local office, the waste recovery service or the dealer where the appliance was purchased.
DECLARATION OF CONFORMITY
This appliance has been designed, manufactured and marketed in compliance with:
- The safety objectives of the 2006/95/EC Low Voltage Directive (that replaces the 73/23/EEC Directive and successive amendments);
The protection requisites of the 2004/108/EC "EMC" Directive.
Household and similar electrical appliances - Safety 60335-1 and 60335-2-45.
The electrical safety of the appliance is only ensured when it is correctly connected to an efficient earth plant in compliance with the legal Standards.
BEFORE USING FVSD 2900
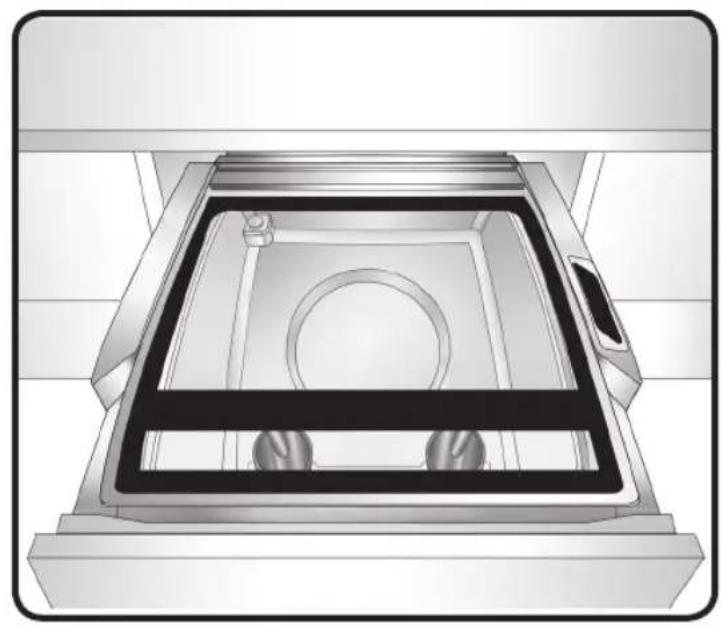
PRELIMINARY CLEANING OF THE VACUUM CHAMBER AND THE LID
- Before using the machine, the vacuum chamber and lid must be cleaned using a damp cloth and drinking water.
- It is recommended not to use aggressive detergents, stainless steel scrubbers, scrapers or abrasive, acid or aggressive substances, which could damage the stainless steel surface inside the vacuum chamber irreparably.
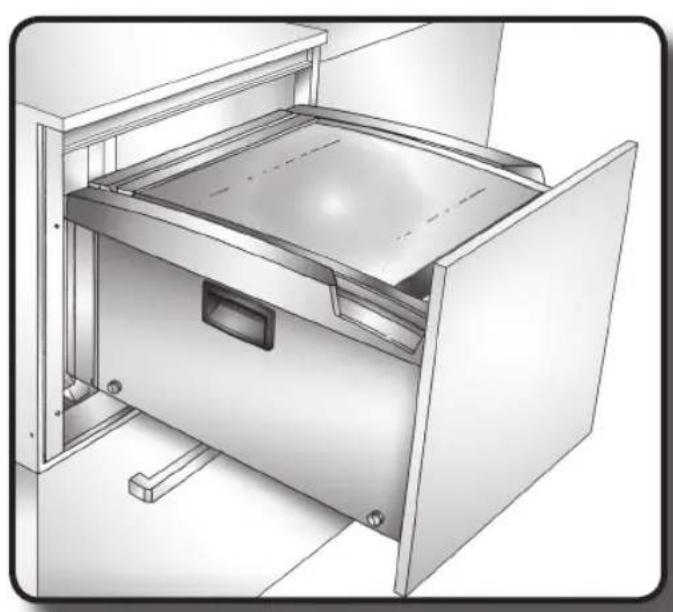
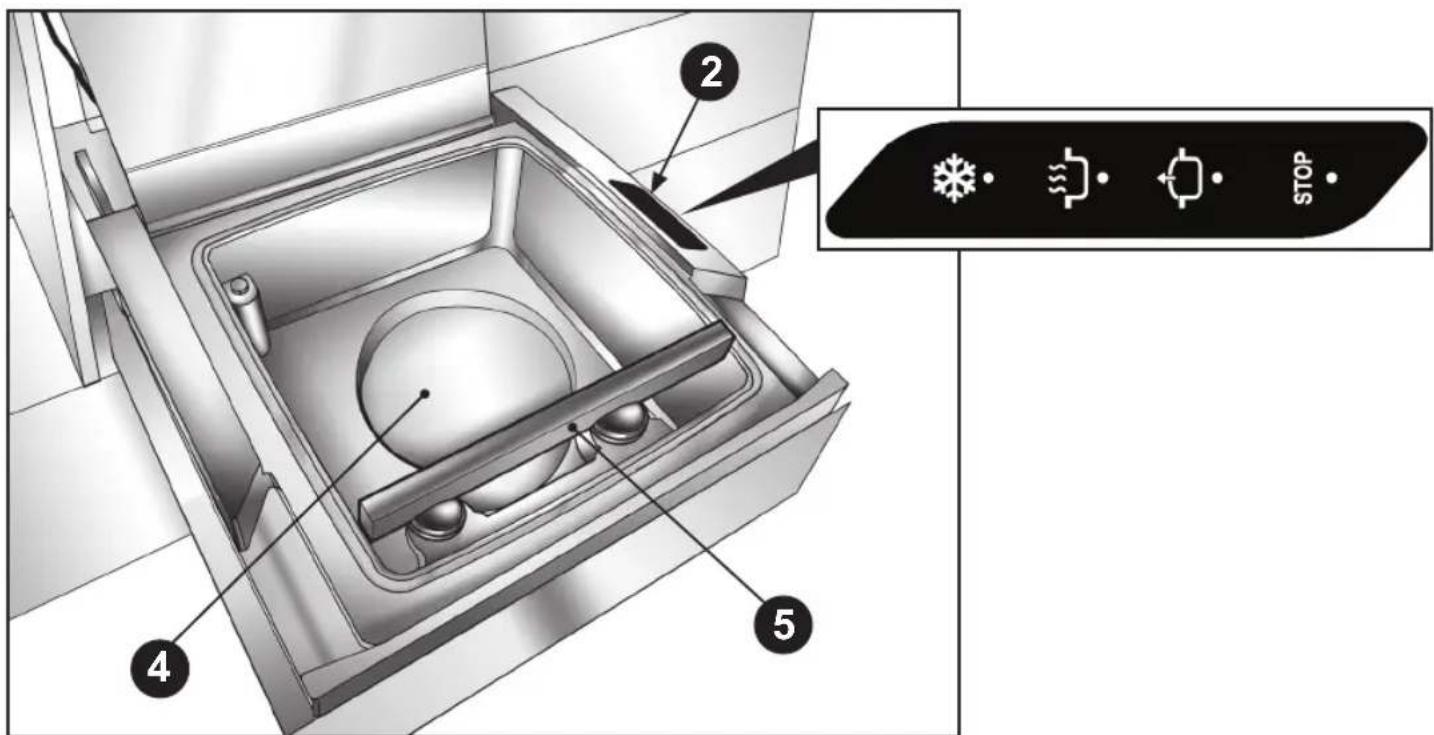
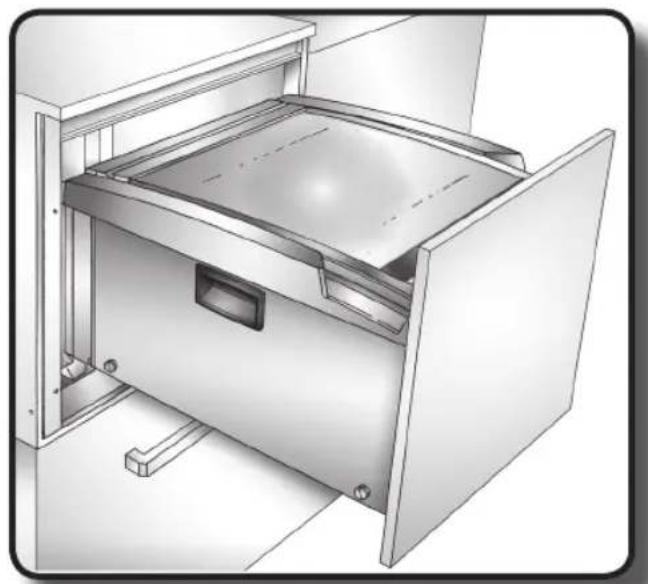
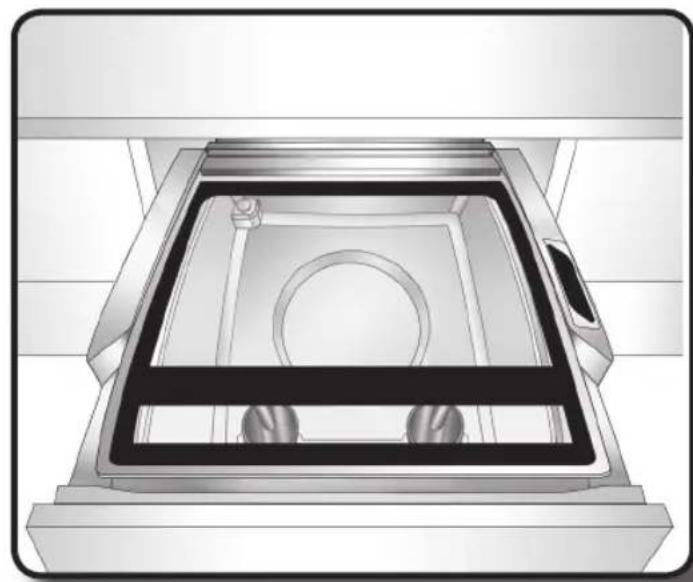
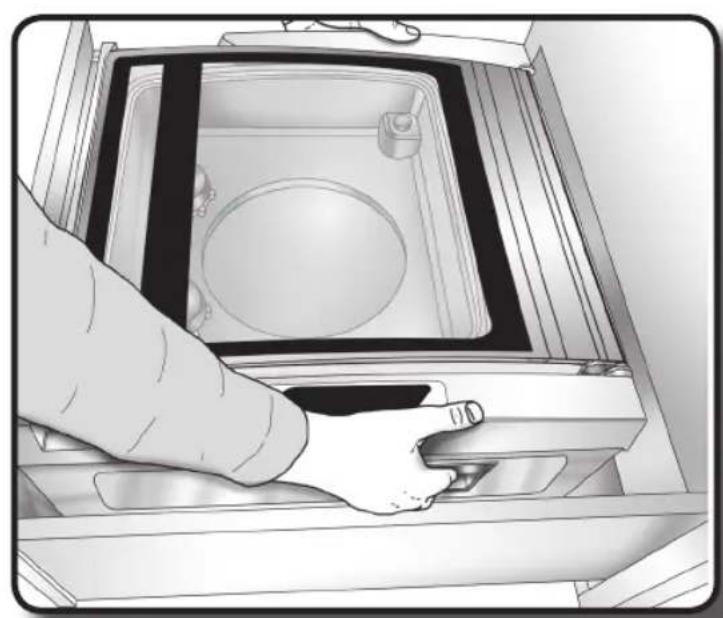
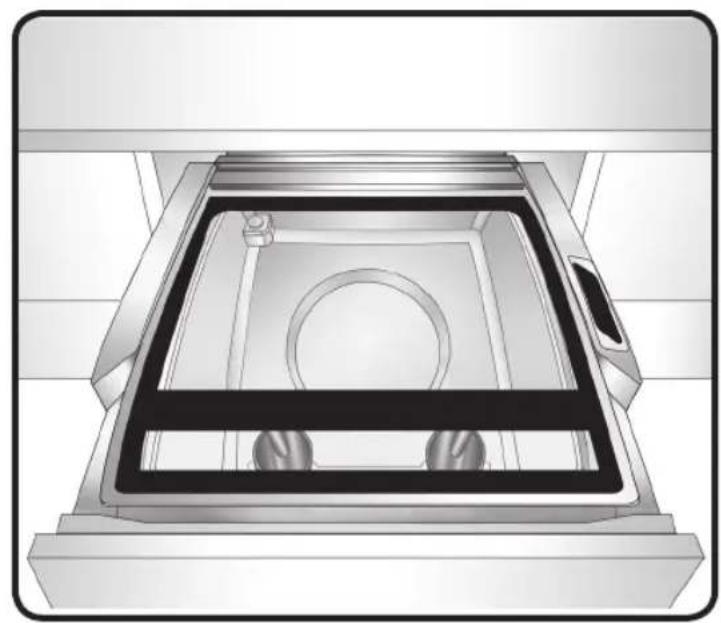
DESCRIPTION OF THE APPLIANCE
The appliance is made up from an extractable machine body (1) that includes the vacuum chamber (4) and relative lid (3) for closure.
There is a sealing bar inside the vacuum chamber (5), whose function is to seal the bags hermetically.
The device can be turned on by plugging it into a suitable socket.
1) Machine body
2) Control panel
3) Vacuum chamber lid in tempered glass
4) Vacuum chamber
5) Sealing bar

NOTIONS REGARDING THE POSSIBLE OPERATIONAL METHODS
The foodstuffs must be prepared previously inside the relative vacuum bags (for cooking or preservation) or inside the rigid containers for vacuum packing.
The bag or the container, is positioned inside the vacuum chamber, inside which the evacuation of the air takes place and, when vacuum pack bags are used, also the sealing of the same.
The vacuum generated can have four different levels:
VACUUM CYCLES FOR BAGS

Vacuum cycle for preservation.
The vacuum level is high, the air inside the bag is removed totally.

Cooking vacuum cycle.
The vacuum level is the high level. The air is removed around the food and from the heart of the product, in a way to obtain a uniform transmission of heat from the outside to the he
of the product in the successive cooking phase, inside a steam oven, of the foodstuff packed in the relevant cooking bag.
PA/PE are used in the preservation vacuum cycle or bags in OPA/PP are used for vacuum cooking cycles. Whenever the successive cooking of the food stuff is envisioned in a steam oven inside the packing, the use of bags in OPA/PP specific for cooking is indispensable.
Therefore, with OPA/PP bags the foodstuffs can be preserved and cooked, with PA/PE bags they can only be preserved.
VACUUM CYCLES IN CONTAINERS

BRIEF vacuum cycle in jars.
Used for vacuum packing containers in plastic, for household use.

LONG vacuum cycle in jars (activated by pressing for 5 seconds). Used for professional vacuum packing containers.
MAINTENANCE CYCLES

Automatic dehumidifying cycle of the pump oil (activated by pressing the key for 5 seconds).

It evacuates the watery vapour formed inside the pump while the device is used. The cycle lasts 20 minutes and must be carried out regularly.
NOTIONS REGARDING VACUUM PACKING BAGS
The bags used for vacuum preservation and/or cooking foodstuffs are characterised by an external nylon layer (barrier layer), which prevents the passage of oxygen from outside towards the inside of the bag, thus preserving the organoleptic properties of the packed food.
The bags suitable for the use described in this manual are:
- BAGS FOR PRESERVATION (in PA/PE).
They are smooth and opaque and normally have a thickness of 90 micron.
They are indicated for preserving foodstuffs and suitable for contact with the same, in compliance with the legislation in force.

They are not suitable for the vacuum cooking culinary technique.
BAGS FOR COOKING (in OPA/PP).
They are smooth and shiny and normally have a thickness of 75-85 micron.
They are indicated for vacuum cooking. With this technique, the maximum temperature reached is 100^ for some types of vegetables, while most foodstuffs are cooked at 60 - 65^ .
These bags are therefore suitable to resist temperatures up to 100^ .
The vacuum bags are indicated for packing products that cannot be easily crushed (meat, sliced meats, hard cheeses, legumes, etc...).
Perfect sealing is essential, which is highlighted via a well-marked seam without burns.

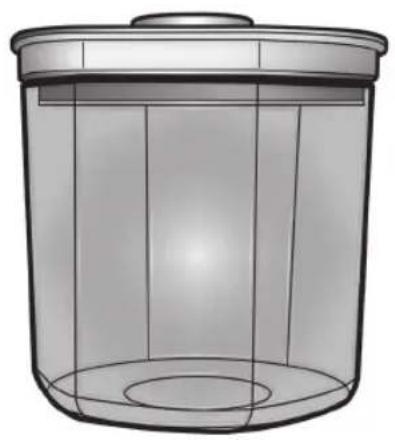
NOTIONS REGARDING THE VACUUM PACKING CONTAINERS
- Transparent plastic vacuum containers are usually found on the market. These are designed for domestic use not for professional vacuum levels (i.e. equal to about 80% of the absolute volume). The lids of these containers have a valve through which the air is evacuated.
- These accessories are useful for preserving products that can be easily crushed and for the preservation of liquids. They are not used in the vacuum cooking technique.
- To prevent the implosion or the excessive deformation of these containers due to the high level of vacuum that FVSD 2900 can reach, the appliance is equipped with a special functioning cycle, which automatically stops the evacuation of the air at a vacuum level such as guarantee good preservation, while maintaining the integrity of the container through time.
- If, however, you have rigid steel or glass containers available that can resist a high vacuum level as in the case of FVSD 2900, a longer cycle can be set, which takes the vacuum inside the container near to zero.
- Obviously the use of any type of containers depends on the maximum size of the vacuum chamber inside of which the same are to be placed.

NOTIONS REGARDING VACUUM PRESERVATION OF FOODS
Here are several fundamental rules to be respected for perfect results in the kitchen.
Do not use the system to preserve products that are already altered or impoverished from a nutritional point of view, lost quality cannot be recovered.
Foodstuffs that are kept too long at room temperature or that have just been prepared or cooked, loose humidity and initial quality (colour, perfume, taste, etc.) and are more subject to bacterial contamination.
It is therefore recommended to vacuum pack products that have been cooled in the fridge for a time sufficient to take them to 3^ .
This important solution also helps to preserve the pump from oxidation.
- If bags are used to vacuum pack raw or cooked foods, remember to distribute them uniformly in order to make it easier for the air to escape. Do not fill them excessively as the hermetic sealing could be jeopardised.
It is good practice to fill the bags up to 2/3 of their volume with the product to be packed. - It is preferable that vegetables and fruit are dried after washing, in order to prevent the stagnation of liquids, which could make them flaccid.
- To preserve meats for a reasonably long time, remember to cool them in the fridge for at least 2 hours in order to slow down bacterial proliferation. Before vacuum packing, dry them to obtain a good percentage of absence of air. If the meat is on the bone, e.g. spare ribs, pork chops or other, cover it with aluminium foil to prevent the bag being ripped.
- Regarding fish, it must first be washed well, eliminate the scales, remove the entails and gills, dry it and as for meat, cool it well before vacuum packing. Preserve it in the fridge at a temperature that does not exceed +3^ .
- For hard cheeses, such as Parmesan, Goat's milk cheese etc, do not have particular requirements, while soft cheeses must be wrapped in cellophane or preserved in the vacuum pack containers to prevent them being crushed.
- For cold pork meats and salads, if vacuum containers are used, no preparations are required. If they are to be packed in bags, dry them before carrying out the procedure.
- For sauces, proceed as follows: once prepared as usual, pack them in glass jars and then pasteurise them in a microwave for 12 minutes at maximum power. Place the container in water and ice to cool the sauce and then make the vacuum by pouring the product into the vacuum pack container.
INDICATIVE PRESERVATION TIMES
The preservation times listed are purely indicative and depend on the initial quality of the product to be preserved, the temperature of preservation, cooling time in the case of cooked foods, the level of vacuum reached as well as the quality of the bag used for vacuum packing.
- Fresh salads: up to 12 days
- Fresh cheeses: up to 20 days
- Fresh fish: up to 7 days
- Fresh meat: up to 15 days
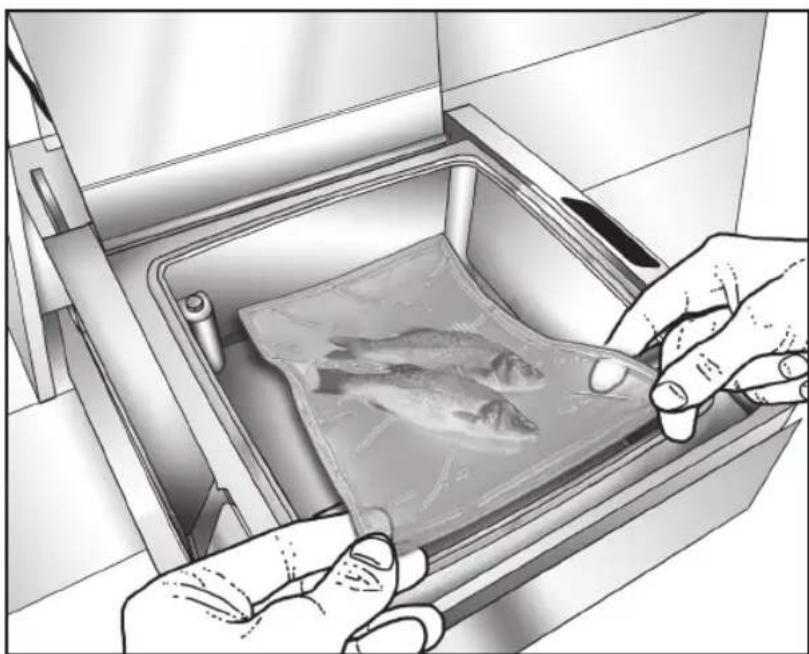
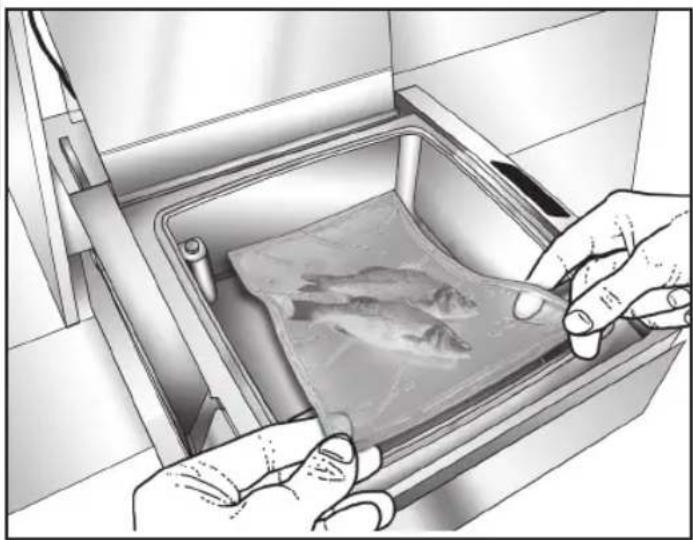
PREPARATION: USING VACUUM PACKING BAGS
1) After three minutes of inactivity, the machine enters the energy-saving state. To exit the energy-saving state, press any key.
2) Select the bag depending on the method of use (preservation or cooking), suitable for the dimensions of the product (the product must not occupy more than 2/3 of the useful volume of the bag).
3) Open the lid and make sure that the vacuum chamber is empty and the product to be packed is dry. When inserting the food into the bag, pay attention not to wet or make the inside of the bag dirty in proximity of the opening so as not to compromise efficient sealing.
4) Place the bag, centred on the sealing bar (A), in a way that the open edge projects by about 2 cm with respect to the bar itself (Fig. 1-2).
5) When packing liquid products, fill the bag only up to half of its volume.
6) Close the appliance lid.
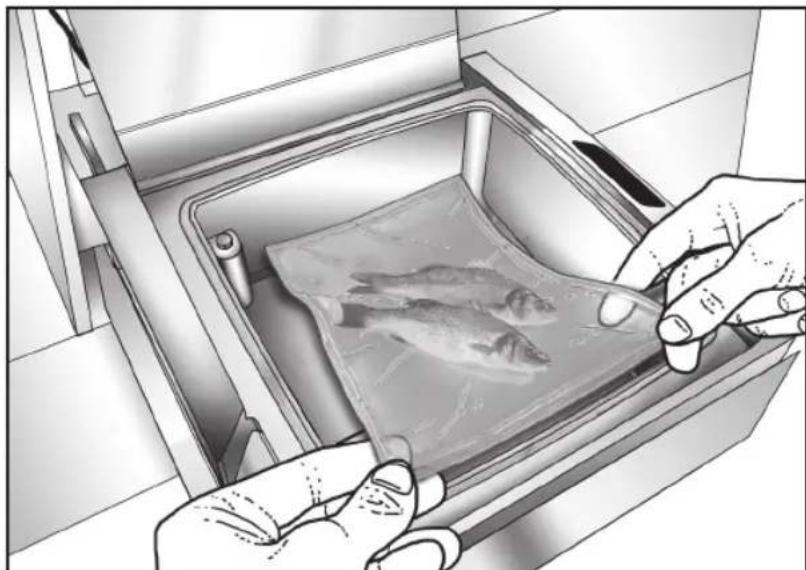
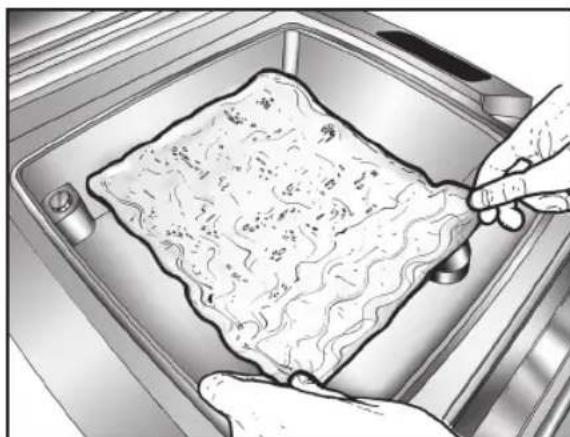
Fig. 1
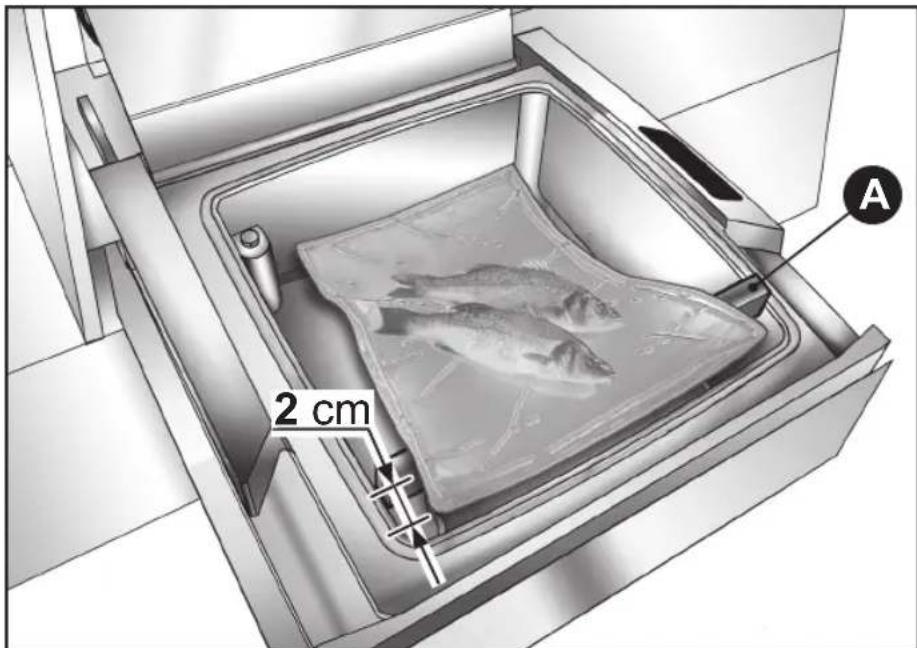
Fig. 2
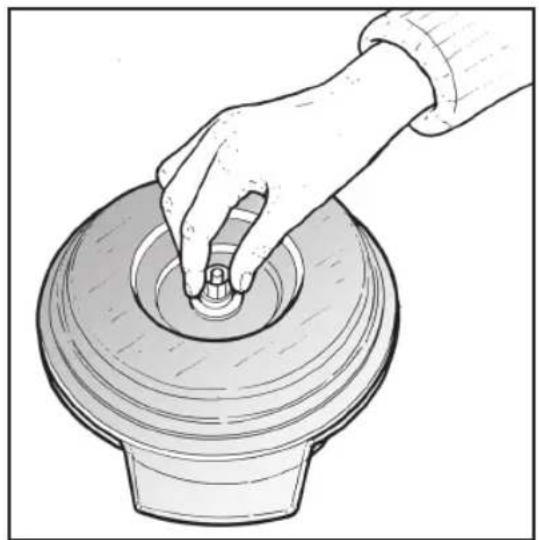
PREPARATION: USING VACUUM PACKING CONTAINERS
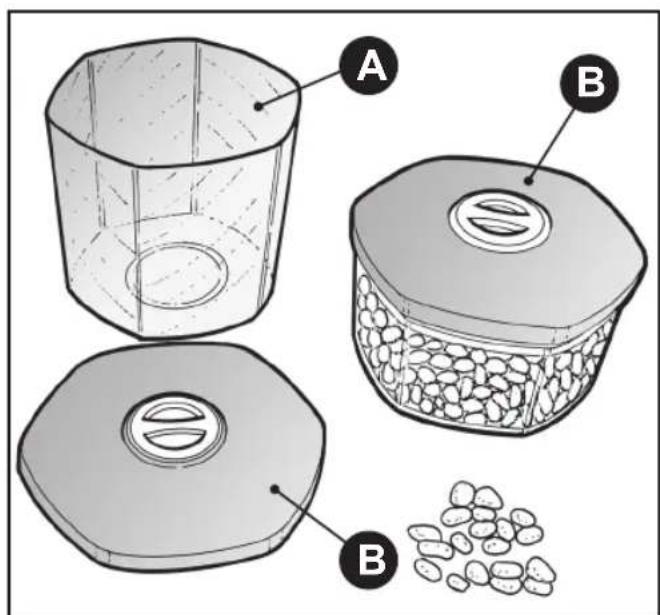
The following can be used:
- Plastic vacuum packing containers (ATTENTION: for domestic use), with valve on lid (only on short tray cycle).
Professional stainless steel containers, with valve on lid. - Pans, container and trays in combination with special vacuum packing lids.

In all cases, liquid foodstuffs must only fill the containers up to 3/4 of their volume.
The corresponding jar cycle will be set on the basis of the type of container selected (brief for plastic vacuum packing containers sensitive to crushing, long for the rigid professional type). The lid valves, must be set-up in a way to allow the suction of the air inside the container.
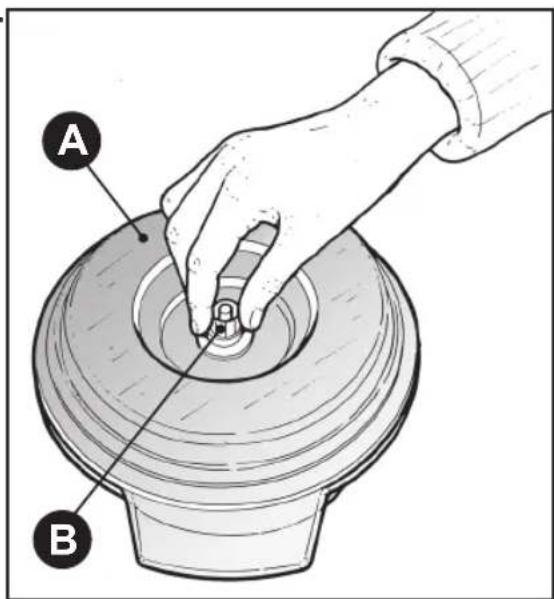
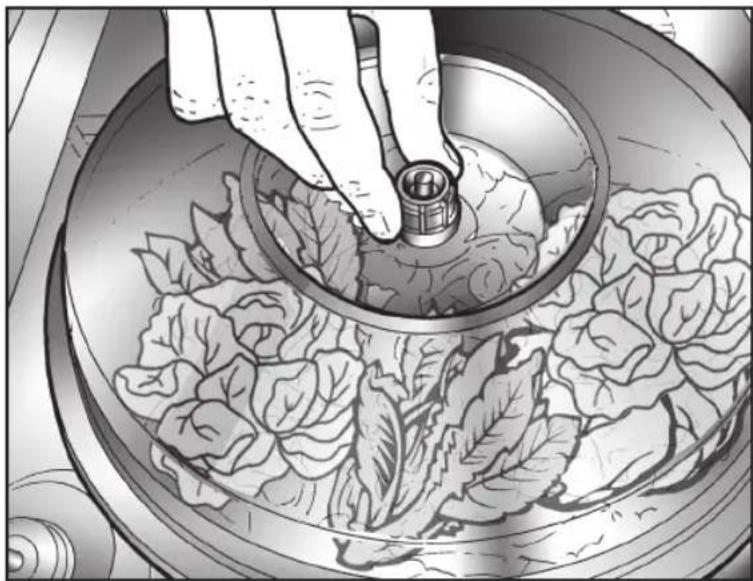
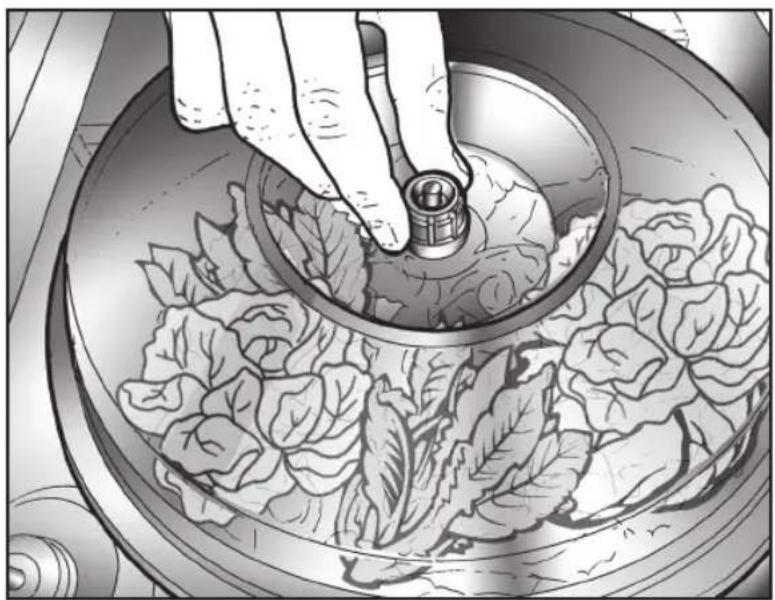
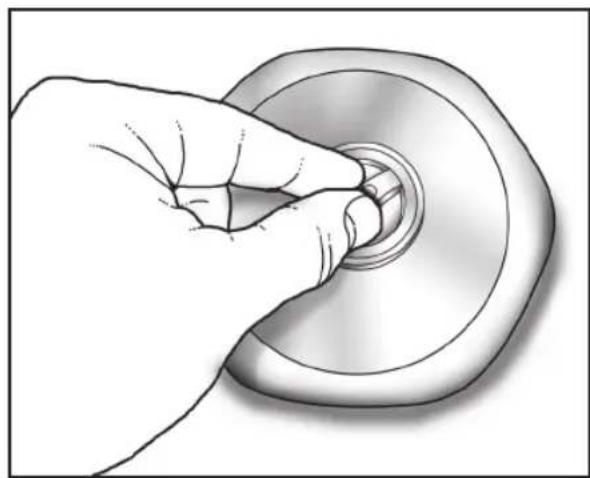
1) Prepare a container or a vacuum pack lid (A) with valve open (B), in a way to allow the suction of air from the container.
2) Fill the container up to a maximum of 34 of its volume, if liquid foodstuffs are being processed.
3) Position the container inside the vacuum chamber (Fig. 1).
4) Close the appliance lid.
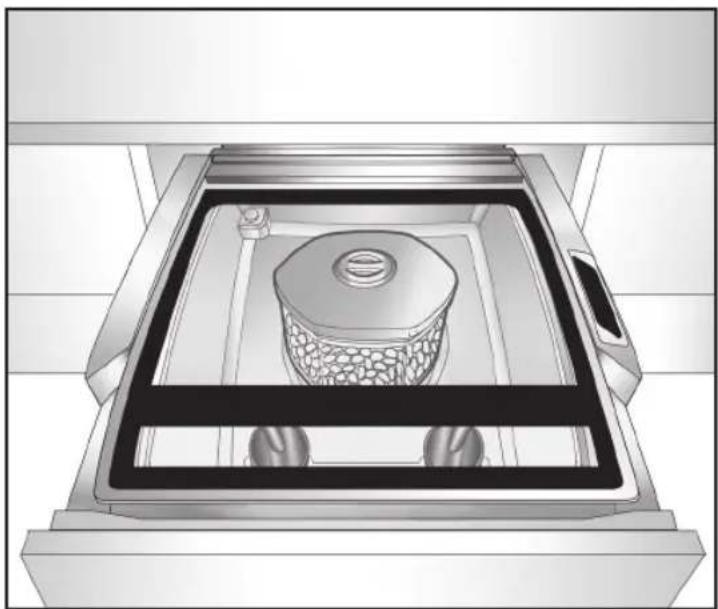
Fig. 1
CONTROL PANEL
1) Keys.
2) Luminous indicators (LEDs).

ENNS

Selects the vacuum cycle for preservation.
If the key is selected again once the cycle has started, the machine passes directly to sealing the bag.

If pressed for 5 seconds, it activates the dehumidifying cycle of the pump oil.
This maintenance cycle, which must be performed regularly, lasts 20 minutes.

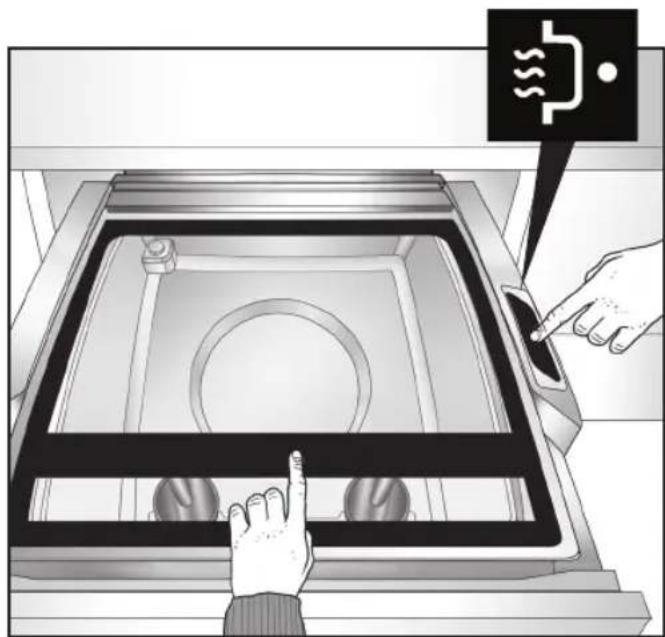
Selects the vacuum cycle for cooking.
If the key is selected again once the cycle has started, the machine passes directly to sealing the bag.

It interrupts the cycle in progress.

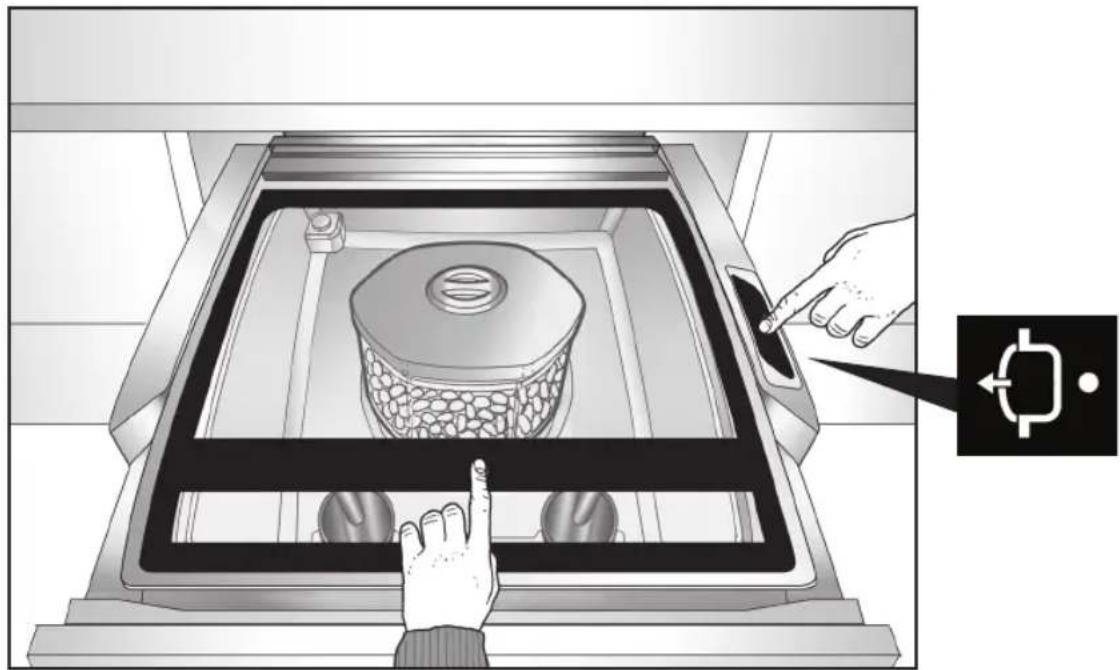
It selects the cycle for vacuum in containers for household use.

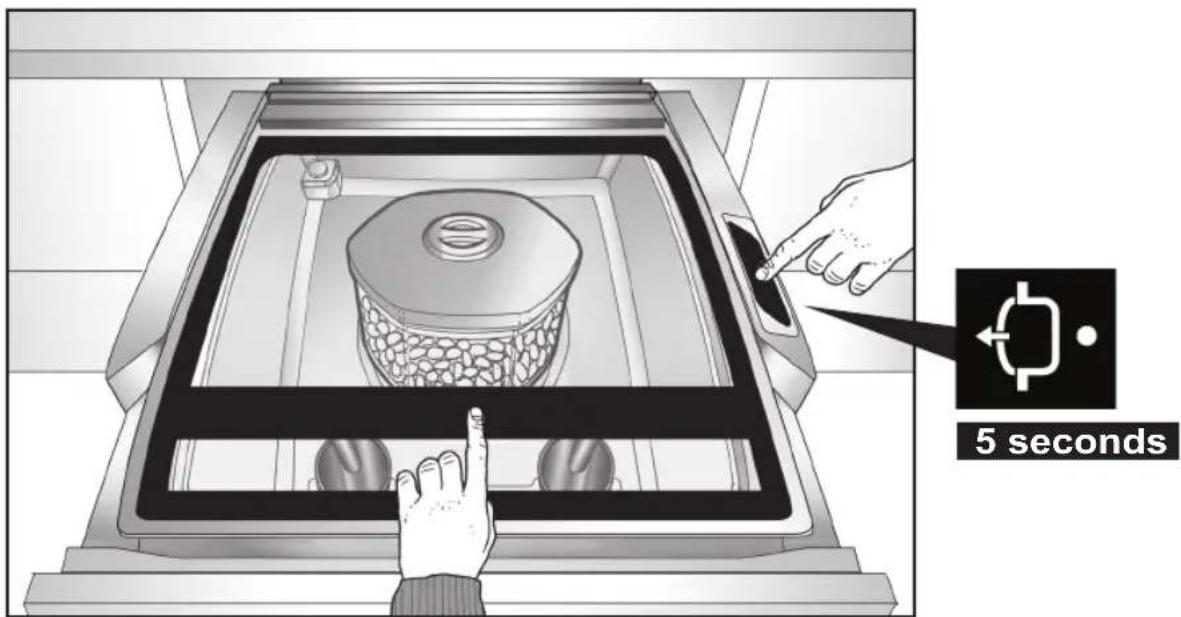
Pressed for 5 seconds, it activates the cycle for vacuum in containers of professional type.

After three minutes of inactivity, the machine enters the energy-saving state. To exit the energy-saving state, press any key.
FUNCTIONING
SWITCH-ON
- After three minutes of inactivity, the machine enters the energy-saving state. To exit the energy-saving state, press any key.
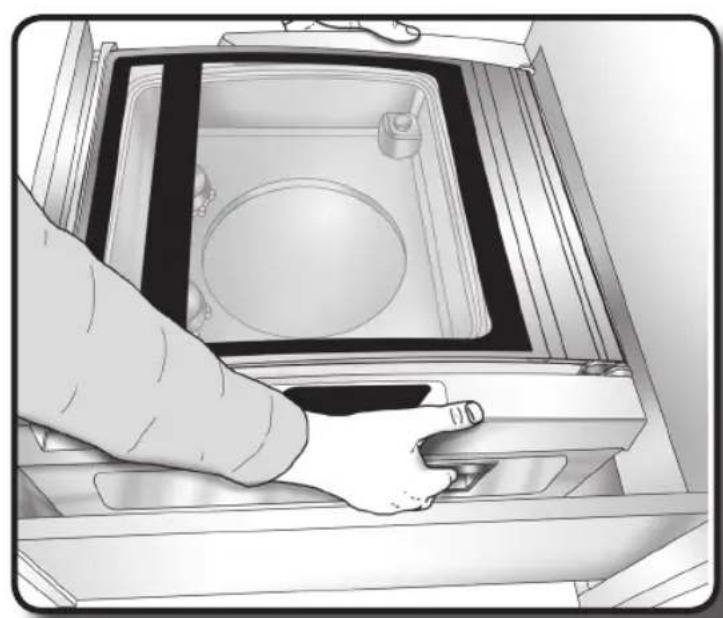
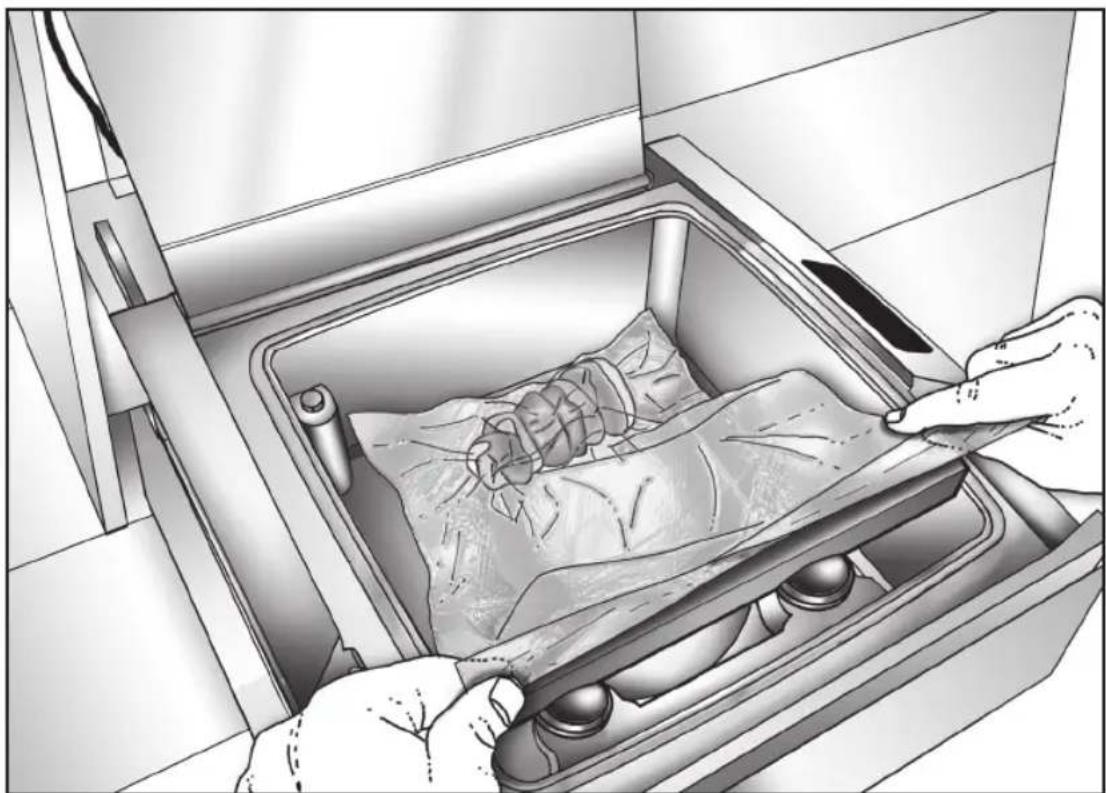
VACUUM CYCLE FOR PRESERVATION

Once the pack has been prepared inside the vacuum chamber as described in the "Preparation" chapter, close the lid exerting a slight pressure on the front and at the same time select the
key the preservation vacuum cycle is started.
An acoustic signal (short beep) is emitted on cycle start.

The cycle proceeds automatically in the following order:
The evacuation phase is signalled by the flashing.
The sealing phase is signalled by the luminous indicator key on.
During the successive unload phase, all of the luminous indicators go back to initial switch-on situation
- When the vacuum chamber is decompressed, it is possible to open the lid and extract the sealed bag (at the end of the unload phase).
- In the case of the preservation vacuum cycle, the product is tightly wrapped and compressed by the bag.
- An acoustic signal (short beep) is emitted at the end of the cycle, indicating that the machine is ready for a new cycle.

By pressing the

key during the air evacuation phase, the appliance passes to
the sealing phase in advance.

The cycle can be interrupted in advance by pressing the

key. In this case, the
appliance does not carry out sealing and the chamber is decompressed.

To exit the energy-saving state, press any key.
VACUUM CYCLE FOR COOKING

Once the pack has been prepared inside the vacuum chamber as described in the "Preparation"
chapter, close the lid exerting a slight pressure on the front and at the same time select the key. The cooking vacuum cycle is started.

An acoustic signal (short beep) is emitted on cycle start.
The cycle proceeds automatically in the following order:
The evacuation phase is signalled by the luminous indicator of the flashing.
The sealing phase is signalled by the luminous indicator key on.
During the successive unload phase, all of the luminous indicators go back to initial switch-on situation.
- When the vacuum chamber is decompressed, it is possible to open the lid and extract the sealed bag.
- As in the case of the preservation vacuum cycle, in the cooking vacuum cycle the product is tightly wrapped and compressed by the bag.
- An acoustic signal (short beep) is emitted at the end of the cycle, indicating that the machine is ready for a new cycle.

By pressing the

key during the air evacuation phase, the appliance passes to
the sealing phase in advance.

The cycle can be interrupted in advance by pressing the

key. In this case, the
appliance does not carry out sealing and the chamber is decompressed.

To exit the energy-saving state, press any key.
VACUUM CYCLE FOR JARS - BRIEF

Request the most suitable vacuum containers from your regular dealer.
Once the container is inserted inside the vacuum chamber as described in the "Preparation" chapter
close the lid exerting a slight pressure on the front and at the same time select the

An acoustic signal (short beep) is emitted on cycle start.
The cycle proceeds automatically in the following order:
The evacuation phase is signalled by the luminous indicator

flashing.
- During the successive unload phase, all of the luminous indicators go back to initial switch-on situation.
- An acoustic signal (short beep) is emitted at the end of the cycle, indicating that the machine is ready for a new cycle. The chamber is decompressed, allowing the container to be extracted.

The cycle can be interrupted in advance by pressing the

key.
Close the container suction valve immediately so that air cannot enter the container.

The vacuum obtained with this cycle is equal to 80% of the vacuum that can be reached with FVSD 2900 and is indicated for use with non-professional plastic containers.
VACUUM CYCLE FOR JARS - LONG

Request the most suitable vacuum containers from your regular dealer.
Once the container is inserted inside the vacuum chamber as described in the "Preparation" chap-
ter, close the lid exerting a slight pressure on the front and at the same time select the key, holding it down for 5 seconds.
An acoustic signal (short beep) is emitted on cycle start.
The cycle proceeds automatically in the following order:
The evacuation phase is signalled by the luminous indicator key flashing.
- During the successive unload phase, all of the luminous indicators go back to initial switch-on situation.
- An acoustic signal (short beep) is emitted at the end of the cycle, indicating that the machine is ready for a new cycle. The chamber is decompressed, allowing the container to be extracted.

The cycle can be interrupted in advance by pressing the

key.
Close the container suction valve immediately so that air cannot enter the container.

The vacuum obtained with this cycle is equal to 100% of the vacuum that can be reached with FVSD 2900 and is consequently only indicated for very strong containers realised in thick plastic, in glass or in steel.
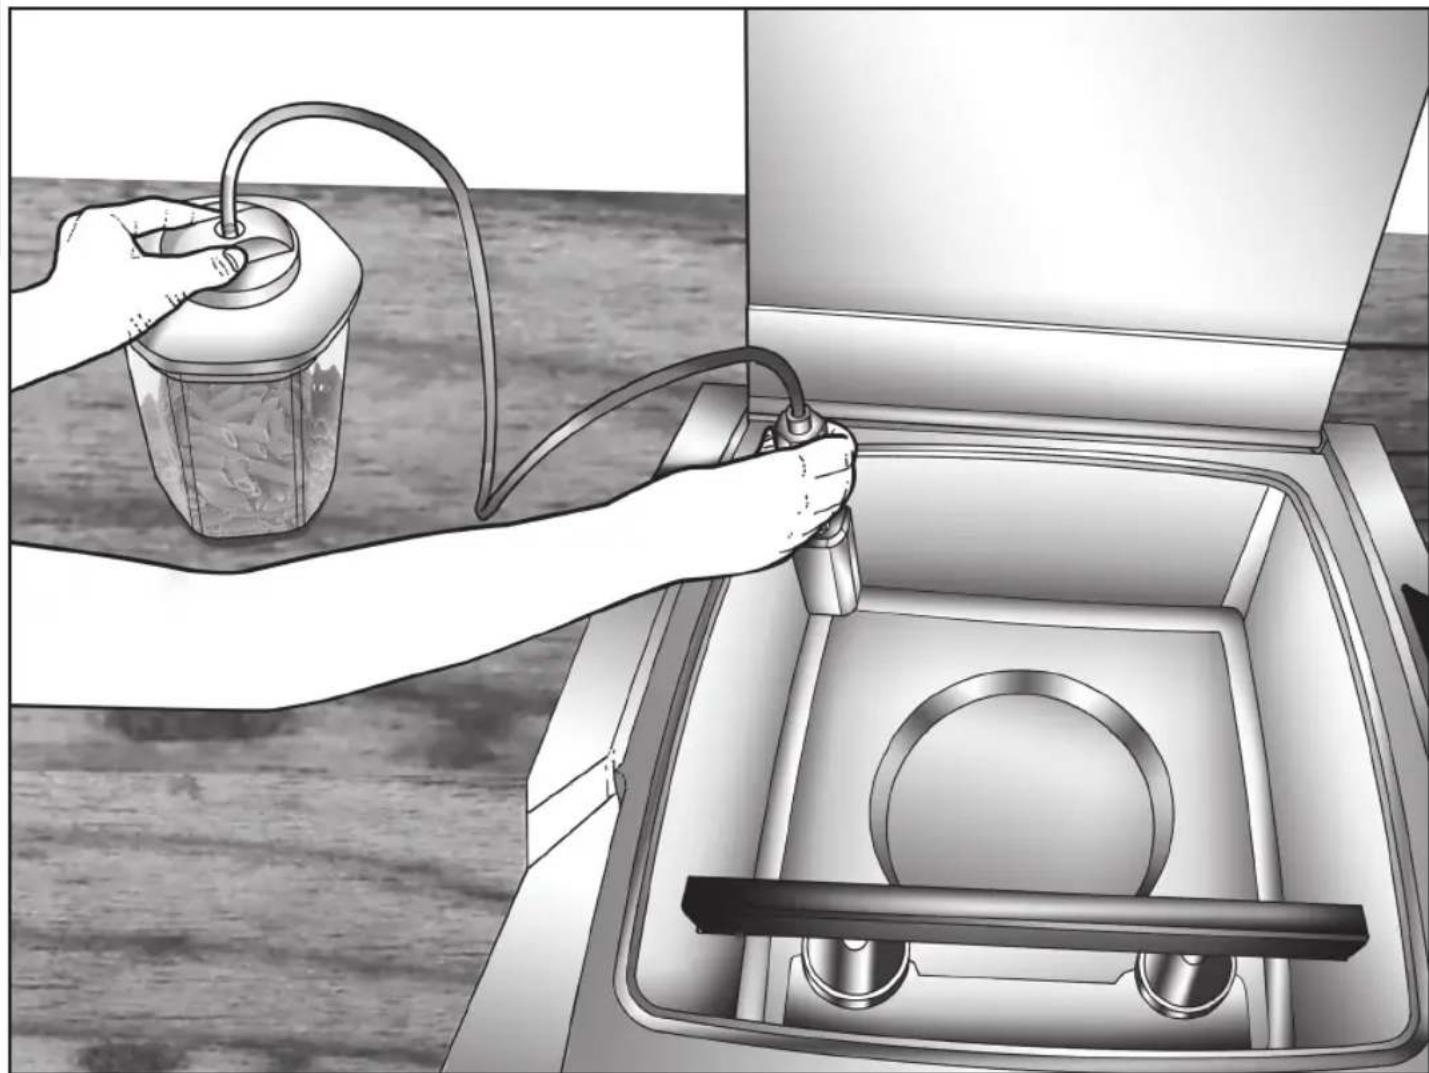
NO-LOAD CYCLE FOR TRAYS WITH CONTAINER OUTSIDE OF THE CHAMBER
Request the most suitable vacuum containers and suction device from your regular dealer.
If you work with containers that exceed the capacity of the vacuum chamber, use the dedicated accessory.
Activate the tray cycle suitable for the type of container and press the suction device from the suction inlet side (at the top right of the vacuum chamber), and from the container side.
INTERRUPTION OF THE CYCLE IN PROGRESS STOP
By pressing the
STOP
key, an acoustic signal warns that the cycle is interrupted immediately.
The bag is not sealed and the tank is decompressed.
After the unload phase the luminous indicators go back to the initial switch-on phase.
SIGNALS AND WARNINGS
PUMP OIL REPLACEMENT NECESSARY WARNING
FVSD 2900 has a high performance vacuum pump, oil recirculation lubricated with a special lubricant studied for this application.
With use of the machine, the oil undergoes deterioration due to suction of impurities and liquids. Consequently, so as not to compromise appliance performance, the oil must be changed every 2500 cycles, corresponding to about 150 hours of functioning.
FVSD 2900 indicates when the oil must be changed.

The oil must only be changed by an authorised dealer.
On machine switch-on, reaching the limit of 2500 cycles for the first time, all of the control panel luminous indicators will flash for 3 seconds and an acoustic signal can be heard (long beep).
This visual and acoustic signal informs that the pump oil must be replaced.

Any cycle can be activated in the presence of an alarm. The alarm is zeroed with the first oil replacement intervention.
INSUFFICIENT VACUUM SIGNAL
FVSD 2900 has a device that detects the level of vacuum reached inside the chamber and which is determinant for the correct functioning of the appliance. If a minimum vacuum level is not reached, the cycle is automatically interrupted after about one minute. The appliance indicates the anomaly
using the luminous indicator of the STOP key, which flashes for about 20 seconds, accompa
nied by an intermittent acoustic signal.
The signal re-enters on the activation of a new cycle. If the cause is not removed, the alarm situation described is repeated.
If an insufficient vacuum is signalled, before calling the Dealer or the authorised after-sales centre, check the correct closure of the lid and the correct insertion if the gasket in the seat.
If, after the controls suggested, the anomalous situation remains, call the Dealer or authorised after-sales, communicating the information on the plate data.

ATTENTION! Do not try to repair or modify any part of the appliance: as well as making the warrant null and void, it can be potentially dangerous. Entrust specialised technicians only.
TEMPORARY INTERRUPTION OF THE ELECTRIC POWER SUPPLY
If a power cut occurs during a functioning cycle, on restore of the power supply, the vacuum chamber is decompressed and the machine goes back to initial switch-on conditions.
If the power supply is cut-off in Initial switch-on phase, once the power supply is restored the machine goes back to Initial switch-on.

ATTENTION: In the event of a power outage during the vacuuming process, the vacuum state is maintained in the chamber and the lid cannot be opened. Never attempt to open the lid by force or with the use of tools. Once electrical power is restored it will
again be possible to open the lid.
WARNING REGARDING ROUTINE MAINTENANCE
The information and instructions given in this chapter are destined for all staff operating on the machine: the user and the maintenance technician.
ELEMENTARY SAFETY STANDARDS
To carry out cleaning and routine maintenance operations in safety, follow the regulations given below:
- Disconnect the machine from the power supply mains without pulling the power supply cable.
- Do not touch the machine with bare, humid or wet hands or feet.
- Do not insert screwdrivers, kitchen instruments or other between the guards and moving parts.

It is prohibited to remove the guards and safety devices in order to carry out routine maintenance operations. The Manufacturer declines all liability for accidents caused due to the failure to comply with the above-mentioned obligation.

ATTENTION! Do not scrape the surfaces with pointed or abrasive objects!

ATTENTION! For any maintenance, handling, installation and cleaning operations on the appliance, always use relevant prevention and protection devices (gloves etc.).
CLEANING EXTERNAL SURFACES
BODY FRAME
- The stainless steel external surfaces of FVSD 2900 must be cleaned using a soft cloth or sponge with neutral detergent following the direction of the satin finish.
- It is recommended not to use stainless steel scrubbers, scrapers or abrasive, acid or aggressive substances, which could damage the surface irreparably.

ATTENTION! Do not remove the serial number plates during cleaning. These supply important information regarding the appliance for the technical after-sales service.
CONTROL PANEL
- The FVSD 2900 instrument panel has "Soft-touch" controls without any projecting buttons, for easy cleaning. Clean using products specific for glass surfaces.
It is recommend to use a soft cloth with a small amount of detergent and to dry thoroughly.
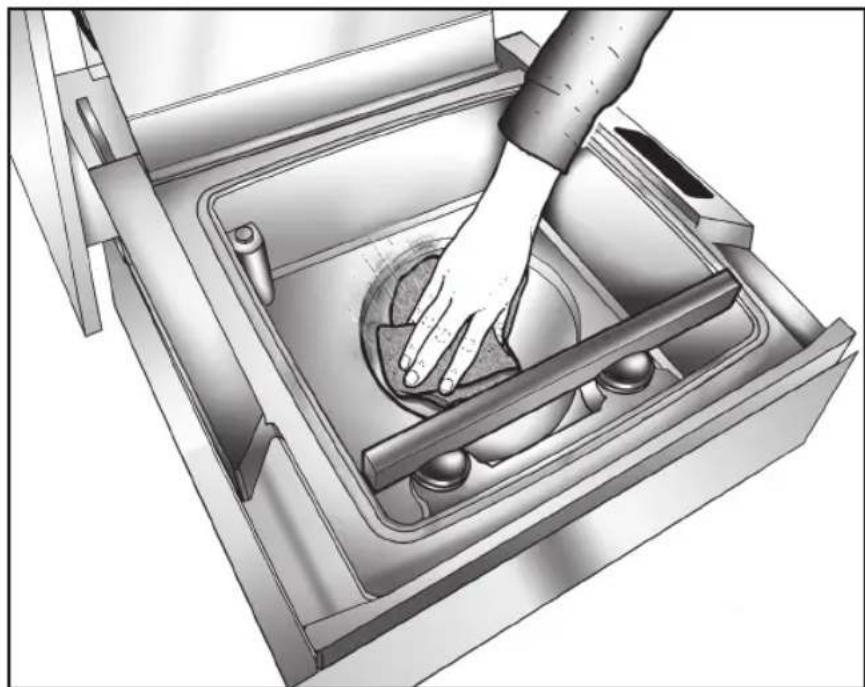
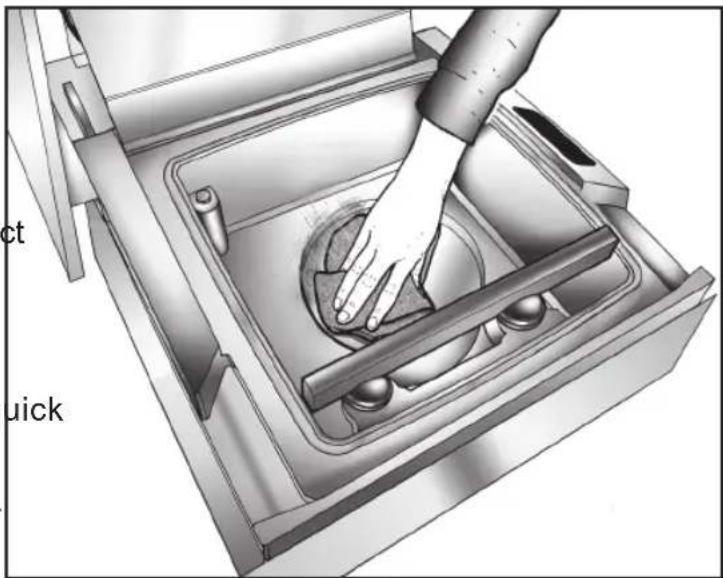
CLEANING VACUUM CHAMBER

ATTENTION! Remove the electric power supply before intervening for maintenance.
In order to guarantee hygiene and protect the quality of the food products packed, the inside of the vacuum chamber must be cleaned after every use.
- The chamber conformation allows quick cleaning.
The use of a soft cloth or non-abrasive sponge and a neutral detergent or alcohol-based disinfectant is recommended.
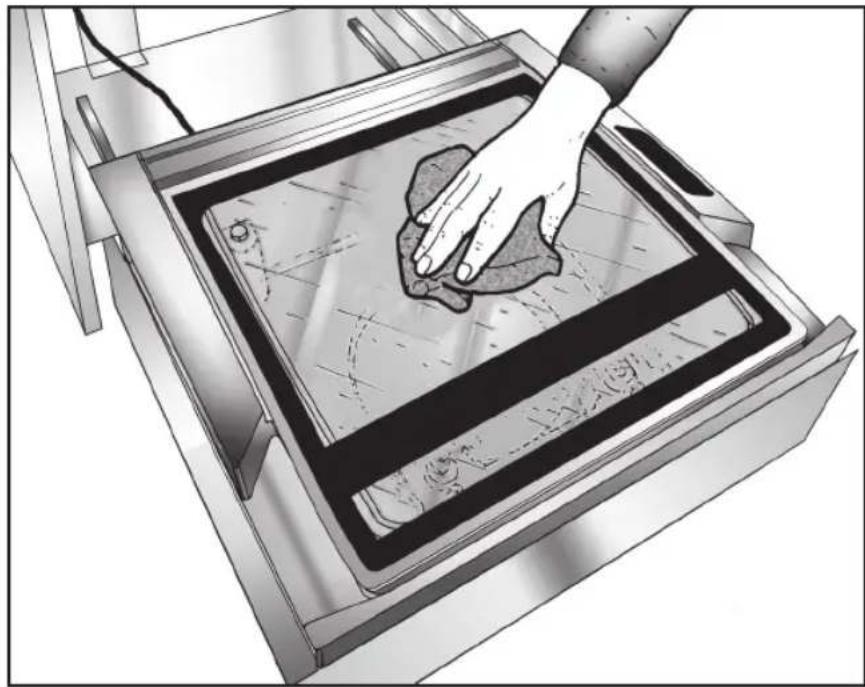
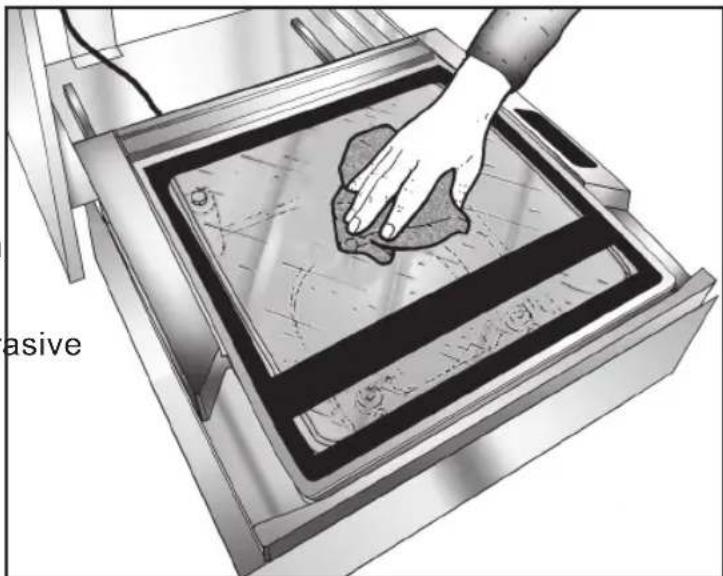
CLEANING LID

ATTENTION! Remove the electric power supply before intervening for maintenance.
In the same way, it is recommended to clean lid after use.
- The use of a soft cloth or non-abrasive sponge soaked in drinking water or specific products for cleaning glass is recommended.
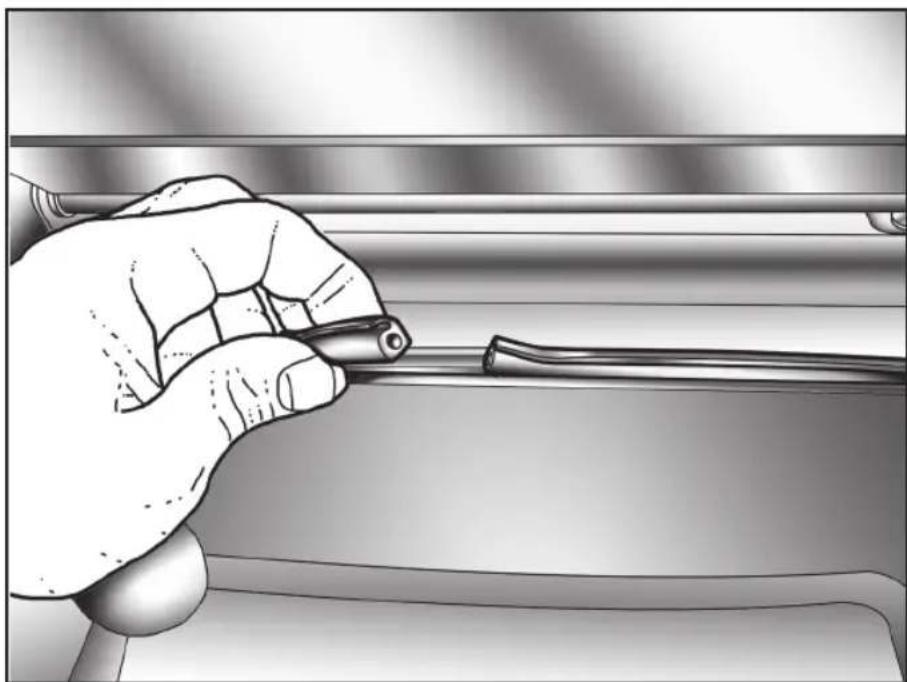
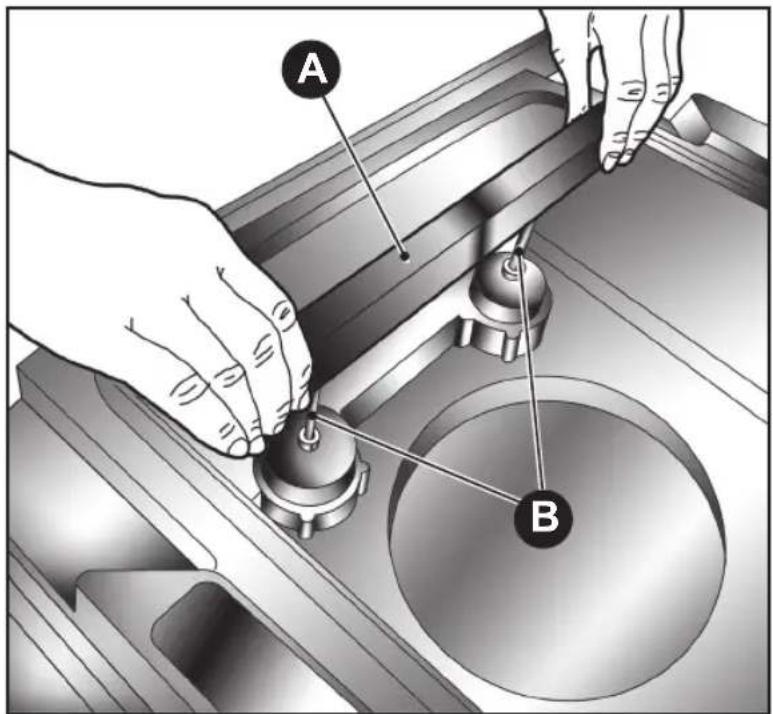
CLEANING THE SEALING BAR

ATTENTION!
Remove the electric power supply before intervening for maintenance.
It is recommended to clean the sealing bar every month in a way to remove any residues that could cause deterioration of the bag sealing quality.
To make the operation easier, lift the sealing bar upwards (A), extracting it from the two pins (B).
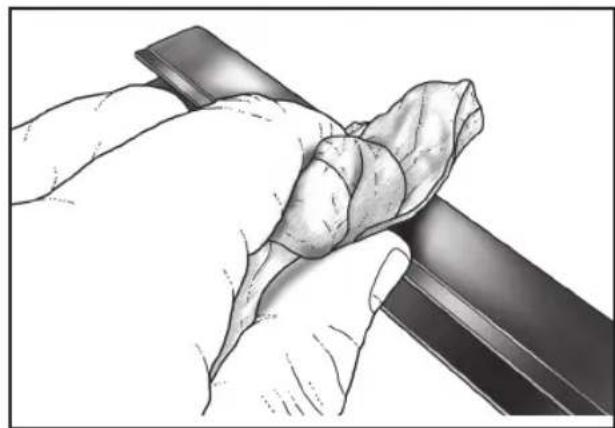
- The use of a soft cloth or non-abrasive sponge and a neutral detergent or alcohol-based disinfectant is recommended.
- Finally, engage the bar on the two pins (B) centring the two holes on the lower part of the bar and check correct engagement.

ATTENTION!
Do not remove the black Teflon strip! Do not use scrapers or abrasive tools!
DEHUMIDIFYING CYCLE OF PUMP OIL
The core of the machine is the vacuum pump.
Carry out the following instructions to preserve the inside surfaces of the pump from oxidation, which blocks the rotor due to oxidized residue, which occurs when the watery vapour, sucked in together with air, condenses and remains inside the pump body for a long time:
1) Always pack the product while it is cold, possibly at 3 - 4^ . The hotter the product is, the less it lasts and the more condensation is formed inside the pump, thereby oxidizing and damaging it.
2) If the device is used only every now and then, before packing the products, carry out at least 2 or 3 complete "Vacuum in the vessels" long cycles with the vacuum chamber. This allows the temperature of the pump oil to be brought to a steady level and to evacuate the watery vapour.
3) We recommend carrying out the dehumidifying cycle of the pump oil regularly, pressing

key for 5 seconds.
PERIODS OF INACTIVITY
- If the appliance is to remain at a standstill for a long period of time, clean the inside and outside thoroughly and protect the external surfaces with specific oil-based products for stainless steel.

ATTENTION! Disconnect the plug until further use.

ATTENTION! Before new use, control the integrity of the appliance and clean FVSD 2900 thoroughly
- When re-starting, carry out an automatic dehumidifying cycle of the pump oil pressing the key for 5 seconds.
The cycle lasts 20 minutes. At the end, the machine will be in stand-by.
MALFUNCTIONING

ATTENTION! In the case of malfunctioning, before calling the Dealer to request after-sales assistance, check the perfect insertion of the power supply cable and make sure electric current is present.
- Moreover, check that the lid gasket is well inserted and that the sealing bar is correctly engaged on the two pins.
- If, after having carried out the controls suggested, FVSD 2900 still does not work, disconnect the appliance from the mains and call the Dealer or authorised after-sales centre, communicating the machine serial number.

ATTENTION! Do not try to repair or modify any part of the appliance: as well as making the warrant null and void, it can be potentially dangerous. Entrust specialised technicians only.
TROUBLESHOOTING GUIDE
| FUNCTIONAL ANOMALY | POSSIBLE CAUSES SOLUTION | |
| The cycle does not start and all control panel keys flash. | Overheating, damage to the electronic circuit. | |
| The luminous STOP key flashes accompanied by an intermittent acoustic signal. | Insufficient vacuum in the cham-ber due to one of the following reasons: • Lid not pressed on cycle start-up. • Lid gasket worn or incorrectly positioned. • Leak from vacuum circuit. • Faulty vacuum sensor. • Clogged vacuum pump. | |
| On switch-on, all luminous indicators on the control panel flash for 3 seconds and an acoustic signal is heard (long beep). | Warning that oil change is requi-RED as 2500 functioning cycles have been performed. | |
| The cycle starts (keys flash) but the pump does not start. | Pump circuit breaker pro-tion intervention due to heating. | |
| The machine does not switch on. | No energy. Check the connection to the electric line. | |
| FUNCTIONAL ANOMALY | POSSIBLE CAUSES SOLUTION | |
| Little vacuum in the bag. • | rregular bag sealing. Irregular sealing seam. Bag dirty or perforated. Insufficient sealing. Bag dimensions unsuitable for product di-sions. Insufficient pump perfor-mance. | Position the bag correctly on the sealing bar. Control the state of the Teflon cover-ring. Call the after-sales technical assistance for the replacement of the Teflon and checking the sealing resistance. Change the Bag. Call the after-sales technical assistance to check the bar hoisting pistons and the sealing resistance. Choose a format where the product does not exceed 2/3 of the bag's volume. Call the after-sales technical assistance to check the pump. |
| The machine does not seal the bags. | 3-way solenoid valve blocked or dirty. Dirty contacts. Sealing bar resistance broken. No electric power supply to the sealing bar. | Call the after-sales technical assistance to replace the electrovalve. Slide the sealing bar from the two pins and clean the two holes using a brush. Call the after-sales technical assistance to replace the sealing bar. Call the after-sales technical assistance to check the wiring and the machine's electric system. |
USEFUL NOTES
Date of purchase:
Dealer Data:
Name:
Address:
Telephone: Fax:
Nearest recommended After-sales Centre:
Name:
Address:
Telephone: Fax:
FULGOR
ENGLISH

INSTALLER
INSTALLATION STANDARDS
WARNING FOR THE INSTALLER
This manual is an integral part of the product and supplies all indications necessary for correct installation and maintenance of the machine.

It is mandatory for the user and installer to read this manual carefully and always make reference to it. Moreover, it must be kept in place that is known and accessible to the authorised operators (installer, user, maintenance technician).
The appliance is only intended for the use for which it was designed, i.e. for vacuum packing foodstuffs.
All other use must be considered improper and potentially dangerous.
The manufacturer declines any liability and all warranty obligations, whenever damage/injury occurs to persons, the appliance and objects that can be blamed on:
Incorrect installation and/or that is not in compliance with the laws in force.
- Modifications or interventions that are not specific for the model.
- Use of non-original spare parts or that are not specific for the model.
- Failure to comply, even partial, with the instructions in this manual.
- Failure to comply with Accident-prevention Standards and the Laws in force during installation.
FOREWORD

Installation must be carried out exclusively by authorised and specialised staff, respecting the instructions and the prescriptions in this manual.
- Before installing the appliance, make sure that any pre-existing electric plants are in compliance with the Law and suitable for the plate data of the appliance to be installed (V, kW, Hz, N° of phases and power available).
- The installer must also check any prescriptions on the subject of fire-prevention.
The Manufacturer declares compliance with the European Standards in force.
TRANSPORT AND HANDLING
The loading and unloading of the appliance from the means of transport can be performed using suitable means or by two persons.
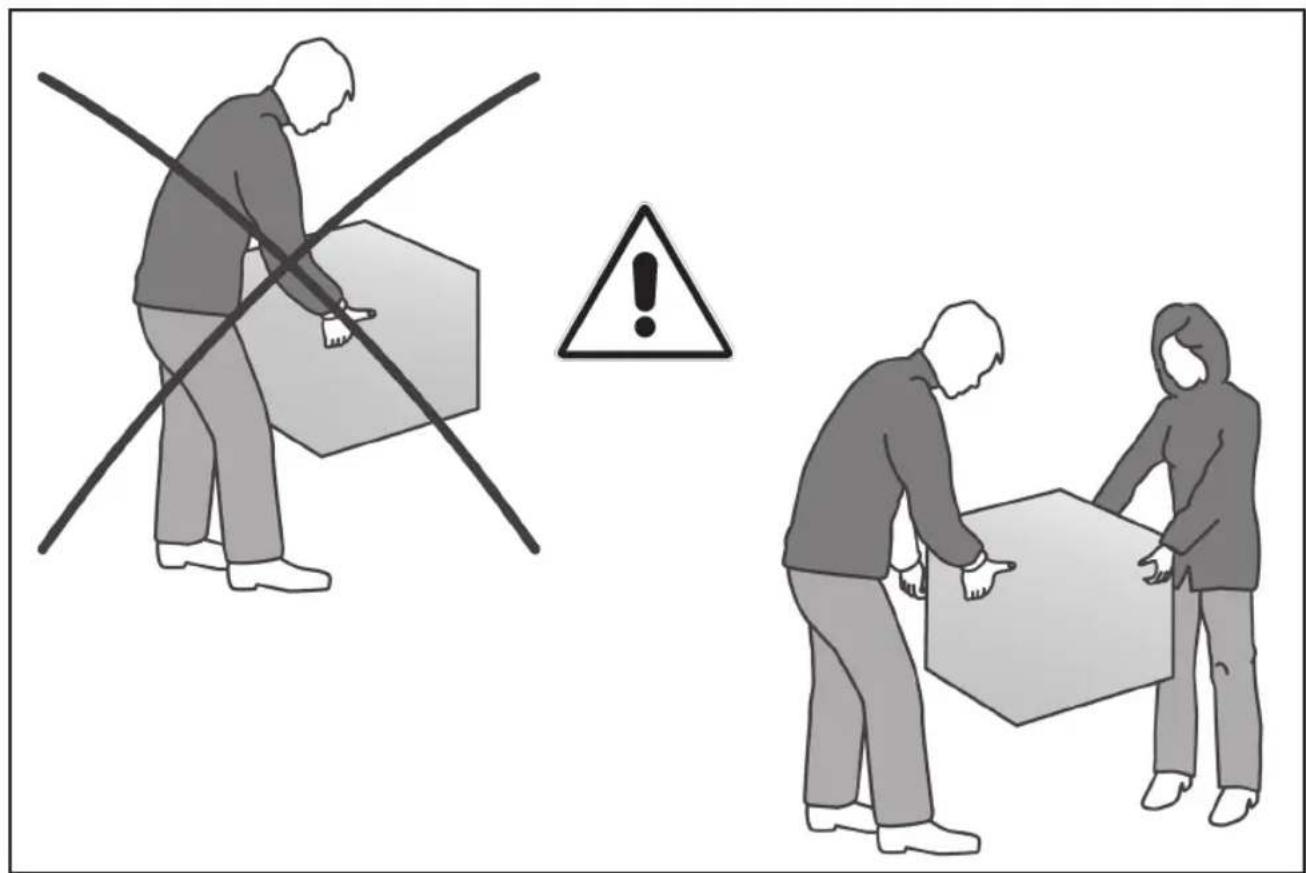

ATTENTION! The vacuum pump contains oil. Always keep the packaging and the appliance in a horizontal position to prevent the oil leaking from the pump vent.

ATTENTION! All necessary precautions must be adopted when handling the appliance in order not to damage it, or cause injury/damage to persons or objects, respecting the indications positioned on the packaging.
Open the cardboard package and take out the bag that contains:
| Nr. 1 power cord with Schuko plug | |
| Nr. 2 screws for fixing the machine to the slides | |
| Nr. 20 screws for wood 4.5×16 for fixing the built-in platform to the shelf | |
| Foot kit – consisting of 4 feet, 4 screws and 4 spacers | |
| Anti-rollover bracket kit – consisting of 2 brackets, 4 screws for chipboard | fixing |
Now extract the filling volumes from above, using protective gloves.
Lift the appliances with the aid of the two handles lateral.
After the packaging has been removed, immediately check the integrity of the appliance. If anomalies are present, DO NOT run the machine and contact the Dealer.
Firstly extract the the accessories described above and then the machine body.

ENGLISH
Carefully remove the protective bag and keep it out of the reach of children (danger of suffocation). If there should be traces of adhesive, remove them delicately with a soft cloth and a neutral product. It is recommended not to use stainless steel scrubbers, scrapers or abrasive, acid or aggressive substances, which could damage the stainless steel surface irreparably.

ECOLOGICAL NOTES: all of the various packaging components must be disposed of according to the Standards in force in the Country where the appliance is used. In all cases, nothing must be dispersed into the environment.

ATTENTION! The packaging components can be potentially dangerous for children and animals, make sure that they are kept out of their reach!
ELEMENTARY SAFETY STANDARDS
The user is responsible for the operations performed on the machine, ignoring the indications stated in this manual.
The main Safety Standards regarding installation are given below:
- Do not touch the machine with humid, wet or unprotected hands/feet (suitable gloves and shoes).
- Do not insert screwdrivers, kitchen instruments or other between the guards and moving parts.
- Operate after having disconnected the machine (do not pull the power supply cable).
- For any maintenance, handling, installation and cleaning operations on the appliance, always use relevant prevention and protection devices (gloves etc.).
INSTALLATION
The machines must be installed and inspected in complete respect with the Accident-prevention Standards, the traditional legislation and Standards in force.
PLATE DATA
How to read the data plate
The plate data is positioned on:
External cardboard packaging: 1 label
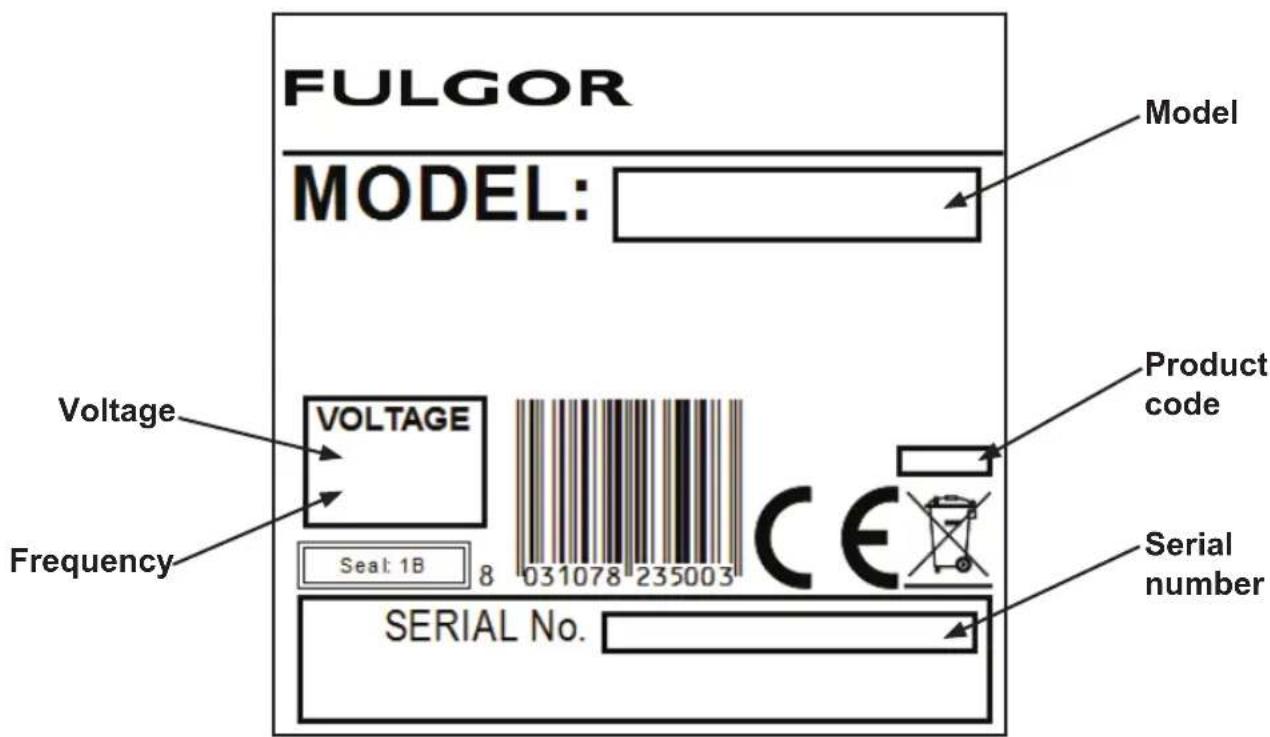
- Appliance: 1 rating plate, affixed to the back of the machine.
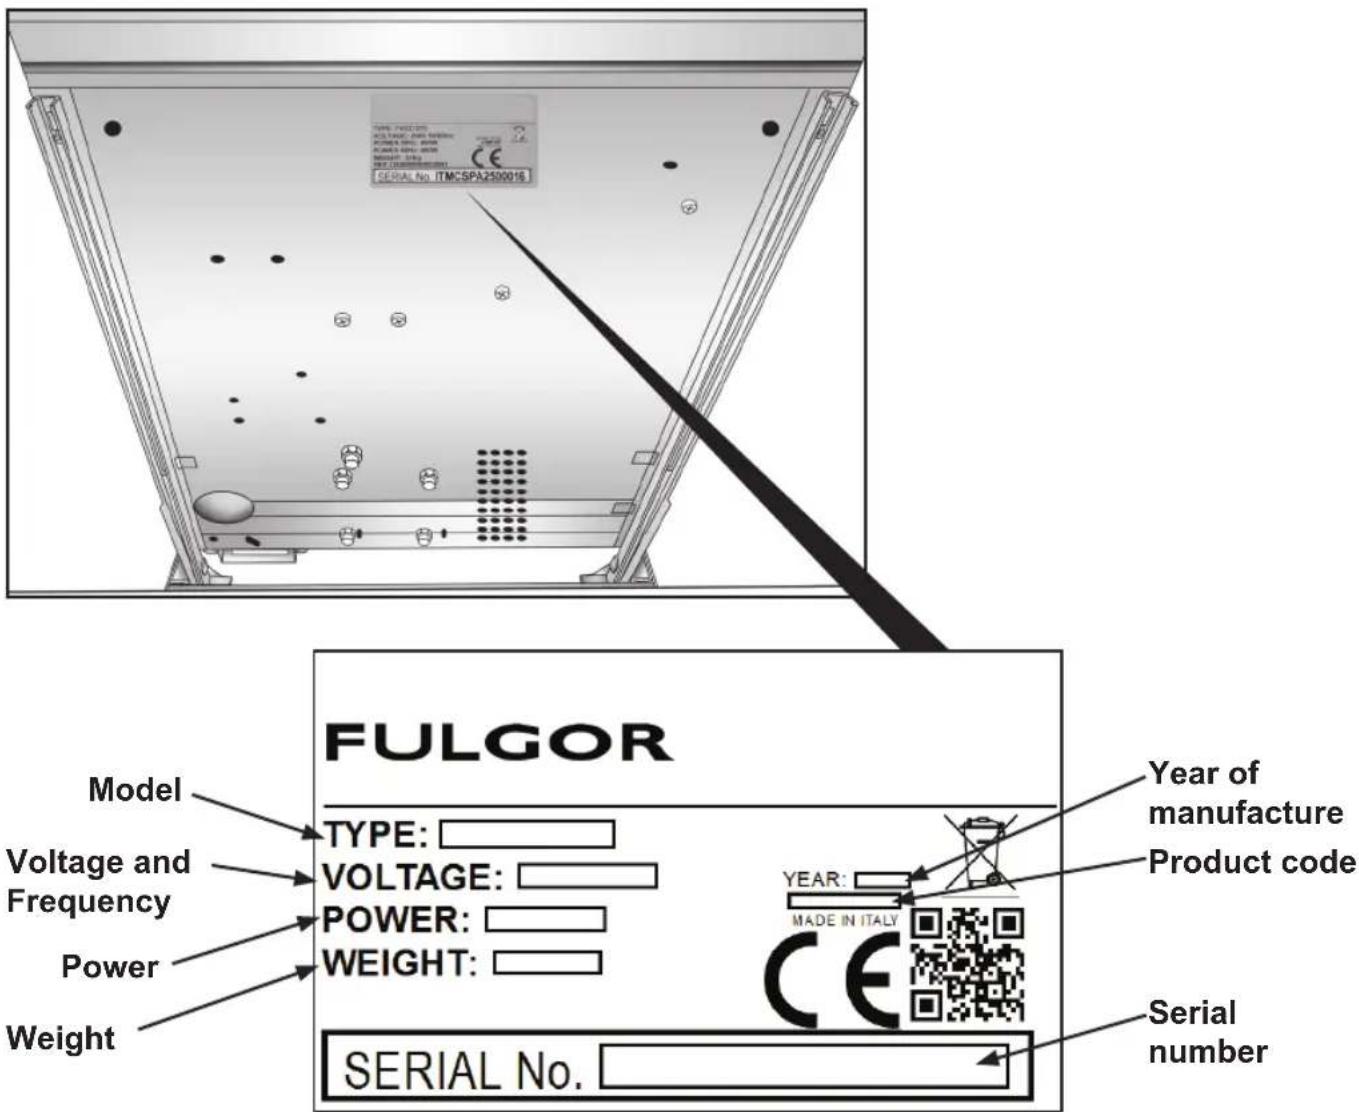

ATTENTION! Do not remove, damage or change the plates applied to the appliance.
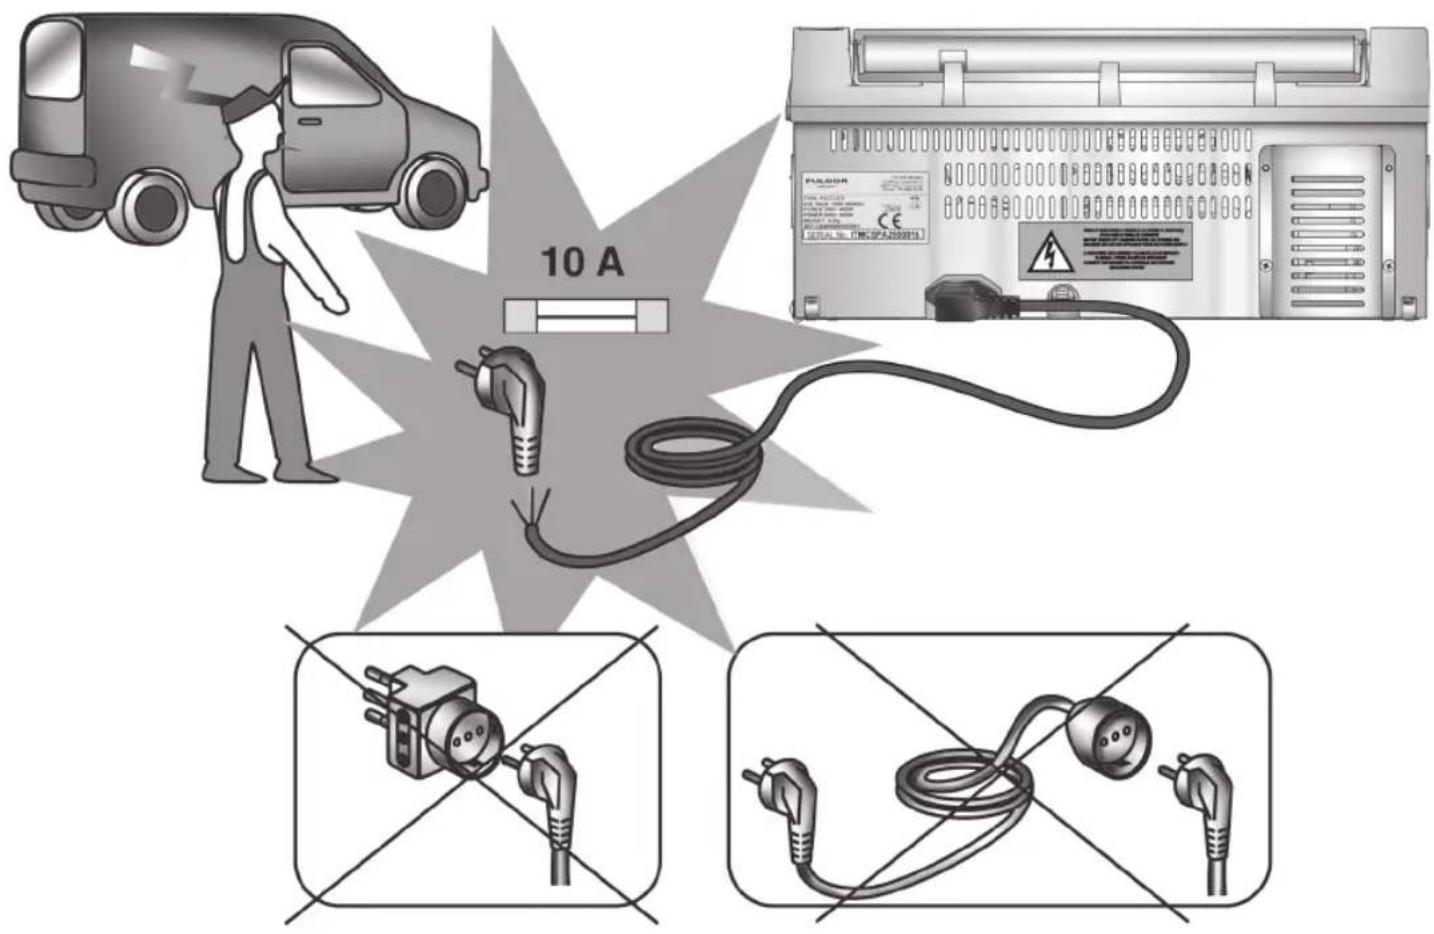
ELECTRIC CONNECTION
- Before installing the appliance, make sure that any pre-existing electric plants are in compliance with the Law and suitable for the plate data of the appliance to be installed (V, kW, Hz, and power available).
- The freestanding appliances are supplied with a power supply cable measuring 200 cm with standard Schuko 16A plug. On the back of the built-in appliancesis provided with a 1.4 m three-pole power cord with the three terminals fitted with ferrules for connection to a plug or to the mains. The socket must have a 10A fuse and must be easily accessible.

ATTENTION!
Make sure that the plug is accessible even after the unit has been installed!
- If the plug for the appliance is not easily accessible, the power supply network must be equipped with devices for the omnipolar disconnection with an opening distance of the contacts that allows complete disconnection in overvoltage category III conditions.

ATTENTION! If the entire length of the cable is not used, DO NOT roll it up but leave it free and make sure that it does not obstruct or endanger the passage of persons. Also make sure that it is not crushed or bent.
ATTENTION! Make sure that the power supply cable does not come into contact with any types of liquid, sharp or hot objects and corrosive substances.
ATTENTION! Do not allow children or animals to play with the power supply cable.
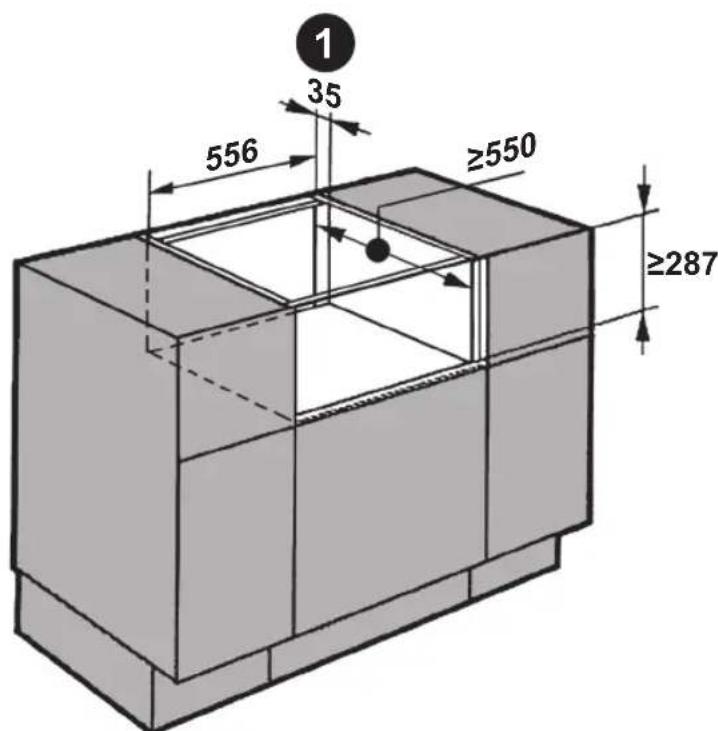
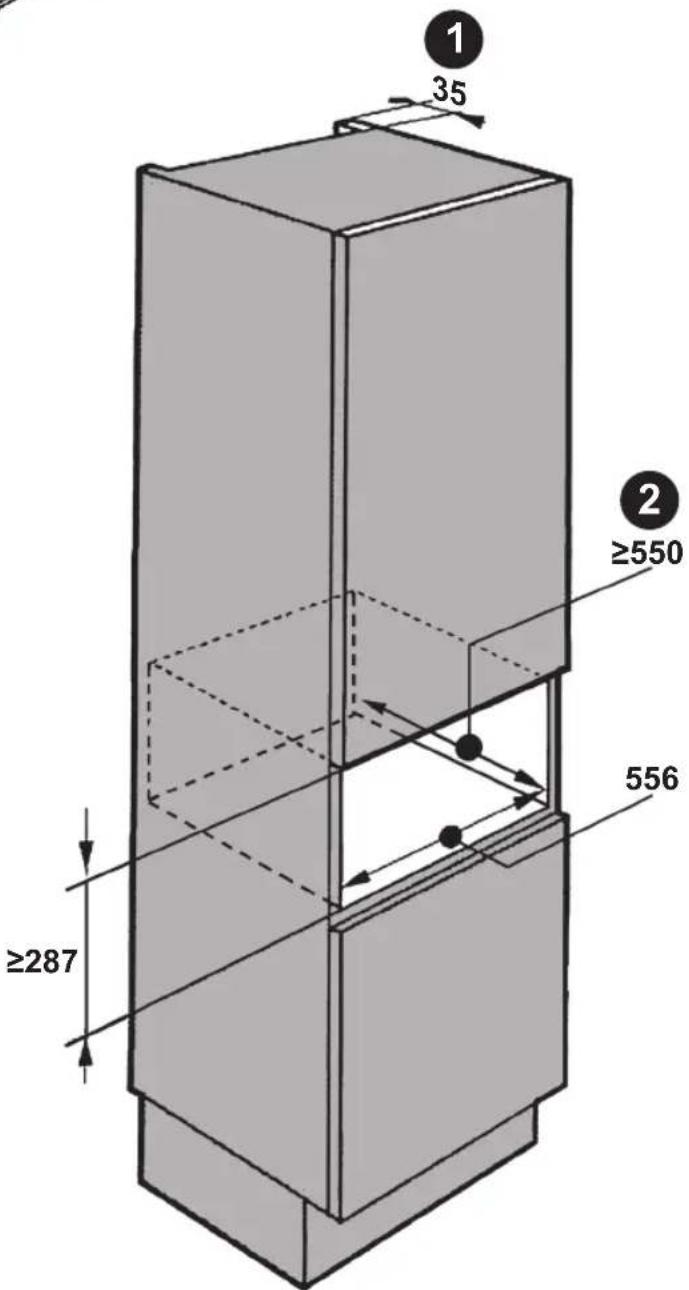
MINIMUM CLEARANCE OF THE INSTALLATION COMPARTMENT AND OPENING FOR VENTILATION
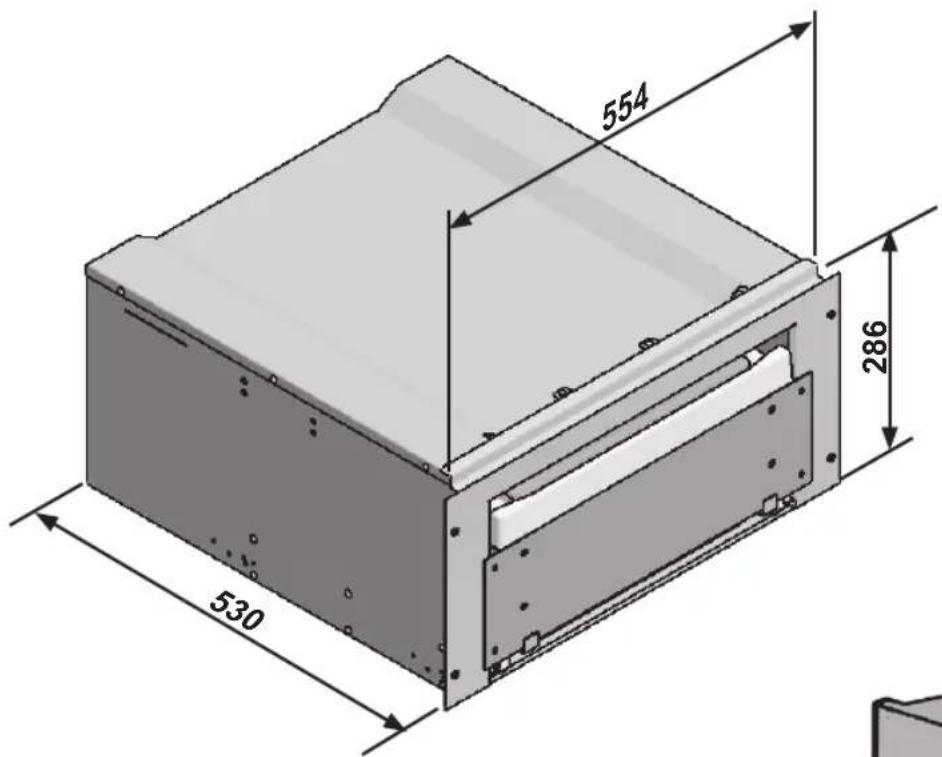
1 Ventilation opening.
2 Recessed measurement including plug for the electrical power supply. Electrical power cord, L = 140cm
FULGOR
1 Insert the anti-rollover brackets into the side slots of the recessed box (Fig. 1).
If necessary, install the feet to lift the recessed box from the unit (Fig. 2).
3 Insert the packaging machine into the unit compartment, resting it on the lower floor (Fig. 3).
Insert the IEC plug into the socket on the back of the box and route the power cord, leading it towards the wall. (Fig. 4).
5 Secure the anti-rollover brackets to the sides of the unit using screws for wood (Fig. 5).
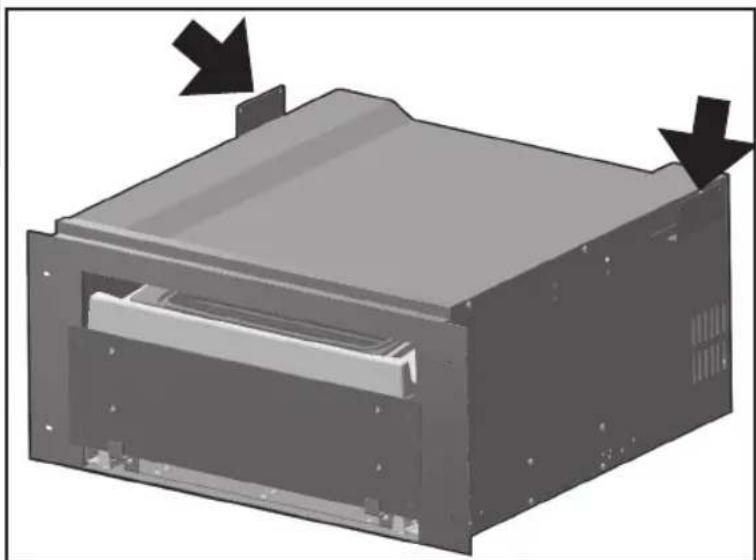
Fig. 1

Fig. 2

Fig. 3
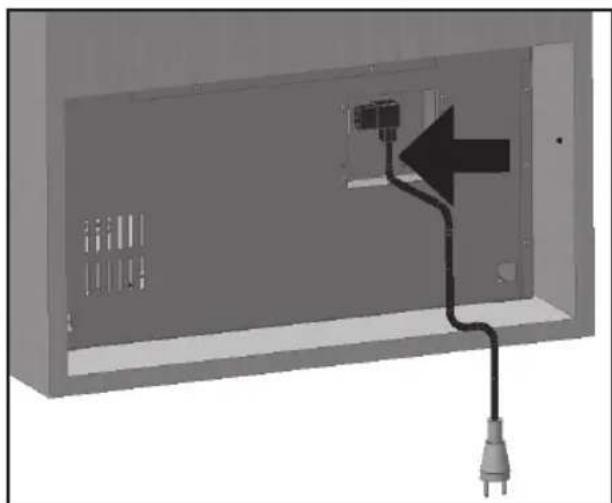
Fig. 4
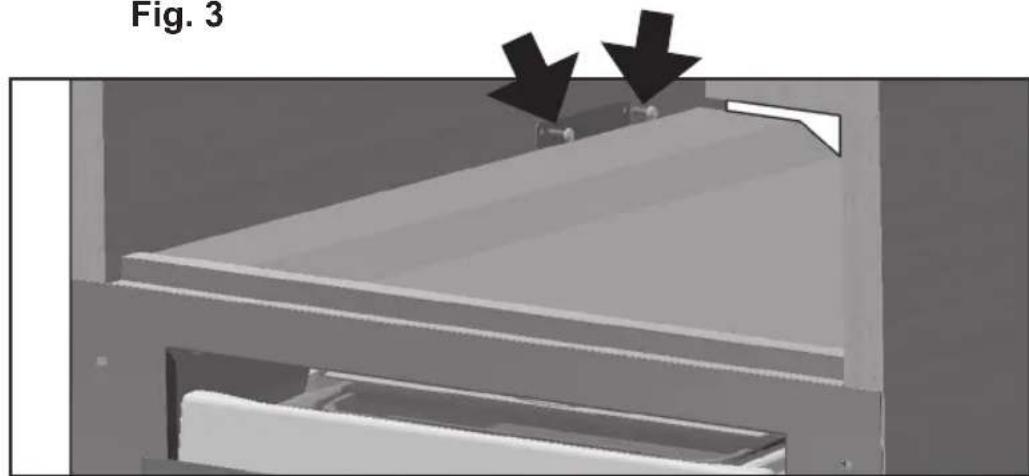
Fig. 5
FULGOR
6 Secure the front of the packaging machine onto the unit using screws for wood, taking care to align the sides (Fig. 6).
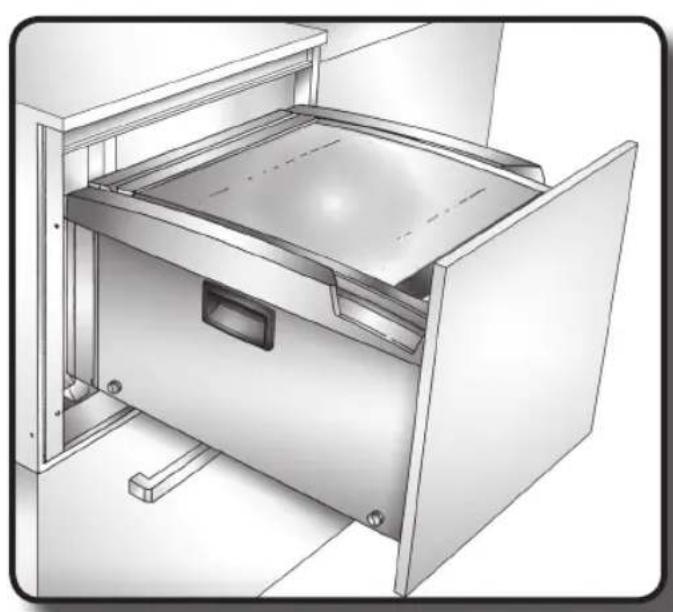
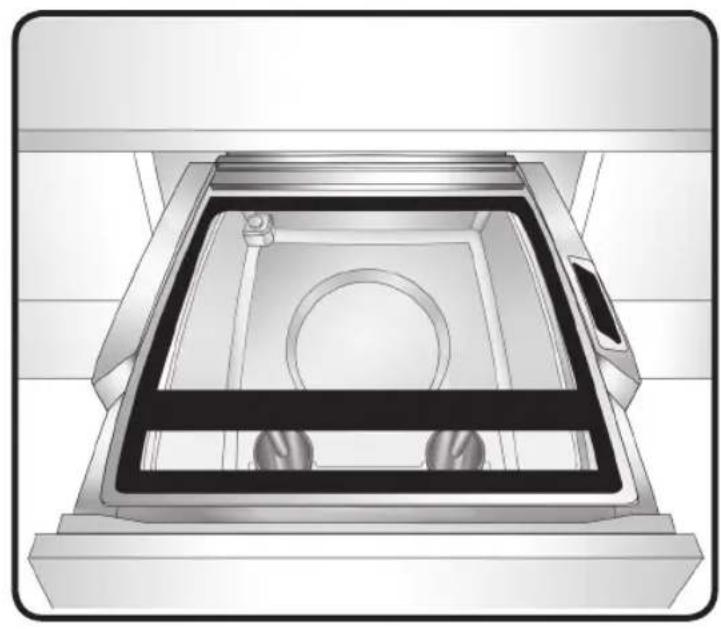
7 Remove the transport retainers (Fig. 7).

Fig. 6
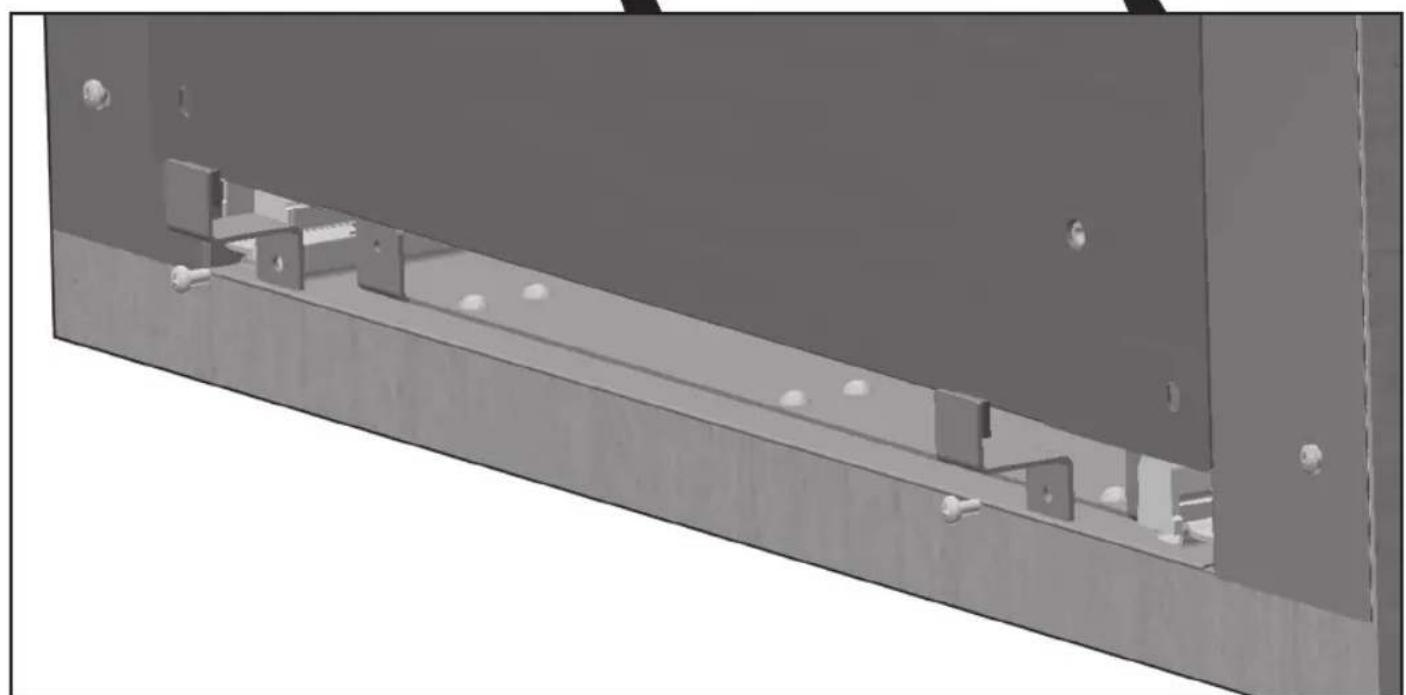
Fig. 7
FULGOR
Remove the film of the adhesive tape from the front panel (Fig. 8), and position the panel of the unit, ensuring correct upper, lower and side alignment (Fig. 9 and 10).
Pull out the drawer and mark the holes on the panel (Fig. 11), then fix with screws for wood (not included). Additional adjustment can be made using the slotted holes on the front panel of the machine (Fig. 12).
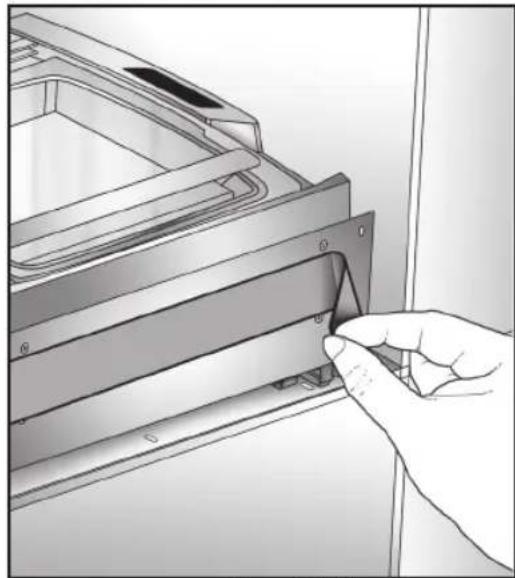
Fig. 8 Fig. 9
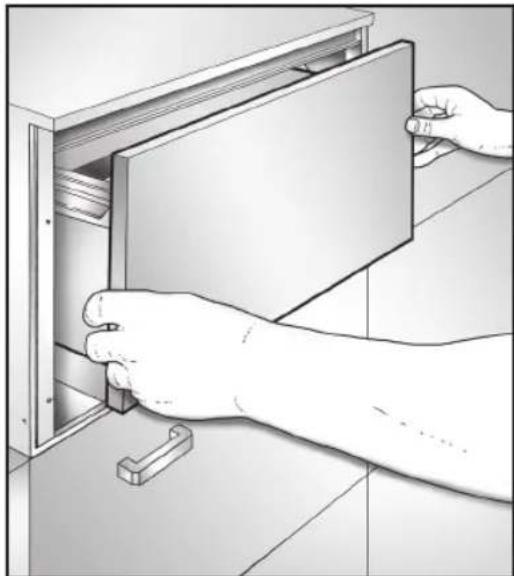
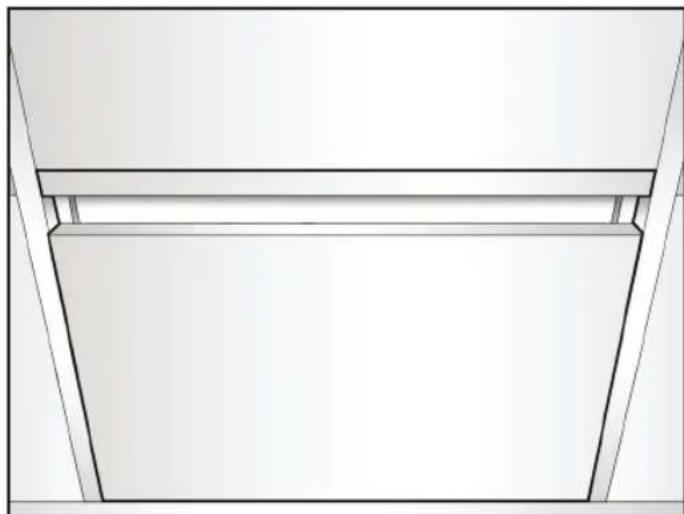
Fig. 10 Fig. 11
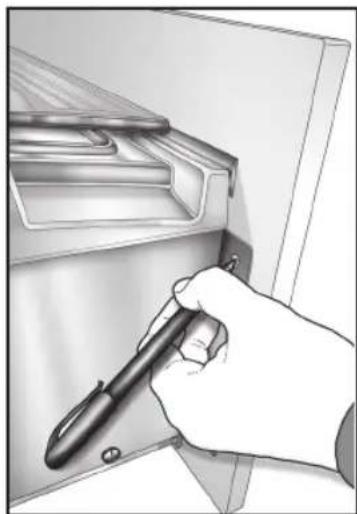
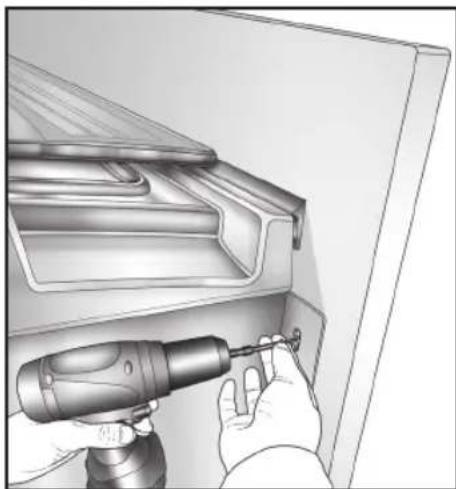

Fig. 12
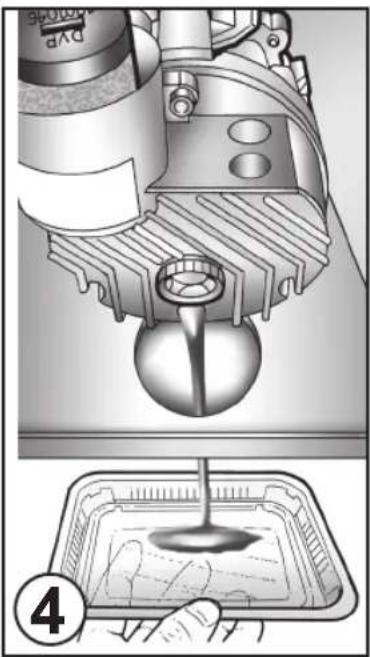
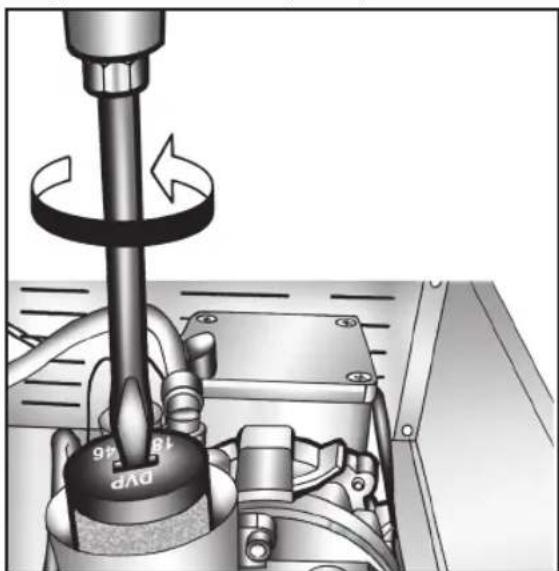
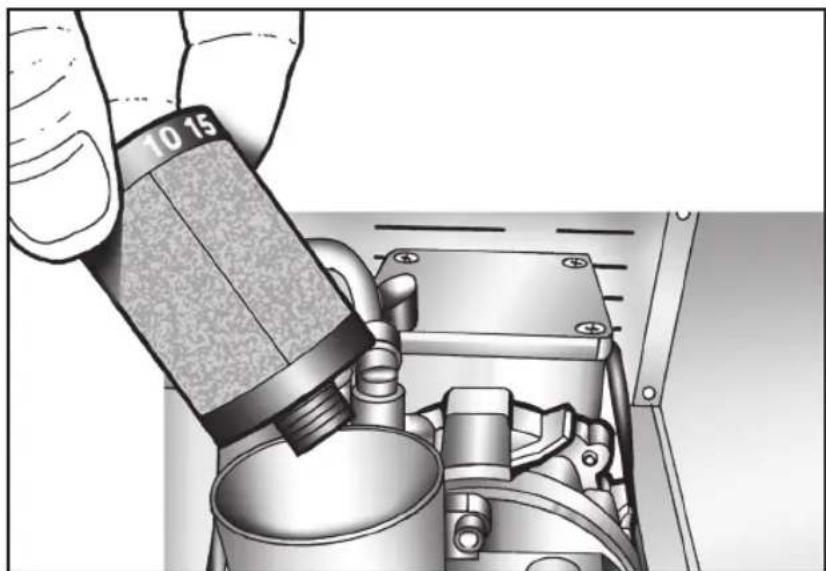
TOPPING UP OF OIL AND PUMP EXHAUST FILTER REPLACEMENT (IN CASE OF OIL SPILL IN TRANSIT)
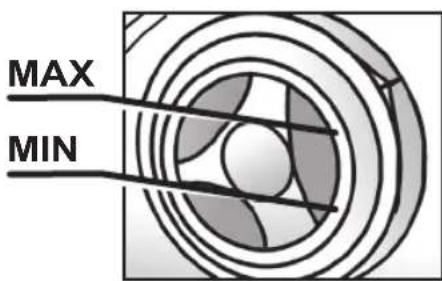
If the appliance has been transported in a non-vertical position (e.g. on its back) or has been overturned during installation, check the oil level in the pump through the inspection window (3) and also check that the exhaust filter is free of oil.
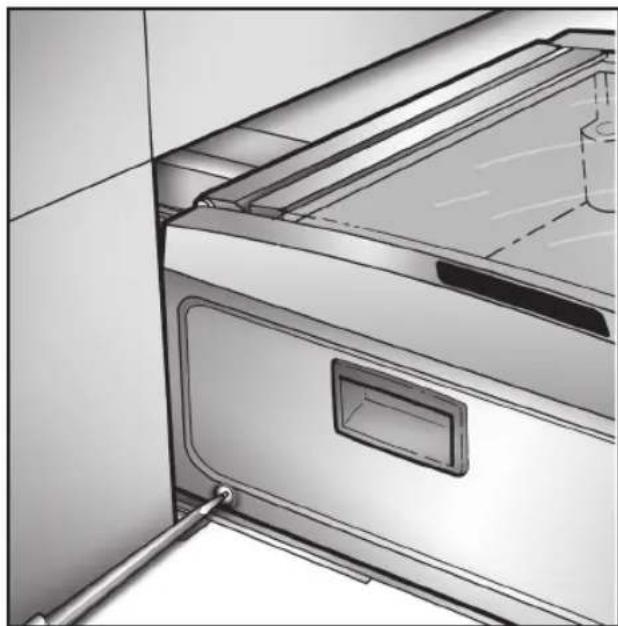
Open the machine by unscrewing the two side screws of the same and overturning the casing by 45^ .
Lock the machine in open position with the special stick (A).
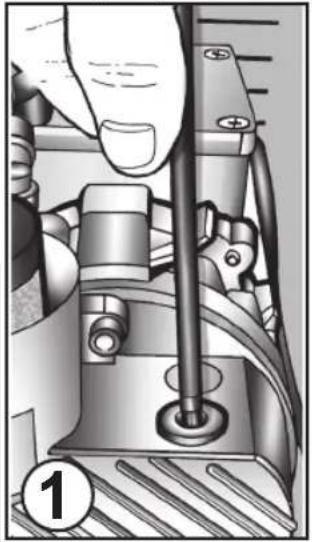
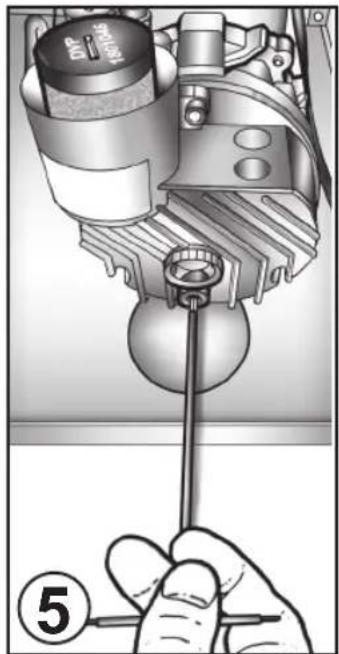
If necessary and top-up the pump using ORV40 oil and replace the exhaust filter following the steps below.
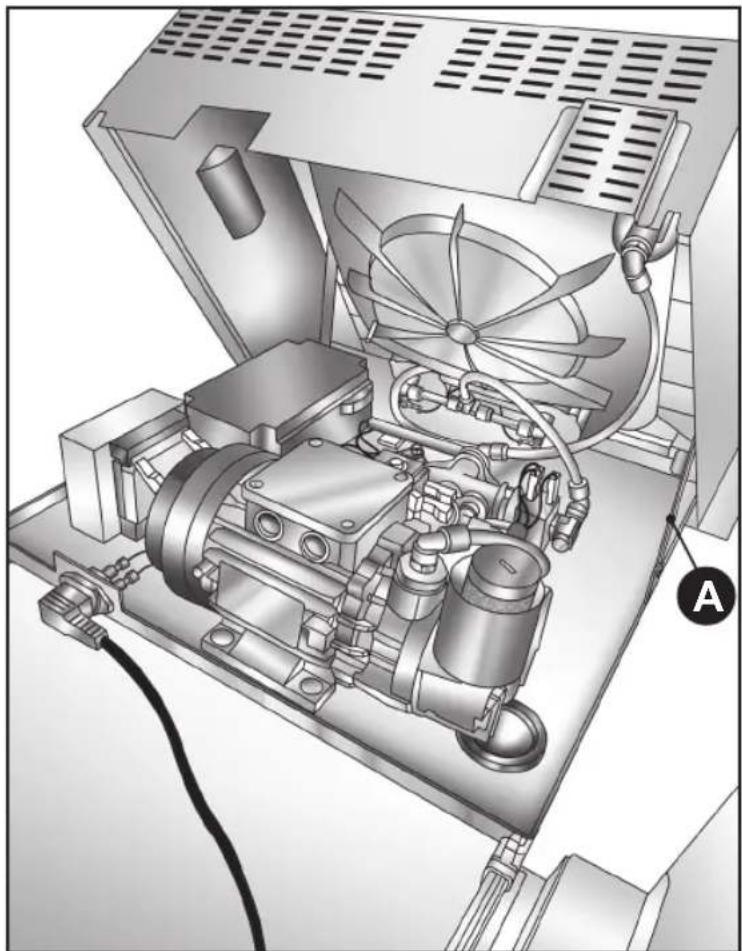

1) Pump.
2) Oil top-up cap.
3) Oil level.
4) Oil drain cap.
5) Oil drain rubber cap.
6) Oil filter.
HS1793
Oil top-up
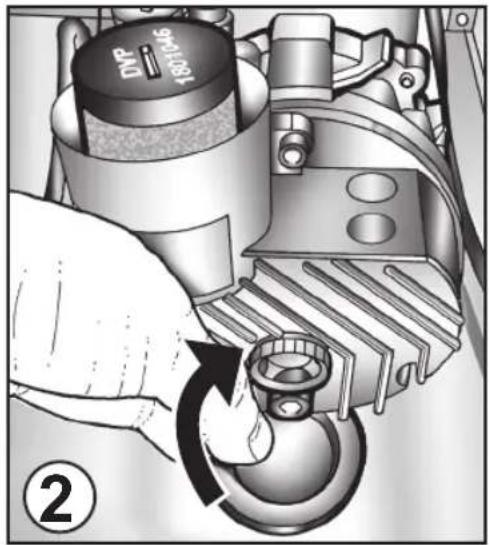
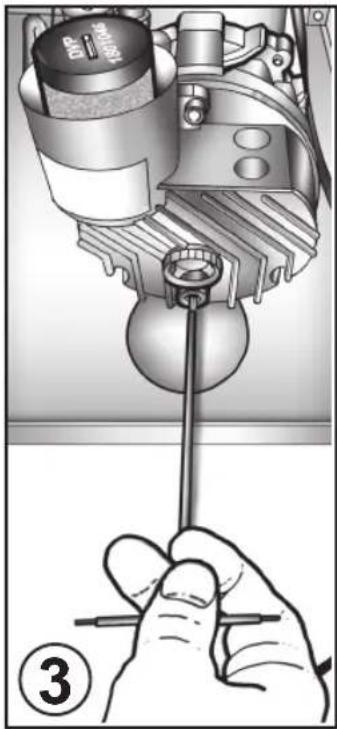
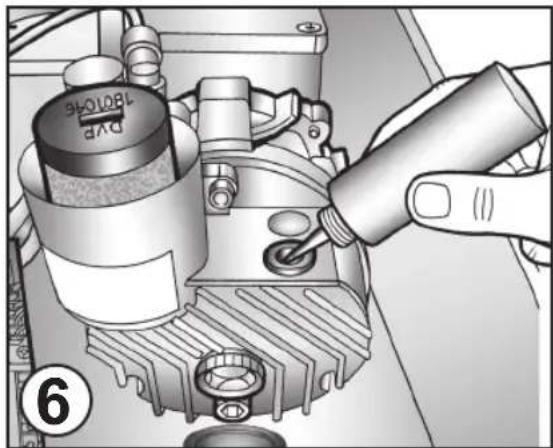
Replacement of pump exhaust filter
Close the container table.
When these checks have been completed:
- Carry out at least one complete vacuum packing functioning cycle for bags.
- Inform the customer regarding the exact use of the appliance with specific reference to use and the requirements of the customer himself.
ENVIRONMENT TEMPERATURE AND FRESH AIR
The air temperature in the functioning environment must not exceed 35^
The performance declared is not guaranteed above this temperature.
SAFETY AND CONTROL SYSTEMS
- Klixon (heat protection pad) mounted on the vacuum pump motor that intervenes in the case of overloads or functioning anomalies.
- Safety system for sealing.
Control pressure in vacuum chamber managed by the circuit board via a pressure sensor.
TECHNICAL DATA
| DATA FVSD 2900 | ||
| Dimensions machine body | Width 444 mm | |
| Depth 457 mm | ||
| Height 202 mm | ||
| Dimensions recessed element | Width 557 mm | |
| Depth 555 mm | ||
| Height 230 mm | ||
| Internal dimensions vacuum chamber | Width 303 mm | |
| Length 293 mm | ||
| Chamber depth (maximum on central funnel) 110 mm | ||
| Installation recessed | ||
| Vacuum chamber volume 7,65 lt | ||
| Useful length sealing bar 260 mm | ||
| Overall dimension vacuum bags 25 × 35 cm | ||
| Weight 25,90 kg | ||
| Material vacuum chamber | High resistance thermoplastic material | |
| Housing material Stainless steel | ||
| Lid material | Hardened glass, thickness 8mm, coated with an anti-crushing 100my safety film | |
| Pump flow 4 m³/h | ||
| Maximum power consumption 50Hz | 350 W | |
| Maximum power consumption 60Hz | 350 W | |
| Final vacuum achievable | 0 - 20 millibar | |
| Command type | Control panel with four capacitive keys | |
| Programs | 4 (Preservation cycle, cooking cycle, short jar cycle, long jar cycle) | |
FRANÇAIS
INDICATIONS POUR LA SÉCURITÉ ET MISES EN GARDE
DYSFUNCTIONNEMENT 136
GUIDERECHERCHE DES PANNES 137
NOTICES UTILES 139
INSTALLATEUR
NORMES D'INSTALLATION 142
MISES EN GARDE POUR L'INSTALLATEUR 142
AVANT-PROPOS 142
TRANSPORT ET MANUTENTION 143
NORMES DE SECURITE ELEMENTAIRES 146
INSTALLATION 146
DONNEES DE LA PLAQUE 146
BRANCHEMENT ELECTRIQUE 148
DIMENSIONS MINIMUMS DU COMPARTIMENT D'INSTALLATION ET OUVERTURE POUR AERATION 149
RAJOUT D'HUILE ET REMPLACEMENT DU FILTRE DESHUILEUR DE LA POMPE (EN CAS DE FUITE D'HUILE PENDANT LE TRANSPORT) 153
TEMPERATURE AMBIANTE ET CHANGESMENT D'AIR 155
SYSTEMES DE SECURITE ET DE CONTROL 155
DONNEES TECHNIQUES 156
FULGOR

FRANÇAIS