DigitRadio Bike 1 - Radio TECHNISAT - Free user manual and instructions
Find the device manual for free DigitRadio Bike 1 TECHNISAT in PDF.

User questions about DigitRadio Bike 1 TECHNISAT
0 question about this device. Answer the ones you know or ask your own.
Ask a new question about this device
Download the instructions for your Radio in PDF format for free! Find your manual DigitRadio Bike 1 - TECHNISAT and take your electronic device back in hand. On this page are published all the documents necessary for the use of your device. DigitRadio Bike 1 by TECHNISAT.
USER MANUAL DigitRadio Bike 1 TECHNISAT
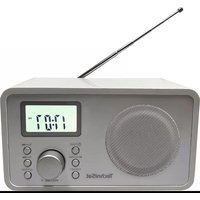
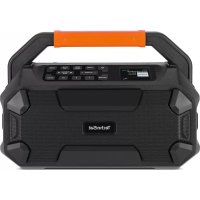
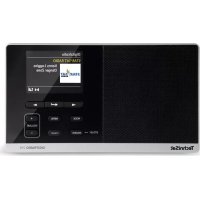
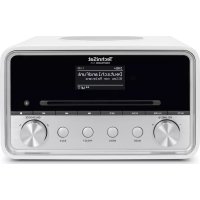
Operating instructions DIGITRADIO Bike 1 DAB+/UKW bike radio with Bluetooth and battery operation2
Power supply connection DC-IN 5 V, 2 A (MicroUSB connection)
Description of the DIGITRADIO Bike 1
Recalling DAB+ stations from a memory location ...........................................35
Storing FM stations in a memory location .......................................................41
Recalling FM stations from a memory location................................................42
Technical data / manufacturer's information
Foreword Dear customers, Thank you for purchasing a TechniSat digital radio. These operating instructions are intended to help you familiarise yourself with the extensive functions of your new device and make optimum use of them. It will help you to use the device safely and as intended. It is intended for any person who installs, operates, cleans or disposes of the device. Keep the operating instructions in a safe place for future reference. You can find a current version of the operating instructions in the download area of your product on the TechniSat website www.technisat.de. We hope you enjoy your TechniSat digital radio! Yours TechniSat Team9
Signs and symbols used in these operating instructions: Indicates a safety instruction which, if disregarded, can lead to serious injuries. can lead to injuries or death. Observe the following signal words: DANGER - Serious injuries with fatal consequences WARNING - Serious injuries, possibly fatal ATTENTION - Injuries Indicates a note that you must observe to avoid device defects, data loss/misuse or unintentional operation. It also describes additional functions for your device. Warning of electrical voltage. Follow all safety instructions to avoid electric shock. Never open the appliance.10 On the device: Indoor use - Appliances with this symbol are only suitable for indoor use. Protection class II - Electrical appliances in protection class II are electrical appliances that have continuous double and/or reinforced insulation and no connection options for a protective conductor. The housing of an insulated electrical appliance of protection class II can partially or completely form the additional or reinforced insulation. Your appliance bears the CE mark and fulfils all required EU standards. Electronic devices do not belong in household waste, but must be disposed of properly in accordance with Directive 2012/19/EU of the European Parliament and Council of 4 July 2012 on waste electrical and electronic equipment (WEEE). At the end of its service life, please dispose of this appliance at the designated public collection points.11
Intended use The DIGITRADIO Bike 1 is designed to receive DAB+/UKW radio programmes. It can be mounted on bicycles using the accessories supplied. The device is designed for private use and is not suitable for commercial purposes.
Safe handling of the product Please observe the following instructions in order t o minimise safety risks, avoid damage to the appliance and contribute to environmental protection. Please read all safety instructions carefully and keep them for future reference. Always follow all warnings and instructions in these operating instructions and on the back of the appliance. WARNING! Never open the appliance! Touching live parts is life-threatening! WARNING! Choking hazard! Do not leave the packaging and its parts to children. Choking hazard due to film and other packaging materials.12 Observe all the following instructions to use the appliance as intended and to prevent appliance defects and personal injury.
Do not repair the appliance yourself. Repairs may only be carried out by trained specialists. Please contact our customer service centres.
The appliance may only be operated in the ambient conditions specified. Do not expose the appliance to heat sources that heat the appliance in addition to normal use.
In the event of a conspicuous appliance defect, odour or smoke development, significant malfunctions or damage to the housing, contact the service department immediately.
The appliance may only be operated with the specified mains voltage and only with the power supply unit supplied. Never attempt to operate the device with a different voltage or a different power supply unit.
As this appliance is disconnected from the mains by unplugging the mains adapter, it is essential that it is easily accessible at all times.13
If the appliance is damaged, it must not be put into operation.
Foreign objects, e.g. needles, coins, etc., must not fall into the interior of the device. Do not touch the connection contacts with metal objects or your fingers. This may result in short circuits.
This appliance is not intended for use by persons (including children) with reduced physical, sensory or mental capabilities, or lack of experience and/or knowledge, unless they have been given supervision or instruction concerning use of the appliance by a person responsible for their safety.
Modifications to the appliance are prohibited.
Only mount the device on the bike using the accessories supplied and check that it is mounted correctly before every ride.
Do not listen to music at too high a volume in road traffic. Observe the applicable traffic regulations.
Do not operate the radio while driving. Risk of falling!
The appliance is suitable for use in temperate climates.14
Legal information Hereby, TechniSat declares that the radio equipment type DIGITRADIO Bike 1 is in compliance with Directive 2014/53/EU. The full text of the EU Declaration of conformity is available at the following Internet address: http://konf.tsat.de/?ID=23127 TechniSat is not liable for product damage due to external influences, wear and tear or improper handling, unauthorised repairs, modifications or accidents. Subject to changes and printing errors. Status 04/22. Reproduction and duplication only with the authorisation of the publisher. The latest version of the manual is available in PDF format in the download area of the TechniSat homepage at www.technisat.com.15 DIGITRADIO Bike 1 and TechniSat are registered trademarks of: TechniSat Digital GmbH TechniPark Julius-Saxler-Straße 3 D-54550 Daun/Eifel www.technisat.com16
Service instructions This product is quality-tested and comes with a statutory warranty period of 24 months from the date of purchase. Please keep the invoice as proof of purchase. With For warranty claims, please contact the dealer of the product. Please note! For questions and information or if there is a problem with this device, please contact our technical hotline: Mon. - Fri. 8:00 - 18:00 under Tel.: 03925/9220 1800. Repair orders can also be ordered directly online at www.technisat.de/reparatur.17 If you need to return the device, please use only the following address: TechniSat Digital GmbH Service Centre Nordstr. 4a 39418 Staßfurt The names of the companies, institutions or brands mentioned are trademarks or registered trademarks of their respective owners.18 4 Description of the DIGITRADIO Bike 1
The scope of delivery Please check that the scope of delivery is complete before commissioning:
DIGITRADIO Bike 1 1x radio holder 1x quick release 1x power supply unit 2x belts 4x screws 1x operating instructions
The special features of the DIGITRADIO Bike 1 The DIGITRADIO Bike 1 consists of a DAB+/UKW receiver with the following functions:
You can store up to 20 DAB+ and 20 FM stations.
The radio receives on the frequencies FM 87.5-108 MHz (analogue) and DAB+ 174.9-239.2 MHz (digital).
Universal mounting options especially for bicycles.
Music playback via a Bluetooth connection.
Preparing the DIGITRADIO Bike 1 for operation
Charge battery Before using the DIGITRADIO Bike 1 for the first time, you should first fully charge the battery. Make sure that the operating voltage of the power supply unit matches the local mains voltage before plugging it into the wall socket. WARNING! Do not touch the mains plug with wet hands, risk of electric shock! ATTENTION! Lay the mains cable so that nobody can trip over it.
Connect the supplied mains adapter to the socket labelled DC-IN (1) on the back of the DIGITRADIO Bike 1. To do this, lift the protective cover of the socket and fold it upwards. Then connect the power supply unit to the mains.20
The charge status is shown on the display by means of a BaGerie symbol if the DIGITRADIO Bike 1 is in standby mode. If the device is in operation and the battery is fully charged, [Fully charged] appears continuously on the display.
Align antenna The number and quality of the stations to be received depends on the reception conditions at the installation site. Excellent reception can be achieved with the aerial.
Fold the antenna out of the holder on the back of the DIGITRADIO Bike 1 and set it upright. The exact alignment of the telescopic antenna is important, especially in the fringe areas of DAB+ reception. On the Internet, for example, you can find "www.dabplus.de" to quickly find the location of the nearest transmitter mast. Start the first scan outdoors in the direction of the transmitter mast. If the weather is poor, DAB+ reception may only be possible to a limited extent.21 Do not touch the aerial while a station is playing. This can lead to impaired reception and audio dropouts. Depending on the mounting position of the DIGITRADIO Bike 1 on the bike, the antenna can also remain folded in. However, reception problems and dropouts in playback may occur more frequently in this case.22 Radio holder Screws Quick release
Mounting the DIGITRADIO Bike 1 on the bike There are several ways to mount the DIGITRADIO Bike 1 on your bike, which are explained below.
Handlebar mounting The DIGITRADIO Bike 1 can be attached to the handlebars of your bike using the radio holder and the quick release. First attach the quick release to the radio holder using the 2 screws supplied. Depending on the diameter of the handlebar tube, you can use the rubber adapter in the quick release.23
Frame assembly If you have already fitted a bottle cage to your bike, you can place the DIGITRADIO Bike 1 in it. Check that the DIGITRADIO Bike 1 is securely fastened before every journey. The DIGITRADIO Bike 1 is designed to be compatible with most bottle cages. However, depending on the type/design of the bottle cage, the DIGITRADIO Bike 1 may sit too loosely. In this case, use the radio holder supplied. Quick release24 Radio holder Scratch protection Strap The supplied radio holder can be attached in various ways:
With the 2 screws supplied (use the holes on the frame of your bike for the bottle cage).
Using the supplied straps at any point on the frame. To do this, first attach the rubber strip under the radio holder to protect the frame from scratches or damage.
A combination of screws and belts, depending on the position. Even if the DIGITRADIO Bike 1 is installed correctly, it is possible, especially when travelling over very rough terrain, that the DIGITRADIO Bike 1 may fall out of the holder. Therefore, if possible, secure it additionally against falling out.2526
Placing the DIGITRADIO Bike 1 in the radio holder
Slide the DIGITRADIO Bike 1 from the left (in the direction of the arrow) into the radio holder (1) until it engages in the end position (2)
To remove it, lift the DIGITRADIO Bike 1 slightly on the left-hand side and pull it out of the holder to the left.27
There is a small nipple (A) on the inside of the radio holder on the left-hand side, which engages in the corresponding hole (B) on the underside of the DIGITRADIO Bike 1. Check that it is correctly seated:
General device functions WARNING! Danger of falling! Do not operate the device while travelling.
Switch on the device
Press the On/Standby button (2) to switch on the DIGITRADIO Bike 1. After switching on for the first time, you must first set the [Language]. To do this, use the ◀ or ▶ buttons to select one of the available languages and confirm your selection by pressing the Select/ Info button. The device then automatically performs a complete search in DAB mode. During the search, the display information shows the progress and the number of digital radio stations found. Once the station search is complete, the first DAB+ programme is played.29
Switch off the device In battery mode:
Pressing the On/Standby button switches the device to power saving mode and the display goes out. The message [Power off] appears briefly on the display. In power supply operation
Press the On/Standby button to switch the device to standby mode. The message [Standby] appears briefly on the display, followed by the time/date and the battery charge status.
The Mode/Menu button (3) can be used to switch between the sources DAB+ (digital radio), FM (FM) and Bluetooth. To do this, briefly press the ok button until the desired source is shown on the display.
Adjust the volume using the Volume + and - buttons (8, 9). The set volume is shown on the display using a bar chart.30 If the volume is turned down completely (mute) in Bluetooth mode, the device switches to standby mode after approx. 15 minutes.
Press and hold the Select/Info button to switch through the displays. You have the option of displaying the following information: In DAB+ mode: [Laufext] (scrolling text with additional information that the broadcasters may provide), [Title], [Artist], [Signal quality], [Programme type], [Ensemble], [Frequency], [Signal error], [Bit rate /Codec], [Batterie], [Time], and [Date]. In FM/UKW mode: [Radio text] (if broadcast), [Programme type] (PTY), [Frequency], [Audio information], [Batterie], [Time], and [Date]. In Bluetooth mode: [Status], [Batterie], [Time], and [Date].32
Menu operation You can access all functions and settings of the DIGITRADIO Bike 1 via the menu. The menu is navigated using the Mode/Menu, Down◀, Up▶ and Select/Info buttons. The menu is divided into submenus and contains different menu items or functions that can be activated depending on the selected source. To open menu, simply press and hold the Mode/Menu button. To switch to submenus, first press the Down◀, Up▶ buttons to display a submenu and then the Select/Info button to call up the submenu. An asterisk (*) marks a currently selected function. Close the menu: Press the Mode/Menu button several times (depending on which submenu you are in) until the current radio programme is displayed again. Settings are only saved by pressing the Select/Info button. If the Mode/Menu button is pressed in the meantime, the settings are not accepted and saved (the Mode/Menu button takes on the function of a "Back" button and the menu is exited). Functions and buttons to be pressed are described in these operating instructions in fat is shown. Display indications in [square brackets].33 Some texts (e.g. menu entries, station information) may be too long to be shown on the display. After a short time, these will then be displayed as a loud text. 6 The DAB+ (digital radio) function
What is DAB+ DAB+ is a digital format that allows you to listen to crystal-clear sound without noise. Unlike conventional analogue radio stations, DAB+ broadcasts several stations on the same frequency. Further information can be found at www.dabplus.de or www.dabplus.ch.
Press the Mode/Menu button briefly until [DAB] appears on the display. When DAB+ is started for the first time, a complete station search is performed. Once the scan is complete, the first station is played in alphanumeric order.34
Carry out a complete search The automatic scan Full scan scans all DAB+ bands III channels and thus finds all stations broadcast in the reception area. Once the search is complete, the first station is played in alphanumeric order.
Open the menu by pressing and holding the Mode/Menu button and then use the Down◀, Up▶ buttons to select the [Complete search] entry. Press the Select/Info button.
The display shows [Search...]. During the search, a progress bar and the number of channels found are displayed.
Press the Down◀, Up▶ buttons to call up the station list and switch between the available stations.35 Depending on the setting under MENU > [Change station], the Select/Info button must then be pressed to play the selected station (option: Change station > List) or the station is played automatically (option: Change station > Channel). The channel list can also be called up via MENU > [Channel list].
Store DAB+ stations in a memory location The programme memory can store up to 20 stations in the DAB+ range.
First select the desired channel (see point 6.2.2).
To store this station in a memory location, press and hold the Preset button during playback until [Favourite memory] appears in the display. Then use the Down◀, Up▶ buttons to select a favourite memory (1...20). Press the Select/Info button to save.
Repeat this procedure to save additional transmitters.36
Recalling DAB+ stations from a memory location
To recall a station that you have previously stored in the FAV memory, briefly press the Preset button and use the Down◀, Up▶ buttons to select a station preset (1...20). Press the Select/Info button to play the station. If no station is stored in the selected programme position, [(empty)] appears in the display.
Overwriting/deleting a programme position memory
Simply save a new channel to a favourite memory location as described. All memory locations are deleted when the factory settings are called up.
Press and hold the Select/Info button several times until the signal strength bar is displayed.
The signal strength is shown on the display using a bar chart. The marker shows the minimum signal strength.37 Transmitters whose signal strength is below the required minimum signal strength are not transmitting a sufficient signal. If necessary, realign the aerial or change the location.
Set manually This menu item is used to check the reception channels and can be used to align the aerial. Furthermore, transmitters can be added manually.
Open the menu and use the Down◀, Up▶ buttons to select the [Manual setting] entry and press the Select/Info button.
Use the Down◀, Up▶ and Select/Info buttons to select a channel (5A to 13F). The signal strength is now shown on the display. If a DAB+ station is received on a channel, the ensemble name of the station is displayed. The antenna can now be aligned for maximum signal strength. Transmitters whose signal strength is below the required minimum signal strength are not transmitting a sufficient signal. If necessary, realign the aerial or change the location.