. Les fonctions suivantes sont disponibles :
-Rap.preselection : Tous les favors mémorisés.
- Mémorisation : Cette option permet d'affector un emplacement mémoire à la station actuelle (favoris).
- Régl. Recherche : « Toutes stations » ou « Stations fortes »
- Réglage audio : « Sté reproduction » ou « Mono ».
Utilisez l'option « Mono » dans les environnement dans lesquels la réception est mauvaise.
Les autres menus sont décrits au chapitre 4.
8. Audio BLUETOOTH
La fonction BLUETOOTH permit la transmission sans fil des fichiers de musique (Streaming audio) à la radio. Des smartphones, tablettes ou apparils similaires peuvent être appariés à la radio. Appuyez sur la touche < /FUNC> de la radio jusqu'à ce que l'écran affiche « BLUETOOTH »
8.1 Etablir une connexion
L'écran affiche « Déconnecté » et le symbole BLUETOOTH jaune clignote.
- Lancez la recherche d'appareils depuis votre apparéil mobile. Sélectionnez « CR-M30DAB » dans la liste des apparéils et apparçez les deux apparéils comme d'habitude.
L'ecran affiche « Connecté » et un message vocal retentit.
Vouss pouvez alors diffuser les contenus souhaites depuis votre apparéil mobile.
Voussouspoucezcommanderles fonctionsde lecture de baseaussideplusla radio.
- Touche: Fonction Lecture / Pause
- Touches ou : Titre suivant ou précédent
8.1 Déconnexion
Seul un apparéil peut être relié à la radio par BLUETOOTH. Si vous souhaïez connecter un autre apparéil, vous doivent déconnecter l' apparéil connecté actuellement. À cet effet, procédez comme suit :
Annulez I'apparriage depuis votre apparéil mobile.
- Les apparils se déconnectent aussi lorsque vous les déplacez hors de la portée BLUETOOTH.
Si vous coupez la radio, elle se reconnecte automatiq. à l'appareil BLUETOOTH dés que vous le rallumez, sous réserve que cet apparéil se trouve à proximité, est allumé et que sa fonction BLUETOOTH est activée.
9. Utilisation d'un casque audio
Pour utiliser la radio CR-M30DAB avec un casque audio, vous devez désir un modele du commerce équipé d'une fiche Jack de 3,5 mm. Si la station radio émet un signal stéreo, la lecture est transmise en stéreo au casque.
Attention!
L'écoute régulière de musique à un volume élevé peut occasionally des lésions auditives.
Diminuez le volume avant d'entamer la diffusion de musique depuis la radio.
10. Élimination des défaillances
Remarques concernant la recherche de défaillances
| Problème Solution | |
| Sans fonction | • Le bloc d'alimentation à fiches est-il correctement branché?
• L'accu est-il entièrement chargeé? |
| Absence de son | • Le volume est-il régle au minimum?
• Augmentez évientuèlement le volume depuis l'appareil de lecture.
• La réception de la station souhaïée est-elle correcte? |
| La radio ne réagit pas à l'actionnement des touches | • Débranchez le bloc d'alimentation à fiches et/ou attendez que l'accu se soit décharge. Rebranchez ensuite le bloc d'alimentation à fiches |
| Problèmes lors de la réception radio | • Réorientez l'antenne
• Trouvez un endroit adapté pour l'installation
• D'autres appar兼s électroniques perturbent la réception.
• Le lieu d'installation n'est pas ajusté à la réception de signaux DAB+. |
11. Maintenance et entretien
Nettoyage du boîtier : Utilisez un chiffon légèrement humecté avec un détergent doux. N'utilisez pas de détergents contenant de l'alcool, de l'ammoniac ou d'abrasifs.
La condensation (rosée) peut se former à l'intérieur de l'appareil si la différence entre la température de l'appareil et la température ambiente est trop importante. Si la condensation se forme à l'intérieur de l'appareil, elle peut nuire à son bon fonctionnement. Dans ce cas, il convient d'attendre quelques heures. Une fois l'humidité disparue, l'appareil peut de nouveau être utilisé.
Des précautions particulières sont à prendre dans les cas suivants :
Si l'appareil est déplaced d'un endroit à un autre dont la température est considérablement plus élevé ou BASSE, si I'humiidity ambiente augmente sur le lieu d'installation de I'appareil, etc.
13. Caractéristiques techniques - CR-M30DAB
| Adaptateur secteur USB |
| Fabricant de l'adaptateur secteur USB GUIJIN Technology Co. Ltd. | Building 3 of Songxin Industry Park, Songgang, Baoan, Shenzhen, China 518105
République POPULAIRE DE CHINE |
| Marque et identifient du modele de l'adaptateur secteur USB GJT | AK06WG-0500100VW |
| Tension d'entrée Tension alternative 100 - 240 V | |
| Fréquence de courant alternatif d'entrée 50/60 Hz | |
| Tension / intensité / puissance de sortie Tension continue 5,0 V/ 1,0 A / 5,0 W | |
| Type de fiche USB-C | |
| Efficiency moyenne en service 73,62 % | |
| Puissance absorbée en charge à vide 0,1 Watt | |
| Accu |
| Type Lithium-ions | |
| Tension / Capacité / Énergie disponible 3,7 V / 2000 mAh / 7,4 Wh | |
| Durée de service / durée de charge max. 7 heures / env. 4 heures | |
| N° UN UN3481 Accu lithium-ions intégré à l'équipement | |
| BLUETOOTH |
| Version BLUETOOTH / Classe de performances V5.0 / Classe 2 | |
| Puissance émettrice maximal < 20 dBm | |
| Portée Env. 10 m (peut varier en fonction de l'environnement) | |
| Plage de fréquences | 2,402 GHz – 2,480 GHz |
| Profil BLUETOOTH | A2DP (Advanced Audio Distribution Profile, AVRCP (Audio/Video Remote Control Profile) |
| Antenne UKW/DAB+ |
| Gamage d'accord DAB LANDE III | 174,928 MHz – 239,200 MHz |
| Gamage d'accord FM | 87,50 MHz – 108,00 MHz |
| Port pour casque audio | Douille de jack 3,5 mm |
| Amplificateur |
| Puissance de sortie | 1,5 W RMS / 3,2 W de puissance de sortie maximale |
| Dimensions et poids |
| Radio (I x h x p) 160 x 56 x 96 mm 0,32 kg | |
| Plage de température | 0°C à 40°C |
14. Garantie
Cher client,
Nous vous remercions d'avoir opté pour ce produit Kenwood. Si ce produit avait prisenter des defaults de pieces ou de main d'oeuvre sous des conditions d'utilisation normales, nous les éliminerons gratuitem et remplacerons l'appareil à nos frais, conformément à nos conditions de garantie.
Veuillez conserver soigneusement la presente carte de garantie.
Kenwood accorde sur cet apparéil une garantie de deux ans à partir de la date d'achat indiqués sur la facture ou le justificatif d'achat du revendeur Kenwood.
Cette garantie s'etend aux defaults de pieces et main d'oeuvre. Nous nous réservons le droit de remplacer le produit si sa réparation n'est plus appropriée sur le plan économique. Les coûts d'emballage et d'in installation, ainsi que les coûts et risques liés à la réparation elle-même ne sont pas inclus dans la prestation de garantie et seront facturés.
Conditions
A. Pour faire valeur un droit de garantie, les données suivantes sont nécessaire en plus de la presentation de la presente carte de garantie :
(a) Vos noms et adresse complets
(b) Le ticket de caisse ou la facture d'un détaillant domicilié dans un état membre de l'Union Européenne, sur lesquels figuent la date d'achat d'origine.
(c) Les noms et adresse complets du détaillant auprès duquel le produit a été acheté.
(d) Le numero de série et la désignation du modele du produit.
Kenwood se reserve le droit de refuser la prestation de garantie sir les informations indiquées ci-dessus ne sont pas disponibles ou si le produit a ete modifie depuis son acquisition initiale.
B. À a date de la livraison au commercant, le présente produit satisfait à toutes les normes et disposition de sécurité applicables dans le pays de destination. Les modifications nécessaires à l'utilisation de l'appareil dans les pays en dehors du pays de destination sont exclues des dispositions de garantie susnommées. De plus, nous déclinons toute responsabilité pour les interventions réalisées dans ce contexte, ni pour les déteriorations du produit occasionnées par de telles interventions.
Si le produit est utilisé dans un pays pour lequel il n'est ni conscience, ni fabriqué, nos interventions de garantie ne sont réalisées que si les coûts pour la transformation de l'appareil en fonction des normes et dispositions de sécurité nationales applicables sont prises en charge par l'utilisateur.
Si de plus, le produit est différent des produits commercialisés par l'importateur officiel et si certaines pieces détachées n'était pas disponibles pour la réparation du produit, l'utilisateur doit prendre en charge les frais pour les transports aller et retard de l'appareil vers et depuis le pays d'acquisition.
Cela s'applique également si dans le pays concerné, les prestations de garantie ne peuvent pas etre proposées pour d'autres raisons.
C. Sont exceptés des prestations de garantie :
(a) Les modifications du produit ainsi que les opérations de maintenance et de réglage normales, y compris les contrôleurs réguliers indiqués dans la notice d'emploi.
(b) Les dommages sur le produit occasionnés par des opérations défectueuses ou non-conformes, si ces opérations ont été réalisées par des tiers qui n'ont pas été habilités pour la réalisation de prestations de garantie au nom du fabricant.
(c) Les dommages occasionnés par de la négligence, des accidents, des modifications, un montage non-conforme, un emballage insuffisant, des erreurs d'utilisation ou l'usage de pieces détaches erronées lors d'une réparation.
(d) Les dommages liés au feu, les dégats des eaux, la foudre, les tremblements de terre, une ventilation insuffisante, des cas de force maière. le raccordement à une tension de secteur erronée ou d'autres causes non imputables à Kenwood.
(e) La dépréciation des haut-parleurs par un fonctionnement à des puissances supérieures à celles indiquées. Les dépréciations de disques, bandes sonores, cassettes audio et video, disques compacts CD et autres objets qui ne font pas partie du produit.
(f) Les consommables et pieces d'usure à remplaner dans le cadre du service clients normal, par ex.: les systèmes de prise
de sons, les aiguilles de tourne-disques, les courroies d'entrainment, les têtes de lecture audio, les inserts, les meubles audio, les batteries sèches, les accus rechargeables, les canules de puissance, etc.
(g) Tous les produits dont le ou les numeros de série ont ete retires entiereont ou en partie, modifiés ou rendus illisibles.
Cette garantie peut etre exercée par toute personne ayant acquis le produit en toute legalite.
Conformément aux dispositions de garantie sus-nommées, le produit est réparé ou remplace gratuitem. Ce droit ne nuit enaucn casauxautresdroitsde l'utilisation dansle cadre desdispositions juridiquesapplicable.
La réparation ou le emplacement ne donnent pas lieu à une prolongation de la durée de garantie.
Les droits complémentaires sont exclus, notamment ceux relatifs à la rédhibition, la réduction du prix ou les dommages-intérêts.
Coordonnées :
JVCKENWOOD EUROPE B.V. Succursale France
7 Allee des Barbanniers,
92632 Gennevilliers CEDEX
Tel. 09-69-390-811 www.kenwood-electronics.fr
KENWOOD
C E
KENWOOD
Radio compatta DAB+
CR-M30DAB
MANUALE DIISTRUZIONI
JVCKENWOOD Corporation
Indice
Contenuo Pagina
- Prima della messa in servizio / Istruzioni di sicurezza
- Informazioni sulla batteria 5
- Dichiarazione di conformità 6
- Messa in servizio 7
- Funzionamento della radio 9
- Uso della radio DAB+ 12
- Uso della radio FM 13
- Audio BLUETOOTH 14
- Uso di cuffie 15
- Eliminazione errori 15
- Cura e manutenzione 15
- Smaltimento 16
- Dati tecnici 17
14.Garanzia 18
3
1. Prima della messa in servizio
IMPORTANT ISTRUZIONI DI SICUREZZA
Attenzione: Leggere attendamente questa pagina per garantire un funzionamento sicuro dell'unità.
Leggere attendamente queste istruzioni!
- Seguire tutte le istruzioni di sicurezza e d'uso durante l'utilizzo di quello prodotto.
Conservare le note in un luogo sicuro!
- Conservare le istruzioni di sicurezza e d'uso per future consultagioni.
Osservare tutte leindicazioni di avventenza!
Seguire scrupolosamente tutte le avvertenze riportate sul prodotto e nelle istruzioni per l'uso.
Pulire solo con un panno asciutto!
- Prima di pulire il prodotto, scollegare tutti i cavi dall'apparecchio. Non utilizzato mai detergenti liquidi o spray di pulizia. Per la pulizia utilizzato solo un panno leggermente umido.
Accessori
- Utilizzare solo gli accessori specificati dal produttore.
Non usare quello prodotto vicino all'acqua
- Non esporre mai l'apparecchio a gocce o spruzzi d'acqua - ad esempio in prossimità di una vasca da bagno, lavabo, lavandino, lavello, lavatrice, cantina umida, piscina, ecc. Non collocare mai contentitori pieni di liquidi, come vasi di fiori, sull'apparecchio o direttamente accanto adesso.
Ventilazione
- Le fissure e le aperture all'interno dell'involucro sono previste per la ventilazione dell'apparecchio per garantire un funzionamento affidabile dell'apparecchio, per proteggerlo dal surriscaldamento e dall'eventuale autoaccensione. Non bloccare le aperture di ventilazione. Installare l'apparecchio secondo le istruzioni del produttore. Non bloccare mai le aperture di ventilazione collocando l'apparecchio su un letto, un divano, una moquette o una superficie morbida simile. Questa unità non deve essere installata in una libreria o in un armadio a meno che non vi sia un'adeguata ventilazione.
Alimentazione della tensione
- Questa unità più essere collegata alla tensione di rete solo utilizzando l'alimentatore USB-C in dotazione. Utilizzato l'alimentatore di rete solo per la radio compatta CR-M30DAB. In agli caso, assicurarsi che la tensione di rete locale corrisponda alle specifiche dell'alimentatore. Se non siete sicuri del tipo di alimentazione elettrica della vostra casa, contattate il vostro rivenditore o l'azienda elettrica locale.
Alimentatore di rete
- Assicurarsi che l'alimentatore a spina non sia danneggiato meccanicamente e che non sia possibile inciampare nel cavo. Il cavo non deve essere schiacciato o attorcigliato in nessun caso, nemmeno all'uscita dell'alimentatore.
Intemperie
- Scollegare l'apparecchio alla rete elettrica durante i temporali e quando non verrà utilizzato per un lungo periodo di tempo.
Sovraccarico
- Non sovraccaricare mai le prese di alimentazione, le prolonghe o le prese multiple, in quanto sussiste il rischio di incendio o scossa elettrica.
Penetrazione di materiale estraneo e liquido
- Non lasciare mai che materiali estranei o liquidi penetrino nell'unità o nell'adattatore CAattraverso le aperture, per evitare il contatto con componenti ad alta tensione o un cortocircuito, con seguenti incendi o scosse elettriche. Non versare mai liquidi di alcun tipo su questa unità o sull'alimentatore a spina.
Manutenzione
- Non tentare mai di riparare l'apparecchio da soli, poiché le aperture o la rimozione delle copertura possono esporre parti sotto tensione che potrebbero essere pericolose al contatto. Per tutti gli interventi di manutenzione rivolgersi a personale qualificato.
Danni che richiedono una riparazione
- I lavori di manutenzione e riparazione devono essere eseguite esclusivamente da un centro di assistenza clienti qualificato.
L'assistenza è necessaria quando l'apparecchio è stato danneggiato (ad esempio, adattatore di alimentazione), è stato versato del liquido, sono caduti oggetti all'interno dell'apparecchio, oppure l'apparecchio è stato esposto a pioggia o umilità, non funzione normalmente o è caduto.
Ricambi
- Se sono necessarie parti di ricambio, assicurarsi che l'addetto dell'assistenza tecnia usi i ricambi prescritti dal costruttore o aventi le stesse caratteristiche dei pezzi di ricambio originali. Ricambi non autorizzati possono causare incendi, scosse elettriche o altri incidenti.
Controllo di sicurezza
- Al termine dei lavori di manutenzione o riparazione di questo apparecchio, chiedere al tecnico dell'assistenza di eseguire un controllo di sicurezza per determinare se l'apparecchio è in perfette condizioni.
Calore
Non installare l'unità in prossimità di superfici calde come radiatori, termoventilatori, stufe o altre apparecchiature (compresi gli amplificatori) che potrebbero surriscaldarsi. Non collocare mai oggetti con fiamme libero, come candele o lanterne, sopra o vicino al prodotto. Non esporre le batterie installate a calore eccessivo, come luce solare diretta, fuoco o simili.
Rischi associati a volumi elevati
Per evitare possibili danni all'udito, non ascoltare ad alto volume per lunghi periodi di tempo.
Funzione automatica di risparmio energetico
L'unità è dotata di una funzione di risparmio energetico automatico. Se non è stato ricevuto alcun segnale audio o non è stata eseguita alcuna operazione, l'unità passa in modalità standby entro 15 minuti.
La batteriaagliioni di litio contiene sostenze inflammabili come ad es. solvente organico. Se maneggiata male, la batteria puo scoppiare e prendere fuoco o rilasciare calore estremo, degradare le prestazioni o sviluppare altri danni. Si prega di prestare particolare attenzione a queste istruzioni, quale trattamento è vietato.
Pericolo di incendio
- Proteggere l'unità con la batteria agli ioni di litio installata in modo permanente da danni meccanici.
- Candele e altre fiamme libero devono essere tenute sempre lontane da quello prodotto per evitare che l'apparecchio prenda fuoco.
- Proteggere l'unità dal calore: C'é un rischio di incendio. Se si colloca l'unità su uno scaffale, mantenere una distanza di almeno 10 cm dai tutti i lati.
Pericolo dovuto alla batteria integrata
- Non utilizzato l'unità in caso di danni visibili all'involucro o al cavo di ricarica USB. Le riparazioni dell'apparecchio possono essere effettuate solo dal servizio clienti autorizzato.
- Non esporre l'unità alla luce diretta del sole o al calore. La temperatura ambiente non deve scendere al di sotto di +5^ e non deve superare i +35^ . In un'automobile, la temperatura può significativamente superiore a 35^ .
- Caricare la batteria solo con l'alimentatore USB in dotazione.
- Quando la batteria ha raggiunto la fine della sua vita utile, il disposativo con la batteria integrata deve essere smaltito correttamente. Non tentare di rimuovere o sostuire la batteria.
Non riutilizzare o smontare la batteria.
- Se la soluzione elettrolitica fuorises alla batteria, evitare il contatto con gli occhi, le mucose e la pelle. Sciacquare immediatamente le zone colpite con abbondante acqua pulita e rivolgersi a un medico. La soluzione elettrolitica può causare irritazioni.
- La batteria non deve essere messa in cortocircuito. La batteria potrebbe surriscaldarsi ed esplodere.
- L'apparecchio non deve essere gettato nel fuoco. La batteria potrebbe esplodere.
- Non è consentito apportare modifiche al disposativo.
Prudenza!
Pericolo di esplosione se la batteria viene sostituita con una di tipo non corretto;
- a temperature extremamente alto o bajo a cui una batteria può essere esposta durante l'uso, lo stoccaggio o il trasporto;
- a bassa pressione dell'aria ad alta quota;
- quando si sostituisce una batteria di tipo non corretto che può bypassare un fusabile (ad esempio, alcuni tipi di batterie al litio);
- quando si smaltisce una batteria nel fuoco o in unorno caldo, o quando si schiaccia o taglia meccanically una batteria;
- quando di lascia la batteria in un ambiente con temperature extremamente elevate o con una pressione dell'aria extremamente Bassa, che potrebbe causare un'esplosiono o la fuoriuscita di liquidi o gas infiammabili.
JVCKENWOOD Europe B.V. dichiara che l'apparecchiatura radio tipo [KENWOOD] CR-M20DAB è conforme alla Direttiva 2014/53/UE. Il testo integrale della dichiarazione di conformità UE è disponibile al seguente indirizzo Internet: https://www.kenwood.com/euukdoc/
Produttore:
JVCKENWOOD Corporation
3-12. Moriya-cho, Kanagawa-ku, Yokohama-shi, Kanagawa 221-0022, JAPAN
Indirizzo di contatto UE:
JVCKENWOOD Europe B.V.
Amsterdamseweg 37, 1422 AC Uithoorn, THE NETHERLANDS
4. Messa in servizio
4.1 Sconfezionamento
Sconfezionare delicatamente il dispositivo e assicurarsi che tutti gli accessori siano presenti:
- Alimentatore USB-C
- Manuale di istruzioni
4.2 Controli e collegamenti
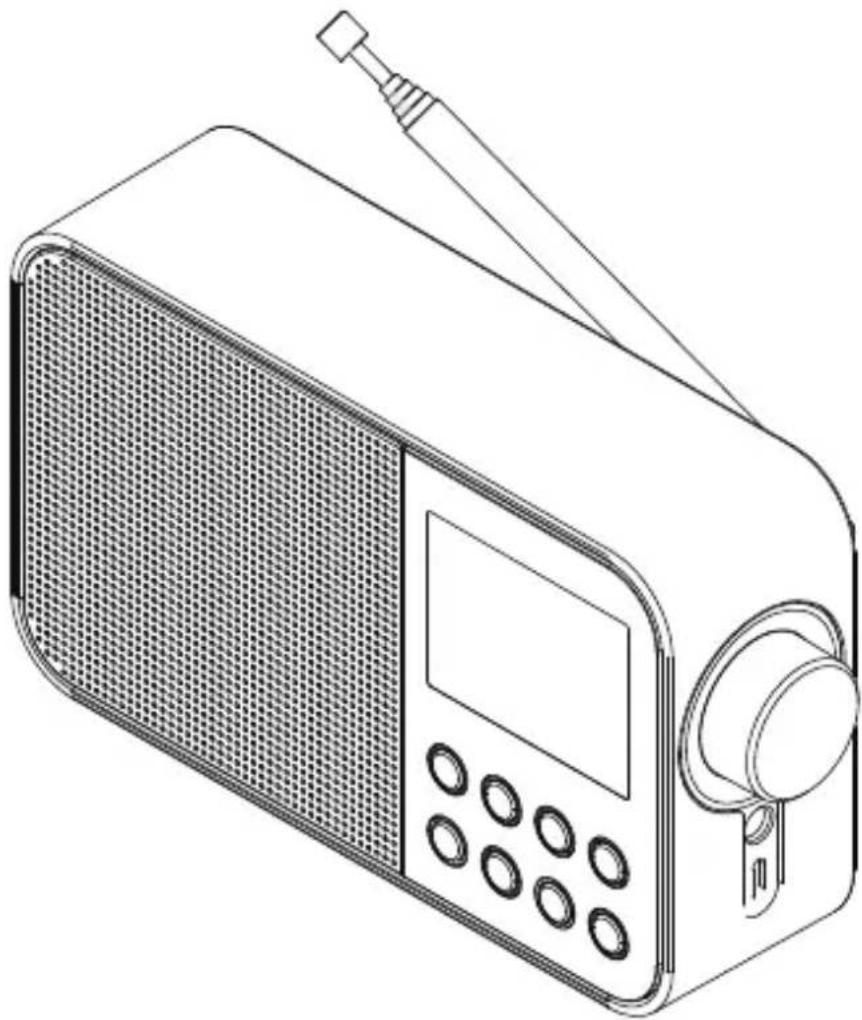
1 - Antenna telescopica
2 - Display LCD
3 - FUNC. Tasto
4 - Tasto MENU/INFO
5 - Tasto PRESET
6 - Tasto ENTER/SCAN
7 - Tasto [Tune +]
8 - Tasto [Tune -]
9 - Tasto P2
10 - Tasto P1
11 - Volume/Scroll
12 - Presa per cuffie
13 - LED di controllo della carica
14 - Alimentatore con ingresso USB-C
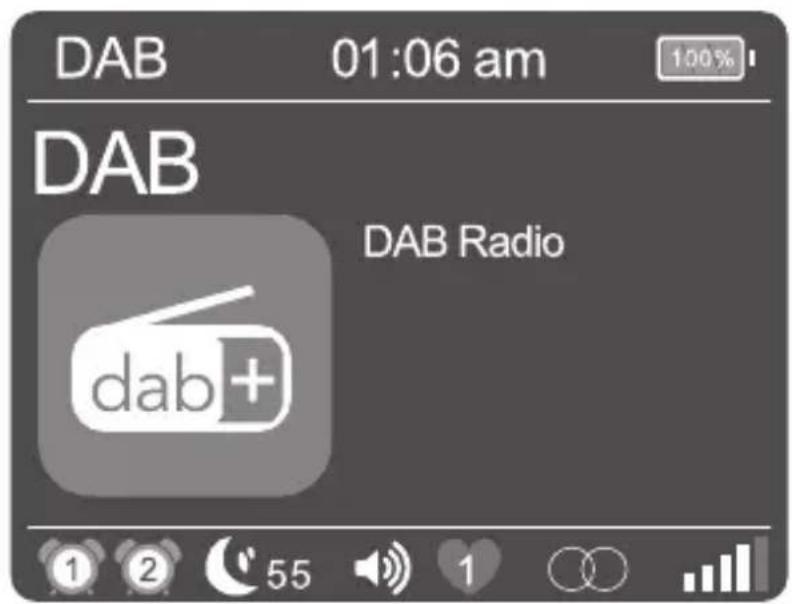
| 1 | Display per la sveglia 1 |
| 2 | Display per la sveglia 2 |
| 55 | Tempo residuo del timer di spegnimento |
| Volume |
| 1 | Preselezione selezionata 1-20 |
| Display per la ricezione stereo |
| R·D·S | Display per il segnale RDS |
| Potenza di ricezione |
| Display BLUETOOTH |
| Indicatore del livello di carica della batteria |
4.4 Caricare la batteria
Per evitare di danneggiare la batteria integrata, al momento dell'acquistoessa è carica solo a metà. Caricare completamente la batteria prima di utilizzato la radio per la primaolta.
A tal fine, collegare il cavo "CC IN" con l'adattatore di rete USB in dotazione e collegarlo a una presa di corrente disponibile accessibile.
Durante la ricarica, un LED sopra il connettore si illumina di rosso. Non appena la batteria è completenesse carica, la spia si spegne. Il tempo di ricarica normale a batteria scarica è di circa 4-6 ore. É possibile utilizzato la radio durante la ricarica, ma quello aumento è il tempo di ricarica.
- A seconda delle condizioni ambientali, del volume, ecc. la durata della riproduzione è di circa 5-7 ore (al 50% del volume).
- Per mantenere la piena capacité della batteria il più a lungo possibile, è necessario caricarla completeness anni 2 o 3 mesi,anche se non si utilizza la radio.
- Caricare la batteria in un range di temperatura compreso tra 0e + 40^ .
- La batteria mantiene la carica al meglio a temperatura ambiente.
- Più bassa è la temperatura ambiente, più breve è il tempo di riproduzione.
- La batteria deve essere ricaricata quando sul display compare il simbolo di batteria scarica.
Attenzione: La funzione di allarme non è disponibile in modalità batteria.
5.6 Impostazione della data e dell'ora
Quando si riceve il segnale di una stazione DAB+ o FM di qualità sufficiente, l'ora viene impostata automaticamente. A seconda dell'intensità di riscizione, quello processo cui richiedere del tempo. Se non è disponibile una stazione corrispondente, è possibile impostare l'oraanche manualmente:
- Accendere la radio e richiamare il menu con il tasto
- Con i tasti < TUNE + / - > o il controllo del volume selezionare il menu "Ora" e successivement confermare.
- "Impost. ora/data" per selezionare e confermare l'opzione visualizzata. Quindi selezionare, impostare e confermare il giorno, il mese, l'anno, le ore e i minuti.
Si possono selezionare le seguenti funzioni nel menu "Ora":
"Imposta oraSYSTEMA": Impostazione del formato dell'ora.
Possibilità di scelta: "24 ore" / "12 ore
"Impost.formato data: Impostazione del formato della data.
Possibilità di scelta: "gg-mm-aaaa" / "mm-gg-aaaa / aaaa-mm-gg"
"Stile orologio": Impostazione del design dell'orologio in modalità standby.
Possibilità di scelta: "Analogico" / "Digitale"
"Aggiorn. automatico": Impostazione per la regolazione automatica dell'ora.
Possibilità di scelta: "Nessun aggiorn." / "Aggiornamento alla radio"
5.7 Impostazione dell'illuminazione del display
L'illuminazione del display può essere programmata in 3 livelli di luminosità. Nel menu è possible effettuire le seguenti impostazioni di "Retroilluminaz."
"Timeout": Tempo che intercorre fino allo spegnimento della retroilluminazione del display.
Possibilità di scelta: "Sempre acceso / 10 sec. / 20 sec. / 30 sec. / 45 sec. / 60 sec. / 90 sec. / 120 sec. / 180 sec."
In modalità "Sempre acceso" la retroilluminazione non è spenta. Questo riduce la durata della batteria.
"Livello": Luminosità del display quando la radio è accesa.
Possibilità di scelta: "Basso" / "Medio" / "Alto"
Per effettuare l'impostazione procedere come segue:
- Accendere la radio e richiamare il menu con il tasto
- Selezionare con o il controllo del volume per selezionare il menu "Retroilluminaz." e poi premere .
- Con i tasti < TUNE + / - > o il controlo del volume per selezionare il menu "Timeout" o "Livello e poi premere per confermare.
5.8 Impostazione del timer di spegnimento
Il timer di spegnimento viene utilizzato per spegnere automaticamente la radio dopo un periodo di tempo prestabilitito. Per effettuire l'impostazione procedere come segue:
- Accendere la radio e richiamare il menu con il tasto
-
Selezionare con o il controllo del volume per selezionare il menu "Sleep" e poi premere .
-
Scegliere una delle seguenti opzioni nel menu seguente: "Off / 15 min / 30 min / 45 min / 60 min / 1 ora e 15 min / 1 ora e 30 min / 1 ora e 45 min / 2 ore". Confermare l'impostazione desiderata con il tasting .
- Sul display appeare il symbolo del timer di spegnimento con il tempo rimanente sono allo spegnimento della radio.
Se si desidera disattivare il timer di spegnimento, selezionare l'impostazione dell'ora "OFF".
5.9 Impostazione della sveglia
Si noti che la funzione "Svegli" è disponibile solo quando l'unità di rete è collegata. La funzione di allarme non può essere utilizzata in modalità batteria.
Con il CR-M30DAB è possibile impostare 2 diversi tempi della sveglia. Questi tempi di risveglio sono essere programmati per i seguenti blocchi di tempo: "Una volta" / "Ogni giorno" / "Fine settimana" / "Giorni lavorativo".
Per effettuare l'impostazione della sveglia, procedere come segue:
- Accendere la radio e richiamare il menu con il tasto
- Con i tasti < TUNE + / - > o il controlo del volume per aprire il menu "Sveglie selezionare e confirmare.
- "Sveglia 1"iene visualizzato. è ora possibile impostare l'ora della sveglia 1 o impostarla con i tasti o il controllo del volume per passare alla sveglia 2 ("Sveglia 2").
- Dopo aver confirmato con il eseguire i seguenti passaggi:
- Impostazione della sveglia "On" o "Disattivato" (Selezionare con o il controllo del volume, continuare con il tasto ).
- Impostazione di ore e minuti (selezionare i numero con o il controllo del volume, continuare con il tasto ).
- Impostazione della sorgente "FM", "DAB" o "Cicalino" con o il controlledo del volume continuare con il tasto .
- Impostazione "Ripetere": "Una volta" / "Ogni giorno" / "Fine settimana" / "Giorni lavorativo" selezionare con o il controllo del volume, continuare con .
- Volume di accensione sotto "Volume" selezionare con o il controllo del volume, continuare con .
L'ora della sveglia è ora salvata e si può uscire dal menu. Sul display appare il symbolo della sveglia correspondente.
Per l'impostazione della 2^ sveglia procedere allo stesso modo per regolare l'ora. Per cancellare un allarme impostato, selezionare "Alarm Disattivato" nell'ultima fase dell'impostazione.
La sveglia si accende all'ora specificata. Se si desidera interrompere il segnale di allarme, premere più volte un taste qualsiasi, se necessario, per attivare la funzione snooze con i seguenti intervalli:
5 - 10 - 15 - 30 minuti.
Premere il tasto < / FUNC> per disattivare il segnale di allarme.
5.10 Regolazione del suono (equalizzatore)
La radio dispone di sette impostazioni audio preimpostate:
"Classica" / "Pop" / "Jazz" / "Rock" / "Flat" / "Film" / "Notizie"
Questi possono essere selezionati nel menu "EQ" menu.
5.11 Impostazione di fabbrica
Nel menu "Ripristino di default" è possibile ripristinare le impostazioni di fabbrica della radio. A tal fine, selezionare "Si" e la radio si riavvia. A "No" viene richiamato il livello di menu precedente.
6. Uso della radio DAB+
Premere il tasting < /FUNC> sulla radio finché il display non visualizza "DAB".
6.1 Impostazione delle stazioni DAB+
La ricerca delle stazioni era più stata effettuata quando l'apparecchio è statoMESSO in funzione. Le emissenti trovate sono memorizzate in ordine alfabetico nell'elenco delle stazioni.
Riavvio della ricerca automatica delle stazioni:
- Richiamate il menu con il tasting
- Selezionare "Ricerca"e avviare la ricerca con la tasting .
- Durante la ricerca, il display在哪 il numero di stazioni trovate finora.
- Se durante la ricerca non viene trovata nessuna stazione, il display visualizza "Non spettacolo!". Controllare il corretto orientamento dell'antenna o cercare un'altra posizione per il disposativo per ottenere una ricezione miglior. Quindi richiamare il menu "Ricerca".
- La ricerca si avviaanche tenendo premuto il tasto.
Impostazione manuale dell'emittente:
- Richiamate il menu con il tasto
- Selezionare con o il controllo del volume per selezionare il menu "Sinton. Manuale" e poi premere . Il canale attualmente impostato viene visualizzato sul display con la frequenza corrispondente.
- Utilizzare i tasti o il controllo del volume, per selezionare manualmente un altro canale.
- Premere il tasting < ENTER/SCAN> per confermare la selezione. Successivement, il livello del segnale viene visualizzato sul display; un'altra pressione del tasting carica l'insieme selezionato.
Selezione di una stazione DAB+
Le stazioni memorizzate in ordine alfabetico nell'élenco delle stazioni posso sono essere selezionate come segue:
- Premere i tasti < TUNE + / -> oppure utilizzato il controllo del volume per scorrere in avanti o indietro l'elenco delle stazioni.
- Una volta selezionato il canale desiderato, premere il tasto per avviare la riproduzione.
- Se il livello di ricezione della stazione selezionata non è sufficiente per una riproduzione priva di interferenze, il display visualizza "Nessun segnale!". Quindi selezionare un'altra stazione.
6.2 Memorizzazione delle stazioni nella memoria delle stazioni (preferiti)
Per facilitare la ricerca a un stazione DAB sono disponibili 40 posizioni di memoria. Con i tasti di selezione diretta è possibile selezionare 2 positizioni di memoria.
1. Memorizzazione sui tasti di selezione diretta 1 & 2:
- Selezionare una stazione da memorizzare
- Premere e tenere premuto il tasting numerico corrispondente fino a quando "Impostato con successo" appeare sul display.
- Le stazioni memorizzate possono essere richiamate premendo breveamente i tasti "One Touch".
2. Assegnazione delle posizioni di memoria 3 - 40:
- Selezionare una stazione da memorizzare
- Premere il tasting < PRESET> Fino a quando "Memor.preselez." appeare sul display.
- Selezionare con i tasti o il controllo del volume per selezionare una posizione di memoria.
-
Premere il tasto per completeness il salvataggio. Il display visualizza "Impostato con successo".
-
Le stazioni memorizzate sono essere ripristinate premendo il tasting e sono selezionate con il tasting o il controllo del volume e caricate con .
Tenere premuto il tasto <MENU/INFO per accedere al menu relativo alla sorgente. Con i tasti o il controllo del volume è possibile scorrere fra il menu. Le voci di menu vengono selezionate con i tasti . Sono disponibili le seguenti funzioni:
- Listastazioni: Tuttle le stazioni trovate in ordine alfabetico.
Richiama presel.: Tutte le stazioni preferite salvate.
- Memor.preselez.: Qui è possible salvare la stazione corrente in una posizione di memoria (Preferiti).
Ricerca ...: Ricerca automatica delle stazioni.
Sinton. Manuale: Ciò consente di impostare manualmente un canale di ricezione specifico.
- Elimina: Consente di eliminare le stazioni non valide dall'elenco delle stazioni. Selezionare con il tasto , "No/Si" con i tasti o il controllo del volume e poi premere per confermare.
Gli altrini menu sono descritti nel capitolo 4.
7. Uso della radio FM
Premere il tastingo < /FUNC> finché il display non visualizza "FM".
7.1 Impostazione di un stazione FM
- Premere il tasto per augmentare la frequenza di riscezione.
- Premere il tasto per ridurre la frequenza di ricezione.
- Quando si preme il tasto<TUNE + o si avvia una stazione: Avviare ricerca automatica delle stazioni, che si farma alla stazione successiva trovata.
- Quando si preme il tasto , inizia la ricerca automatica delle stazioni. Tutte le stazioni trovate vengono memorizzate nella memoria delle stazioni.
Funzioni RDS
Premendo ripeturamente il tasting < MENU/ INFO> si possono richiamare le seguenti informazioni:
PTY ( Tipo di programma) / Testo radio RDS / Freqenza / Tempo / Data
In caso di condizioni di ricezione insufficienti, la riscione di queste informazioni potrebbe essere disturbata o non possibile.
7.2 Memorizzazione delle stazioni nella memoria delle stazioni
Per facilitare la ricerca a un stazione FM sono disponibili 40 posizioni di memoria. Con i tasti di selezione diretta è possibile selezionare 2 positizioni di memoria.
1. Memorizzazione sui tasti di selezione diretta 1 & 2:
2. Assegnazione delle posizioni di memoria 3 - 40:
Tenere premuto il tasto