
MultipleBridge EIV9467 - Cooker AEG - Free user manual and instructions
Find the device manual for free MultipleBridge EIV9467 AEG in PDF.
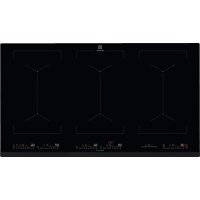



| Product Type | Built-in Induction Hob |
| Brand | AEG |
| Model | MultipleBridge EIV9467 |
| Number of Cooking Zones | 6 induction zones |
| Table Dimensions (W x D x H) | Approx. 122 x 52 x 5 cm |
| Net Weight | Approx. 15 kg |
| Power Supply | 230 V / 50-60 Hz, 11.0 kW |
| Heating Technology | Induction with automatic pan recognition |
| Bridge Function | Allows coupling two zones for large cookware |
| PowerBoost | Power increase on each zone (up to 3200 W) for 10 minutes |
| PowerSlide | Temperature adjustment by moving pan on the flexible zone |
| Hob²Hood | Wireless connection with compatible hood for automatic ventilation control |
| Pause | Pauses cooking by reducing all zones to level 1 |
| Timers | Countdown timer and CountUp Timer (up to 99 minutes) |
| Child Safety | Control panel lock and child safety device |
| Residual Heat Indicators | Indicator lights for each zone |
| Automatic Safety Shut-off | Automatic deactivation after inactivity or overheating |
| Power Management | Intelligent power distribution to avoid circuit overload |
| Cleaning | Ceramic glass surface: specific cleaner and scraper for stubborn residues |
| Repairability | Spare parts available through AEG after-sales service |
| Country of Manufacture | Germany |
Frequently Asked Questions - MultipleBridge EIV9467 AEG
User questions about MultipleBridge EIV9467 AEG
0 question about this device. Answer the ones you know or ask your own.
Ask a new question about this device
Download the instructions for your Cooker in PDF format for free! Find your manual MultipleBridge EIV9467 - AEG and take your electronic device back in hand. On this page are published all the documents necessary for the use of your device. MultipleBridge EIV9467 by AEG.
USER MANUAL MultipleBridge EIV9467 AEG
How to install your Electronux Induction Hob - Worktop installation
4. APPLIANCE DESCRIPTION
WE'RE THINKING OF YOU
Thank you for purchasing an Electrolux appliance. You've chosen a product that brings with it decades of professional experience and innovation. Ingenious and stylish, it has been designed with you in mind. So whenever you use it, you can be safe in the knowledge that you'll get great results every time.
Welcome to Electrolux.
Visit our website to:

Get usage advice, brochures, trouble shooter, service and repair information: www.electrolux.com/support

Register your product for better service: www.registerelectrolux.com

Buy Accessories, Consumables and Original spare parts for your appliance: www.electrolux.com/shop
CUSTOMER CARE AND SERVICE
Always use original spare parts.
When contacting our Authorised Service Centre, ensure that you have the following data available: Model, PNC, Serial Number.
The information can be found on the rating plate.
Warning / Caution-Safety information i General information and tips Environmental information
Subject to change without notice.
CONTENTS
1. SAFETY INFORMATION 22 2. SAFETY INSTRUCTIONS 24 3. INSTALLATION 27 4. PRODUCT DESCRIPTION 28 5. DAILY USE 29 6. HINTS AND TIPS 34 7. CARE AND CLEANING 37 8. TROUBLESHOOTING 37 9. TECHNICAL DATA 39 10. ENERGY EFFICIENCY 39 11. ENVIRONMENTAL CONCERNS 40
1. SAFETY INFORMATION
Before the installation and use of the appliance, carefully read the supplied instructions. The manufacturer is not responsible
for any injuries or damage that are the result of incorrect installation or usage. Always keep the instructions in a safe and accessible location for future reference.
1.1 Children and vulnerable people safety
- This appliance is not intended for use by persons (including children) with reduced physical, sensory or mental capabilities, or lack of experience and knowledge, unless they have been given supervision or instruction concerning use of the appliance by a person responsible for their safety.
- Children should be supervised to ensure that they do not play with the appliance.
- Keep all packaging away from children and dispose of it appropriately.
- WARNING: Keep children and pets away from the appliance when it operates or when it cools down. Accessible parts become hot during use.
- If the appliance has a child safety device, it should be activated.
- Children shall not carry out cleaning and user maintenance of the appliance without supervision.
1.2 General Safety
- WARNING: The appliance and its accessible parts become hot during use. Care should be taken to avoid touching heating elements.
- WARNING: Unattended cooking on a hob with fat or oil can be dangerous and may result in fire.
- NEVER try to extinguish a fire with water, but switch off the appliance and then cover flame e.g. with a lid or a fire blanket.
- WARNING: The appliance must not be supplied through an external switching device, such as a timer, or connected to a circuit that is regularly switched on and off by a utility.
- CAUTION: The cooking process has to be supervised. A short term cooking process has to be supervised continuously.
- WARNING: Danger of fire: Do not store items on the cooking surfaces.
- Metallic objects such as knives, forks, spoons and lids should not be placed on the hob surface since they can get hot.
- Do not use the appliance before installing it in the built-in structure.
- Do not use a steam cleaner to clean the appliance. After use, switch off the hob element by its control and do not rely on the pan detector.
- If the glass ceramic surface / glass surface is cracked, switch off the appliance and unplug it from the mains. In case the appliance is connected to the mains directly using junction box, remove the fuse to disconnect the appliance from power supply. In either case contact the Authorised Service Centre.
- If the supply cord is damaged, it must be replaced by the manufacturer, an authorized Service or similarly qualified persons in order to avoid a hazard.
- WARNING: Use only hob guards designed by the manufacturer of the cooking appliance or indicated by the manufacturer of the appliance in the instructions for use as suitable or hob guards incorporated in the appliance. The use of inappropriate guards can cause accidents.
2. SAFETY INSTRUCTIONS
2.1 Installation

WARNING!
Only a qualified person must install this appliance.

WARNING!
Risk of injury or damage to the appliance.
- Remove all the packaging.
- Do not install or use a damaged appliance.
- Follow the installation instructions supplied with the appliance.
- Keep the minimum distance from other appliances and units. Always take care when moving the appliance as it is heavy. Always use safety gloves and enclosed footwear.
- Seal the cut surfaces with a sealant to prevent moisture from causing swelling.
- Protect the bottom of the appliance from steam and moisture.
- Do not install the appliance next to a door or under a window. This prevents hot cookware from falling from the appliance when the door or the window is opened. Each appliance has cooling fans on the bottom.
- If the appliance is installed above a drawer:
- Do not store any small pieces or sheets of paper that could be pulled in, as they can damage the cooling fans or impair the cooling system.
- Keep a distance of minimum 2 cm between the bottom of the appliance and parts stored in the drawer.
- Remove any separator panels installed in the cabinet below the appliance.
2.2 Electrical Connection

WARNING!
Risk of fire and electric shock.
- All electrical connections should be made by a qualified electrician.
- The appliance must be earthed.
- Before carrying out any operation, make sure that the appliance is disconnected from the power supply.
- Make sure that the parameters on the rating plate are compatible with the electrical ratings of the mains power supply.
- Make sure the appliance is installed correctly. Loose and incorrect electricity mains cable or plug (if applicable) can make the terminal become too hot.
- Use the correct electricity mains cable.
- Do not let the electricity mains cable tangle.
- Make sure that a shock protection is installed.
- Use the strain relief clamp on the cable.
- Make sure the mains cable or plug (if applicable) does not touch the hot appliance or hot cookware when you connect the appliance to a socket.
- Do not use multi-plug adapters and extension cables.
- Make sure not to cause damage to the mains plug (if applicable) or to the mains cable. Contact our Authorised Service Centre or an electrician to change a damaged mains cable.
- The shock protection of live and insulated parts must be fastened in such a way that it cannot be removed without tools.
- Connect the mains plug to the mains socket only at the end of the installation. Make sure that there is access to the mains plug after the installation.
- If the mains socket is loose, do not connect the mains plug.
- Do not pull the mains cable to disconnect the appliance. Always pull the mains plug.
- Use only correct isolation devices: line protecting cut-outs, fuses (screw type fuses removed from the holder), earth leakage trips and contactors.
- The electrical installation must have an isolation device which lets you disconnect the appliance from the mains at all poles. The isolation device must have a contact opening width of minimum 3 mm.
2.3 Use

WARNING!
Risk of injury, burns and electric shock.
- Remove all the packaging, labelling and protective film (if applicable) before first use.
- This appliance is for household (indoors) use only.
- Do not change the specification of this appliance. Make sure that the ventilation openings are not blocked.
- Do not let the appliance stay unattended during operation.
- Set the cooking zone to "off" after each use.
- Do not put cutlery or saucepan lids on the cooking zones. They can become hot.
- Do not operate the appliance with wet hands or when it has contact with water.
- Do not use the appliance as a work surface or as a storage surface.
- If the surface of the appliance is cracked, disconnect immediately the appliance
from the power supply. This to prevent an electrical shock.
- Users with a pacemaker must keep a distance of minimum 30 cm from the induction cooking zones when the appliance is in operation.
- When you place food into hot oil, it may splash.

WARNING!
Risk of fire and explosion
- Fats and oil when heated can release flammable vapours. Keep flames or heated objects away from fats and oils when you cook with them.
- The vapours that very hot oil releases can cause spontaneous combustion. Used oil, that can contain food remnants, can cause fire at a lower temperature than oil used for the first time.
- Do not put flammable products or items that are wet with flammable products in, near or on the appliance.

WARNING!
Risk of damage to the appliance.
- Do not keep hot cookware on the control panel.
- Do not put a hot pan cover on the glass surface of the hob.
- Do not let cookware boil dry.
- Be careful not to let objects or cookware fall on the appliance. The surface can be damaged.
- Do not activate the cooking zones with empty cookware or without cookware.
- Do not put aluminium foil on the appliance.
- Cookware made of cast iron, aluminium or with a damaged bottom can cause scratches on the glass / glass ceramic. Always lift these objects up when you have to move them on the cooking surface.
- This appliance is for cooking purposes only. It must not be used for other purposes, for example room heating.
2.4 Care and cleaning
- Clean the appliance regularly to prevent the deterioration of the surface material.
- Switch off the appliance and let it cool down before cleaning.
- Do not use water spray and steam to clean the appliance.
- Clean the appliance with a moist soft cloth. Use only neutral detergents. Do not use abrasive products, abrasive cleaning pads, solvents or metal objects.
2.5 Service
To repair the appliance contact the Authorised Service Centre. Use original spare parts only. - Concerning the lamp(s) inside this product and spare part lamps sold separately: These lamps are intended to withstand extreme physical conditions in household appliances, such as temperature, vibration, humidity, or are intended to signal information about the operational status of the appliance. They are not intended to be used in other applications and are not suitable for household room illumination.
2.6 Disposal

WARNING!
Risk of injury or suffocation.
- For information on how to dispose of the appliance, contact your dealer, manufacturer's authorized person, or your local solid waste operator.
- Disconnect the appliance from the mains supply.
- Cut off the mains electrical cable close to the appliance and dispose of it.
3. INSTALLATION

WARNING!
Refer to Safety chapters.
3.1 Before the installation
Before you install the hob, write down the information below from the rating plate. The rating plate is on the bottom of the hob.
Serial number
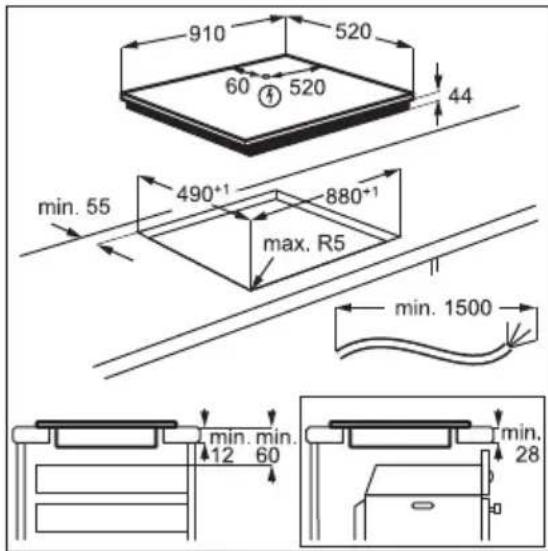
3.2 Built-in hobs
Only use the built-in hobs after you assemble the hob into correct built-in units and work surfaces that align to the standards.
3.3 Connection cable
The hob is supplied with a connection cable. - To replace the damaged mains cable, use the cable type: H05V2V2-F which withstands a temperature of 90°C or higher. Contact an Authorised Service Centre. The connection cable may only be replaced by a qualified electrician.
3.4 Assembly
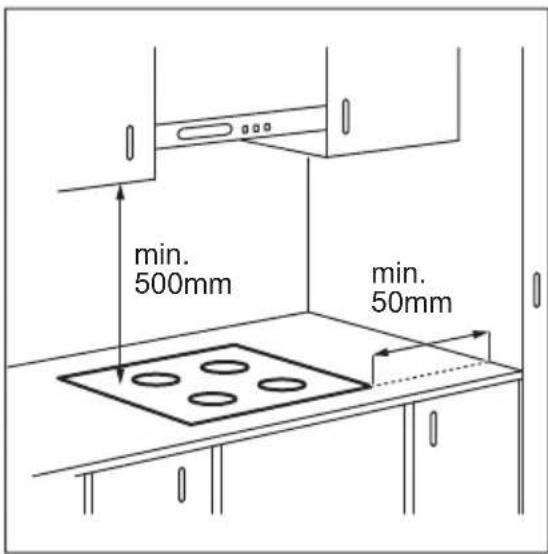
If you install the hob under a hood, please see the installation instructions of the hood for the minimum distance between the appliances.
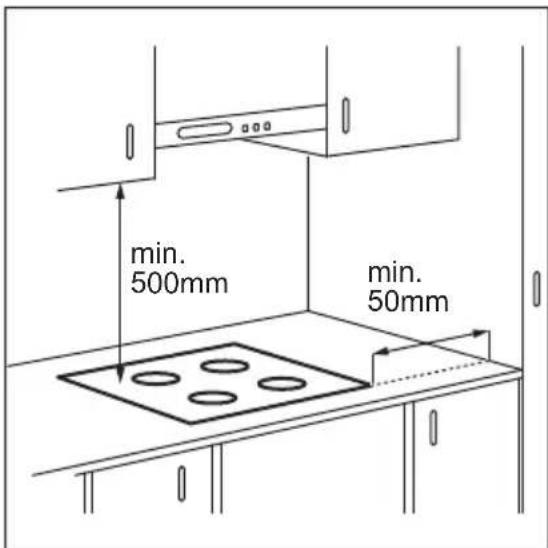
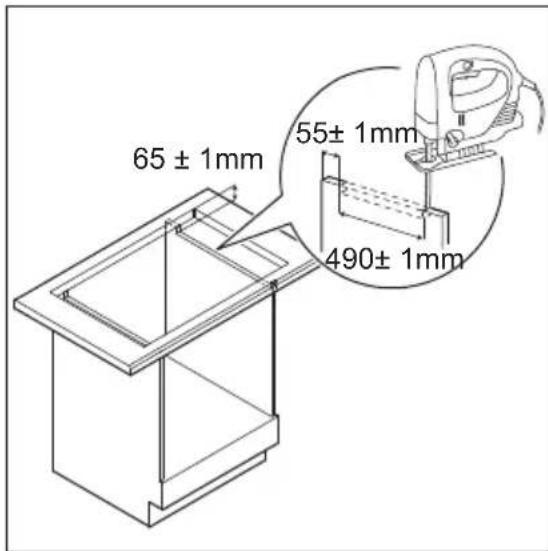
If the appliance is installed above a drawer, the hob ventilation can warm up the items stored in the drawer during the cooking process.

Find the video tutorial "How to install your Electrolux Induction Hob - Worktop installation" by typing out the full name indicated in the graphic below.

YouTube
www.youtube.com/electrolux www.youtube.com/aeg
How to install your Electronlux Induction Hob - Worktop installation

4. PRODUCT DESCRIPTION
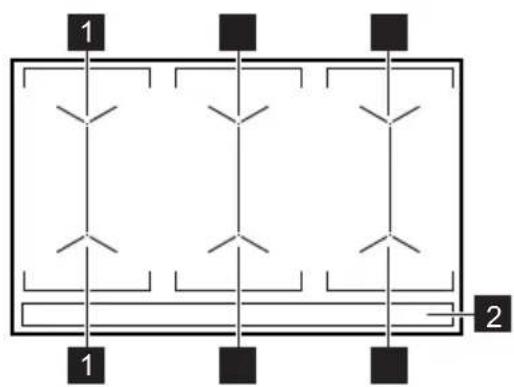
4.1 Cooking surface layout
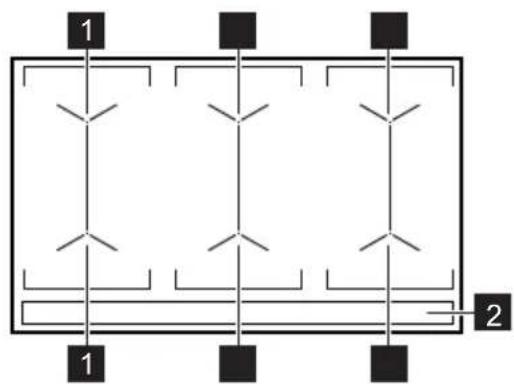
1 Induction cooking surface 2 Control panel
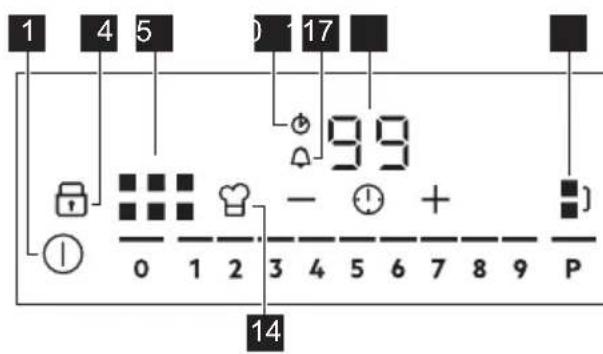
4.2 Control panel layout
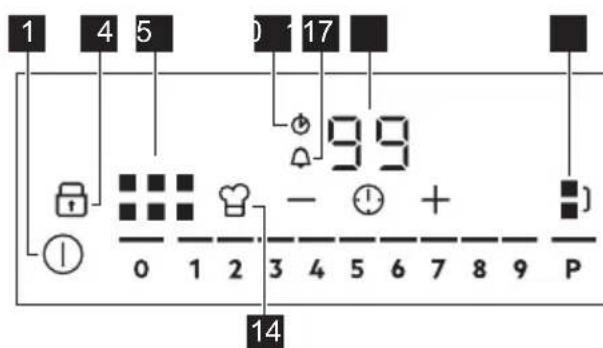
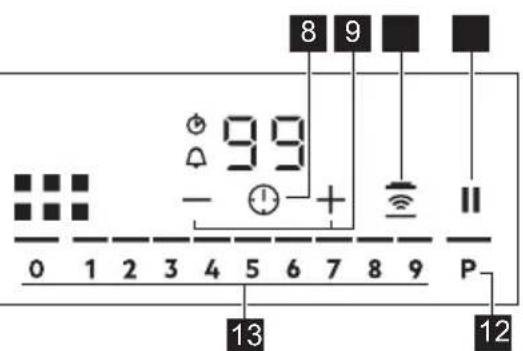
Use the sensor fields to operate the appliance. The displays, indicators and sounds tell which functions operate.
Sensor field Comment
| 1 | ① | To activate and deactivate the hob. |
| 2 | To activate and deactivate Lock or Child Safety Device. | |
| 3 | To show the active zone. | |
| 4 | CountUp Timer indicator. | |
| 5 | Count Down Timer indicator. | |
| 6 | - Timer display: 00 - 99 minutes. | |
| 7 | To activate and deactivate Bridge and to switch between the modes. | |
| 8 | To select Timer functions. | |
| 9 | +/- | To increase and decrease the time. |
Sensor field Comment
| 10 | To activate and deactivate Hob2Hood. | |
| 11 | || | To activate and deactivate Pause. |
| 12 | P | To activate PowerBoost. |
| 13 | - To set a heat setting: 0 - 9. | |
| 14 | ○ | To activate and deactivate.PowerSlide. |
5. DAILY USE

WARNING!
Refer to Safety chapters.
5.1 Activating and deactivating
Touch for 1 second to activate or deactivate the hob.
The control panel comes on after you activate the hob and goes off after you deactivate the hob.
5.2 Automatic Switch Off
The function deactivates the hob automatically if:
- you do not place any cookware on the hob for 50 seconds,
- you do not set the heat setting for 50 seconds after you place the cookware,
- you spill something or put something on the control panel for more than 10 seconds (a pan, a cloth). When you hear the acoustic signal, the hob deactivates. Remove the object or clean the control panel.
- the hob gets too hot (e.g. when a saucepan boils dry). Let the cooking zone cool down before you use the hob again.
- you do not deactivate a cooking zone or change the heat setting. After some time, the hob deactivates.
The relation between the heat setting and the time after which the hob deactivates:
Heat setting The hob deactivates after
1-26 hours 3-45 hours 54 hours 6-91.5 hours
5.3 Using the cooking zone

CAUTION!
Do not place hot cookware on the control panel. There is a risk of damage to the electronic parts.
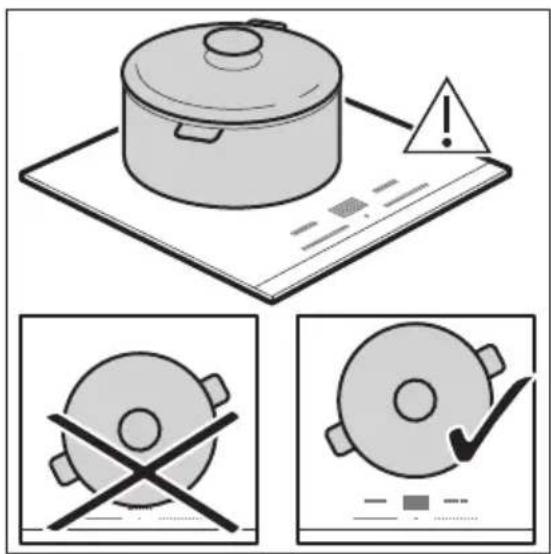
Place the cookware in the centre of the selected zone.
Induction cooking zones adapt to the dimension of the bottom of the cookware automatically. When you place the cookware in the correct position, the hob recognizes it and the appropriate control bar comes on. A red cooking zone indicator appears above the control bar and indicates the position of the pot.
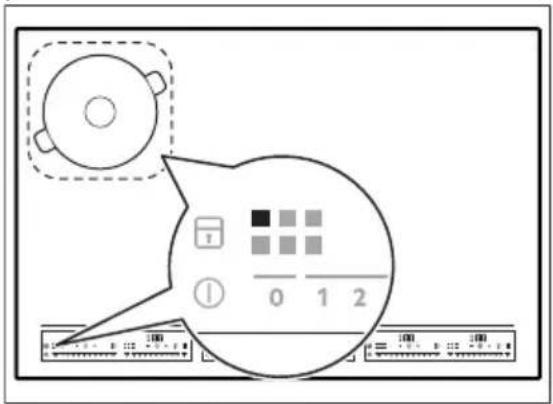
Each square on the control panel represents one cooking zone on the induction cooking surface. Zone indicators show which cooking zone is controlled by the appropriate control bar.
5.4 Heat setting
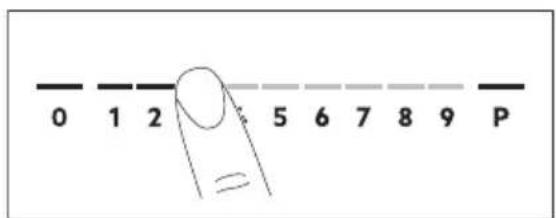
- Press the desired heat setting on the control bar. You can also move your finger along the control bar to set or change the heat setting for a cooking zone.
- To deactivate a cooking zone, press 0. Once you place a pot on the cooking zone and set the heat setting, it remains the same for 2 minutes after you remove the pot. The control bar and the cooking zone indicator blink for 2 minutes. If you place the pot on the cooking zone again within this time, the heat setting reactivates. Otherwise the cooking zone deactivates.
5.5 OptiHeat Control (3 step Residual heat indicator)

WARNING!
As long as the indicator is on, there is a risk of burns from residual heat.
The induction cooking zones produce the heat necessary for the cooking process directly in the bottom of the cookware. The glass ceramic is heated by the heat of the cookware.
The indicators appear when a cooking zone is hot. They show the level of the residual heat for the cooking zones you are currently using.
The indicator may also appear:
for the neighbouring cooking zones even if you are not using them, - when hot cookware is placed on cold cooking zone, - when the hob is deactivated but the cooking zone is still hot.
The indicator disappears when the cooking zone has cooled down.
5.6 Bridge
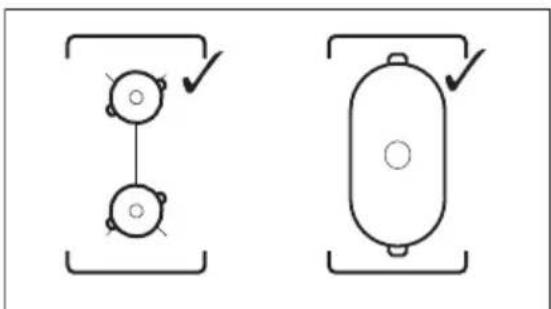
This function connects two cooking zones and they operate as one. You can use the function with large cookware.
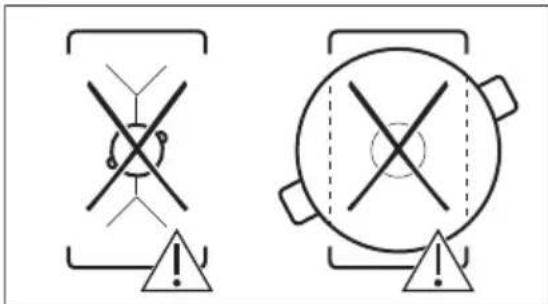
- Place the cookware on two cooking zones. The cookware must cover the centres of both zones.
turns white. 2. Touch activate the function. 3. Set the heat setting. The cookware must cover the centres of both zones but not go beyond the area marking.
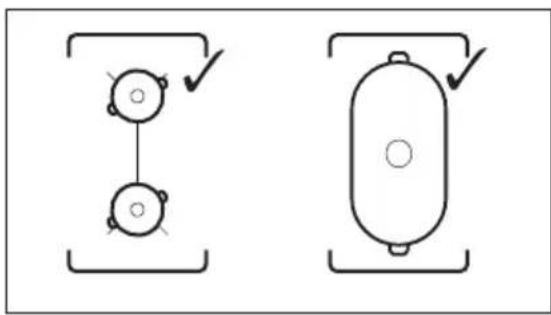

To deactivate the function, touch The cooking zones operate independently.
5.7 PowerBoost
This function activates more power for the appropriate induction cooking zone, depending on the cookware size. The function can be activated only for a limited period of time.
Touch P to activate the function for the cooking zone.
The symbol turns red.
The function deactivates automatically.
i
For maximum duration values, refer to "Technical data".
5.8 Pause
When the function is active, and symbols can be used.
The function does not stop the timer functions.
Press to activate the function. The symbol turns red. The heat setting is lowered to 1.
To deactivate the function: press The symbol turns white. The previous heat setting comes on.
5.9 Timer

Count Down Timer
Use this function to specify how long a cooking zone should operate during a single cooking session.
First set the heat setting, then set the function.
- Touch to activate the function or change the time.
The timer digits and the indicators + and come on the display. turns red, and turns white.
If the timer is not set, all indicators disappear after 4 seconds.
- Touch or to set the time (00 - 99 minutes).
After 3 seconds, the timer starts to count down automatically. The indicators 1 , + and disappear. stays red.
When the time comes to an end, a signal sounds and flashes. To stop the signal, touch
To deactivate the function: touch The indicators and come on. Use or to set on the display. Alternatively, set the heat level to 0. As a result, a signal sounds and the timer is cancelled.

CountUp Timer
You can use this function to monitor how long a cooking zone operates.
Touch twice to activate the function.
The indicator turns red, the timer starts to count up automatically.
To deactivate the function: touch When the indicators light up, touch

Minute Minder
You can use this function when the hob is activated but no cooking zone operates.
To see the control panel, place a pot on a cooking zone.
- Touch, until the indicator turns red, to activate the function.
- Touch or to set the time. The function starts automatically after 4 seconds. The indicators and disappear. Stays red.
When you set the function, you can remove the pot.
When the time comes to an end, a signal sounds and flashes. Touch to stop the signal.
To deactivate the function: touch The indicators + and light up. Use or to set on the display.

The function has no effect on the operation of any cooking zone.
5.10 Lock
You can lock the control panel while the hob operates. It prevents an accidental change of the heat setting.
Set the heat setting first.
Touch to activate the function. The symbol turns red and blinks.
To deactivate the function, touch The symbol turns white.

When you deactivate the hob, you also deactivate this function.
5.11 Child Safety Device
This function prevents an accidental operation of the hob.
Activate the hob first and do not set the heat setting.
Touch until it turns red to activate the function.
The control bars disappear. Deactivate the hob.

When you deactivate the hob, the function is still active.
To deactivate the function for only one cooking time: Activate the hob with ①
comes on. Touch until it turns white. The control bars appear. Set the heat setting within 50 seconds. You can operate the hob.
When you deactivate the hob with ① the function is still active.
To deactivate the function permanently: Activate the hob and do not set the heat setting. Touch until it turns white. The control bars appear. Deactivate the hob.
5.12 PowerPoint
This function allows you to adjust the temperature by moving the cookware to a different position on the induction cooking area.
The function divides the induction cooking area into three areas with different heat settings. The hob detects the position of the cookware and adjusts the heat setting corresponding to the position.

Use only one pot when you operate the function. If you want to change the heat setting, lift up the cookware and place it on a different zone. Sliding the cookware can cause scratches and discolouration of the surface.
- The zone indicator shows both zones in a bridge even if only one of the zones is used.
- You may adjust the heat setting manually only if at least one of the zones is activated automatically.
- You can change the heat settings for each position separately. When you deactivate the hob, it remembers your heat settings and applies them next time you activate the function.
- If you want to change the heat setting, lift up the cookware and place it on a different zone. Sliding the cookware can cause scratches and discolouration of the surface.
Touch to activate the function.
The symbol turns red and the control bar displays the default heat setting. All cooking zones operate for 9 minutes.
After 9 minutes, an acoustic signal sounds and the empty cooking zones are
deactivated. Touch to resume this function. You can move the pot or place it in a new position.
To modify the default heat setting manually touch the control bar and choose the appropriate level.
- You may change the default heat setting only if the function is active.
- You can change the default heat settings for each position separately. When you deactivate the hob, it remembers your settings and applies them the next time you activate the function.
To deactivate the function, touch The symbol turns white.
5.13 Hob²Hood
It is an advanced automatic function which connects the hob to a special hood. Both the hob and the hood have an infrared signal communicator. Speed of the fan is defined automatically on the basis of the mode setting and temperature of the hottest cookware on the hob. You can also operate the fan from the hob manually.

For most of the hoods, the remote system is originally deactivated. Activate it before you use the function. For more information refer to the hood user manual.
Operating the function automatically
To operate the function automatically set the automatic mode to H1 - H6. The hob is originally set to H5. The hood reacts whenever you operate the hob. The hob recognizes the temperature of the cookware automatically and adjusts the speed of the fan.
Activating the light
You can set the hob to activate the light automatically whenever you activate the hob. To do so, set the automatic mode to H1 - H6.

The light on the hood deactivates 2 minutes after deactivating the hob.
Automatic modes
| Auto- | matic light | Boiling 1) | Frying 2) |
| Mode H0 Off Off Off | |||
| Mode H1 On Off Off | |||
| Mode H23) | On Fan speed 1 | Fan speed 1 | |
| Mode H3 On Off Fan speed | 1 | ||
| Mode H4 On Fan speed | 1 | Fan speed 1 | |
| Mode H5 On Fan speed | 1 | Fan speed 2 | |
| Mode H6 On Fan speed | 2 | Fan speed 3 | |
1) The hob detects the boiling process and activates the fan speed in accordance with the automatic mode. 2) The hob detects the frying process and activates the fan speed in accordance with the automatic mode. 3) This mode activates the fan and the light and does not rely on the temperature.
Changing the automatic mode
- Deactivate the appliance.
- Touch for 3 seconds. The display comes on and goes off.
- Touch for 3 seconds.
- Touch a few times until comes on.
- Touch the Timer to select an automatic mode.
When you finish cooking and deactivate the hob, the hood fan may still operate for a certain period of time. After that time, the system deactivates the fan automatically and prevents you from an accidental activation of the fan for the next 30 seconds.

To operate the hood directly on the hood panel, deactivate the automatic mode of the function.
Operating the fan speed manually
You can also operate the fan from the hob manually.
Touch when the hob is active.
This deactivates automatic operation of the function and allows you to change the fan speed manually.
When you press, you raise the fan speed by one. When you reach an intensive level and press again, you set the fan speed to 0 which deactivates the hood fan. To start the fan again with the fan speed 1 touch

To activate an automatic operation of the function, deactivate the hob and activate it again.
5.14 OffSound Control (Deactivating and activating the sounds)
Deactivate the hob first.
- Touch for 3 seconds to activate the function.
The display comes on and goes out.
- Touch for 3 seconds.
bO or bcomes on.
- Touch of the timer to choose one of the following:
- the sounds are off
- the sounds are on
- Wait until the hob deactivates automatically to confirm your selection.
When the function is set to , you can hear the sounds only when:
·you touch
- Minute Minder comes down
- Count Down Timer comes down
- you put something on the control panel.
5.15 Power management
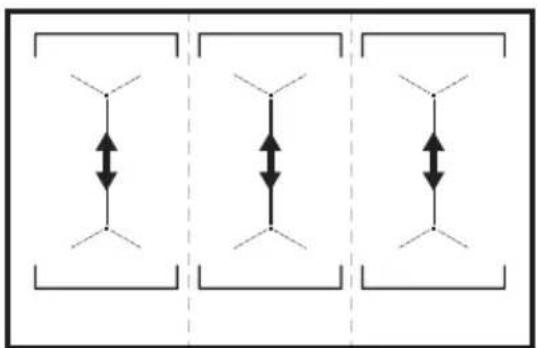
If multiple zones are active and the consumed power exceeds the limitation of the power supply, this function divides the available power between all cooking zones.
The hob controls heat settings to protect the fuses of the house installation.
- Cooking zones are grouped according to the location and number of the phases in the hob. Each phase has a maximum electricity loading of 3680 W. If the hob reaches the limit of maximum available power within one phase, the power of the cooking zones will be automatically reduced.
- For cooking zones that have a reduced power, the control panel shows the maximum possible heat settings.
- If a higher heat setting is not available, reduce it for the other cooking zones first.
- The activation of the function depends on the number and size of pots.
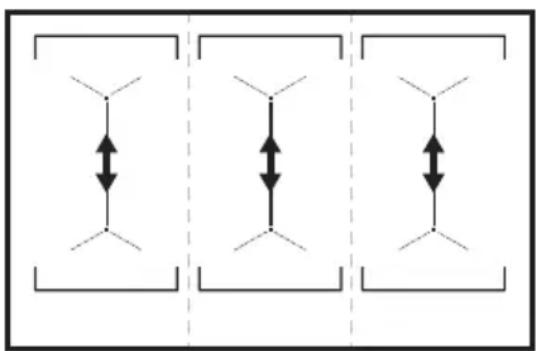
Refer to the illustration for possible combinations in which power can be distributed among the cooking zones.
6. HINTS AND TIPS

WARNING!
Refer to Safety chapters.
6.1 Cookware

For induction cooking zones a strong electro-magnetic field creates the heat in the cookware very quickly.
Use the induction cooking zones with suitable cookware.
- The bottom of the cookware must be as thick and flat as possible.
- Ensure pan bases are clean and dry before placing on the hob surface.
- In order to avoid scratches, do not slide or rub the pot across the ceramic glass.
Cookware material
- correct: cast iron, steel, enamelled steel, stainless steel, multi-layer bottom (with a correct marking from a manufacturer). not correct: aluminium, copper, brass, glass, ceramic, porcelain.
Cookware is suitable for an induction hob if:
- water boils very quickly on a zone set to the highest heat setting.
- a magnet pulls on to the bottom of the cookware.
Cookware dimensions
- Induction cooking zones adapt to the dimension of the bottom of the cookware automatically.
- The cooking zone efficiency is related to the diameter of the cookware. The cookware with a diameter smaller than the minimum receives only a part of the power generated by the cooking zone.
- For both safety reasons and optimal cooking results, do not use cookware larger than indicated in "Cooking zones specification". Avoid keeping cookware close to the control panel during the
cooking session. This might impact the functioning of the control panel or accidentally activate hob functions.

Refer to "Technical data".
6.2 The noises during operation
If you can hear:
- crack noise: cookware is made of different materials (a sandwich construction).
- whistle sound: you use a cooking zone with a high power level and the cookware is made of different materials (a sandwich construction).
- humming: you use a high power level.
- clicking: electric switching occurs.
- hissing, buzzing: the fan operates.
The noises are normal and do not indicate any malfunction.
6.3 Öko Timer (Eco Timer)
To save energy, the heater of the cooking zone deactivates before the count down timer sounds. The difference in the operation time depends on the heat setting level and the length of the cooking operation.
6.4 Examples of cooking applications
The correlation between the heat setting of a zone and its power consumption is not linear. When you increase the heat setting, it is not proportional to the increase in power consumption. This means that a cooking zone on the medium heat setting uses less than half of its power.

The data in the table is for guidance only.
| Heat setting Use to: Time | Hints (min) |
| 1 Keep cooked food warm. as neces- | Put a lid on the cookware. |
| sary | |
| 1 - 2 Hollandaise sauce, melt: butter, choco- late, gelatine. | 5 - 25 Mix from time to time. |
Heat setting Use to: Time
Hints
(min)
1 - 2 Solidify: fluffy omelettes, baked eggs. 10 - 40 Cook with a lid on.
2-3 Simmer rice and milk-based dishes, heat up ready-cooked meals.
25 - 50 Add at least twice as much liquid as rice, mix milk dishes halfway through the procedure.
3 - 4 Steam vegetables, fish, meat. 20 - 45 Add a couple of tablespoons of liquid.
4 - 5 Steam potatoes. 20 - 60 Use max. 1% of water for 750 g of po
tatoes.
4-5 Cook larger quantities of food, stews and soups.
60 - 150 Up to 3 l of liquid plus ingredients.
6-7 Gentle fry: escalope, veal cordon bleu, cutlets, rissoles, sausages, liver, roux, eggs, pancakes, doughnuts.
as necessary - Turn halfway through.
7-8 Heavy fry, hash browns, loin steaks, steaks.
5 - 15 Turn halfway through.
9 Boil water, cook pasta, sear meat (goulash, pot roast), deep-fry chips.

Boil large quantities of water. PowerBoost is activated.
6.5 Hints and Tips for Hob²Hood
When you operate the hob with the function:
- Protect the hood panel from direct sunlight.
- Do not spot halogen light on the hood panel.
- Do not cover the hob control panel.
- Do not interrupt the signal between the hob and the hood (e.g. with the hand, a cookware handle or a tall pot). See the picture.
The hood in the picture is only exemplary.
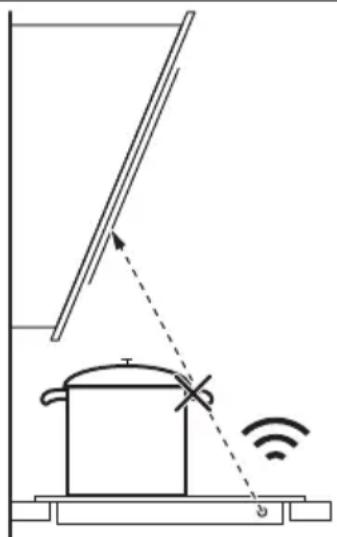

Other remotely controlled appliances may block the signal. Do not use any such appliances near to the hob while Hob²Hood is on.
Cooker hoods with the Hob²Hood function To find the full range of cooker hoods which work with this function refer to our consumer website. The Electrolux cooker hoods that work with this function must have the symbol
7. CARE AND CLEANING

WARNING!
Refer to Safety chapters.
7.1 General information
- Clean the hob after each use. Always use cookware with a clean base.
- Scratches or dark stains on the surface have no effect on how the hob operates.
- Use a special cleaner suitable for the surface of the hob.
- Use a special scraper for the glass.
7.2 Cleaning the hob
- Remove immediately: melted plastic, plastic foil, sugar and food with sugar,
otherwise, the dirt can cause damage to the hob. Take care to avoid burns. Use a special hob scraper on the glass surface at an acute angle and move the blade on the surface.
- Remove when the hob is sufficiently cool: limescale rings, water rings, fat stains, shiny metallic discoloration. Clean the hob with a moist cloth and a non-abrasive detergent. After cleaning, wipe the hob dry with a soft cloth.
- Remove shiny metallic discoloration: use a solution of water with vinegar and clean the glass surface with a cloth.
8. TROUBLESHOOTING

WARNING!
Refer to Safety chapters.
8.1 What to do if...
Problem Possible cause Remedy
| You cannot activate or operate the hob. | The hob is not connected to an elec- trical supply or it is connected incor- rectly. | Check if the hob is correctly connected to the electrical supply. |
| The fuse is blown. Make sure that the fuse is the cause of | the malfunction. If the fuse is blown again and again, contact a qualified electrician. | |
| You touched 2 or more sensor fields at the same time. | Touch only one sensor field. | |
| Pause operates. Refer to "Daily use". | ||
| There is water or fat stains on the control panel. | Clean the control panel. | |
| You cannot select the maximum heat setting for one of the cook- ing zones. | The other zones consume the maxi- mum available power. Your hob works properly. | Reduce the heat setting of the other cooking zones connected to the same phase. Refer to "Power management". |
| An acoustic signal sounds and the hob deactivates. An acoustic signal sounds when the hob is deactivated. | You put something on one or more sensor fields. | Remove the object from the sensor fields. |
Problem Possible cause Remedy
| The hob deactivates. You put something on the sensor field ① | Remove the object from the sensor field. | |
| Residual heat indicator does not come on. | The zone is not hot because it operated only for a short time or the sensor is damaged. | If the zone operated sufficiently long to be hot, speak to an Authorised Service Centre. |
| Hob2Hood does not work. You covered the control panel. Remove the object from the control panel. | ||
| You use a very tall pot which blocks the signal. | Use a smaller pot, change the cooking zone or operate the hood manually. | |
| There is no sound when you touch the panel sensor fields. | The sounds are deactivated. Activate the sounds. Refer to "Daily use". | |
| comes on. | Child Safety Device or Lock oper- ates. | Refer to "Daily use". |
| The control bar blinks. There is no cookware on the zone or the zone is not fully covered. | Put cookware on the zone so that it fully covers the cooking zone. | |
| The cookware is unsuitable. Use suitable cookware. Refer to "Hints and tips". | ||
| The diameter of the bottom of the cookware is too small for the zone. | Use cookware with correct dimen- sions. Refer to "Technical data". | |
| PowerSlide operates. Two pots are placed on the flexible induction cooking area. | Use only one pot. Refer to "Flexible in- duction cooking area". | |
| and a number come on. | There is an error in the hob. Deactivate the hob and activate it again after 30 seconds. If comes on again, disconnect the hob from the electrical supply. After 30 seconds, connect the hob again. If the problem continues, speak to an Authorised Service Centre. | |
| You can hear a constant beep noise. | The electrical connection is incor- rect. | Disconnect the hob from the electrical supply. Ask a qualified electrician to check the installation. |
8.2 If you cannot find a solution...
If you cannot find a solution to the problem yourself, contact your dealer or an Authorised Service Centre. Give the data from the rating plate. Make sure you operated the hob correctly. If not, the
servicing by a service technician or dealer will not be free of charge, also during the warranty period. The information about the guarantee period and Authorised Service Centres is in the guarantee booklet.
9. TECHNICAL DATA
9.1 Rating plate
Model EIV9467 PNC 949 596 708 00
Typ 61 E6A 04 AA 400 V 3N 50 - 60 Hz
Induction 11.0 kW Made in: Germany
Ser.Nr. 11.0 kW
ELECTROLUX
9.2 Cooking zones specification
| Cooking zone Nominal power (maximum heat setting) [W] | PowerBoost [W] PowerBoost maximum dura- tion [min] | Cookware diameter [mm] |
| Left front 2300 3200 10 125 - 210 | ||
| Left rear 2300 3200 10 125 - 210 | ||
| Middle front 2300 3200 10 125 - 210 | ||
| Middle rear 2300 3200 10 125 - 210 | ||
| Right front 2300 3200 10 125 - 210 | ||
| Right rear 2300 3200 10 125 - 210 |
The power of the cooking zones can be different in some small range from the data in the table. It changes with the material and dimensions of the cookware.
For optimal cooking results, use cookware no larger than the diameter specified in the table.
10. ENERGY EFFICIENCY
10.1 Product Information*
Model identification: EIV9467
| Type of hob Built-In Hob | ||
| Number of cooking areas | 3 | |
| Heating technology Induction | ||
| Length (L) and width (W) of the cooking area | Left | L 37.9 cm W 22.0 cm |
| Length (L) and width (W) of the cooking area | Middle | L 37.9 cm W 22.0 cm |
| Length (L) and width (W) of the cooking area | Right L 37.9 cm | W 22.0 cm |
| Energy consumption of the cooking area (EC electric cooking) | Left 186.8 Wh / kg |
| Energy consumption of the cooking area (EC electric cooking) | Middle 186.8 Wh / kg |
| Energy consumption of the cooking area (EC electric cooking) | Right 186.8 Wh / kg |
| Energy consumption of the hob (EC electric hob) 186.8 Wh / kg | |
- For the European Union according to EU 66/2014. For Belarus according to STB 2477-2017, Annex A. For Ukraine according to 742/2019.
EN 60350-2 - Household electric cooking appliances - Part 2: Hobs - Methods for measuring performance.
The energy measurements referring to the cooking area are identified by the markings of the respective cooking zones.
10.2 Energy saving
You can save energy during everyday cooking if you follow the hints below.
- When heating water, use only the amount you need.
- If possible, always put the lids on the cookware.
- Before activating the cooking zone, place the cookware on it.
- Put smaller cookware on the smaller cooking zones.
- Place the cookware directly in the center of the cooking zone.
- Use the residual heat to keep food warm or to melt it.
11. ENVIRONMENTAL CONCERNS
Recycle materials with the symbol. Put the packaging in relevant containers to recycle it. Help protect the environment and human health by recycling waste of electrical and electronic appliances. Do not dispose of
appliances marked with the symbol with the household waste. Return the product to your local recycling facility or contact your municipal office.
WE THINK OF YOU
How to install your Electrolux Induction Hob - Worktop installation

4. APPLIANCE DESCRIPTION
Type 61 E6A 04 AA 400 V 3N, 50 - 60 Hz
How to install your Electrolux Induction Hob - Worktop installation
How to install your Electrolux Induction Hob - Worktop installation

For installation and connection, contact a qualified person:

To ensure proper operation, maintenance, and repair of the appliance, contact:
www.electrolux.kz/support
For good service, please register your product here:

www.registerelectrolux.com

For purchasing accessories, consumables, and original spare parts:
www.electrolux.com/shop
SAFETY INFORMATION
Please read the safety instructions carefully before use.
When using the appliance, follow the instructions below. Keep this manual for future reference.
The appliance is intended for household use only.
Dishwasher / Washing machine / Vacuum cleaner / Refrigerator / Air conditioner
Do not use the appliance without proper installation.
CONTENTS
1. SAFETY INFORMATION 105 2. SAFETY INSTRUCTIONS 107 3. INSTALLATION 109 4. PRODUCT DESCRIPTION 111 5. OPERATION 112 6. TIPS 118 7. CARE AND CLEANING 120 8. TROUBLESHOOTING 121 9. TECHNICAL DATA 123 10. ENVIRONMENTAL CONCERNS 123 11. WARRANTY AND SERVICE 124
1. SAFETY INFORMATION
Read the instructions carefully before using the appliance. The manufacturer is not responsible for any damage resulting from improper installation or use. Keep the instructions for future reference.
1.1 Safety of children and vulnerable people
This appliance can be used by children aged from 8 years and above and persons with reduced physical, sensory or mental capabilities or lack of experience and knowledge if they have been given supervision or instruction concerning use of the appliance in a safe way and understand the hazards involved. Children shall not play with the appliance. Cleaning and user maintenance shall not be made by children without supervision. Keep all packaging away from children. WARNING: When the appliance is in operation or when it is hot, do not let children or pets near it. Burns may occur during use. If the appliance has a child safety device, it should be activated.
1.2 Electrical safety
WARNING: The appliance and its accessible parts become hot during use. Be careful not to touch hot elements. WARNING: If the power cord is damaged, it must be replaced by the manufacturer, its service agent or similarly qualified persons in order to avoid a hazard.
- The device is intended for household use only. It must be used only for its intended purpose, i.e., for ironing clothes.
- WARNING: The iron must be connected to a power outlet with a grounding contact. CAUTION: The iron must be placed on a stable surface. If the iron is placed on an unstable surface, it may fall.
- WARNING: There is a risk of burns: do not touch the hot soleplate.
- Do not place the knife, fork, spoon, and lid on the hot soleplate, as they may melt. Do not place the iron on the ironing board while it is hot. Do not use abrasive cleaners to clean the iron.
- After use, unplug the iron and let it cool down before storing it. Store it out of reach of children.
- If the power cord is damaged, it must be replaced by the manufacturer, its service agent, or similarly qualified persons in order to avoid a hazard. If the iron is connected via a residual current device, press the reset button to reset it. In these cases, contact a qualified service center. If the plug is damaged, do not use it to avoid danger; have it replaced by a qualified service center or a similarly qualified person.
- WARNING: Only use the iron with the accessories provided by the manufacturer or with accessories recommended by the manufacturer. Do not use accessories that are not recommended, as they may cause damage.
2. SAFETY INSTRUCTIONS
2.1 Installation

WARNING!
This iron must be installed only by a qualified person.

WARNING!
There is a risk of electric shock or fire.
Remove all packaging materials. Do not install or use the iron near water. Follow the installation instructions provided with the iron. Maintain a minimum distance between the iron and other objects. Do not place the iron on a hot surface or near a heat source. Keep the iron away from flammable materials and liquids. Do not cover the iron with cloth or other materials. Do not place the iron under a cabinet or shelf. This is necessary to prevent hot steam from escaping when the door or window is open. - Each iron has a label on the bottom. If the iron is placed on its side:
Do not store paper or plastic items that may fall into the iron, as they may cause damage or malfunction.
- Place the device at least 2 cm away from walls and other objects to ensure proper ventilation.
Remove the protective film from the device before use.
2.2 Electrical Connection

DANGER!
There is a risk of fire and electric shock.
- All electrical connections must be made by a qualified electrician. Do not touch the device with wet hands. When performing any work, ensure the device is disconnected from the power supply. The parameters on the technical data plate must correspond to the electrical parameters of the mains supply. Do not operate the device if it is damaged. If the power cord or plug (if present) is damaged, it must be replaced by the manufacturer or a qualified person. - Do not use a damaged power cord.
- Do not bend the power cord.
- Do not operate the device if it is damaged.
- Do not use the device if it is deformed. When connecting the device to the power outlet, ensure that the power cord or plug (if present) is not pinched or damaged. Do not use extension cords or adapters. Do not cover the device's openings (if present) or the power cord. If the power cord is damaged, contact a qualified service center or an electrician.
- To protect against electric shock, the device must be properly grounded. Do not use the device if the plug or outlet is damaged. After installation, do not touch the device with wet hands.
- If the outlet is loose, do not use it. Do not disconnect the device by pulling the power cord. Always pull the plug out by hand. Do not use the device with a damaged cord or plug: replace damaged cords, plugs (if they are damaged), and do not use the device if it has been dropped or damaged. The device must be used with a power cord that is suitable for the electrical current. The power cord must be at least 3 mm thick.
2.3 Usage

DANGER!
There is a risk of fire or explosion.
- Before using the device, read the instructions, safety warnings, and the warranty card (warranty card).
- The device is intended for indoor use only.
- Do not use the device if it is damaged or malfunctioning. Do not exceed the specified operating parameters. Do not leave the device unattended while it is in operation.
- When not in use, turn the device off using the power switch.
- Do not insert fingers or objects into the openings. They may be hot. Do not touch the device with wet hands or when it is in water. Do not use the device near water or in damp conditions.
- If the device is damaged, unplug it from the power source. Do not use it to avoid fire or explosion. When the device is in operation, keep it away from flammable materials.
Keep a distance of at least 30 cm from the device.
If the device is used improperly, it may cause injury.

DANGER!
There is a risk of fire or burns.
The device may become hot during use. Do not touch the hot surfaces or the heating elements. The device may emit steam or hot air. Do not place the device near flammable materials or on top of them. Do not cover the device.

DANGER!
The device can be unplugged.
- We have not checked the output values at the output.
- We have not added the output table to the output annex. - If the output is dry, we do not add it. We do not allow placing parts or outputs on top of the dry. It may be necessary to close. - We do not use loose parts or parts without a part for repair. We do not put aluminum on the dry. Parts that have been bent, scratched with aluminum, or have come into contact with acid, 1/1 ceramic surface may crack. If the repair surface needs to be rough, we remove these parts.
- This is a device intended only for this purpose. It cannot be used for other purposes, washing with water or cleaning.
2.4 Cleaning and maintenance
Clean the device surface periodically to ensure the material's quality. Do not wipe the device with a dry cloth or water. Use a soft cloth and mild detergent for cleaning. Clean the device with a damp cloth. Do not use abrasive cleaners, sharp objects, or metal parts.
2.5 Service
Contact a qualified service center for device repair. Only use original spare parts. The following parts are included in the scope of this document: These parts are temperature,
humidity, and electrical components that are sensitive to environmental conditions. They are not intended for use in other applications and may be damaged by improper handling.
2.6 Disposal

WARNING!
There is a risk of electric shock or fire.
Contact the operator for disposal of the device in accordance with local regulations. Do not dispose of the device with household waste. Disconnect the device from the power supply and dispose of it properly.
3. OPERATION

WARNING!
Observe the safety instructions.
3.1 Installing the hob
Before installing the hob, prepare the worktop. The worktop must be cut according to the dimensions given in the installation instructions.
Safety instructions
3.2 Preparing the worktop
Prepare the worktop by cutting the hole according to the dimensions and standards specified in the installation instructions.
3.3 Oblique cable
The hob is supplied with an oblique cable.
To connect the cable to the mains, we recommend using a cable type H05V2V2-F with a maximum temperature of 90°C. Contact a qualified electrician. The oblique cable must be connected by a qualified electrician.
3.4 Installation
Install the hob in the prepared cutout, ensuring it is level. Follow the installation instructions carefully.
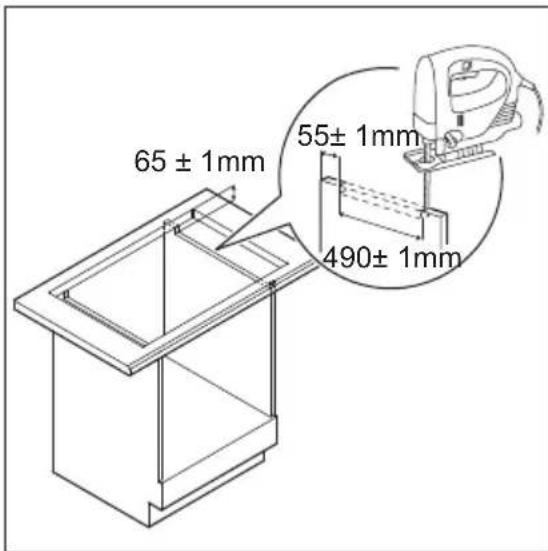
If the hob is not installed correctly, there is a risk of electric shock or fire.
For detailed installation instructions, refer to the video "Electrolux Induction Hob Installation Guide - Worktop Installation" available on the official website.

YouTube
www.youtube.com/electrolux www.youtube.com/aeg
How to install your Electrolux Induction Hob - Worktop installation

4. BUTTONS AND CONTROLS
4.1 Description of the control panel
1 Power button 2 Control panel
4.2 Control panel description
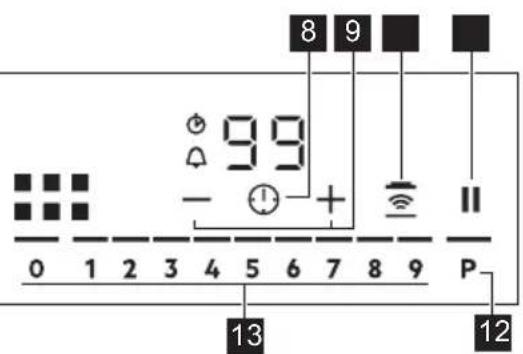
To remove the cover, use the sensor buttons. The functions of the buttons, indicators and light signals are described below.
= /F indicator: when the button is pressed, the corresponding function is activated.
The buttons for the washing programs are located on the front panel. They are marked with the corresponding symbols.
The program indicator lights up during the washing cycle. It shows the current stage of the washing program.
In addition, this indicator has the following functions:
- If the door is not closed properly, the washing program will not start.
- If the door is opened during the washing cycle, the program will pause.
This indicator lights up when the washing program is finished.
5.6 Bridge
This function allows two washing programs to be combined and they work as one program. This function can be used for larger loads.
- Press the power button. The two buttons should be pressed simultaneously. If this does not work, please refer to the manual. 2. To cancel the function, press the same buttons again.
- The original text is in a mix of Cyrillic and Latin scripts, likely a transliteration of a technical manual. It appears to be instructions for using a device. I will translate it to English and clean it up.
The text is in a mix of Cyrillic and Latin scripts, likely a transliteration of a technical manual. It appears to be instructions for using a device. I will translate it to English and clean it up.
5.7 PowerBoost
This function provides additional power and increased performance for the device. This function can be activated or deactivated.
To use the function, press the P button. The indicator light will turn on. The function will turn off automatically.

For the maximum parameters, refer to the "Technical data" section.
5.8 Kiziric
The function is not available when the device is not connected.
The timer function does not stop the functions.
To use the function, press the button.
The indicator light will turn on. The parameter will be set to 1.
To use the function: press the button. The indicator light will turn on.
The data will be saved. The parameter has been added.
5.9 Timer
The timer is set.
By function, the count-up timer can be used to measure the elapsed time.
To set the parameters, press the corresponding buttons.
1. Press the button to start or stop the timer.
The indicators will flash. The set time will be displayed, then the actual time.
If the time is exceeded, the indicators will flash for 4 seconds.
2. Set the time by pressing + or - (00-99 minutes).
Press the button to start the timer automatically.
The indicators will light up. The set time will be displayed.
When the time has elapsed, a beep signal will sound.
Press the button to stop the signal.
To select the function: press the button. The indicators will light up.
Press the button to start or stop. The alternative setting parameter will be displayed.
The signal will sound and the timer will stop.
CountUp Timer
This function is used to measure the elapsed time with the count-up timer.
Function of the button: press and hold to turn on.
Indicators: red indicator, automatic mode is on. Functions: press to turn on.
Indicator light is on, press to turn off.
Minute hand
If you press this button while the system is in operation, the alarm will be turned off.
Press the button to turn off the alarm.
1. Function: press and hold the red indicator to turn on.
- Press + or - to adjust the time.
Function: after 4 seconds, automatic mode is activated. + and -
Indicators are on. Red light is on.
After setting the function, press the button.
When the alarm is activated, the signal will sound continuously.
Press to stop the signal.
Function: press to turn on. + and - indicators are on.
Press + or - to adjust the time.
i ΦyHKnna eWKaHdaa nicipy aHaBbIHbIH KMbICbHa ecep etneii.
5.10 Kynbintay
Backapy nahenin new kymbic icten Typfahda 6yfaTayfa 6oana. OJ Kbl3y npaMeTpiniH abaicbla e3repinye kon 6epmei.
AaIbImeH Kb3y npaMeTpih OPhTbHb3.
Функиянbl kocy ywiH yMecih 6acbHb3. BeNri Tyci Kbl3blf aHaJaDbI JxHe KbInblbIKTaIdbI.
Neew KocyIbI TypFaHda TymeciH 6acblbI3.
ByI cyHKnHbIH aBTOMaTTbI pexMmH cHdpin,KeJdETKlWtIH KblDAMdbIFbIH KOIme3repTyre MymkHidk 6pepi.
6enricin 6ackaHda, XeNdtkiuTih XblnDaMdbfbH 6ip 6ipnikke Ke6eHTeci3. EH XOFapfI DeHreRe XeTKeHde 6enricin Kaeta 6accaHbI3, XeNdtkiuTih XblnDaMdbfbI O-RE KOyblIn, TApTkbls KypblnFbHbIH XeNdtkiwi ceHei.
XeIeTkiWtiH XbIaMdbIfbIH 1-ree KoiBIn XeIeTkiWti Kocy yuIH bEnricih 6acbHb3.

Функиньн aBTOMaTTbI peximih icke kocy ywiH neWti cHdpin, KaTta icke KocbiHbI3.
5.14 OffSound Control (Дыбысъдксгнандарьсэндipy кocу)
AnbmeH neWti cHdpiH3.
- Neusti Kocy yuH 6eJricin 3 cekyHd Kocblb3.
Dncnnej kanaDbla, cehdi.
2.3cekyH6oBby typtiHi3.
- To select the first option, press the button:
- - Power button
- - Add button
- When the machine is turned on, the settings are set automatically.
When the function is activated, a faster signal is given in case of danger:
The button - minute countdown is displayed
- The hour and minute indicators are displayed
- When something is pressed on the control panel
5.15 Power control
If the power is suddenly cut off, the device will automatically resume operation after the power is restored. This function is designed to protect the device from damage and to maintain the settings.
- The drawing parts must be connected to the ground and reliably contacted. It has a maximum electric arc of 3680 V. If the parts are connected to the ground, the arc will be automatically reduced. For the reduced arc parts, the highest output parameters should be indicated on the control panel.
- If the high output parameters are not configured, then reduce the output of other parts. - The function's on-off is based on the number and elements of the outputs.
Between the parts, check the output modes with a special tool.
6. ADVICE

WARNING!
Check the safety measures.
6.1 Output

For functional parts, use a strong electromagnetic field to quickly output.
Connect the functional parts with a tight output.
The output must be possible and tight. - Do not allow the plate to be dirty, dusty, or wet. To avoid output, cover the capacitor with a ceramic cover or seal it.
Output material
Correct: full, iron, coated with enamel, stainless iron, output that can be covered with a lid
(with a special tool).
- Type of material: aluminum, copper, steel, cast iron, ceramics, etc.
Before installation, the following installation instructions must be read:
The hot water outlet must be connected to the pipe with the appropriate diameter. - The magnetic filter must be installed in the return pipe.
Installation steps
- The induction heater must be installed with the return pipe and automatic shut-off. - The heater's inlet pipe must be connected to the system's supply pipe. The diameter must be at least two sizes smaller than the pipe diameter, which is a clear sign of the heater's inlet. For maximum performance and to avoid overheating of the heater, the supply pipe must be larger than the specified diameter in the "Heater Installation Manual". During heater operation, the control panel
must be protected. Do not expose the control panel to moisture or rain, as this may cause malfunction.

Read the warning.
6.2 Operation during operation
If you have any questions:
- If the supply pipe is exposed: the pipe is made of various materials (including plastic pipes).
- If the pipe is exposed: the heater's inlet must be higher than the pipe and made of various materials (with insulation).
- Warning: Do not start the heater without water.
- Disposal: Disconnect the electrical connection.
- Cleaning, maintenance: Check for leaks.
The unit must be installed by qualified personnel and they must be familiar with these instructions.
6.3 Oko Timer (3ko TaImeP)
KyaattbI yHemdey ywiH nicipy aHaHBiH Kbl3dbipfbwbl Kepi caHaKa TaMepiHi CNrHaJIbI ecTIImeN TypbIn cHeDi. Kymbcic ICTey yaBtBnHbN ap TpyPi 6onybl KbI3y napameTpIne XHe nicipy yaBtBHa 6aJNaHbICTbl.
6.4 Θ3ipney Ke3iHnde KOndaHy KaFdaIJaPbIHbIH MbIcAJaPbI
Nicipy anaHbIHbIN KbI3y napameTpimeh KyaTTbI TyTbIHy MHe i3apa Typa 6aHaNbICTbI eMec. KbI3y napameTpIH Ke6eHTkeH Ke3de, nicipy anaHbI NaaHaHaTbIH Kyat MHe nponopuHOHaNbDbI TpydKe6eMeiDi. CoHbIKtah opTaWa KbI3y napameTpIH KondaHaTbIH nicipy anaHbI, e3 KyaTbIHbIH JapTbcIHHaH a3bIH KymcaNdbl.

KecTeDi IepeKTeP TeK HycKay petiHde 6epinreH.
Kayinci3ik TapaynapbIH
KapaHb3.
8.1 He ictepci3, erep...
| Месе biktuman ce6e6i Sheim | |||
| Плитаны icke кosa hemeces пайдана на щимасы3. | ПлITA злескг жуесице Косьлмаян hemecе ол дурьс жалганбаган. | Плитанын олескг жуесице дурьс КосьлмаянTekсерінiz. | |
| Са��андыр fvblш Куйн кетken. Акayлбikka са��андыр fvbltsbн себен Тур: Боглмаян Trckсерінiz. Са��андыр fvblш Куйн кетken Куйн Trьбогрс Trdtrg, Куйн Trьбогрс Trdtrg. Куйн Trьбогрс Trdtrg. Kуйн Trьбогрс Trdtrg. Тур: Боглмаян Trckсерінiz. Са��андыр fvblш Куйн кетken Куйн Trьбогрс Trdtrg, Куйн Trьбогрс Trdtrg. Kуйн Trьбогрс Trdtrg. Kуйн Trьбогрс Trdtrg. Тур: Боглмаян Trckсерінiz. Са��андыр fvblш Куйн кетken Куйн Trьбогрс Trdtrg, Куйн Trьбогрс Trdtrg. KуйнTrьбогрсTrdtrg. KуйнTrьбогрсTrdtrg. KуйнTrьбогрсTrdtrg. KуйнTrьбогрсTrdtrg. KуйнTrьбогрсTrdtrg. KуйнTrьбогрсTrdtrg. KуйнTrьбогрсTrdtrg. KуйнTrвбогрсTrdtrg. KуйнTrьбогрсTrdtrg. KуйнTrьбогрсTrdtrg. KуйнTrьбогрсTrdtrg. KуйнTrьбогрсTrdtrg. KуйнTrьбогрсTrdtrg. KуйнTrьбогрсTrdtrg. КуйнTrьбогрсTrdtrg. KуйнTrьбогрсTrdtrg. KуйнTrьбогрсTrdtrg. KуйнTrьбогрсTrdtrg. KуйнTrьбогрсTrdtrg. KуйнTrьбогрсTrdtrg. KуйнTrьбогрсTур: Боглмаян Trckсерінiz. Са��андыр fvblш Куйн кетken. Тур: Боглмаян Trckсерінiz. Са��андыр fvbltsbн себен Тур: Боглмаян Trckсерінiz. Са��андыр fvbltsb Тур: Боглмаян Trckсерінiz. Са��андыр fvbltsb Тур: Боглмаян Trckсерінiz. Са��андыр fvbltsb Тур: Боглмаян Trckсерінiz. Са��андыр fvbltsb Тур: Боглмaley Trckсерінiz. Са��андыр fvbltsb Тур: Боглмаян Trckсерінiz. Са��андыр fvbltsb Тур: Боглмаян Trckсерінiz. Са��андыр fvbltsb Тур: Боглмаян Trckсерінiz. Сa��андыр fvbltsb Тур: Боглмаян Trckсерінiz. Са��андыр fvbltsb Тур: Боглмаян Trckсерінiz. Сa��андыр fvbltsb Тур: Боглмаян Trckсерінiz. Сa��андыр fvbltsb Тур: Боглмаян Trckсерінiz. Сa��андыр fvbltsb Тур: Боглмаян Trckсерінiz. Сa��андыр fvbltsb | Боглмаян Trckсерінiz. Са��андыр fvbltsa Кайта-Кайта Кайт Куйн Trьбогрс Trdtrg. Куйн Trьбогрс Trdtrg. Куйн Trьбогрс Trdtrg. Куйн Trьбогрс Trdtrg. Куйн Trьбогрс Trdtrg. Куйн Trьбогрс Trdtrg. Куйн Trьбогрс Trdtrg. Куйн Trьбогрc Куйн Trьбогрc Куйн Trьбогрc Куйн Trьбогрc Куйн Trьбогрc Куйн Trьбогрc Куйн Trьбогрc Куйн Trьбогрc Куйн Trьбогрc Куйн Trьбогрc Kуйн Trьбогрc Kуйн Trьбогрc Kуйн Trьбогрc Kуйн Trьбогрc Kуйн Trьбогрc Kуйн Trьбогрc Kуйн Trьбогрc Kуйн Trьбогрc Kуйн Trьбогрc Kuядір Боглмаян Trckсерінiz. Са��андыр fvbltsb Тур: Боглмаян Trckсерінiz. Са��андыр fvbltsb Тур: Боглмаян Trckсерінiz. Са��андыр fvbltsb Тур: Боглмаян Trckсerі Са��андыр fvbltsb Тур: Боглмаян Trckсері Са��андыр fvbltsb Тур: Боглмаян Trckс Са��андыр fvbltsb Тур: Боглмаян Trckс Са��андыр fvbltsb Тур: Боглмаян Trckс Са��андыр fvbltsb Тур: Боглмаян Trckс Са��андыр fvbltsb Тур: Боглмaley Trckс Са��андыр fvbltsb Тур: Боглмaley Trckс Са��андыр fvbltsb Тур: Боглмaley Trckс Са��андыр fvbltsb Тур: Боглмaley Trckс Са��андыр fvbltsb Тур: БоглмALE Са��андыр fvbltsb Тур: БоглмALE Са��андыр fvbltsb Тур: БоглмALE Са��андыр fvbltsb Тур: БоглмALE Са��андыр fvbltsb Тур: БоглмALE Са��андыр fvbltsa БоглмALE Са��андыр fvbltsb Тур: БоглмALE Са��андыр fvbltsb Тур: БоглмALE Са��андыр fvbltsb Тур: БоглмALE Са��андыр fvbltsb Тур: БоглмALE Са��анд Тур: БоглмALE Са�� Тур: БоглмALE Са�� Тур: БоглмALE Са�� Тур: БоглмALE Са�� Тур: БоглмALE Са�� Тур: БоглмALE Са�� Тур: БоглмALE Са�� Тур: БоглмALE Са�� Tур: БоглмALE Са�� Tур: БоглмALE Са�� Tур: БоглмALE Са�� Tур: БоглмALE Са�� Tур: БоглмALE Са�� Tур: БоглмALE Са�� Tур: БоглмALE Са�� TуP: БоглмALE Са�� TуP: БоглмALE Са�� TуP: БоглмALE Са�� TуP: БоглмALE Са�� TуP: БоглмALE Са�� TуP: БоглмALE Са�� TуP: БоглмALE Са�� TуP: ВоглмALE Са�� TуP: БоглмALE Са�� TуP: БоглмALE Са�� TуP: БоглмALE Са�� TуP: БоглмALE Са�� TуP: БоглмALE Са�� TуP: БоглмALE Са�� TуP: Богlund Тур: БоглмALE Са�� TуP: Богlund Са�� TуP: Богlund Са�� TуP: Богlund Са�� TуP: Богlund Са�� TуP: Богlund Са�� TуP: Богlund Са�� TуP: Богlund Са�� TуP: Богlund Са�� TуP: Богlund Са刘 TуP: Богlund Са刘 TуP: Богlund Са刘 TуP: Богlund Са刘 TуP: Богlund Са刘 TуP: Богlund Са刘 TуP: Богlund Са刘 TуP: Богlund Са刘 TуP: Богlund Са刘 TуR ТуP: Богlund Са刘 TуR ТуP: Богlund Са刘 TуR ТуP: Богlund Са刘 TуR ТуP: Богlund Са刘 TуR ТуP: Богlund Са刘 TуR ТуP: Богlund Са刘 TуR ТуP: Boglund Са刘 TуR ТуP: Boglund Са刘 TуR ТуP: Boglund Са刘 TуR ТуP: Boglund Са刘 TуR ТуP: Boglund Са刘 TуR ТуP: Boglund Са刘 TуR ТуP: Boglund Сa刘 TуR ТуP: Boglund Са刘 TуR ТуP: Boglund Са刘 TуR ТуP: Boglund Са刘 TуR ТуP: Boglund Са刘 TуR ТуP: Boglund Са刘 TуR ТуP: Boglund Са刘 Túr ТуP: Boglund Са刘 Túr ТуP: Boglund Са刘 Túr ТуP: Boglund Са刘 Túr ТуP: Boglund Са刘 Túr ТуP: Boglund Са刘 Túr ТуP: Boglund Са刘 Túr ТуR ТуP: Boglund Са刘 Túr ТуR ТуP: Boglund Са刘 Túr ТуR ТуP: Boglund Са刘 Túr ТуR ТуP: Boglund Са刘 Túr ТуR ТуP: Boglund Са刘 Túr ТуP: Boglund Са刘 Túr ТуR ТуP: Boglund Са刘 Túr ТуR ТуP: Boglund Са刘 Túr ТуR ТуP: Boglund Са刘 Túr ТуR ТуR ТуP: Boglund Са刘 Túr ТуR ТуP: Boglund Са刘 Túr ТуR ТуP: Boglund Са刘 Túr ТуR ТуP: Boglund Са刘 Túr ТуR ТуP: Boglund Са刘 Tú r ТуR ТуP: Boglund Са刘 Túr ТуR ТуP: Boglund Са刘 Túr ТуR ТуP: Boglund Са刘 Túr ТуR ТуP: Boglund Са刘 Túr ТуR ТуP: Boglund Са刘 Tút ТуR ТуP: Boglund Са刘 Tút ТуR ТуP: Boglund Са刘 Tút ТуR ТуP: Boglund Са刘 Tút ТуR ТуP: Boglund Са刘 Tút ТуR ТуP: Boglund Са刘 Túr ТуR ТуP: Boglund Са刘 Túr ТуR ТуP: Boglund Са刘 Túr ТуR ТуP: Boglund Са刘 Túr ТуR ТуP: Boglund Са刘 Túl ТуR ТуP: Boglund Са刘 Túr ТуR ТуP: Boglund Са刘 Túr ТуR ТуP: Boglund Са刘 Túr ТуR ТуP: Boglund Са刘 Túr ТуR ТуP: Boglund Са刘 Túf ТуR ТуP: Boglund Са刘 Túf ТуR ТуP: Boglund Са刘 Túf ТуR ТуP: Boglund Са刘 Túf ТуR ТуP: Boglund Са刘 Túf ТуR ТуP: Boglund Са刘 Túr ТуR ТуP: Boglund Са刘 Túr ТуR ТуP: Boglund Са刘 Túr ТуR ТуP: Boglund Са刘 Túr ТуR ТуP: Boglund Са刘 TúF ТуR ТуP: Boglund Са刘 Túr ТуR ТуP: Boglund Са刘 Túr ТуR ТуP: Boglund Са刘 Túr ТуR ТуP: Boglund Са刘 Túr ТуR ТуP: Boglund Са刘 Tú'r ТуR ТуP: Boglund Са刘 Túr ТуR ТуP: Boglund Са刘 Túr ТуR ТуP: Boglund Са刘 Túr ТуR ТуP: Boglund Са刘 Túr ТуR ТуP: Boglund Са刘 Tár ТуR ТуP: Boglund Са刘 Túr ТуR ТуP: Boglund Са刘 Túr ТуR ТуP: Boglund Са刘 Túr ТуR ТуP: Boglund Са刘 Túr ТуR ТуP: Boglund Са刘 Tír ТуR ТуP: Boglund Са刘 Túr ТуR ТуP: Boglund Са刘 Túr ТуR ТуP: Boglund Са刘 Túr ТуR ТуP: Boglund Са刘 Túr ТуR ТуP: Boglund Са刘 Tür ТуR ТуP: Boglund Са刘 Túr ТуR ТуP: Boglund Са刘 Túr ТуR ТуP: Boglund Са刘 Túr ТуR ТуP: Boglund Са刘 Túr ТуR ТуP: Boglund Са刘 Tùr ТуR ТуP: Boglund Са刘 Túr ТуR ТуP: Boglund Са刘 Túr ТуR ТуP: Boglund Са刘 Túr ТуR ТуP: Boglund Са刘 Túr ТуR ТуP: Boglund Са刘 Tór ТуR ТуP: Boglund Са刘 Túr ТуR ТуP: Boglund Са刘 Túr ТуR ТуP: Boglund Са刘 Túr ТуR ТуP: Boglund Са刘 Túr ТуR ТуP: Boglund Са刘 Tér ТуR ТуP: Boglund Са刘 Túr ТуR ТуP: Boglund Са刘 Túr ТуR ТуP: Boglund Са刘 Túr ТуR ТуP: Boglund Са刘 Túr ТуR ТуP: Boglund Са刘 TÍr ТуR ТуP: Boglund Са刘 Túr ТуR ТуP: Boglund Са刘 Túr ТуR ТуP: Boglund Са刘 Túr ТуR ТуP: Boglund Са刘 Túr ТуR ТуP: Boglund Са刘 Tár ТуR ТуP: Boglund Са刘 Túr ТуR ТуP: Boglund Са刘 Túr ТуR ТуP: Boglund Са刘 Túr ТуR ТуP: Boglund Са刘 Túr ТуR ТуP: Boglund Са刘 Túrl ТуR ТуP: Boglund Са刘 Túr ТуR ТуP: Boglund Са刘 Túr ТуR ТуP: Boglund Са刘 Túr ТуR ТуP: Boglund Са刘 Túr ТуR ТуP: Boglund Са刘 Túrn ТуR ТуP: Boglund Са刘 Túr ТуR ТуP: Boglund Са刘 Túr ТуR ТуP: Boglund Са刘 Túr ТуR ТуP: Boglund Са刘 Túr ТуR ТуP: Boglund Са刘 Túrg ТуR ТуP: Boglund Са刘 Túrg ТуR ТуP: Boglund Са刘 Túrg ТуR ТуP: Boglund Са刘 Túrg ТуR ТуP: Boglund Са刘 Túrg ТуR ТуP: Boglund Са刘 Túr ТуR ТуP: Boglund Са刘 Túrg ТуR ТуP: Boglund Са刘 Túrg ТуR ТуP: Boglund Са刘 Túrg ТуR ТуP: Boglund Са刘 Túr ТуR ТуP: Boglund Са刘 Túr ТуR ТуP: Boglund Са刘 Túrg ТуR ТуP: Boglund Са刘 Túrg ТуR ТуP: Boglund Са刘 Túr ТуR ТуP: Boglund Са刘 Túrg ТуR ТуP: Boglund Са刘 Túr ТуR ТуP: Boglund Са刘 Túrg ТуR ТуP: Boglund Са刘 Túrg ТуR ТуP: Boglund Са刘 Túr ТуR ТуP: Boglund Са刘 Túr ТуR ТуP: Boglund Са刘 Túr ТуR ТуP: Boglund Са刘 Túr ТуR ТуP: Boglund Са刘 Túrd ТуR ТуP: Boglund Са刘 Túrd ТуR ТуP: Boglund Са刘 Túrd ТуR ТуP: Boglund Са刘 Túrd ТуR ТуP: Boglund Са刘 Túrd ТуR ТуP: Boglund Са刘 Túr ТуR ТуP: Boglund Са刘 Túrd ТуR ТуP: Boglund Са刘 Túrd ТуR ТуP: Boglund Са刘 Túrd ТуR ТуP: Boglund Са刘 Túr ТуR ТуP: Boglund Са刘 Túr ТуR ТуP: Boglund Са刘 Túr ТуR ТуP: Boglund Са刘 Túr ТуR ТуP: Boglund Са刘 Túrt ТуR ТуP: Boglund Са刘 Túrt ТуR ТуP: Boglund Са刘 Túrt ТуR ТуP: Boglund Са刘 Túrt ТуR ТуP: Boglund Са刘 Túrt ТуR ТуP: Boglund Са刘 Túr ТуR ТуP: Boglund Са刘 Túrt ТуR ТуP: Boglund Са刘 Túrt ТуR ТуP: Boglund Са刘 Túrt ТуR ТуP: Boglund Са刘 Túr ТуR ТуP: Boglund Са刘 Túr ТуR ТуP: Boglund Са刘 Túr ТуR ТуP: Boglund Са刘 Túr ТуR ТуP: Boglund Са刘 Túrs ТуR ТуP: Boglund Са刘 Túr ТуR ТуP: Boglund Са刘 Túr ТуR ТуP: Boglund Са刘 Túr ТуR ТуP: Boglund Са刘 Túr ТуR ТуP: Boglund Са刘 Túrf ТуR ТуP: Boglund Са刘 Túrf ТуR ТуP: Boglund Са刘 Túrf ТуR ТуP: Boglund Са刘 Túrf ТуR ТуP: Boglund Са刘 Túrf ТуR ТуP: Boglund Са刘 Túf ТуR ТуP: Boglund Са刘 Túf ТуR ТуP: Boglund Са刘 Túf ТуR ТуP: Boglund Са刘 Túf ТуR ТуP: Boglund Са刘 Túrf ТуR ТуP: Boglund Са刘 Túf ТуR ТуP: Boglund Са刘 Túf ТуR ТуP: Boglund Са刘 Túf ТуR ТуP: Boglund Са刘 Túrf ТуR ТуP: Boglund Са刘 Túrf ТуR ТуP: Boglund Са刘 Túrf ТуR ТуP: Boglund Са刘 Túrf ТуR ТуP: Boglund Са刘 Túr ТуR ТуP: Boglund Са刘 Túrf ТуR ТуP: Boglund Са刘 Túrf ТуR ТуP: Boglund Са刘 Túrf ТуR ТуP: Boglund Са刘 Túf ТуR ТуP: Boglund Са刘 Túrf ТуR ТуP: Boglund Са刘 Túrf ТуR ТуP: Boglund Са刘 Túrf ТуR ТуP: Boglund Са刘 Túf ТуR ТуP: Boglund Са刘 Túr ТуR ТуP: Boglund Са刘 Túf ТуR ТуP: Boglund Са刘 Túf ТуR ТуP: Boglund Са刘 Túf ТуR ТуP: Boglund Са刘 Túr ТуR ТуP: Boglund Са刘 Túf ТуR ТуP: Boglund Са刘 Túf ТуR ТуP: Boglund Са刘 Túr ТуR ТуP: Boglund Са刘 Túf ТуR ТуP: Boglund Са刘 Túr ТуR ТуP: Boglund Са刘 Túf ТуR ТуP: Boglund Са刘 Túf ТуR ТуP: Boglund Са刘 Túrf ТуR ТуP: Boglund Са刘 Túf ТуR ТуP: Boglund Са刘 Túrf ТуR ТуP: Boglund Са刘 Túf ТуR ТуP: Boglund Са刘 Túf ТуR ТуP: Boglund Са刘 Túrf ТуR ТуP: Boglund Са刘 Túf ТуR ТуP: Boglund Са刘 Túr ТуR ТуP: Boglund Са刘 Túf ТуR ТуP: Boglund Са刘 Túrf ТуR ТуP: Boglund Са刘 Túf ТуR ТуP: Boglund Са刘 Túf ТуR ТуP: Boglund Са刘 Túr ТуR ТуP: Boglund Са刘 Túf ТуR ТуP: Boglund Са刘 Túrf ТуR ТуP: Boglund Са刘 Túrf ТуR ТуP: Boglund Са刘 Túf ТуR ТуP: Boglund Са刘 Túf ТуR ТуP: Boglund Са刘 Túrf ТуR ТуP: Boglund Са刘 Túrf ТуR ТуP: Boglund Са刘 Túf ТуR ТуP: Boglund Са刘 Túrf ТуR ТуP: Boglund Са刘 Túf ТуR ТуP: Boglund Са刘 Túrf ТуR ТуP: Boglund Са刘 Túrf ТуR ТуP: Boglund Са刘 Túf ТуR ТуP: Boglund Са刘 Túr ТуR ТуP: Boglund Са刘 Túrf ТуR ТуP: Boglund Са刘 Túrf ТуR ТуP: Boglund Са刘 Túrf ТуR ТуP: Boglund Са刘 Túr ТуR ТуP: Boglund Са刘 Túf ТуR ТуP: Boglund Са刘 Túrf ТуR ТуP: Boglund Са刘 Túrf ТуR ТуP: Boglund Са刘 Túrf ТуR ТуP: Boglund Са刘 Túr ТуR ТуP: Boglund Са刘 Túr ТуR ТуP: Boglund Са刘 Túrf ТуR ТуP: Boglund Са刘 Túrf ТуR ТуP: Boglund Са刘 Túf ТуR ТуP: Boglund Са刘 Túrf ТуR ТуP: Boglund Са刘 Túr ТуR ТуP: Boglund Са刘 Túrf ТуR ТуP: Boglund Са刘 Túrf ТуR ТуP: Boglund Са刘 Túf ТуR ТуP: Boglund Са刘 Túf ТуR ТуP: Boglund Са刘 Túr ТуR ТуP: Boglund Са刘 Túrf ТуR ТуP: Boglund Са刘 Túrf ТуR ТуP: Boglund Са刘 Túf ТуR ТуP: Boglund Са刘 Túr ТуR ТуP: Boglund Са刘 Túr ТуR ТуP: Boglund Са刘 Túf ТуR ТуP: Boglund Са刘 Túf ТуR ТуP: Boglund Са刘 Túr ТуR ТуP: Boglund Са刘 Túr ТуR ТуP: Boglund Са刘 Túf ТуR ТуP: Boglund Са刘 Túr ТуR ТуP: Boglund Са刘 Túf ТуR ТуP: Boglund Са刘 Túr ТуR ТуP: Boglund Са刘 Túr ТуR ТуP: Boglund Са刘 Túf ТуR ТуP: Boglund Са刘 Túrf ТуR ТуP: Boglund Са刘 Túf ТуR ТуP: Boglund Са刘 Túrf ТуR ТуP: Boglund Са刘 Túr ТуR ТуP: Boglund Са刘 Túf ТуR ТуP: Boglund Са刘 Túf ТуR ТуP: Boglund Caiy | БоглмALE | БоглмALE |
| БоглмALE | БоглмALE | БоглмALE | |
| БоглмALE | БоглмALE | БоглмALE | |
| БоглмALE | БоглмALE | БоглмALE | |
| БоглмALE | БоглмALE | БоглмALE | |
| БоглмALE | БоглмALE | БоглмALE | |
| Боглмale | БоглмALE | Боглmale | |
| БоглмALE | Боглmale | Боглmale | |
| БоглмALE | Боглmale | Боглmale | |
| БоглмALE | Боглmale | Боглmale | |
| БоглмALE | Боглmale | Боглmale | |
| БоглмALE | Боглmale | Боглmale | |
| БоглмALE | Боглmole | Боглmole | |
| БоглмALE | Боглmole | Боглmole | |
| БоглмALE | Боглmole | Боглmole | |
| БоглмALE | Боглmole | Боглmole | |
| БоглмALE | Боглmole | Боглmole | |
| Боглmale | Боглmole | Боглmole | |
| Боглmale | Боглmole | Боглmole | |
| Боглmale | Боглmole | Боглmole | |
| Боглmale | Боглmole | Боглmole | |
| Боглmale | Боглmole | Боглmole | |
| Боглmole | Боглmole | Боглmole | |
| Боглmole | Боглmole | Боглmole | |
| Боглmole | Боглmole | Боглmole | |
| Боглmole | Боглmole | Боглmole | |
| Боглmole | Боглmole | Боглmole | |
| Боглmale | Боглmole | Боглmole | |
| Боглmole | Боглmole | Боглmole | |
| Боглmole | Боглmole | Боглmole | |
| Боглmole | Боглmole | Боглmole | |
| Боглmale | Боглmole | Боглmole | |
| Боглmale | Боглmole | Боглmole | |
| Боглmole | Боглmole | Боглmole | |
| Боглmole | Боглmole | Боглmole | |
| Боглmale | Боглmole | Боглmole | |
| Боглmole | Боглmole | Боглmole | |
| Боглmale | Боглmole | Боглmole | |
| Боглmole | Боглmole | Боглmole | |
| Боглmole | Боглmole | Боглmole | |
| Боглmale | Боглmole | Боглmole | |
| Боглmale | Боглmole | Боглmole | |
| Боглmale | Боглmole | Боглmole | |
| Боглmole | Боглmole | Боглmole | |
| Боглmale | Боглmole | Боглmole | |
| Боглmole | Боглmole | Боглmole | |
| Боглmale | Боглmole | Боглmole | |
| Боглmale | Боглmole | Боглmole | |
| Боглmole | Боглmole | Боглmole | |
| Боглmale | Боглmole | Боглmole | |
| Боглmale | Боглmole | Боглmole | |
| Боглmale | Боглmole | Боглmole | |
| Боглmale | Боглmole | Боглmole | |
| Боглmle | Боглmole | Боглmole | |
| Боглmle | Боглmole | Боглmole | |
| Боглmle | Боглmole | Боглmole | |
| Боглmle | Боглmole | Боглmole | |
| Боглmle | Боглmole | Боглmole | |
| Боглmole | Боглmole | Боглmole | |
| Боглmle | Боглmole | Боглmole | |
| Боглmle | Боглmole | Боглmole | |
| Боглmle | Боглmole | Боглmole | |
| Боглmle | Боглmole | Боглmole | |
| БоглmLE | Боглmole | Боглmole | |
| Боглmle | Боглmole | Боглmole | |
| Боглmle | Боглmole | Боглmole | |
| Боглmle | Боглmole | Боглmole | |
| Боглmle | Боглmole | Боглmole | |
| Боглmles | Боглmole | Боглmole | |
| Боглmle | Боглmole | Боглmole | |
| Боглmle | Боглmole | Боглmole | |
| Боглmle | Боглmole | Боглmole | |
| Боглmle | Боглmole | Боглmole | |
| Боглmlez | Боглmlez | Боглmlez | |
| Боглmlez | Боглmlez | Боглmlez | |
| Боглmlez | Боглmlez | Боглmlez | |
| Боглmlez | Боглmlez | Боглmlez | |
| Боглmlez | Боглmlez | Боглmlez | |
| Боглmlez | Боглmlez | Боглmlore | |
Mocene bIKTmamJI ce6e6i Ieewim
| ПлNTа сенedi. | Сi3 сeнсорьк epicke b#р hερсé КоиFaHcbl3. | Сeнсорьк epicteri 3aTTb aIbIn ТаCTaHbI3. | |
| Калдык жылу Иndикаторы ханбай тур. | Аймak bICTbik emec, себбі ол a3 уakbl fana кocblbɪn Tурган He сeнсорын akaybl 6ap. | Еreamak bICNTbɪdai y3ak yakblT ЖуMbIC iCTece, yekineTTi kbl3met КерсeТу ортыlbɪha xabaplacbɪh3. | |
| Hob²Hood жуMbic ictemeіt typ. Ciz 6ackapy панелін жалын b13. | Бackapу панелін жалын b13. | Бackapу панелін deri 3aTTb aIbIn ТаCTaHbI3. | |
| Синhalfa 6eREtжасайын ete 6niK ыdblcbl naДандын b13. | KiiшIKEk bIDbICtbl naДaндын b13, nicipy aiMaFbɪN aybICtblbɪn 3 He neuTIH mexaHnkaBik KOLmeh Бackapbyln b13. | ||
| Панелын сeнсорьк epicteri турken kezde ewbip синhal ectiIMeɪdi. | ДыбыICTBk синhalДap сeндіруNi. ДыбыICTBk синhalДap b13. | «Кундeліkti колдагы kColbɪn b13. «Кундeліkti колдагы kColbɪn b13. «Кундeліkti колдагы kColbɪn b13. «Кундeліkti колдагы kColbɪn b13. «Кундeліkti колдагы kColbɪn b13. «КундeліKTi колдагы kColbɪn b13. «КундeліKTi колдагы kColbɪn b13. «КундeліKTi колдагы kColbɪn b13. «КундeліKTi колдагы kColbɪn b13. «КундeліKTi колдагы kOLmAHaH. «КундeліKTi кOLmAHaH. «КундeліKTi кOLmAHaH. «КундeліKTi кOLmAHaH. «КундeліKTi кOLmAHaH. «КундeліKTi кOLmAHaH. «КундeліKTi кOLmAHaH. «КундeліKTi кOLmAHаH. «КундeліKTi кOLmAHaH. «КундeліKTi кOLmAHaH. «КундeліKTi кOLmAHaH. «КундeліKTi кOLmAHaH. «КундeліKTi кOLmAHaH. «КундeліKTi кOLmAHaH. «Kун'de l'KoLmEi. | |
| Бжанды. | Бana kayinciaDi rkiyblfbcI Hemece Kylblntay jyMbIC icTeiDi. | «Кундeліkti колдагы» 6eLIMin KaparbIbI3. | |
| Бackapу жоалы ЖылblbIK TaɪdBi. | Аймakta ewbip bIDbIC xOJK hemec аIMak TOnblfBIMen Jx6blImaHaH. | Пису aiMaFbɪN toIbIFbIMeH ЖаБaTbɪn dəi etɪn bIdcTbɪaɪ MαMka КoYbIbIbI3. | |
| Бidbyc sai Keilmei Di. | Саіkec Keeletɪn bIDbIC TlKOLdaHbIbI3. | «СeЗКeМeKTeRжэHe KeHecTeR» БeLIMin KaPArbIbI3. | |
| Бidbyc tv6iH dnAmetpi aiMaK yUsiH TbIM KIIskHe. | Дурьс eIlewemdepi 6ap bIDbICr KOLdaHbIbIbI. «ТeХИкaLbɪk CINaTTama» 6eLIMin KaPArbIbI3. | ||
| PowerSlide jyMbic icTeiDi. Eki | Кастюн ККeMDI INDyKUZIIbIK nicipy aiMaFbIbHa opHaIaIcTbIPbIlnfAHa. | Tek 6ip kactpIoulli NaIaIaNbHbI3. «ИкeMDI INDyKUZIIbIK nicipy aiMaFbIbI» БeLIMin KaPArbIbI3. | |
| ExeHe saH naIda 6oJaIbI. | ПлNTaDA kaTe 6ap. ПлNTaHbI cSeHdiPirih3 De, kaIta 30 cesHydtan KeiH icKe KocbHbI3. Eep E kaIta xaHca, neSti Tok Ke3iHene afblblbI3. 30 ceKyHdTan KeiH ПлNTaHbIbI KaIbTa KocbHbI3. Akayblk ЖоыlmaHа yekinettI Kbl3met KepcetTu optaibfblbHa xa6aplacbIbI3. | ||
| Тура'tы синhal дыбicbH eCTnci3. | Злесчпдь baiIaHbIC duPybIC emec. ПлNTaHbI zIeKtrp keJIciciH aXbipaTbIbI3. BiIiKti 3eLeKtp MamahbHa xa6aplacbɪn, onbɪn opHaTbIybln TekcepTin3. |
8.2 Erep uewim Ta6bImmaca...
AkaaynbiktbI e3iH3 Ty3eTe aImacaHbI3, dInnepiH3re HeyekineTTi KbI3MeT Kepcety optaibfbiHa xa6apnacbiHbI3. 3ayblTBk TaKtaaadaFbI DepeKTePdi 6epiH3. Pnnta Dypbc naiDanaHbINFaHbIH TeKcePiH3.Erep
ocbl wapTTap opbIHdaJmaca, cepBnCTIK TexHnKTIH HeMeCe DInepDIn Kbl3MeT KeiINdk Mep3imHe De aKblb Tpyde opbIHdaJaDbI. Keninik Mep3imi MeH yekilTeTI Kbi3MeT Kepcety optaikTapbl TypaIb IaKnapaT Keninidk KiTanWacbIHda KepcTeIReH.
9. TEXHnKAnbIK DePEK
9.1 3aybITbIK TaKTaIsha
Ynrici EIV9467 PNC 949 596 708 00
Typi 61 E6A 04 AA 400 B 3N 50 - 60 T
Induction 11.0 kW Made in: Germany
Ser. No. 11.0 kW
ELECTROLUX
9.2 Appliance description
| Пису онлайн城乡居民 Куат (еон жогары КьИЗУ паяметри) [ВТ] | PowerBoost [ВТ] PowerBoost eн КЕР узakтбК [Мин] | ыдьICTын Диаметри [MM] |
| Сол жak онлайн 2300 3200 10 125 - 210 | ||
| Сол(apткы жak 2300 3200 10 125 - 210 | ||
| Ортынfy онлайн 2300 3200 10 125 - 210 | ||
| Ортынfy(apткы 2300 3200 10 125 - 210 | ||
| Он жak онлайн 2300 3200 10 125 - 210 | ||
| Он(apткы жak 2300 3200 10 125 - 210 |
The appliance may differ from the drawings in the instructions. The manufacturer reserves the right to make changes to materials and accessories.
To reach the cooking zones, use the diameter indicated in the table, not larger than the cooking zone.
10. POWER SUPPLY
10.1 Appliance information
Model identification: EIV9467
| ПлNTа typi Kipictipilren ПлNTa | ||
| Пису умakтарын саны 3 | ||
| КыздыруTekhoлогиясы | Инданя | |
| Пису умakтарын yзындыfы (Y) кэн eнi (E) | Con | Y 37,9 cm E 22,0 cm |
| Пису умakтарын yзындыfы (Y) кэн eнi (E) | Opta | Y 37,9 cm E 22,0 cm |
| Плесу ща м弗ын узвдьчы (Y) ке He eH (E) OH Y 37,9 cM | E 22,0 cM |
| Плесу ща м弗ы пайдана насын Куат мелшepi (EC electric cooking) | СоI 186,8ВТ / кг |
| Плесу ща м弗ы пайдана насын Куат мелшepi (EC electric cooking) | ОртA 186,8ВТ / кг |
| Плесу ща м弗ы пайдана насын Куат мелшepi (EC electric cooking) | ОH 186,8ВТ / кг |
| ПлессTи пайдана насын Куат мелшepi (EC electric hob) 186,8ВТ / кг | |
- Complies with standard 66/2014 for European Union. For Belarus, complies with standard STB 2477-2017. For Kazakhstan, complies with standard 742/2019. EN 60350-2 - Household electric cooking appliances - Part 2: Hobs - Methods for measuring performance. The power consumption of the cooking zones is indicated by the markings on the cooking surface.
10.2 Energy saving
If you follow the recommendations below, you will save energy during cooking.
Preheat the pan only if necessary.
- If possible, always cover the pan with a lid.
- Do not use the device if the power cord is damaged.
- Do not immerse the device in water.
- Do not place the device near the edge of a table.
For cleaning, use a soft, dry cloth.
11. TROUBLESHOOTING
Store all materials in a dry place. Store materials in a sealed container for dry storage. The electrical and electronic components must be kept dry to avoid damage to the device and personal injury.
Do not dispose of the device in household waste. Do not dispose of the device with other waste. Dispose of it at a recycling point or contact your local waste disposal service.
This product has been manufactured in accordance with the requirements of the European Directive and bears the CE mark. The serial number is 14512345 and the product was manufactured in 2021.
Manufacturer: Electrolux Appliances AB, St. Göransgatan 143, 105 45 Stockholm, Sweden.
Made in Germany.
How to install your Electrolux Induction Hob - Worktop installation
4. DESCRIPTION OF THE APPLIANCE
Fan precords 3
How to install your Electrolux Induction Hob - Worktop installation

4. PRODUCT DESCRIPTION
1. SAFETY INFORMATION
Before installing and using the appliance, carefully read the supplied instructions. The manufacturer is not responsible for any injuries or damage that are the result of incorrect installation or usage. Always keep this instruction manual together with the appliance for future reference.
1.1 Safety of children and persons with limited capabilities
- This appliance is not intended for use by persons (including children) with reduced physical, sensory or mental capabilities, or lack of experience and knowledge, unless they have been given supervision or instruction concerning use of the appliance by a person responsible for their safety. - Children should be supervised to ensure that they do not play with the appliance. Keep all packaging materials out of reach of children and dispose of them appropriately. WARNING! Do not allow children and pets to come near the appliance during operation, and also after use, until the appliance has cooled down. The exposed parts of the appliance heat up during operation. - If the appliance is equipped with a child safety device, it should be activated. Repairs and maintenance of the appliance should not be carried out by children without supervision.
There is a risk of damaging the appliance.
Do not place hot cookware on the control panel. Do not place hot lids or pans on the glass surface of the hob. Do not allow liquids to boil over from cookware. Make sure that no objects or cookware fall onto the appliance. The surface may be damaged. Do not switch on the cooking zones without cookware or with empty cookware. Do not place aluminium foil on the appliance. - Cookware made of cast iron, aluminium or with a damaged bottom may cause scratches on the glass or glass-ceramic surface. Always lift these items when moving them on the hob. - This appliance is intended exclusively for cooking purposes. It should not be used for other purposes, such as heating the room.
2.4 CARE AND CLEANING
- To avoid damage to the surface of the appliance, clean it regularly.
- Before cleaning, switch off the appliance and let it cool down. Do not use a steam cleaner or high-pressure water for cleaning. Clean the appliance with a soft, damp cloth. Use only neutral detergents. Do not use abrasive cleaners, scouring pads, solvents or metal objects.
2.5 SERVICE
For repairs of the appliance, contact an authorized service center. Use only original spare parts. - About the lamps inside the appliance: the lamps, sold separately as spare parts, are designed to operate in household appliances in extremely difficult temperature, vibration and humidity conditions and are intended to transmit information about the operating state of the appliance. They are not intended for use in other appliances and are not suitable for lighting household rooms.
2.6 Disposal

WARNING!
There is a risk of injury or damage.
For information on how to correctly dispose of the appliance, contact the manufacturer's representative or the local operator for solid household waste. - Disconnect the appliance from the power supply. - Cut the power cable as close to the appliance as possible and dispose of it.
3. INSTALLATION

WARNING!
See chapters, contents
Safety instructions.
Safety instructions.
3.1 Before installation
Before installation, carefully read the technical data table listed below. The technical data table is located on the rating plate.
Serial number
3.2 Built-in ovens
Operation of built-in ovens is permitted only after their installation in furniture intended for built-in ovens and meeting the required standards.
3.3 Induction hob cable
The hob is supplied with a mains cable. To replace a damaged mains cable, use cable type: H05V2V2-F, which withstands temperatures of 90°C or higher. Contact an authorized service center. Replacement of the mains cable must be carried out only by a qualified electrician.
3.4 Assembly
Before installing the hob, read the installation instructions for the hob, which provide the necessary data on the minimum distances between appliances.
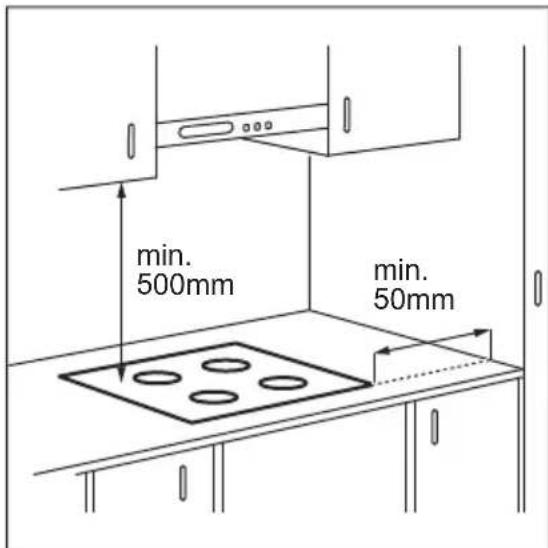
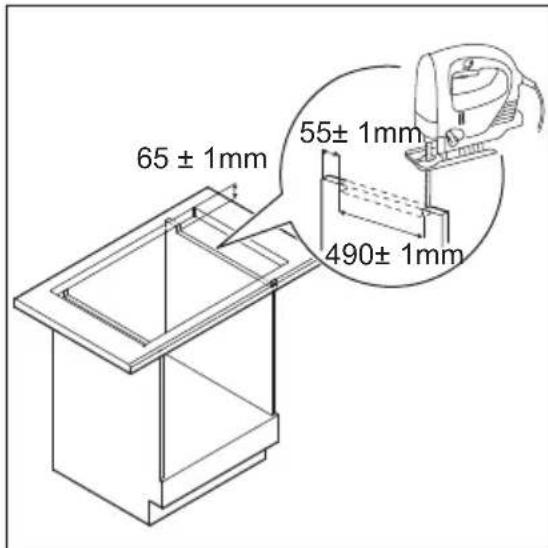
If the appliance is installed above a drawer, the ventilation system of the hob surface may heat up items stored in the drawer during cooking.
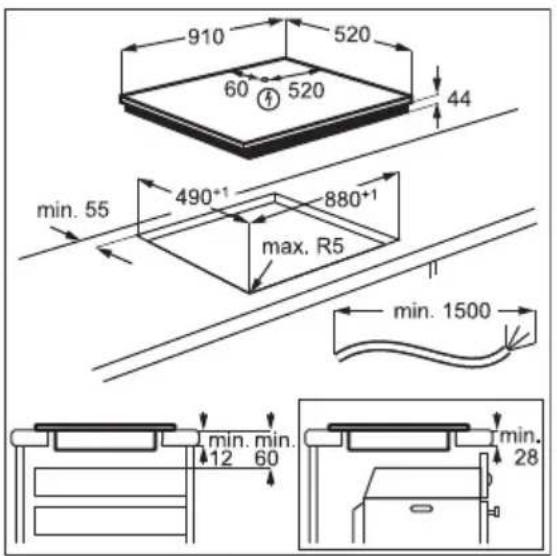
Watch the video instructions "Installing an Induction Hob Electrolux - installation in a worktop". To do this, enter the full name shown in the illustrations below in the search field.

www.youtube.com/electrolux www.youtube.com/aeg

4. APPLIANCE DESCRIPTION
4.1 Functional elements of the cooking surface
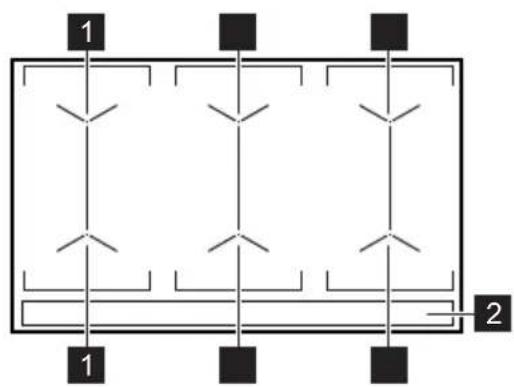
1 Induction cooking zone 2 Control panel
If the hot indicator is on, there is a risk of burns due to residual heat.
Induction cooking zones create the heat necessary for cooking directly in the cookware placed on them. The glass ceramic is heated by the heat of the cookware.
If the cooking zone is still hot, the indicators /f.QHn turn on and show the level of residual heat of the cooking zones in use at that moment.
The indicator may also turn on:
For adjacent cooking zones, even if they are not in use; when hot cookware is placed on a cold cooking zone; when the hob control panel is switched off, but the cooking zone is still hot.
5.6 Bridge
The Bridge function combines two cooking zones so that they operate as one cooking zone. This function can be used with large cookware.
- Place the cookware on the two cooking zones. The cookware must cover the centers of both cooking zones. The symbol lights up. 2. To switch on the function, touch
- Set the corresponding heating power level.
The cookware must cover the centers of both cooking zones, but must not extend beyond the marked areas.
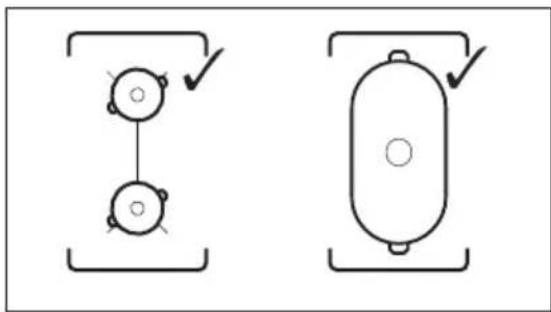
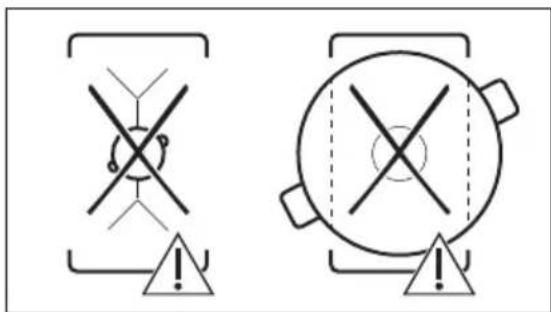
To switch off the function, touch the symbol. The cooking zones will now operate independently of each other.
5.7 PowerBoost
This function allows you to increase the power of the corresponding induction heating zone. It depends on the size of the cookware. The function can only be switched on for a limited period of time.
To switch on the function for a cooking zone, touch the symbol.
The symbol lights up red. The function switches off automatically.

Maximum values for the duration are given in the chapter “Technical data”.
5.8 Pause
When the function is active, the use of the functions ① and N is possible.
This function does not switch off the timer function.
To turn off the knob, press the symbol with a red color. The heating level will be lowered to the value 1
To turn off the function: press the symbol with a red color. The heating level will be reduced.
5.9 Timer
Countdown timer
This function is used to set the duration of operation of the hob for one cooking cycle.
First set the heating level, then set the cooking time.
1. To turn on the function, press the timer symbol repeatedly until the indicators change to red. If the timer is not set, after a few seconds all indicators will go out.
2. Touch to set the time (from 00 to 99 minutes).
After 3 seconds, the countdown will start automatically. The indicators
will disappear. The red one remains. When the set time has elapsed, an audible signal will sound and the indicator will flash. To turn off the signal, touch
To turn off this function: touch ①. The indicators will light up. To set the heating level beforehand, use - or also you can set the heating level earlier. This will lead to the deactivation of the audible signals and the timer.
CountUp Timer
This function can be used to control the operating time of the hob.
To turn on the function, touch twice
The indicator will turn red, and the timer will automatically start a new countdown from the beginning of cooking.
To activate the function, touch the indicators when they light up, touch
the timer
You can use this function when the warming plate is switched on, but none of the hotplates are in use.
To make the control panel light up, place a pot on the hotplate.
1. To activate the function, touch and hold until the indicator turns red.
2. To set the time, use + or -. The function starts automatically after 4 seconds. The + indicator goes out. It stays red. After setting the function, you can remove the pot.
After the set time has elapsed, an audible signal sounds and the warming plate starts to blink. Touch to switch off the audible signal.
To switch off this function: touch ①. The indicator goes out. To adjust the settings on the display, use -
This function does not affect the operation of any of the hotplates.
5.10 Key lock
During operation of the warming plate, you can lock the control panel. This prevents accidental changes to the heating power.
First set the desired heating level.
To activate the function, touch the symbol. It lights up red and flashes.
To deactivate the function, touch and hold the symbol. It lights up white.

When the warming plate is switched off, this function is also switched off.
This function prevents accidental use of the steam iron.
First turn on the steam iron, but do not select a heat level.
To activate the function, press and hold until the color changes to red.
The control lines will light up. Turn off the steam iron.

After turning off the steam iron, this function continues to work as before.
To deactivate the function for only one cooking cycle: turn on
8.2 If the problem could not be solved...
If you cannot fix it yourself, contact the store where the device was purchased or an authorized service center. Provide the information indicated on the technical data plate. Make sure that the control panel
was operated correctly. In case of incorrect operation of the device, the technical service provided by the service center specialists or the seller will be paid, even if the warranty period has not expired. Information about the warranty period and authorized service centers is given in the warranty certificate.
9. TECHNICAL DATA
9.1 Table with technical data
Model EIV9467 Product number (PNC) 949 596 708 00
Tn61E6A04AA400B3N50-60
Power 11.0 kW Made in: Germany
ELECTROLUX
9.2 Cooking hob
Made in Germany.
DESIGNED FOR YOU
Thank you for purchasing an Electrolux appliance. You have chosen a product that has been developed based on decades of professional experience and innovation. Ingenious and stylish – designed with your comfort in mind. With every use, you can be sure of excellent performance. Welcome to the world of Electrolux.
How to install your Electrolux Induction Hob - Worktop installation
4. PRODUCT DESCRIPTION
How to install your Electrolux Induction Hob - Worktop installation

4. PRODUCT DESCRIPTION
How to install your Electrolux Induction Hob - Worktop installation

4. PRODUCT DESCRIPTION
ELECTROLUX APPLIANCES AB
BUSINESS SECTOR EMA-EMEA (SEE)
ST GÖRANSGATAN 143
SE-105 45 STOCKHOLM
SWEDEN
TEL: +46 (8) 738 60 00
FAX: +46 (8) 738 63 35
www.electrolux.com
Importer: Electrolux Dayanikli Tuketim Mamulleri San. ve Tic. AS.
TR-34435 Taksim-Beyoglu-Istanbul
Customer Service: 0 850 250 35 89
musteri_hizmetleri@electrolux.com
WEB: www.electrolux.com.tr
- APPLIANCE DESCRIPTION
- WE'RE THINKING OF YOU
- VISIT OUR WEBSITE TO
- CUSTOMER CARE AND SERVICE
- CONTENTS
- SAFETY INFORMATION
- CHILDREN AND VULNERABLE PEOPLE SAFETY
- GENERAL SAFETY
- SAFETY INSTRUCTIONS
- INSTALLATION
- WARNING
- ELECTRICAL CONNECTION
- USE
- CARE AND CLEANING
- SERVICE
- DISPOSAL
- BEFORE THE INSTALLATION
- BUILT-IN HOBS
- CONNECTION CABLE
- ASSEMBLY
- YOUTUBE
- PRODUCT DESCRIPTION
- COOKING SURFACE LAYOUT
- CONTROL PANEL LAYOUT
- DAILY USE
- ACTIVATING AND DEACTIVATING
- AUTOMATIC SWITCH OFF
- THE FUNCTION DEACTIVATES THE HOB AUTOMATICALLY IF
- HEAT SETTING THE HOB DEACTIVATES AFTER
- USING THE COOKING ZONE
- CAUTION
- HEAT SETTING
- OPTIHEAT CONTROL (3 STEP RESIDUAL HEAT INDICATOR)
- BRIDGE
- POWERBOOST
- PAUSE
- TIMER
- COUNT DOWN TIMER
- COUNTUP TIMER
- MINUTE MINDER
- LOCK
- CHILD SAFETY DEVICE
- POWERPOINT
- HOB²HOOD
- OPERATING THE FUNCTION AUTOMATICALLY
- ACTIVATING THE LIGHT
- AUTOMATIC MODES
- CHANGING THE AUTOMATIC MODE
- OPERATING THE FAN SPEED MANUALLY
- OFFSOUND CONTROL (DEACTIVATING AND ACTIVATING THE SOUNDS)
- POWER MANAGEMENT
- HINTS AND TIPS
- COOKWARE
- COOKWARE MATERIAL
- COOKWARE IS SUITABLE FOR AN INDUCTION HOB IF
- COOKWARE DIMENSIONS
- THE NOISES DURING OPERATION
- IF YOU CAN HEAR
- THE NOISES ARE NORMAL AND DO NOT INDICATE ANY MALFUNCTION
- ÖKO TIMER (ECO TIMER)
- EXAMPLES OF COOKING APPLICATIONS
- HEAT SETTING USE TO: TIME
- HINTS
- (MIN)
- TATOES
- HINTS AND TIPS FOR HOB²HOOD
- GENERAL INFORMATION
- CLEANING THE HOB
- TROUBLESHOOTING
- WHAT TO DO IF
- IF YOU CANNOT FIND A SOLUTION
- TECHNICAL DATA
- RATING PLATE
- COOKING ZONES SPECIFICATION
- ENERGY EFFICIENCY
- PRODUCT INFORMATION
- ENERGY SAVING
- ENVIRONMENTAL CONCERNS
- WE THINK OF YOU
- FOR INSTALLATION AND CONNECTION, CONTACT A QUALIFIED PERSON
- SAFETY OF CHILDREN AND VULNERABLE PEOPLE
- ELECTRICAL SAFETY
- DANGER
- USAGE
- CLEANING AND MAINTENANCE
- OPERATION
- INSTALLING THE HOB
- PREPARING THE WORKTOP
- OBLIQUE CABLE
- BUTTONS AND CONTROLS
- DESCRIPTION OF THE CONTROL PANEL
- CONTROL PANEL DESCRIPTION
- KIZIRIC
- THE TIMER IS SET
- KYNBINTAY
- OFFSOUND CONTROL (ДЫБЫСЪДКСГНАНДАРЬСЭНДIPY КOCУ)
- POWER CONTROL
- ADVICE
- OUTPUT
- OUTPUT MATERIAL
- BEFORE INSTALLATION, THE FOLLOWING INSTALLATION INSTRUCTIONS MUST BE READ
- INSTALLATION STEPS
- OPERATION DURING OPERATION
- IF YOU HAVE ANY QUESTIONS
- OKO TIMER (3KO TAIMEP)
- Θ3IPNEY KE3IHNDE KONDAHY KAFDAIJAPBIHBIH MBICAJAPBI
- HE ICTEPCI3, EREP
- EREP UEWIM TA6BIMMACA
- TEXHNKANBIK DEPEK
- AYBITBIK TAKTAISHA
- POWER SUPPLY
- APPLIANCE INFORMATION
- DESCRIPTION OF THE APPLIANCE
- SAFETY OF CHILDREN AND PERSONS WITH LIMITED CAPABILITIES
- BEFORE INSTALLATION
- BUILT-IN OVENS
- INDUCTION HOB CABLE
- FUNCTIONAL ELEMENTS OF THE COOKING SURFACE
- COUNTDOWN TIMER
- THE TIMER
- KEY LOCK
- IF THE PROBLEM COULD NOT BE SOLVED
- TABLE WITH TECHNICAL DATA
- COOKING HOB
- DESIGNED FOR YOU
Brand : AEG
Model : MultipleBridge EIV9467
Category : Cooker