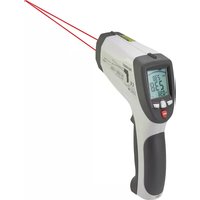
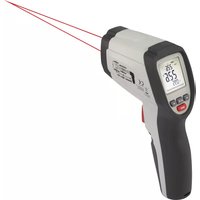
IR 80020C - Thermometer VOLTCRAFT - Free user manual and instructions
Find the device manual for free IR 80020C VOLTCRAFT in PDF.
| Product type | Non-contact infrared thermometer with type K contact probe |
| Brand | Voltcraft |
| Model | IR 80020C |
| Power supply | 9 V block battery |
| IR measurement range | -40 °C to +800 °C |
| IR resolution | 0.1 °C |
| IR optics | 20:1 (distance to spot size ratio) |
| Adjustable emissivity | 0.10 to 1.00 |
| Response time | 150 ms |
| Aiming laser | Class 2, wavelength 630-670 nm, power < 1 mW |
| Contact measurement range (type K) | -50 °C to +1370 °C (with appropriate probe) |
| Included probe | Type K temperature probe, range -20 °C to +250 °C |
| IR accuracy (≥0 °C) | ±1.5 °C or ±1.5% (whichever is greater) |
| IR repeatability | ±0.8% or ±1 °C (whichever is greater) |
| Measurement functions | Maximum, minimum, differential, average, bargraph |
| Threshold alarm | Adjustable high and low thresholds with audible signal and red display |
| Auto power off | TRIG function: shut off after 10 minutes of continuous measurement |
| Backlight | Activatable, combined with laser button |
| Tripod thread | Yes |
| Dimensions (L x W x H) | 198 x 112 x 55 mm |
| Weight | 186 g (without battery) |
| Operating conditions | 0 °C to +50 °C, 10-90% RH |
| Lens maintenance | Compressed air or soft lint-free cloth, no solvents |
| Laser safety | Do not look directly into the beam, avoid reflective surfaces |
| Disposal | Do not dispose of with household waste, recycle batteries separately |
Frequently Asked Questions - IR 80020C VOLTCRAFT
User questions about IR 80020C VOLTCRAFT
0 question about this device. Answer the ones you know or ask your own.
Ask a new question about this device
Download the instructions for your Thermometer in PDF format for free! Find your manual IR 80020C - VOLTCRAFT and take your electronic device back in hand. On this page are published all the documents necessary for the use of your device. IR 80020C by VOLTCRAFT.
USER MANUAL IR 80020C VOLTCRAFT
GB Operating Instructions
IR 800-20C IR thermometer
Item No. 2399953 Page 21 - 39
F Mode d'emploi
text_image
QR code image containing encoded data, no visible human-readable textnatural_image
Warning symbol with a triangle and central explosion (no text or numbers)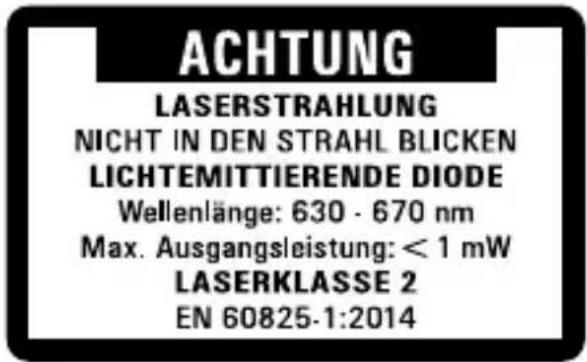
text_image
Technical diagram of a handheld device with numbered parts labeled 1 through 7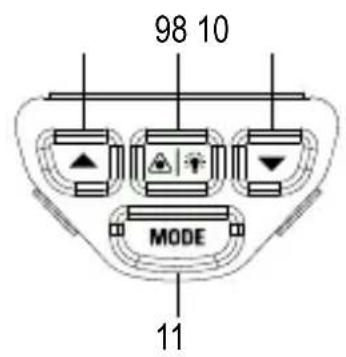
text_image
98 10 MODE 11- Introduction......22
- Explanation of symbols ......22
- Intended use....23
- Package contents....23
- Features and functions....24
- Safety instructions....24
a) General information....24
b) Laser 26
c) Battery....27
- Product overview....28
- Display....29
- Inserting/changing the battery ....29
- Operation....30
a) Function....30
b) Measuring....30
c) IR measuring spot size - Ratio measuring distance:measuring surface ....31
d) Target laser....32
e) Backlight....32
f) Maximum, minimum, differential and average measurement function 32
g) Bar graph....32
h) Contact measurement....33
- Settings ....33
a) Emission level 33
b) Temperature unit ....34
c) Alarm....34
d) Switch-off after 10 minutes of continuous operation (TRIG function)....35
- Care and cleaning ....36
a) Cleaning the lens....36
b) Cleaning the housing....36
-
Troubleshooting....36
-
Disposal....37
a) Product....37
b) Batteries 37
- Technical Data....38
1. Introduction
Dear customer,
Thank you for purchasing this product.
This product complies with statutory national and European regulations.
To ensure that the product remains in this state and to guarantee safe operation, always follow the instructions in this manual.

These operating instructions are part of this product. They contain important information on setting up and using the product. Do not give this product to a third party without the operating instructions. Therefore, retain these operating instructions for reference!
If there are any technical questions, please contact:
www.conrad.com/contact
2. Explanation of symbols

The symbol with the exclamation mark in the triangle is used to indicate important information in these operating instructions. Always read this information carefully.
The arrow symbol indicates special information and advice on operation.
3. Intended use
The infrared thermometer is a measuring device for contactless temperature measurement. It determines the temperature by infrared energy that is emitted by an object and by its emission ratio. It is especially useful for measuring the temperature of hot, difficult to access or moving objects. The device measures the surface temperature of an object. It cannot measure through transparent surfaces such as glass or plastics.
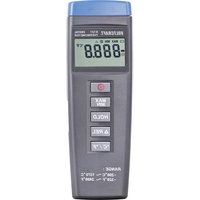
In addition, contact measurement with a conventional K-type temperature sensor is possible.
The IR thermometer itself must not come into contact with the measured temperature. Always maintain sufficient safety distance and observe the permitted ambient conditions.
Diagnostic application for medical purposes is not permissible.
The emission level can be adjusted to the surface properties of the measured object at hand.
A 9 V block battery is required for the voltage supply. Do not use any other power supply.
For safety and approval purposes, you must not rebuild and/or modify this product. Using the product for purposes other than those described above may damage the components. In addition, improper use can cause injuries. Read the instructions carefully and store them in a safe place. Only make this product available to third parties together with its operating instructions.
All company and product names are trademarks of their respective owners. All rights reserved.
4. Package contents
- Infrared thermometer
- 9 V monobloc battery
- Type-K temperature sensor (measurement range -20 to +250 °C)
- Storage pouch
- Operating instructions
Up-to-date operating instructions
To download the latest operating instructions, visit www.conrad.com/downloads or scan the QR code on this page. Follow the instructions on the website.

text_image
QR code image containing encoded data, no visible human-readable text5. Features and functions
- Circular target laser
- Adjustable emission level from 0.10 to 1.00
• Additional temperature measurement via K-type contact sensor - Optional background illumination for the display
• 20:1 optics
• IR measurement range -40 to +800 °C - Tripod thread
- Integrated alarm function (optical and acoustic signal) for upper and lower alarm values
- Storage of the maximum, minimum, average and difference temperature during measurement.
6. Safety instructions

Read the operating instructions and safety information carefully. If you do not follow the safety information and information on proper handling in these operating instruction, we will assume no liability for any resulting personal injury or damage to property. Such cases will invalidate the warranty/guarantee.
a) General information
- The device is not a toy. Keep it out of the reach of children and pets.
- Do not leave packaging material lying around carelessly. It may become a dangerous toy for children.
- Protect the product from extreme temperatures, direct sunlight, strong jolts, high humidity, moisture, flammable gases, vapours and solvents.
-
If it is no longer possible to operate the product safely, stop using it and prevent unauthorised use. Safe operation can no longer be guaranteed if the product:
-
is visibly damaged,
- is no longer working properly,
- has been stored for extended periods in poor ambient conditions or
- has been subjected to any serious transport-related stress.

• Always handle the product carefully. Jolts, impacts or a fall even from a low height may damage the product.
- Do not use in the immediate proximity of strong magnetic or electromagnetic fields or transmission aerials. These may distort the measurements.
- During outdoor use, the appliance must only be operated when the weather conditions are suitable and only with the appropriate safety devices.
• Water vapour, dust, smoke and/or vapours may impair the optical characteristics and lead to faulty measurements!
- Do not use the thermometer immediately after it has been brought from a cold environment into a warm room. The resulting condensation may destroy the interior components. In addition, the lens may become misty, which can lead to inaccurate measurements. Wait until the thermometer has reached the ambient temperature before using it.
• Always comply with the accident prevention regulations for electrical equipment when using the product in commercial facilities.
- Trained personnel must supervise the use of electrical appliances in schools, training facilities and DIY workshops.
- Consult a technician if you are not sure how to use or connect the product.
- Maintenance, modifications and repairs must be done by a technician or a specialist repair centre.
- If you have questions which remain unanswered by these operating instructions, contact our technical support service or other technical personnel.

b) Laser
- When operating the laser equipment, always make sure that the laser beam is directed so that no one is in the projection area and that unintentionally reflected beams (e.g. from reflective objects) cannot be directed into areas where people are present.
- Laser radiation can be dangerous, if the laser beam or its reflection enters unprotected eyes. Before using the thermometer, familiarise yourself with the statutory regulations and instructions for operating such a laser device.
- Never look into the laser beam and never point it at people or animals. Laser radiation can seriously damage your eyes.
- If laser radiation enters your eyes, close your eyes immediately and move your head away from the beam.
- If your eyes have been irritated by laser radiation, do not continue to carry out tasks with safety implications, such as working with machines, working from great heights or close to high voltage. Do not drive any vehicles until the irritation has completely subsided.
- Do not point the laser beam at mirrors or other reflective surfaces. The uncontrolled, reflected beam may strike people or animals.
- Never open the device. Configuration or maintenance tasks must only be completed by a trained specialist who is familiar with the potential hazards. Improperly executed adjustments might result in dangerous laser radiation.
- The product is equipped with a class 2 laser. Laser signs in different languages are included in the package. If the sign on the laser is not in your local language, attach the appropriate sign to the laser.

natural_image
Warning symbol with a black triangle and a central explosion or burst (no text or numbers)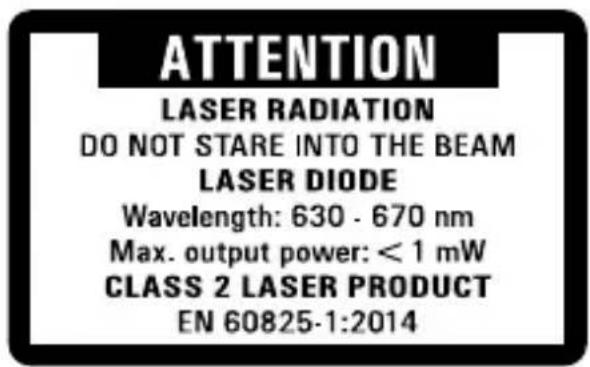
text_image
ATTENTION LASER RADIATION DO NOT STARE INTO THE BEAM LASER DIODE Wavelength: 630 - 670 nm Max. output power: < 1 mW CLASS 2 LASER PRODUCT EN 60825-1:2014- Caution: Using equipment or procedures other than those described in these instructions could lead to exposure to dangerous radiation.

text_image
Warning symbol with exclamation mark inside a trianglec) Battery
- To prevent battery leakage, remove the battery if you do not plan to use the product for an extended period. Leaking or damaged batteries may cause acid burns when they come into contact with skin. Always use protective gloves when handling damaged batteries.
- Keep batteries out of the reach of children. Do not leave batteries lying around, as they constitute a choking hazard for children and pets.
- Batteries must not be dismantled, short-circuited or thrown into fire. Never recharge non-rechargeable batteries. Danger of explosion!
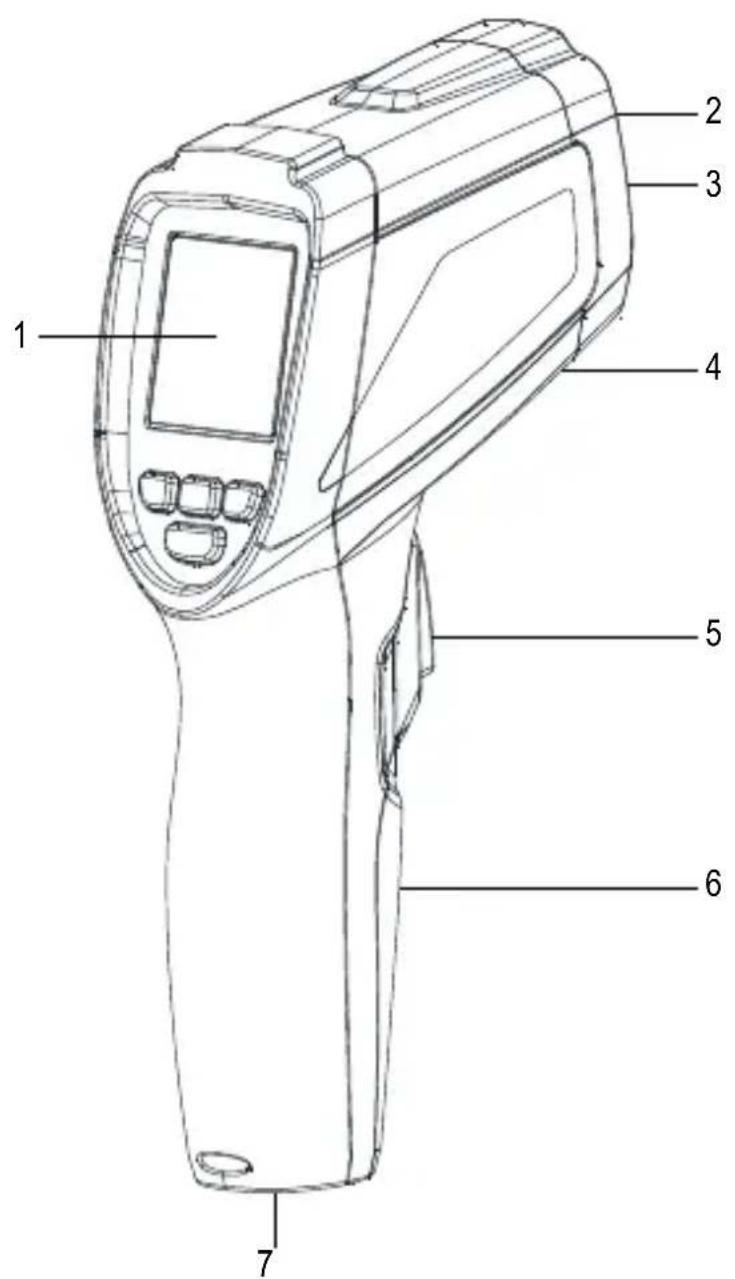
7. Product overview
text_image
Technical diagram of a handheld device with numbered parts labeled 1 through 7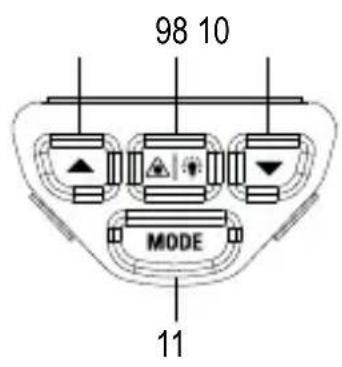
text_image
98 10 MODE 111 Display
2 Laser outlet
3 IR sensor
4 Temperature sensor connection socket
5 Measuring button
6 Battery compartment cover
7 Tripod thread
8 ▲ button
9 Laser/Backlight button
10 ▼ button
11 MODE button
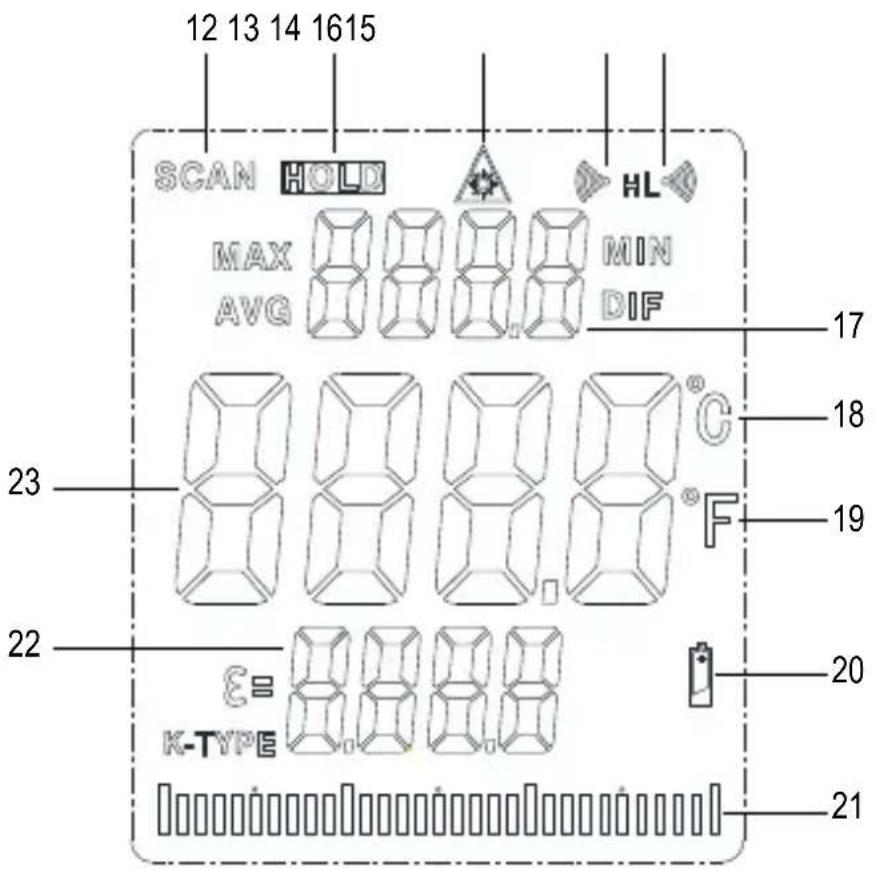
8. Display
text_image
12 13 14 1615 SCAN HOLD HL MAX MIN AVG DIF 23 22 ε= K-TYPE 17 18 19 20 2112 Measuring indicator SCAN
13 Standby indicator HOLD
14 Laser symbol for activated target laser
15 Alarm symbol for the upper limit value
16 Alarm symbol for the lower limit value
17 MAX/MIN/AVG/DIF temperature display
18 Degrees Celsius
19 Degrees Fahrenheit
20 Low-battery symbol
21 Bar graph
22 Emission level / K-type value
23 Temperature display
9. Inserting/changing the battery
→ Replace the battery when the low-battery symbol appears on the display.
- Loosen the screw using a Phillips screwdriver. Remove the battery compartment cover.
- Remove the flat battery from the battery clip and connect a new battery of the same type with the correct polarity to the battery clip.
The battery clip is constructed so the battery can be connected only with the correct polarity. Do not use force when plugging in the battery. - Replace the cover of the battery compartment again and secure it with the previously loosened screw.
10. Operation
a) Function
- Infrared thermometers measure the surface temperature of an object. The sensor of the device analyses the emitted and reflected heat radiation of the object measured, and converts this information into a temperature value.
- Emissivity is used to describe the energy emission characteristics of a material. The higher the emission level, the more radiation a material can emit.
- Many organic materials and surfaces have an emission level of approx. 0.95.
- Metallic surfaces or shiny materials have low emissivity. This results in imprecise measuring values. For this reason, the emission level can be set.
b) Measuring
- Point the measuring hole, preferably at a 90° angle, at the object to be measured. Make sure the object to be measured is not smaller than the IR measuring spot of the device.
- Press and hold the measuring button. The measuring value is indicated on the display. The displayed measurement value corresponds to the average surface temperature of the IR measuring spot. During measurement, the SCAN indicator is shown on the display.
- After releasing the measuring button, the last measured value will be displayed for approx. 8 seconds for improved readability. The HOLD indicator also appears.
- About 8 seconds after releasing the measuring button, the device turns off automatically.
• Horizontal bars appear on the display if the temperature range is exceeded.
To determine the hottest spot on the measured object you have to scan the object, with the measuring button held down, in a zigzag motion until you find the hottest spot. When the MAX temperature function is active, the highest measured temperature appears at the top of the display during measurement.
In order to obtain exact measured values, the infrared thermometer has to be adjusted to the ambient temperature. Allow the device to adjust to the ambient temperature after relocation.
Shiny surfaces affect the measured result. To compensate, the shiny part of the surface can be covered with adhesive tape or matt black paint.
The device cannot measure through transparent surfaces such as e.g. glass. Instead, it measures the surface temperature of the glass.
Prolonged measurement of high temperatures at near measuring distances leads to self-heating of the measuring device and thus to inaccurate measurements. In order to obtain exact measured values, remember the following rule of thumb: The higher the temperature, the greater the measuring distance and the shorter the measuring time.
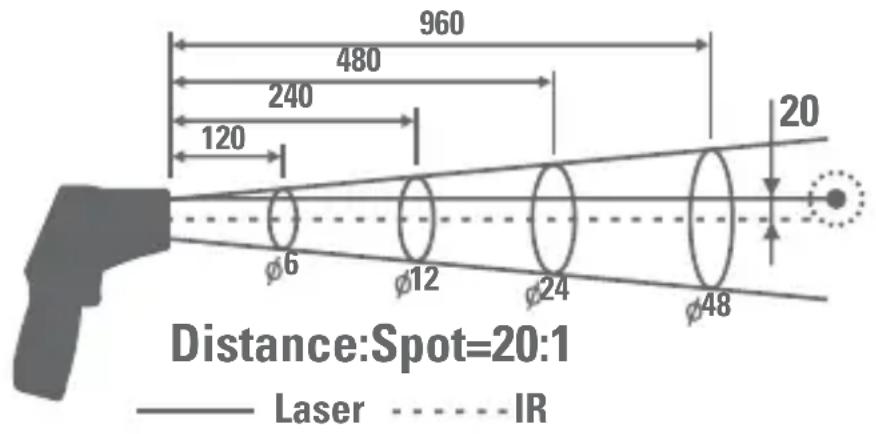
c) IR measuring spot size - Ratio measuring distance:measuring surface
- In order to obtain precise measuring results, the measured object must be larger than the IR measuring spot. The measured temperature is calculated using the average temperature of the measured area. The smaller the object, the closer it must be to the thermometer.
- The exact size of the measuring spot is shown in the following diagram. It is also indicated on the thermometer. To ensure precise measurements, the measured object should be at least twice the size of the measuring spot.
other
| Distance | Label | | -------- | ----- | | 960 | | | 480 | | | 240 | | | 120 | | | 20 | | | φ6 | | | φ12 | | | φ24 | | | φ48 | |- However, keep sufficient distance to avoid faulty measurement due to the IR thermometer heating.
• Example: At a distance of 120 cm the measurement diameter is 6 cm.
d) Target laser
- The target laser can be switched on and off. Press and hold the backlight/laser button.
- When the laser is activate, the laser symbol appears on the display.
- Press the backlight/laser button again to deactivate the target laser. The laser symbol disappears.
e) Backlight
When the device is on, press the backlight/laser button to turn the display backlight on/off.
f) Maximum, minimum, differential and average measurement function
- When the measuring button is released, the last measured value is frozen on the display. The standby indicator HOLD lights up on the display.
- Repeatedly press the MODE button. One of the following indicators and the associated measured value appears on the display:
MAX: Highest measured value of the last measurement.
MIN: Lowest measured value of the last measurement.
AVG: Average value of the last measurement.
DIF: Difference between highest and lowest measured value of the last measurement.
→ These values always refer to IR measurement, not to contact measurement.
g) Bar graph
- The bar graph can be used to graphically view the current measured value in relation to the MIN/MAX values. The left end represents the MIN value of the current measurement, the right end the MAX value.
- Example: The MIN value is 0 °C and the MAX value +100 °C. The current measurement is +50 °C. In this case the bar graph deflects to the middle of the display.
h) Contact measurement

Contact temperature measurement is permissible in combination with non-rotating and voltage-free stationary objects only.
Contact temperatures are only possible up to the approved temperature of the sensor.
The approved temperature range of the included wire sensor is -20 to +250 °C.
In order to use the entire measuring range of the measuring device, you need an optional wire sensor with a higher maximum temperature.
Contact measurement allows for measurement of temperature regardless of the object's material and emission level.
In addition to the included wire temperature sensor, all conventional K-type thermocouple sensors with miniature plug be connected to the device.
- Open the cover to expose the sensor socket.
- Plug the thermocouple plug of the sensor with correct polarity into the sensor socket. Pay attention to the “+” marking on the plug and the socket. The plug fits only in one direction into the socket.
- As soon as a sensor is connected to the measuring device, the temperature of the sensor appears below the IR measured value in measuring mode.
- After measuring, remove the sensor and close the cover to prevent dirt from entering the device.
11. Settings
a) Emission level
The measuring device allows setting the emission ratio. Thus, different materials and surfaces can be measured with exact results.
- Hold the MODE button for approx. 1 second to access the setup menu. The symbol for the emission level flashes.
- Press the ▲ or ▼ button to change the value. Press and hold the button for fast setting.
- Press the measuring button to confirm your input or press the MODE button to proceed to the next setting.
- When the device is switched off, the set value is retained.
→ Following the technical data you will find a table with typical materials and the emission level.
The contact temperature measurement function can also be used to determine the emission level of a surface. Measure the temperature of the surface with the contact temperature measurement function. Change the emission level of the infrared thermometer until the measured value matches that of the contact temperature measurement.
b) Temperature unit
- Hold the MODE button for approx. 1 second to access the setup menu.
- Press the MODE until measuring unit flashes on the display.
- Use ▲ and ▼ to select the desired measuring unit.
- When the device is switched off, the set value is retained.
- Press the measuring button to confirm your input or press the MODE button to proceed to the next setting.
c) Alarm
The measuring device is equipped with an alarm function on underrunning/exceeding preset temperature values. The alarm features a signal tone as well as lighting up the display red.
This function makes the measuring device ideal for temperature monitoring, etc.
The device has two adjustable temperature values (upper and lower alarm value). The alarm is triggered on underrunning the lower alarm value or exceeding the upper alarm value.
Those values can be adjusted and activated independently. The upper alarm limit value, however, must be higher than the lower alarm limit value.
Proceed as follows to set and activate the upper alarm value (H = High):
- Hold the MODE button for approx. 1 second to access the setup menu.
- Press the MODE button until the display flashes the alarm symbol and the letter H for the upper limit value.
- Press the ▲ or ▼ button to change the value.
- Press the laser/backlight button to activate (ON) or deactivate (OFF) the alarm.
- Press the measuring button to confirm your input or press the MODE button to proceed to the next setting.
- When the device is switched off, the set value is retained.
Proceed as follows to set and activate the lower alarm value (L = Low):
- Hold the MODE button for approx. 1 second to access the setup menu.
- Press the MODE button until the display flashes the alarm symbol and the letter L for the lower limit value.
- Press the ▲ or ▼ button to change the value.
- Press the laser/backlight button to activate (ON) or deactivate (OFF) the alarm.
- Press the measuring button or MODE to confirm your input.
- When the device is switched off, the set value is retained.
d) Switch-off after 10 minutes of continuous operation (TRIG function)
If you use the TRIG function, the product switches off automatically when the measuring button is pressed for longer than 10 minutes without interruption. This prevents unwanted continuous measurement if, for example, the measuring button is pressed accidentally.
- Hold the MODE button for approx. 1 second to access the setup menu.
- Press the MODE button until TRIG flashes on the display.
- Press the laser/backlight button to activate (ON) or deactivate (OFF) the function.
12. Care and cleaning

Never use aggressive detergents, rubbing alcohol or other chemical solutions, as these may damage the casing or cause the product to malfunction.
a) Cleaning the lens
- Remove loose particles with clean compressed air and wipe off remaining residues with a fine lens brush.
- Clean the surface of the lenses using a lens cloth or a soft, lint-free cloth.
- The cloth can be moistened with water or a lens cleaning solution to remove fingerprints and other residues.
- Do not use any acidic, alcoholic or other solvents or rough, linty cloth to clean the lens.
- Avoid applying too much pressure when cleaning the lens.
b) Cleaning the housing
Use a clean, lint-free, antistatic and slightly damp cleaning cloth.
13. Troubleshooting
The IR thermometer you have purchased was designed using the latest technology and is safe to use.
However, problems and malfunctions may still occur.
Therefore, we would like to describe here how you can solve any problems.
| Error Possible cause | |
| The device does not work. Is the battery empty? | |
| Is the wrong emission level set? | |
| Is the lens dirty? | |
| Incorrect measurement display. | Is the measuring surface covered with a glass pane? |
| Was the permissible operating temperature exceeded or fallen below? | |
14. Disposal
a) Product
Electronic devices are recyclable waste and must not be disposed of in the household waste. At the end of its service life, dispose of the product in accordance with applicable regulatory guidelines.
Remove any inserted batteries and dispose of them separately from the product.
b) Batteries
You as the end user are required by law (Battery Ordinance) to return all used batteries. Disposing of them in the household waste is prohibited.
Contaminated batteries are labeled with this symbol to indicate that disposal in the domestic waste is forbidden. The designations for the heavy metals involved are: Cd = Cadmium, Hg = Mercury, Pb = Lead (name on batteries, e.g. below the trash icon on the left).
Used batteries can be returned to collection points in your municipality, our stores or wherever batteries are sold.
You thus fulfill your statutory obligations and contribute to the protection of the environment..
15. Technical Data
Power supply....9 V block battery
IR measurement range......-40 to +800 °C
Resolution....0.1 °C
IR optics....20:1
Emission level....0.1 – 1.00 (adjustable)
Response time....150 ms
Laser class 2
Laser wave length 630 – 670 nm
Laser output....<1 mW
Operating conditions....0 to +50 °C, 10 – 90 % RH
Storage conditions....-10 to +60 °C, <80 % RH
Dimensions....198 x 112 x 55 mm
Weight 186 g
Infrared temperature measurement
| Measurement range Accuracy Reproducibility | ||
| <0 °C) ±(2°C + 0.2°C per degree) | ±0.8 % or ±1 °C (whichever is greater) | |
| ≥0 °C | ±1.5 °C or ±1.5 %(whichever is greater) | |
K-type contact measurement
| Measurement range Accuracy |
| -50 to 0 °C ±2 °C |
| 0 to +1370 °C ±0.5 % ±1.5 °C |
The emission levels of different surfaces
| Surface Emission level | Surface Emission level | ||
| Asphalt 0.90 – 0.98 Varnish (matt) 0.97 | |||
| Concrete 0.94 Marble 0.94 | |||
| Chromium oxide 0.81 Human skin 0.98 | |||
| Ice 0.96 – 0.98 Mortar 0.89 – 0.91 | |||
| Ferric oxide 0.78 – 0.82 Paper 0.70 – 0.94 | |||
| Earth 0.92 – 0.96 Plastic 0.85 – 0.95 | |||
| Hard plaster | 0.80 – 0.90 Sand | 0.90 | |
| Glass | 0.90 – 0.95 Foam | 0.75 – 0.80 | |
| Rubber (black) | 0.94 Fabric (black) | 0.98 | |
| Ceramic | 0.90 – 0.94 Textiles 0.90 | ||
| Carbon (powder) | 0.96 Water 0.92 – 0.96 | ||
| Copper oxide | 0.78 Cement | 0.96 | |
| Varnish 0.80 – 0.95 Brick | 0.93 – 0.96 |
The emission ratios in the above table are approximate values. Parameters such as the shape and characteristics of the material can affect the emissivity of an object.
Page
France (email): technique@conrad-france.fr
text_image
QR code image containing encoded data, no visible human-readable texttext_image
Warning sign with black triangular triangle and central explosion symbol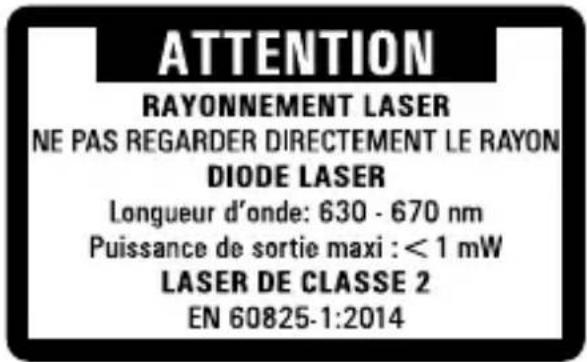
text_image
ATTENTION RAYONNEMENT LASER NE PAS REGARDER DIRECTEMENT LE RAYON DIODE LASER Longueur d'onde: 630 - 670 nm Puissance de sortie maxi : < 1 mW LASER DE CLASSE 2 EN 60825-1:2014text_image
Technical diagram of a handheld device with numbered parts labeled 1 through 7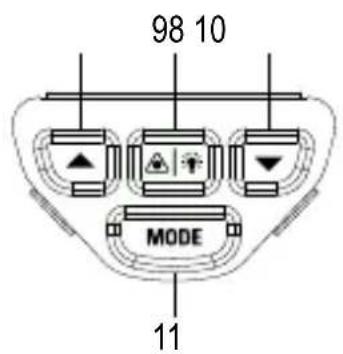
text_image
98 10 MODE 11text_image
QR code image containing encoded data, no visible human-readable textnatural_image
Warning symbol with a triangle and central explosion (no text or numbers)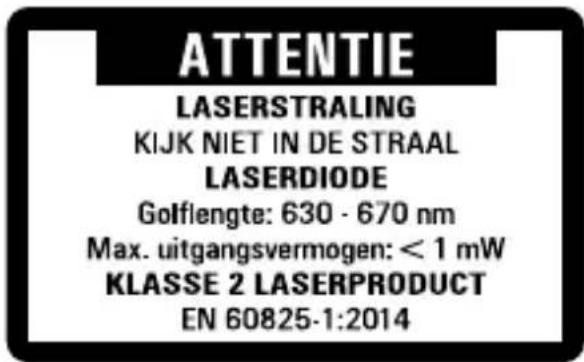
text_image
ATTENTIE LASERSTRALING Kijk NIET IN DE STRAAL LASERDIODE Golflengte: 630 - 670 nm Max. uitgangsvermogen: < 1 mW KLASSE 2 LASERPRODUCT EN 60825-1:2014text_image
Warning symbol with exclamation mark inside a trianglec) Batterij
text_image
Technical diagram of a handheld device with numbered parts labeled 1 through 7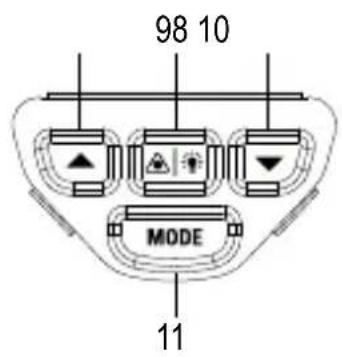
text_image
98 10 MODE 11Copyright 2021 by Conrad Electronic SE.
This is a publication by Conrad Electronic SE, Klaus-Conrad-Str. 1, D-92240 Hirschau (www.conrad.com). All rights including translation reserved. Reproduction by any method, e.g. photocopy, microfilming, or the capture in electronic data processing systems require the prior written approval by the editor. Reprinting, also in part, is prohibited. This publication represents the technical status at the time of printing.
Copyright 2021 by Conrad Electronic SE.
Copyright 2021 by Conrad Electronic SE.