
Impossible I1 - Camera POLAROID - Free user manual and instructions
Find the device manual for free Impossible I1 POLAROID in PDF.
User questions about Impossible I1 POLAROID
0 question about this device. Answer the ones you know or ask your own.
Ask a new question about this device
Download the instructions for your Camera in PDF format for free! Find your manual Impossible I1 - POLAROID and take your electronic device back in hand. On this page are published all the documents necessary for the use of your device. Impossible I1 by POLAROID.
USER MANUAL Impossible I1 POLAROID
Please be sure to read through this manual before using the I-1. Keep for future reference. For updated information, video tutorials and more, please visit: support.the-impossible-project.com
natural_image
Silhouette illustration of a vintage rotary phone with circular head and buttons (no text or symbols)The Impossible I-1 is an easy to use, point and shoot analog instant camera for the original instant photo format. It makes real, physical photos that develop in the palm of your hand. The I-1 features an advanced ring flash, designed for taking great portraits. It can also be used with the I-1 App for iOS, which lets you try creative techniques like light painting and gives you full photographic control of manual features like shutter speed and aperture.
Parts diagram
text_image
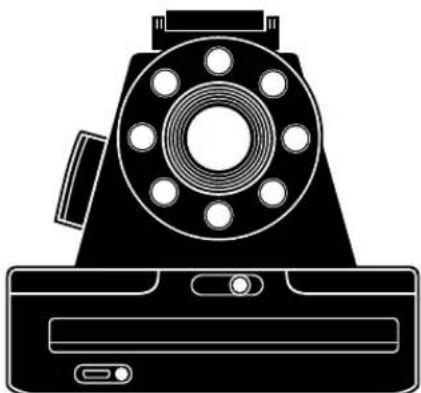
D Viewfinder rear lens E Viewfinder front lens Lighten/darken Switch C Control Knob B Shutter Button A F Ring Flash G Flash Switch H Film Door Latch M Strap Mount Frog Tongue J Indicating LED K USB Power Connector Film Door L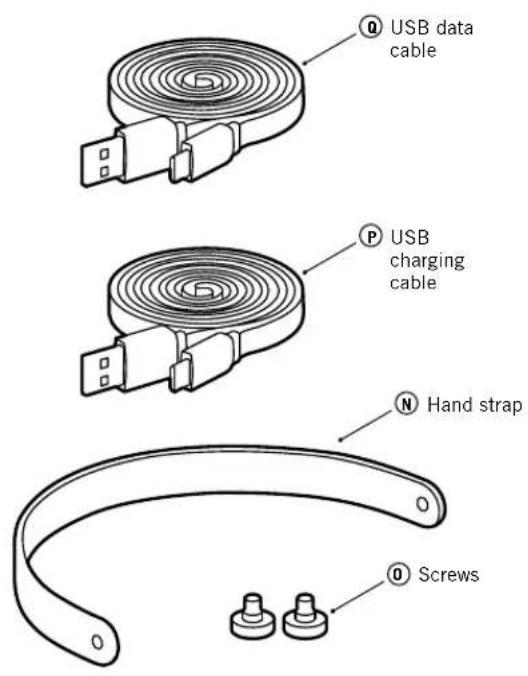
text_image
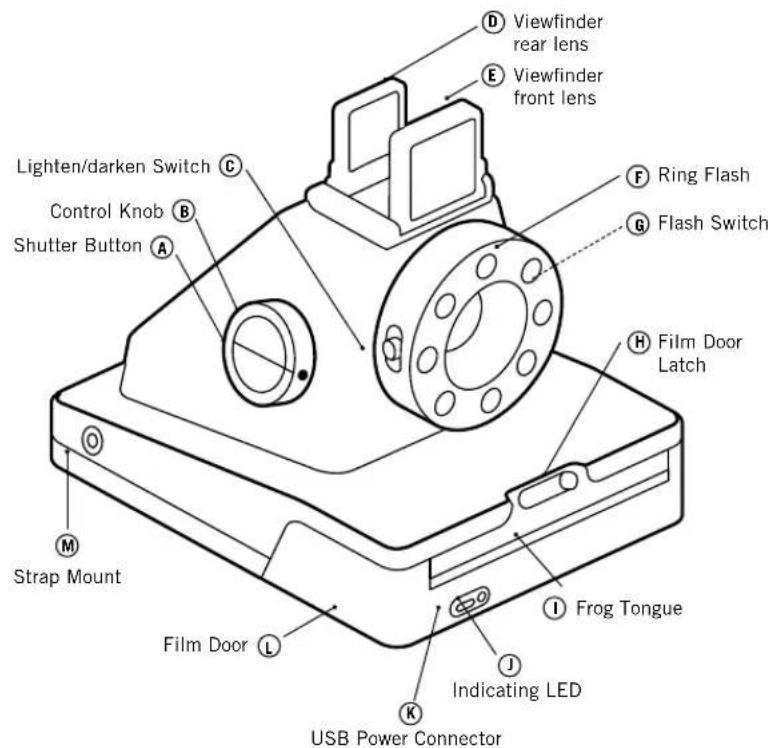
USB data cable USB charging cable N Hand strap ScrewsThe Viewfinder
text_image
5cmThe Ring Flash
flowchart
graph TD
    A["1"] --> B["2"]
    B --> C["3"]
    C --> D["4"]
    D --> E["5"]
    E --> F["6"]
    F --> G["7"]
    G --> H["8"]
    H --> A
REMAINING PHOTOS
CONTROL KNOB: ○ → ●

natural_image
Circular black ring with white circular holes and a small star-like symbol at the top (no text or labels)natural_image
Circular black ring with eight white circular holes and a small sun icon at the top center (no text or symbols)SEARCHING FOR DEVICE
CONTROL KNOB:
How to use the I-1
IMPORTANT: Always charge the I-1 fully before using
natural_image
Technical line drawing of a mechanical device with a magnified inset showing a circular component (no text or symbols)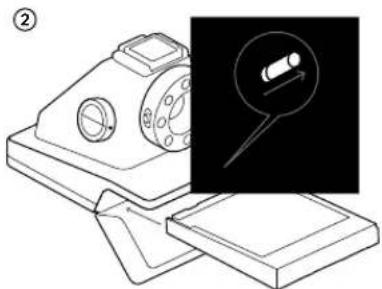
natural_image
Technical line drawing of a mechanical device with an inset showing a magnified view of a cylindrical component (no text or symbols present)
natural_image
Line drawing of a mechanical device with a rotating base and circular components (no text or symbols)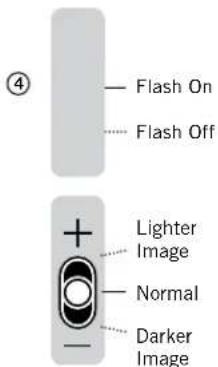
text_image
④ — Flash On — Flash Off + Lighter Image — Normal — Darker Image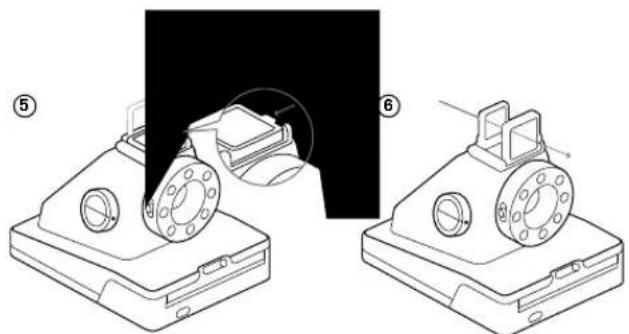
natural_image
Technical line drawing of a mechanical device with two views (⑤ and ⑥) showing assembly or assembly process, no text or symbols present.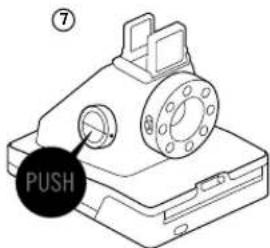
text_image
⑦ PUSH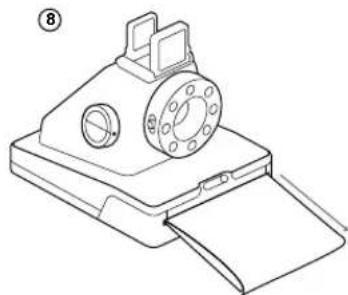
natural_image
Line drawing of a mechanical device with a cylindrical component and paper sheet (no text or symbols)CONTENTS
ENGLISH 10
Box Contents
How to Use the I-1
Further Guidance
The I-1 App
Troubleshooting & FAQ
Customer Support
Safety Information
Compliance
DEUTSCH 26
I-1 APP INFO LEAFLET
CHARGE THE CAMERA
Important: The I-1 will not be charged upon purchase – it must be fully charged before first use. You should charge the I-1 fully before every use to ensure it has enough power for the duration of your shoot. A full charge usually takes just one and a half to two hours when you use the dedicated I-1 USB charging cable (P) with a smartphone power adapter or computer USB port. To charge the camera, plug the USB charging cable Ⓟ into the micro USB slot on the camera door Ⓙ. Then plug the other end of the cable into a charger such as your iPhone charger, or into your computer's USB slot. The red power indicator LED ⏻ will switch off as soon as the battery is fully charged.
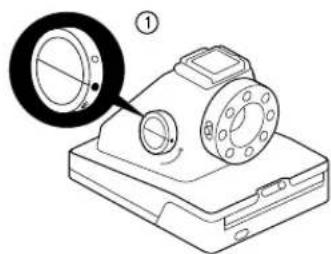
① TURN THE CAMERA ON/OFF
To turn the camera on, turn the control knob Ⓑ counter-clockwise
until the yellow lines on the control knob and shutter button A line up, and the filled circle symbol is at the front. To turn it off again, turn the control knob clockwise until the empty circle symbol is at the front and the yellow line is pointing downwards.
② LOAD THE FILM
Slide the fi lm door latch ^H to open the fi lm door L. Push the fi lm cassette all the way in, with darkslide up and plastic base at the bottom.
Note: Please check individual fi Im packaging for development time, handling and storage details.
③ CLOSE FILM DOOR
When you close the fi lm door, the darkslide will eject from the camera automatically, underneath the frog tongue. The plastic frog tongue is designed to protect images from light as they develop – it should not be removed. Take the darkslide out from under the frog tongue and let the frog tongue roll back up. If the darkslide has not ejected, take out the fi lm pack and re-insert it, making sure it is pushed all the way to the back of the camera.
④ SET FLASH & LIGHTEN/DARKEN
Flash: You can find the flash on/off switch ☐ on the side of the lens barrel. To turn the flash on, push the flash on/off switch up so it meets the yellow lightning flash symbol. The flash is on by default when you unpack the camera. We recommend that you use the flash in all conditions except bright, direct sunlight.
Note: the camera should be fully charged to take best advantage of the ring flash.
Lighten/Darken: Use the lighten/darken switch Ⓐ on the opposite side of the lens barrel to adjust the exposure of your shot. To get a brighter photo, move the lighten/darken switch up to the plus position. For a darker photo, move the lighten/darken switch down to the minus position. These two settings
correspond to different Exposure Values (EV). The camera's Exposure Values are +^2 / 3 (when you move the switch up) and -^2 / 3 (when you move the switch down).
⑤ OPEN THE VIEWFINDER
To open the viewfi nderD & E, gently push the tab labeled 'push' sideways in the direction of the arrow. This will release the latch and the viewfi nder will pop up. To close it again, simply fold it down, rear lens fi rst, pressing gently downwards until the latch clicks shut.
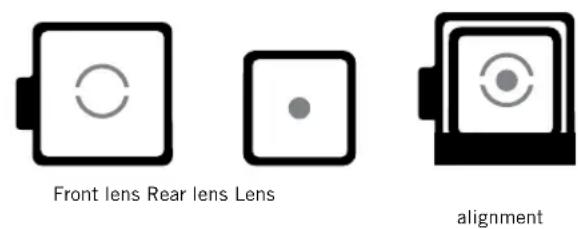
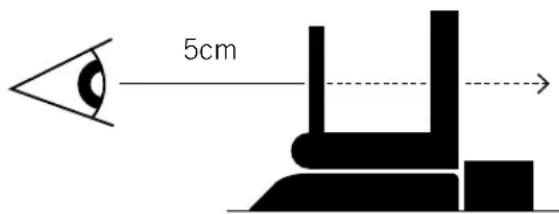
Using the viewfi nder: The I-1 uses a mechanical pop-up viewfi nder with reflective silver markings that help you to align the camera correctly for a well-composed shot. The viewfi nder is most accurate when you hold it 4 – 5cm away from your eye. To use the alignment markings, follow these steps:
- Close one eye and hold your camera out in front of you, at first about 20cm away from your face.
- Train your eye on the silver dot on the viewfi nder's rear lens. Move the camera until the silver dot is in the center of the circle on the front lens.
- Move the camera towards you until the viewfi nder is 4–5 cm away from your eye. The dot will become blurry but should still be visible inside the circle. You'll see that the view through the viewfi nder has become sharp.
- Remember that the viewfi nder sits above the camera's lens, so at very close distances (1.2 meters or less), you will need to aim higher than what you see in the viewfi nder to compose your shot correctly.
Note: See "The Viewfi nder" diagram on the inside cover of this manual.
⑥ COMPOSE YOUR PHOTO
The I-1 uses infrared light to work out how far away the subject is. In order for this to work most effectively, your subject should be at the center of your composition while the camera is focusing. If you don't want your subject to be in the center of your photo, fi rst compose the shot with the subject at the center. Then press the shutter button halfway in to focus. To avoid a blurry photo, make sure you are at least 30cm away from your subject when you take the picture.
Important: The shutter button has two positions: press it lightly halfway in to focus, and fi rmly all the way in to take a photo. You will feel a very subtle click when you reach the halfway position. Practice this a few times while the camera is switched off to get a feel for it.
Keep your finger on the shutter button as it's pressed halfway in, then reframe your shot by moving your subject off-center. Then,
fi nally, push the shutter button all the way in to take the photo. Your subject will remain in focus even though it is no longer centered.
⑦ TAKE THE PHOTO
Press the shutter button Ⓐ halfway to automatically focus your shot. Press the shutter button all the way in to take the photo. The photo will be ejected from the slot at the front of the camera as soon as you let go of the shutter button. It will be shielded from the light by the frog tongue Ⓞ, which also holds it in place.
⑧ REMOVE AND SHIELD THE PHOTO
Remove the photo from beneath the frog tongue and let the frog tongue roll back into the camera. Place the photo face down to continue shielding it from light as it develops.
FURTHER GUIDANCE
HOW THE RING FLASH WORKS
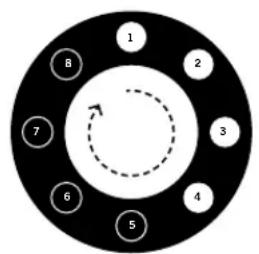
The I-1 ring flash is made up of 12 individual LEDs. 8 LEDs (1 red, 7 white) provide the main light source and give status indications – these are supplemented by 4 smaller LEDs. When you take a photo, all 12 LEDs will flash at once, to provide a bright but soft light.
Important: always use the fl ash for every shot, unless you're shooting in bright, direct sunlight.
As well as lighting photos, the ring flash also gives you information about the camera's current status. You can use the ring flash to see:
How much film is left in the pack
Every time you turn the control knob to the on position, the ring flash will light up. The number of LEDs which light up corresponds to the number of shots you have left. So e.g. if six LEDs light up, there are six shots left in that film pack.
If you have used up all 8 shots in your fi lm pack, or if there is no fi lm pack inserted in the camera, then the red LED (top) will blink rapidly when you turn the camera on.
How much battery you have left
If you press the shutter button A while the camera is switched off, the number of LEDs which light up will correspond to battery level. So e.g. if six bulbs light up, your camera's battery is 6/8 charged. When the I-1 battery is low (3 or fewer ring fl ash LEDs light up), then the red LED power indicator J will blink on and off and the fl ash will no longer work. At this point you should only use the camera for photography in bright, direct sunlight.
Important: Due to the high power requirements of the ring flash, we recommend that you always charge the I-1 before use, for about an hour, using the USB charging cable provided.
COMPATIBLE FILM
The I-1 works with all Impossible 600-type and Impossible I-type fi lms, in either color or black & white.
REMOVING THE VIEWFINDER
The viewfi nder is removable. It's attached to the top of the camera with magnets, which makes it easy to detach and reattach. When you want to reattach it, it will simply slide and click into place. You will need the viewfi nder to compose all your shots, but you can remove it when you need to throw your camera into a bigger bag or suitcase.
CLEANING THE VIEWFINDER
When cleaning the viewfi nder, we recommend that you only use cleaning cloths made for optical lenses, like the one included in the I-1 box. Do not use any solvent, such as alcohol, to clean the viewfi nder, as this may damage the silver markings.
To clean the camera's rollers, fi rst make sure the I-1 is switched off. Then open the fi lm door - the rollers are two metal cylinders located just inside. Position your thumbs on top of the rollers on either side, then gently turn inwards, towards the camera. Clean the rollers as you go, using a soft cloth slightly dampened with water. Do not use solvents or chemical cleaners, as these may damage the camera. Then make sure you turn the camera on before you close the fi lm door again. This will reset the roller position.
POWER SUPPLY
Charge the I-1 fully before every use to ensure it has enough power for the duration of your shoot (see "CHARGE THE CAMERA"). The red power indicator LED ① switches off as soon as the battery is fully charged. The rechargeable Li-ion battery will typically last long
enough for you to shoot 15 packs of fi lm at once, or for three days of use on and off. You can check how much battery life you have by counting how many LEDs in the ring fl ash blink when you turn the camera off and on again.
When the I-1 battery is low (3 or fewer ring flash LEDs light up), then the red LED power indicator ① will slowly blink on and off and the flash will no longer work. When the battery is critically low, the blinking becomes more rapid and the camera will cease operation.
UPDATING CAMERA SOFTWARE
The I-1 box includes a USB data cable ①. This is a dedicated cable for data transfer between the camera and a computer. Please only use it if for updating the software of your I-1.
ATTACH THE CAMERA HAND STRAP
The I-1 comes with a removable hand strap Ⓙ. To attach it to the camera, first locate the two circular
strap mounts M on the sides of the camera towards the back. When you get your camera, it will come with two screws 0 in the accessories compartment. Position the screws at either end of the strap over the mount holes. Twist the screws in until they can go no further and are holding the strap firmly in place.
USING A TRIPOD
The I-1 has a tripod socket in its base, which works with most standard tripods. Simply screw your tripod mount onto the I-1.
Note: with most tripods, the tripod mount will need to be unscrewed before you can load or exchange film into the I-1.
THE I-1 APP
THE I-1 APP FOR iOS & ANDROID
The I-1 works as a standalone point and shoot camera, but you can also unlock more features through the I-1 App for Apple iOS (8 and up) and Google Android (4.3 and up). To check whether your Apple or Android device is compatible with the I-1, visit this link: support.the-impossible-project.com
DOWNLOADING THE I-1 APP AND CONNECTING IT WITH YOUR CAMERA
Download the I-1 App to your device. Search for 'Impossible I-1' in the Apple App Store or Google Play Store. To connect the camera to the App, put the camera in App Mode by turning the control knob B counterclockwise until the Bluetooth symbol is at the front. A blue indicating LED within the camera's ring flash will blink slowly as it searches for a device to pair with. Make sure Bluetooth
is enabled on your smartphone or iPod touch, then open up the App. You'll know the devices are paired when the App screen reads 'Connection Successful' and the blue LED stops blinking.
If you are having trouble connecting the camera to the App, then try resetting the camera by pressing the reset button. You can find the reset button inside the fi lm door – it's a small black dot on the top left-hand side, above where the fi lm pack is inserted. To push the reset button, carefully apply gentle pressure with a narrow pointed object like a pencil or a toothpick.
TROUBLESHOOTING & F.A.Q.
The I-1 won't eject my photo
Make sure that the control knob is in the 'on' position: the yellow line on the control knob should be lined up with the line on the shutter button.
Make sure that your I-1 camera is charged: the power indicator LED ① should glow red if the camera is on and charged. It will rapidly blink red if it doesn't have enough power to operate. If the light doesn't turn on, the battery may be completely empty and need to be charged.
Make sure you still have fi Im in your camera: to check, turn the control knob off and on. The ring flash will indicate how many shots you have left. If the red LED (top) in the ring flash blinks rapidly when the camera turns on again, this means that there are no shots left in the fi Im pack, or that no fi Im pack is inserted.
Make sure you press the eject button all the way in to ensure that the photo ejects properly. If the camera is still unresponsive, try pressing the reset button inside the fi lm door to do a hard reset.
The ring flash doesn't fire when I take a photo
Make sure that the ring flash is switched on – the flash on/off switch should be pushed up so it meets the yellow lightning flash symbol.
(continued) If the flash still won't fire, then the camera may be
conserving battery life in low power mode. You can check if this is the case by looking at the red power indicator LED – if the camera is on and it is blinking, the flash will be inhibited in order to conserve battery, and the camera needs to be charged.
My photo turned out slightly too dark
Make sure you use the camera with fl ash ON: we strongly recommend that you always use the fl ash when shooting indoors, as well as outside at nighttime, at dusk and on cloudy days.
Make sure you are not shooting towards the sun: the I-1 meters the average light level it sees. When shooting towards sunlight, the sun exposes the image in such a way that it can become too dark to reveal your subject properly.
Move the lighten/darken switch Ⓐ on the right side of the lens barrel to the + position for a brighter image.
My photo turned out blurry or fuzzy
The I-1 autofocus system selects the focus distance when you press the shutter button Ⓐ halfway in. It will use the center of what you see as the reference point. If your subject is off-center, move your subject to the center of your shot, then press the shutter button halfway in. Recompose your shot while still holding the shutter button half pressed in.
Hold the camera steady when shooting, especially in low light conditions, and make sure you have a strong light source to illuminate your shot. We strongly recommend that you always use the flash when shooting indoors and outdoors at nighttime, at dusk or on cloudy days. You can also use a tripod to give your camera a stable base.
Make sure you are not too close to your subject when you take a photo. In order to avoid blurriness, you should shoot from at least 30cm away.
Horizontal bars appear across my image
If you see horizontal bars or stripes across your photo, this means that the camera's rollers are depositing dirt or developer paste on the image and need to be cleaned. To clean the rollers, fi rst open the fi lm door L and remove the fi lm pack from the camera. Then gently wipe down the rollers with a soft, damp cloth.
Always use the fl ash when shooting indoors, even when you don't think you need it. Indoor light appears yellow on Impossible fi lm – the l-1's ring fl ash is designed to compensate for this.
Getting a good photo at night means paying attention to the light already in the scene. You will need different settings whether you're shooting at a party or trying to capture streetlight, for example. When shooting at a party (or in any indoor nighttime environment), you should always use the flash. You can also try moving the lighten/darken switch up to get a brighter shot. If you want to capture city lights at night, you can use the I-1 App to fi ne-tune your image by adjusting aperture and shutter speed in Manual Mode.
Natural light is your best friend when it comes to instant photography. On a sunny day, outdoors, you don't need to use the ring fl ash at all. Make sure that the sun is always behind you when you shoot. If your environment is very bright, you can try moving the lighten/ darken switch down to the 'darken' position to let less light into the shot and ensure it isn't blown out. Remember that if you are not shooting in bright, direct sunlight, we recommend that you still use the ring fl ash.
If you're trying to capture a landscape, make sure that the sun or main light source is behind you to prevent the image from being blown out. On a gloomy day you may wish to put the camera on a steady surface, which makes it easier for the entire scene to remain in focus.
CUSTOMER SUPPORT
The Impossible Customer Support Team is always more than happy to hear from you. Please get in touch using the contact details provided below.
For more detailed and up-to-date information, please visit support.the-impossible-project.com
USA/CANADA
usa@the-impossible-project.com
+212 219 3254
EUROPE/REST OF WORLD
service@the-impossible-project.com
00 800 577 01500
Impossible B.V.
Dimensions: 145mm (L) x 110mm (W) x 99mm (H)
Note: with viewfinder, (H) = 108mm
Weight: 440 grams (without fi lm pack)
Operating Temperature: 4°–38°C, 5–90% relative humidity
Bluetooth: Bluetooth Low Energy 4.0
Compatible Film: Impossible
600-type and I-type fi Im in both Color and Black & White, including Special Editions
Battery: 500mAh high performance lithium ion battery (35°C rated discharge current)
MATERIALS
Outer shells: Polycarbonate + ABS plastics with soft touch rubberized coating
Viewfi nder, Viewfi nder mounting plate, strap mounts: Zinc Aluminium alloy
Lenses: Optical grade Polycarbonate and Acrylic Lenses, coated
Shutter system: custom design, using precision step motors for shutter and focus control
OPTICAL SYSTEM
Lens: 6 lenses total, with 5 possible configurations
Autofocus: 5 zone autofocus system, using reflective IR ranging
Macro (0.3 - 0.5m)
Close-up (0.5 - 1.0 m)
Near-fi eld (1.0 - 2.2m)
Mid-fi eld (2.2 - 4.5m)
Focal length: 82 - 109mm
Field of view: 41 degrees vertical, 40 degrees horizontal
FLASH SYSTEM
12 LED advanced ring flash, consisting of 8 focused LEDs for increased range + 4 diffuse LEDs for softer light at closer distances (portraits)
SAFETY INFORMATION
CAUTION - RISK OF ELECTRIC SHOCK - DO NOT OPEN/DISASSEMBLE THE MOTORIZED ROLLER SYSTEM.
- Do not disassemble the device. Incorrect reassembly can cause electrical shock if the device is used again.
- Do not immerse the device in water or other fluids.
- Do not operate the device in a high humidity environment or very dusty environments.
- Do not attempt to tamper with, adjust or remove the battery and/or the electronics located below the rollers behind the device's film door.
- Do not attempt to remove the door itself as it is connected electronically to the body of the device. Doing so is unsafe, will likely damage your device, and will void your warranty.
- Do not insert metal objects into the product.
- Do not insert any objects into the rollers or gears.
- Keep small children and infants away from the device to avoid them being injured by the device's moving parts.
- Do not use or store the product near any heat source or any type of equipment that generates heat, including stereo amplifiers.
- Do not use the device near flammable or explosive gases.
- Do not charge the device if you notice any unusual odors, noise or smoke.
- Do not attempt to disassemble the fi Im's battery or modify it in any way (if using 600-type fi Im). If battery fi Id gets into your eyes, immediately rinse your eyes with fresh cold running water and seek medical attention immediately.
BATTERY AND CHARGER
- This device uses a custom Impossible lithium ion battery that is non-removable and mounted inside the camera body. No other type of battery can be used. Battery replacement can only be done by Impossible Service Centers. The battery will provide many years of service if properly used.
- Power consumption varies depending on the environment the device is used in and how the device has been stored. Used directly after full charge, the battery will power the processing of up to 15 fl lm packs with fl ash exposures, or three days of use on and off. Due to the high energy requirements of the fl ash, we recommend charging the camera before every session for best results.
- Once the battery energy level falls below a certain level, the device will no longer process film. The LED will blink and signal when it needs to be recharged. This is to avoid a photo getting stuck as it's being processed through the roller system.
The rechargeable battery is not fully charged at the time of purchase. Charge the battery fully with the impossible USB charging cable (provided). This usually takes 1-2 hours (can vary depending on usage).
The supplied USB charging cable has been tested and certified to work with the Apple iPhone power adaptor. While it can be used in other USB ports, e.g. computers, USB power adaptors, TVs, cars etc., Impossible cannot guarantee correct operation. - When the device is no longer in use, please recycle it properly.
USAGE ENVIRONMENT
The I-1 must be powered by direct current only. Charge the I-1 using the USB charging cable provided in the camera box.
To protect the high-precision technology contained in this device, never leaves the camera in the following environments for an extended period of time: high temperature (+40°C/104°F), high humidity, places with extreme changes in temperature (hot and cold), direct sunlight, sandy or dusty environments such as beaches, damp places, or places with strong vibrations.
- Do not drop the device or subject it to severe shocks or vibrations.
Do not push, pull or press on the lens.
COMPLIANCE
Important directions for using Lithium-Ion-Batteries
- Do not throw into fire.
- Do not short circuit.
- Do not disassemble.
- Do not continue to use when damaged.
- Dispose correctly.
EU DECLARATION OF CONFORMITY
Hereby, Impossible B.V. declares that the Impossible I-1 Analog Instant Camera is in compliance with the appropriate essential requirements of Article 3 of the R&TTE and other relevant provisions, when used for its intended purpose.
FCC
This device complies with Part 15 of the FCC Rules. Operation is subject to the following two conditions: (1) this device may not cause harmful interference, and (2) this device must accept any interference received, including interference that may cause undesired operation.
Caution: The user is cautioned that changes or modifications not expressly approved by the party responsible for compliance could void the user's authority to operate the equipment.
Note: This equipment has been tested and found to comply with the limits for a Class B digital device, pursuant to part 15 of the FCC Rules. These limits are designed to provide reasonable protection against harmful interference in a residential installation. This equipment generates, uses and can radiate radio
frequency energy and, if not installed and used in accordance with the instructions, may cause harmful interference to radio communications. However, there is no guarantee that interference will not occur in a particular installation. If this equipment does cause harmful interference to radio or television reception, which can be determined by turning the equipment off and on, the user is encouraged to try to correct the interference by one or more of the following measures: - Reorient or relocate the receiving antenna.
- Increase the separation between the equipment and receiver.
- Connect the equipment into an outlet on a circuit different from that to which the receiver is connected.
- Consult the dealer or an experienced radio/TV technician for help.
This equipment complies with FCC radiation exposure limits set forth for an uncontrolled environment. End user must follow the specific operating instructions for satisfying RF exposure compliance. This transmitter must not be co-located or operating in conjunction with any other antenna or transmitter.
INDUSTRY CANADA (IC)
INFOBLATT ZUR I-1 APP
KAMERA AUFLADEN
support.the-impossible-project.com
support.the-impossible-project.com
EUROPE / ÜBRIGE WELT
service@the-impossible-project.com
00 800 577 01500
USA/KANADA
usa@the-impossible-project.com
+212 219 3254
Impossible B.V.
support.the-impossible-project.com
DOWNLOAD DELL'APP I-1 E CONNES- SIONE ALLA FOTOCAMERA
support.the-impossible-project.com
EUROPA/RESTO DEL MONDO
service@the-impossible-project.com 00 800 577 01500
USA/CANADA
usa@the-impossible-project.com +212 219 3254
Impossible B.V.
Primo piano (0.5 - 1m)
Campo prossimo (1.0 - 2.2m)
Campo intermedio (2.2 - 4.5m)
Industry Canada (IC)
CÂBLE DE DONNÉES USB
COFFRET DE PRÉSENTATION / BOÎTE DE RANGEMENT
MODE D'EMPLOI
GUIDE DE DÉMARRAGE
DRAGONNE & VIS DE FIXATION
CHIFFON DOUX
LIVRET DE L'APPLI I-1
RECHARGER L'APPAREIL
service@the-impossible-project.com 00 800 577 01500
USA / CANADA
usa@the-impossible-project.com +212 219 3254
Impossible B.V.
Gros plan (0.5 - 1m)
Plan rapproché (1.0 - 2.2m)
Plan moyen (2.2 - 4.5m)
support.the-impossible-project.com
EUROPA/RESTO DEL MUNDO
service@the-impossible-project.com 00 800 577 01500
EE.UU./CANADÁ
usa@the-impossible-project.com +212 219 3254
Impossible B.V.
support.the-impossible-project.com
DOWNLOAD DA I-1 APP E CONEXÃO COM A CÂMERA
service@the-impossible-project.com 00 800 577 01500
US/CANADÁ
usa@the-impossible-project.com +212 219 3254
Impossible B.V.
Hoge Bothofstraat 45 7511 ZA Enschede The Netherlands
ESPECIFICAÇÕES TÉCNICAS
GERAIS
Industry Canada (IC)
support.the-impossible-project.com
support.the-impossible-project.com
ヨーロッパ/ROW
service@the-impossible-project.com
00 800 577 01500
米国/カナダ
usa@the-impossible-project.com
+212 219 3254
IMPOSSIBLE B.V.
support.the-impossible-project.com
Support Team (Impossible
客户支持团队)始终欢迎您的来信。
请使用以下方式与我们联系。
更多详情和最新信息,请访问:
support.the-impossible-project.com
欧洲/世界其它地区
service@the-impossible-project.com
00 800 577 01500
美国/加拿大
usa@the-impossible-project.com
+212 219 3254
IMPOSSIBLE B.V.
support.the-impossible-project.com
欧洲/世界其它地区
service@the-impossible-project.com
00 800 577 01500
美國/加拿大
usa@the-impossible-project.com
+212 219 3254
歐洲/世界其他地區
service@the-impossible-project.com
00 800 577 01500
Impossible B.V.
IMPOSSIBLE I-1 ANALOG INSTANT CAMERA
Impossible B.V.
End of the disposal warning: When the unit has come to the end of life, dispose of it in accordance with local regulations. This product is subject to the EU directive 200/96/EC or Waste Electrical and Electronic Equipment (WEET) and should not be disposed as unsorted municipal waste.
The Japanese CITEKI symbol is applied to devices which are certified as conforming to Japanese Technical Standards for radio waves.
FCC ID: 2AHU9-9001
IC ID: 21310-9001
Revision 9 - 09/2016