IAN 293408 - Electric scooter Playtive - Free user manual and instructions
Find the device manual for free IAN 293408 Playtive in PDF.
| Brand | Playtive |
| Model | IAN 293408 |
| Product type | Three-wheel scooter for children, convertible with removable seat |
| Recommended age | 18 months to 3 years (with seat) or from 3 years (without seat) |
| Maximum user weight | 20 kg for versions with seat, 50 kg for version without seat |
| Main material | Plastic and metal |
| Dimensions (L x W x H) | Not specified |
| Product weight | Not specified |
| Power supply | None (foot propulsion) |
| Number of wheels | 3 (two front, one rear) |
| Front wheel diameter | 120 mm each |
| Rear wheel diameter | 100 mm |
| Assembly variants | 3: 1) with seat and round handlebar, 2) without seat and round handlebar, 3) without seat and T-handlebar |
| Adjustable seat height | From 26 to 32 cm |
| Brake | Friction brake on rear wheel (version without seat) or foot braking (with seat) |
| Maintenance | Clean and dry after use, check screws and wheel condition |
| Packaging materials | Remove before use |
| Safety | Protective gear mandatory, do not use on public roads |
| Spare parts available | Replacement front wheels (same diameter) |
| Warranty | 3 years from date of purchase |
Frequently Asked Questions - IAN 293408 Playtive
User questions about IAN 293408 Playtive
0 question about this device. Answer the ones you know or ask your own.
Ask a new question about this device
Download the instructions for your Electric scooter in PDF format for free! Find your manual IAN 293408 - Playtive and take your electronic device back in hand. On this page are published all the documents necessary for the use of your device. IAN 293408 by Playtive.
USER MANUAL IAN 293408 Playtive
text_image
www.lidl-service.com PDF online3-IN-1 TRI-SCOOTER
TROTTINETTE TROIS ROUES 3 EN 1
DE AT CH
3-IN-1 TRI-SCOOTER
Gebrauchsanweisung
FR BE
TROTTINETTE TROIS ROUES 3 EN 1
Instructions for use
NL BE
3-IN-1 TRI-SCOOTER
Gebruiksaanwijzing
ES
PATINETE DE TRES RUEDAS 3 EN 1
Part names / Scope of delivery 12
Technical data 12
Correct use 12
Safety notes 12-13
Assembly 13
Dismantling 14
Use 14
Maintenance 14
Care, storage 14
Disposal 14
Notes on the guarantee and service
handling 14-15
NL BE
With your purchase you have decided on a high-quality product. Get to know the product before you start to use it.
Carefully read the following instructions.
Use the product only as described and only for the given areas of application. Keep these instructions safe. When passing the product on to a third party, always make sure that the documentation is included.
Part names/
Scope of delivery (figure A)
1 x Base with board and rollers (1)
1 x Handlebar with round handle (2)
1 x Handlebar with T-handle (3)
1 x Seat (4)
4 x Screws 6 x 12mm (5)
2 x Threaded sleeves 8 x 34mm (6)
2 x Threaded sleeves 8 x 39mm (7)
3 x Screws 8 x 24mm (8)
1 x Stabiliser plate (9)
2 x Allen key
1 x Instructions for use
Technical data
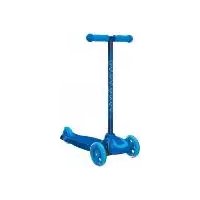
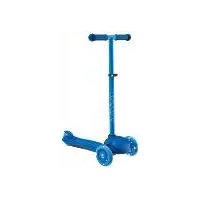
Design variations (figure G):
Design variation 1:
With seat and handlebar with round handle
Design variation 2:
With handlebar with round handle, without seat
Design variation 3:
With handlebar with T-handle, without seat

Maximum user weight for variations 1
2: 20kg

Minimum user weight for variation 3:

Front rollers: ø 120mm each
Back roller: ∅ 100mm

Date of manufacture (month/year):
2/2017
Correct use
This article is a toy for children for private use. It is suitable for different age groups and user weights depending on the design variation.
Design variation 1:
- For children aged 1 12 - 3 years.
- Caution! Not for use by children aged over 36 months because of the construction type.
- Caution! To be used with protective equipment. Not to be used in traffic. 20kg maximum
Note: The seat may not be used in conjunction with the handlebar with T-handle!
Design variation 2:
• For children aged 2 - 3 years.
- Caution! To be used with protective equipment. Not to be used in traffic. 20kg maximum
Design variation 3:
• For children aged 3 years and above.
- Caution! Not suitable for children under 36 months. Risk of suffocation as small parts could be swallowed or inhaled!
- Caution! To be used with protective equipment.
Not to be used in traffic.
50kg maximum

Safety notes
Design variation 1:
- Caution! To be used with protective equipment.
Not to be used in traffic.
20kg maximum
- Caution! Not to be used by children aged over 36 months because of the construction type.
Note: The seat may not be used in conjunction with the handlebar with T-handle!
Design variation 2:
- Caution! To be used with protective equipment.
Not to be used in traffic.
20kg maximum
Design variation 3:
- Caution! To be used with protective equipment.
Not to be used in traffic.
50kg maximum
- Caution! Not suitable for children under 36 months. Risk of suffocation as small parts could be swallowed or inhaled!
Design variations 1, 2, and 3 CAUTION!
- None of the packaging and attachment materials are a constituent part of the toy and should be removed for safety reasons before the article is given to children to play with.
• Children may only play with the article under supervision.
Risk of injury!
- The assembly of the article should always be carried by adults due to the presence of small parts!
- The article may only be used by one person at a time.
- Inspect the article before each use for damage or wear. Always check that all connecting elements are firmly in place. The article may only be used while in perfect condition!
- Ensure that screws and threaded sleeves retain their self-locking characteristics.
- Do not modify the article in such a way that it could endanger your safety.
• Always wear suitable protective equipment (helmet, hand, wrist, elbow, and knee protectors) and shoes!
• Always show consideration for others! -
Only use the article on suitable surfaces that are smooth, clean, and dry. Ride away from other road users where possible. Avoid sloping terrain, stairs, and open bodies of water.
-
Never ride in the dark or in bad visibility.
- Do not allow your child to use the article without supervision, as children are not able to assess potential risks.
- Skill is required for the use of the article in order to avoid falls or collisions that could lead to injury to the driver or to other persons.
Avoiding damage to property!
- Avoid water, oil, potholes, and very rough surfaces.
Assembly
Assembling the handlebar (figure B)
You will need the base (1) and the handlebar with the round handle (2) for design variations 1 and 2 or the handlebar with the T-handle (3) for design variation 3. Press the pin (2a, 3a) and insert the handlebar into the base.
Important: Please ensure that the handlebar clicks into the base.
Assembly of design variation 1 (figure C)
Lay the seat (4) onto the base (1). Please ensure that the drill holes on the seat and the base are directly above one another. Insert the short sleeves (6) through the two front drill holes from above and secure them from below using two screws (5). Insert the long sleeves (7) through the two back drill holes and back drill holes on the stabiliser plate (9) from above. Secure these from below using two screws (5). Insert a screw (8) in the front drill hole on the stabiliser plate and tighten it (figure D). Use the included Allen key for the assembly.
Assembly of design variation 2 (figure E)
Secure the stabiliser plate at the back three drill holes using the screws (8) and tighten the screws with the included Allen key.
Adjusting the height of the seat (figure F)
The seat can be set to different heights between approximately 26 - 32cm. To make this adjustment release the locking screw (4a) and set the desired height. Tighten the locking screw again.
Dismantling
Dismantling the handlebar
Press the pin on the back of the base (2a, 3a) and pull the handlebar out (figure B).
Dismantling the seat
Release the screws and pull the threaded sleeves out. Remove the seat.
Use
Riding
Depending on the design variation, sit on the seat and create momentum by pushing off with both legs at regular intervals, or, if using the scooter without a seat, stand on the board with one leg and create momentum by pushing off regularly with the other leg. The article is steered by shifting weight.
Braking
When using design variation 1 with the seat, brake by putting both feet on the ground. When using the article without the seat, brake by stepping onto the friction brake on the back wheel with one foot.
Maintenance
Exchanging the front rollers
You can change the front rollers.
Important!
Pay attention to the technical data.
Rollers with a different diameter can change the riding conditions and pose a risk to the user in some circumstances. Do not use any rollers that cannot be fitted perfectly.
Never fit rollers that are larger than the original rollers on the article.
Rollers suffer wear. The wear depends on many factors such as the ground, size and weight of the user, weather conditions, roller material and their degree of hardness. It is therefore necessary to exchange them from time to time.
- Release the screws on the front two rollers using a suitable Allen key.
- Fit the new rollers and secure the new rollers with the screws.
After exchange:
Please ensure that the screws are still tight after the first few minutes of riding and that nothing has been released or become loose. Tighten the roller again in order to ensure that it is running smoothly.
Care, storage
We recommend thorough cleaning and drying after using the article.
Remove small stones or other objects that may have been caught on the rollers. Always store the article in a dry place.
Disposal
Please dispose of the product and packaging in an environmentally friendly manner, separating different materials for recycling as required! Dispose of this item through an authorised disposal company or through your local waste disposal facilities - ask your local authority for information if further guidance is required.
Ensure that you comply with all regulations currently in force.
Notes on the guarantee and service handling
The product was produced with great care and under constant supervision. You receive a three-year warranty for this product from the date of purchase. Please retain your receipt.
The warranty applies only to material and workmanship and does not apply to misuse or improper handling. Your statutory rights, especially the warranty rights, are not affected by this warranty. With regard to complaints, please contact the following service hotline or contact us by e-mail. Our service employees will advise as to the subsequent procedure as quickly as possible. We will be personally available to discuss the situation with you.
Any repairs under the warranty, statutory guarantees or through goodwill do not extend the warranty period. This also applies to replaced and repaired parts. Repairs after the warranty are subject to a charge.
IAN: 293408
GB Service Great Britain
Tel.: 0871 5000 720 (£ 0.10/Min.)
E-Mail: deltasport@lidl.co.uk
IE Service Ireland
Tel.: 1890 930 034
(0,08 EUR/Min., (peak))
(0,06 EUR/Min., (off peak))
E-Mail: deltasport@lidl.ie