
Simply Fresh - Electric coffee maker MELITTA - Free user manual and instructions
Find the device manual for free Simply Fresh MELITTA in PDF.

| Brand | Melitta |
| Model | Simply Fresh |
| Product type | Filter coffee maker with integrated bean grinder |
| Power | 220-240 V ~ 50/60 Hz |
| Capacity | Up to 10 cups (1.25 L) |
| Main functions | Preparation with coffee beans or ground coffee, grind selector (3 positions), strength setting (mild, medium, strong), delay start function (Timer), adjustable keep warm (20/40/60 min), auto shut-off, descaling indicator |
| Bean container | Capacity for 2 to 3 preparations of 10 cups, removable |
| Recommended filter type | Melitta 1x4® coffee filters (size 4) |
| Anti-drip system | Yes, allows removing the carafe during brewing |
| Carafe | Glass carafe with lid, dishwasher safe |
| Water hardness setting | 4 levels (I to IV) to adapt descaling frequency |
| Grinder protection | Overload protection (foreign objects) |
| Cleaning and maintenance | Removable bean container and grinder, cleaning brush included, automatic descaling with recommended product (Melitta Anti Calc Liquid) |
| Safety | Auto shut-off after keep warm, overheat protection, bean container lock |
| Manufacturer warranty | 36 months (under conditions, domestic use) |
| Consumer service | Melitta France: 0970 805 105, www.melitta.fr |
Frequently Asked Questions - Simply Fresh MELITTA
User questions about Simply Fresh MELITTA
0 question about this device. Answer the ones you know or ask your own.
Ask a new question about this device
Download the instructions for your Electric coffee maker in PDF format for free! Find your manual Simply Fresh - MELITTA and take your electronic device back in hand. On this page are published all the documents necessary for the use of your device. Simply Fresh by MELITTA.
USER MANUAL Simply Fresh MELITTA
A. Chocolking Kaffepe, Hererwendung, Sinding for an open and coffee. Particles show the kiloton oil and crude oil as well as a great quantity of [ hear mace on Feasol calmol] . Descompared more salt oxides in solid oil makes hotzing, I find it again for maize oil. Isolding for a broad mixlark, from potato to brown soybean. [ The same type is one heavy oxidant ]
B. CALC-Turn | CALC button (varies) are your coversings | CALC-ops | It shows CALC | Border CALC | CALC-turn | CALC-tops | CALC-set | CALC-set | Probable with noise unit (CALC)
Eurwark Kaferskran Deinga la robo strung in Austrates por Darmont de rama (Iberlava) voor kaffitorales [importa om per il guro del aRf] Aursa de la internas de calè (Indes ling i kaffertus) [buchar for la liffacy la Iberlava for la luffery] Austrates la tina suivada la Ustravank maay Izrey
D
TPR-100 | TPR-200 | Etoxor de programmato | Spont d'Ind | TPR-100 |
TPR-100 | Rama TempORZADOR TPR-400 | TPR-200 | TPR-100 |
TPR-100 | Prudent TPR-4
E START-Tune | START battery | boucher de rer en marché | START-Hoop | Enée START | Boute IN CIO | START-Hop | START-upgen | START-hop | START-upin | Puyéb START
F
Übrüstung Tussentrahl | Sertags für number of ugs | Partnabrtes vor la svörte de turett (Institute voor total kopper) - Ertragsteilen per 1 varvare di ruse: Algegen para cinkreter de turett | Rebruttig al zerm kopper, inklagerer für total kopper | Institute voor total kopper | Anzahlte opplan/misartle | Charmen und führ in
H1Sunday / M/Howard (tune) / Thailand Pharmacy (buen) / hawore & the (furan) a P e (rivian) / Inopar voor lard (trivian) / H1 (tual 17 s.21 - Parals / Dounen) (horn) / Minakai / H1/oup / HM/angex / HM/kaop / H1/mao / H1/maok (parke) / trayak H (godny) / Y (mukya
H. (12)(12)(12)
Wacemar Italia (vocum kore display) Indicatior da una sottica [wocupoli indicazioni di vascuata] la scala e precaste del bronzione | Indicator dei risoli di agua (vancento daola) regodenderegen pi cavaori | schering pi cavaori | mobiliare interstituto | Pecce si inizi e con i maio a ria
1 Wens me de los (wes me de la parrado del yramar a rca) o bivir el que nocto
I accorso al pertanto de la que [Tas de deposto en agan] verdankana by [locos il retentura-
la] like i varance, veolló be hau! Pok ywa pastrava in work
K Donnerbeniär | Dean conalser | Diservirta grän de cál | Donnerseveler | Conenizore del chloci | Ola-Clutivirano, Bagninjeln | Blandjeln, Bagninjeln | Feste i Prunstav du chloci
L Mahvorsong | Grecor ring | Aroca ca moolin | Malvorsing - Arolla or mechinoic | Aro cd mol- olla | Huu zuo | Samba | Yambe | Kandhar marza | Evidiat neshagirva phala
M. Malkener, Gadercluster | Kauwarkumaln | Malkener | Carrio radicinella | Cingolol | Malgkinen | Kauwarken | Kauhanna | Carrio glabra | Kauwarken
N
Mahgradogler. Strad love die | Selectur ce mouture | Malgrand aux Inop | Secretore dei grato di reali andere | Selectur del vial da molido | Malignyadineau d'Aquenap | Narmagena | Eve noladae | Sulturaure valuta | Agalator popa a minica
Schwabfluss | nevefluss | ponsfluss arreable | avredlar | ilire condens | ilire gironalis | laking of a bursing of the | haring to open the condens | sialak | a quark flue in bedens | suadu mappler tarsalahen | Ureyt in her
1° Troplinop | dip. rup | penta antiposus | drugulop | la paclera antipocolorum | lappa
Q
Rein geopausal - Clearing result | Trava de rençons | Rakingbores | Spasola à pala. | Capão de lapa | Rakingbores | Rakingbores | Rakingbores | Pávuschura | Podotik do canazana
natural_image
Product image of a Simple Fresh coffee maker with no visible text or symbols on the device itself.DE Gebrauchemietung
GB Operating Instructions
ER Mode d'emploi
Nl. Gebruksopin
IT Isovion duso
ES. Instruciones de Uso
text_image
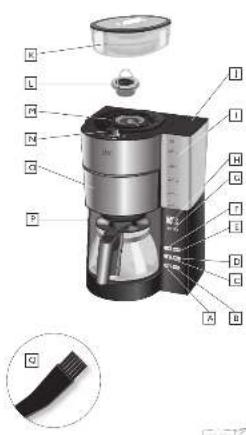
Labeled diagram of a coffee maker with parts numbered 1 to 12, showing internal components and a close-up of the cable.(2) H_2O


Liebe Kunden, Lieber Kunden,
dav, daw, daw, daw, daw, daw, daw, daw, daw, daw, daw, daw, daw, daw, daw, daw, daw, daw, daw, daw, daw, daw, daw, daw, daw, daw, daw, daw, daw, daw, daw, daw, daw, daw, daw
as a certain, however, Sua Saha leve ed.
Bolles agalvese emphim. For Solider ch
Thank you for buying our SimplyFresh filter coffee maker. We hope you will be very happy with it. If you need further information or if you have any questions please contact Melitta® or visit us on the Internet at www.melitta.co.uk
For your safety
CE The appliance complies with all valid European guidelines.
The appliance has been tested and certified by an independent test institute.
Please read the safety notes and the operating manual in full. To avoid danger you must pay attention to the safety and operating instructions. Melitta ^® is not liable for damage caused by ignoring these instructions.
1. Safety notice
This appliance is intended for use in households and similar areas, such as -
• in kitchens for employees in shops, offices and other commercial areas
• in agricultural establishments
- in motels, hotels and other residential facilities and bed and breakfast establishments
Any other use is considered to be improper use and may result in personal injury or damage to property. Melitta® is not liable for damage caused by improper use.
Please observe the following instructions to avoid injuries in case of misuse:
- The appliance must not be placed in a cupboard during operation.
- Connect the appliance only to a properly installed earthed socket.
- The appliance must always be disconnected from the power supply when unsupervised and
before assembly, disassembly or cleaning.
- During operation, parts of the appliance such as the steam outlet at the filter become very hot. Avoid touching these parts and avoid contact with hot steam.
- Do not open the filter holder during brewing.
- The hotplate becomes very hot during use and remains hot for a long time after the brewing process. Contact with the hot plate can cause burns, so avoid touching it.
- Make sure that the power cable does not touch the hot plate.
- Do not use the appliance if the power cable is damaged.
- Do not allow the power cable to come into contact with liquids.
- Never immerse the appliance in water.
- Do not use the jug in the microwave
- Do not clean the parts that come into contact with food with aggressive cleaning agents or scouring cream. Remove detergent residues with clean water. Further information on cleaning can be found under „Cleaning and care“.
- This appliance can be used by children from 8 years of age or older if they are supervised or have been instructed in the safe use of the equipment and have understood the potential hazards. Cleaning and maintenance must not be carried out by children,
unless they are 8 years or older and are supervised. Keep the appliance and the power cable away from children under 8 years of age.
- The appliance may be used by persons with reduced physical, sensory or mental abilities or lack of experience and/or knowledge if they are supervised or have been instructed in the safe use of the appliance and have understood the potential hazards.
• Children must not play with the appliance - Replacement of the power cable and all other repairs may only be carried out by Melitta® Customer Service or by an authorised repair shop.
2. Before first use
- Ensure that the mains voltage in your home corresponds to that indicated on the identification label on the base of the appliance.
- Connect the appliance to the mains power. Cable which is not required, can be stored in the cable spool ①.
- Set the current time using the buttons 'H' and 'M' ②. It is possible to speed this up by holding in the respective button. The display light can be turned on or off by holding down the H and M buttons ② for longer than 2 seconds.
- All appliances are tested for fault free operation when they are produced. Some residual water may be left behind after this test. Rinse the appliance twice with the maximum amount of water without a coffee filter or ground coffee in order to clean it. To do this, fill the water tank ⑥ up to the 10 cup level marker, then press the setting for using ground coffee ⑮ and turn the appliance on ④.
- The appliance has a variety of features for the best coffee enjoyment and ease of use. These features are explained below.
3. Set water hardness
Depending on water hardness lime scale may build up in the appliance. This increases the appliance's energy consumption as lime scale on the heating element can prevent the water heating effectively. To avoid damage the appliance must be descaled regularly. The descaling display helps you in this. If the CALC-button ③ is permanently lit this shows that the appliance needs
to be descaled.
The appliance is pre-set for a high level of water hardness (level 4). You can find out the level of water hardness in your area by asking your local water provider or by using water hardness measuring strips available in the shops. For softer water the descaling display can be adjusted to descale less often.
- Hold down the CALC-button ③ and by briefly pressing the m-button ② set the desired level of water hardness. The hardness setting will then show in the display
- Once you have set the desired level of water hardness, let go of the CALC-button. Your settings are now saved.
- The settings and display are shown in the table.
Please note:
| Hardness setting | I II III | IV | ||
| ^ dH | <7 ^ dH | 7-14 ^ dH | 14-21 ^ dH | >21 ^ dH |
| Display 2 | 1 | 2 3 4 |
• Water hardness cannot be programmed while brewing.
- The last water hardness level chosen remains even after removing the power cable.
4. Setting the hotplate
Keeping coffee warm on the hotplate affects the taste of your coffee. To avoid this you should enjoy your coffee fresh, by drinking it as soon after brewing as possible. Unnecessary warming also uses valuable energy. The factory settings for the appliance are for 40 minutes of warming. After this the hotplate turns off automatically. This time can be changed as needed:
- Hold down the START-button ④ and by briefly pressing the M-button ② set the desired time (20, 40 or 60 minutes). The current warming time will be shown in the display ②.
- Once you have set the desired warming time let go of the button. Your setting is now saved.
- The last setting chosen remains even after removing the power cable.
5. Coffee preparation
For aromatic coffee flavour and the best fit of your coffee filter in the filter holder we recommend using Melitta® coffee filters size 1x4®.
- Ensure that the power cable is plugged in.
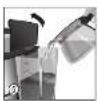
- Open the lid on the water tank ⑤.
- Pour the required amount of cold water into the water tank using the glass jug. With the help of the level markings on the tank ⑥ you can select the required number of cups (2/4/6/8/10).
- Close the water tank lid and place the glass jug with closed lid in the appliance.
- Set the number of cups ⑦ to the amount of water in the water tank ⑥. The number of cups is shown in the display ②.
Note: Ensure that the selected number of cups corresponds to the amount of water in the water
container ⑧. Please note that when making coffee all the water in the water tank is used. If the number of cups and the amount of water do not correspond to each other then this can lead to you not getting the coffee flavour you would like.
5.1 Using coffee beans
- When the bean container is completely full, you can brew enough coffee for 10 cups 2 or 3 times. Roasted coffee beans lose their flavour. Only fill coffee beans in the container which will be used within a few days.
- Open the bean container lid and fill with coffee beans ⑨. Then close the lid.
Note: To ensure the grinder functions perfectly do not use caramelised coffee beans. Do not put ground coffee in the bean container.
- Open the swivel filter ⑩ to the left.
- Fold a Melitta ^ 1x4 ^ coffee filter at the embossed seams and place it in the filter holder ⑪. Use your hand to press the filter in to ensure the best fit.
- Swivel the filter back into the appliance. An audible click indicates that the filter is in place.
- Turn the grind dial ⑫, to select the required grind level (from fine to coarse). The grind dial allows you to select from 3 different settings. Settings between the symbols are also possible. The ‘fine’ setting is for standard coffee. This setting may give the coffee a slightly bitter character. If a coarser setting is selected the coffee will be less bitter.
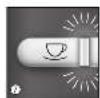
- Press the button to select coffee strength ⑬. The selected coffee strength is shown in the display ②. One coffee bean #is for mild, two beans #for medium and three beans #for strong.
- Turn the appliance on using the start button ON/OFF ④. Coffee preparation begins and the green LED flashes.
- If you hear three warning tones when starting the grinding process or when programming the timer and the display shows three flashing beans, the bean container is not completely in place. If this happens please reinsert the bean container as described in point 7.
Note: The appliance has an overload safety function of the grinder, which protects the grinder against damage by foreign objects in the coffee beans. If you hear a loud chattering, unknown noise during the grinding process, switch the appliacne off ④ and clean the grinder as described in point 7.
- When the coffee is ready the green LED ④ is illuminated but stops flashing. The hot plate keeps your coffee warm and switches off automatically after the time you have set (see point 4). This avoids the unnecessary use of electricity and saves energy. You can of course turn the appliance off manually at any time ④.
- The drip stop ⑭ prevents coffee dripping when you remove the jug from the appliance.
- The used coffee filter can be disposed of simply and easily using the removable filter insert.
Additional note to clause 5.1
Melitta has no influence on possible foreign objects between the roasted coffee beans. As described in clause 5.1 of the manual the grinder is equipped with an overload protection. With this damages of the grinder due to foreign objects shall be avoided.
Rarely the overload protection will not be activated. The motor stops and there is no grinding sound to hear after switch on. In this case the appliance must be switched off immediately. A repeated switch on should be avoided. Clean the grinder as described in clause 7. of the manual. After that the appliance is ready for use again.
5.2 Using ground coffee
- To use ground coffee select the ground coffee setting ⑮.
- Open the swivel filter to the left ⑩.
- Fold a Melitta ^ 1×4 ^ coffee filter at the embossed seams and place it in the filter holder ⑪. Use your hand to press the filter in to ensure the best fit.
- Put the ground coffee in the coffee filter. The amount of coffee you use depends on your personal taste. We recommend using 6 g of ground coffee per cup.
- Swivel the filter back into the appliance. An audible click indicates that the filter is in place.
- Turn the appliance on using the start button ON/OFF ④. Coffee preparation begins and the green LED flashes.
- When the coffee is ready the green LED ④ is illuminated but stops flashing. The hot plate keeps your coffee warm and switches off automatically after the time you have set (see point 4). This avoids the unnecessary use of electricity and saves energy. You can of course turn the appliance off manually at any time ④.
- The drip stop ⑭ prevents coffee dripping when you remove the jug from the appliance.
- The used coffee filter can be disposed of simply and easily using the removable filter insert.
6. Timer Feature
The appliance is equipped with a TIMER. This allows you to start brewing coffee automatically at the time you set.
- Prepare the appliance as described in point 5. 'coffee preparation' but without pressing the start button ON/OFF ④.
- To set the required start time, hold down the TIMER button ⑯. The first time you set it, the time indicator and the clock symbol will flash in the display ②. Set the required start time by repeatedly pressing the H and M buttons ②. It is possible to speed this up by holding in the respective button.
- Two seconds after you let go of the TIMER button the current time will be displayed again. The start time you selected is saved until a new time is selected or the appliance is removed from the power supply.
- Pressing the TIMER button ⑯ briefly activates the timer feature for automatic coffee preparation. The start time you set appears briefly in the display ②. The clock symbol in the display ② and the white LED are illuminated ⑯.
- The appliance starts preparing coffee automatically at the time you set.
- If you do not remove the appliance from the mains electricity or programme a new start time then the time previously set is saved.
- The TIMER feature can be deactivated at any time by pressing the TIMER button ⑯. The white LED ⑯ and the clock symbol ② are no longer illuminated.
7. Cleaning and care
External cleaning:
- The housing and the water tank can be cleaned with a soft, damp cloth.
- The glass jug and lid and the filter insert are dishwasher safe.
- The hotplate can be cleaned with a soft, damp cloth when it is cold.
For the best coffee flavour we recommend cleaning the bean container, the grinder and the ground coffee chute regularly. This is easiest when the bean container and the grinder are completely empty.
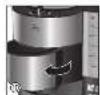
Remove bean container:
- Turn the bean container anti-clockwise until the triangular indicators are aligned ⑰.
- Remove the bean container from the appliance and empty it completely.
- Put the bean container in place:
- Align the triangular indicators ⑰.
- Lightly press down on the bean container and turn it clockwise until it clicks into place.
- Put a coffee filter in the filter holder ⑪.
• Empty the grinder completely:
- Set the appliance at 2 cups ⑦ and one coffee bean ⑬.
- Press the start button ON/OFF ④ and allow the appliance to grind until empty.
- After grinding use the ON/OFF button to turn the appliance off.
- Remove the bean container ⑰ again as described above.
Clean the grinder:
- Turn the grind level dial to 'Open' ⑱.
- Lift up the bracket and pull the grinder ring out of the grinder ⑲.
- Clean the grinder with the cleaning brush provided ⑳.
- To completely remove ground coffee deposits we recommend using a vacuum cleaner.
- Open the swivel filter and dispose of the coffee filter ⑩.
Clean the ground coffee chute:
- Holding the appliance in both hands carefully lay it on its back.
- Now you can firstly clean the area above the swivel filter with the brush and a damp cloth.
- To open the ground coffee chute hold down the button for ground coffee ⑮ for 5 seconds.
- The ground coffee chute flap opens and the chute can be cleaned with the brush..
- To close the flap on the ground coffee chute hold down the button for ground coffee ⑮ for 5 seconds.
- Put the swivel filter ⑩ back in place and stand the appliance up again.
- Put the grinder ring ⑲ back in place and close down the bracket again.
- Turn the grind level dial back into a grind position ⑱.
- Put the bean container in place again as described above.
Descaling:
Based on the water hardness you have set (see point 3) the appliance should be descaled soon after the CALC ③ indicator lights up.
- Measure out the descaling fluid according to the manufacturers instructions and pour it into the water tank. We recommend using Melitta® "Anti Calc Liquid for Filter Coffee & Aqua Machines".
- Briefly press the CALC button ③. The red LED starts to flash ③.
- The current time and 'CALC' appear alternately in the display ②.
- The descaling process runs automatically. To remove even heavy calcification the descaling process takes about 25 minutes.
- Attention: Only by running the complete descaling process can all limescale deposits be removed. Only then does the Calc LED ③ go off. Therefore the descaling process should not be interrupted.
- After the descaling process has been completed the light in the CALC button ③ goes off. The appliance turns off automatically.
- To completely remove any deposits from descaling, the appliance must be rinsed twice with the maximum amount of water without coffee, after the descaling process has ended. Proceed as described in point 2.
8. Note on disposal
- Appliances labelled with this symbol ☒ are subject to European guidelines for WEEE (Waste Electrical and Electronic Equipment).
- Electric appliances do not go in the household bin. Dispose of the appliance in an environmentally friendly way using suitable collection systems.
- Packaging materials are raw materials and can be recycled. Please recycle them.
Cher client, chère cliente,
In addition to the statutory warranty rights to which the end user is entitled from the seller, we give a manufacturer's guarantee for this appliance under the following conditions if it has been purchased from a dealer authorised by us on the basis of their ability to offer expert advice:
- The guarantee period begins on the day of sale to the end customer. It is valid for 36 months. The purchase date must be documented by a purchase receipt. The appliance has been designed and constructed for household use and is not suitable for commercial use. Guarantee services do not extend or re-start the guarantee period for the appliance or any spare parts installed.
- Within the guarantee period, we shall remedy all defects on the device which are based on material or manufacturing defects, at our discretion, by repairing or replacing the device. Exchanged parts become our property.
- The guarantee does not cover defects caused by improper connection, improper handling or attempted repairs by unauthorized persons. The same applies to non-compliance with the instructions for use, care and maintenance as well as the use of materials (e.g. cleaning and descaling agents or water filters) which do not correspond to the original specifications. Parts subject to wear (e.g. seals and valves) and fragile parts such as glass are excluded from the guarantee.
- Guarantee services are processed using the relevant country service hotline (see details below).
- These guarantee conditions apply to appliances purchased and used in the Federal Republic of Germany, Austria and Switzerland. If devices are purchased abroad or taken there, guarantee services will only be provided within the scope of the guarantee provisions applicable for that country.
Melitta UK Ltd.
Hortonwood 45
Telford, Shropshire, TF1 7FA
United Kingdom
Tel: +44(0)800 0288002
www.melitta.co.uk

FR
Garantie Melitta®
Melitta Poland Sp. z o.o.
www.melitta.pl
