Nebula Touch Digital 86930 - Fan UNOLD - Free user manual and instructions
Find the device manual for free Nebula Touch Digital 86930 UNOLD in PDF.
Download the instructions for your Fan in PDF format for free! Find your manual Nebula Touch Digital 86930 - UNOLD and take your electronic device back in hand. On this page are published all the documents necessary for the use of your device. Nebula Touch Digital 86930 by UNOLD.
USER MANUAL Nebula Touch Digital 86930 UNOLD
This symbol indicates potential hazards that may result in injury or damage to the appliance. Please read the following instructions and keep them on hand for later reference. Instructions for persons in the household
1. This appliance can be used by children 8 years and older, as
well as by persons with reduced physical, sensory or mental abilities or with lack of experience and/or knowledge, if they are supervised or if they have been instructed with regard to safe use of the appliance and have understood the dangers that can result from use of the appliance.
2. Children must not play with the appliance.
3. Children are not allowed to perform cleaning and user
maintenance, unless they are 8 years of age or older and are supervised.
4. Keep the appliance and the power cord out of the reach of
children under 8 years of age.
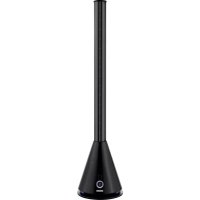
Power: 90 watt, 220-240 V~, 50 Hz Dimensions: approx. 40.0 x 40.0 x 120.0 cm (L/W/H) Weight: approx. 5.6 kg Diameter: approx. 38 cm Power cord length: approx. 160 cm Material: Plastic Protection class: II, protective insulation Water tank: 3 litre fill quantity Features: With misting function in 3 intensities, electronic adjustment, 3 speed levels, oscillation can be switched on, timer function to maximum 7.5 hours, residual water drain Accessories: Remote control unit, operating instructions Equipment features, technology, colours and design are subject to change without notice. Copyright UNOLD AG | www.unold.de UNOLD ©Stand 17.12.2021 21 von 106
Safety instructions for set-up and operation of the appliance
5. Only switch the appliance on when it has been properly assem-
Ensure that there is sufficient space where the appliance is located. A minimum distance of 50 cm must be maintained between the appliance and other objects.
7. Do not use the appliance in rooms that are extremely dusty or in
the vicinity of flammable substances.
8. Only connect the appliance to an AC power supply with voltage
corresponding to the voltage specified on the rating plate.
9. This appliance must not be operated with an external timer or a
remote control system.
10. Never immerse the appliance or the power cord in water or other
liquids - life-threatening danger!
11. Do not open the motor housing under any circumstances, there
is danger of electric shock!
12. The appliance is intended for household use only, or for similar
areas of use, such as, in kitchenettes in businesses, offices or other workplaces, for use by guests in hotels, motels or other lodgings, in private guest houses or holiday homes.
13. The power cord must be laid out in such a manner that there is
no possibility of stumbling over it.
14. To avoid damage to the cord, do not, under any circumstances
wrap the power cord around the appliance.
15. To avoid damage to the cord, always unplug the power plug from
the electrical outlet by grasping the plug, never pull on the power cord to unplug the appliance.
16. Ensure that the electrical outlet used is easily accessible, in
order to unplug the appliance in an emergency.
17. To avoid damage to the power cord, ensure that it is not pinched
or pulled over corners.
18. If possible, do not use an extension cord. If you must use an
extension cord, completely unwind the extension cord and com
ply with the power limits of the respective extension cord.
20. The appliance must never be used in wet/wet and cold or damp
rooms – danger of electric shock!
21. Keep the appliance out of direct sunlight.
22. Never stick fingers or objects, such as needles, pins, etc. through
the basket grille into the interior of the appliance – danger of injury!
23. Take proper precautions to ensure that long hair cannot be
caught by the impeller.
24. Check the appliance, the plug and the power cord regularly for
wear or damage. In case of damage to the power cord or other parts, please send the appliance for inspection and repair to our customer service department. Unauthorised repairs can result in serious hazards for the user and void the warranty.
25. To avoid damage, do not use the appliance with accessories of
other manufacturers or brands.
26. Unplug the power plug from the electrical outlet after use and
before cleaning. Never leave the appliance unattended when the power plug is plugged in. The manufacturer will not be liable in the event of incorrect assembly, improper or incorrect use or if repairs are carried out by unauthorized third parties. Never stick fingers or objects, such as needles, pins, etc. through the basket grille into the interior of the appliance – danger of injury! Only operate the appliance on a level, stable substrate, so that it does not tip over. Never open the housing of the appliance. This can result in electric shock. Copyright UNOLD AG | www.unold.de UNOLD ©Stand 17.12.2021 23 von 106
1. Before assembling, ensure that you are assembling the appliance in a place
that is level and dry.
2. Remove all packaging materials and transport safeguards. Keep the
packaging material, such as plastic bags or Styrofoam away from small children - danger of suffocation!
3. Check whether all needed parts are present.
4. Turn the base upside down so that you are looking at the underside of the
base. Screw the five provided rollers into the associated five holes. Then turn the base right-side-up.
5. There is a threaded ring on the underside of the housing. Unscrew this
threaded ring from the housing. Insert the housing into the aperture of the base and firmly screw the threaded ring back onto the underside of the base.
6. Insert the motor with stand tube into the housing and ensure that both parts
are properly connected. The black locking screw (15) can only be properly screwed in through the opening in the stand tube if both parts are properly connected.
7. Remove the nut (6) from the motor housing (8/9) by turning it anti-clockwise.
8. Fasten the rear grille on the motor, by fixing the cover in place with the
nut (6) (Fig. 1). In this process do not press too firmly. In this process pay attention to the apertures/pins.
9. Place the impeller on the axle on the motor housing. Fix the impeller in place
with the fastening ring (4) (turn it anti-clockwise). Check whether the fan blades move freely. Note: The fastening ring tightens itself, consequently, do not use excessive force when fastening (Fig. 2).
10. Remove the three screws (3) on the rear of the ornamental ring trim (1). Fit
the ornamental ring trim onto the front grille and firmly fasten it with the three screws.
11. Connect the front grille to the rear grille.
Always unplug the appliance from the electrical outlet before working on the water tank
1. Grasp the handle and pull the water tank to the rear and away from the
housing, and take out the water tank (Fig. 3).
2. Reverse the water tank so that the black lid faces upward.
3. Unscrew the black lid (Fig. 4)
12. Fix both grille elements in place by placing the grille connection ring around
both grilles (both grilles must be seated precisely in the ring) and fasten on the lock (11).
13. Connect the hose (22) to the hose connection of the ornamental ring trim
(1) on the front grille. Check whether all parts are firmly connected to each other.
14. Ensure for yourself that all parts have been correctly assembled and fixed in
4. Fill with water and screw the lid closed. Note: To prevent appliance damage
the temperature of the water used should not be over 40°C. We advise to use distilled or boiled, cooled down water
5. Reverse the water tank and insert it into the housing. It is recommended to
first guide the lower side of the water tank into the housing and then slide in the water tank using the handle.
6. Ensure that the water tank is properly inserted.
7. The water in the water tank must be changed at least once a week in order to
prevent lime-scale and algae build-up. For hygienic reasons we recommend changing the water several times a week.
8. You can drain excess water via the water drain on the underside of the appli-
ance. Unscrew the cover an tilt the appliance slightly to the rear, e.g. over a shallow bowl. Let the water flow out and then seal the water drain. Attention: Do not fill water directly into the appliance. Open Closed Fig. 4
1. Carefully pull the cover of the battery compartment out of the remote control
2. Insert the battery into the intended holder.
3. If you want to insert a different battery, ensure that you use a CR2025
button cell battery.
4. Carefully slide the cover back into the remote control unit. In this regard the
„+“ symbol must point to the rear of the remote control unit.
5. If you adjust the appliance with the remote control unit, ensure that you
always hold it in the direction of the fan while you are making the settings.
6. To avoid damage, never allow the remote control unit to fall from a significant
For switching the appliance on and off
Geschwindigkeit/Speed For adjusting the three speed levels
Modus/Mode For selecting the desired mode. Standard mode, Near-Natural Mode or Sleep Mode can be selected.
Zeitvorwahl/Timer For selecting the time, after which the appliance switches off, adjustable between 0.5 and 7.5 hours
Oszillation/Swing For switching the Oscillation/Swing function on and off
Misting function Switch-on and switch-off, as well as adjusting the misting intensity
1. Ensure that the appliance is standing on a suitable, level substrate, and has
been set up so that it is safe and stable in the vicinity of an electrical outlet.
2. Do not set up the appliance in bathrooms or other wet rooms!
3. Plug the power plug of the appliance into the electrical outlet (220–240 V~
50 Hz). A brief signal tone indicates that the appliance is connected to the mains supply.
4. If you want to set up the appliance at a different location, first switch off the
appliance and then unplug the power plug from the electrical outlet.
5. Do not insert any objects into the appliance.
Adjusting the tilt angle
6. You can tilt the motor housing horizontally to a certain extent. To do this,
press the motor housing into the desired tilt angle. To prevent appliance damage, do not use excessive force. ON/OFF button
7. Press the ON/OFF button to activate the fan. The appropriate indicator light
on the control panel lights up.
8. You can now press the button for the misting function, if you want to use the
misting function without fan function. The mist will be distributed without the fan function.
9. Press the ON/OFF button again to switch on the fan function. In the basic
settings the appliance runs at low speed in normal mode.
10. Now you can select the other functions.
11. To switch on the low speed stage, when the device is switched off, press the
ON/OFF button two times in succession. On the control panel the indicator light for low speed lights up:
12. Now press the „Speed“ button until the appliance is working at the desired
speed. The appropriate setting is shown by the respective indicator light: Medium speed: High speed: Copyright UNOLD AG | www.unold.de UNOLD ©30 von 106 Stand 17.12.2021
13. When the appliance is switched off press the ON/OFF button twice, the
appliance will run in standard mode. The control panel does not have a separate indicator light for this.
14. Press the „Mode“ button and select the desired operating mode. You
can select Standard mode, Near Natural mode, and Sleep mode. Press the „Mode“ button repeatedly until the desired setting is shown by the appropriate indicator light. Near Natural mode Symbol The appliance works with alternating speeds that feel like the natural movement of air. Sleep mode Symbol The appliance works like it does in Near Natural mode with permanently set speeds that decrease incrementally. Zeitvorwahl/Timer
15. Via the „Timer“ button you can select the desired runtime of the appliance.
This is possible in the range from 0.5 hour to 7.5 hours. Press the „Timer“ button until the desired number of hours appears in the display. After this time elapses the appliance switches off automatically. If you do not make a time setting, the appliance will run continuously, however none of the indicator lights for the timer will be illuminated. Swing function/oscillation
16. Press the „Oscillation (Swing)“ button to switch on the swing function.
Press the button again to stop the appliance in the current position, the fan however keeps running. Misting function
17. The misting function can be used with or without fan function.
18. Press the button for the misting function once for low misting intensity,
twice for medium misting intensity, and three times for high misting inten- sity.
19. The appliance now distributes a fine water mist.
20. In the view window on the front of the housing the blue indicator light
is illuminated, indicating that the misting function is switched on. If the indicator light is illuminated red, this means that there is no water in the water tank and the tank must be filled up with water again. Copyright UNOLD AG | www.unold.de UNOLD ©Stand 17.12.2021 31 von 106
Switch off the appliance and unplug the power plug from the electrical outlet. Wait until the appliance has come to a complete standstill. Never immerse the appliance in water. The motor or electrical components of the appliance must not get wet.
1. Never use any abrasive scouring agents, steel wool, metal objects, hot
cleaning agents or disinfectants.
2. Wipe off the housing and grille of the fan with a slightly dampened cloth.
3. The water in the water tank must be changed at least once a week in order to
prevent lime-scale and algae build-up. For hygienic reasons we recommend changing the water several times a week.
4. If the appliance will not be used for an extended period of time, the excess
water must be drained from appliance. In this regard comply with all instructions in the chapter “Water tank”.
5. Likewise at air temperatures under 0°C, the water must be drained from the
appliance, otherwise frost damage can occur on the device.
6. Wipe off the chambers for the water with a damp cloth, and then dry the
chambers thoroughly.
7. Store the fan in a dry, safe place so that it is protected from dust, impact,
22. Note: The desired effect is best with dry heat. If the environment is too
muggy, the mugginess may increase due to the misting. Switching off
23. Press the ON/OFF button to switch off the appliance. When you are no
SOLVING PROBLEMS Problem Cause Solution The appliance does not work No power supply Plug the power plug into an electrical outlet. If the appliance still does not work, contact the Customer Service organization No spray mist Water tank is empty The valve in the tank closure is jammed Water tank is too full Add water Move the valve lightly with your nger Drain off a little water Spray mist smells bad Water tank is contaminated Clean the water tank and ll it with fresh water Insufcient spray mist The valves in the tank closure is contaminated Clean the water tank and check the valves Copyright UNOLD AG | www.unold.de UNOLD ©Stand 17.12.2021 33 von 106
GUARANTEE CONDITIONS We grant a 24 months guarantee, and in case of commercial use a 12 months guarantee, starting from the date of purchase for any damage demonstrably due to manufacturing defects and when the appliance has been used according to its intended use. Within the warranty period we will remedy defective materials or workman- ship through repair or replacement, at our option. Our warranty terms apply only to appliances sold in Germany and Austria. For other countries, please contact the responsible importer. In the event of a claim for remedy of defects, please send the appliance to our after sales service, properly packaged, together with a copy of the automatically generated sales receipt, which must show the date of purchase, and a description of the defect. You can print out a return receipt on our website www.unold.de/ruecksendung. (only for entries from Germany and Austria). The warranty does not cover damage from normal wear, improper handling and failure to comply with the maintenance and care instructions. The warranty is void if repairs or modifications are made to the appliance by third parties. Any claims of the end consumer vis-à-vis the retailer are not limited by this warranty.
WASTE DISPOSAL / ENVIRONMENTAL PROTECTION
Our appliances are produced on a high quality level for a long lifetime. Regular maintenance and expert repairs by our after-sales service can extend the useful life of the appliance. If an appliance is defective and repair is not possible we ask you to follow the following instructions for disposal. Do not dispose this appliance together with your standard household waste. Please bring this product to an approved collection point for recycling of electric and electronic prod- ucts. By separate collection and disposal of waste products you help to protect natural resources and ensure, that the product is disposed in an adequate way to protect health and environment. Do not dispose of used batteries as household waste. Dispose of this product via your appliance dealer or take it to the municipal collection point. The instruction booklet is also available for download: www.unold.de Copyright UNOLD AG | www.unold.de UNOLD ©34 von 106 Stand 17.12.2021