
MS36 - String Trimmer SABO - Free user manual and instructions
Find the device manual for free MS36 SABO in PDF.
| Brand | SABO |
| Model | MS36 |
| Product type | Battery-powered brush cutter (grass trimmer) |
| Product designation | Battery-powered brush cutter, type SA561121 |
| Motor | Brushless DC motor 40 V |
| No-load speed (line/blade) | 5500 / 6000 ±10 % min⁻¹ |
| Cutting tool | Cutting line (nylon ∅ 2.0 mm) and metal blade (accessory) |
| Cutting diameter (line) | 356 mm (adjustable to 406 mm) |
| Cutting diameter (blade) | 254 mm |
| Weight (without battery) | 4.5 kg |
| Power supply | Lithium-ion battery 40 V (compatible models: SAU15032, SAU16450/51, SAU17028/29) |
| Compatible charger | SAU15033, SAU16509 |
| Sound pressure level (line) | LPA = 79.9 dB(A) (uncertainty k=3 dB(A)) |
| Sound pressure level (blade) | LPA = 84.7 dB(A) (k=3 dB(A)) |
| Guaranteed sound power level (line) | LWA = 96.0 dB(A) |
| Guaranteed sound power level (blade) | LWA = 101.0 dB(A) |
| Vibration (measured value) | a < 2.5 m/s², uncertainty k=1.5 m/s² |
| Main functions | Cutting grass, weeds; push-button line advance; cutting diameter adjustment; safety lock |
| Maintenance and cleaning | Clean with damp cloth; remove battery; replace line spool or blade; sharpen the line cutter |
| Safety | Safety lock button + trigger; grass deflector; hearing protection, eye protection, gloves and safety shoes mandatory |
| Spare parts and repairability | Line spool (∅ 2.0 mm), blade (SAU17056), line cutter, cover, etc. Repairs by authorized professional |
| Warranty and use | Household use only; no commercial use |
| Storage | Remove battery, store in dry place < 27 °C, attach blade guard |
Frequently Asked Questions - MS36 SABO
User questions about MS36 SABO
0 question about this device. Answer the ones you know or ask your own.
Ask a new question about this device
Download the instructions for your String Trimmer in PDF format for free! Find your manual MS36 - SABO and take your electronic device back in hand. On this page are published all the documents necessary for the use of your device. MS36 by SABO.
USER MANUAL MS36 SABO
Cordless brushcutter OPERATOR'S MANUAL

Accumotorzeis GEBRUKSANWIJSING

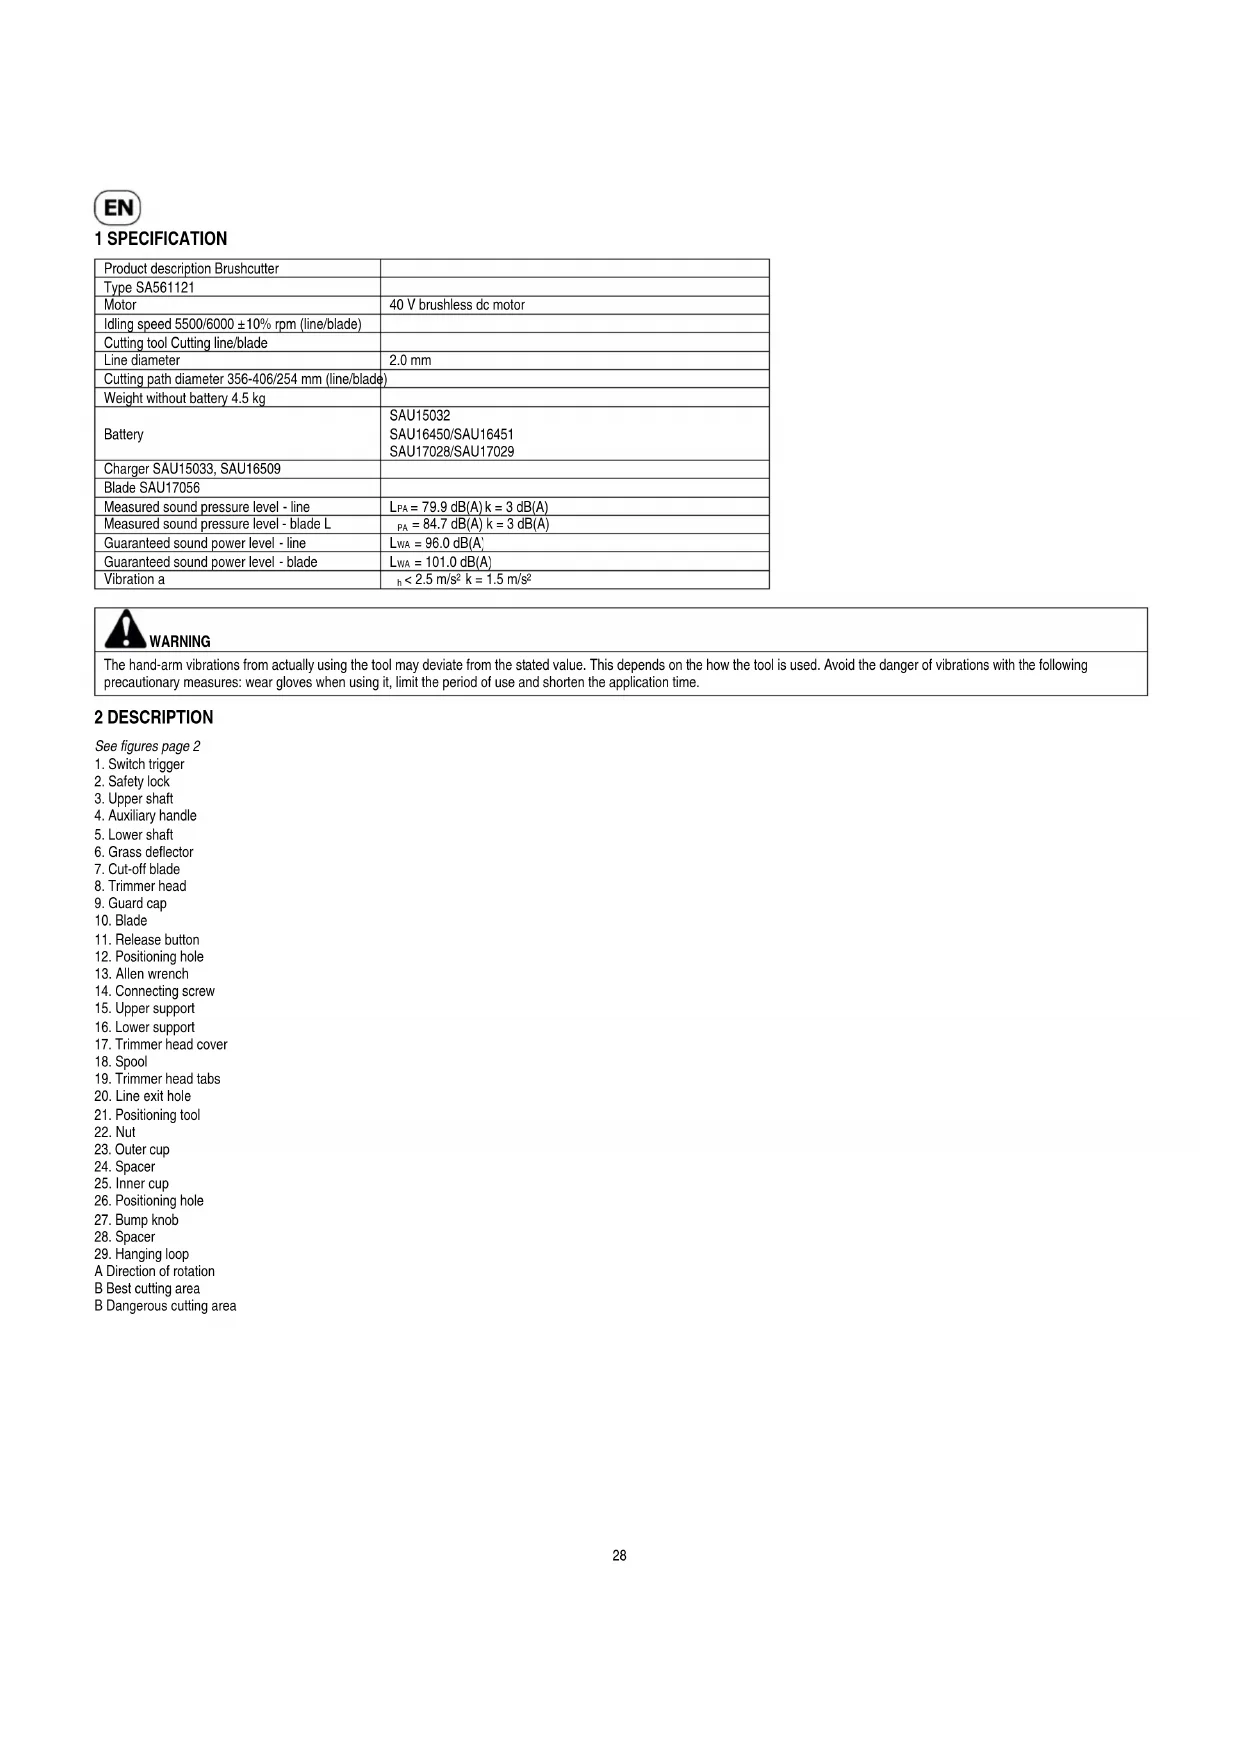
| Product description Brushcutter | |
| Type SA561121 | |
| Motor | 40 V brushless dc motor |
| Idling speed 5500/6000 ±10% rpm (line/blade) | |
| Cutting tool Cutting line/blade | |
| Line diameter | 2.0 mm |
| Cutting path diameter 356-406/254 mm (line/blade) | |
| Weight without battery 4.5 kg | |
| Battery | SAU15032 SAU16450/SAU16451 SAU17028/SAU17029 |
| Charger SAU15033, SAU16509 | |
| Blade SAU17056 | |
| Measured sound pressure level - line | LPA=79.9 dB(A) k = 3 dB(A) |
| Measured sound pressure level - blade L | LPA=84.7 dB(A) k = 3 dB(A) |
| Guaranteed sound power level - line | LWA=96.0 dB(A) |
| Guaranteed sound power level - blade | LWA=101.0 dB(A) |
| Vibration a | n<2.5 m/s² k = 1.5 m/s² |
| WARNING |
| The hand-arm vibrations from actually using the tool may deviate from the stated value. This depends on the how the tool is used. Avoid the danger of vibrations with the following precautionary measures: wear gloves when using it, limit the period of use and shorten the application time. |
2 DESCRIPTION
See figures page 2
- Switch trigger
- Safety lock
- Upper shaft
- Auxiliary handle
- Lower shaft
- Grass deflector
- Cut-off blade
- Trimmer head
- Guard cap
- Blade
- Release button
- Positioning hole
- Allen wrench
- Connecting screw
- Upper support
- Lower support
- Trimmer head cover
- Spool
- Trimmer head tabs
- Line exit hole
- Positioning tool
- Nut
- Outer cup
- Spacer
- Inner cup
- Positioning hole
- Bump knob
- Spacer
- Hanging loop
A Direction of rotation
B Best cutting area
B Dangerous cutting area
3 EXPLANATION OF THE IDENTIFICATION PLATE ON THE BRUSHCUTTER

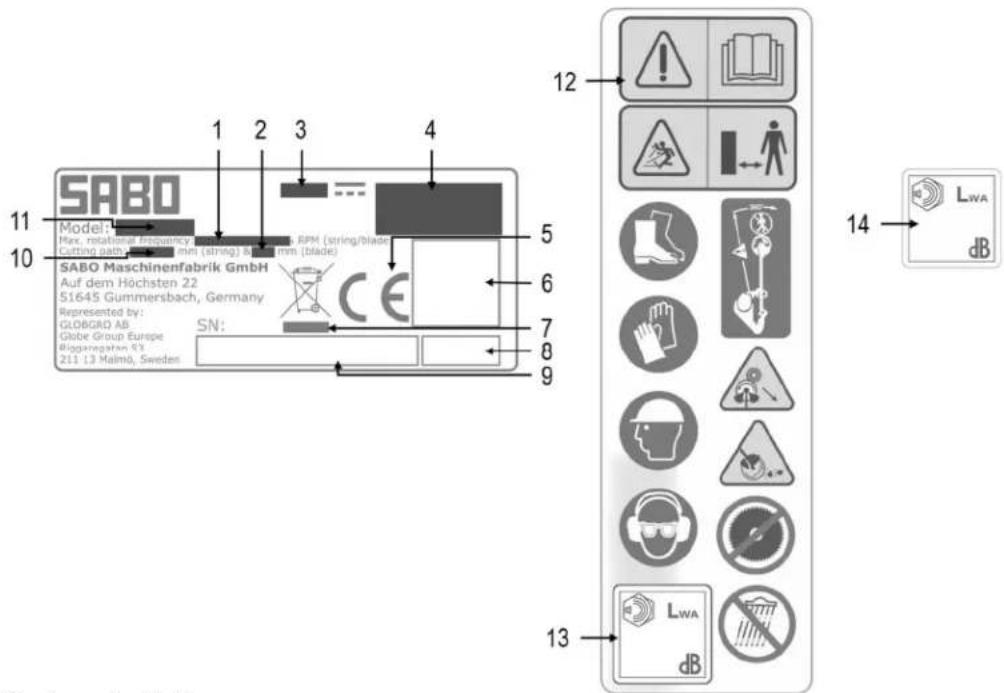
1 Speed range (line/blade)
2 Cutting area (blade)
3 Rated voltage
4 Product description
5 CE conformity mark
6 QR code
7 Do not dispose of this device with household waste. The device, accessories and packaging must be returned for recycling in accordance with environmental guidelines.
8 Date of production
9 Production identification number
10 Cutting area (line)
11 Type description
12 Instruction, prohibition and warning information
13 Guaranteed sound power level (line)
14 Guaranteed sound power level (blade)
4 EXPLANATION OF THE SYMBOLS
The following symbols are shown on your device. Familiarise yourself with these symbols and note their meaning. A good understanding of these symbols will assist you in using the product better and more safely.
| SYMBOL | DESCRIPTION/EXPLANATION |
| Read and understand all the instructions before using the product. Follow all the warnings and safety instructions. | |
| Wear head protection when using this device. | |
| When using this device, wear safety goggles and ear protection. | |
| Wear protective shoes when using this device. | |
| Wear protective gloves when using this device. |
EN
| Do not expose the device to rain or moisture. | |
| Do not use saw blades as a cutting tool. | |
| Avoid contact with stationary objects. The device may kick back. | |
| Objects on the ground, such as stones, may be thrown and cause injury and physical damage. Wear protective clothing and boots. | |
| Objects on the ground, such as stones, may be thrown and cause injury and physical damage. All persons and animals nearby must maintain a distance of at least 15 m. | |
| Make sure that the entire work area around you is free of all persons and animals. |
| The following signal words and meanings indicate the degree of risk associated with this product. | ||
| SYMBOL SIGNAL MEANING | ||
| A | DANGER: | Describes an immediate dangerous situation that, if it is not prevented, can lead to death or serious injuries. |
| A | WARNING: | Describes a possible dangerous situation that, if it is not prevented, can lead to death or serious injuries. |
| A | ATTENTION! | Describes a possible dangerous situation that, if it is not prevented, can lead to minor and moderate injuries. |
| ATTENTION! (without safety symbol) | Describes a situation which can lead to material damage. | |
| i | NOTE Describes information that will help you better understand the operation of the device. | |
TECHNICAL MAINTENANCE
The maintenance requires the highest levels of caution and knowledge and therefore should only be performed by an expert. We recommend that you take the device to a nearby approved dealer for repair. In servicing the device, only original replacement parts may be used.

WARNING
Use of a power tool can lead to other objects hitting you in the eyes and cause serious eye injuries. Before working with power tools, always wear safety goggles with side protection and, if applicable, with face protection. We recommend vision safety mask, which can be used with normal glasses or standard safety goggles with side protection. Always wear eye protection that corresponds to standard EN 166.
5 INTENDED USE
- The device may only be used for the following purposes:
This product is only suitable for outdoor use.
This product is intended for use to cut grass, weeds and other similar plants at or above ground height.
The cutting level must be roughly parallel to the surface of the ground.
Any use going beyond this is considered not proper; the manufacturer is not liable for any damage resulting from such use, the risk is borne by the user alone. Proper use also includes adherence to the operation, maintenance and service conditions prescribed by the manufacturer.
Special care is required during use in public areas, parks, sports facilities, on roads and in agricultural and forestry operations.
The product must not be used to cut or trim hedges, bushes, trees or other plants, for which the cutting level is not parallel to the surface of the ground.
Please note that this device is not designed for commercial, trade or industrial use. We accept no warranty claims for devices that are used in commercial, trade or industrial operations or similar activities.
The use of any additional equipment and attachments not approved by the manufacturer is prohibited. If such additional equipment and attachments are used, the CE conformity and guarantee are considered null and void. Unauthorized modifications to this lawn mower exclude the manufacturer from liability for any damage resulting from these modifications
There is a residual risk despite the intended use and particular care of the user. Use the device with care at all times. Possible dangers are:
oFlying cuttings, earth and smaller stones.
Damage to hearing if you do not wear ear protection
Injuries to eyes or face if safety goggles or face protection is not worn.
Safety datasheet
Your brushcutter has been developed and produced with the highest levels of reliability, user-convenience and user safety. It maintained carefully, the device will work reliably and fault-free for many years.
6 GENERAL SAFETY WARNINGS

WARNING
Read all safety warnings and all instructions.
Failure to follow the warnings and instructions may result in electric shock, fire and/or serious injury.
Save all warnings and instructions for future reference.
The term "power tool" in the warnings refers to your mains-operated (cored) power tool or battery-operated (cordless) power tool.
Work area safety
- Keep your work area clean and well lit. Messy or unlit work areas can lead to accidents.
Do not use the power tool in an explosive environment with flammable liquids, gases or dust. Power tools generate sparks, which can ignite the dust or vapours. - Keep children and bystanders away while operating a power tool. Never operate the machine while people, especially children, or pets are nearby. Distractions can cause you to lose control.
Do not use the device in bad weather if there is any risk of a lightning strike.
Electrical safety
- Avoid physical contact with earthed surfaces such as pipes, heaters, ovens and fridges. There is an increased risk of electric shock if your body is earthed.
- Keep power tools out of the rain and moisture. Water penetrating a power tool increases the risk of an electric shock.
Personal safety
Be alert. Be mindful of what you are doing and take care when working with a power tool. Do not use a power tool if you are tired or under the influence of drugs, alcohol or medication. A moment of inattention during use of the power tool can lead to serious injuries.
- Wear personal protective equipment and always safety goggles. Wearing personal protective equipment such as dust masks, non-slip safety shoes, a helmet or ear protectors reduces the risk of injuries depending on the type and use of power tool.
- Avoid accidental start up. Ensure that the power tool is switched off before inserting the battery, lifting or carrying it. Touching the switch with your fingers while carrying the power tool or inserting the battery while the power tool is on can lead to accidents.
- Remove adjustment tools or wrench before switching on the power tool. A tool or key inside a rotating part of the device can lead to injuries.
Do not overreach. Keep proper footing and balance at all times. Walk, never run. This enables better control of the power tool in unexpected situations.
- Wear appropriate clothing. Do not wear loose-fitting clothing or jewellery. Keep hair, clothing and gloves away from moving parts. Loose-fitting clothing, jewellery and long hair can get caught in moving parts.
Careful handling and use of power tools
Do not overload the tool. Use the right power tool for your task. You can work better and more safely within the specified performance range with the right power tool.
Do not use a power tool with a defective switch. A power tool which can no longer be switched on or off is dangerous and must be repaired.
- Remove the battery before adjusting settings, replacing accessories or after use. The safety provisions prevent the power tool from starting accidentally.
Store all unused power tools out of the reach of children. Do not let persons use the device who are unfamiliar with it or who have not read these instructions. Power tools are dangerous if they are used by inexperienced persons.
Carefully maintain your device. Check that the moving parts work correctly. Make sure that no part of the device is damaged. Check the assembly and all other elements that could affect the operation of the device. If parts are damaged, you must have your device repaired before use. Many accidents are caused by poorly maintained power tools.
- Keep cutting tools sharp and clean. Carefully maintained cutting tools with sharp cutting edges get stuck less often and are easier to use.
- Use power tools, accessories, tool bits, etc. according to their instructions. Consider the working conditions and work to be performed. The use of power tools for purposes other than the intended uses can lead to dangerous situations.
Specific safety provisions for battery-powered devices
Before inserting the battery, make sure that the switch is either at "Off" or is locked. Inserting a battery into a switched-on device can lead to accidents.
- Recharge only with the charger specified by the manufacturer. A charger that is suitable for one type of battery pack may create a risk of fire when used with another battery pack.
Use power tools only with specifically designated battery packs. Use of any other battery packs may create a risk of injury and fire.
- When battery pack is not in use, keep it away from other metal objects, like paper clips, coins, keys, nails, screws or other small metal objects, that can make a connection from one terminal to another. Shorting the battery terminals together may cause burns or a fire.
Under abusive conditions, liquid may be ejected from the battery; avoid contact. If contact accidentally occurs, flush with water. If liquid contacts eyes, additionally seek medical help. Liquid ejected from the battery may cause irritation or burns.
All safety information regarding the handling, storage, safekeeping, transport, disposal of the lithium-ion battery and first-aid measures and measures for.
combating fires is contained in the "Product safety datasheet" at www.sabo-online.com under Instructions.
Information hotline for lithium ion batteries
+49 (0) 2261 704-0

Have your power tool serviced by a qualified repair person using only identical replacement parts. This will ensure that the safety of the power tool is maintained.
INSTRUCTION
- Read the instructions carefully. Familiarise yourself with the operating elements and correct machine operation.
- Never allow persons who are not familiar with these instructions to use the device. Regional regulations may restrict the age of the user.
Remember that the operator or user is responsible for accidents with or dangers to other persons or their property.
PREPARATION
- Check the battery for signs of damage and ageing before use. If the battery is damaged during use, switch off the device and immediately remove the battery. Do not use the device if the battery is damaged or worn.
Before use, always perform a visual inspection in order to check that none of the protective covers or panels is damaged, missing or incorrectly fitted.
Never use the machine while persons, particularly children, or animals are nearby.
OPERATION
- Keep mains cables away from cutting tools.
- When using this machine, always wear ear protectors, eye protectors, long trousers and sturdy shoes.
If applicable, wear eye and ear protection. - Do not use the device in bad weather if there is any risk of a lightning strike.
- Do not use expose the machine to rain when in use.
- Only use the machine in daylight or good artificial light.
- Never use the machine with defective or missing safety equipment and shields.
- Switch on the motor only when hands and feet are away from the cutting tool.
Always remove the battery from the device
when the machine is left unsupervised.
obefore you remove a blockage.
before you inspect or clean the machine or carry out work on it.
to inspect the device after strong contact with an object
if the machine starts to vibrate strangely (immediate inspection necessary).
- Prevent injuries to feet and hands from the cutting tool.
Always ensure that the fan openings are free from deposits.
CARE AND STORAGE
Always remove the battery from the device.
- Use only spare parts and accessories that are recommended by the manufacturer.
Regularly inspect and maintain the machine. Have the machine repaired by an authorised workshop.
- Keep the machine out of reach of children when it is not being used.
7 SAFETY INFORMATION FOR BRUSHCUTTER
This device may be used by children aged 8 and above and by persons with impaired physical, sensory or mental aptitude or lack of experience and knowledge if they are supervised or have received instructions about the safe use of the device and the related dangers.
Children must not play with the device.
- Cleaning and maintenance may not be performed by unsupervised children.
- The battery must be removed from the device before it is disposed of.
The battery must be disposed of safely.
- Avoid unergonomic postures. Make sure you have a firm footing and keep your balance at all times. This allows you to control the power tool better in unexpected situations.
Wear clothing appropriate for the conditions. Do not wear loose-fitting clothing or jewellery. Keep hair, clothing and gloves away from moving parts. Loose-fitting clothing, jewellery and long hair can be trapped in moving parts.
This device is not suitable for use by persons (including children) with impaired physical, sensory or mental aptitude or lack of experience and knowledge unless they are supervised or have been instructed in the use of the device by a person responsible for their safety.
Children should be supervised in order to ensure they do play with the device.
- If a metal cutting attachment is mounted: Fit the transport guard.
KEEP THESE INSTRUCTIONS SAFE. READ THEM REGULARLY AND EXPLAIN THEM TO ANYONE WHO MAY WANT TO USE THIS DEVICE. IF YOU LEND THIS DEVCE, PLEASE ALSO PASS ON THESE INSTRUCTIONS.
8 ASSEMBLY
UNPACKING
This product must be assembled before the first use.
Carefully remove the product and accessories from the box. Check whether all the objects listed in the packing list are included. In some cases these may already be pre-fitted on the device in the specified position. In these cases the disassembly and reassembly of the unit is necessary.

WARNING
Do not use this product if parts listed on the packing list are already fitted to your product when you unpack it. The parts on this list have not been prefitted to the product by the manufacturer and must be fitted by the customer. The use of a product that has not been correctly fitted can lead to serious injuries.
PACKING LIST
Brushcutter (basic unit)
- Grass deflector (6)
- Small plate for grass deflector assembly
- Screw for grass deflector 4x
Guard cap (9)
- Screw for guard cap 2x
Auxiliary handle (4)
- Connecting screw (14) 1x
- Upper support (15)
Lower support (16)
Blade (10)
Nut (22)
- Outer cup (23)
- Spacer (24)
- Inner cup (25)
- Spacer (28)
Shoulder harness
- Allen wrench (13)
- Positioning tool (21)
Transport guard
Operator manual
- Carefully inspect the product and make sure that no damage has occurred during the transport.
Do not immediately dispose of the packaging material until you have carefully inspected and successfully used the product.

WARNING
If any of the parts are damaged or missing, wait until the parts have been replaced before using the device. Using this product with damaged or missing parts can lead to serious injuries.

WARNING
Do not try to modify this device or attach accessories that have not been recommended for this device. Any changes or incorrect use of this device can be very risky and lead to possible serious physical injuries.

WARNING
In order to avoid injuries, always remove the battery from the device before fitting parts.
ATTACHING THE GRASS DEFLECTOR
See figure 1 and 2

WARNING
The blade (7) attached to the grass defector (6) is sharp. Avoid contact with the blade. Contact can lead to serious injuries.
Never use the device with a defective or missing grass deflector.
- Remove the battery.
- Turn the brushcutter so that you can reach the trimmer head (8).
- Remove the screws from the trimmer head with a Phillips screwdriver (not included).
- Attach the grass deflector (6) to the trimmer head.
- Align the screw holes on the grass deflector with the screw holes on the trimmer head.
- Tighten the screws.
- Place the guard cap (9) on the grass deflector.
- Align the screw holes in the guard cap with the screw holes on the grass deflector.
- Tighten the screws.

WARNING
Even if you know the device well, the highest caution must be taken when using it. Even a momentary lapse of attention can result in serious injuries.

WARNING
When using a power tool, always wear safety goggles with side protection. Failure to wear this equipment may lead to objects hitting you in the eyes, resulting in serious injuries.


WARNING
Never use blades, hammering devices, wires or ropes on this product. Do not use attachments or accessories that are not recommended by the manufacturer of this device. Using attachments or accessories that are not recommended can lead to serious injuries.
ASSEMBLING THE SHAFT
See figure 3
- Loosen the bottom screw on the coupler with the Allen wrench (13).
- Press the release button (11) on the lower shaft (5).
- Press and hold the release button (11) while pushing the lower shaft (5) into the coupler.
- Rotate the lower shaft (5) until the release button (11) engages in the positioning hole (12).
- Manually tighten the bottom screw on the coupler with the Allen wrench (13).
ATTACHING THE AUXILIARY HANDLE
See figure 1 and 4

CAUTION
Be aware of the cable when assembling the auxiliary handle. Be careful not to pull on it or crush it. Damage to the cable can cause unexpected malfunctions.
- Loosen the connecting screw (14).
- Remove the upper support (15) and the lower support (16).
Note: Do not forget the spring between the upper (15) and lower support (16).
- Place the auxiliary handle (4) between the upper and lower support.
- Place the auxiliary handle with the supports on the housing of the shaft.
- Place the auxiliary handle somewhere that is comfortable for you.
- Lock the auxiliary handle with a connecting screw (14).
9 COMMISSIONING
Put the harness over your shoulder so that the latch is in the front and the eye bolt is positioned on the right side.
- Close the latch.
- Now you can hook the shoulder harness into the hanging loop (29).
Hold the brushcutter in your right hand by the right handle and hold the left handle in your left hand.
- Hold the device tight during use.
- The brushcutter should be held in a comfortable position.
INSERTING THE BATTERY

WARNING
- Replace a damaged battery or charger.
- Stop the machine and wait for the motor to come to a stop before removing the battery.
- Read, understand and follow the procedures in the operating instructions for the battery and the charger.
See figure 5
- Insert the battery in the brushcutter. Align the bar on the battery with the guide in the battery shaft.
- Allow the latch on the bottom of the battery to lock in place and make sure the battery is securely inserted before beginning use.
REMOVING THE BATTERY
See figure 5 and 6
- Release the switch trigger (1) to stop the brushcutter.
- Press and hold the battery latch button on the bottom of the battery while you remove the battery from the battery shaft.
STARTING/STOPPING THE BRUSHCUTTER
See figure 6
To stop the brushcutter, press and hold the safety lock (2) and also press the switch trigger (1).
To continue using the brushcutter, release the safety lock (2) and continue holding the switch trigger (1).
- To stop the brushcutter, release the switch trigger (1).

WARNING
Noise: A certain amount of noise from the machine is unavoidable. High noise levels during work is only allowed during certain times. Observe the quite periods and limit working time to a minimum. Persons who are not working with the device or who are remaining nearby must wear ear protection.
Vibration: Always wear safety and anti-vibration gloves. Excessive vibrations can cause Raynaud's syndrome or carpal tunnel syndrome. If you experience an unpleasant feeling while using the machine or if the skin on your hands becomes discoloured, stop working. Schedule reasonable rest periods. Frequent and regular users should carefully check the conditions of their hands and fingers.

WARNING
Keep the brushcutter away from the body at all times and keep it at a safe distance. Any contact with the trimmer head or blade while the unit is in use can lead to serious injuries.
OPERATING TIPS
See figure 7
- Hold the machine with the correctly connected shoulder harness.
- Hold the machine to the right of the body at all times. Otherwise the grass deflector cannot provide full protection.
- Hold the machine firmly with both hands at all times during operation.
Cut high grass from top to bottom. This prevents grass from winding around the shaft housing and the spool, which could lead to damage to the device due to overheating.
If grass wraps around the trimmer head or the shaft housing
See figure 5 and 6
- Release the switch trigger (1) to stop the brushcutter.
- Remove the battery.
- Remove the grass on the trimmer head or the shaft housing.
TIPS FOR CUTTING
See figure 8
- Hold the brushcutter tilted slightly forward. This achieves the best cutting results.
- The brushcutter cuts best when it moves from left to right across the cutting area.
Use the tips of the cutting line to cut and cut grass starting from the edge of the lawn. Do not push the trimmer head into the middle of uncut grass.
Frequent contact between the cutting line with stationary objects such as curbstones, walls, fences, trees, can result in increased wear and tear and cause the line to break. - Avoid contact between the blade with stationary objects such as curbstones, walls, fences, trees. This can cause damage to the blade and to the object.
- Avoid cutting trees and bushes. Tree bark, wooden ornaments, external wall cladding and fence posts can be easily damaged by the line and blade.
FEEDING THE LINE
See figure 9 and 10
- When the brushcutter is being used, the cutting line becomes worn and shorter.
- This brushcutter includes a bump feed with line advance (27).
The line is lengthened by hitting the trimmer head (8) against the ground while the motor is running. Feed line every time you hear that the motor is running faster than normal or if the cutting performance deteriorates. This maintains the optimum performance and the line is long enough that it can be fed properly.
The blade (7) shortens the line to achieve optimal line length.
SETTING THE CUTTING DIAMETER
See figure 10

NOTE
The machine is set to a cutting diameter of 356mm at delivery. You can also set a cutting diameter of 406mm . With a cutting diameter of 356mm , you have a longer running time and with a cutting diameter of 406mm you can cut larger areas faster.
- Remove the battery.
- Remove the screws from the cut-off blade (7).
- Rotate the cut-off blade by 180^ .
- Tighten the screws.
10 GENERAL MAINTENANCE AND CARE

WARNING
Only use original spare parts when replacing parts. The use of other parts can lead to danger or damage your device.

WARNING
To avoid serious injuries during cleaning or to carry out other maintenance work, always remove the battery from the tool first.
The product should be inspected for damaged, missing or loose parts, such as screws, nuts, bolts, covers, etc. before every use. Tighten all the fastenings and covers and do not use the product until all the missing or damaged parts have been replaced. Do not use solvents to clean plastic parts. Most plastics can be damaged by different types of commercial solvent. Use a clean cloth to remove dirt, dust, oil, lubricants etc.
Before service work:
- Stop the machine.
- Remove the battery.
- Let the motor cool.
- Store the machine in a cool and dry place.
- Wear appropriate and close-fitting clothing, protective gloves and protective goggles.


WARNING
Never allow brake fluids, petrol products based on oils, etc. come into contact with plastic parts. Chemicals can damage, weaken or destroy plastic, which can lead to serious injuries.
CLEAN MACHINE
- Clean the machine after use with a damp towel that is moistened with neutral cleaning agent.
- Do not use aggressive cleaning agents or solvents to clean the plastic parts or handle.
- Keep the trimmer head free of grass, leaves or excess grease.
- Keep the air openings clean and free of dirt to prevent overheating and damage to the motor or to the battery.
- Do not spray water on the motor or the electrical components.
Only the parts listed in the spare parts list are authorised for repair or replacement by the customer. All other parts have to be replaced by the authorised customer service
REPLACING THE SPOOL
see figure 11 to 15
- Remove the battery.
Press both trimmer head tabs (19) on the side of the trimmer head cover (17) while you remove them. - Remove the old spool (18).
When inserting the new spool, make sure that the line is in the slot for the new spool. Make sure that the end of the line is coming about 15 cm out the slot.
Insert the new spool so that the line and the slot are aligned with the line exit hole (20). Guide the line through the line exit hole.
Reattach the trimmer head cover (17) by pushing the tabs into the slots until they lock into place.
REPLACING THE LINE
See figure 12 and 16 to 18
- Remove the spool (18) from the trimmer head.

NOTE
Remove any old line that may still be on the spool.

NOTE
Use only nylon cutting line with a diameter of 2.0mm

IMPORTANT
You must mount the cut-off blade (7) if you are using the trimmer head (8).
Cut a line with an approximate length of 3m
- Bend the line in the middle and hold the loop in the slot on the middle rib of the spool.
- Wrap the lines with your finger evenly and firmly between the lines in the specified direction around the spool. Do not wind the cutting line beyond the outer ribs of the spool.
- Place the line into the guide grooves.
ASSEMBLING THE TRIMMER HEAD
See figure 19.
- Place the positioning tool (21) in the positioning hole (26) and push the spacer (28) onto the shaft so that the positioning tool engages in one of the grooves of the spacer.
Slide the trimmer head (8) onto the shaft and turn the trimmer head until the positioning tool stops the rotation. - Turn the trimmer head counter-clockwise to tighten.
- Remove the positioning tool from the hole.
DISASSEMBLING THE TRIMMER HEAD
See figure 19
Press the positioning tool (21) into the positioning hole (26) and turn the trimmer head (8) until the positioning tool stops the rotation.
- Turn the trimmer head clockwise to unscrew.
- Remove the positioning tool from the positioning hole.
ASSEMBLING THE CUT-OFF BLADE
See figure 19 and 20

WARNING
Wear gloves and exercise caution with sharp edges.

WARNING
Attach the guard to the blade.
- Place the positioning tool (21) until it stops in the positioning hole (26) and push the spacer (28) onto the shaft so that the positioning tool engages in one of the grooves of the spacer.
-
Move the following parts onto the shaft one after the other:
-
Inner cup (25) (slot pointing up, flat side pointing down),
- Blade (10) (assembly direction can be freely chosen; you can turn the blade when it is worn),
- Spacer (24) (slot pointing up, flat side pointing down),
- outer cup (23),
- nut (22) (do not tighten yet; left-hand thread! turn counter-clockwise!).
Press the positioning tool (21) into the positioning hole (26) and turn the blade until the positioning tool stops the rotation.
- Tighten the nut (22) by turning counter-clockwise with a 19 mm or 3/4^ wrench (torque: 44 to 58 Nm).
DISASSEMBLING THE CUT-OFF BLADE
See figure 20

WARNING
Attach the guard to the blade (10)
Press the positioning tool (21) into the positioning hole (26) and turn the blade (10) until the positioning tool stops the rotation.
Loosen the nut (22) by turning clockwise with a 19 mm or 3/4^* wrench (left-hand thread: turn clockwise!).
Pull the outer cup (23), the outer ring-nut (24), the cut-off blade (10) and the inner cup (25) away from the shaft.
- Remove the positioning tool from the positioning hole.
REPLACINT THE BUMP KNOB
See figure 12 and 21
Press both trimmer head tabs (19) on the side of the trimmer head cover (17) while you remove them.
- Remove the spool (18).
- Hold the bump knob (27) tight and pull it out with a screw driver or similar tool.
- Place the new bump feed in the trimmer head cover (17).
- Push the trimmer head cover onto the spool cap so that the tabs lock into the slots.
11 STORING THE BRUSHCUTTER
- Remove the battery from the trimmer before storing the brushcutter.
- Assemble the blade guard.
- Store it in a location out of the reach of children.
- Keep the battery away from the corrosives such as garden chemicals and salt.
- Keep an unused battery away from paperclips, coins, keys, screws, nails and all other objects that could connect the contacts.
A short circuit of the battery can cause burns or fires. Store the battery in a dry place and at a temperature below 27^ - Never store discharged batteries. A battery that is too warm must be allowed to cool before charging.
The battery's charge will diminish during storage. The higher the temperature, the faster the discharge. Recharge the batteries monthly if they are being stored for a longer period. This increases the life and maintains performance.
Remove the battery from the device before adjusting settings, replacing accessories or after use. This prevents the risk of your device being switched on inadvertently or unsupervised. - Secure the brushcutter during transport in order to prevent damage and injuries. Clean the device before storage.
ENVIRONMENTAL PROTECTION
Environmental protection should be an essential and prioritised aspect when using the machine. Do not disturb your surroundings when using the device.
Strictly observe the local provisions for disposal of the packaging, oil, petrol, filters, damaged parts or all other polluting materials. These materials must not be disposed of with domestic waste, but instead must be collected separately and disposed of at a recycling site that recycles the materials.
- Strictly observe the local provisions for disposal of the cut waste.
The device must not be disposed of in the regular waste, but instead must be disposed of at a recycling site according to the local provisions.

12 TROUBLESHOOTING
| PROBLEM POSSIBLE CAUSES SOLUTION | ||
| The machine does not start when you press the switch trigger (1). | There is no electrical contact between the machine and the battery. | Remove the battery. Check the contact. Re-insert the battery. |
| The battery is empty. Charge the battery. | ||
| The safety lock button (2) and the switch trigger (1) are not pressed at the same time. | Press the safety lock (2) on the battery and hold it down. Push the switch trigger (1) to start the machine. | |
| The machine stops when you cut. | The grass deflector is not mounted to the machine. | Remove the battery. Attach the grass deflector to the machine. |
| Heavy cutting line is used. | Use only nylon cutting line with a diameter of 2 mm. | |
| Grass winds around the motor shaft and the trimmer head. | Stop the machine. Remove the battery. Carefully remove the grass from the motor shaft and/or the trimmer head. | |
| The motor is overloaded. | Free the trimmer head from the grass. See the section "If grass wraps around the trimmer head or the shaft housing" in these operating instructions. You can continue using the motor when the load has been removed. As you are cutting, move the trimmer head into and out of the grass you want to cut and do not cut more than 20 cm in a pass. | |
| The battery or the machine is too hot. | Let the battery cool until its temperature is reduced. Let the machine cool for approx. 10 minutes. | |
| There is no electrical contact between the machine and the battery. | Remove the battery. Check the contact. Re-insert the battery. | |
| The battery is empty. | Charge the battery. | |
| The line does not advance. | The line is stuck. | Oil with silicon spray. |
| There is not enough line on the spool. | Install a new spool. For this, see the section in these instructions about replacing the line. | |
| The line is worn and too short. | Remove the battery. Pull the line while pushing the trimmer head. | |
| The line is wound around the spool. | Remove the line from the spool and wind it up. For this, see the section in these instructions about replacing the line. | |
| The line keeps breaking. | The machine is not used properly. | Cut with the tip of the line and avoid contact with rocks, walls and other hard objects. Advance the cutting line regularly for full cutting breadth. |
| Grass winds around the shaft housing and the trimmer head. | High grass is cut too close to the ground. | Cut high grass from top to bottom. Do not cut more than 20 cm in each pass to prevent grass wrapping around. |
| The line is not cutting well. | The blade (7) is dull. | Sharpen the blade with a file or replace it. |
| The vibrations are increasingly significantly. | The line is worn down on one side and did not advance when it was supposed to. | Make sure that the line can move freely on both sides. Move the line to check. |
13 DISPOSING OF THE DEVICE
Do not dispose of electric devices with household waste. Dispse of these devices at recing centres. Contact the relevant authorities or your retailer for information about this. Separate collection of used products and packaging allows materials to be recycled. The reuse of materials helps to prevent pollution and reduces the demand for raw materials. Disoge f batteries at the end of their service life and in a manner that respects the environment. The battery contains material that is dangerous to you and to the environment. Therefore, it must be disposed of separately in a facility that accepts lithium-ion batteries.
14 SPARE PARTS LIST
See spare parts catalogue

Batteries

1 SPECIFICATIONS
6 ALGEMENE VEILIGHEIDSWAARSCHUWINGEN
IEC 62321-3-1, IEC 62321-4, IEC 62321-5, IEC 62321-6, IEC 62321-7-1, IEC 62321-7-2, IEC 62321-8
GLOBGRO AB, Globe Group Europe
EU DECLARATION OF CONFORMITY
GLOBGRO AB, Globe Group Europe
Riggaregatan 53,211 13 MalmöSweden
Name and address of the person authorised to collate technical files:
Name: Peter Söderström
Address: Riggaregatan 53, 211 13 Malmo, Sweden
We herewith declare that the product
Category:
40 V Brushcutter & String trimmer
SA561121
Serial number:
see product identification plate
see product identificati
-
complies with the corresponding conditions of the Machinery Directive (2006/42/EC)
-
complies with the conditions of the other following Directives:
EMC Directive 2014/30/EU
Directive 2000/14/EC on noise emissions as amended by 2005/88/EU
RoHS Directive 2011/65/EC as amended by 2015/863/EC
and we also declare that the following (parts/conditions from) European harmonised standards
have been applied
EN60335-1,EN50636-2-91
EN 62233
EN ISO 3744, ISO 11094, EN ISO 11806-1
Measured sound power level (lineblade):
95.3/98.3dB(A)
Guaranteed sound power level (line/blade): 96.0/101.0 dB(A)
Conformity assessment method following Directive 2000/14/EC Annex V.
Place, date: Malmö, 01/01/2021
Signature:

Ralf Pankalla
GLOBGRO AB, Globe Group Europe
as authorised representative of the manufacturer

DECLARATION DE CONFORMITE UE
GLOBGRO AB, Globe Group Europe
Riggaregatan 53,211 13 Malmo,Suee
Director CEM 2014/30/UE
IEC 62321-3-1, IEC 62321-4, IEC 62321-5, IEC 62321-6, IEC 62321-7-1, IEC 62321-7-2, IEC 62321-8
GLOBGRO AB, Globe Group Europe
GLOBGRO AB, Globe Group Europe
Riggaregatan 53,211 13 Malmö,Zweden
GLOBGRO AB, Globe Group Europe
IEC 62321-3-1, IEC 62321-4, IEC 62321-5, IEC 62321-6, IEC 62321-7-1, IEC 62321-7-2, IEC 62321-8
GLOBGRO AB, Globe Group Europe
GLOBGRO AB, Globe Group Europe
como delegato del produttore


- DESCRIPTION
- EXPLANATION OF THE IDENTIFICATION PLATE ON THE BRUSHCUTTER
- EXPLANATION OF THE SYMBOLS
- EN
- TECHNICAL MAINTENANCE
- WARNING
- INTENDED USE
- Safety datasheet
- GENERAL SAFETY WARNINGS
- Save all warnings and instructions for future reference.
- Work area safety
- Electrical safety
- Personal safety
- Careful handling and use of power tools
- Specific safety provisions for battery-powered devices
- INSTRUCTION
- PREPARATION
- OPERATION
- CARE AND STORAGE
- SAFETY INFORMATION FOR BRUSHCUTTER
- ASSEMBLY
- UNPACKING
- PACKING LIST
- ATTACHING THE GRASS DEFLECTOR
- ASSEMBLING THE SHAFT
- ATTACHING THE AUXILIARY HANDLE
- CAUTION
- COMMISSIONING
- INSERTING THE BATTERY
- See figure 5
- REMOVING THE BATTERY
- STARTING/STOPPING THE BRUSHCUTTER
- OPERATING TIPS
- If grass wraps around the trimmer head or the shaft housing
- TIPS FOR CUTTING
- FEEDING THE LINE
- SETTING THE CUTTING DIAMETER
- NOTE
- GENERAL MAINTENANCE AND CARE
- CLEAN MACHINE
- REPLACING THE SPOOL
- REPLACING THE LINE
- IMPORTANT
- ASSEMBLING THE TRIMMER HEAD
- DISASSEMBLING THE TRIMMER HEAD
- ASSEMBLING THE CUT-OFF BLADE
- DISASSEMBLING THE CUT-OFF BLADE
- REPLACINT THE BUMP KNOB
- STORING THE BRUSHCUTTER
- ENVIRONMENTAL PROTECTION
- DISPOSING OF THE DEVICE
- SPARE PARTS LIST
- ALGEMENE VEILIGHEIDSWAARSCHUWINGEN
- EU DECLARATION OF CONFORMITY
- Ralf Pankalla
- DECLARATION DE CONFORMITE UE
Brand : SABO
Model : MS36
Category : String Trimmer