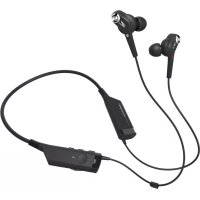
ATHIEX1 - Earplug AUDIO TECHNICA - Free user manual and instructions
Find the device manual for free ATHIEX1 AUDIO TECHNICA in PDF.

| Product Type | Hybrid In-Ear Headphones |
| Brand | Audio-Technica |
| Model | ATH-IEX1 |
| Frequency Response | 5-50,000 Hz |
| Impedance | 5 ohms |
| Sensitivity | 102 dB/mW |
| Maximum Input Power | 3 mW |
| Transducers | 9.8 mm dynamic + 8.8 mm balanced armature × 2 |
| Weight (without cable) | Approx. 19 g |
| Cable Connector | A2DC (detachable) |
| Supplied Cables | 1.2 m stereo mini plug 3.5 mm (L) + 1.2 m balanced plug 4.4 mm (5-pole) |
| Included Accessories | Carrying case, silicone eartips XS/S/M/L, Comply foam eartips S/M/L, cleaning cloth |
| Spare Parts | Cable and eartips sold separately |
| Maintenance | Clean with a dry cloth; clean eartips with diluted detergent |
| Safety | Do not use while driving; do not expose to moisture or shocks; do not disassemble |
| Intended Use | Music listening with acoustic isolation |
Frequently Asked Questions - ATHIEX1 AUDIO TECHNICA
User questions about ATHIEX1 AUDIO TECHNICA
0 question about this device. Answer the ones you know or ask your own.
Ask a new question about this device
Download the instructions for your Earplug in PDF format for free! Find your manual ATHIEX1 - AUDIO TECHNICA and take your electronic device back in hand. On this page are published all the documents necessary for the use of your device. ATHIEX1 by AUDIO TECHNICA.
USER MANUAL ATHIEX1 AUDIO TECHNICA
Hybrid In-Ear Headphones
natural_image
Illustration of a hand holding a cable with a connector inserted (no text or symbols visible)natural_image
Illustration of a hand holding a medical or laboratory device with a curved arrow indicating rotation (no text or symbols present)購入のしかた
The product comes with a pair of Comply™ Ts-500 foam eartips.
■ Cleaning the eartips
Remove eartips from the in-ear headphones, and wipe their surfaces with a moistened cloth that has been wrung out well. Do not wash these eartips in water.
■ Replacing the eartips
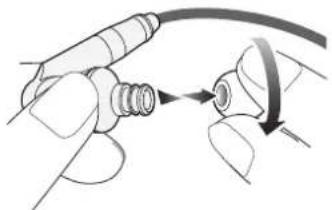
Remove the old eartip with a twisting motion as shown in the figure. Mount the new eartip over the stem to the base of the stem. When mounting the COMPLY™ foam earlips, use the flat parts of your fingers and do not use your nails so as to avoid damaging the surface of the eartips.
natural_image
Illustration of a hand holding a cable with a connector, showing a curved arrow indicating rotation (no text or symbols present)To order COMPLY™ foam eartips (except for Japan)
Visit www.complyfoam.com and select the COMPLY™ Ts-500 foam eartips.
COMPLY™ is a trademark of Hearing Components, Inc.
Introduction
Thank you for purchasing this product. Before using the product, read through the user manual to ensure that you will use the product correctly. Please keep this manual for future reference.
Caution
- Follow applicable laws regarding mobile phone and headphone use if using the product while driving.
- Do not use the product in places where the inability to hear ambient sound presents a serious risk (such as at railroad crossings, train stations, construction sites).
- The product effectively shields external sound, so you may not hear sound around you clearly while wearing the product. Adjust the volume to a level where you can still hear background sound and monitor the area around you while listening to music.
- Store the eartips out of the reach of small children.
- If you begin to feel unwell while using the product, discontinue use immediately.
- To prevent damage to your hearing, do not raise the volume too high. Listening to loud sound for an extended period may cause temporary or permanent hearing loss.
- Discontinue use if skin irritation results from direct contact with the product.
- Do not disassemble, modify or attempt to repair the product.
- When removing the product from your ears, check to make sure the eartips are still attached to the main unit. If the eartips become lodged in your ears and you are unable to remove them, consult a physician at once.
Notes on use
- To ensure compatibility and correct usage, always consult the user manual of any device before connecting the product to it.
- Audio-Technica will not be liable in any way for any loss of data in the unlikely event that such losses should occur while using the product.
- On public transport systems or in other public places, keep the volume low so as not to disturb other people.
- Minimize the volume on your audio device before connecting the product in order to avoid hearing damage from sudden exposure to excessive volume.
- When using the product in a dry environment, you may feel a tingling sensation in your ears. This is caused by static electricity accumulated on your body, not by product malfunction.
- Do not subject the product to strong impact.
- Do not store the product under direct sunlight, near heating devices or in a hot, humid or dusty place. Do not allow the product to get wet.
- When the product is used for a long time, the product may become discolored due to ultraviolet light (especially direct sunlight) or wear.
- Connect/disconnect the included cable by holding the plug. Pulling directly on the cable can result in a broken wire and the risk of electric shock.
- The cable may become caught or severed if the product is placed in a bag without adequate protection.
- When you are not using the product, store it in the included case.
- Do not wind the cable around your portable audio device. This may damage or sever the cable.
- Use only the included cable. Using a different cable may result in product malfunction.
Name of each part
Confirm each part before using the product.

flowchart
graph TD
    A["A2DC connector plug"] --> B["Left Right indicator L/R"]
    B --> C["The left bushing has a protruding part."]
    D["A2DC connector jack"] --> E["Housing"]
    F["Eartip"] --> E
    G["Hi-Res audio player Smartphone"] --> H["Input plug"]
    I["Balanced cable (1.2 m (3.9') / 4.4 mm (0.17'') gold-plated balanced plug (5 pole)"] --> H
    J["Cable (1.2 m (3.9') / 3.5 mm (1/8'') gold-plated stereo mini-plug"] --> H
Using the headphones
- Identify the left (L) and right (R) connectors on the included detachable cable and plug each into the appropriate connector jack until it clicks.
- Refer to "About the detachable cable" for detailed information.
- Lower the volume on the device you intend to use, then connect the input plug to the device's headphone jack.
- Make sure to place each eartip (L/R) in the correct ear.
- Turn on your audio device, and adjust volume as necessary.
- Also read the user manual of your audio device.

Care
Get into the habit of regularly cleaning the product to ensure that it will last for a long time. Do not use alcohol, paint thinners or other solvents for cleaning purposes.
- Use a dry cloth to clean the headphones.
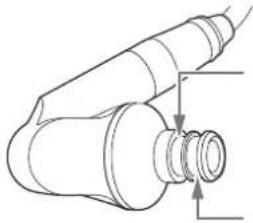
- Natural oils from the skin are particularly likely to build up on the eartip attachment parts (see figure at right). If these areas are not cleaned, the eartips can become detached. Clean them regularly. Do not touch the areas where sound is produced as they are delicate. Doing so may result in malfunction.
- Use a dry cloth to clean the cable of any sweat or dirt. Failure to clean the cable may cause it to deteriorate and harden over time, resulting in malfunction.
-
Wipe the cable's plugs with a dry cloth if dirty. Using the plugs without cleaning them can cause sound interruption or distortion.
-
For long-time storage, keep the product in a well-ventilated place without high temperatures and humidity.
- Refer to "Cleaning the eartips" in "About the eartips" to learn how to clean the cartips.
■ About the eartips
Size and position
The product comes with silicone eartips in four sizes (XS, S, M and L). At the time of purchase, the M size silicone eartips are attached and positioned in standard position.
To ensure the best sound quality and position, select the eartip size that is best suited for you, and adjust the eartips inside your ears for a snug fit. It may be difficult to hear bass sounds if the eartips do not fit snugly in your ears.
- Refer to "About COMPLY™ foam eartips" for use of COMPLY™ foam eartips.
2 POSITION POST
2 position post maximizes sound isolation while providing a better fit.
natural_image
Technical line drawing of a mechanical component with no visible text or symbols1. Standard position
The cartips are positioned nearer to the drivers.
2. Extended position
The eartips are positioned further from the drivers than the Standard position.
text_image
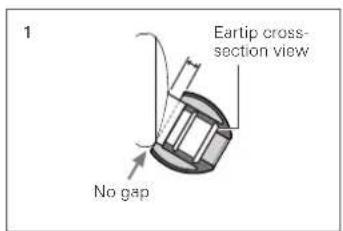
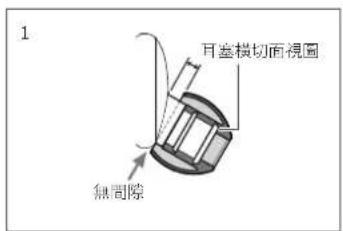
1 Eartip cross- section view No gap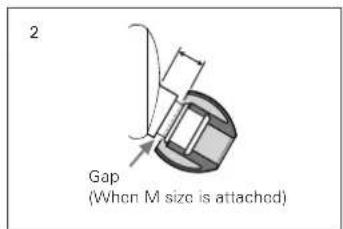
text_image
2 Gap (When M size is attached)■ Cleaning the eartips
Remove earlips from the product and clean them with a diluted detergent. After cleaning, dry before use.
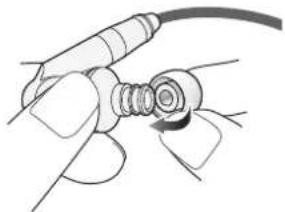
■ Replacing the eartip
Remove the old eartip and attach the new eartip by pushing it onto the headphone at an angle (see figure). Push firmly on the eartip so that the inside of the eartip expands, and push the eartip onto the post as far as it will go.
• The eartips are designed to fit tightly to the product so that they will not come loose unintentionally.
natural_image
Illustration of a hand holding a medical device with a bulb inserted (no text or symbols visible)- Periodically remove and clean the eartips as they become dirty easily. Using dirty eartips may cause the headphones themselves to become dirty, resulting in deteriorated sound quality.
- Earlips are consumable parts that degrade through storage and use. If the earlips are loose and easily removed or if they appear to have degraded, purchase replacements.
- When reattaching eartips that were previously removed, be sure to check that they are securely attached. Injury or illness may occur if the eartips become detached and are left inside the ear.
■ About the detachable cable
The cable on the product is detachable. If there are signs of deterioration, replace the cable (sold separately).
- Do not detach the cable except when replacing it with a new cable.
How to replace the detachable cable
The detachable connector is very delicate. Only pull or attach in a straight motion to prevent malfunction.
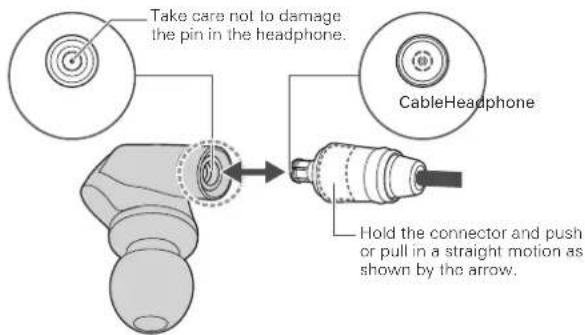
text_image
Take care not to damage the pin in the headphone. CableHeadphone Hold the connector and push or pull in a straight motion as shown by the arrow.How to detach the cable
Hold the connector and pull straight out in the direction shown by the arrow.
How to attach the cable
Plug the left or right connector in as shown in the figure until it clicks.
Specifications
| Type | Hybrid |
| Driver | 9.8 mm, 8.8 mm, Balanced armature × 2 |
| Sensitivity | 102 dB/mW |
| Frequency response | 5 to 50,000 Hz |
| Maximum input power | 3 mW |
| Impedance | 5 ohms |
| Input jack | A2DC connector jack |
| Weight (without cable) | Approx. 19 g (0.67 oz) |
| Included accessories | Cable (1.2 m (3.9') / 3.5 mm (1/8") gold-plated stereo mini plug (L-shaped), Balanced cable (1.2 m (3.9') / 4.4mm (0.17") gold-plated balanced plug (5 pole / L-shaped)), Case, Eartips (XS, S, M, L), COMPLYTM foam eartips (S, M, L), Cleaning cloth |
| Sold separately | Cable, Balanced cable, Eartips |
For product improvement, the product is subject to modification without notice.
Introduction
natural_image
Technical line drawing of a mechanical component with no visible text or symbols- Position standard
natural_image
Illustration of a medical or laboratory procedure showing a tool interacting with a device (no text or symbols visible)natural_image
Technical line drawing of a mechanical component with no visible text or symbols1. Standardposition
natural_image
Illustration of a medical or laboratory procedure showing a tool interacting with a device (no text or symbols visible)natural_image
Technical line drawing of a mechanical component with no visible text or symbols- Posizione standard
natural_image
Illustration of a hand holding a medical device with a bulb inserted (no text or symbols visible)natural_image
Technical line drawing of a mechanical component with no visible text or symbols- Posición estándar
natural_image
Illustration of a medical or laboratory procedure showing a tool interacting with a device (no text or symbols visible)natural_image
Technical line drawing of a mechanical component with no visible text or symbols- Posição padrão
natural_image
Illustration of a medical or laboratory procedure showing a tool interacting with a device (no text or symbols visible)natural_image
Technical line drawing of a mechanical component with no visible text or symbolsnatural_image
Illustration of a hand holding a medical or laboratory device with a coiled cable (no text or symbols visible)natural_image
Technical line drawing of a mechanical component with no visible text or symbolsnatural_image
Illustration of a medical procedure involving a tool and a device (no text or symbols visible)natural_image
Technical line drawing of a mechanical component with no visible text or symbols- 標準位置
耳塞的位置較靠近驅動單元。
- 擴展位置
耳塞的位置比標準位置較遠離驅動單元。
natural_image
Illustration of a medical or laboratory procedure showing a tool interacting with a device (no text or symbols visible)natural_image
Technical line drawing of a mechanical component with no visible text or symbols1. 표준 위치
natural_image
Illustration of a medical or laboratory procedure showing a tool interacting with a device (no text or symbols visible)©2019 Audio-Technica Corporation
中国大陆客户联系资料
制造商:钛三角有限公司
代理商:广州市德讯贸易有限公司