CrispPrp - Deep fryer Klarstein - Free user manual and instructions
Find the device manual for free CrispPrp Klarstein in PDF.
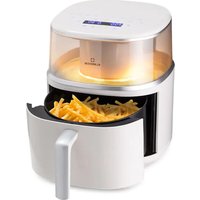
| Product type | Air fryer |
| Brand | Klarstein |
| Model | CrispPrp |
| Bowl capacity | 3.5 L |
| Power | 1400 W |
| Power supply | 220-240 V ~ 50/60 Hz |
| Temperature range | 80 °C – 200 °C |
| Timer | 1 – 60 minutes |
| Preset programs | 8 programs (Fries, Bacon, Chicken, Shrimp, Steak, Cake, Vegetables, Fish) |
| Non-stick coating | Yes (bowl and basket) |
| Cleaning | Bowl and basket washable with hot water, dish soap, and non-abrasive sponge |
| Housing maintenance | Wipe with a damp cloth |
| Safety | Automatic timer shut-off, insulated handle, steam vent |
| Safety instructions | Do not immerse in water, use on heat-resistant surface, keep out of reach of children |
| Pause function | Yes, via On/Off button |
| Manual shutdown | Yes, by turning the control knob to 0 or holding the On/Off button |
| Spare parts | Bowl and basket available from the manufacturer |
| Repairability | Repair possible by a professional; do not open yourself |
| General information | Household use only; recipe book included |
| Disposal | Do not dispose with household waste; recycle according to local regulations |
Frequently Asked Questions - CrispPrp Klarstein
User questions about CrispPrp Klarstein
0 question about this device. Answer the ones you know or ask your own.
Ask a new question about this device
Download the instructions for your Deep fryer in PDF format for free! Find your manual CrispPrp - Klarstein and take your electronic device back in hand. On this page are published all the documents necessary for the use of your device. CrispPrp by Klarstein.
USER MANUAL CrispPrp Klarstein
text_image
QR code image containing encoded data, no visible human-readable textINHALT
Technische Daten 4
text_image
Technical diagram of an air fryer with numbered parts and labeled parts, including a close-up view of the device.Member of Berlin Brands Group
Handwerkerstr. 11
15366 Dahlwitz-Hoppegarten
Deutschland
natural_image
Symbol of a trash bin crossed with a diagonal line, no text or numbers presentBerlin Brands Group UK Ltd
PO Box 1145
Oxford, OX1 9UW
United Kingdom
Dear Customer,,
Congratulations on purchasing this device. Please read the following instructions carefully and follow them to prevent possible damages. We assume no liability for damage caused by disregard of the instructions and improper use. Scan the QR code to get access to the latest user manual and more product information.

text_image
QR code image containing encoded data, no visible human-readable textCONTENTS
Technical Data 20
Safety Instructions 21
Product Description 23
Getting Started 24
Control Panel Operation 26
Recipes 28
Cleaning and Care 29
Disposal Considerations 32
Manufacturer & Importer (UK) 32
TECHNICAL DATA
| Item number 10040701, 10040702 | |
| Power supply 220-240 V ~ 50/60 Hz | |
| Power rating 1400 W | |
| Pan capacity 3.5 l | |
| Adjustable temperature 80-200 °C | |
| Timer 1-60 m | |
SAFETY INSTRUCTIONS
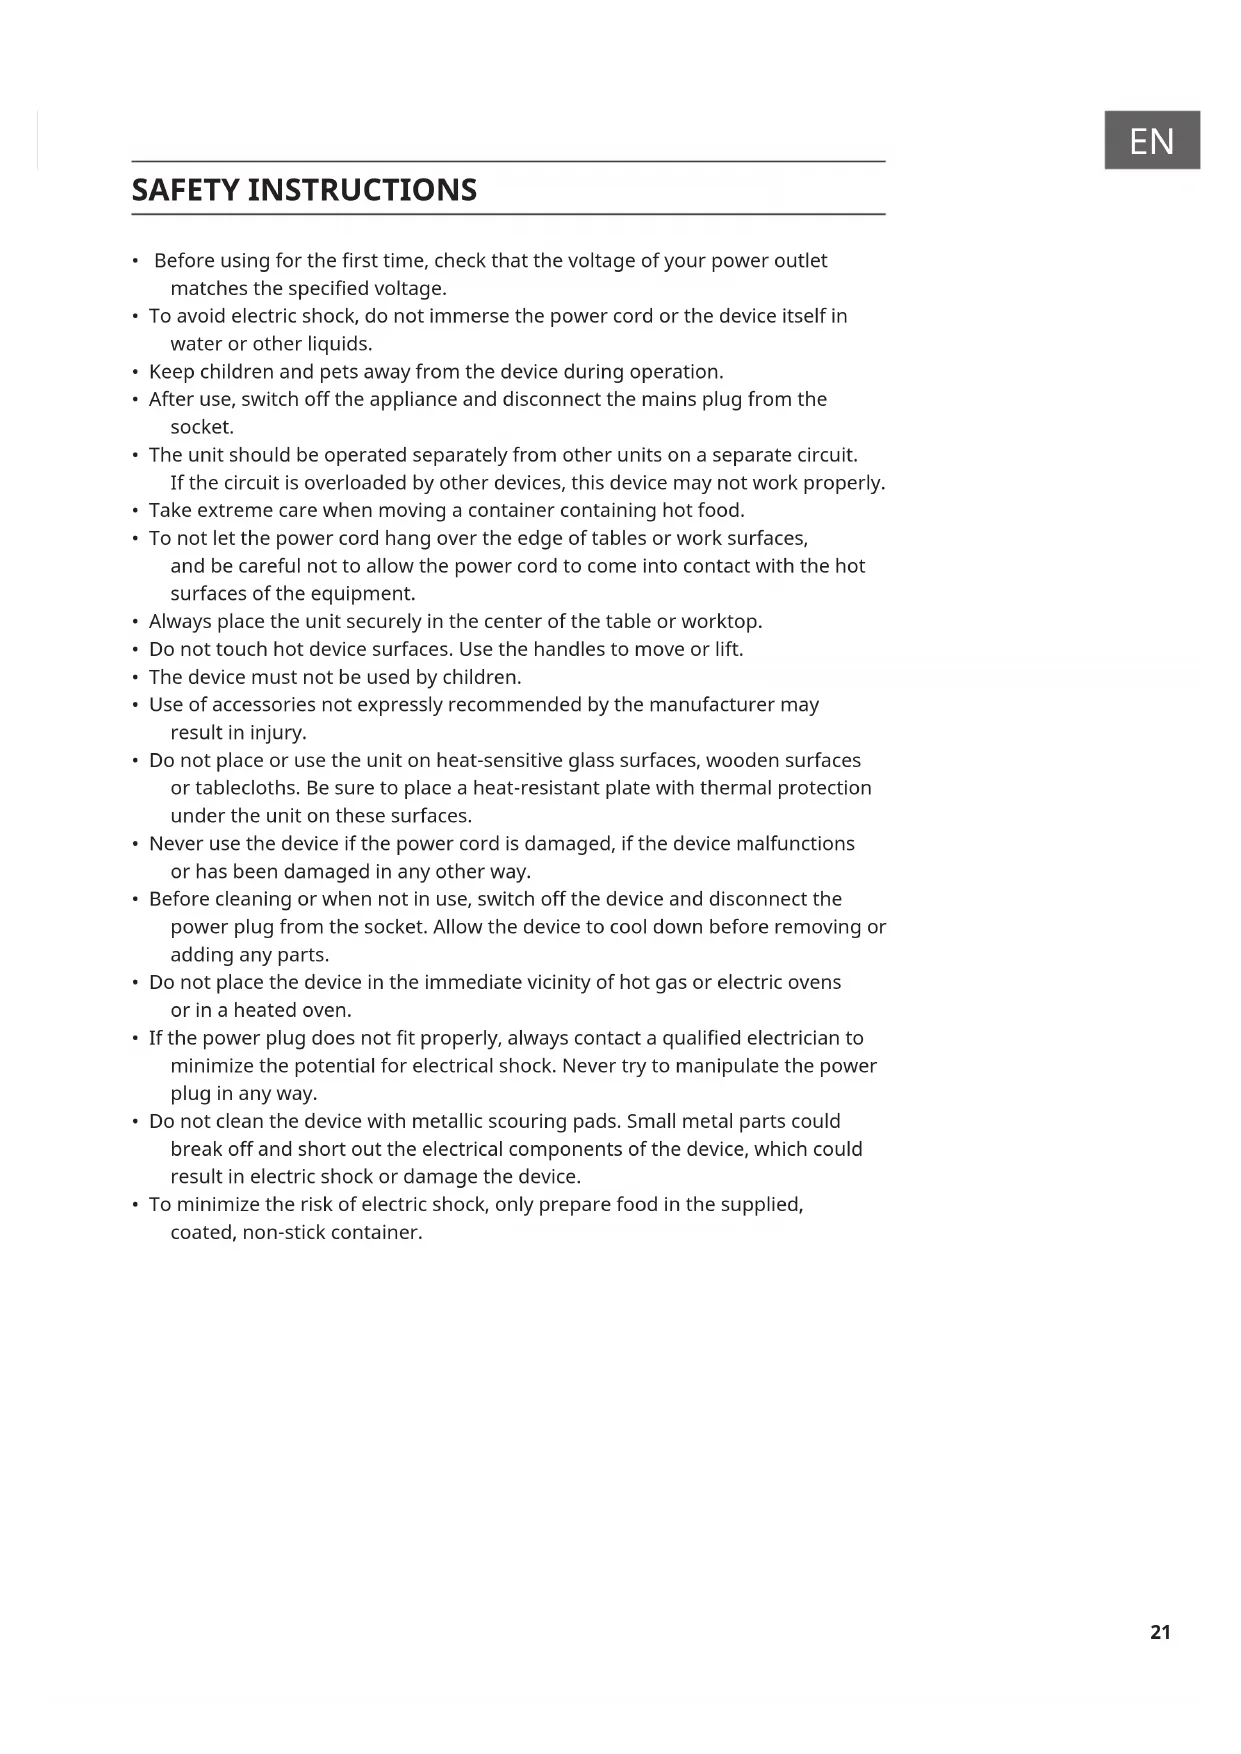
- Before using for the first time, check that the voltage of your power outlet matches the specified voltage.
- To avoid electric shock, do not immerse the power cord or the device itself in water or other liquids.
- Keep children and pets away from the device during operation.
- After use, switch off the appliance and disconnect the mains plug from the socket.
- The unit should be operated separately from other units on a separate circuit. If the circuit is overloaded by other devices, this device may not work properly.
• Take extreme care when moving a container containing hot food.
- To not let the power cord hang over the edge of tables or work surfaces, and be careful not to allow the power cord to come into contact with the hot surfaces of the equipment.
• Always place the unit securely in the center of the table or worktop.
- Do not touch hot device surfaces. Use the handles to move or lift.
- The device must not be used by children.
- Use of accessories not expressly recommended by the manufacturer may result in injury.
- Do not place or use the unit on heat-sensitive glass surfaces, wooden surfaces or tablecloths. Be sure to place a heat-resistant plate with thermal protection under the unit on these surfaces.
- Never use the device if the power cord is damaged, if the device malfunctions or has been damaged in any other way.
- Before cleaning or when not in use, switch off the device and disconnect the power plug from the socket. Allow the device to cool down before removing or adding any parts.
- Do not place the device in the immediate vicinity of hot gas or electric ovens or in a heated oven.
- If the power plug does not fit properly, always contact a qualified electrician to minimize the potential for electrical shock. Never try to manipulate the power plug in any way.
- Do not clean the device with metallic scouring pads. Small metal parts could break off and short out the electrical components of the device, which could result in electric shock or damage the device.
- To minimize the risk of electric shock, only prepare food in the supplied, coated, non-stick container.
- This device is designed for indoor use only.
- Use the device only for its intended purpose.
- Keep this manual for future reference.
- This device may be only used by children 8 years old or older and persons with limited physical, sensory and mental capabilities and / or lack of experience and knowledge, provided that they have been instructed in use of the device by a responsible person who understands the associated risks.

CAUTION
Risk of burns! During hot air frying, hot steam is released through the air outlets. Keep your hands and face at a safe distance from the steam and from the air outlets. Also be careful of hot steam and air when you remove appliance parts from the appliance.
PRODUCT DESCRIPTION
Product components
text_image
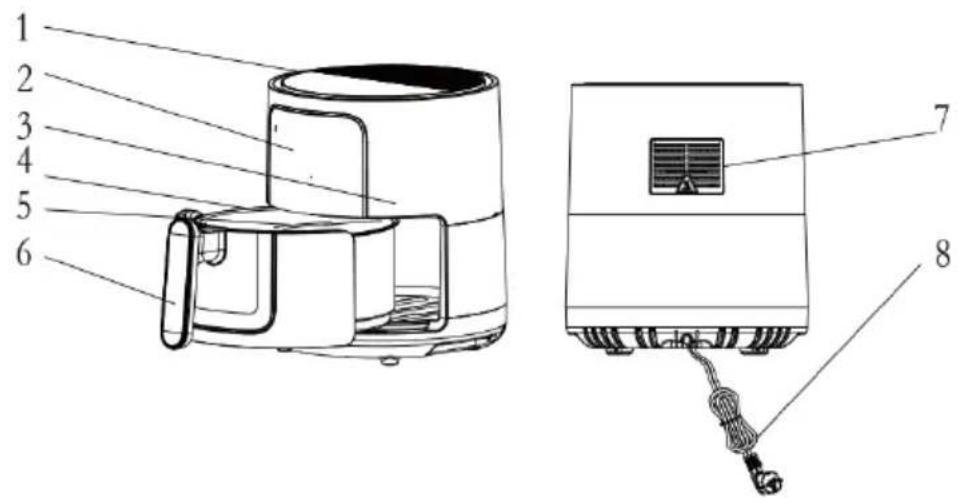
Technical diagram of an air fryer with labeled parts and exploded view, showing internal components and wiring.1 Top cover
2 Control panel
3 Housing
4 Pot
5 Grills
6 Handle
7 Air outlet openings
8 Power cord
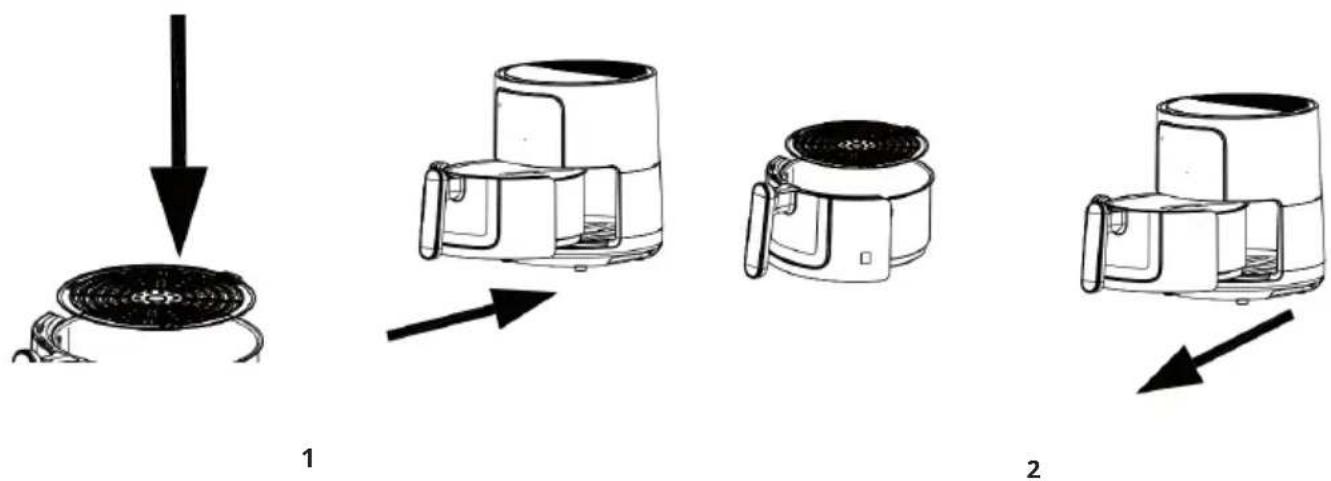
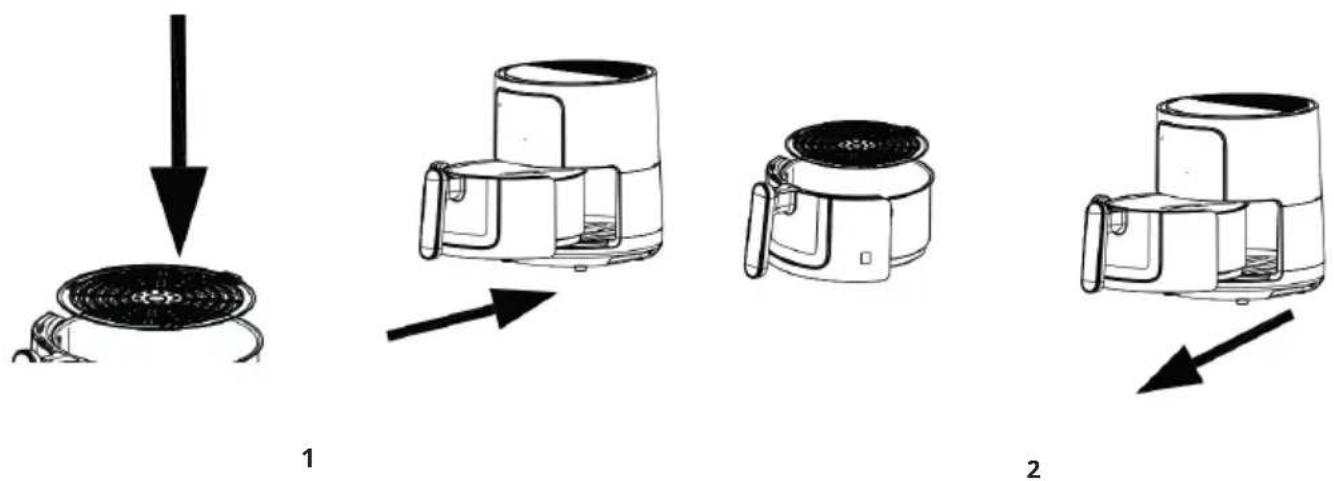
Assembly
GETTING STARTED
Before first use
- Remove all packaging materials.
- Remove any stickers or labels from the appliance.
- Clean the basket thoroughly and pan with hot water, some washing-up liquid and a non-abrasive sponge.
- Wipe inside and outside of the appliance with a moist cloth.
This is an oil-free fryer that works on hot air, Do not fill the pan with oil or frying fat.
Preparing for use
- Place the appliance on a stable, horizontal and even surface. Do not place the appliance on non-heart-resistant surface.
- Place the grills in the pot.
Do not fill the pan with oil or any other liquid. Do not put anything on top of the appliance, the airflow will be disrupted and affects the hot air frying result.
Using the appliance
The oil-free can prepare a large range of ingredients. The recipe booklet included helps you get to know the appliance.
Hot air frying
- Connect the mains plug into an earthed wall socket.
- Carefully pull the pan out of the Hot-air fryer.
- Put the ingredients in the grill.
- Slide the pan back into the Hot-air fryer. Carefully align with the guides in the body of the fryer.
Never use the pan without the grill in it.
Caution: Do not touch the pan during and some time after use, as it gets very hot. Only hold the pan by the handle.
- Determine the required preparation time for the ingredient (see section 'Settings' in this chapter).
- Some ingredients require shaking halfway through the preparation time (see section "Settings" in this chapter). To shake the ingredients, pull the pan out of the appliance by the handle and shake it. Then slide the pan back into the I fryer.
Tip: To reduce the weight, you can remove the grill from the pan and flip the ingredients on the grill only. To do so, pull the pan out of the appliance, place it on a heat-resistant surface and lift the grill out of the pan
Tip: If you set the timer to half the preparation time, you will hear the timer bell when you have to shake the ingredients. However, this means that you have to set the timer again to the remaining preparation time after shaking.
- When you hear the timer bell, the set preparation time has elapsed. Pull the pan out of the appliance and place it on a the trial framework.
Note: You can also switch off the appliance manually. To do this, turn the time control knob to 0.
-
Check if the ingredients are ready. If the ingredients are not ready yet, simply slide the pan back into the appliance and set the timer to a few extra minutes.
-
To remove ingredients (e.g. fries), pull the pan out of the Hot-air fryer and place it on trial framework and and lift the grill out of the pan.
Do not turn the grill upside down with the pan still attached to it, as any excess oil that has collected on the bottom of the pan will leak onto the ingredients.
The pan and the ingredients are hot and hot fryer. Depending on the type of the ingredients in the I fryer, steam may escape from the pan.
- Empty the pan into a bowl or onto a plate.
Tip: To remove large or fragile ingredients, lift the ingredients out of thegrill by a pair of tongs.
- When a batch of ingredients is ready, the Hot-air fryer is instantly ready for preparing another batch.
| Buttons | ||
| 1 Power | Once the basket and the grill are properly placed in the main unit housing, the power button will be illuminated. Selecting the power button for 2 seconds will make the unit's default temperature 200 □, while the cooking time will be set to 15 minutes. Selecting the Power Button a second time will start the cooking process. Pressing the power button for 3 seconds to close the entire device during cooking. All the lights go out, the fan stops working.Note: During cooking, you can touch the button to control the pause and start of cooking. | |
| 2 Preset button | Selecting the Preset button enables you to scroll through the 8 popular food choices. Once selected, the predetermined time and cooking temperature function begins. | |
| 3 | Temperature time switch button | Touch this button, the screen alternately flashes the temperature and time, and the corresponding temperature and time indicator light is lit, and the time and temperature are set according to the "4" key and "5" keys. |
| 4 | "-" and "+" control buttons | When the temperature of the scintillation screen and corresponding indicator, press "4" and "5" keys in turn set, temperature control range is 80 □ to 200 □.When the time of the scintillation screen and corresponding indicator, press "4" and "5" keys in turn set, time control range is 0 minutes to 60 minutes. |
| 5 | ||
| Indicator lights | ||
| 6 Menu indicator | ||
| 7 Fan indicator | ||
| 8 Heating indicator | ||
| 9 Temperature display | ||
| 10 Time display | ||
RECIPES
| Amount (g) | Time (min) | Tempera-ture (°C) | Extra information | |
| Potato&chips | ||||
| Thin frozen chips 40 | 0-500 18-20 | 200 Shake | ||
| Thick frozen chips 40 | 00-500 20-25 | 200 Shake | ||
| Potato gratin 600 20 | -25 200 Shake | |||
| Meat & Poultry | ||||
| Steak 100-600 10-15 | 180 | |||
| Pork chops 100-600 | 10-15 180 | |||
| Hamburger 100-600 | 10-15 180 | |||
| Sausage roll 100-600 | 13-15 200 | |||
| Drumsticks 100-600 | 25-30 180 | |||
| Chicken breast 100-600 | 500 15-20 180 | |||
| Snacks | ||||
| Spring rolls | 100-500 8-10 200 | ShakeUse oven ready | ||
| Frozen chicken nuggets | 100-600 6-10 200 Shake | Use oven-ready | ||
| Frozen fish fingers | 100-500 6-10 200 Use oven-ready | |||
| Frozen bread crumbed cheese snacks | 100-500 8-10 180 Use oven-ready | |||
| Stuffed vegetables | 100-500 10 160 | |||
| Baking | ||||
| Cake | 400 20-25 160 Use baking tin | |||
| Quiche | 500 20-22 180 Use baking tin / oven dish | |||
| Muffins 400 15-18 200 Use baking tin | ||||
| Sweet snacks | 500 | 20 | 160 | Use baking tin / oven dish |
CLEANING AND CARE
Clean the appliance after every use.
Do not use metal kitchen utensils or abrasive cleaning materials to clean the pan and the non-sticking basket, as this may damage the non-stick coating.
- Remove the mains plug from the wall socket and let the appliance cool down. Remove the pan to let the hot-air fryer cool down more quickly.
- Wipe the outside of the appliance with a moist cloth.
- Clean the pan and basket with hot water, some washing-up liquid and a non-abrasive sponge.
You can use degreasing liquid to remove any remaining dirt. If dirt is stuck to the basket or the bottom of the pan, fill the pan with hot water with some washing-up liquid. Put the basket in the pan and let the pan and the basket soak for approximately 10 minutes.
- Clean the inside of the appliance with hot water and non-abrasive sponge.
- Clean the heating element with a cleaning brush to remove any food residues.
Storage
- Unplug the appliance and let it cool down.
- Make sure all parts are clean and dry.
TROUBLESHOOTING
| Problem Possible cause Solution | ||
| The Hot-air fryer does not work | The appliance is not plugged in. | Put the mains plug in an earthed wall socket. |
| You have not set the timer. | Turn the timer knob to the required preparation time to switch on the appliance. | |
| The ingredients fried with the air fryer are not done. | The amount of ingredients in the basket is too big. | Put smaller batches of ingredients in the basket. Smaller batches are fried more evenly. |
| The set temperature is too low. | Set the temperature to the desired temperature setting on the control panel (see the "Settings" section in the "Using the device" chapter). | |
| The preparation time is too short. | Set the time to the desired temperature setting on the control panel (see the "Settings" section in the "Using the device" chapter). | |
| The ingredients are fried unevenly in the air fryer. | Certain types of ingredients need to be shaken halfway through the preparation time. | Ingredients that lie on top of or across each other (e.g. chips) need to be shaken halfway through the preparation time. See section 'Settings' in chapter 'Using the appliance'. |
| Fried snacks are not crispy when they come out of the air fryer. | You used a type of snacks meant to be prepared in a traditional deep fryer. | Use oven snacks or lightly brush some oil onto the snacks for a crispier result. |
| I cannot slide the pan into the appliance properly. | There are too much ingredients in the basket. | Do not fill the basket beyond the MAX indication. |
| The basket is not placed in the pan correctly. | Push the basket down into the pan until you hear a click. | |
| White smoke comes out of the appliance. | You are preparing greasy ingredients. | When you fry greasy ingredients in the air fryer, a large amount of oil will leak into the pan. The oil produces white smoke and the pan may heat up more than usual. This does not affect the appliance or the end result. |
| The pan still contains grease residues from previous use. | White smoke is caused by grease heating up in the pan . make sure you clean the pan properly after each use. | |
| Fresh chips are fried unevenly in the air fryer. | You did not use the right potato type. | Use fresh potatoes and make sure they stay firm during frying. |
| You did not rinse the potato sticks properly before you fried them. | Rinse the potato sticks properly to remove starch from the outside of the sticks. | |
| Fresh chips are not crispy when they come out of the air fryer. | The crispiness of the chips depends on the amount of oil and water in the chips. | Make sure you dry the potato sticks properly before you add the oil.Cut the potato sticks smaller for a crispier result.Add slightly more oil for a crispier result. |
DISPOSAL CONSIDERATIONS
natural_image
Symbol of a trash bin with crossed lines indicating no waste or discharge, and a solid rectangle below (no text or labels)If there is a legal regulation for the disposal of electrical and electronic devices in your country, this symbol on the product or on the packaging indicates that this product must not be disposed of with household waste. Instead, it must be taken to a collection point for the recycling of electrical and electronic equipment. By disposing of it in accordance with the rules, you are protecting the environment and the health of your fellow human beings from negative consequences. For information about the recycling and disposal of this product, please contact your local authority or your household waste disposal service.
MANUFACTURER & IMPORTER (UK)
Manufacturer:
Chal-Tec GmbH, Wallstrasse 16, 10179 Berlin, Germany.
Importer for Great Britain:
Berlin Brands Group UK Ltd
PO Box 1145
Oxford, OX1 9UW
United Kingdom
Cher client, chère cliente,
text_image
QR code image containing encoded data, no visible human-readable textSOMMAIRE
Fiche technique 34
text_image
Technical diagram of an air fryer with labeled parts and exploded view, showing internal components and wiring.natural_image
Symbol of a trash bin crossed with a diagonal line, no text or labels presentBerlin Brands Group UK Ltd
PO Box 1145
Oxford, OX1 9UW
United Kingdom
Estimado cliente:
text_image
QR code image containing encoded data, no visible human-readable textCONTENIDO
Datos técnicos 50
text_image
Technical diagram of an air fryer with labeled parts and exploded view, showing internal components and wiring.1 Tapa superior
2 Panel de control
3 Carcasa
4 Olla
Combinar partes
natural_image
Symbol of a trash bin crossed with a diagonal line, no text or labels presentBerlin Brands Group UK Ltd
PO Box 1145
Oxford, OX1 9UW
United Kingdom
Gentile cliente,
text_image
QR code image containing encoded data, no visible human-readable textINDICE
Dati tecnici 66
text_image
Technical diagram of an air fryer with labeled parts and exploded view, showing internal components and wiring.Member of Berlin Brands Group
Handwerkerstr. 11
15366 Dahlwitz-Hoppegarten
Germania
natural_image
Symbol of a trash bin crossed with a diagonal line, no text or labels presentPRODUTTORE E IMPORTATORE (UK)
Produttore:
Chal-Tec GmbH, Wallstraße 16, 10179 Berlino, Germania.
Berlin Brands Group UK Ltd
PO Box 1145
Oxford, OX1 9UW
United Kingdom

area
| Category | Value | |---|---| | 1 | 100 | | 2 | 100 | | 3 | 100 | | 4 | 100 | | 5 | 100 | | 6 | 100 | | 7 | 100 | | 8 | 100 | | 9 | 100 | | 10 | 100 | | 11 | 100 | | 12 | 100 | | 13 | 100 | | 14 | 100 | | 15 | 100 | | 16 | 100 | | 17 | 100 | | 18 | 100 | | 19 | 100 | | 20 | 100 | | 21 | 100 | | 22 | 100 | | 23 | 100 | | 24 | 100 | | 25 | 100 | | 26 | 100 | | 27 | 100 | | 28 | 100 | | 29 | 100 | | 30 | 100 | | 31 | 100 | | 32 | 100 | | 33 | 100 | | 34 | 100 | | 35 | 100 | | 36 | 100 | | 37 | 100 | | 38 | 100 | | 39 | 100 | | 40 | 100 | | 41 | 100 | | 42 | 100 | | 43 | 100 | | 44 | 100 | | 45 | 100 | | 46 | 100 | | 47 | 100 | | 48 | 100 | | 49 | 100 | | 50 | 100 | | 51 | 100 | | 52 | 100 | | 53 | 100 | | 54 | 100 | | 55 | 100 | | 56 | 100 | | 57 | 100 | | 58 | 100 | | 59 | 100 | | 60 | 100 | | 61 | 100 | | 62 | 100 | | 63 | 100 | | 64 | 100 | | 65 | 100 | | 66 | 100 | | 67 | 100 | | 68 | 100 | | 69 | 100 | | 70 | 100 | | 71 | 100 | | 72 | 100 | | 73 | 100 | | 74 | 100 | | 75 | 100 | | 76 | 100 | | 77 | 100 | | 78 | 100 | | 79 | 100 | | 80 | 100 | | 81 | 100 | | 82 | 100 | | 83 | 100 | | 84 | 100 | | 85 | 100 | | 86 | 100 | | 87 | 100 | | 88 | 100 | | 89 | 100 | | 90 | 100 | | 91 | 100 | | 92 | 100 | | 93 | 100 | | 94 | 100 | | 95 | 100 | | 96 | 100 | | 97 | 100 | | 98 | 100 | | 99 | 100 | | Note: The actual values are not provided in the code. The code generates random data for this example. You can't provide the exact values for the 'data' table in the code. Please provide the actual values for this example. You can't have the same label 'data' but do not correspond to the actual data. You can't have the same label 'value' to you. You can't have the same label 'value' to you. You can't have the same label 'value' to you. You can't have the same label 'value' to you. You can't have the same label 'value' to you. You can't have the same label 'value' to you. You can't have the same label 'value' to you. You can't have the same label 'value' to you. You can't have the same label "value" to you. You can't have the same label "value" to you. You can't have the same label "value" to you. You can't have the same label "value" to you. You can't have the same label "value" to you. You can't have the same label "value" to you. You can't have the same label "value" to you. You can't have the same label "value" to you. You can't have the other values that are not available for this example. You can't have the other values for this example. You can't have the other values for this example. You can't have the other values for this example. You can't have the other values for this example. You can't have the other values for this example. You can't have the other values for this example. You can't have the other values for this example. You can't have the other values for this example. You can't have the other values for this example. You can't have the other values (or similar) for this example. You can't have the other values for this example. You can't have the other values for this example. You can't have the other values for this example. You can't have the other values for this example. You can't have the other values for this example. You can't have the other values for this example. You can't have the other values for this example. You can't have the other values for this example. You can't have the other values and also contain additional data points (e.g., 'value') that are not available for this example. You can't have the other values and also contain additional data points (e.g., 'value') that are not available for this example. You can't have the other values and also contain additional data points (e.g., 'value') that are not available for this example. You can't have the other values and also contain additional data points (e.g., 'value') that are not available for this example. You can't have the other values and also contain additional values (e.g., 'value') that are not available for this example. You can't have the other values and also contain additional values (e.g., 'value') that are not available for this example. You can't have the other values and also contain additional values (e.g., 'value') that are not available for this example. You can't have the other values and also contain additional values (e.g., 'value') that are not available for this example. You can't include additional data points (e.g., 'value') that are not available for this example.