Air Bloom - Deep fryer Klarstein - Free user manual and instructions
Find the device manual for free Air Bloom Klarstein in PDF.

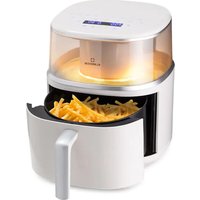
| Product type | Hot air fryer with steam |
| Brand | Klarstein |
| Model | Air Bloom |
| Rated power | 1500 W |
| Power supply | 220-240 V ~ 50-60 Hz |
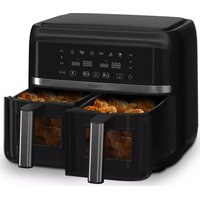
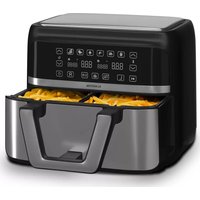
| Pan capacity | 7.5 L |
| Water tank capacity | 300 ml |
| Cooking functions | Chicken wings, chicken, fish, steak, chips, french fries, grill, popcorn, vegetables, cake, hot air cooking, defrosting, reheating, keep warm, delayed preset |
| Steam function | Yes, integrated to humidify food |
| Preheating | Yes |
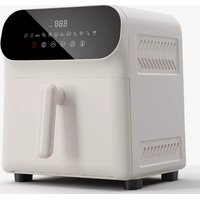
| Digital screen | Yes, with temperature and time display |
| Control panel | Touch |
| Safety | Automatic shutdown, overheating protection, locking when pan is improperly inserted |
| Maintenance | Cleaning with a damp cloth, pan and accessories washable with soapy water |
| Included accessories | Pan, frying insert, cake mold (optional), drip tray, water tank, spacer |
| Repairability | Spare parts available via customer service |
Frequently Asked Questions - Air Bloom Klarstein
User questions about Air Bloom Klarstein
0 question about this device. Answer the ones you know or ask your own.
Ask a new question about this device
Download the instructions for your Deep fryer in PDF format for free! Find your manual Air Bloom - Klarstein and take your electronic device back in hand. On this page are published all the documents necessary for the use of your device. Air Bloom by Klarstein.
USER MANUAL Air Bloom Klarstein
Member of Berlin Brands Group
Handwerkerstr. 11
15366 Dahlwitz-Hoppegarten
Deutschland
Berlin Brands Group UK Ltd
PO Box 1145
Oxford, OX1 9UW
United Kingdom
Dear Customer,
Congratulations on purchasing this device. Please read the following instructions carefully and follow them to prevent possible damages. We assume no liability for damage caused by disregard of the instructions and improper use. Scan the QR code to get access to the latest user manual and more product information.

CONTENTS
Safety Instructions 25
Product Description 27
Product Instructions 28
Operation 30
Cleaning and Maintenance 36
Troubleshooting 37
Disposal Considerations 39
Manufacturer & Importer (UK) 39
TECHNICAL DATA
| Item number 10040495, 10040496, 10040497 | |
| Power supply 220-240 V ~ 50 | 60 Hz |
| Power rating 1500 W | |
| Pot capacity 7.5 l | |
| Water tank capacity 300 ml | |
SAFETY INSTRUCTIONS
General information
- Never wash the cabinet with running water to prevent damage to the electrical components.
- To prevent electric shock, do not allow water or other liquids to enter the unit.
- This device may be only used by children 8 years old or older and persons with limited physical, sensory and mental capabilities and / or lack of experience and knowledge, provided that they have been instructed in use of the device by a responsible person who understands the associated risks.
- Before use, check the voltage on the device's sticker. Only connect the device to sockets that correspond to the voltage of the device.
- Do not use this product if the plug, power cord, or product is damaged.
- If the power cord or plug is damaged, it must be replaced by the manufacturer, an authorized service centre, or a similarly qualified person.
- Do not allow children to play with the product.
- Do not handle the plug or control panel with wet hands.
- Do not place this product on or near tablecloths, curtains, or other combustible materials.
- Allow at least 10cm of space around the product on all sides. Do not place any objects on top of the unit.
- Do not leave the unit unattended during use.

CAUTION
Danger of burns! Hot steam may escape when the oven door is opened. Keep a safe distance to avoid scalding.
- Danger of burns! Hot steam may escape when the oven door is opened. Keep a safe distance to avoid scalding.
- Do not insert any foreign bodies into the openings of the appliance.
- Do not use a steam cleaner for cleaning.
- Make sure that the appliance is switched off before replacing the lamp to avoid electric shock.
- Do not install the unit in a cabinet, as it may overheat.
Instructions for safe use

CAUTION
Danger of burns! The appliance becomes hot during use. Take care not to touch the heating elements inside the oven and use oven gloves.
- Before cleaning, unplug the appliance from the wall outlet and allow it to cool completely.
- Install the appliance on a dry, flat surface and leave at least 10cm of space around the appliance in all directions so that the air can circulate sufficiently.
- Do not plug the appliance into an outlet that is already connected to other kitchen appliances.
- Do not place the appliance near flammable objects. Install it away from window curtains, door curtains, wallpaper, and similar objects to prevent fire. Do not place or place any objects on the unit.
- Clean the door panel of the stove with a soft and damp cloth. Do not use abrasives or metal scrapers as they will scratch the surface.
- Do not connect the unit to external timers or remotely controlled power sockets.
- Before use, check that your cookware is suitable for this product. We recommend that you use heat-resistant glass containers or ceramic containers. Fill the container to a maximum of two thirds.
- Do not overfill the water tank. When filling, use the MAX mark in the tank as a guide.
- Do not place any containers on the open oven door.
- Do not heat food in a sealed container, otherwise the container may explode. Transfer the food into a heat-resistant container before heating.
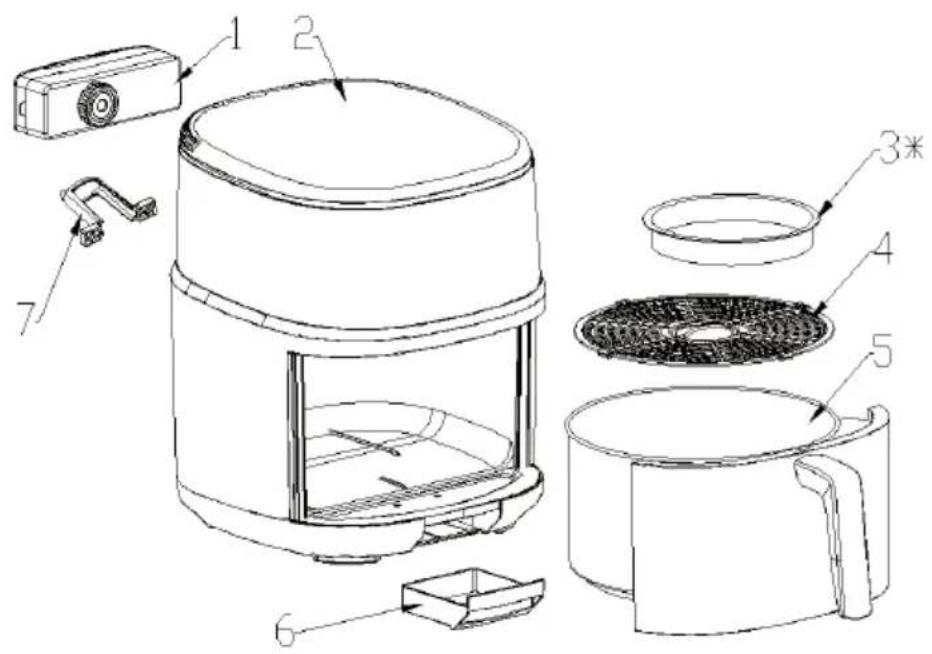
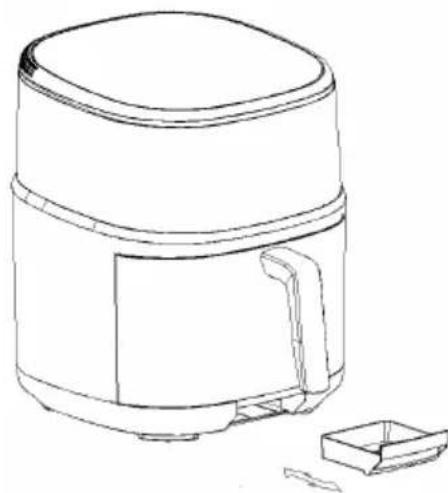
Product components
1 Water tank
2 Housing
3 Cake plate (optional)
4 Frying basket slices
5 Pot
6 Water tray
7 Partition wall block
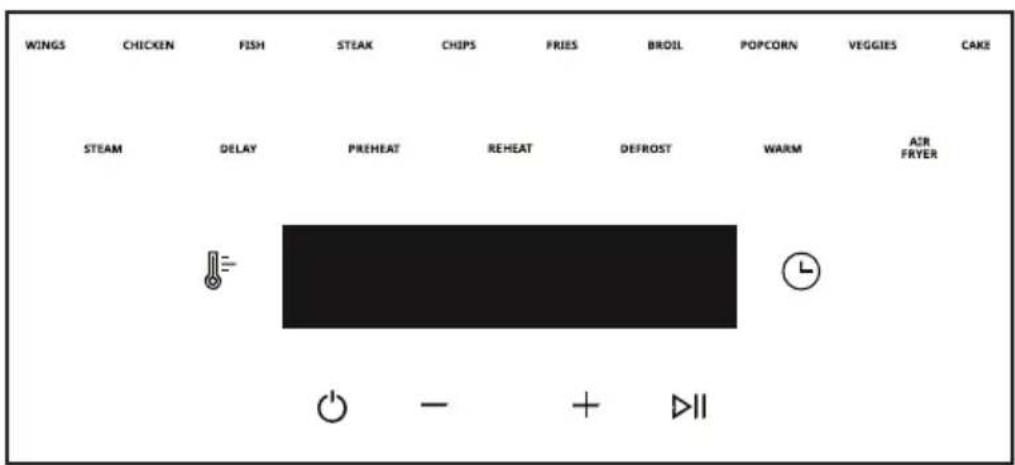
Intelligent control panel
PRODUCT INSTRUCTIONS
-
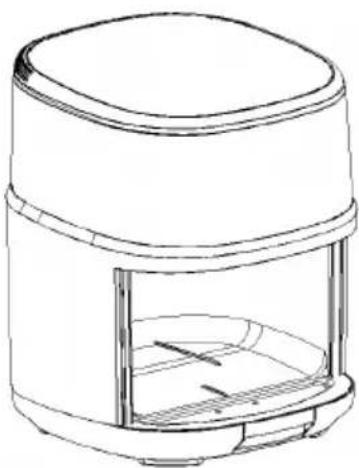
After unpacking, the user fastens the partition wall block to the back of the machine. Place the machine on a stable horizontal surface. Leave not less than 20cm in the back and not less than 10cm on both sides of the space, and pay attention to keep away from curtains, wall cloth and other combustible materials.
-
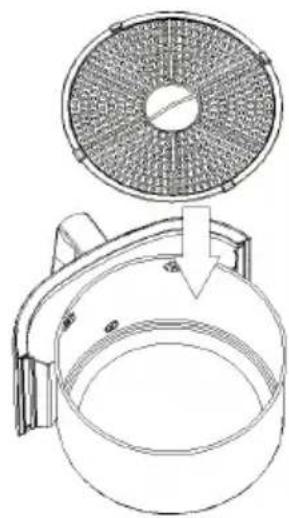
After pulling out the pot body, the frying basket slices should be placed in the pot fl at (see below).

-
Put The food on the frying basket slices, and then push the pot into the housing.
-
Take out the water tank, fi ll it with water and tighten the water tank lid, put it into the housing (see below).
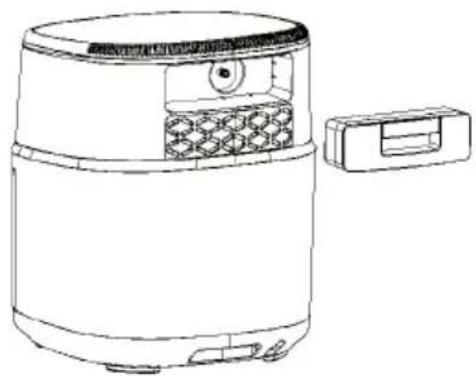

- Take out the water tray, check and empty it, and then install it back to the housing (see below).
Notes
- Different cooking options, different accessories.
- After cooking, remove the frying basket slices, rack and cake plate from the pot with gloves or other anti scald tools.
- Do not fill the pot with food fully, keep to a minimum of 30mm distance from the top edge of the pot. It is necessary to keep the internal air flowing smoothly, and the food may become bigger after heating, depending on the actual situation.
- Only when the pot door is closed can the machine work properly, or the display will show "OPEN".
- Do not use other magnetic objects close to the location shown in picture below and turn the machine on to avoid injury.
- Make sure the suction pipe is at the bottom of the water tank.
OPERATION
Before first use
- Remove all packaging materials, fasten the partition wall block, place the machine on a stable horizontal surface.
- Clean the pot, frying basket slices, cake plate and other accessories with hot water, liquid detergent and non-abrasive sponge.
- Fill the tank with water (recommend use distilled or purified water).
- Wipe the inside and outside of the appliance with a cloth.
- First use, please don't put any food in the pot, fill the tank with purified water. Use the preset function - "fish" to run one cycle with steam function at the same time, which time may smell a slight smell and smoke, don't worry, it's a normal phenomenon.
Product operating instructions
When the power is turned on, there will have a "Bi" sound, the digital screen and all indicator lights flicker and turn off, only the button indicator light flashes slowly, indicating that the appliance is power on state (the power on state is the standby mode).
Put the ingredients in the clean pot, and put the pot into the housing. Fill the tank with water. Plug in the power plug. Press button, the digital screen lights up. The user can choose proper function buttons, cooking time and temperature according to the food materials and preferences, just press button to cooking automatically.
Note: This machine uses the principle of light wave tube heating to cook, and the lighting in the appliance can not be controlled by human.
Menu function selection
- Press button, all lights on the control panel light up, means enter the function selection interface.
- Select the function menu, the corresponding function menu indicator will light up, press button to start work.
Main function figure description
| Symbol Food/Function | Symbol Food/Function |
| WINGS chicken wings VEGGIES vegetable | |
| CHICKEN chichen CAKE cake | |
| FISH fisch DELAY delay time | |
| STEAK steak PREHEAT preheat | |
| CHIPS crisps REHEAT reheat | |
| FRIES chips DEFROST defrost | |
| BROIL potatoes | WARM warming |
| POPCORN popcorn | AIR FRYER air frying |
Notes
- The main function button can be executed directly, that is, the first time to enter the standby state can be pressed, can no longer do other operations, just press button, the machine can run the corresponding function.
- The additional function button can not be used alone. It is an additional option for the primary function and must be used in conjunction with the primary function.
We provide a combination of different cooking time and cooking temperature to meet your pursuit of food. Below is our menu combination, you can also change the cooking time and temperature according to the actual needs.
| No. | Function button Preset | Temp (□) | Time adjust(min) | Presettime (min) | Adjusttime (min) |
| 1 | WIN GS 190 50-200 15 1-60 | ||||
| 2 | CHICKEN 200 50-200 30 1-60 | ||||
| 3 | FISH 200 50-200 14 1-60 | ||||
| 4 | STEAK 200 50-200 12 1-60 | ||||
| 5 | CHIPS 180 50-200 10 1-60 | ||||
| 6 | FRIES 200 50-200 25 1-60 | ||||
| 7 | BROIL 190 50-200 40 1-60 | ||||
| 8 | POPCORN 200 50-200 25 1-60 | ||||
| 9 | VEGGIES 70 40-70 480 1-480 | ||||
| 10 | CAKE | 140 50-180 35 | 1-60 | ||
| 11 | DELAY | - 50-200 60 | 10-540 | ||
| 12 | PREHEAT 200 50-200 | 5 | 1-60 | ||
| 13 | REHEAT | 100 | 80-200 | 5 | 1-30 |
| 14 | DEFROST | 45 | 40-80 | 30 | 1-60 |
| 15 | WARM | 65 | 40-80 | 30 | 1-480 |
| 16 | AIR FRYER 200 70-200 30 1-60 |
Notes:
- The above settings are all directional, we cannot guarantee the best setting of your ingredients when the origin, shape, size and brand of ingredients are different; You can set it according to the actual situation, the larger the amount of food you cook, the longer time it takes.
During cooking some food, pulling out the pot and turning over the food can help to cook more evenly and cook better.
If the ingredients are not well cooked enough, it can be put back to the pot directly and cooked with an appropriate time. - Marinate food should penetrate into the interior of the food, to taste better and more delicious.
- If you want the ingredients increase moisture to meet the different taste, can select the "steam" function button.
| No. Steam function control Remarks | |
| 1 - 5 min start steaming - Stop steaming at the last 1 min | - |
| 2 - 7 min start steaming - next 1 min stop steaming - Steam starts 2 minutes after spinning. - Stop steaming at the last 1 min. | Start spinning at half time |
| 3 - 8 min start steaming | - |
| 4 - 5 min start steaming - | |
| 5 - 5 min start steaming - | |
| 6 - | |
| 7 - 5 min start steaming - | |
| 8 - - | |
| 9 - - | |
| 10 - - | |
| 11 - - | |
| 12 - - | |
| 13 - - | |
| 14 - - | |
| 15 - - | |
| 16 - - |
Time and Temperature Setting
The temperature and time of each function can be adjusted within the corresponding adjustable range (as shown in the table above) according to the user's taste and food condition, press or button, the corresponding light flashes, then press + or to adjust the time or temperature; then, there will have a buzzer sound and the indicator stops flashing.
Note: Can adjust the time and temperature during working.
Steam Function
After selecting the main function, if the user want to keep a certain amount of water in the food according to the needs of food taste, and the taste is delicious and not irritation, the steam auxiliary function can be chosen.
Notes:
- The steam function is additional function, can not steam food alone.
- The amount of steam for each functional has been set, it is fixed gap spraying and cannot be adjusted.
- Some function cannot be used with steam function.
- Make sure there is water in the tank when cook with steam.
- The steam temperature is very high, the atomization effect is very good, the user may not be able to see the steam visually (can judge the steam effect based on the amount of water in the tank).
- The set temperature will not increase or decrease due to use the steam function.
Water shortage alarm
The light is flashing which reminder the user to add water into the water tank. When the water tank full of water and it is put back to its position, the alarm is released.
Notes
- If there is no additional steam function, the water tank without water will not alarm and will not affect the work.
- Recommend use distilled or purified water to fill the water tank.
- Make sure the water does not drip onto the surface or inside of the appliance.
Pause function
During cooking, press button, the cooking will stop automatically, the function light that is being executed will remain light on, the screen display will keep the data when it is suspended, the "READY" and the button flashes. Press again to resume work.
Notes
- If do not operate for more than 10 minutes in the pause state, the appliance will return to the power on state automatically.
- During cooking or finish cooking, the pot and its utensils and food are too hot to be touched by hand.
- During working, pull out the pot directly will enter the pause state.
Reservation
This product has reservation function, the user selects and adjusts the cooking function, press DELAY button, and preset the time, then press the button to start the appointment.
Notes
- In the reservation state, other buttons are locked and cannot be operated, except the and the button.
- You cannot use reservation function with defrosting and heat preservation at the same time.
Pre-heat
Choose this function based on the user needs. If there are no food in the pot and in standby mode, press the PREHEAT button, after pressing the button, it will enter the preheating state. When you hear the alarm sound, preheat is completed, take out the pot, put the prepared ingredients into the pot, and close the door again to start working automatically.
Note: Preheating and reservation functions cannot be used at the same time. You cannot use preheating function with reheating, defrosting, and heat preservation at the same time.
Cooking done
- There is a "Bi" sound means cooking finish. After 60 seconds of cooling, the screen display "END" and with "Bi-Bi-Bi-Bi" sounds, means cooking done.
- Pull out the pot and place it on a stable horizontal surface.
- Take out the cooked food and put on the plate or tableware.
- After cooking, press the power button to turn off the power and unplug the power cord from the socket.
Notes
- When taking out the pot or utensil, don't touch them to avoid scalding.
- Better take out the pot after cooling completely, which is also good for the appliance.
- Do not turn the pot upside down, as there will be extra grease dripping out.
CLEANING AND MAINTENANCE
Cleaning the appliance surface
Clean the appliance and accessories after every use, keep the appliance clean.
Notes
- Unplug from the outlet and let the appliance cool down before cleaning.
- Wipe the appliance surface with soft moist cloth.
- Do not immerse the power cord, plug and the appliance's body into water or other liquid, it may cause damage of appliance, fire, electric shock or injury to persons.
Storage
Please pay attention to the following
- Unplug the appliance and allow it to cool completely before storing.
- Make sure all parts are clean and dry, assemble all parts and then place it in dry, clean, no corrosive environment.
TROUBLESHOOTING
| Problem Possible cause | Solution | |
| Appliance does not work. | The appliance is not plugged in. Make sure plug into the socket. | |
| The pot is out of its place. Please put the pot into the housing closely. | ||
| Food is not completely cooked. | The food are too large/thick. Place smaller and thin batches of food into the pot. | |
| The cooking time is too short. Adjust the cooking time. | ||
| The cooking temperature is too low. | Adjust the cooking temperature. | |
| Too much food in the pot. The food cannot more than 4 / 5 of the pot, and do not put overstuffed, should leave a gap between the ingredients. | ||
| The food is not defrosting completely. | Defrosting the food completely. | |
| Food is cooked unevenly. | Some food need to be turn over constantly during cooking. | During cooking, pulling out the pot and turning over the food for every 5-8mins. |
| White smoke is coming out of the pot. | Cooking greasy foods will cause a lot of oil oozing. This oil will produce white smoke with high temperature. It's normal. | |
| Residual oil in the pot from last time. | Make sure the pot is clean before and after each use. | |
| French fries are not cooked crispy. | It depends on the water and oil content of ingredients. | Make sure the chips are dry before frying and don't cut the chips too thick. Can preheat the pot before frying. |
| Water tank leaking. The lid of the water tank is loose. Tighten the water tank lid. | ||
| The water tank is broken. Please contact customer service for replacement. | ||
| There are no stem released when use steam function. | The suction pipe in the water tank is upturned. | Place the suction pipe at the bottom of the tank. |
| Steam may not be visible. Confirm wether the water in the water tank is significantly reduced by using the cleaning function to work for a few minutes. | ||
| The nozzle blockage. Remove the nozzle for cleaning, and ensure that small holes on the nozzle are unblocked. | ||
| The water pump doesn't work. Please contact after-sales service. | ||
| Display shows Error Code “E01” | There is an open circuit in NTC sensor. | It may be loose or disconnected, please contact professional after-sales service. |
| Display shows Error Code “E02” | There is an short circuit in NTC sensor. | Maybe the NTC sensor is damaged, please contact professional after-sales service. |
| Display shows Error Code “E03” | The PCB communication error. Maybe be the wire installation wrong or broken, please contact professional after-sales service. | |
DISPOSAL CONSIDERATIONS

If there is a legal regulation for the disposal of electrical and electronic devices in your country, this symbol on the product or on the packaging indicates that this product must not be disposed of with household waste. Instead, it must be taken to a collection point for the recycling of electrical and electronic equipment. By disposing of it in accordance with the rules, you are protecting the environment and the health of your fellow human beings from negative consequences. For information about the recycling and disposal of this product, please contact your local authority or your household waste disposal service.
MANUFACTURER & IMPORTER (UK)
Manufacturer:
Chal-Tec GmbH, Wallstrasse 16, 10179 Berlin, Germany.
Importer for Great Britain:
Berlin Brands Group UK Ltd
PO Box 1145
Oxford, OX1 9UW
United Kingdom
Cher client, chere clientele,
Berlin Brands Group UK Ltd
PO Box 1145
Oxford, OX1 9UW
United Kingdom
Estimado cliente:
Berlin Brands Group UK Ltd
PO Box 1145
Oxford, OX1 9UW
United Kingdom
Gentile clientele,
PRODUTTORE E IMPORTATORE (UK)
Produttore:
Chal-Tec GmbH, Wallstraße 16, 10179 Berlin, Germania.
Berlin Brands Group UK Ltd
PO Box 1145
Oxford, OX1 9UW
United Kingdom


KLARSTEIN