
Caldetto - Coffee machine Klarstein - Free user manual and instructions
Find the device manual for free Caldetto Klarstein in PDF.

| Brand | Klarstein |
| Model | Caldetto |
| Product type | Coffee machine with hot water dispenser |
| Power supply | 220-240 V ~ 50/60 Hz |
| Power | 1600-1900 W |
| Capacity of coffee water tank | 1.25 L |
| Carafe capacity | 1.5 L |
| Capacity of hot water tank | 1.25 L |
| Number of cups | Approximately 12 cups (with 1.5 L carafe) |
| Main functions | Filter coffee preparation, hot water dispensing, delayed programming, anti-drip function, keep warm, aroma intensity setting (electric) |
| Control panel | Digital display, keys: on/off, programming, brew, time setting |
| Safety | Automatic shut-off after 30 min (coffee) / 2 h (hot water), hot hotplate, use on stable surface, do not immerse |
| Maintenance | Clean after each use, descale every 2 months with descaling agent or vinegar |
| Spare parts | Glass carafe, filter holder, removable tanks, drain plug |
| Repairability | Repairs by qualified technician only |
| Intended use | Household use only |
| Manual | 56-page instruction manual available for download |
Frequently Asked Questions - Caldetto Klarstein
User questions about Caldetto Klarstein
0 question about this device. Answer the ones you know or ask your own.
Ask a new question about this device
Download the instructions for your Coffee machine in PDF format for free! Find your manual Caldetto - Klarstein and take your electronic device back in hand. On this page are published all the documents necessary for the use of your device. Caldetto by Klarstein.
USER MANUAL Caldetto Klarstein
KLARSTEIN NIEIJSRATK TEIN NIEIJSRATK KLAR KLARSTEIN NIEIJSRATK TEIN NIEIJSRATK KLAR KLARSTEIN NIEIJSRATK TEIN NIEIJSRATK KLAR KLARSTEIN NIEIJSRATK
KLARSTEIN
Caldetto
Kaffeemaschine & Heißwasserspender Coffee Machine & Hot Water Dispenser Cafetera & Dispensador de agua caliente Cafetière & Distributeur d'eau chaude Caffettiera & Dispenser di bevande calde

bar
| Category | Value | |---|---| | Category 1 | 100 | | Category 2 | 100 | | Category 3 | 100 | | Category 4 | 100 | | Category 5 | 100 | | Category 6 | 100 | | Category 7 | 100 | | Category 8 | 100 | | Category 9 | 100 | | Category 10 | 100 | | Category 11 | 100 | | Category 12 | 100 | | Category 13 | 100 | | Category 14 | 100 | | Category 15 | 100 | | Category 16 | 100 | | Category 17 | 100 | | Category 18 | 100 | | Category 19 | 100 | | Category 20 | 100 | | Category 21 | 100 | | Category 22 | 100 | | Category 23 | 100 | | Category 24 | 100 | | Category 25 | 100 | | Category 26 | 100 | | Category 27 | 100 | | Category 28 | 100 | | Category 29 | 100 | | Category 30 | 100 | | Category 31 | 100 | | Category 32 | 100 | | Category 33 | 100 | | Category 34 | 100 | | Category 35 | 100 | | Category 36 | 100 | | Category 37 | 100 | | Category 38 | 100 | | Category 39 | 100 | | Category 40 | 100 | | Category 41 | 100 | | Category 42 | 100 | | Category 43 | 100 | | Category 44 | 100 | | Category 45 | 100 | | Category 46 | 100 | | Category 47 | 100 | | Category 48 | 100 | | Category 49 | 100 | | Category 50 | 100 | | Category 51 | 100 | | Category 52 | 100 | | Category 53 | 100 | | Category 54 | 100 | | Category 55 | 100 | | Category 56 | 100 | | Category 57 | 100 | | Category 58 | 100 | | Category 59 | 100 | | Category 60 | 100 | | Category 61 | 100 | | Category 62 | 100 | | Category 63 | 100 | | Category 64 | 100 | | Category 65 | 100 | | Category 66 | 100 | | Category 67 | 100 | | Category 68 | 100 | | Category 69 | 100 | | Category 70 | 100 | | Category 71 | 100 | | Category 72 | 100 | | Category 73 | 100 | | Category 74 | 100 | | Category 75 | 100 | | Category 76 | 100 | | Category 77 | 100 | | Category 78 | 100 | | Category 79 | 100 | | Category 80 | 100 | | Category 81 | 100 | | Category 82 | 100 | | Category 83 | 100 | | Category 84 | 100 | | Category 85 | 100 | | Category 86 | 100 | | Category 87 | 100 | | Category 88 | 100 | | Category 89 | 100 | | Category 90 | 100 | | Category 91 | 100 | | Category 92 | 100 | | Category 93 | 100 | | Category 94 | 100 | | Category 95 | 100 | | Category 96 | 100 | | Category 97 | 100 | | Category 98 | 100 | | Category 99 | 100 | | Total (Total) = [sum of bars] / [values] * (sum of bars + bars) * (sum of bars + bars) * (sum of bars + bars). The values in the table represent the sum of the bars and the corresponding sum of the bars. There is no additional data series or categories specified in the code.INHALTSVERZEICHNIS
natural_image
Symbol of a trash bin crossed with a diagonal line, no text or numbers presentCongratulations on purchasing this device. Please read the following instructions carefully and follow them to prevent possible damages. We assume no liability for damage caused by disregard of the instructions and improper use. Scan the QR code to get access to the latest user manual and more product information.

CONTENT
Safety Instructions 14
Device Overview 16
Before the first use 18
Operating the coffee Machine 18
Operating the Hot Water Dispenser 19
Cleaning and Care 20
Hints on Disposal 22
Producer 22
TECHNICAL DATA
| Item number 10035476 | |
| Power supply 220-240 V ~ 50/60 Hz | |
| Performance 1600-1900 W | |
| Hot water tank capacity 1.25 L | |
| Coffee tank capacity 1.5 L |
SAFETY INSTRUCTIONS
Coffee Machine
- Read all the safety and operating instructions and retain them for future reference.
- The appliance is designed exclusively for private use and for the envisaged purpose. This appliance is not fit for commercial use.
- Don't use it outdoors. Keep it away from sources of heat, direct sunlight, humidity (never dip it into any liquid) and sharp edges. Do not use the appliance with wet hands. If the appliance is humid or wet, unplug it immediately.
- When cleaning or putting it away, switch off the appliance and always pull out the plug from the socket (pull the plug itself, not the lead) if the appliance is not being used and remove the attached accessories.
- Do not operate the machine without supervision Never leave the operating machine unattended. If you leave the room you should always turn the device off. Remove the plug from the socket.
- The device and the mains lead have to be regularly checked regularly for signs of damage. If damage is found the device must not be used.
- Do not try to repair the appliance on your own. Always contact an authorized technician. To avoid the exposure to danger, always have faulty cable be replaced only by the manufacturer, by our customer service or by qualified person and with a cable for the same type.
- In order to ensure your children's safety, please keep all packaging (plastic bags, boxes, polystyrene etc.) out of their reach.
- Place the coffee machine on a firm and flat at surface. Position it so that it cannot tip over.
- Never apply accessory attachments which are not specified for this appliance.
- Do not touch hot parts of appliance.
- Do not place the device directly next to a gas or electric cooker or any other source of heat.
- The water tank must only be filled with cold water! Never open the filter cover during the boiling process, as otherwise this may cause burns.
- The appliance is only to be used as described in this user manual.
- Do not use the appliance for any commercial purposes.
- Any other use is not intended and can result in damages or personal injuries.
- The manufacturer assumes no liability for damages caused by improper use.
- This device may be only used by children 8 years old or older and persons with limited physical, sensory and mental capabilities and / or lack of experience and knowledge, provided that they have been instructed in use of the device by a responsible person who understands the associated risks.
CAUTION
Danger of burns! To avoid burns, do not touch the surfaces during operation. The hot plate in particular can remain very hot for a long time during operation and even after switching off.
Hot Water Dispenser
- Before use, check the voltage on the device badge. Connect the device only to sockets which correspond to the voltage of the device.
- Since the surface temperature of the hot water dispenser may exceed 60 °C during operation, touch only the handle and knobs.
- The distance between the hot water dispenser and other equipment above it must be more than 50 cm to prevent other equipment from being damaged by steam. Do not place the hot water dispenser near other equipment that can easily be deformed by high temperatures.
- Children 8 years of age and older, mentally, sensory and physically impaired persons may only use the appliance if they have been thoroughly familiarised with its functions and safety precautions by a supervisor responsible for them and understand the associated risks.
- Do not leave the device unattended during operation, especially when children are present.
- Do not allow the power cord to hang over the worktop, as children may pull on it and scalds themselves.
- If the power cord or plug is damaged, it must be replaced by the manufacturer, an authorized service center, or a similarly qualified person.
- Place the hot water dispenser on a level, stable and heat-resistant surface.
- Do not plug the hot water dispenser into an outlet that is already connected to other kitchen appliances. Use a separate socket for the hot water dispenser.
- Do not use an extension cord.
- Never immerse the hot water dispenser in water or other liquids.
- When not in use, unplug the appliance from the wall outlet.
- Do not cover the ventilation openings.
- Do not use the hot water dispenser in wet places and do not touch it with wet hands.
- Allow the hot water dispenser to cool completely before cleaning.
- Store the unit in a dry, cool place.
- The appliance is not intended for commercial use, but only for household and similar environments. This includes kitchens in offices, farms, hotels, motels and facilities offering Bed & Breakfasts.
- Do not place the appliance near heat sources or in direct sunlight.
- Repairs should only be performed by qualified personnel and are required if the equipment has been damaged, power cords or plugs are damaged, liquid has been spilled or objects have fallen on the equipment, the equipment has been exposed to moisture or moisture, has been dropped or is not operating normally.
DEVICE OVERVIEW
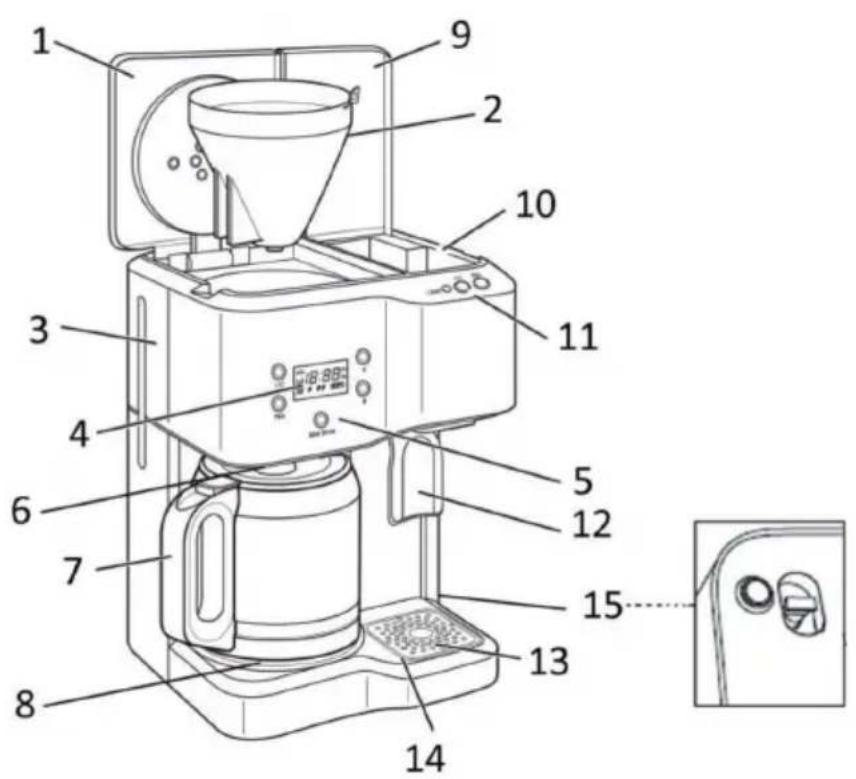
| 1 | Coffee machine container lid | 9 | Container cover of the hot water dispenser |
| 2 | Filter tank | 10 | Water tank of the hot water dispenser |
| 3 | Water tank of the coffee machine | 11 | Hot water dispenser control panel |
| 4 | Display | 12 | Lever for hot water output |
| 5 | Control panel of the coffee machine | 13 | Drip tray cover |
| 6 | Anti-drip valve | 14 | Collecting tank |
| 7 | Glass carafe | 15 | Water drain plug |
| 8 | Hot plate |
Control panels and key functions
| 1 | On/Off button on the coffee machine | 5 | Time button (minute) of the coffee machine |
| 2 | Programming button on the coffee machine | 6 | On/Off button of the hot water dispenser |
| 3 | Brewing button on the coffee machine | 7 | Programming button on the hot water dispenser |
| 4 | Time button (hour) of the coffee machine | 8 | Hot water dispenser stand-by light |
BEFORE THE FIRST USE
- Before using this unit for the first time, rinse all removable components thoroughly with warm water.
- Fill the water tank of the coffee machine with cold water up to the maximum water level indicator.
• Now brew water without coffee powder twice. - Do the same for the hot water dispenser.
| 1 | Open the coffee machine container lid and fill the tank with cold water. Do not fill the water above the MAX line. |
| 2 | Place a standard filter in the filter container and add the appropriate amount of coffee powder depending on the number of cups you wish to brew. Close the lid. |
| Note: To avoid overflowing, please use only medium or coarse ground filter coffee for brewing. Do not add too much coffee powder. If the filter container overflows due to improper handling, please unplug the power cord and let the coffee in the filter container cool down completely before removing the filter container. | |
| 3 | Place the glass carafe horizontally on the hot plate, making sure that the middle hole in the lid of the glass carafe is aligned with the anti-drip valve. |
| 4 | Plug the power cord into the socket. The display will flash [0:00]. |
| 5 | If you press the button once or several times, you can adjust the aroma intensity: > >. If you do not set this, the appliance operates with the default setting. In this case the display shows: If you want to reset this setting after the appliance has been started up or set to automatic start, you must first cancel the operation or automatic start of the appliance and then change the aroma intensity mode. |
| 6 | Start making coffee by pressing the [I/O] button once. The button illuminates blue and the symbol flashes on the display. The tank lid must be closed to unlock the drip stop function. |
| 7 | Press the [I/O] button again to switch off the machine after making coffee. If you leave the machine switched on, the hot plate will keep the coffee warm for 30 minutes after the brewing process is finished. After 30 minutes, the machine automatically switches off and enters standby mode. |
Important notes on coffee preparation
- The device is equipped with an anti-drip function. During the brewing process you can temporarily remove the glass carafe and pour out the coffee. When pouring coffee from the glass carafe, pour it out slowly.
- Do not suddenly tilt the glass carafe at a large tipping angle, as hot coffee can flow out of the lid rim and injure people.
- Do not place an empty glass carafe on the hot hot plate.
Setting the time and starting time
| 1 | To set the current time: Press the [00: --] button to set the current hour, press the [--:00] button to set the current minute. |
| 2 | While holding down the button, press the [00: --] and [--:00] buttons to set the desired start time (AM or PM). Then release the button and the start time is set. The display returns to the current time. |
| 3 | Press the button, the light will turn green and the stored start time is activated. Press the button again to cancel the function. |
| 1 | Open the container lid of the hot water dispenser and fill the tank with cold water. Do not fill the water above the MAX line. |
| 2 | Close the lid. Press the [I/O] button to heat the water. The button lights up blue, the symbol flashes on the display and the water starts to heat up. When the water is boiling, the ready indicator lights up green. The water remains hot for 2 hours, after which the appliance switches off automatically and goes into standby mode. |
| 3 | Press your mug, cup or glass against the hot water lever to release hot water. |
| Note: If the "FIL H2O" symbol appears in the display, it means that there is no water in the hot water tank of the hot water dispenser. Fill the tank. If you want to fill the tank during operation, first turn off the appliance and then fill it with clean water. |
Set time and start time
| 1 | Press the [00: --] and [--:00] buttons to set the current time. Make sure that the hot water dispenser is turned off. |
| 2 | Hold down the PROG button and press the [00: --] and [--:00] buttons to set the desired start time (AM or PM). Then release the PROG button, the start time is accepted and the display returns to the current time. |
| 3 | Press the PROG button, the light turns green and the set start time is activated. Press the button again to cancel the function. |
| Note: You can program both the hot water dispenser and the coffee machine independently of each other. To display the programmed time, press and hold the PROG button. |
How to empty the Hot Water Dispenser tank
Unplug the appliance and let it cool down completely to avoid the risk of scalding. The tank must be emptied whenever the appliance is stored or not used for more than a week. Hold the appliance over a sink and pull down the water drain plug to remove the water. Replace the plug after emptying.
CLEANING AND CARE
Coffee Maker
- Clean the unit after each use.
• Always unplug the power cord before cleaning. - Never immerse the housing in water or other liquids.
- Disconnect the coffee machine from the power supply and allow it to cool completely before cleaning.
- Clean the housing surface with a soft, damp cloth.
- Do not clean the hot plate with abrasive cleaner or steel wool.
- Descale the machine every two months with a commercially available descaler or a water-vinegar mixture. Fill the water tank with the mixture and let the mixture run through the machine once. Fill the tank with fresh, clean water up to the MAX mark and let the water run through as well.
- Clean the glass carafe and funnel with water and dry both parts carefully.
- Remove the spray arm and clean it as well.
Hot Water Dispenser
- Disconnect the plug from the socket and allow the appliance to cool down. Then clean it with a damp cloth and a little detergent. Do not use abrasive detergents as they may damage a surface.
- The hot water dispenser must be cleaned regularly to remove limescale. Too much lime can damage the heater. To clean the appliance, run a full load of lemon water through it and then a full load of fresh water.
- Never immerse the hot water dispenser in water or other liquids.
HINTS ON DISPOSAL
natural_image
Symbol of a trash bin crossed with a diagonal line, no text or numbers presentAccording to the European waste regulation 2012/19/EU this symbol on the product or on its packaging indicates that this product may not be treated as household waste. Instead it should be taken to the appropriate collection point for the recycling of electrical and electronic equipment. By ensuring this product is disposed of correctly, you will help prevent potential negative consequences for the environment and human health, which could otherwise be caused by inappropriate waste handling of this product. For more detailed information about recycling of this product, please contact your local council or your household waste disposal service.
PRODUCER
Chal-Tec GmbH, Wallstraße 16, 10179 Berlin, Germany.
Estimado cliente:
ÍNDICE DE CONTENIDOS
natural_image
Symbol of a trash bin crossed with a diagonal line, no text or numbers presentSOMMAIRE
natural_image
Symbol of a trash bin crossed with a diagonal line, no text or numbers presentINDICE
natural_image
Symbol of a trash bin crossed with a diagonal line, no text or numbers present
- KLARSTEIN NIEIJSRATK TEIN NIEIJSRATK KLAR KLARSTEIN NIEIJSRATK TEIN NIEIJSRATK KLAR KLARSTEIN NIEIJSRATK TEIN NIEIJSRATK KLAR KLARSTEIN NIEIJSRATK
- KLARSTEIN
- Caldetto
- INHALTSVERZEICHNIS
- CONTENT
- SAFETY INSTRUCTIONS
- Coffee Machine
- CAUTION
- Hot Water Dispenser
- DEVICE OVERVIEW
- BEFORE THE FIRST USE
- Important notes on coffee preparation
- Setting the time and starting time
- Set time and start time
- How to empty the Hot Water Dispenser tank
- CLEANING AND CARE
- Coffee Maker
- HINTS ON DISPOSAL
- PRODUCER
- Estimado cliente:
- ÍNDICE DE CONTENIDOS
- SOMMAIRE
- INDICE
Brand : Klarstein
Model : Caldetto
Category : Coffee machine