Emma - Kettle Stelton - Free user manual and instructions
Find the device manual for free Emma Stelton in PDF.

| Product Type | Cordless Electric Kettle |
| Brand | Stelton |
| Model | Emma |
| Power Supply | 220-240 V ~ 50/60 Hz |
| Power | 1850-2200 W |
| Maximum Capacity | 1.2 L |
| Main Material | Double-wall insulated stainless steel |
| Base | 360° swivel power base with cord storage |
| Scale Filter | Removable, located near the spout |
| Operation | On/off button under the handle |
| Automatic Shut-off | Yes, at boiling point (100 °C) |
| Dry-boil Protection | Yes, integrated |
| Indicator Light | Indicates the kettle is on |
| Maintenance | Clean exterior with a damp soft cloth; descale regularly with white vinegar or descaler |
| Safety | Do not exceed MAX, do not open during use, use with original base, do not immerse |
| Warranty | In accordance with current legislation, upon presentation of receipt |
| Manufacturer | Stelton A/S, Christianshavns Kanal 4, 1406 København K, Denmark |
| Usage | Domestic only (for boiling water) |
Frequently Asked Questions - Emma Stelton
User questions about Emma Stelton
0 question about this device. Answer the ones you know or ask your own.
Ask a new question about this device
Download the instructions for your Kettle in PDF format for free! Find your manual Emma - Stelton and take your electronic device back in hand. On this page are published all the documents necessary for the use of your device. Emma by Stelton.
USER MANUAL Emma Stelton
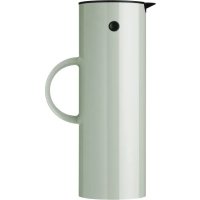
natural_image
White ceramic kettle with black handle and black outline, no visible text or symbolsEmma
electric kettle | elkedel | Wasserkocher
Art. no. x-210
stelton
Beeld 1
natural_image
Technical line drawing of a mechanical component with no visible text or symbolsBeeld 2
natural_image
Line drawing of a curved mechanical component with a looped end and attached cable (no text or symbols)Afbeelding 3
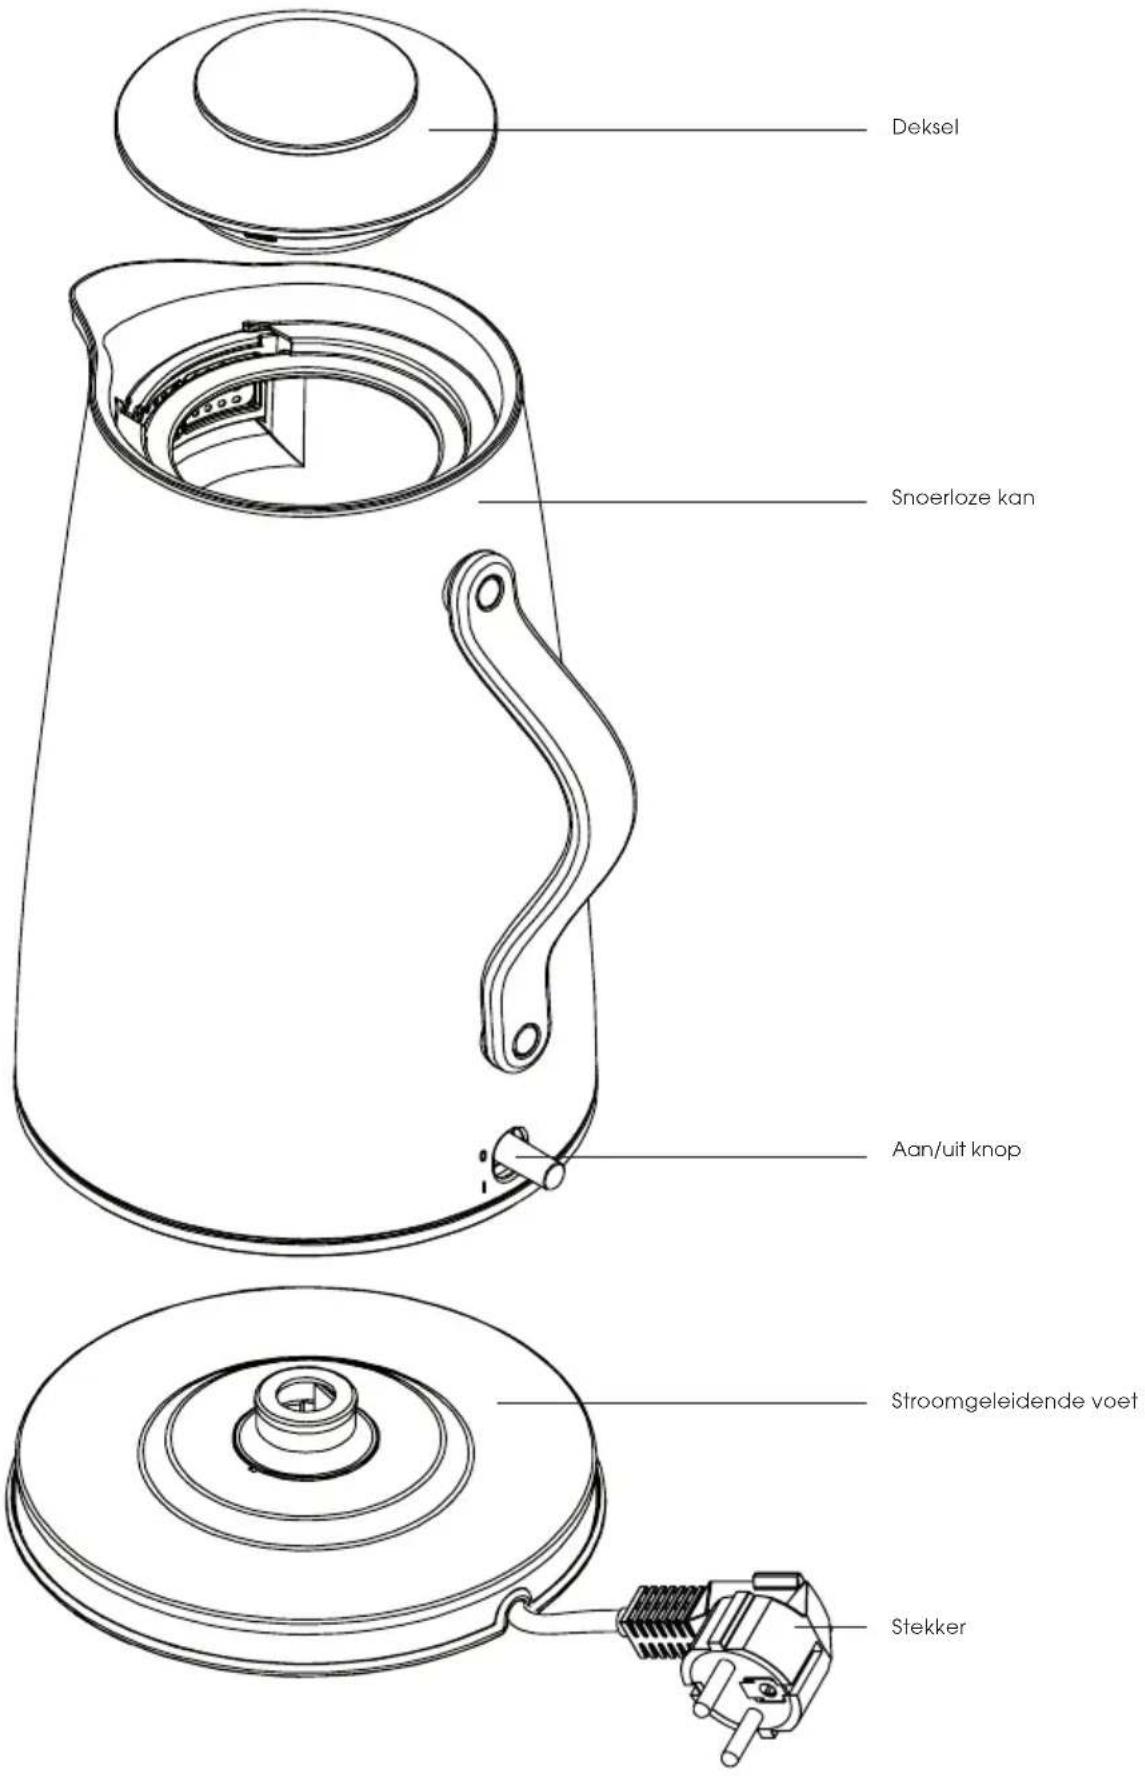
Aan/uit knop
natural_image
Line drawing of a hand holding a tool near a wall with a smiley face, next to an electrical outlet (no text or symbols)Afbeelding 4
natural_image
Diagram of a kitchen appliance showing a drain with a gridded lid and an upward arrow indicating motion (no text or symbols)Afbeelding 5a
natural_image
Line drawing of hands using a tool to adjust or install a component on a surface (no text or symbols)Afbeelding 5b
natural_image
Technical line drawing of a mechanical component with no visible text or symbolsImage 2
natural_image
Line drawing of a curved mechanical component with a looped end and attached cable (no text or symbols)Image 3
Bouton Marche/Arrêt
natural_image
Line drawing of a hand holding a tool near a wall with a smiley face, next to an electrical outlet (no text or symbols)Image 4
natural_image
Diagram of a kitchen appliance showing a drain with a gridded lid and an upward arrow indicating motion (no text or symbols)Image 5a
natural_image
Line drawing of hands using a tool to adjust or install a component on a surface (no text or symbols)Image 5b
natural_image
Technical line drawing of a mechanical component with no visible text or symbolsnatural_image
Line drawing of a curved mechanical component with a looped end and attached cable (no text or symbols)natural_image
Line drawing of a hand holding a tool near a wall with a smiley face, next to an electrical outlet (no text or symbols)
natural_image
Diagram of a kitchen appliance showing a drain with a gridded lid and an upward arrow indicating motion (no text or symbols)natural_image
Line drawing of hands using a tool to adjust or install a component on a surface (no text or symbols)natural_image
Technical line drawing of a mechanical component with no visible text or symbolsnatural_image
Line drawing of a curved mechanical component with a loop and attached cable (no text or symbols)Fig. 3 Taend/sluk knap
natural_image
Line drawing of a hand holding a tool near a wall with a smiley face, next to an electrical outlet (no text or symbols)natural_image
Diagram of a kitchen appliance showing a drain with a gridded lid and an upward arrow indicating motion (no text or symbols)natural_image
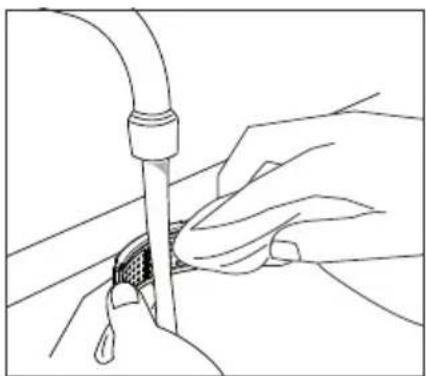
Line drawing of hands using a tool to adjust or install a component on a surface (no text or symbols)Fig. 5b Brug en opvaskebørste eller klud og varmt vand til at rense filteret for kalkrester.
Instruktion
natural_image
Diagram of a mechanical component with internal curved lines and a directional arrow (no text or symbols)Εικόνα 2
natural_image
Line drawing of a curved pipe or tube with a looped end, showing a small protrusion and a straight line extending from it (no text or symbols)Εικόνα 3
Διακόπτης on/off
natural_image
Line drawing of a hand holding a tool near a wall-mounted power outlet (no text or symbols)Εικόνα 4
natural_image
Diagram of a kitchen appliance with a drain cover and lid, showing internal components and an upward arrow (no text or symbols)Εικόνα 5a
natural_image
Line drawing of hands using a tool to adjust or install a component on a pipe (no text or symbols)Εικόνα 5b
natural_image
Technical line drawing of a mechanical component with no visible text or symbolsImagen 2
natural_image
Line drawing of a curved mechanical component with a looped end and attached cable (no text or symbols)Imagen 3
Botón de encendido
natural_image
Line drawing of a hand holding a tool near a wall with a smiley face, next to an electrical outlet (no text or symbols)Imagen 4
natural_image
Diagram of a kitchen appliance showing a drain with a gridded lid and an upward arrow indicating motion (no text or symbols)Imagen 5a
natural_image
Line drawing of hands using a tool to adjust or install a component on a surface (no text or symbols)Imagen 5b
natural_image
Technical line drawing of a mechanical component with no visible text or symbolsKuva 2
natural_image
Line drawing of a curved mechanical component with a looped end and attached cable (no text or symbols)Kuva 3
On/off-kytkin
natural_image
Line drawing of a hand holding a tool near a wall with a smiley face, next to an electrical outlet (no text or symbols)Kuva 4
natural_image
Diagram of a kitchen appliance showing a drain with a gridded lid and an upward arrow indicating motion (no text or symbols)Kuva 5a
natural_image
Line drawing of hands using a tool to adjust or install a component on a surface (no text or symbols)Kuva 5b
natural_image
Technical line drawing of a mechanical component with no visible text or symbolsImmagine 2
natural_image
Line drawing of a curved mechanical component with a looped end and attached cable (no text or symbols)Immagine 3
natural_image
Line drawing of a hand holding a tool near a wall with a smiley face, next to an electrical outlet (no text or symbols)Immagine 4
natural_image
Diagram of a kitchen appliance showing a drain with a gridded lid and an upward arrow indicating motion (no text or symbols)Immagine 5a
natural_image
Line drawing of hands using a tool to adjust or install a component on a surface (no text or symbols)Immagine 5b
natural_image
Technical line drawing of a mechanical component with no visible text or symbolsMynd 2
natural_image
Line drawing of a curved mechanical component with a looped end and attached cable (no text or symbols)Mynd 3
natural_image
Line drawing of a hand holding a tool near a wall with a smiley face, next to an electrical outlet (no text or symbols)Mynd 4
natural_image
Diagram of a kitchen appliance showing a drain with a gridded lid and an upward arrow indicating motion (no text or symbols)Mynd 5a
natural_image
Line drawing of hands using a tool to adjust or install a component on a surface (no text or symbols)Mynd 5b
natural_image
Technical line drawing of a mechanical component with no visible text or symbolsAsseq tulleq
natural_image
Line drawing of a curved mechanical component with a looped end and attached cable (no text or symbols)Assit pingajuat
Ikiguk/qamiguk toortagaq
- Ikittartoq qalatitsivik kissaalerluni aallartippat
- Imermik imaqarani qalatitsinissamut qularnaveeqqusigaq. Qalatitsivik innaallagissamoortoq kiisalu quillia nammineerlutik qamissapput erngup 100 gradi kissassuseq tikippagu imaluunnit qalatitsivik imaqarani qalatitsiniarpat.
natural_image
Line drawing of a hand holding a tool near a wall with a smiley face, next to an electrical outlet (no text or symbols)Assit sisamaat
Innaallagissamut atanera amujuk qalatitsivik atunngippat.

natural_image
Diagram of a kitchen appliance showing a drain with a gridded lid and an upward arrow indicating motion (no text or symbols)Assit tallimaat 5a
natural_image
Line drawing of hands using a tool to adjust or install a component on a surface (no text or symbols)Assit tallimaat 5b
natural_image
Technical line drawing of a mechanical component with no visible text or symbolsFiguur 2
natural_image
Line drawing of a curved mechanical component with a looped end and attached cable (no text or symbols)Figuur 3
Aan/uit-knop
natural_image
Line drawing of a hand holding a tool near a wall with a smiley face, next to an electrical outlet (no text or symbols)Figuur 4
natural_image
Diagram of a kitchen appliance showing a drain with a gridded lid and an upward arrow indicating motion (no text or symbols)Figuur 5a
natural_image
Line drawing of hands using a tool to adjust or install a component on a surface (no text or symbols)Figuur 5b
natural_image
Technical line drawing of a mechanical component with no visible text or symbolsFigur 2
natural_image
Line drawing of a curved mechanical component with a looped end and attached cable (no text or symbols)Figur 3
På/av-knapp
- Lyser när vannkokeren er tent
- Med tørrkokingssikring. Vannkokeren og lampen slukker automatisk när vannet när kokepunktet (100 °C) eller hvis vannkokeren kokes tørr for vann

natural_image
Line drawing of a hand holding a tool near a wall with a smiley face, next to an electrical outlet (no text or symbols)Figur 4
Ta støpselet ut av stikkontakten när vannkokeren ikke er i bruk.

natural_image
Diagram of a kitchen appliance showing a drain with a gridded lid and an upward arrow indicating motion (no text or symbols)Figur 5a
natural_image
Line drawing of hands using a tool to adjust or install a component on a surface (no text or symbols)Figur 5b
natural_image
Diagram of a mechanical component with internal curved lines and a directional arrow (no text or symbols)Ilustracja 2
natural_image
Technical line drawing of a curved mechanical component with a looped end (no text or symbols)Ilustracja 3
natural_image
Line drawing of a hand holding a tool near a wall with a smiley face, next to an electrical outlet (no text or symbols)Ilustracja 4
natural_image
Diagram of a kitchen appliance showing a drain with a gridded lid and an upward arrow indicating motion (no text or symbols)Ilustracja 5a
natural_image
Line drawing of hands using a tool to adjust or install a component on a surface (no text or symbols)Ilustracja 5b
natural_image
Technical line drawing of a mechanical component with no visible text or symbolsBild 2
natural_image
Line drawing of a curved mechanical component with a looped end and attached cable (no text or symbols)Bild 3
På/Av-knapp
natural_image
Line drawing of a hand holding a tool near a wall with a smiley face, next to an electrical outlet (no text or symbols)Bild 4
natural_image
Diagram of a kitchen appliance showing a drain with a gridded lid and an upward arrow indicating motion (no text or symbols)Bild 5a
natural_image
Line drawing of hands using a tool to adjust or install a component on a surface (no text or symbols)Bild 5b
natural_image
Technical line drawing of a mechanical component with no visible text or symbolsImage 2
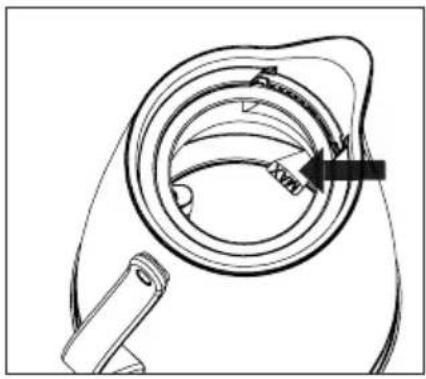
Fill with water only up to the MAX mark for 1.2L.
- Cordless kettle
- Heat-insulated, double-walled steel jug
- Jug in stainless steel
natural_image
Line drawing of a curved mechanical component with a looped end and attached cable (no text or symbols)Image 3
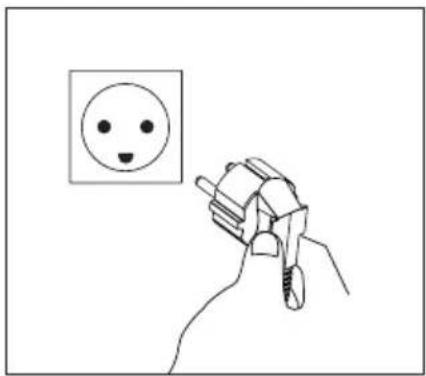
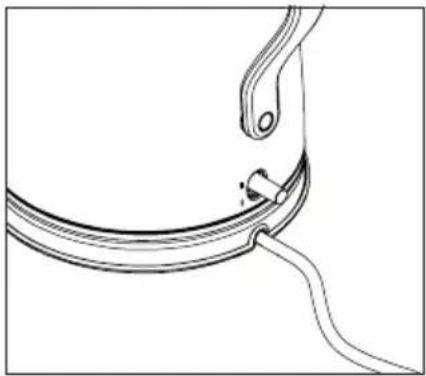
On/off switch
• Lights up when kettle is on
- With dry-boil protection. The electric kettle and light turn off automatically when the water reaches boiling point (100 °C) or if the kettle boils dry of water.

natural_image
Line drawing of a hand holding a tool near a wall with a smiley face, next to an electrical outlet (no text or symbols)Image 4
Unplug when the kettle is not in use.
natural_image
Diagram of a kitchen appliance showing a drain with a gridded lid and an upward arrow indicating motion (no text or symbols)Image 5a
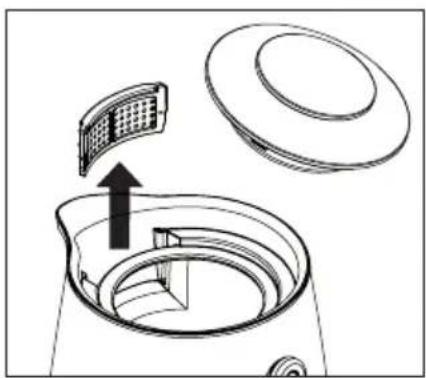
Descaling the filter. Take the top of the filter and pull up carefully.
natural_image
Line drawing of hands using a tool to adjust or install a component on a surface (no text or symbols)Image 5b
Use a washing-up brush or cloth and hot water to clean the filter for limescale.
Instructions
The steel jug can be placed on the base from all angles. Keep the cord as short as possible. Any excess cord should be rolled up under the base.
IMPORTANT: Before filling the kettle with water, remove from base. Only fill up to the steel jug's MAX mark on 1.2 L (see image 2) and push the lid firmly in place.
WARNING: If the electric kettle is filled above the MAX mark see image 2), boiling water may spray out of the kettle when in use.
The firststtime the electric kettle is used, water should be boiled three times in the kettle before drinking. This ensures that any minor impurities from production are removed.
The electric kettle is switched on using the on/off switch under the handle (see image 2).
When the water boils (100 °C), the electric kettle automatically switches off and the light goes off. To boil more water, the switch needs to be switched on again. The automatic dry-boil protection prevents accidental boiling when the steel jug is placed back on the base after pouring. Always unplug when the kettle is not in use.
IMPORTANT: Always check the lid is securely in place before switching the kettle on. The lid will click when pressed into place. If the lid is not clicked into place, the kettle's automatic dry-boil protection will not work optimally. The kettle must not be used without a lid as there is a risk of boiling water spraying out. Should any irregularities occur with the dry-boil protection, such as the kettle switching off before reaching 100 °C or after, leave the kettle to cool; see section on maintenance.
Dry-boil protection
The electric kettle has an inbuilt dry-boil protection, which means the heat element disconnects automatically if the kettle has limescale, if it is switched on without water in it, or if it boils dry. Should this happen, check whether there is a build-up of limescale at the bottom of the kettle and then descale as required. Test the kettle by filling with water and plugging the apparatus in. If the electric kettle continues to disconnect before boiling point, take the kettle and base to the dealer you bought it from for an inspection.
Maintenance
Descaling the filter
The electric kettle is supplied with a removable limescale filter, which is placed in the spout. The filter prevents limescale sediment in the water from pouring into the cup. It is important to clean the limescale filter before too much limescale builds up as otherwise the water cannot pass through the filter and will instead pour out along the sides of the lid, which increases the risk of scolding.
The filter is easily removed from the steel jug by pulling it upwards. Any limescale on the filter can be brushed off under running water with a washing-up brush or cloth. Alternatively soak the filter in household vinegar or descaling fluid. After cleaning with clean water, secure the filter back in its place.
Cleaning the jug
Wipe the outside of the jug with water and detergent using a soft, damp cloth. Dry using a soft cloth or tea towel. Never use scouring powder or other cleaning agents with an abrasive effect, as this will scratch the surface.
Descaling the kettle
The electric kettle must be descaled regularly and cleaned from limescale sediment:
Normal maintenance. Check weekly that the kettle does not have a limescale build-up. We recommend only boiling as much water as is needed. You then avoid water being left in the kettle, which increases the amount of limescale sediment. You also save electricity.
Descale as required. Use one of the following methods:
- Method 1: To remove mild limescale sediment, once a week fill with clear household vinegar until it covers the bottom of the steel jug. Leave the steel jug for a couple of hours, empty and rinse well. Tip: the descaling process is accelerated by heating the liquid to 50 - 60^ .
- Method 2: To remove tough limescale sediment, fill with 0.25L clear household vinegar and 0.75L water. Switch on the kettle and let it boil. Leave it to cool for 15 minutes, then boil again twice.
Once cleaned, boil water in the kettle another three times before drinking. This ensures that any remnants of the descaling liquid are removed from the kettle.
If limescale still remains after descaling, make sure the kettle is descaled more frequently.
IMPORTANT: Only use descaling fluid and household vinegar to descale the kettle. Never use sharp objects to clean or descale the heat plate at the bottom of the steel jug. If the jug is not descaled regularly, it can lead to the heat element or the jug becoming damaged. This type of damage is not covered by the guarantee.
SAFETY
Read the instructions thoroughly before use and store them for later use.
Connect the Emma electric kettle to 220-240 V and only use the kettle for boiling water.
The electric kettle is for household use only, not commercial use (e.g. in an industrial kitchen). Should the kettle be used for other purposes, or should the kettle not be used in accordance with the instructions, the user shall bear full responsibility for any consequences. The right to complain as a result shall not cover any damage to the kettle or personal injury.
Always use the kettle under supervision.
Never switch the kettle on without water.
Before filling the kettle with water, remove from base.
Never fill with more water than to the jug's MAX mark (see image 2).
WARNING: If the electric kettle is overfilled, the boiling water can spray out when the kettle is in use.
WARNING: Risk of scolding. Hot steam and boiling water can lead to scolding. Never open the lid when the kettle is in use and take care when pouring out water.
The kettle can only be used with the associated base.
When cleaning and maintaining the kettle, always unplug it from the socket.
To avoid scolding, personal injury or electric shock, never immerse any of the kettle's parts (with the exception of the limescale filter) in water or other fluids.
Never use the kettle outside.
The kettle can be placed on a flat, stable surface such as a kitchen table.
Never put the kettle on or near hot plates, open fire or similar.
Hold the kettle by the handle, do not touch hot surfaces.
The cord should never hang loose from the table edge or lie on a hot surface.
The kettle and cord should be placed a sensible distance from cookers and other heat sources.
IMPORTANT: The kettle must only be used by children over 8 years old and by people with limited physical, mental or sensory abilities or lack of knowledge of the product following instruction on sensible use of the kettle and the risks associated with it. Instruction must be provided by the person responsible for their safety and they must be supervised at all times. Children must be supervised to ensure they do not play with the kettle or use it irresponsibly. Children are often incapable of assessing risks and noticing dangerous situations.
Children should only clean and maintain the product if they are 8 years or older and under adult supervision.
Unplug the kettle and make sure the kettle has cooled before cleaning or maintaining.
Never use the kettle if parts of the kettle are damaged. To avoid dangerous situations, always check the kettle, handle, cord and plug for damage before use. Within the warranty period and in accordance with applicable legislation, the damaged element will be repaired or replaced by the manufacturer, the manufacturer's service workshop or by similar qualified staff. If elements other than those from the manufacturer are used, fire, personal injury or other dangers may occur.
Complaints
You have the right to complain in accordance with legislation. A machine-stamped till receipt with the purchase date must be provided for complaints. For complaints, the kettle must be returned to the place it was purchased.
Stelton A/S
Christianshavns Kanal 4
1406 Copenhagen K
Denmark
www.stelton.com
Disposing of the electric kettle

Legislation requires that the electric and electronic apparatus and parts of it are recycled. Electric and electronic apparatus, marked with the disposal symbol, must be disposed of at a communal recycling plant.
Technical data
Emma electric kettle
Cordless kettle
Freestanding 360° base with cord
With dry-boil protection
220-240 V
50/60 HZ
Power: 1850–2200 W
Volume: 1.2 L


The right to ongoing changes and improvements is reserved.
The Emma collection
designed by HolmbäckNordentoft
natural_image
Black-and-white still life photo of white ceramic vases and a cylindrical object, no text or symbols visible