Comfort 2923 - Pan Alde - Free user manual and instructions
Find the device manual for free Comfort 2923 Alde in PDF.

| Product type | Gas oil boiler for caravan/motorhome |
| Brand | Alde |
| Model | Comfort 2923 |
| Main fuel | Butane/propane gas (28 mbar butane, 37 mbar propane) |
| Electrical supply | 12 V DC (circulation pump); 230 V AC optional (electric cartridge) |
| Power | 6.1 kW |
| Gas consumption | Max 465 g/h |
| Liquid volume (glycol water) | 2.61 L |
| Boiler temperature range | 35-75 °C |
| Main functions | Hydronic heating, integrated water heater (7 L), external start possible |
| Control panel | Temperature regulator, pump switch (12/230 V), 1 A fuse, 12 V DC socket |
| Routine maintenance | Check liquid level in expansion tank, change liquid every 2 years |
| Cleaning | Clean ventilation grilles, check tightness of gas connections |
| Safety | Overheat protection (electric cartridge), automatic restart, fuse |
| Spare parts | Original Alde parts recommended |
| General information | CE approved for caravans and motorhomes |
Frequently Asked Questions - Comfort 2923 Alde
User questions about Comfort 2923 Alde
0 question about this device. Answer the ones you know or ask your own.
Ask a new question about this device
Download the instructions for your Pan in PDF format for free! Find your manual Comfort 2923 - Alde and take your electronic device back in hand. On this page are published all the documents necessary for the use of your device. Comfort 2923 by Alde.
USER MANUAL Comfort 2923 Alde
natural_image
Vertical cylindrical device with metallic fittings and a central control panel (no visible text or symbols)

Bruksanvisning – Comfort 2923

A. Chimney pipe
B. Level mark for glycol liquid CoverC.
D. Boiler thermostat
E. Water jacket
F. Overheating protection
G. Flame damper Ventilation ductH.
I. Burner
J. Inlet funnel
K. Window
L. Control panel
M. Expansion vessel
N. Circulation pump
NL
FI
How the boiler is constructed 131.
Technical data 131:1
How the boiler works 132.
The functions of the control panel 132:1
Starting the LPG boiler 142:2
Shutting down the LPG boiler 142:3
Setting for maximum comfort 142:4
Setting the room temperature 142:5
Circulation pump 142:6
Electrical heating 142:7
External start 143.
Water heater 154.
Maintenance of the heating system 155.
Bleeding the heating system 155:1
Useful facts about LPG 156.
Troubleshooting 167.
Guarantee 168.
Read these instructions carefully before you use the boiler. The instructions for use are approved in accordance with CE no. 048AO-0006 for LPG boiler type 2923.
Data plate and production number are located inside the metal shell beside the expansion vessel.
1. HOW THE BOILER IS CONSTRUCTED
The boiler operates with what is known as constant temperature, i.e. there is always heated liquid in the boiler to circulate in the system when the room thermostat calls for heat. In other words there is no time lag when heat is most needed.
There is an inlet pipe in the bottom of the boiler which leads air to the combustion chamber. The gas valve and the burner assembly are attached to an easily removable plate screwed to the combustion chamber at the bottom of the boiler. The water jacket, which consists of an inner and an outer pipe, is located above the combustion chamber. The space between these pipes constitutes the reservoir. Inside the inner pipe there is a flame damper which consists of a folded sheet of metal. Its task is to convey the hot exhaust gases from the burner out towards the water jacket so that the water is heated. From the top of the water jacket, a pipe goes up to the expansion vessel. In the expansion vessel there is a 12-volt pump which circulates the heated liquid in the system. On the front of the boiler is the control panel with thermostat knob, cut-out, power intake and change-over switch. At the top of the boiler there is a terminal block for making the electrical connection to the boiler. Beside the boiler, a ventilation duct is attached that takes in fresh air from outside and conveys it into the boiler but outside the combustion part itself. The fresh air is heated by the body of the boiler and convected through the ventilation grille in the front panel out into the room.
1:1 Technical data
Gas: Butane/Propane
Power: 6.7 kW
Gas consumption: Max 465 g/h
Gas pressure: 28 mbar (butane) or 37 mbar (propane).
Liquid volume (glycol water) in boiler: 2.6 litres
Liquid volume (glycol water) in
immersion heater: 1.0 l.
System temperature in the boiler: 35-75°C
2. HOW THE BOILER WORKS
When the room thermostat calls for heat, the circulation pump starts. The liquid in the system starts circulating, and cold water comes into the boiler. The sensor on the water jacket senses that the water is colder than the temperature set on the boiler thermostat. The main burner ignites and heats up the water that circulates round the system. When the heat inside the caravan has reached the temperature set on the room thermostat, the circulation pump stops. The sensor on the boiler senses that the water has reached the temperature set on the boiler thermostat. It shuts off the main burner and goes down to a pilot flame. When the water temperature has fallen a few degrees in the boiler, the main flame is lit again. In this way there is always heated water when the room thermostat calls for heat.
2:1 The functions of the control panel (fig 1)
A. Normal position for immersion heater. The heating element is controlled by the room thermostat.
B. Constant position for the immersion heater. The heating element is controlled by the immersion heater's thermostat. The changeover switch should be in this position when the water heater is in use.
C. 1000 watts power on the immersion heater.
D. 2000 watts power on the immersion heater.
E. 230-volt circulation pump on the immersion heater.
F. 12-volt circulation pump on the boiler.
G. Normal position for 12 and 230-volt circulation pumps. The selected pump starts and stops as indicated by the room thermostat.
H. Constant position for 12 and 230-volt circulation pumps. The pump runs constantly and the room temperature is regulated by the boiler's thermostat knob, in that the boiler's system temperature is adjustable. The constant position uses for example when there are many persons in the caravan. If one sits near the room thermostat it can switch the circulation pump off, with cold areas near the windows and floor as a result. In this position the pump is constantly on and coldness is avoided.
I. Cut-out 1 A fuse.
J. Power intake 12 V DC auxiliary sockel (used for external start etc. See chpt 3:0).
K. Warning light for ignition spark.
L. Thermostat knob.
Starting the LPG boiler2:2
Open the regulator and service tap for the LPG.1. Turn the thermostat knob to ignition position (see 2. fig 2). The indicator light for the ignition spark starts flashing.
Press the thermostat knob down as far as it will go. 3. Hold it down for about 15 seconds after the indicator light has gone out. (The boiler has ignited as soon as the warning light goes out, but in order for the ignition safety cut-out to remain open, the thermostat knob must be held down for the necessary period).
Release the thermostat knob.4.
Turn it to operating position and set the desired tem-5. perature (see chpt 2:4).
If the indicator light starts flashing immediately after 6. the thermostat knob has been released the boiler has not ignited. Press the thermostat knob down again and repeat the starting procedure as above, but hold it down a little longer.
You can also check through the window in the lower 7. front plate whether the boiler is lit.
Should the boiler go out, turn the thermostat knob to stop position (see fig 3). Wait 3 minutes and repeat the starting procedure.
The boiler is equipped with automatic reignition, which means that if it goes out for some reason, it attempts to restart for about 20 seconds (until the safety cut-out has cut the gas supply). Should the gas run out while the boiler is in operation, the warning light will start flashing and continue on until the boiler is shut down or restarted.
Shutting down the LPG boiler2:3
Turn the thermostat knob clockwise to stop position 1. (see fig 3). After about 20 seconds, a click should be heard from the gas valve, which means that the safety cut-out has closed.
Stop the circulation pump on the control panel.2.
Close the service tap for the LPG.3.
NB. When the boiler has gone out, it must not be reignited until 3 minutes have elapsed.
2:4 Setting for maximum comfort
For maximum comfort and economy, it is important to set the right water temperature in the system. At low outside temperatures, a higher water temperature is required than at more normal temperatures. The ideal setting on the thermostat knob is when the circulation pump runs about 75% of the time.
When heating a very cold boiler, the thermostat knob should not be set to maximum temperature immediately, but at an intermediate position for the first 10 minutes. The various figures on the thermostat knob represent the number of degrees of the water temperature in the boiler as per fig 4.
When it is extremely cold, the gas boiler and the immersion heater can be run at the same time. This means that maximum power is obtained from the heating system.
When the heating system is used at a high altitude, the boiling point of the liquid mixture changes. In this case the system temperature should be lowered as per fig 5. In order to utilize the principle of water-born heat in the best possible way, it is important that air can pass freely under beds and behind back cushions. If the caravan has a fitted carpet, for example, ensure that the carpet does not cover the intake hole for the convectors. It is equally important that the cushions and blankets do not prevent air circulation behind the back cushions.
2:5 Setting the room temperature
The temperature required inside the caravan should be set on the knob of the room thermostat, which is graduated between 5 and 30 °C.
2:6 Circulation pump
In order to make the heated glycol water circulate, some form of pump is required. In the expansion vessel of the LPG boiler a 12-volt circulation pump is fitted as standard. The boiler can also be equipped with an immersion heater with a 230-volt circulation pump. The choice of which pump to use, and whether it is to run constantly or be interrupted by the room thermostat, is made on the boiler's control panel.
2:7 Electrical heating
If the immersion heater is fitted on the boiler it can only be used if you have access to 230 volts \~. The power output is 1000 and 2000 watts respectively. Choice of power is made on the boiler's control panel.
Inside the immersion heater's protective cover, there are two thermostats. One ensures that the immersion heater maintains an operating temperature of around 80 ^ C while the other acts as overheating protection, which cuts the current automatically if the immersion heater boils for some reason. If the overheating protection triggers, it can be reset by pressing in the overheat reset button on the side of the immersion heater (see fig 6A). Make sure that textiles and other inflammable material cannot come into contact with the immersion heater.
NB. All electrical work on the immersion heater must be performed by an authorized person.
3. EXTERNAL START
(applies only if the immersion heater is fitted).
Do you want the caravan to be heated when you arrive? If so, your neighbour or the warden can start the heating without having to enter the caravan. However, your boiler must be fitted with an immersion heater and there must be a battery eliminator (art. no. 2921 520) connected to the boiler.
How to perform an external start:
- Plug the battery eliminator into a 230-volt socket.
-
Plug the 12-volt contact into the power intake on the boiler's control panel (see fig 1 J).
Select power and circulation pump on the control 3. panel. -
Switch off the main switch in the caravan.
GB
Disconnect the 230-volt cable from the external 5. power supply.
When you want the heating to start up, reconnect the 6.230-volt cable. The immersion heater and the circulation pump will then start up thanks to the battery eliminator transforming down the voltage to 12 volts.
WATER HEATER4.
The LPG boiler can be equipped with a stainless steel water heater, with a volume of 7 litres of stored fresh water. A maximum capacity of about 12.5 litres of hot water at 40 °C can be obtained.
When the water heater is to be used, the LPG boiler should be started about 20 minutes in advance, and run at maximum boiler temperature to obtain the maximum amount of hot water. If an immersion heater is used instead of gas, the heating period is longer.
Always flush out the water heater before it is used, particularly when it has not been used for a some time.
NB. Although the water heater is protected against frost, fresh water in the heater must always be drained out when there is risk of frost and the vehicle is not in use.
Drain the heater like this:
Empty the fresh water tank. Open the drain cock on the water pipe (fig 6 b), and the air screw (fig 6 c) on the heater and empty out the water in the heater. If there is no drain cock, release the hose from the nipple on the heater instead. Allow it to stand like this until you use the vehicle again.
If the vehicle is equipped with a pressure-controlled pump, it must be switched on. Drain the fresh watertank. Open the water taps and empty the fresh water system. Switch off the pump. Open the drain cock on the water pipe (fig 6 b), and the air screw (fig 6 c) on the heater and leave taps open. Allow it to stand like this until the vehicle is to be used again.
Check regularly the level of liquid for the heating system in the boiler's expansion vessel. The level should be about 1 cm above the min. line when the boiler is cold. The system should be filled with a 40% glycol mixture of the same type as used in car engines (not diesel). If the heating system is exposed to temperatures lower than -25°C, the glycol content should be raised, but must not exceed 50%. The percentageglycol content should be checked before more liquid is added. This is to prevent an excessive concentration of glycol in the mixture. The glycol mixture should be replaced every other year, as its properties, such as corrosion protection, deteriorate.
Never let the heating system stand without the glycol, water liquid.
If the liquid level in the expansion vessel falls for reasons other than pure evaporation, check that all joints, the drain cock and air screws are tight. If glycol water has leaked out, rinse with water and mop up.
Don't forget to check the gas system regularly to ensure that connections and hoses are not leaking.
LPG hoses should be replaced every other year as they dry out and crack, which may give rise to leakage.
Topping up with liquid:
Make sure that the caravan is parked horizontally before topping up, so that no air pockets can be formed. Check that air screws and the drain cock are closed. Remove the upper front cover (see fig 7) pull it upwards, the bottom outwards and then downwards. Release the nut on the expansion vessel and lift up the pump. Pour in the glycol mixture slowly.
NB. Alcohol must not be used as anti-freeze.
Radiator cement must not be mixed in the system.
Bleeding the heating system5:1
When filling the system, air pockets may form, depending on how the system was installed. A sign that there is air in the system is when the heat will only travel a few metres along the radiator system from the boiler, even though the circulation pump is running.
Bleed the system like this:
The boiler should be running and the circulation pump off. Start by opening the air screws. Leave them open until water comes out of nozzle. Start the circulation pump and allow it to run for a while. Feel the pipes and radiators in the vehicle to see it they are getting warm.
If it is hard to get the air out of the system, you can do as follows:
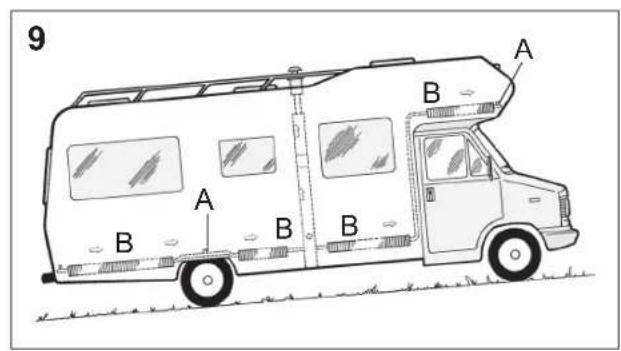
Stop the circulation pump. Roll down the support wheel as far as it goes, so the caravan lean forwards at the front or park it on a downhill slope (see fig 8). Allow it to stand a few minutes so that the air gets to the top of the system. Open the air screw at the highest point and leave it open until the air has come out. Then roll up the support wheel to maximum or park it on a upphill slope and repeat the procedure in this position (see fig 9). Place the caravan on the level and start the circulation pump. When flow and return pipes are almost the same temperature, the system is free of air. When the system has just been filled, small air bubbles may form in the expansion vessel. Stop the circulation pump for a few seconds and they usually disappear.
Figs 8-9 A. Air screw B. Air
USEFUL FACTS ABOUT LPG6.
LPG is a petroleum product and the letters stand for Liquefied Petroleum Gas. It is available as propane and butane. Propane has the advantage that it is gaseous down to -40°C, while butane works unsatisfactorily below 10°C. That is why propane is the most suitable type.
When the cylinder valve is opened, the LPG liquid is released as a gas. When LPG burns, carbon dioxide (CO_2) and water vapour only are emitted, just like in the air we breathe out. In order for combustion to be complete, a good air supply is required. LPG is very environment
friendly and does not generate soot on complete combustion. It can be stored in cylinders for any length of time without its quality deteriorating. LPG is entirely free of poisonous substances.
The risk with gas is that leaking gas is ignited, resulting in an explosion. As LPG has no distinct aroma, sulphur compounds are added that give a distinct, pungent smell, even when the concentration of gas is as low as one fifth of the lower explosion limit. The LPG burner usually works at a lower pressure than the pressure in the cylinder. Low pressure is obtained by allowing the LPG to pass through a regulator.
TROUBLESHOOTING7.
Here is a brief troubleshooting chart that may be of help in the event of simple faults.
The ignition spark comes but the boiler does not start
Check gas supply.1.
Is the service tap fully open?2.
If the boiler has been out of use for a while or if the 3. gas cylinder has been changed, it takes longer to ignite than normal.
The thermostat knob must be pushed down as far as 4. it will go when starting.
If this does not help, contact your service workshop.5.
No ignition spark
Check that there is a 12-volt supply to the boiler.1.
Check the fuse on the boiler is intact.2.
Check that the warning light for the ignition spark is 3. flashing.
Remove the lower front cover. Check that the cables 4. to the ignition transformer (small black box just under the control panel) and the microswitch (under the thermostat) are properly attached and that there is no corrosion on the cable clips.
If this does not help, contact your service workshop.5.
The boiler ignites but goes out when the thermostat knob is released
Repeat the ignition procedure as per instructions in 1. chapter 2:2 (wait 3 minutes before igniting the boiler again). Make sure that the thermostat knob is pushed down as far as it will go and hold it in position for 20-30 seconds after the warning light has gone out.
Check that the pilot flame comes into contact with 2. the tip of the thermoelement (to the right of the pilot burner).
If this does not help, contact your service workshop.3.
The boiler boils
Turn the thermostat knob to 1 (lowest system tem-1. perature) and check that the main flame goes out, as it should.
Check that the sensor is secured correctly. It should 2. be attached to the body of the boiler by a spring clip just under the control box with heat-conducting putty in between.
If this does not help, contact your service workshop.3.
Vibrations in the circulation pump (12-volt)
Release the nut holding the circulation pump.1.
-
Turn the pump a little and tighten up the nut again.
-
Check that the rubber connection between the motor and the shaft is straight and does not wobble when in motion.
Check that there is no obstruction in the way of the 4. pump at the bottom of the expansion vessel. If this does not help, contact your service workshop.5.
Circulation pump (12-volt) will not start
-
Check that the slider on the room thermostat is in "ON" position.
-
Check that the temperature shown on the room thermostat is higher than inside the caravan.
-
Check that the changeover switch on the control panel for the circulation pump is on "12-volt pump".
-
Remove the circulation pump and check that the cables are properly secured, and that there is a 12-volt supply.
If this does not help, contact your service workshop.5.
Incorrect temperature on the room thermostat
- Check by using an accurate thermometer inside the caravan.
Remove the cover from the room thermostat (press 2. in the pin on the left-hand side and pull the cover straight out).
-
Pull out the knob and move it as many degrees up or down as it indicated wrongly, and press it into place again.
-
Replace the cover and check that the temperature agrees with the scale on the room thermostat.
The immersion heater has stopped working
-
Check that there is power (230 volts) in the wall socket.
-
Check that the relays on the immersion heater switch on (a gentle click should be heard).
Check whether the overheating protection has trigg-3. ered. If so, press in the button on the side of the cover.
- If this does not help, contact the service workshop.
Insufficient hot water
- Check that boiler thermostat is set on maximum position.
8. GUARANTEE
Alde International's guarantee applies for one year from date of delivery and covers material defects and manufacturing defects only, on condition that above instructions have been adhered to.
NB! Use only original parts from Alde as spares.