ElTex 2000 - Cultivator Texas - Free user manual and instructions
Find the device manual for free ElTex 2000 Texas in PDF.
| Product type | Electric cultivator |
| Brand | Texas |
| Model | ElTex 2000 |
| Power supply | 230 V - 50 Hz |
| Power consumption | 2000 W |
| Cutting width | 450 mm |
| Maximum working depth | 260 mm |
| Sound pressure level LpA | 76.5 dB(A) |
| Sound power level LWA | 96 dB(A) |
| Vibration value anw | 2.5 m/s² |
| Weight | 31.5 kg |
| Blade speed | Approximately 140 rpm |
| Blades | Replaceable as a set (4 M6x12 screws and 4 M8 screws) |
| Safety | Safety button, emergency stop by releasing the handles |
| Maintenance | Cleaning after use, lubrication of gears, storage in a dry place |
| Included accessories | Bumper, adjustable stabilizer wheels |
| Replacement parts | Use only original parts |
Frequently Asked Questions - ElTex 2000 Texas
User questions about ElTex 2000 Texas
0 question about this device. Answer the ones you know or ask your own.
Ask a new question about this device
Download the instructions for your Cultivator in PDF format for free! Find your manual ElTex 2000 - Texas and take your electronic device back in hand. On this page are published all the documents necessary for the use of your device. ElTex 2000 by Texas.
USER MANUAL ElTex 2000 Texas
natural_image
Black and yellow manual tiller machine with articulated arm and base mount (no visible text or symbols)Advarselssymboler / Warnings Symbols / Warnzeichen / symbole ostrzegawcze
text_image
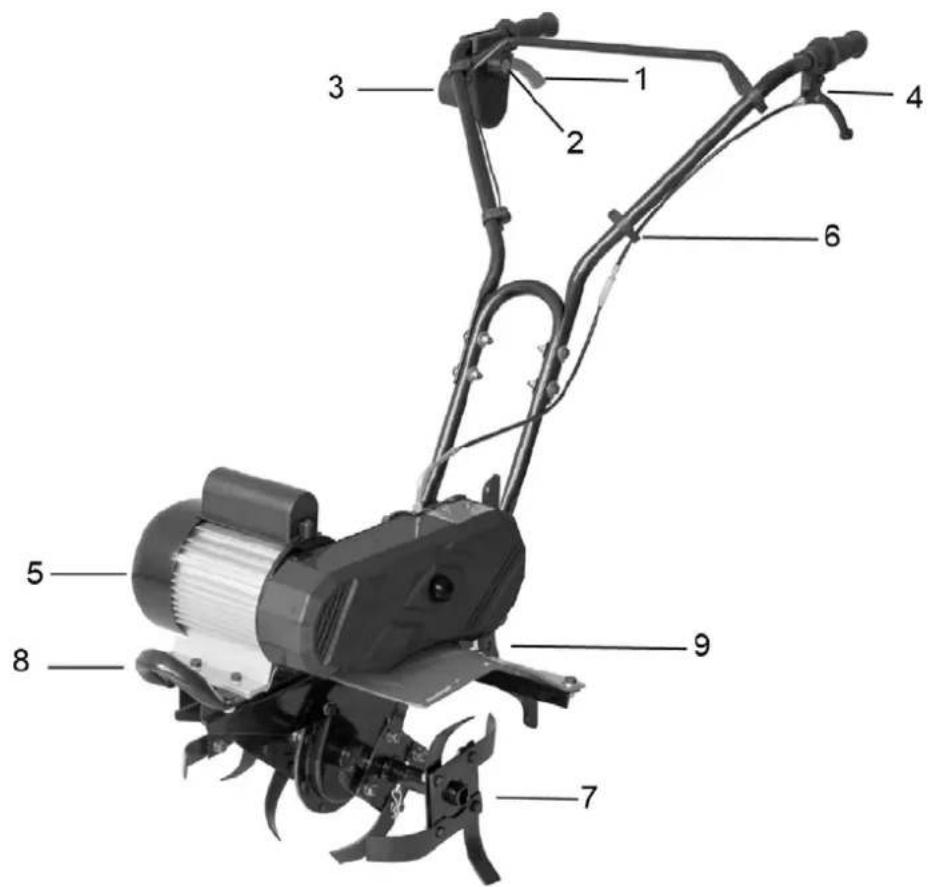
Labeled diagram of a manual tiller machine with numbered parts for identificationnatural_image
Close-up of a black handheld device with a plug and cable, no visible text or symbols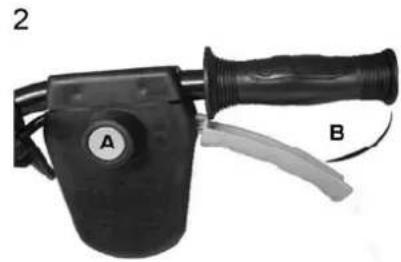
natural_image
Black manual tool with labeled parts A and B, no visible text or symbols on the device itself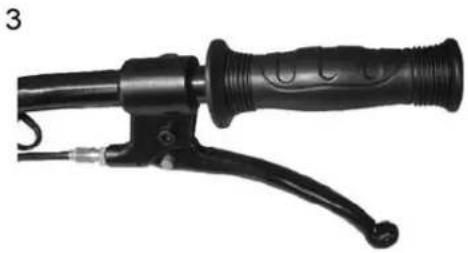
natural_image
Close-up of a black manual lever handle and grip (no text or symbols visible)text_image
6 4x M0x12 4x M67. Smøring
1. Table of Contents
- Safety precautions....9
- Identification....11
- Assembly 12
- Starting machine....13
- Blade....13
- Lubrication 14
- Maintenance and storage 14
- Troubleshooting 14
- Specifications....14
EC Certificate of conformity 42
2. Safety precautions
Setup
Do not put hands or feet near or under rotating parts.
Read this manual carefully. Make sure that you are familiar with the different controls, settings and handles of the equipment.
⚠ Know how to stop the unit and ensure that you are familiar with emergency stop.
Never allow children or people unfamiliar with these instructions to use the machine. Note, that local regulations can restrict the age of the operator.
⚠️ If you feel unwell, tired or have consumed alcohol or drugs, do not operate the machine.
Always inspect the machine before usage Ensure that no parts are worn or damaged.
⚠️ Replace worn out or damaged elements and bolts in sets to preserve balance.
The operator of the machine is responsible for people's safety.
⚠️ Never use the machine near children or animals.
The operator of the machine is held liable for any accidents or hazards to other people and their property.
Thoroughly inspect the area, where the equipment is to be used, if necessary remove any foreign objects.
⚠ Beware of hazards, while working on difficult soil hence; extremely stony or hard soil.
⚠️ Boots with non-slip soles with steel jacket is required. Avoid loose-fitting clothes.
Operation
⚠️ Always start the engine from safety zone.
Do not leave the safety zone while operating the machine, if it is necessary to leave the safety zone, turn off the engine before leaving the zone.
After striking a foreign object, stop the engine immediatel and inspect the machine thoroughly for damage. Repair the damage before continuing
If the machine should start to vibrate abnormally, stop the engine and check immediately for the cause. Vibration is generally a warning of damage.
⚠ Always disengage the levers, turn off the engine, when the unit is left unattended.
Always turn off the engine and ensure that all moving parts have come to a complete stop before making any repairs, adjustments, or inspections.
Exercise extreme caution when operating on slopes.
⚠️ Never operate the machine at a fast pace.
Do not overload machine capacity by attempting to work at too fast a rate.
Do not carry passengers.
⚠️ Never allow any bystanders in front of unit.
⚠ Always disengage the blades, if not in use.
⚠️ Only operate the machine at daylight or in fully illuminated areas
⚠ Ensure a stable foothold and always keep a firm hold on the handles. Always walk, never run.
Do not operate the equipment when barefoot or wearing sandals.
Exercise extreme caution when changing direction on slopes
By rear tillers, ensure that the blades are protected by safety shield, only the part of the blades that works into the soil must be free.
⚠️ Never attempt to make any adjustments, while the engine is running.
⚠ Use extreme caution when reversing or pulling the machine backwards
Maintenance and storage
The engine shall be stopped when carrying out maintenance and cleaning operations, when changing tools and when being transported by means other than under its own power.
Check regularly that all bolts and nuts are tightened. Retighten if necessary.
The engine must be completely cooled before storing indoors or covered.
⚠️ If the machine unused for a period of time, please refer to the instructions in this manual.
⚠️ Maintain or replace safety and instruction labels, as necessary.
Only use original spare parts or accessories. If not original parts or accessories is used, the liability is no longer applied.
⚠️ Replace faulty silencers.
Miscellaneous
The gears are delivered pre-greased. However, always ensure they are well greased before each use.
⚠ Factory-fitted control devices, such as the handle-mounted clutch cable, must not be removed or exposed.
! Ensure that the machine is properly secured when transported on a flatbed etc.
Check with your local authorities for rules on disposal of mechanical implements. Electrical products must always be handed in to a local recycling center for correct disposal.
3. Identification
text_image
Labeled diagram of a manual tiller machine with numbered parts for identification| 1. | Activation lever |
| 3. | Outlet socket 4. Clutch handle |
| 5. | Motor |
| 7. | Blades 8. Bumpe |
| 9. | Stabilizer wheel adjustment |
| Mount the lower handlebar with carriage bolts, washer, spring collar, nuts and the 2 handlebars steel bolt, washer, corrugated disc and nutsMount cable holder as shown on the handlebars. | 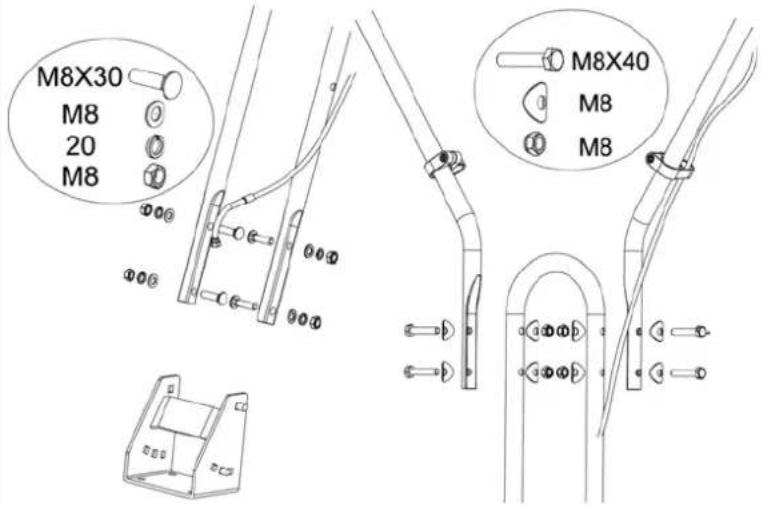 |
| Mount the rod on each side of the handlebars fix with brackets.Tighten the clutch cableTurn clockwise-Loosens cable.Turn counterclockwise- to add tension to cable. | 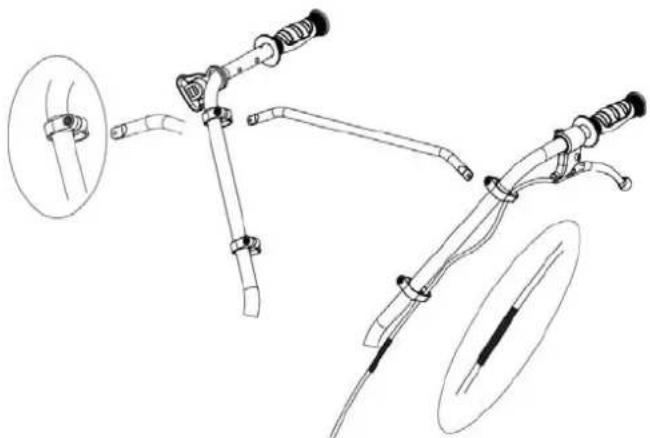 |
| Mount the bumper with steel bolts, washer, spring collar, nuts to the front of the tiller | 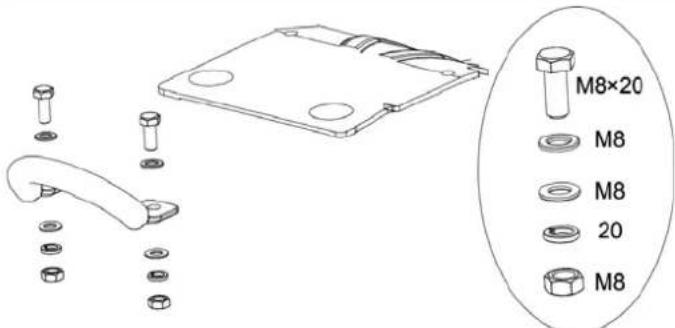 |
| Fit stabilizer wheels with cotter bolt and cotter pin. Wheels can be adjusted to level required using bolt. | 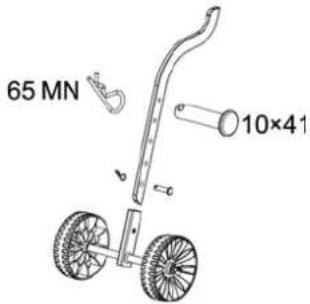 |
5. Starting machine
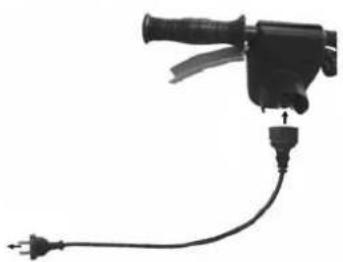
- Connect to mains electricity and ensure cable is correctly secured in cable holder.
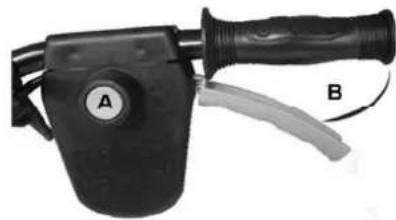
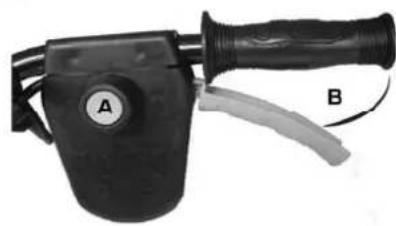
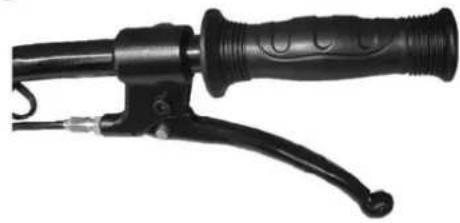
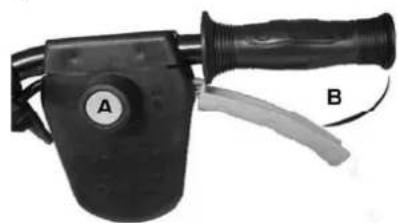
- Start machine by pressing safety button A, then pull lever B up towards handlebar. When machine starts, release button A.
- Activate the clutch lever to start the blades.
1
natural_image
Black handheld device with attached plug and power outlet (no text or symbols visible)2
natural_image
Black manual lever with labeled parts A and B, no visible text or symbols on the device itself3

natural_image
Close-up of a black manual lever handle and grip (no text or symbols visible)Stop machine by releasing both levers.
Tips
Do not start motor before machine is at area to be worked. Always hold machine securely in both hands. Check extension cable is behind you to avoid cutting it.
The blades will propel the machine forwards. Allow the blades to slowly sink into the soil. Remember to adjust the wheel yoke before use. When cutting deeply, the most effective method is to allow the blades to propel the machine forwards for an arm's length. Pull the machine back towards you. Allow it to run forwards again. Blades must always operate at maximum speed. Avoid overloading If the blades get buried, rock machine from side to side while holding it back, until it comes free.
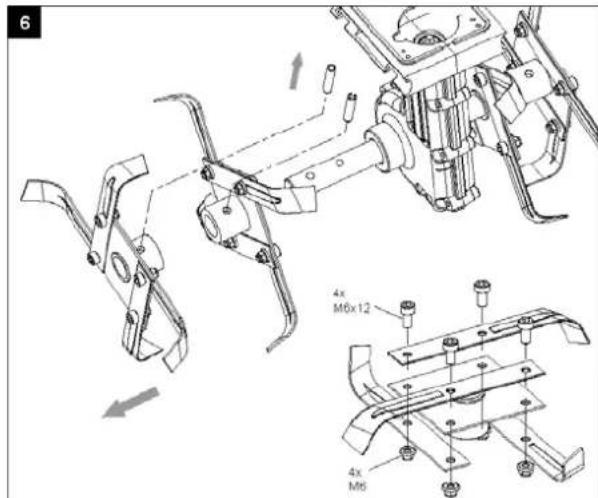
6. Blade
If the blades are worn or broken, they can be replaced. Failure to maintain the blades can cause poor results when cultivating, or overload the motor. Always wear gloves when working near the blades.
Blades can only be replaced as a set. When changing blades, remove the first split pin and the outer blade, followed by the inner split pin to remove the inner blade (fig. 6).
text_image
6 4x M6x12 4x M67. Lubrication
The gear is from the factory lubricated.
8. Maintenance and storage
Clean all grass and soil from machine after each use.
If not to be used for an extended period, coat all metal parts in grease to avoid corrosion and rust.
Use original spare parts only
9. Troubleshooting
| Problem | Issue | Solution |
| Motor will not start: No power | Power Check power supply and cables | |
| Defective safety button Contact authorized workshop | ||
| Overheating cutout activated? | a. Cut shallowerb. Remove any blockagesc. Soil too hard. Change depth and run slowly backwards and forwards several times.Do not restart for 15 min. | |
| Abnormal noise Blade st | stuck Switch off machine and allow to stop completely. Remove obstruction. | |
| No lubrication Contact authorized dealer | ||
| Loose bolts, nuts or safety equipment. | Tighten. Contact authorized workshop if noise persists | |
| Abnormal vibrations Depth | to great Replace or contact authorized workshop | |
| Depth too great Use correct depth | ||
| Poor cutting action Depth | to shallow Use correct depth | |
| Worn blade Replace or contact authorized workshop | ||
10. Specifications
| Model El-Tex 2000 | |
| Power supply 230 Volt - 50 Hz | |
| Power consumption 2000 Watt | |
| Cutting width | 450 mm |
| Max. working depth | 260 mm |
| Sound power level LpA | 75,6 dB(A) |
| Sound power level LwA | 96 dB(A) |
| Vibration Value ahw | 2,5 m/s2 |
| Weight | 31.5 kg |
| RPM | approx. 140/min. |
1. Übersicht
text_image
Labeled diagram of a manual tiller machine with numbered parts for identificationnatural_image
Black handheld device with attached cable and plug, isolated on white background (no text or symbols)2

natural_image
Black manual lever with handle and labeled component A and B (no text or symbols on the lever itself)3

natural_image
Close-up of a black bicycle brake lever handle and grip (no text or symbols visible)text_image
6 4x M0x12 4x M57. Schmierung
text_image
Labeled diagram of a manual tiller machine with numbered parts for identificationnatural_image
Black handheld device with attached plug and power outlet (no text or symbols visible)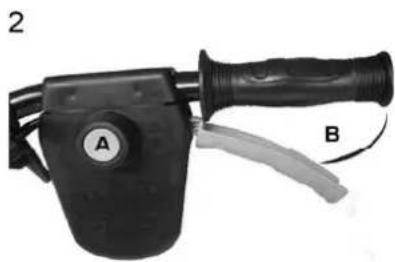
natural_image
Black manual tool with labeled parts A and B, no visible text or symbols on the device itself
natural_image
Close-up of a black manual lever handle and lever with attached cable (no text or symbols visible)text_image
6 4x M0x12 4x M68. Смазка
Spare part drawings for the specific product can be found on our website www.texas.dk
If you find the part numbers yourself, this will facilitate more rapid service.
For purchase of spare parts, please contact your dealer.
You will find a list of dealers on the Texas website.
text_image
Labeled diagram of a manual tiller machine with numbered parts for identificationnatural_image
Black handheld device with attached cable and plug, no visible text or symbols2
natural_image
Close-up of a black manual lever with labeled parts A and B (no text or symbols on the lever itself)3
natural_image
Close-up of a black manual lever handle and grip (no text or symbols visible)text_image
Labeled diagram of a manual tiller machine with numbered parts for identificationnatural_image
Black handheld device with attached cable and plug, isolated on white background (no text or symbols)2
natural_image
Black handheld device with labeled parts A and B, no visible text or symbols on the device itself.3

natural_image
Close-up of a black manual lever handle and grip (no text or symbols visible)text_image
6 4x M0x12 4x M57. Smarowanie
2006/95/EC - 2006/42/EC - 2004/108/EC - 2000/14/EC
Materiellet er udført i henhold til følgende standarder • Conforms with the following standards • In Übereinstimmung mit den folgende Standards • Соответствует следующим стандартам • Conformément aux normes suivantes • Jest zgodna z następującymi normami
EN 60335-1:2002+A11,A1:04+A12+A13+A14 - EN 709:1997+A4
EN 62233 :2008 - ZEK 01.4-08/11.11
S/N: 1712780001 - 1912789999
Texas Andreas Petersen A/S
Knullen 22 • DK-5260 Odense S
Responsible for documentation
Johnny Lolk
22.09.2017

text_image
Henry TahnJohnny Lolk
Managing Director