
BPA 3022 M - Car radio BLAUPUNKT - Free user manual and instructions
Find the device manual for free BPA 3022 M BLAUPUNKT in PDF.
| Product type | Multimedia car radio with DAB+ receiver |
| Brand and model | Blaupunkt BPA 3022 M |
| Dimensions (mounting base) | 129 (width) x 112 (depth) x 65 (height) mm |
| Power supply | 12 V DC, negative terminal connected to ground |
| Max. output power | 4 x 40 W (4 speakers) |
| Current consumption | 10 A (max.) |
| Speaker impedance | 4 – 8 ohms |
| FM radio range | 87.5 – 108 MHz |
| MW radio range | 522 – 1620 kHz |
| DAB+ receiver | Yes (DAB1 and DAB2) |
| Bluetooth | Built-in, for music and phone (A2DP/AVRCP/HFP profiles) |
| USB port | MP3/WMA playback, folder +/- function, song search |
| AUX input | AUX IN 1 (3.5 mm jack front) and AUX IN 2 (rear RCA) |
| HDMI connector | Front input, rear output (pass-through) |
| Audio outputs | RCA (front, rear, subwoofer, REC OUT) |
| Audio zones | Zone 1 and Zone 2, separately adjustable |
| Sound settings | Bass ±10 dB (100 Hz), Treble ±10 dB (10 kHz); P-VOL, BEEP ON/OFF |
| RDS | Station name display, synchronized clock (CT SYNC/INDEP) |
| Remote control | Infrared (IR ON/OFF in menu) |
| Maintenance and cleaning | Use a dry or slightly damp cloth; avoid solvents and abrasives |
| Safety and installation | Professional installation recommended; do not obstruct airbags |
| Disposal | Do not dispose with household waste; take to a collection point |
| Package contents | Multimedia station, remote control, ISO connectors, mounting screws, manual |
Frequently Asked Questions - BPA 3022 M BLAUPUNKT
User questions about BPA 3022 M BLAUPUNKT
0 question about this device. Answer the ones you know or ask your own.
Ask a new question about this device
Download the instructions for your Car radio in PDF format for free! Find your manual BPA 3022 M - BLAUPUNKT and take your electronic device back in hand. On this page are published all the documents necessary for the use of your device. BPA 3022 M by BLAUPUNKT.
USER MANUAL BPA 3022 M BLAUPUNKT
|Dekorative Abdeckungen
DEMONTAGE DES GERÄTS
The car sound system was manufactured according to the state of the art and established safety guidelines. Even so, dangers may occur if you do not observe the safety notes in these instructions. Read these instructions carefully and completely before using the car sound system. Keep the instructions at a location so that they are always accessible to all users. Always pass on the car sound system to third parties together with these instructions. In addition, observe the instructions of the devices used in conjunction with this car sound system.
General safety notes
Observe the following note to protect yourself against injuries: Do not modify or open the device.
Use as directed
This sound system is intended for installation and operation in a vehicle with 12 V vehicle system voltage. Observe the output limits of the device. Repairs and installation, if necessary, should be performed by a specialist.
Installation instructions
You may only install the car sound system yourself if you are experienced in installing car sound systems and are very familiar with the electrical system of the vehicle. For this purpose, observe the wiring diagram in these instructions. Installing the device must not obstruct or block the function of any airbags, other safety devices or controls.
Declaration of conformity
The Blaupunkt Competence Center Car Multimedia - Evo Sales GmbH declares that the device complies with the basic requirements and the other relevant regulations of the directive 2014/53/EU. The declaration of conformity can be found on the Internet under www.blaupunkt.com.
Cleaning notes
Solvents, cleaning and scouring agents as well as dashboard spray and plastics care product may contain ingredients that will damage the surface of the car sound system. Use only a dry or slightly moistened cloth for cleaning the car sound system.
Disposal notes

Do not dispose of your old unit in the household trash!
Use the return and collection systems available to dis-pose of the old device, the remote control and exhausted batteries.
Scope of delivery
The scope of delivery includes:
Main unit BPA 3022 M
Remote control
ISO connectors
Installation screws
Operating manual
ATTENTIONS OF INSTALLATION
- Please read the instruction manual carefully before installing the unit.
- Make sure to connect other wires before power on the unit.
- To avoid short circuit. Please make sure all the exposed wires are insulated.
- Please fix all the wires after installation.
- Please make connection to the player accordingly to this instruction manual. Wrong connection may cause damage to the unit.
- This player only fit for 12V DC device.
Mounting
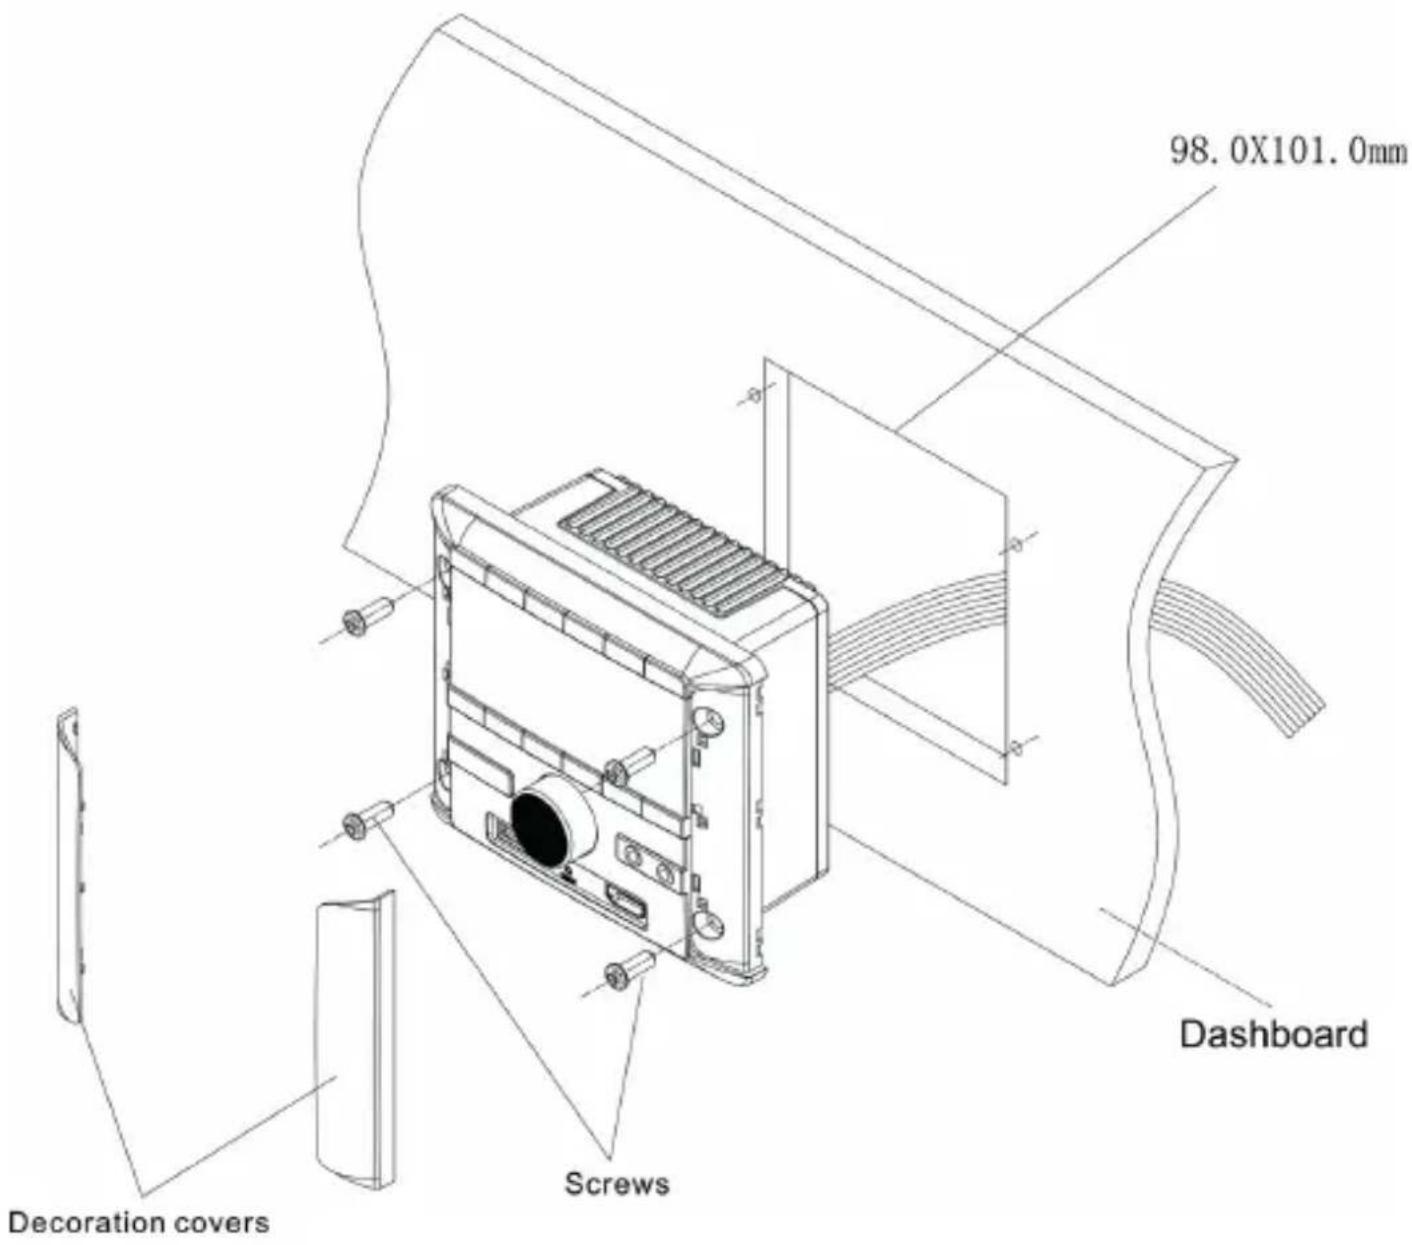
REMOVE THE UNIT
- Remove the unit
- Take out the outer trim frame.
HDMI attention:
Please use good quality HDMI cable.
The overall length (front and rear) should not exceed 12 feet.
WIRING CONNECTION
EN

- This player can only be used by + 12V DC.
- Do not connect the battery terminal until the player is fully well installed.
- Please make sure to connect the yellow wire to the positive of the battery (+).
- When change the fuse please make sure that the specifications are same.
- Using good quality speakers with 4 - 8 ohm can achieve the best effect of the unit.
LOCATION OF KEYS

- STREFA 1
2.1

- STREFA 2
4.2
- BT
6.3 RPT
7.

8.4 RDM
9.

10.5 DIR-
- DIS
12.6 DIR+
-
LCD
-
GNIAZDO AUX
-
GNIAZDO SŁUCHAWKOWE
-
GNIAZDO HDMI
-
RESET
-
POKRETŁO
-
PORT USB
-
SRC/MENU
BASIC OPERATION
Turn on/off the unit and Mute function
Press /MUTE knob to turn on the unit. When the unit is on. Shortly press this knob for mute on/off. Press and hold this button to turn off the unit.
Audio and setting menu adjustment
Press and hold SRC/MENU button into the menu as below:
BAS->TRE->BAL->EQ(off/pop/rock/clas)->LOUD(on/off)->CLK HH->CLK
MM->IR(on/off) ->CT(indep/sync)->BEEP(on/off)->P_VOL(13)->DX(LOC)->STE-REO(MONO)
In each item rotate the VOL knob to set them.
IR (ON/OFF):
IR ON: The unit can be switched on by IR remote control.
The system is in high power consumption status.
IR OFF: The unit can not be switched on by IR remote control.
The system is in low power consumption status.
CT (INDEP/SYNC):
CT INDEP: The clock works independently.
CT SYNC: The clock will be synchronized to the received RDS station's time.
Note: When the clock was set in the menu, The CT is set to INDEP mode automatically.
BEEP (ON/OFF): Turn on/off the beep sound when buttons are pressed.
P-VOL: Setting the power on volume. If the volume at switch-off is lower than the P-VOL, the unit will set the volume to the value of the switch-off volume when it is switched on.
If the volume at shutdown is greater than the P-VOL, the volume will be restored to the
P-VOL value when the unit is switched on.
Bluetooth speaker search
Press and hold BT button shows "SEARCH...". Seconds later shows the Bluetooth device name. Rotate VOL knob to show next one. When the desired Bluetooth speaker name was shown on LCD. Press VOL knob to pair. If the pairing is succeed, it shows BOX ON.
Important note: Despite numerous tests with various Bluetooth devices, compatibility with all Bluetooth devices available on the market cannot be guaranteed.
Bluetooth speaker signal transmit operation
Shortly press BT button to stop/transmit the signal to the Bluetooth speaker. It shows BOX OFF/ON.
Note: Although Blaupunkt checks the compatibility of different Bluetooth speakers with care, a flawless function with all models on the market cannot be guaranteed.
Zone 1 and Zone 2 operation
Shortly press Zone 1 (or ZONE 2) button to unable/enable Zone 1 (or ZONE 2) volume.
Hold Zone 1 (or ZONE 2) button to mute Zone 1 (or ZONE 2) sound. Hold it again to mute off.
Information or Clock priority
Shortly press DIS button to change the clock priority or information priority.
Note: In FM band, when received a RDS station shortly press DIS button to show the STATION NAME/CLOCK/FREQUENCY.
Clock setting
In CLK HH/CLK MM item of the menu. Rotate VOL knob to set the hour/minute.
Head phone operation
There is a 3.5 mm head phone jack in the front panel. It is following the zone 1's operation.
RADIO OPERATION
Receive a radio station
Press SRC/MENU button to select FM1->FM2->MW mode. Shortly press ▶▶/◀◀ button to receive the desired radio station. Press and hold ▶▶/◀◀ button for manual tuning the frequency.
Manually store station & recall preset station
Receiving a desired station. Press and hold one of the preset buttons (1 - 6) for 2 seconds. The current station is stored into the number button. Shortly press the preset button (1 - 6) to directly listen the station that saved in the corresponding preset button.
DAB OPERATION
Press SRC/MENU button switch to DAB1 or DAB2 source.
Selecting station
Press ▶/◀◀ button to select up/down station.
OPERATION
EN
Manually store station and recall preset station
When received a desired station. Press and hold 1 - 6 button for 2 seconds to store this station to corresponding number. Shortly press the preset button (1 - 6) to directly listen the station that saved in the corresponding preset button.
USB OPERATION
When an USB driver was inserted to the unit, the unit will play the MP3/WMA file automatically. If an USB drive is already inserted in the unit, keep pressing SRC/MENU button shortly until the USB mode display appears.
Select file
Press ▶▶/ ◀◀ button to skip to next/previous file. Hold ▶▶/ ◀◀ button to fast forward or fast reverse.
Play/Pause
Press 1 ▶ button to pause/playing the file.
Repeat function
Press 3 RPT button to select RPT mode: RPT ONE/RPT FOLD/RPT ALL(default)
RPT ONE: Repeat the same file.
RPT FOLD: Repeat all files of the folder.
RPT ALL: Repeat all files.
RANDOM
Press 4 RDM button to choose RDM on/off.
RDM on: Playing all files in random order.
RDM off: Turn off the random function.
Directory+/- function
Press DIR+/DIR- button to select next/previous folder to play.
Search song
Press and hold 📋 button shows NUM 0000. Rotating VOL (or directly enter number) to select the numbers then press VOL to play. Please note the 7/8/9/0 as: BT = 7, ◀◀ = 8, ▶▶ = 9, DIS = 0.
AUX IN 1 for front panel 3.5 mm jack. AUX IN 2 for RCA in back of the unit. Pressing SRC/MENU button to switch to AUX IN1 (2) mode when Connecting the audio signal to the unit.
OPERATION
BLUETOOTH OPERATION
Pairing
On mobile phone, select the Bluetooth item searching the Bluetooth device. "BLAUPUNKT" should appear in the list, select "BLAUPUNKT" and then input password "0000" if it needs a password. When successful paired, the BT mark will be displayed on the display.
Bluetooth Audio
Press SRC/MENU button to switch to BT MUSIC mode. It will play a song of your mobile phone automatically. Press▶▶ key to pause/play the song.
Press ▶/◀◀ button to select next/previous song.
HDMI OPERATION
The front HDMI port is pass through to the rear HDMI port. The HDMI playback is therefore not affected.
V-IN and V-OUT RCA connector
In the back of the unit the V-IN connector is pass through to the V-OUT connector.
REMOTE CONTROL
When IR is set to ON in the setting menu.
OFF: The unit can be switched ON and OFF.
VOL+: Volume up
VOL-: Volume down

1: Zone 1 MUTE ON/OFF
2: Zone 2 MUTE ON/OFF
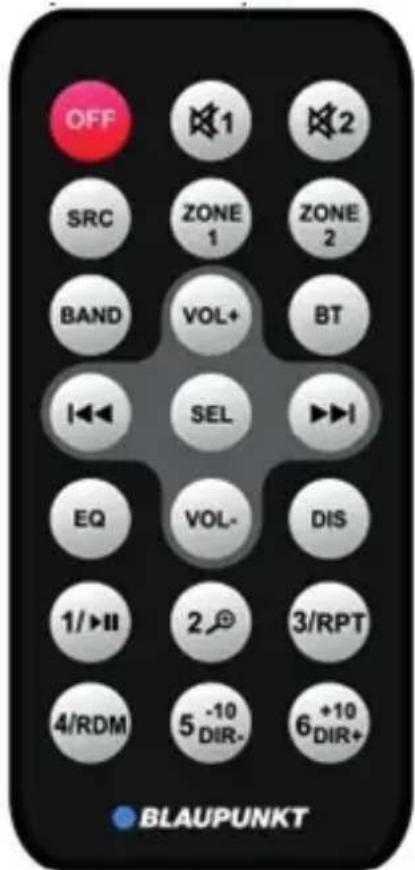
Other operation please reference the description above
GENARAL
Power Supply Requirements : DC 12 Volts, Negative Ground
Chassis Dimensions : 129 (W) x 112 (D) x 65 (H)
Tone Controls
- Bass (at 100 Hz) : ±10 dB
- Treble (at 10 kHz) : ±10 dB
Maximum Output Power : 4 x 40 watts
Current Drain : 10 Ampere (max.)
RADIO
FM
AM
Frequency Coverage 87.5 to 108 MHz 522 to 1620 KHz
IF 10.7 MHz 450 KHz
Sensitivity 4 μV (S/N = 30 dB) 36 dBμV (S/N = 20 dB)
Stereo Separation >25 dB /
TROUBLE SHOOTING
| Symptom | Cause | Solution |
| No power | The car ignition switch is not on. | If the power supply is connected to the car accessory circuits, but the engine is not moving, switch the ignition key to “ACC”. |
| The fuse is blown. | Replace the fuse. | |
| No sound | Volume is set to minimum. | Adjust volume to a desired level. |
| Wiring is not properly connected. | Check wiring connection. | |
| The operation keys do not work. | The built-in microcomputer is not operating properly due to noise. | Press the reset button. |
| The radio does not work. The radio station automatic selection does not work. | The antenna cable is not connected. | Insert the antenna cable firmly. |
| The signals are too weak. | Select a station manually. | |
| No playback of the phone music APP. | Unit is paired with another mobile phone. | 1) Turn off the Bluetooth function of another mobile.2) Exit APP and turn on APP again. |
La fornitura include:
Placche decorative
SMONTAGGIO DEL DISPOSITIVO
BAS->TRE->BAL->EQ (Off/pop/rock/class)->LOUD (On/Off)->CLK HH->CLK MM->IR (On/Off) ->CT (indep/sync)->SEGN. SUONO. (On/Off) ->P_VOL (13)->DX (LOC)->STE-REO (MONO)
INFRAROSSO (ON/OFF):
$$ B T = 7, \quad \text { } = 8, \quad \text { } = 9, D I S = 0. $$
UTILIZZO DELLA PRESA AUX 1/2
EMPLACEMENT DES TOUCHES

- ZONE 1
2.1

- ZONE 2
4.2
- BT
6.3 RPT
7.
8.4 RDM
9.

10.5 DIR-
- DIS
12.6 DIR+
-
LCD
-
PRISE AUX
-
PRISE POUR CASQUE D'ÉCOUTE
-
PRISE HDMI
-
RESET
-
BOUTON ROTATIF
-
PORT USB
-
SRC/MENU
FONCTIONNEMENT DE BASE
BAS->TRE->BAL->EQ (off/pop/rock/class)->LOUD (on/off)->CLK HH->CLK
MM->IR (on/off) ->CT (indep/sync)->SIGN. BEEP (on/off)->P_VOL (13)->DX (LOC)->STE- REO (MONO)
|Decoratieve afdekkingen
DEMONTAGE VAN HET APPARAAT
Other operation please reference the description above
ALGEMENE INFORMATIE
DE, EN, IT, FR, PL, ES, NL
Blaupunkt BPA 3022 M


- DEMONTAGE DES GERÄTS
- General safety notes
- Use as directed
- Installation instructions
- Declaration of conformity
- Cleaning notes
- Disposal notes
- Scope of delivery
- ATTENTIONS OF INSTALLATION
- Mounting
- REMOVE THE UNIT
- HDMI attention:
- WIRING CONNECTION
- LOCATION OF KEYS
- BASIC OPERATION
- Turn on/off the unit and Mute function
- Audio and setting menu adjustment
- IR (ON/OFF):
- CT (INDEP/SYNC):
- Bluetooth speaker search
- Bluetooth speaker signal transmit operation
- Zone 1 and Zone 2 operation
- Information or Clock priority
- Clock setting
- Head phone operation
- RADIO OPERATION
- Receive a radio station
- Manually store station & recall preset station
- DAB OPERATION
- Selecting station
- OPERATION
- Manually store station and recall preset station
- USB OPERATION
- Select file
- Play/Pause
- Repeat function
- RANDOM
- Directory+/- function
- Search song
- BLUETOOTH OPERATION
- Pairing
- Bluetooth Audio
- HDMI OPERATION
- V-IN and V-OUT RCA connector
- REMOTE CONTROL
- GENARAL
- RADIO
- FM
- AM
- SMONTAGGIO DEL DISPOSITIVO
- INFRAROSSO (ON/OFF):
- UTILIZZO DELLA PRESA AUX 1/2
- EMPLACEMENT DES TOUCHES
- FONCTIONNEMENT DE BASE
- DEMONTAGE VAN HET APPARAAT
- ALGEMENE INFORMATIE
Brand : BLAUPUNKT
Model : BPA 3022 M
Category : Car radio