CT 5013 - Coffee machine AMICA - Free user manual and instructions
Find the device manual for free CT 5013 AMICA in PDF.

User questions about CT 5013 AMICA
0 question about this device. Answer the ones you know or ask your own.
Ask a new question about this device
Download the instructions for your Coffee machine in PDF format for free! Find your manual CT 5013 - AMICA and take your electronic device back in hand. On this page are published all the documents necessary for the use of your device. CT 5013 by AMICA.
USER MANUAL CT 5013 AMICA
natural_image
Exterior view of a black Amica water heater with a transparent glass jar (no text or symbols visible)PL INSTRUKCJA OBSŁUGI 6
EN USER MANUAL 12
CS NÁVOD K OBSLUZE 18
SK NÁVOD NA OBSLUHU 24
bar
| Item | Value | |---|---| | 1 | 23456 | | ↑ | 789 | | ↑ | 101112 | The chart displays a single data point (value 23456) and is accompanied by nine distinct icons representing different product categories. The number '1' is shown above the top row, while the rightmost icon is below it. No axes, units, or trends are present; the data represents a standalone metric.

natural_image
Diagram of a mechanical device with a battery and a cross symbol (no text or labels)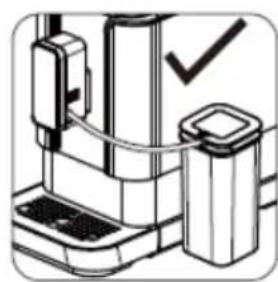
natural_image
Illustration of a mechanical device with a checkmark indicating a detail (no text or symbols present)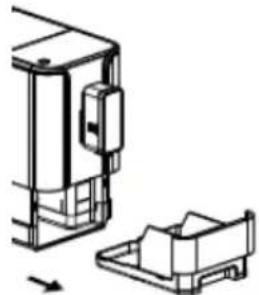
natural_image
Technical line drawing of a mechanical assembly with no visible text or symbols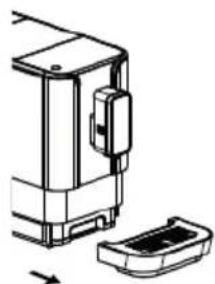
natural_image
Technical line drawing of a mechanical device with a housing and base plate (no text or symbols)56
natural_image
Illustration of a hand inserting a device into a wall, showing the next screen and handle (no text or symbols)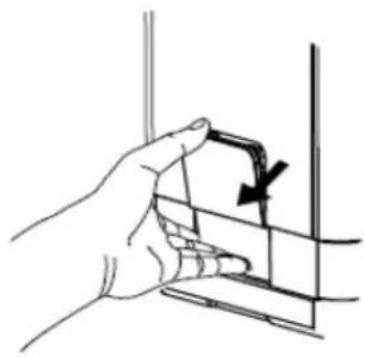
natural_image
Hand holding a small object with an arrow indicating direction, no text or symbols present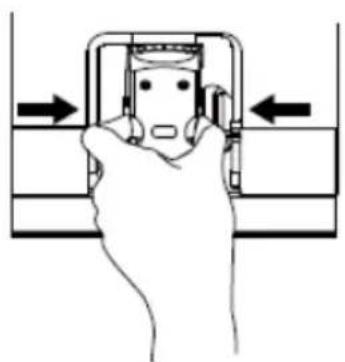
natural_image
Hand pressing a button on a mechanical component (no text or symbols visible)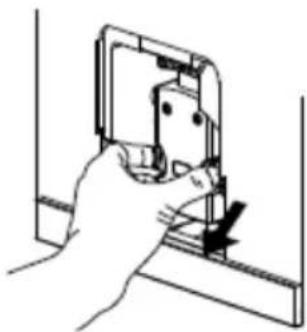
natural_image
Hand holding a small electronic component with a black arrow indicating direction (no text or symbols)7
natural_image
Hand inserting a plug into a device component (no text or symbols visible)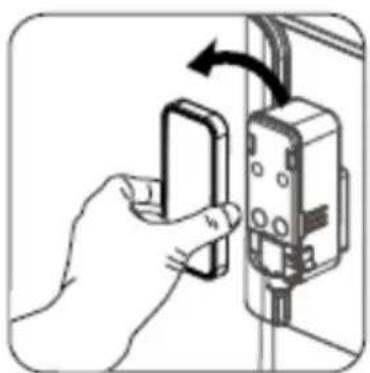
natural_image
Hand inserting a small electronic component into an electrical outlet (no text or symbols visible)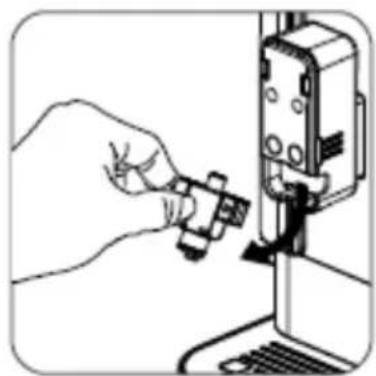
natural_image
Illustration of a hand inserting a small component into a device (no text or symbols visible)8
natural_image
Mechanical assembly diagram showing a valve mechanism with rotation arrow (no text or labels)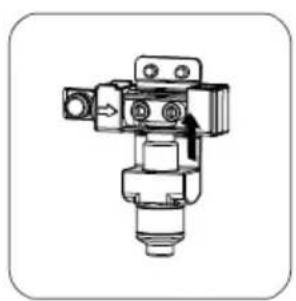
natural_image
Mechanical component diagram showing a valve assembly with no visible text or symbols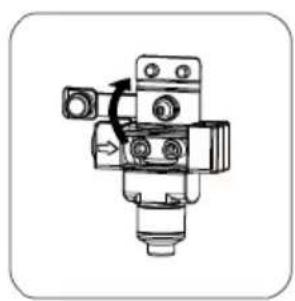
natural_image
Mechanical component diagram showing a valve assembly with no visible text or symbols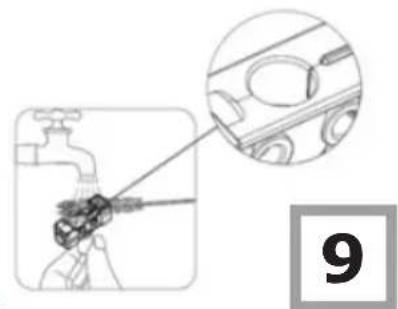
natural_image
Diagram showing a hand holding a tool with a magnified inset of a car (no text or symbols present)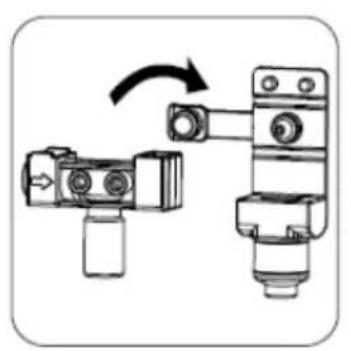
natural_image
Mechanical assembly diagram showing two connected components with a rotation arrow (no text or symbols)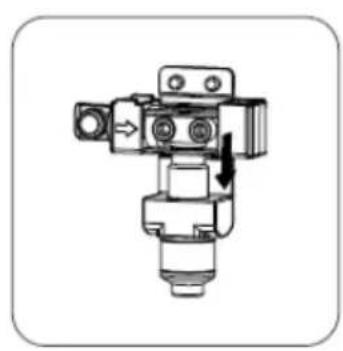
natural_image
Mechanical valve assembly diagram with directional arrow indicating motion (no text or labels)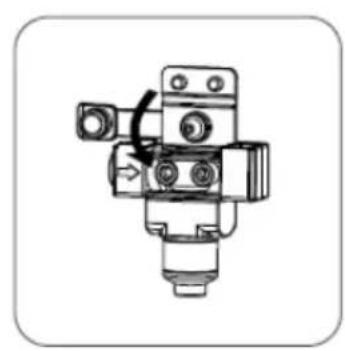
natural_image
Mechanical component diagram showing a valve assembly with no visible text or symbols
natural_image
Illustration of a hand inserting a small component into a device (no text or symbols visible)
natural_image
Illustration of a hand inserting a wall-mounted switch into a door panel (no text or symbols visible)
natural_image
Hand holding a device with a black clip, no visible text or symbols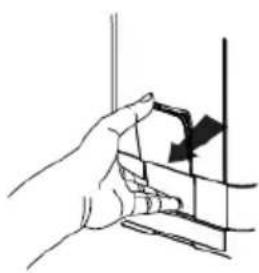
natural_image
Hand holding a vertical object with a black arrow pointing downward (no text or symbols)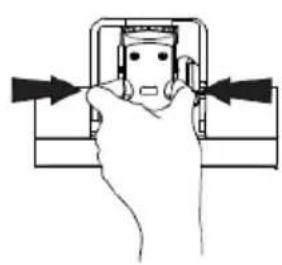
natural_image
Line drawing of a hand pressing a button on a mechanical component (no text or symbols)
natural_image
Line drawing of a hand using a tool to cut or adjust a mechanical component (no text or symbols)
natural_image
Line drawing of a hand inserting a device into a device casing (no text or symbols)
natural_image
Line drawing of a hand holding a pen tip, with no text or symbols present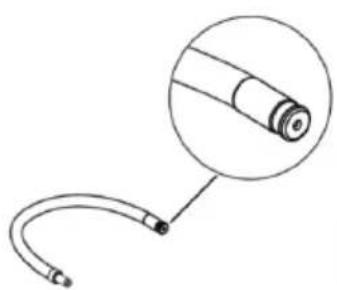
natural_image
Simple line drawing of a medical or laboratory device with a curved tube and a magnified inset showing a cylindrical component (no text or symbols)
natural_image
Technical line drawing of a mechanical component with concentric circles and a central gear-like feature (no text or symbols)
WSKAZÓWKI DÓTYCZĄCE BEZ-PIECZEŃSTWA UŻYTKOWANIA
natural_image
Line drawing of a microwave oven with a cup and lid, no text or symbols present
natural_image
Line drawing of a coffee maker with a cup and lid (no text or symbols)SAFETY INSTRUCTIONS FOR USE
To avoid the risk of serious injury when using the appliance, follow basic safety rules, including the following. BEFORE OPERATING THE APPLIANCE, CAREFULLY REVIEW THE INSTRUCTIONS, NOTES, AND WARNINGS.
- Ensure that the mains voltage specified on the rating plate corresponds to the voltage of the local electricity grid.
- Unwind and straighten the power cord before using the appliance.
- Place the appliance on a solid, level surface.
- Place and use the appliance on a stable surface.
- Unplug the appliance from the power socket in the following circumstances:
- Before you add water to the water tank
- Before you remove or install any parts of the appliance.
- Before cleaning or maintenance
- When the appliance mal- functions
- When you have finished using the appliance
• Empty the water tank when the appliance is not going to be used for a long time - Allow the appliance to cool down before installing or removing parts, and before cleaning the appliance.
• Always use cold water to make coffee. Warm water
or other liquids may damage the appliance.
- If the power cord is damaged it must be replaced to prevent danger. The power cord must be replaced by a service technician authorised by the manufacturer or by another qualified person.
- Only use the grinder to grind coffee beans.
• Children shall not play with the appliance.
- Always' unplug the appliance from the power supply when leaving it unattended and before installing or removing accessories and before cleaning.
- This appliance can be used by children aged 8 years and older or by persons with physical, mental or sensory handicaps, or by those who are inexperienced or unfamiliar with the appliance, provided they are supervised or have been instructed how to safely use the appliance and are familiar with risks associated with the use of the appliance. Ensure that children do not play with the appliance. Do not allow children to clean and maintain the appliance unless they are 8 years or older and are supervised by a competent person.
- Children do not realize the dangers that can arise when using electrical appliances; therefore keep the appliance out of reach of children.
- This appliance is for household use only.
- Do not let children approach the appliance or the power cord during operation.
- Do not leave the appliance unattended when it is connected to the power supply.
- Do not use the appliance outdoors.
- Do not use the appliance for purposes other than those for which it is intended.
- Do not let the power cord hang over the edge of a table, counter, or touch a hot surface.
- Do not use or place the appliance on wet or hot surfaces.
- Do not use the appliance if the drip tray is incorrectly inserted.
- Do not immerse the appli- ance in water or any liquids.
- Do not use the appliance if any parts are damaged.
- Do not use the appliance if it is not operating properly.
- Do not unplug the appliance by pulling the power cord.
- Do not try to open the body or disassemble any parts from the appliance.
- It is not recommended to use accessories not included in the box. This can be dangerous and should be avoided.
- Do not put the appliance on or in the vicinity of a hot gas or electric burner or on an oven.
Electrical requirements: Make sure that the voltage indicated on the nameplate corresponds to that of your home electrical mains. Alternating current must be used, typically marked \~.
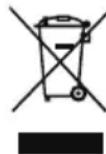
In accordance with European Directive 2012/19/EU and Polish legislation regarding used electrical and electronic goods, this appliance is marked with the symbol of the crossed-out waste container. This marking indicates that the appliance must not be disposed of together with other household waste after it has been used.
The user is obliged to hand it over to waste collection centre collecting used electrical and electronic goods. The collectors, including local collection points, shops and local authority departments provide recycling schemes.
Proper handling of used electrical and electronic goods helps avoid environmental and health hazards resulting from the presence of dangerous components and the inappropriate storage and processing of such goods.
SPECIFICATION:
Model - CT 5013 Barista
Rated voltage - 220-240V\~, 50/60Hz
Rated power - 1235-1470 W
Water tank - 1200 ml
Power cord - 100 cm
Pressure - 19 bar
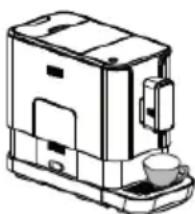
FEATURES AND COMPONENTS (Figure 1).
- Outer drip tray
- Drip tray cover
- Coffee grounds container
- Inner drip tray
- Adjustable coffee spout
- Control Panel
- Coffee bean container
- Coffee bean container lid
- Water tank
- Service cap
- Brewer
- Cleaning brush
- Power cord
- Milk container
- Milk container lid
- Milk container tube
- Milk tube connector
- Rubber connector
- Tube for the milk container
- Pin
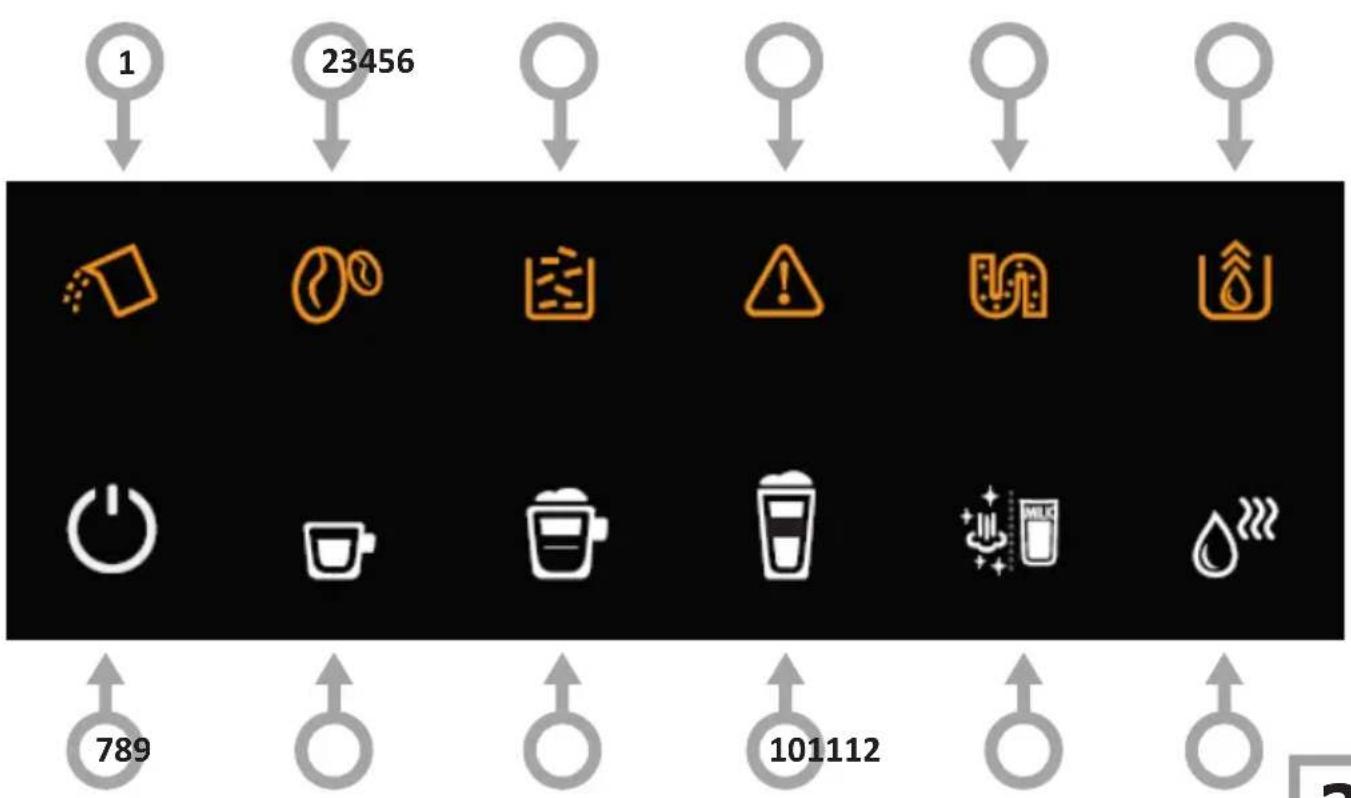
CONTROL PANEL (fig. 2):
- Flashing - low water level / no water tank.
- Flashing - no coffee beans.
- On - the grounds container is full. Flashing - no inner drip tray / coffee grounds container
- On - no brewing unit / unit not installed correctly Flashing - service cover is open / not installed correctly.
- On - descaling required Flashing - descaling in progress
- The empty system function is on
- On/Off
- Espresso
- Cappuccino
- Latte Macchiato
- Clean / Milk Frother button
- Hot water button
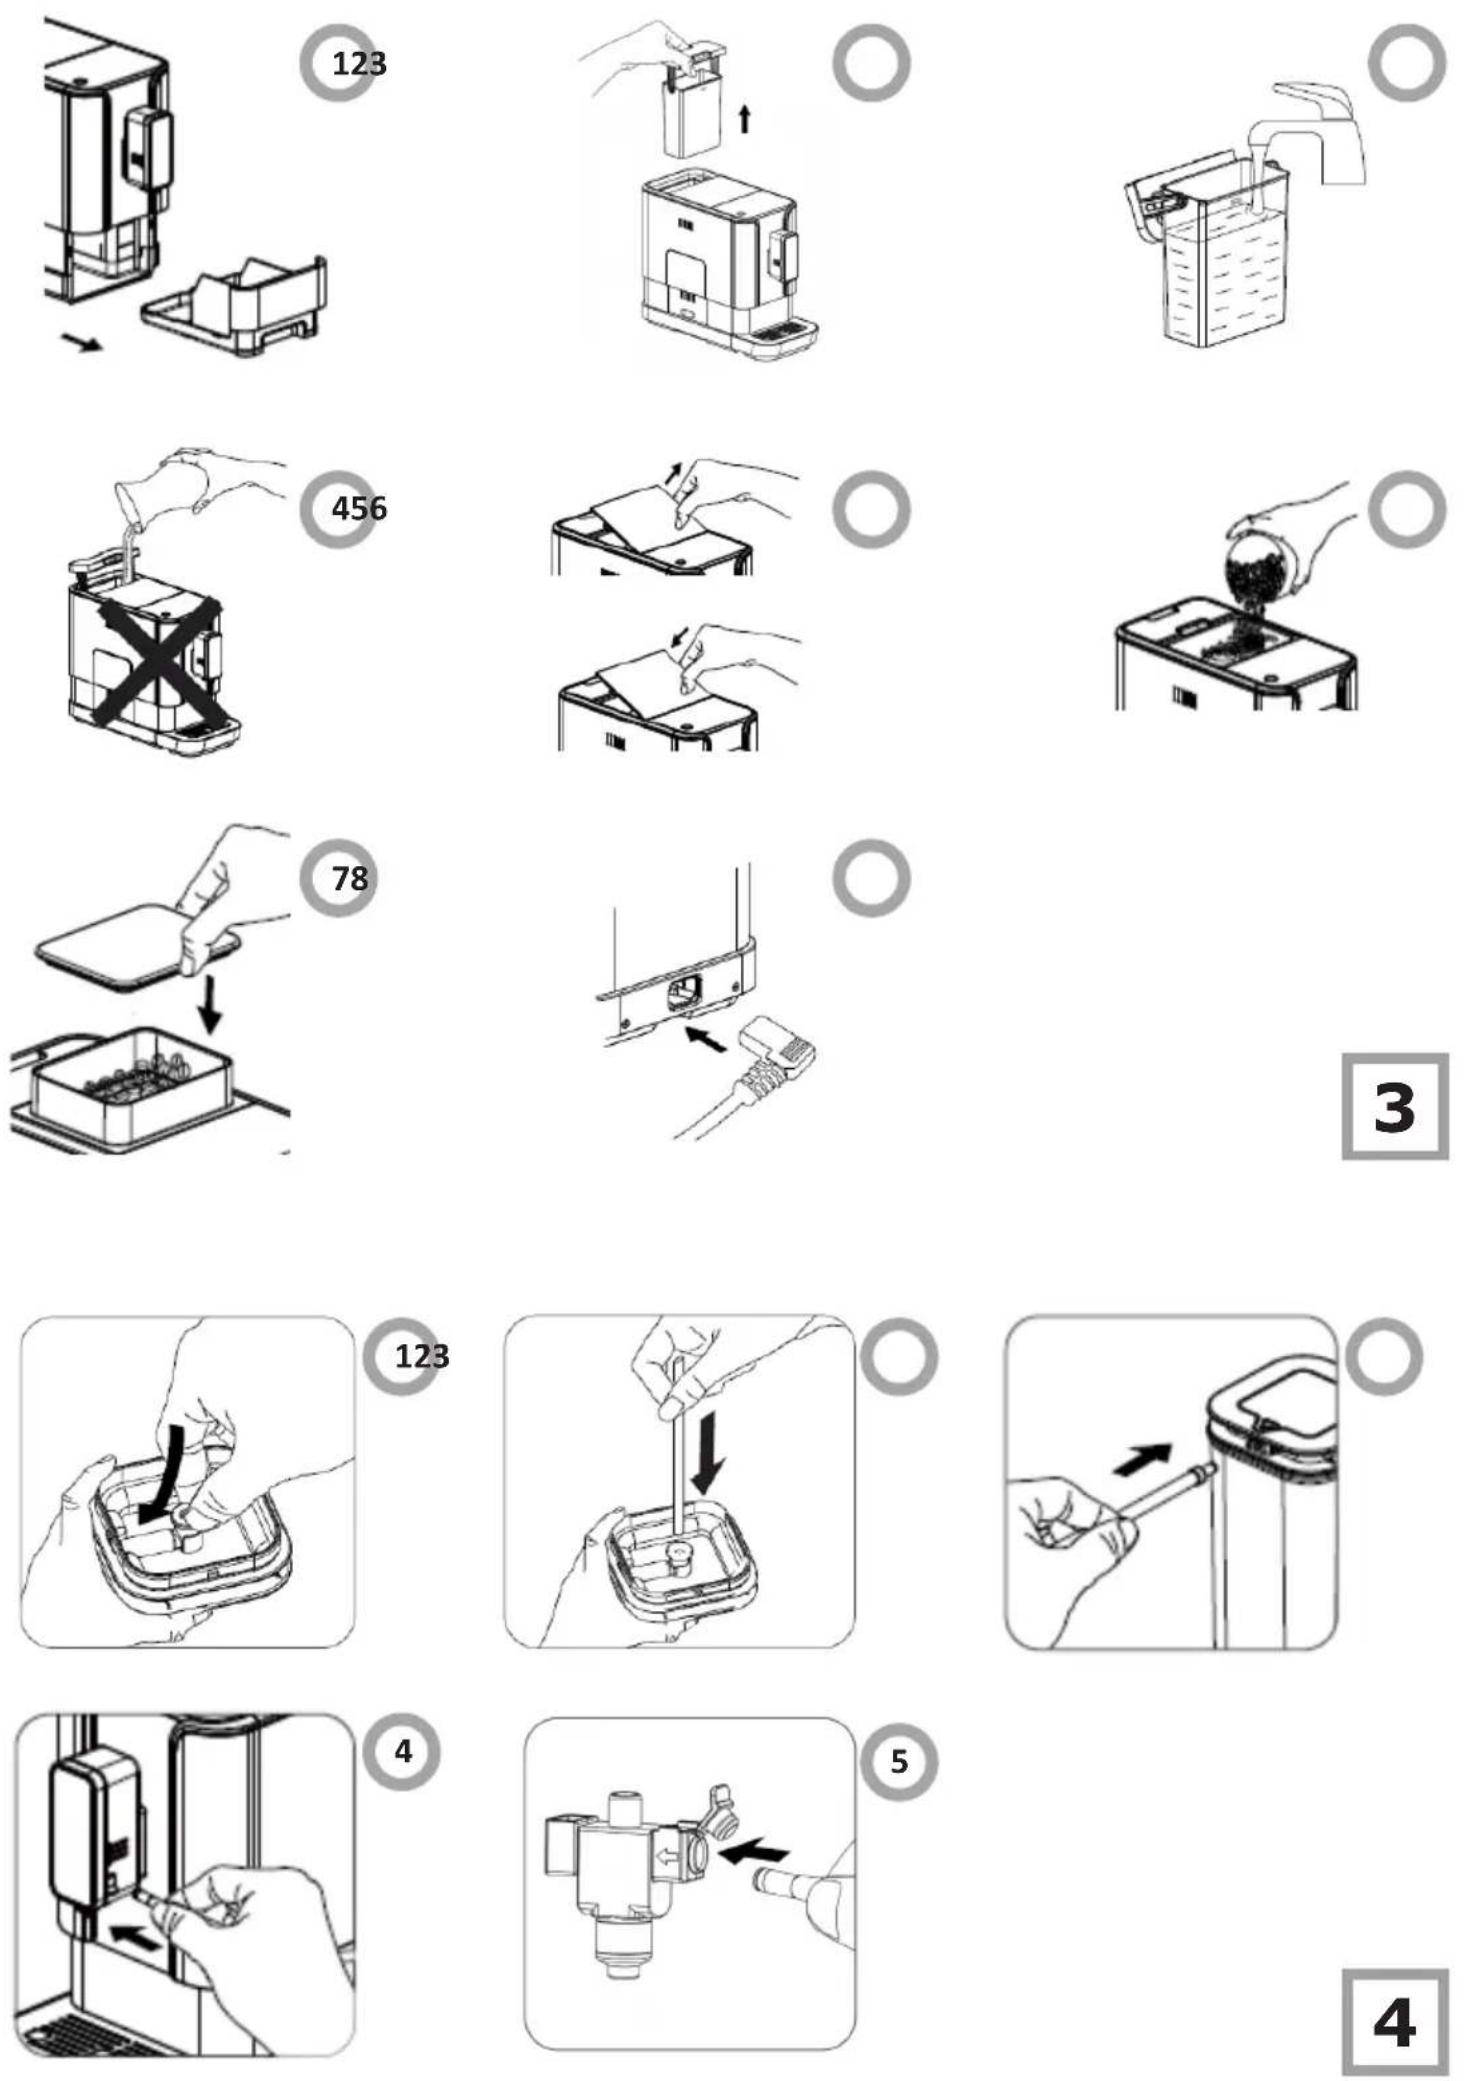
INSTALL THE APPLIANCE (fig. 3):
Remove the protective film, stickers and other packaging materials from the appliance. Place the appliance on a safe and stable surface with an easily accessible power socket, and ensure a minimum clearance from the sides of the appliances.
- Insert the outer drip tray. Make sure it is properly seated.
- Lift the water tank using the lid as a handle.
- Fill the tank with water up to the Max level and place it back in the appliance.
- To prevent water spilling from the tank, do not pour water directly into the appliance using another container.
Note!
- Never fill the water tank with warm, hot, carbonated water or any other liquid that may damage the water tank and the appliance.
-
Only fill the container with coffee beans. Ground coffee, instant coffee, caramelized coffee and any other products can damage the appliance.
-
Remove the lid of the bean container.
- Fill the coffee bean container.
- Put the lid back on.
- Unwind and straighten the power cord and insert the plug into the socket on the back of the appliance. Plug the other end of the power cord into a wall outlet with the correct voltage.
MAKE THE ESPRESSO
Press the hot water button to rinse the inside of the coffee maker before first use.
- Make sure that the drip tray and water tank are installed and then press the power on / off button to turn on the appliance. The appliance will automatically purge the system with a small cup of water. Press the Clean / Milk Frother button to stop the cleaning process.
- The appliance is then on standby.
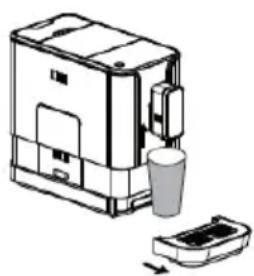
- Place a cup under the coffee spout and adjust the height of the spout to fit your cup. Depending on the size of the cup, you can remove the drip tray or adjust its position as follows:
natural_image
Line drawing of a portable kitchen appliance with a cup and lid, showing no text or symbols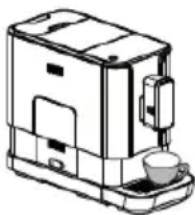
natural_image
Line drawing of a coffee maker with a cup and lid (no text or symbols)- The selected Espresso button will light up and the backlight will indicate that the appliance is brewing a cup of coffee.
- When the appliance enters a standby mode, the coffee is ready to be served.
Note: Automatic rinsing will not take place if the appliance is turned off and on again. You can disable or enable this feature by following the steps below.
- Remove the service cover.
- Press the on / off button until you hear a beep.
PREPARE CAPPUCCINO:
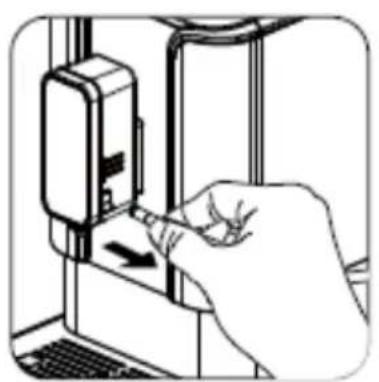
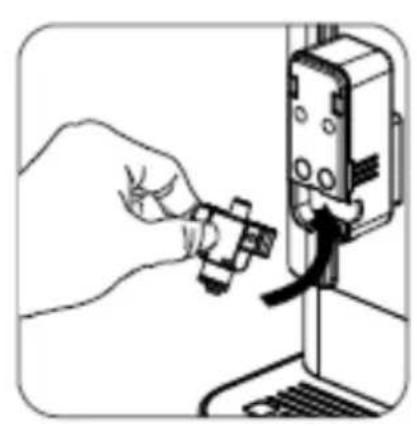
Install the Automatic Milk Frother (fig. 4, items 1-4):
- Insert the rubber connector into the slot inside the lid.
- Insert the tube of the milk container into the rubber connector inside the lid.
- Insert the milk connection tube into the rubber connector on the outside of the lid.
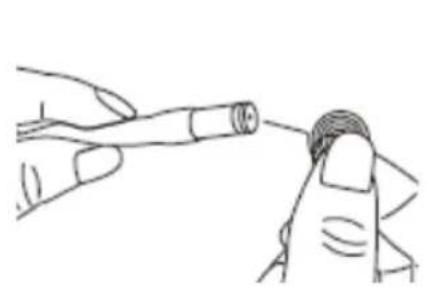
- Insert the connector of the milk tube into the inlet of the milk frother (open the inlet cap first).
Note! There is a protective cap on the inlet of the milk tube connector, just remove it when you need to insert the milk tube connector. (fig. 4, item 5).
- Fill the milk container with milk and close the lid. Make sure that the drip tray is under the coffee spout and water tank is installed and then press the power on / off button to turn on the appliance. The appliance will automatically purge the system with a small cup of water. Press the Clean / Milk Frother button to stop the cleaning process.
- Place a cup under the spout.
- Press the Cappuccino button. Only the Cappuccino button will light to indicate that the coffee is being prepared. The indicator lights up during the coffee making process.
- The appliance dispenses the milk first, then the coffee.
- Coffee making ends automatically. To stop, press the button again during the process.
- Remove the milk container from the appliance and place it in the refrigerator.
- For instructions how to clean the appliance after use, see the "Daily cleaning" section on cleaning the automatic milk frothing system.
Note!
- At the beginning of the coffee brewing cycle, steam and hot milk may spray out of the spout.
- For optimal frothing results, use cold milk (5°C) with a fat content of at least 3%.
- After use, place the milk connection tube around the milk container lid to prevent milk from splashing due to pressure difference. (fig. 5).
- Each time after making milk coffee, clean the appliance according to the "Daily cleaning" section. Otherwise, the frothing system may not function properly due to dried milk residue.
- Ensure that the milk tank tube remains straight and unbent to achieve optimal frothing results.
MAKE THE LATTE MACCHIATO
Install the automatic milk frother as described in the cappuccino preparation section. (fig. 4, items 1-4).
- Fill the milk container with milk and close the lid. Make sure that the drip tray is under the coffee spout and water tank is installed and then press the power on / off button to turn on the appliance. The appliance will automatically purge the system with a small cup of water. Press the Clean / Milk Frother button to stop this process.
- Place a cup under the spout,
- Press the Latte Macchiato Button. Only the Latte Macchiato button will light up, indicating that the Latte is being prepared. The indicator lights up during the coffee making process.
- The appliance dispenses the milk first, then the coffee.
- Coffee making ends automatically. To stop, press the button again during the process.
- Remove the milk container from the appliance and place it in the refrigerator.
- For instructions how to clean the appliance after use, see the "Daily cleaning" section on cleaning the automatic milk frothing system.
Note!
- At the beginning of the coffee brewing cycle, steam and hot milk may spray out of the spout.
- For optimal frothing results, use cold milk (5°C) with a fat content of at least 3%.
- After use, place the milk connection tube around the milk container lid to prevent milk from splashing due to pressure difference. (fig. 5).
- Each time after making milk coffee, clean the appliance according to the "Daily cleaning" section. Otherwise, the frothing system may not function properly due to dried milk residue.
- Ensure that the milk tank tube remains straight and unbent to achieve optimal frothing results.
FROTH MILK
Install the automatic milk frother as described in the cappuccino preparation section (Fig. 4, item 1-4).
- Place a cup under the spout.
- Fill the milk container with milk and close the lid.
- Connect the milk frothing system to the appliance.
- Double-tap the Clean / Milk Frother button. The button lights up during the frothing.
- For instructions how to clean the appliance after use, see the "Daily cleaning" section on cleaning the automatic milk frothing system.
Note!
- At the beginning of the coffee brewing cycle, steam and hot milk may spray out of the spout.
- For optimal frothing results, use cold milk (5°C) with a fat content of at least 3%.
- After use, place the milk connection tube around the milk container lid to prevent milk from splashing due to pressure difference. (Fig. 5).
- Each time after making milk coffee, clean the appliance according to the "Daily cleaning" section. Otherwise, the frothing system may not function properly due to dried milk residue.
- To ensure the automatic frothing function operates correctly, clean the frothing system, tube, and milk container at the end of each day following the instructions in the "Daily Cleaning" section.
- Ensure that the milk tank tube remains straight and unbent to achieve optimal frothing results.
PREPARE HOT WATER:
- Place a cup under the spout.
- Press the hot water button. Only the hot water button will light up to indicate that the hot water is being prepared. The indicator lights up during the coffee making process.
DAILY CLEANING
Regular cleaning and maintenance of the appliance are key to proper operation and extending its life.
- Disconnect the power cord from the wall socket.
- Dispose of the water from the inner and outer drip tray
- Use a damp cloth or a non-abrasive cleaner to wipe water stains on the appliance.
Note!
- Do not use strong detergents, vinegar, or descaling agents not provided in the box to clean the appliance.
Quick clean
Quick clean is used to clean the brew unit and the water channel.
- Place a cup under the spout.
- Press the milk Clean / Milk Frother Button once. The appliance will purge the brewing unit with water and then discharge the water out of the spout.
- A cup of water will be discharged. The process will end automatically or you can press the Clean/Milk Frother button to stop.
When wishes, it indicates the low water level.
CLEAN THE DRIP TRAY AND COFFEE GROUNDS CONTAINER (Fig. 6):
Empty and clean the drip tray daily.
- Pull the outer drip tray out of the appliance.
- Pour the water from the drip tray down the sink and wash it with clean water. Then dry it.
- Pull out the inner drip tray and the coffee grounds container.
- Empty the grounds container and rinse it with clean water. Then dry it.
- Put the coffee grounds container back into the drip tray.
- Place the outer drip tray in the correct position.
When lights up, you need to empty the grounds container. When the indicator is flashing, that the grounds container is removed from the appliance.
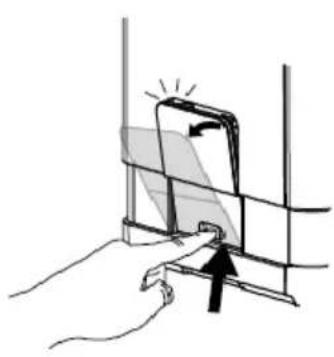
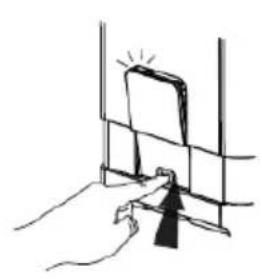
CLEAN THE BREW UNIT (fig. 7):
- Press lightly on the bottom of the service cover to open it.
- Remove the service cover
- Press the release buttons.
- Remove the brew unit and rinse it under running water.
- Put the brew unit back in its place and replace the service cover.
When on, the brew unit is not installed or not installed correctly. When the indicator is flashing, the service cover is not installed or not installed correctly.
CLEAN THE WATER TANK
- Remove the water tank from the appliance and rinse it with clean water.
- Fill the water tank with drinking water up to the MAX level marked and put it back into the appliance.
CLEAN THE AUTOMATIC MILK FROTHING SYSTEM
- Place a cup under the spout.
- Fill the milk container with clean water.
- Connect the milk container to the appliance as described in the "Make Cappuccino"
- Double-press the Clean / Milk Frother button
- The appliance supplies hot water and steam to clean the supply tube and milk spout.
-
Take apart the milk frother as described. Rinse with clean water. Then replace the milk frother (see description below).
-
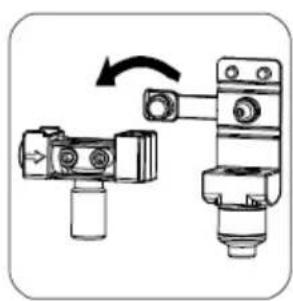
Remove the spout cap and then the milk frother. (Fig. 8).
- Disassemble the milk frother into two parts and thoroughly clean it under running water, paying particular attention to the area marked in the circle. You can use a brush to clean the appliance thoroughly. After cleaning, ensure that there is no milk residue remaining in the frother that could prevent it from optimal operation. (Fig. 9).
- Put the milk frother back into place. (Fig. 10).
- Place the milk frother in the appliance. (Fig. 11).
CLEAN THE MILK CONTAINER AND THE MILK CONTAINER CONNECTING TUBE
- Pour the milk from the milk container and rinse it with clean water. Remove the rubber connector and the milk container tube to rinse them with clean water as well. Immerse the parts in water, squeeze, rinse and thoroughly clean them. Then securely attach them to the lid.
- Rinse both ends of the milk tube with clean water to make sure the hole in the milk tube connector is clean. You can use a needle to clean the hole. (Fig. 13).
- Fill the milk container with clean water and connect it to the appliance with the milk container tube. (Fig. 4).
- When you press the Clean/Milk Frother button twice to use the frothing function when there is water in the milk container you will clean the inner connecting tube. Press the Clean/Milk Frother button again to stop the cleaning.
After a long period of use, the ground coffee may stick to the outlet wall of the appliance. We recommend that you clean the outlet to ensure that ground coffee can enter the brew unit (Fig. 12).
- Press in the recess area of the service cover.
- Remove the service cover.
- Press the release knob of the brew unit.
- Remove the brew unit.
- Use the cleaning brush to clean the ground coffee outlet.
AUTO-CLEAN
When descaling indicator on steadily, the appliance needs self-cleaning. The appliance will stay in top condition if descaling is performed each time the indicator light illuminates.
- Fill the water tank completely.
- Add to the water tank one pack of the cleaning agent provided in the box.
Note!
- Do not use vinegar or other cleaning agents to self-clean this appliance. Incompatible cleaning agents can damage the appliance.
- Plug in the appliance.
- Place a sufficiently large container under the coffee spout.
- When the appliance is on, press and hold the on/off and Espresso buttons for 5 seconds. You will hear two beeps and the descaling and Espresso indicators will start flashing.
- Press the Espresso button to confirm the self-cleaning process. Press on/off to exit the function.
- Flashing of the descaling indicator means that the appliance is running the self-cleaning process.
- When both the low water and Espresso indicators are flashing, indicating that all the water in the tank has been used up, remove the water tank and drain any remaining liquid from it and from the container under the spout. Return the empty
container under the spout, refill the tank with regular tap water up to the maximum level, and reinsert it into the appliance. The appliance will then continue the self-cleaning process. The self-cleaning takes some time, please be patient and allow the appliance to complete the process rather than stop it manually
- When the self-cleaning process is completed, the appliance will turn off automatically.
RINSE MANUALLY
You can perform a manual rinse cycle to clean the coffee spout after use. Manual rinsing is also recommended if the appliance has not been used for a long time.
- When the appliance is on, simultaneously press and hold the 🔒 and hot water 🔒 button.
- The Clean / Milk button will flash. The coffee spout then dispenses a small amount of water that is used for rinsing.
- After rinsing, the appliance will remain on.
Note!
- The water coming out of the steam and coffee nozzles is hot. Avoid contact with splashes of hot water.
ADJUST THE QUANTITY OF COFFEE / MILK FROTH / HOT WATER
The appliance can memorize the required quantity of coffee, frothed milk and hot water.
- Place a cup under the spout.
- Turn on the appliance on, all buttons light up.
- Press the Espresso / Latte Macchiato / Cappuccino / Froth / Water button. Only the selected function indicator will be lit up and the settings entered will be stored in the appliance memory.
- If the appliance is dispensing milk, press and hold the button to continue. Release the button when the desired quantity of frothed milk is dispensed. The appliance will stop dispensing, you will hear two beeps and the desired quantity is memorised.
- If the appliance is dispensing coffee, press and hold the button to continue. Release the button when the desired quantity of coffee is dispensed. The appliance will stop dispensing, you will hear two beeps and the desired quantity is memorised.
- If the appliance is dispensing water, press and hold the button to continue. Release the button when the desired quantity of water is dispensed. The appliance will stop dispensing, you will hear two beeps and the desired quantity is memorised.
- The Espresso / Latte Macchiato / Cappuccino / Frothed milk / Water button is programmed to dispense the desired quantity. Each time you press the button, the appliance will dispense the same desired quantity for a selected function.
Note!
- To reset the quantity of coffee / frothed milk / hot water to the factory settings, press and hold the On / Off button and the Cappuccino Button at the same time for approximately 5 seconds.
ADJUST GRINDING
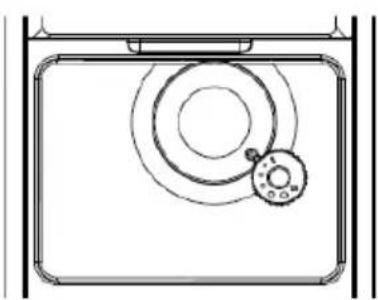
Turn the bean container adjustment knob to adjust the grinder to the degree of roasting of your coffee.
- You can turn the knob and make the adjustment while the grinder is grinding the coffee beans. Never make grinding adjustments while the grinder is not running. This may damage the grinder.
- The dots on the grinding adjustment knob indicate the degree of grinding. (Fig. 14).
SELECT MODE
The appliance can be set to three modes: the normal mode, ECO mode and quick mode. In ECO mode, the appliance helps to save energy. The quick mode allows you to brew the coffee faster than in the normal mode.
| Rapid wash | Normal mode | ECO mode | |
| Lighting YES YES | NO | ||
| Pre-brewing NO YES YES | |||
| Auto off time | 30 min-utes | 20 min. 10 min. | |
| Memorise the cup volume | YES YES YES |
Note!
- The pre-brewing function moistens the ground beans in the brew unit with a little water before full extraction. This increases the volume of the ground coffee to create more pressure in the brew unit which helps to extract all the oils and full flavour from the ground beans.
-
The appliance is equipped with an auto off function. Depending on the selected mode, the appliance will have different auto-off times.
-
With the appliance is ready operate, press and hold on/off for 5 seconds.
- The button below will have the following indications for different settings:
| Latte Mac-chiato | Espresso Cappuccino | ||
| ECO mode Steady on Flash Flash | |||
| Quick mode Flash Steady on | Flash | ||
| Normal mode | Flash | Flash | Steady on |
Press the Latte Macchiato button for ECO mode, the Espresso button for quick mode and the Cappuccino button for default mode. You will hear two beeps to indicate the mode is being selected.
- If you do not wish to change the setting, press again or simply wait 5 seconds.
It is advisable to run the system purge function when you do not plan to use the appliance for an extended period of time.
- When the appliance is on, simultaneously press and hold the On/Off and Latte Macchiato buttons for 5 seconds.
- The system purge indicator will flash.
- Remove the water tank from the appliance. The system purge indicator will illuminate steadily to indicate that the function is operating. Before removing the water tank, you can press on/off to return to standby.
- When the system purge function ends, the appliance will turn off automatically.
Note!
- Before using the coffee maker again after the system purge function has been used, press the hot water button until water flows out of the spout.
COMMON FAULTS AND TROUBLESHOOTING
| PROBLEM POSSIBLE CAUSE SOLUTION | ||
| The appliance takes a long time to warm up. | An excessive layer of limescale has built up. | Descale the appli-ance. |
| Water tank is removed or water level is very low but there is no alarm. | The area around the water tank connector is wet. | Wipe off the water around the water tank connector. |
| The inner drip tray is filled with water. | The coffee is ground too finely and the flow of water is restricted. | While the coffee grinder is running, adjust the coffee grinding level to a higher setting. |
| The coffee runs out too slowly or comes out in drops. | The coffee is ground too finely and the flow of water is restricted. | When the grinder is running, set the grinding setting to a larger dot. |
| The empty bean container indicator flashes, but there are still many beans inside the container. | The inner ground coffee outlet is blocked. | Carry out the steps in section “Clean the ground coffee outlet.” |
| No frothed milk is dispensed. | The Automatic Milk Frother is dirty or incorrectly assembled or installed. | Clean the Auto-matic Milk Frother and make sure it is properly assembled and installed. |
| The opening in the milk tube connector is blocked with milk residue. | See the “Daily Cleaning” section. Follow the instruc-tions “Clean the milk container and the milk container connecting tube.” Clean the con- nector and make sure the entire connector opening is clean. Use a needle or a bristle brush to clean the opening. | |
| The type of milk used is not suitable for frothing. | Various types of milk have different properties and yield different quantity of froth. Semi-skimmed or full-fat milk yields good results. | |
| The descaling indicator flashes even after the descaling process is completed. | The descaling process is not complete. | Wait for the pro-cess to complete. The appliance turns off automat-ically. Do not turn off the appliance manually. |
POKYNY K BEZPEČNÉMU POUŽÍ-VÁNÍ
natural_image
Line drawing of a microwave oven with a cup and base (no text or symbols)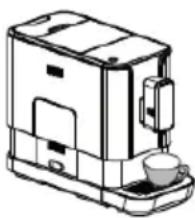
natural_image
Line drawing of a modern coffee maker with a cup and lid (no text or symbols)natural_image
Line drawing of a portable appliance with a cup and lid, no text or symbols present
natural_image
Line drawing of a coffee maker with a cup and lid (no text or symbols)natural_image
Line drawing of a portable coffee maker with a cup and lid, no text or symbols present
natural_image
Line drawing of a coffee maker with a cup and lid (no text or symbols)natural_image
Line drawing of a microwave oven with a cup and lid, showing internal components (no text or symbols)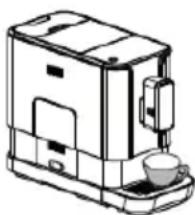
natural_image
Line drawing of a coffee maker with a cup and lid (no text or symbols)natural_image
Line drawing of a portable kitchen appliance with a cup and lid, no text or symbols present
natural_image
Line drawing of a coffee maker with a cup and lid (no text or symbols)natural_image
Line drawing of a microwave oven with a cup and lid, showing internal components (no text or symbols)
natural_image
Line drawing of a coffee maker with a cup and lid (no text or symbols)natural_image
Line drawing of a portable coffee maker with a cup and baseplate (no text or symbols)
natural_image
Line drawing of a coffee maker with a cup and lid (no text or symbols)natural_image
Line drawing of a microwave oven with a cup and lid, no text or symbols present