Cremis CD 2011 - Coffee machine AMICA - Free user manual and instructions
Find the device manual for free Cremis CD 2011 AMICA in PDF.

| Product Type | Programmable filter coffee maker |
| Brand | Amica |
| Model | Cremis CD 2011 |
| Power Supply | 220-240 V ~ 50/60 Hz |
| Rated Power | 1100 W |
| Carafe Capacity | 1800 ml (approx. 12 cups) |
| Dimensions (approx.) | 30 x 20 x 35 cm |
| Weight (approx.) | 3 kg |
| Main Functions | Delayed programming, keep warm (3 levels), iced coffee, intensity adjustment (mild, medium, strong), cup selector (2-12), auto shut-off |
| Display | LED screen with clock and function indicators |
| Coffee Type | Ground coffee (paper filter included) |
| Maintenance and Cleaning | Automatic descaling program, clean removable parts with soapy water |
| Safety | Auto shut-off in standby mode, overheat protection, auto shut-off when carafe removed >30 sec, child lock (not specified but supervision required) |
| Spare Parts and Repairability | Filter, carafe, funnel, spoon; repair by authorized service |
| General Information | Household use only; do not immerse in water; use cold water; unwind cable before use |
Frequently Asked Questions - Cremis CD 2011 AMICA
User questions about Cremis CD 2011 AMICA
0 question about this device. Answer the ones you know or ask your own.
Ask a new question about this device
Download the instructions for your Coffee machine in PDF format for free! Find your manual Cremis CD 2011 - AMICA and take your electronic device back in hand. On this page are published all the documents necessary for the use of your device. Cremis CD 2011 by AMICA.
USER MANUAL Cremis CD 2011 AMICA
natural_image
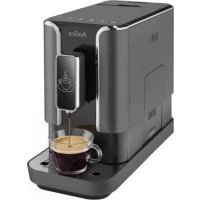
Black Amica coffee maker with digital display and glass cup, no visible text or symbols on device bodyPL INSTRUKCJA OBSŁUGI 3
EN USER MANUAL 8
CS NÁVOD K OBSLUZE 13
SK NÁVOD NA OBSLUHU 18
text_image
Technical diagram of a kitchen grater with numbered parts for identification and assembly reference.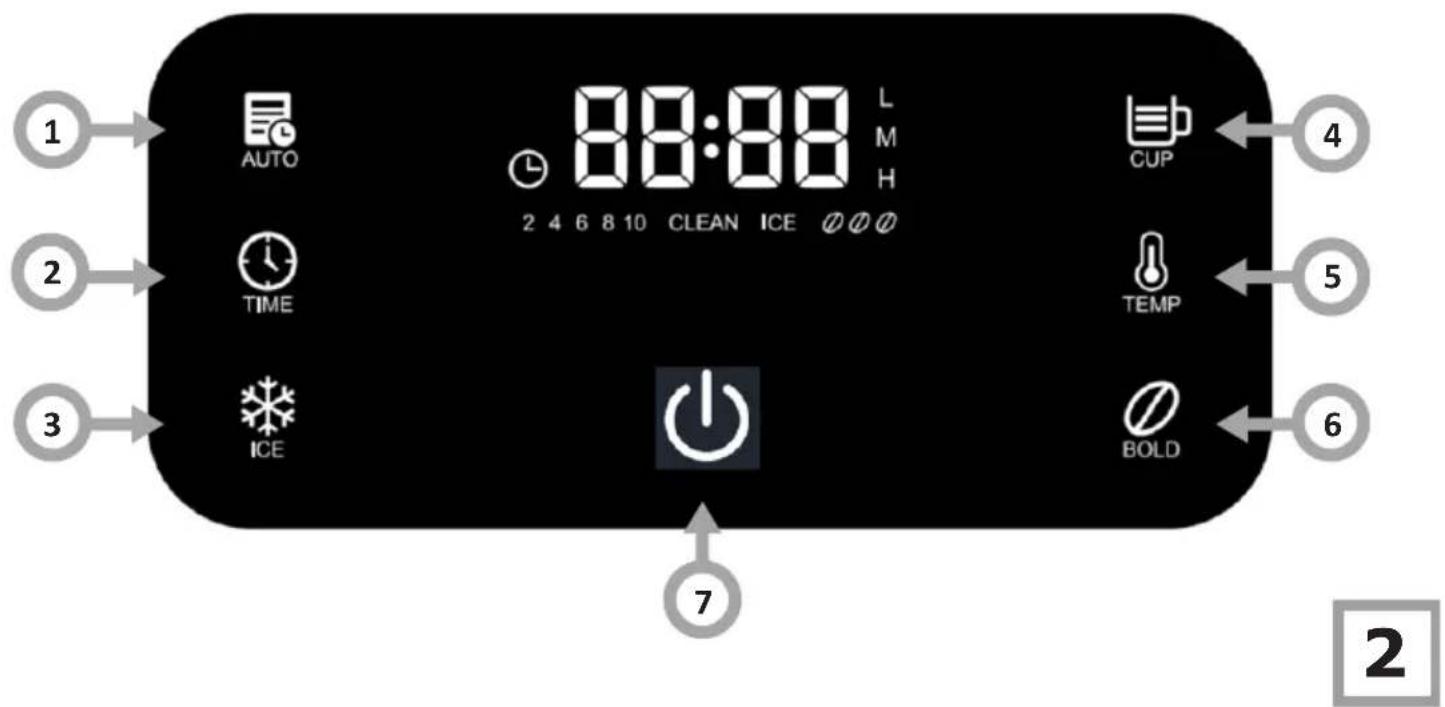
text_image
1 AUTO 2 4 6 8 10 CLEAN ICE TIME ICE 88:88 L M H CUP 4 5 6 7 BOLDWSKAZÓWKI DOTYCZĄCE BEZPIECZEŃSTWA UŻYTKOWANIA
natural_image
Line drawing of a rectangular industrial or laboratory device with a handle and base, no text or symbols present.WSKAZÓWKI:
SAFETY INSTRUCTIONS FOR USE
To avoid the risk of serious injury when using the appliance, follow basic safety rules, including the following. BEFORE OPERATING THE APPLIANCE, CAREFULLY REVIEW THE INSTRUCTIONS, NOTES, AND WARNINGS.
- Ensure that the mains voltage specified on the rating plate corresponds to the voltage of the local electricity grid.
- Unwind and straighten the power cord before using the appliance.
- Place the appliance on a solid, level surface.
- Place and use the appliance on a stable surface.
- Unplug the appliance from the power socket in the following circumstances:
- Before you add water to the water tank
- Before you remove or install any parts of the appliance.
- Before cleaning or maintenance
- When the appliance mal- functions
- When you have finished using the appliance
• Empty the water tank when the appliance is not going to be used for a long time - Allow the appliance to cool down before installing or removing parts, and before cleaning the appliance.
• Always use cold water to make coffee. Warm water
or other liquids may damage the appliance.
- If the power cord is damaged it must be replaced to prevent danger. The power cord must be replaced by a service technician authorised by the manufacturer or by another qualified person.
• Children shall not play with the appliance.
- Always unplug the appliance from the power supply when leaving it unattended and before installing or removing accessories and before cleaning.
- This appliance can be used by children aged 8 years and older or by persons with physical, mental or sensory handicaps, or by those who are inexperienced or unfamiliar with the appliance, provided they are supervised or have been instructed how to safely use the appliance and are familiar with risks associated with the use of the appliance. Ensure that children do not play with the appliance. Do not allow children to clean and maintain the appliance unless they are 8 years or older and are supervised by a competent person.
- Children do not realize the dangers that can arise when using electrical appliances; therefore keep the appliance out of reach of children.
- Do not use a cracked carafe or a carafe with a loose
or damaged handle.
- Scalding may occur if the lid is removed during the brewing cycle.
- Do not operate the coffee maker without water.
- This appliance is for household use only.
- Do not let children approach the appliance or the power cord during operation.
- Do not leave the appliance unattended when it is connected to the power supply.
- Do not use the appliance outdoors.
- Do not use the appliance for purposes other than those for which it is intended.
- Do not let the power cord hang over the edge of a table, counter, or touch a hot surface.
- Do not use or place the appliance on wet or hot surfaces.
- Do not immerse the appliance in water or any liquids.
- Do not use the appliance if any parts are damaged.
- Do not use the appliance if it is not operating properly.
- Do not unplug the appliance by pulling the power cord.
- Do not try to open the body or disassemble any parts from the appliance.
- It is not recommended to use accessories not included in the box. This can be dangerous and should be avoided.
- Do not put the appliance
on or in the vicinity of a hot gas or electric burner or on an oven.
Electrical requirements: Make sure that the voltage indicated on the nameplate corresponds to that of your home electrical mains. Alternating current must be used, typically marked \~.

In accordance with European Directive 2012/19/EU and Polish legislation regarding used electrical and electronic goods, this appliance is marked with the symbol of the crossed-out waste container. This marking indicates that the appliance must not be disposed of together with other household waste after it has been used.
The user is obliged to hand it over to waste collection centre collecting used electrical and electronic goods. The collectors, including local collection points, shops and local authority departments provide recycling schemes.
Proper handling of used electrical and electronic goods helps avoid environmental and health hazards resulting from the presence of dangerous components and the inappropriate storage and processing of such goods.
SPECIFICATION:
Model - CD 2011
Rated voltage - 220-240V\~ 50/60Hz
Rated power - 1100 W
Carafe capacity - 1,800 ml
FEATURES AND COMPONENTS (fig. 1, page 2):
-
Filter
-
Funnel
-
Coffee spoon
-
Lid
-
Carafe handle
-
Carafe
-
Hinged lid
-
Water container
-
Carafe cavity
-
Warming base
CONTROL PANEL (fig. 2, page 2):
| 1 Auto name start settings | |
| 2 Set time clock TIME | |
| 3 Iced time function ICE | |
| 4 Num of cups setting CUP | |
| 5 Keep warm function TEMP | |
| 6 Coffee Intensity setting BOLD | |
| 7 Power off | |
BEFORE FIRST USE:
Remove the protective film, stickers and other packaging materials from the appliance. To use your appliance, first select a safe, level, and stable surface with an easily accessible power outlet. Then
- Ensure that all accessories are included with your appliance.
- Carefully examine the appliance for any mechanical damage that may have occurred during shipping.
- Fill the water reservoir with fresh, cold water up to the maximum level mark.
- Start the coffee maker to simulate brewing, but do not add ground coffee to the filter.
- Repeat this process 2-3 times, discarding the brewed water after each cycle. The purpose of this step is to flush the appliance's internal water system and eliminate any contamination remaining from the production process.
- Remove all detachable parts of the coffee maker that contact water or coffee, such as the filter, carafe, and lid.
- Wash these components in warm water using a mild detergent.
- Thoroughly rinse all components under running water to ensure removal of all detergent residue.
- Dry the washed components using a soft, clean cloth or allow them to air dry completely.
Note!
- The first brew of coffee after these steps might have a slight aftertaste from the manufacturing process, so it's advisable to discard the first cup.
- Never fill the water tank with warm, hot, carbonated water or any other liquid that may damage the water tank and the appliance.
USE THE APPLIANCE.
- Open the hinged lid. Fill the water reservoir to the maximum level indicated on the water level indicator.
- Position the funnel within the funnel holder, verifying that it is properly secured. Then, correctly position the filter within the funnel.
- Pour ground coffee into the filter. Generally, one level tablespoon of ground coffee is recommended per cup, though you may adjust the quantity to suit your preference. Then close the hinged lid.
- Place the carafe on the warming base.
- Plug the power cord into an electrical outlet.
- Set the desired function by following the instructions in the "Set functions and operating modes" section, then press the power button to begin brewing coffee.
- You can interrupt the brewing process at any time by pressing the power button once. The appliance will resume brewing when you press the power button again.
- Remove the carafe to serve the coffee once brewing is complete (about two minutes after the coffee stops dripping).
Note!
- You can remove the carafe, pour and serve the coffee at any time. The appliance will automatically pause the flow of brewed coffee. The flow of brewed coffee will pause for approximately 30 seconds, so ensure you remove the carafe and serve the coffee within this time.
- Expect to get less coffee than the amount of water you added, because the coffee grounds will absorb some of the water.
- Once brewing is finished, if you don't intend to serve the coffee right away, leave the coffee maker plugged in to keep the coffee warm in the carafe.
- Ensure the coffee maker is always turned off and unplugged when it is not in use.
Warning:
- To pour coffee, tilt the carafe gently, ensuring the angle from upright doesn't exceed about 45 degrees. Pour the coffee at a slow and steady pace until the carafe is completely empty. Pouring too quickly can cause the coffee in the carafe to spill onto the lid and flow out through both edges, potentially leading to injury.
- Do not open the top hinged lid of the coffee maker during brewing to avoid being scalded by steam.
SET FUNCTIONS AND OPERATING MODES
- Once the coffee maker is connected to the mains power supply, it will initialize. All six function indicators will illuminate.
- The indicator light on the button marked with the symbol will illuminate dimly.
- The "00:00" will appear flashing on the LED display, indicating that the clock must be set - please consult the "Set the clock" section for instructions on how to do this.
- If you fail to set the clock within 5 seconds, the appliance will automatically accept the current time as the default setting. "00:00" will stop flashing and the colon ":" between the digits will start flashing to indicate that the clock is running.
- You can also immediately confirm the current time by pressing the Button. Then, all six function indicators will illuminate brightly, the indicator on the Button will illuminate dimly, and the display will light up.
- After one minute of inactivity, the appliance will automatically enter standby mode.
1. Standby:
- The button indicator is dimly lit.
- The remaining six function indicators are off.
- The display is dimmed and only displays the time.
- Press the button in standby to activate the appliance.
2. Operation:
- All six function indicator lights are brightly illuminated.
- The button indicator is dimly lit.
• The display is brightly lit.
3. Quick brew mode:
- When the appliance is on, press the power button and it will illuminate brightly while the other six function indicators turn off.
• The LCD display remains lit up. - The quick brew function begins and operates until the thermostat deactivates the heater.
- Once brewing is complete, the light on the 🎨 button stays on, the LCD display is lit, and the other function indicators are off.
- The coffee maker will beep three times after 2 minutes and automatically enter the keep-warm mode.
- Following 40 minutes in keep-warm mode, the coffee maker will automatically transition to standby mode.
(Note: To immediately stop brewing, press the power button at any point during the brewing cycle.
4. Stop brewing:
- To immediately stop brewing, press the power button ⏻t any point during the brewing cycle.
- One minute after brewing stops, the appliance will automatically enter standby mode if there is no user interaction.
SET THE CLOCK:
When the appliance is on, press the 📄 button to enter the clock setting. The hour digits will start flashing while : and minutes digits do not flash.
- Each time you briefly press the Sutton, the hour setting will increase by one. "01:00" will appear on the display. Press and hold the Sutton for 2 seconds to quickly advance through the hours until you reach "23:00". After "23:00", the cycle will repeat from "00:00". After setting the desired hour, wait 3 seconds. The coffee maker will confirm the set hour. After confirming the hour setting, the appliance will automatically switch to the minutes setting mode. The minute digits on the display will start flashing.
- Each time you briefly press the Button, the minutes setting will increase by one. "00:01" will appear on the display. Each time you briefly press the button, the minutes setting will increase by one. Press and hold the Button for 2 seconds to quickly advance through the minutes until you reach "00:59". After "00:59", the cycle will repeat from "00:00". After setting the desired minutes, wait 3 seconds. The coffee maker will confirm the set minutes, the minute digits will stop flashing, and the clock is now set.
- When the current time is displayed, the “:” on the display flashes once per second. Other functions are unavailable in clock setting mode.
COFFEE INTENSITY SETTING:
- By default, the display shows a single coffee bean icon indicate the quick coffee brewing setting of mild intensity.
- Select two coffee beans medium intensity coffee.
- Select three coffee beans with high intensity coffee.
- Once the coffee flavour intensity is set, the appliance permanently remembers the current setting.
-
Set coffee flavour intensity:
-
Press the coffee intensity icon once to display two coffee beans medium intensity coffee.
- Press the coffee intensity icon @ gain to display three coffee beans @ high intensity coffee.
- Press the coffee intensity icon again to display one coffee bean for mild intensity coffee.
SET THE NUMBER OF CUPS:
- Press the “Cups” button once and the display will show 2 cups. Each subsequent press of the “Cups” button will display 4, 6, 8, and then 10 cups. Once the display shows 10 cups, pressing the “Cups” button again will clear the selection, returning to the default setting. The digital cup indicators on the display will turn off, and the coffee maker will revert to the default setting of 12 cups. Why you press the “Cups” button again, the display will show 2 cups
- The default number of cups for the coffee maker is 12.
- Once you set the number of cups, the appliance permanently remembers the current setting.
- To set the number of cups, press the "tups" button repeatedly and the display will cycle through the values of 2, 4, 6, 8, and 10. These values correspond to the number of cups.
SET THE KEEP WARM FUNCTION:
- The keep warm function offers three levels — high, medium, and low. Press the icon to select the keep warm level. The currently selected keep-warm level is shown on the display — Low (L), Medium (M), High (H); by default, the keep-warm level is Medium (M).
- Each time you press the ☐ on, you will cycle through the keep warm levels — Low (L), Medium (M), High (H). By default, the coffee will be kept warm for 40 minutes after brewing at medium intensity.
- Once the keep warm level is set, the appliance will permanently remember the current setting.
ICED COFFEE FUNCTION:
To activate the iced coffee function, first press the icon, and the "ICE" symbol will appear on the display and then, press 🔒.
Note! You can prepare up to 7 cups of coffee using the iced coffee function. With the iced coffee function activated, the keep warm and number of cups functions are unavailable.
AUTOMATIC START FUNCTION:
The automatic start function allows you to set a specific time for the coffee maker to begin brewing. You can set a specific time for the coffee maker to automatically begin brewing coffee.
- Press the automatic start button once, and the clock icon on the display will flash, indicating the appliance is in time setting mode. Press the time button and 01:00 will appear on the display. Each time you briefly press the button, the hour setting will increase by one. Press and hold the time button for 2 seconds to quickly advance through the hours until you reach "23:00". After "23:00", the cycle will repeat from "00:00". After setting the time, press the automatic start button or simply wait 3 seconds to confirm. The hour digits will stop flashing while the minute digits will begin flashing.
- When the minute digits start flashing, press the time button once, and the display will then show 00:01. Each time you briefly press the button, the minutes setting will increase by one. Press and hold the time button for 2 seconds to quickly advance through the minutes until you reach "00:59". The display will then reset to "00:00", and the process will repeat if you continue holding the button. After setting the time, press the automatic start button or simply wait 3 seconds to confirm. The minutes will stop flashing. The automatic start time is now set and the button on the display will stop flashing, indicating that the automatic start function has been activated. (The display shows 00:00 by default.)
- To cancel the automatic start, press the button, and the
automatic start icon 📊will disappear from the display. If you want to set the automatic start time again, repeat steps 1-2.
Note!
With the automatic start time set, you can still adjust other settings on the coffee maker, such as the number of cups, whether to prepare iced coffee, or the coffee intensity.
- To set the coffee intensity for automatic brewing, first press the coffee intensity button ☐ choose your preferred flavour strength, and then press the automatic start button ☐ to set the brewing start time. The clock ☐ on the display will stop flashing, indicating that the automatic start function has been activated.
- To set the number of cups for automatic brewing, first press the number of cups button ☐ choose your number of cups, and then press the automatic start button ☐ to set the brewing start time. The clock ☐ on on the display will stop flashing, indicating that the automatic start function has been activated.
- To set the keep warm function for automatic brewing, first press the keep warm function button to choose your preferred warming level, and then press the automatic start button to set the brewing start time. The clock is on the display will stop flashing, indicating that the automatic start function has been activated.
APPLIANCE SETTINGS RETENTION:
Should the power supply be interrupted or the power cord be accidentally disconnected while the appliance is operating, it will automatically resume the previous operation from where it stopped as long as the power is restored within 15 seconds, and no buttons need to be pressed. If a power outage lasts longer than 15 seconds, the default settings will appear on the display, and you will need to reinitialise the appliance.
DESCALE THE APPLIANCE
- When the coffee maker has been used for 80 operating cycles, the CLEAN message will light up on the display to remind you that descaling is needed.
- To start descaling, add a descaling solution (water mixed with a descaling agent) to the water reservoir or to rinse the appliance, add only water and then, press and hold the button for 3 seconds to begin the descaling. During descaling, the CLEAN message on the display flashes once per second, and the heater cycles on and off until the water in the water reservoir reaches the required temperature. After 2 minutes, the appliance will beep three times. If there is no further operation within the next minute, it will enter standby mode. Once descaling is completed, the "CLEAN" message on the display will turn off, and the cycle counter will start counting down again.
- To manually start descaling, add a descaling solution (water mixed with a descaling agent) to the water reservoir or to rinse the appliance, add only water and then, press and hold the button for 3 seconds to begin the descaling. During descaling, the CLEAN message on the display flashes once per second, and the heater cycles on and off until the water in the water reservoir reaches the required temperature. After 2 minutes, the appliance will beep three times. If there is no further operation within the next minute, it will enter standby mode. Once the descaling cycle is finished, the CLEAN message on the display will turn off. When the CLEAN message on the display flashes, press and hold the button for 3 seconds to cancel descaling. Once descaling is cancelled, the CLEAN message on the display will be turned off and the cycle counter will start counting down again.
- If a power outage occurs during the descaling process, the "CLEAN" message will remain displayed when power is restored, indicating that descaling needs to be repeated.
CLEANING AND CARE:
Disconnect the appliance from the power supply before cleaning! Do not immerse the cord, plug, or appliance in water or any other liquid to prevent electric shock. Always unplug the appliance after each use.
- Wash all removable parts of the appliance in hot water and a mild detergent after each use.
- To remove dust and stains, wipe the exterior of the appliance
with a soft, damp cloth.
- During brewing, water droplets may collect above the funnel and drip onto the coffee maker's base. To control drips, wipe the base of the coffee maker with a clean, dry cloth after each use.
- Gently wipe the warming plate with a damp cloth. Do not use abrasive or scouring cleaning agents to clean the appliance.
- Assemble all appliance components and store the appliance, ready for the next use.
POWER CORD STORAGE COMPARTMENT:
You can store the power cord in the compartment located on the rear of the appliance. Leave the required length of the power cord exposed, then store the rest inside the appliance.

natural_image
Line drawing of a rectangular industrial container with a handle and side base (no text or symbols)NOTE:
- For delicious coffee, keeping you coffee maker clean is crucial. Regularly clean your coffee maker by following the instructions in the “CLEANING AND MAINTENANCE” chapter.
• Always use fresh, cold water in your coffee maker. - Store unused ground coffee in a cool, dry place. To maintain freshness, tightly reseal any opened packet of ground coffee and store it in the refrigerator.
- To enjoy the best coffee flavour, buy whole coffee beans and grind them finely just before brewing.
- Reused ground coffee significantly reduces flavour, so it's best to use fresh grounds each time. Reheating coffee is not recommended because it tastes best immediately after brewing.
- Clean your coffee maker regularly to prevent oil build-up, which can sometimes be more noticeable if over-brewing occurs. Small droplets of oil on the surface of brewed black coffee are due to the natural oils being extracted from the ground coffee during the brewing process.
- Droplets of oil in your brewed coffee are often more common when using heavily roasted coffees, as these beans tend to contain and release more oils.