RP8000 MK2 - Turntable Reloop - Free user manual and instructions
Find the device manual for free RP8000 MK2 Reloop in PDF.

| Product type | Professional direct-drive turntable |
| Drive system | Quartz-controlled direct drive, high torque |
| Playback speeds | 33 1/3, 45, 78 RPM |
| Platter | Die-cast aluminum |
| Tonearm height adjustment | Up to 6 mm |
| Tracking force | 3.5 - 8.5 g (cartridge included 13 - 18 g) |
| Anti-skating | Adjustable dial |
| Pitch range | ±8%, ±16%, ±50% |
| Starting torque | Adjustable from 2.8 to 4.5 kg/cm |
| Start/stop time | Adjustable from 0.2 to 6 seconds |
| Signal-to-noise ratio | > 55 dB (1 kHz, input 4 mV) |
| Wow and flutter | < 0.01% WRMS |
| Power consumption | 17 W |
| Power supply | AC 115/230 V, 60/50 Hz (EU/US); AC 100 V, 50/60 Hz (JP) |
| Dimensions (W x D x H) | 458 x 354 x 144.6 mm |
| Weight | 11.8 kg |
| MIDI functions | MIDI control via USB, 8 drum pads, CUE, Sampler, Loop, Roll, Slicer, Pitch Play, User modes |
| Needle illumination | Adjustable bulb, chassis-powered |
| Platter Link | Link between two turntables for simultaneous control |
| Platter Play | Melody creation function by speed variation via pads |
Frequently Asked Questions - RP8000 MK2 Reloop
User questions about RP8000 MK2 Reloop
0 question about this device. Answer the ones you know or ask your own.
Ask a new question about this device
Download the instructions for your Turntable in PDF format for free! Find your manual RP8000 MK2 - Reloop and take your electronic device back in hand. On this page are published all the documents necessary for the use of your device. RP8000 MK2 by Reloop.
USER MANUAL RP8000 MK2 Reloop
Deutsch. 02-07
English 08-13
Francais 14-19
Espanol. 20-25
RP8000MK2
PROFESSIONAL QUARTZ DIRECT DRIVE TURNTABLE

Bedienungsanleitung
ACHTUNG!
For your own safety, please read this operation manual carefully before initial operation! All persons involved in the installation, setting-up, operation, maintenance and service of this device must be appropriately qualified and observe this operation manual in detail. This product complies with the requirements of the applicable European and national regulations. Conformity has been proven. The respective statements and documents are deposited at the manufacturer.
Mode d'emploi
ATTENTION!
To prevent fire or avoid an electric shock do not expose the device to water or fluids!
Never open the housing!
ATTENTION!
Keep information for further reference!
11.2 Firmware Upgrade
Safety Instructions.. 8
Application in accordance with regulations....8
Maintenance 8
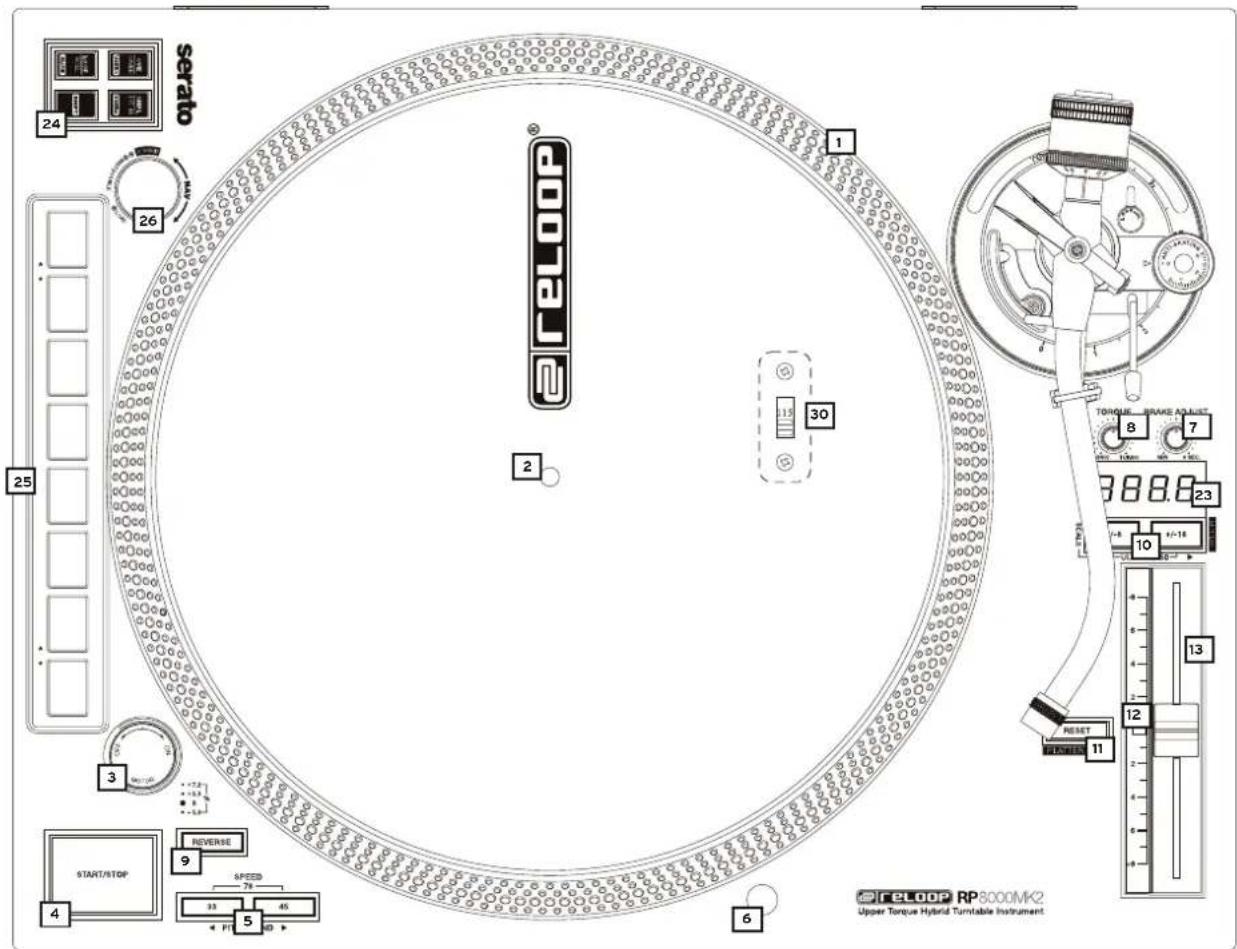
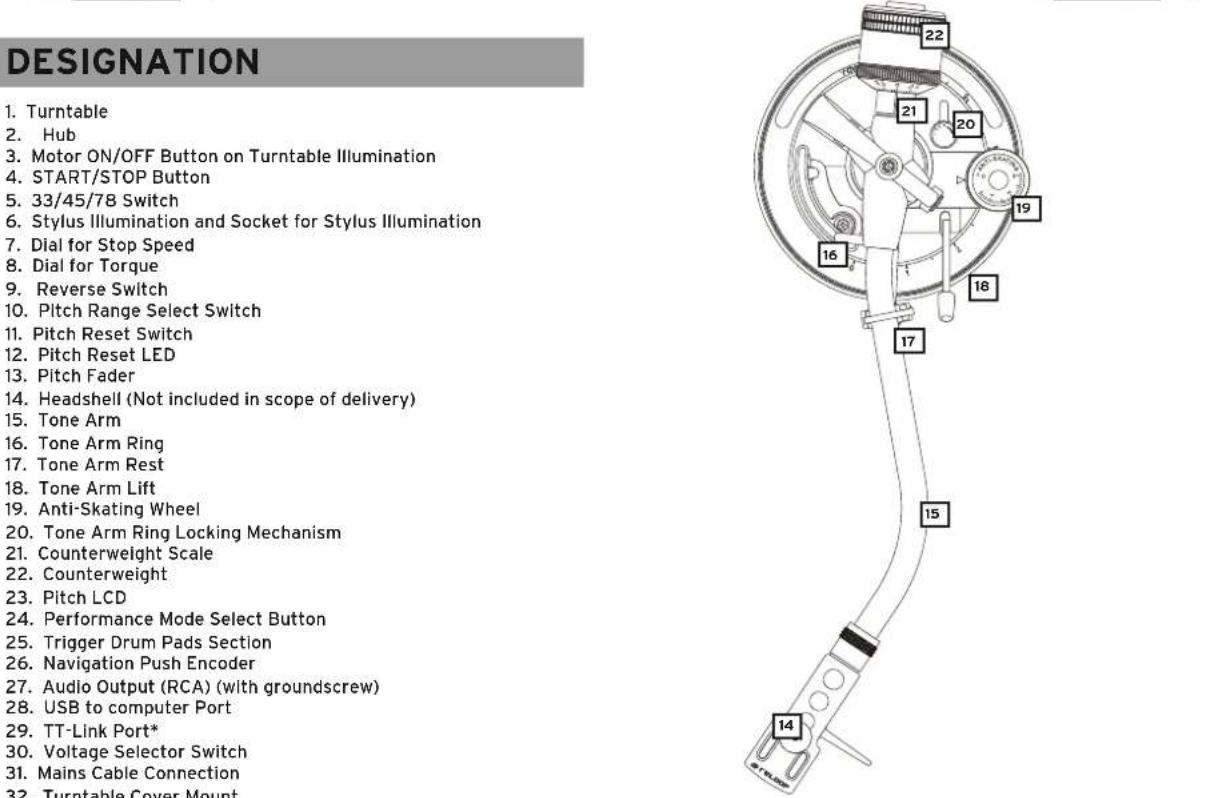
Designation 9
Assembly & Connections. 10
Operation 10
- Counterweight 10
- Anti-Skating Wheel 10
- Tone Arm Height 10
4.Power On. 10 -
Playback... 10
-
Needle Illumination 10
- Pitch Fine Adjustment.. 10
- Stop Speed Adjustment 11
- Torque Adjustment 11
MIDI 11
10.1 Performance Mode-Section 11
10.2 Navigation Encoder 11
10.3 Deck Selection.. 11
10.4 Turntable Link 11
10.5 Platter-Play 11
10.5.1 Platter Play toggle 11
10.5.2 Pad section 11
10.5.3 Octave Range Selector 11
10.5.4 Scale Selection 11
10.5.5 External Platter Play control... 11
11. Firmware Settings.. 12
11.1 LED Check 12
11.2 Firmware Upgrade.. 12
11.3 Advanced MIDI-Functions.. 12
Technical Specifications 12
CAUTION! For your own safety, please read this operation manual carefully before initial operation! All persons involved in the installation, setting-up, operation, maintenance and service of this device must be appropriately qualified and observe this operation manual in detail. This product complies with the requirements of the applicable European and national regulations. Conformity has been proven. The respective statements and documents are deposited at the manufacturer.
Please remove the Reloop RP-8000MK2 from its packaging. Check before initial operation to make sure that the device has not been visibly damaged during transport. If you detect any damage to the power cable or casing, do not operate the device. Contact your specialised dealer.
SAFETY INSTRUCTIONS
CAUTION! Please exercise particular caution when handling power voltage. This voltage rating may lead to a critical electrical shock! Any damage caused by the non-observance of this operation manual excludes any warranty claims. The manufacturer is not liable for any damage to property or for personal injury caused by improper handling or non-observation of the safety instructions.
This device left the works in perfect condition. To maintain this condition and to ensure a risk-free operation the user must observe the safety instructions and warnings contained in this operation manual.
- For reasons of safety and certification (CE) the unauthorised conversion and/or modification of the device is prohibited. Please note that in the event of damage caused by manual modification to this device, any warranty claims are excluded.
- The inside of the device does not contain any parts which require maintenance, with the exception of wear parts that can be exchanged from the outside. Qualified staff must carry out maintenance, otherwise warranty does not apply!
- Ensure that the power will only be supplied after the device has been fully set up. Always plug in the mains plug last. Ensure that the mains switch is in the "OFF" position when connecting the device to power.
- Only use cables that comply with regulations. Observe that all jacks and bushes are tightened and correctly hooked up. Refer to your dealer, if you have any questions.
- Ensure that when setting up the product, the mains cable is not squashed or damaged by sharp edges.
- Prevent the mains cable from coming into contact with other cables! Exercise great care when handling mains cables and connections. Never touch these parts with wet hands!
- Connect the power cable exclusively to appropriate shock-proof outlets. The only supply point to be used is a supply outlet in accordance with specifications of the public supply network.
- Disconnect the device from the supply outlet when not in use and before cleaning! Be sure to hold the mains plug by the body. Never pull the mains cord! When not using the turntable for longer periods of time, close the dust guard.
- Position the device on a horizontal and stable low-flame base.
- Avoid any concussions or violent Impact when installing or operating the device.
- When selecting the location of installation, make sure that the device is not exposed to excessive heat, humidity, and dust. Be sure that no cables lie around openly. You will endanger your own safety and that of others!
Do not rest any containers filled with liquid that could easily spill onto the device or in its immediate vicinity. If, however, fluids should access the inside of the device, immediately disconnect the mains plug. Have the device checked by a qualified service technician before re-use. Damage caused by fluids inside the device is excluded from warranty.
Do not operate the device under extremely hot (In excess of 35^ ) or extremely cold (below 5^ ) conditions. Keep the device away from direct exposure to the sun and heat sources such as radiators, ovens, etc. (even during transport in a closed vehicle). Always ensure a sufficient ventilation.
- The device must not be operated after being taken from a cold environment into a warm environment. The condensation caused hereby may destroy your device. Do not switch on or operate the device until it has reached ambient temperature!
- Controls and switches should never be treated with spray-on cleaning agents and lubricants. This device should only be cleaned with a damp cloth. Never use solvents or cleaning fluids with a petroleum base for cleaning.
- When relocating, the device should be transported in its original packaging.
- When starting operation, the crossfaders and volume controls of your amplifier must be set to minimum level. Bring the loudspeaker switches into the "OFF" position. Wait between 8 to 10 seconds before increasing the volume to avoid damage to loudspeakers and the diplexer.
Devices supplied by voltage should not be left in the hands of children. Please exercise particular care when in the presence of children.
- At commercial facilities the regulations for the prevention of accidents as stipulated by the association of professional associations must be observed.
- At schools, training facilities, hobby and self-help workshops the operation of the device must be monitored with responsibility by trained staff.
- Keep this operation manual in a safe place for later reference in the event of questions or problems.
APPLICATION IN ACCORDANCE WITH REGULATIONS
- This equipment is a professional turntable that plays conventional 12" and 7" records. The equipment is connected to a mixing console.
- This product is authorized for connection to AC 115/230V, 60/50Hz or AC100V, 50/60Hz (for JP) and is designed exclusively for indoor application.
If the device is used for any other purposes than those described in the operation manual, damage can be caused to the product, leading to the exclusion of warranty rights. Moreover, any other application that does not comply with the specified purpose harbours risks such as short circuit, fire, electric shock, etc. - The serial number determined by the manufacturer must never be removed to uphold the warranty rights.
MAINTENANCE
- Check the technical safety of the device regularly for damage to the mains line or casing, as well as for wear of wear parts such as rotary, sliding switches and the pick-up.
- If it is to be assumed that a safe operation is no longer feasible, then the device must be disconnected and secured against accidental use. Always disconnect the mains plug from the outlet!
- It must be assumed that a safe operation is no longer feasible, if the device bears visible defects, the device no longer functions, following longer storage under unfavorable conditions or after major transport stress.

* The maximum voltage/current power output is 5V, 0,2A. Please make sure the connected device's power consumption is not higher to avoid any damage.
ASSEMBLY & CONNECTIONS
- Connect the Turntable -1- to the motor. To do so, put the turntable above the Hub -2-.
- Put the included slipmat above the Hub -2- on the turntable.
- Connect the Counterweight -22- to the Tone Arm -15-.
NOTE! The counterweight Scale -21- must face the DJ.
4. Screw the Headshell -14- into the Tone Arm -15- after mounting your cartridge to the headshell as described in the following:
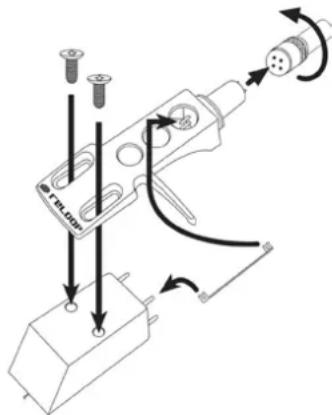
a) Connect the headshell's connecting wires to the cartridge's connection and observe the correct wire assignment.
| COLOUR: Channel and Polarity | |
| I. White (L+) Left, Positive Pole | |
| II. Blue (L-) Left, Negative Pole | |
| III. Red (R+) Right, Positive Pole | |
| IV. Green (R-) Right, Negative Pole |
b) Fix the cartridge via the included mounting screws.
NOTE! If you use a ready to mount SME system instead of a headshell system, screw it directly into the Tone Arm -15-. In this case you do not need the headshell.
- Insert the needle illumination in the intended socket -6-.
- Connect the Audio Output Cable -27- to the audio inputs of your mixer. Grounding the turntable is optional and usually only necessary under extreme circumstances.
- Connect the mains cable to the corresponding connection -31- and a power outlet.
OPERATION
1. Counterweight
Lower the Tone Arm Lift -18- to "down" position. Guide the Tone Arm -15- almost in front of the Turntable -1-. Adjust the Balancing Weight -22- by turning it clockwise as such that the Tone Arm does not lean up nor down, i.e. It should be balanced parallel to the record. Then return the Tone Arm to its support -17-. Set the Balancing Scale -21- of the Balancing Weight as such that the ,0^ position is above the marked line. Continue turning the Balancing Weight clockwise until the scale indicates the value which corresponds to the recommended stylus force of the pick-up system.
2. Anti-Skating Wheel
Adjust the Anti-Skating Wheel -19- as such that the value of the stylus force corresponds to the stylus force of the pick-up system.
3. Tone Arm Height
You can adjust the tone arm's height, if the cartridge you use necessitates this: First release the Tone Arm Ring Locking Mechanism -20- from the "LOCK" position. Now you can raise the tone arm via the Tone Arm Ring -16- in the scale's range by up to 6 millimeters (0 millimeters = default setting). Move the Tone Arm Ring Locking Mechanism back to "LOCK" position after the tone arm has been set to the desired height.
ATTENTION! The tone arm must not exceed the maximum height of 6 millimeters as otherwise damage to the tone arm socket cannot be excluded. Observe the tone arm ring's marking by all means!
4. Power On
After carrying out all connections turn on the device via the Power ON/OFF Button and the Motor ON/OFF Switch. The integrated turntable illumination and needle illumination will be activated.
5. Playback
Put a record on the slipmat on the turntable -1. Select the right speed via the 33/45/78 Switch -5-. The LED of the corresponding switch will go on.
NOTE! In order to select 78 RPM, press both 33 and 45 switches -5- simultaneously. Both LEDs will go on.
Press the Start/Stop Button -4-. Remove the needle protection from the cartridge. Bring the Tone Arm Lift -18- to the "Up" position and move the Tone Arm -15- above the point you wish to play. Put the Tone Arm Lift down so that it lowers itself onto the record's groove.
NOTE! It is possible to leave the Tone Arm Lift permanently in "Down" position and to lower the Tone Arm manually onto the desired position. When doing so, be sure not to damage the stylus of the Pick-Up System.
By pressing the Reverse Switch -9- the turntable will move counterclockwise; the LED will be lit. All functions of the RP-8000MK2 remain available. By pressing the button again, the turntable will move clockwise again; the LED will go out.
6. Neelde Illumination
The Needle Illumination -6- will be activated automatically, when turning on the motor power. You can freely move the lamp by 360^
NOTE! If you do not wish to use the needle illumination, just pull out the needle illumination from the socket.
7. Pitch Fine Adjustment
Via the Pitch Fader -13- you can steplessly adjust the record's pitch. Via the Pitch Range Button -10- you can choose between a pitch range of +/-8% and +/-16%. The respective LED will be lit.
NOTE! In order to select a pitch range of 50% , press both pitch range select switches simultaneously; both LEDs will be lit.
If you want to play a record at its original pitch, bring the pitch fader to the + / - 0% position. By using the Pitch Reset Switch -11- you can deactivate the pitch fine adjustment, the LED will go on. By pressing again the fine adjustment will be re-activated: the turntable returns to the speed set via the pitch fader and the LED will go out. The Pitch Reset LED -12- will be lit when in original pitch and when pitch fine adjustment is deactivated; when the pitch differs, it will go out.
8. Brake Speed Adjustment
Via the dial -7- you can steplessly adjust the motor's stop time in a range of 0.2 (dial to the left) - 6 seconds (dial to the right).
9. Torque Adjustment
Via the dial -8- you can steplessly adjust the motor's torque in a range of 2.8kg / cm (dial to the left) - 4.5 kg/cm (dial to the right).
10. MIDI
The RP-8000MK2 offers the possibility to control MIDI compatible software via the integrated USB Port -28-. This port is used for MIDI data and to control Serato DJ Pro and further MIDI compatible software. In the operating system the player will automatically be recognized as "RP8000MK2" via plug and play (compatible with Windows 7/8/10, macOS 10.10 or higher) without the need for a special driver.
10.1 Performance Mode-Section
Via the Performance Mode buttons it is possible to control various modes in Serato DJ Pro which can be reached through different layers. The first layer can be reached by pressing one of the performance modes. By pressing an active performance mode you will reach the second layer. By additionally pressing the Shift Button, you will reach the third layer.
FIRST LAYER
CUE Mode:
Via the 8 Drum Pads -25- it is possible to store and trigger up to 8 cue points. By additionally pressing the Shift Button, the corresponding cue point will be deleted. The colour coding corresponds to the cue point colour in Serato DJ Pro.
SAMPLER Mode:
By pressing, a loaded sample in one of the 8 Serato DJ Pro sample slots will be played back. By additionally pressing the Shift Button, the active sample will stop playback.
LOOP Mode:
Different Auto Loop Lengths can be (de-)activated by pressing the pads, corresponding to the set loop length range.
By pressing the Shift Button and Pad 1+2 this range can be moved.
SECOND LAYER
SAVED LOOP Mode
Allows to (de-)activate saved loops or to store an active loop in an empty slot. By additionally pressing the Shift Button, you will jump directly to the corresponding loop which in turn will also be activated.
PITCH PLAY Mode
The respective cue points are played back in different tone pitches. By holding the Shift Button, the cue point can be defined. By default this is the first cue point.
*To use this feature, the Serato plug-in "Pitch N Time" is necessary.
ROLL-Mode
In Loop Roll Mode a determined loop length is repeated for as long as the corresponding pad is being held. Each pad contains a different loop length.
THIRD LAYER
USER Mode 1&2
Here you can save one's own MIDI mappings. By opening the MIDI panel in Serato DJ Pro, it is possible to store a function on a free pad by clicking on the corresponding element in the software.
SLICER Mode
When Slicer is active, a determined section is sliced into 8 equal parts. These 8 parts are spread on the respective performance pads. When the Playhead reaches the end of a section, it continues to move ahead of the section and forms a new one.
10.2 Navigation Encoder
You can use this encoder to browse your DJ software's active playlist. By pressing, the selected song will be loaded into the respective deck.
10.3 Deck Selection
You can assign the RP-8000MK2 to various decks in your DJ software. To select which deck should be controlled please proceed as follows:
- Make sure that the RP-8000MK2 is turned on (see settings ON/OFF Button -33-).
- Press and hold the Navigation Encoder -26- for more than 3 seconds. The pitch display shows which channel is currently being used. "CH-1" corresponds to deck A (also called deck 1). "CH-2" corresponds to deck B, "CH-3" corresponds to deck C and "CH-4" corresponds to deck D.
- Now turn the Navigation encoder to select the desired channel.
- Confirm this change by pressing the Navigation encoder.
NOTE! You can carry out this setting also during ongoing operation.
10.4 Turntable Link
This turntable offers the possibility to link up to four RP-8000MK2 so that only one USB cable has to be connected to your computer. To do so, connect the USB cable from the USB Port -28- of one turntable to the USB TT Link Port -29- of the turntable that should be connected. Then connect the turntable with the free USB Port -28- to the computer. The turntable connected to the computer is always the master turntable and set automatically to deck 1 ("CH-1"). The second turntable will be assigned to deck 2. It is only recommended to connect Reloop RP-8000MK2 series to the TT-Link port.
10.5 Platter-Play
Platter Play is a term which refers to performing musically by controlling the turntable platter speed via the performance pads. It allows you to use the turntable as much more of an instrument in the hands of a musician. So the traditional turntable, which has historically been used to play and mix music, can now be used to create music like any other musical instrument. Through Platter Play, you are now able to play complete melodies in a wide variety of 22 scales and 34 keys. Whatever sound can be played on a turntable, can now be manipulated to the highest degree ever possible on a turntable.
10.5.1 Platter Play toggle
To enter and exit Platter Play mode, press Shift+Reset.
10.5.2 Pad section
In regular Platter Play mode, pads will be illuminated in either red, green or yellow, according to the currently selected octave range. Pressing any pad will result in the dedicated speed change of the platter, which will in turn, result in the corresponding key change to any sound playing on the turntable.
10.5.3 Octave Range Selector
Turning the encoder, allows you to cycle through the octaves in your chosen scale, and the corresponding keys within that particular octave.
10.5.4 Scale Selection
The scale selection buttons can be used to cycle through and select any of the 22 scales. The currently selected scale will be displayed in the LED display and will toggle to the corresponding key whenever a pad is pressed and held.
10.5.5 External Platter Play control
The turntable platter can also be controlled by connecting a compatible external MIDI device, such as a MIDI keyboard.
11. Firmware Settings
11.1 LED Check
Herewith you can check whether all of the RP-8000MK2's LEDs function flawlessly.
For the function test please proceed as follows:
- Make sure that the RP-8000MK2 is turned off and the USB-cable is unplugged.
- Press and hold the CUE button and the Shift button and simultaneously turn on the RP-8000MK2.
- Now release both buttons.
- Now all LEDs should be lit. You can turn the encoder -26- to adjust the LED brightness.
- In order to end the test, just turn off the device via the on/off button. The LED brightness will be saved.
11.2 Firmware Upgrade
The RP-8000MK2's firmware can be updated. Possible firmware updates will be offered by Reloop via www.reloop.com. This guarantees that your turntable can be updated with new features and improvements in the future.
- Make sure that the RP-8000MK2 is turned off and connected via USB to your computer.
- Hold the SHIFT and SAMPLER buttons and simultaneously turn on the RP-8000MK2
- Now release both buttons. The pitch LC display will read "Update".
- Start the upgrade program.
- Select the correct firmware file and press "Start". The upgrade will now be carried out. After carrying it out successfully unplug the USB cable from the RP-8000MK2.
NOTE! Please observe that Java Runtime Environment is installed on your computer to carry out the update. Further information can be found under www.java.com.
11.3 Advanced MIDL-Functions
By holding the SHIFT and LOOP buttons and simultaneously turning on the turntable, you will enter the advanced setup menu. Now each drum pad is equipped with a function that can be turned on/off. When lit green, the function is activated, when lit red, the function is deactivated.
| DRUM PAD FUNCTION | |
| #1 | PLAY Button, Reverse Button, 33/45 Button, Quartz Lock-Button, Pitch Fader, Torque Dial, Start/Brake Dial, 8/16%-Buttons additionally send MIDI. Please note that the respective analogue function will not be deactivated (Default On). |
| #2 The start | and standby sequence can be turned on/off |
| #3 When act | rated, the reverse function will be carried out for as long as the button is being held |
| #4 In Platter | Play mode the CUE and LOOP buttons can be used for pitch bending. |
| #5 (De-)activates playback speed 78 rpm | |
TECHNICAL SPECIFICATIONS
Type: manual quartz driven turntable with MIDI control
Drive: quartz driven upper torque direct drive
Motor: . brushless DC motor
3 speeds, fully manual
Turntable RPM: 331/3, 45 and 78 RPM
Turntable: aluminum die casting
Pitch: variably adjustable + / - 8% + / - 16% + / - 50%
Torque: adjustable from min. 2800 - 4500 qf-cm
Start up time / tempo change (33rpm): less than 0.2 sec.
Brake system: electronic brake
Wow and flutter: .01% WRMS*
S/N ratio: more than -55 dB
Admissible cartridge weight range: 3.5 - 8.5 g (incl. headshell 13 - 18 g)
Anti-skating range: 0 - 3 g
Adjustable brake time: 0.2 - 6 sec.
USBLINK power output: .0.2A
Power input: 17 W
Power supply: AC 115/230 V, 60/50 Hz (EU/US), AC 100 V, 50/60 Hz (JP)
Dimensions: 458 x 144.6 x 354 mm (w/h/d)
Weight: 11.8 kg
Incl. USB cable, slipmat & tone arm Illumination but without stylus
*Impact of stylus, record and tone arm not taken into account.
Note:
Subject to alterations.
The specified data is of approximate value.
INDEX
10.1 Section Performance Mode
Ave t e i a n t t t t t t t t t t t t t t t t t t t t t t t t t t t t t t t t t t t t t t t t t t t t t t t t t t f i e i i i i i i i i i i i i i i i i i i i i i i i i i i i i i i i i i i i i i i i i i i i i i i i i i i o
1. NIVEAU
Mode CUE:
2. Rueda anti-deslizamiento (anti-skating)
Subject to alterations.
Illustrations similar to original product.
Misprints excepted