Turn X - Turntable Reloop - Free user manual and instructions
Find the device manual for free Turn X Reloop in PDF.
| Product Type | Direct-drive turntable, fully manual |
| Brand | Reloop |
| Model | Turn X |
| Dimensions (W x D x H) | 460 x 367.3 x 172.6 mm |
| Weight | 10.35 kg |
| Power Supply | AC 100-240 V, 50/60 Hz, 3 W |
| Speeds | 33 1/3, 45 and 78 rpm |
| Motor | Brushless DC motor, 16 poles, 3-phase |
| Starting Torque | 4500 gf.cm |
| Wow and Flutter | < 0.1 % WRMS (JIS WTD) |
| Signal-to-Noise Ratio | > 60 dB (DIN-B) |
| Tonearm | S-shaped, static balance, effective length 230 mm |
| Pre-installed Cartridge | Ortofon 2M Blue (elliptical, tracking force 1.8 g) |
| Audio Outputs | 1 PHONO output (gold-plated), 1 GND ground terminal |
| Anti-skating | Range 0 to 3 g |
| Platter | Die-cast aluminum, 305 mm diameter, 2.1 kg |
| Adjustable Feet | Yes, height-adjustable |
| Dust Cover | Removable, with hinges |
| Included Accessories | Rubber mat, RCA cable, power cable, headshell, counterweight, manual |
| Maintenance | Clean with a slightly damp cloth; do not use solvents |
| Safety | Unplug before cleaning; do not expose to moisture; do not open the casing |
Frequently Asked Questions - Turn X Reloop
User questions about Turn X Reloop
0 question about this device. Answer the ones you know or ask your own.
Ask a new question about this device
Download the instructions for your Turntable in PDF format for free! Find your manual Turn X - Reloop and take your electronic device back in hand. On this page are published all the documents necessary for the use of your device. Turn X by Reloop.
USER MANUAL Turn X Reloop
natural_image
Black electronic typewriter with open lid and circular vent, no visible text or symbols on the device itselfBedienungsanleitung
ACHTUNG!
For your own safety, please read this operation manual carefully before initial operation! All persons involved in the installation, setting-up, operation, maintenance and service of this device must be appropriately qualified and observe this operation manual in detail. This product complies with the requirements of the applicable European and national regulations. Conformity has been proven. The respective statements and documents are deposited at the manufacturer.
Mode d'emploi
ATTENTION!
To prevent fire or avoid an electric shock do not expose the device to water or fluids! Never open the housing!
ATTENTION!
Keep information for further reference!
natural_image
Technical line drawing of a mechanical component with a circular arrow indicating rotation (no text or symbols)https://www.reloop-hifi.com/support-ticket-request
Reloop Hifi
www.reloop-hifi.com
Reloop
Global Distribution GmbH & Co. KG
Schuckertstrasse 28
48153 Münster / Germany
Fax: +49.251.6099368
For your own safety, please read this operation manual carefully before initial operation! All persons involved in the installation, setting-up, operation, maintenance and service of this device must be appropriately qualified and observe this operation manual in detail. This product complies with the requirements of the applicable European and national regulations. Conformity has been proven. The respective statements and documents are deposited at the manufacturer.
Please remove the Turn X from its packaging. Check before initial operation to make sure that the device has not been visibly damaged during transport. If you detect any damage to the power cable or the casing, do not operate the device. Contact your specialised dealer.
SAFETY INSTRUCTIONS
CAUTION!
Please exercise particular caution when handling AC 100 - 240 V, 50/60Hz power voltage. This voltage rating may lead to a critical electrical shock! Any damage caused by the non-observance of this operation manual excludes any warranty claims. The manufacturer is not liable for any damage to property or for personal injury caused by improper handling or non-observance of the safety instructions.
WARNING!
To prevent fire or avoid an electric shock do not expose the device to water or fluids! Never open the housing!
- This device left the factory in perfect condition. To maintain this condition and to ensure a risk-free operation the user must observe the safety instructions and warnings contained in this operation manual.
- For reasons of safety and certification (CE) the unauthorised conversion and/or modification of the device is prohibited. Please note that in the event of damage caused by the manual modification to this device any warranty claims are excluded.
- The inside of the device does not contain any parts which require maintenance, with the exception of wear parts that can be exchanged from the outside. Qualified staff must carry out maintenance, otherwise the warranty does not apply!
- The fuse must exclusively be exchanged against fuses of the same class, with the same trigger features and nominal current rating.
- Ensure that the power will only be supplied after the device has been fully set up.
- Only use cables that comply with regulations. Observe that all jacks and bushes are tightened and correctly hooked up. Refer to your dealer, if you have any questions.
- Ensure that when setting up the product, the mains cable is not squashed or damaged by sharp edges.
- Prevent the mains cable from coming into contact with other cables! Exercise great care when handling mains cables and connections. Never touch these parts with wet hands!
- Connect the power cable exclusively to appropriate shock-proof outlets. The only supply point to be used is a supply outlet in accordance with specifications of the public supply network.
- Disconnect the device from the supply outlet when not in use and before cleaning! Be sure to hold the mains plug by the body. Never pull the mains cord!
- Position the device on a horizontal and stable low-flame base.
- Avoid any concussions or violent impact when installing or operating the device.
- When selecting the location of installation, make sure that the device is not exposed to excessive heat, humidity and dust. Be sure that no cables lie around openly. You will endanger your own safety and that of others!
- Do not rest any containers filled with liquid that could easily spill onto the device or in its immediate vicinity. If, however, fluids should access the inside of the device, immediately disconnect the mains plug. Have the device checked by a qualified service technician before re-use. Damage caused by fluids inside the device is excluded from warranty.
- Do not operate the device under extremely hot (in excess of 35^ ) or extremely cold (below 5^ ) conditions. Keep the device away from direct exposure to the sun and heat sources such as radiators, ovens, etc. (even during transport in a closed vehicle). Always ensure sufficient ventilation.
- The device must not be operated after being taken from a cold environment into a warm environment. The condensation caused hereby may destroy your device. Do not switch on or operate the device until it has reached ambient temperature!
- Controls and switches should never be treated with spray-on cleaning agents and lubricants. This device should only be cleaned with a damp cloth. Never use solvents or cleaning fluids with a petroleum base for cleaning.
- When relocating, the device should be transported in its original packaging.
- When starting operation, the crossfaders and volume controls of your amplifier must be set to minimum level. Bring the loudspeaker switches into the "OFF" position. Wait between 8 to 10 seconds before increasing the volume to avoid damage to loudspeakers.
- Devices supplied by voltage should not be left in the hands of children. Please exercise particular care when in the presence of children.
- At commercial facilities the regulations for the prevention of accidents as stipulated by the organization of professional associations must be observed.
- At schools, training facilities, hobby and self-help workshops the operation of the device must be monitored with responsibility by trained staff.
- Keep this operation manual in a safe place for later reference in the event of questions or problems.
APPLICATION IN ACCORDANCE WITH REGULATIONS
- If the device is used for any other purposes than those described in the operation manual, damage can be caused to the product, leading to the exclusion of warranty rights. Moreover, any other application that does not comply with the specified purpose harbours risks such as short circuit, fire, electric shock, etc.
- The serial number determined by the manufacturer must never be removed to uphold the warranty rights.
MAINTENANCE
- Check the technical safety of the device regularly for damage to the mains line or the casing, as well as for wear of wear parts such as rotary and sliding switches.
- If it is to be assumed that the safe operation is no longer feasible, then the device must be disconnected and secured against accidental use. Always disconnect the mains plug from the outlet!
- It must be assumed that a safe operation is no longer feasible, if the device bears visible defects, if the device no longer functions, following longer storage under unfavourable conditions or after major transport stress.
text_image
4 RELOOP HF 1 2 3 78 45 33 off 10 9 8 6 7 5 4 TURNX Premium Class HF Tunable System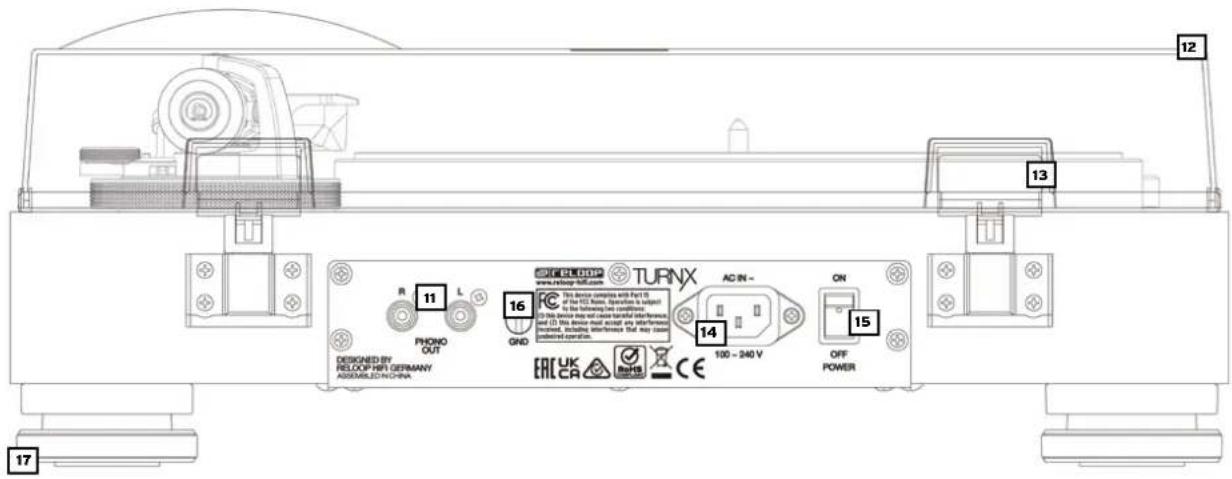
text_image
R 11 PHONO OUT DESIGNED BY RELOOP HWI GERMANY ASSEMBLED IN CHINA 16 GND TURNX www.risling.hall.com AC IN - 14 ON OFF POWER 15 13 12 17SCOPE OF DELIVERY
• Dust cover + 2x hinge
- Rubber mat
• Power supply cable
• RCA cable & grounding connection (gold-plated)
• Headshell with Ortofon 2M Blue (pre-installed)
- Turntable platter
• Operation manual
- Counterweight
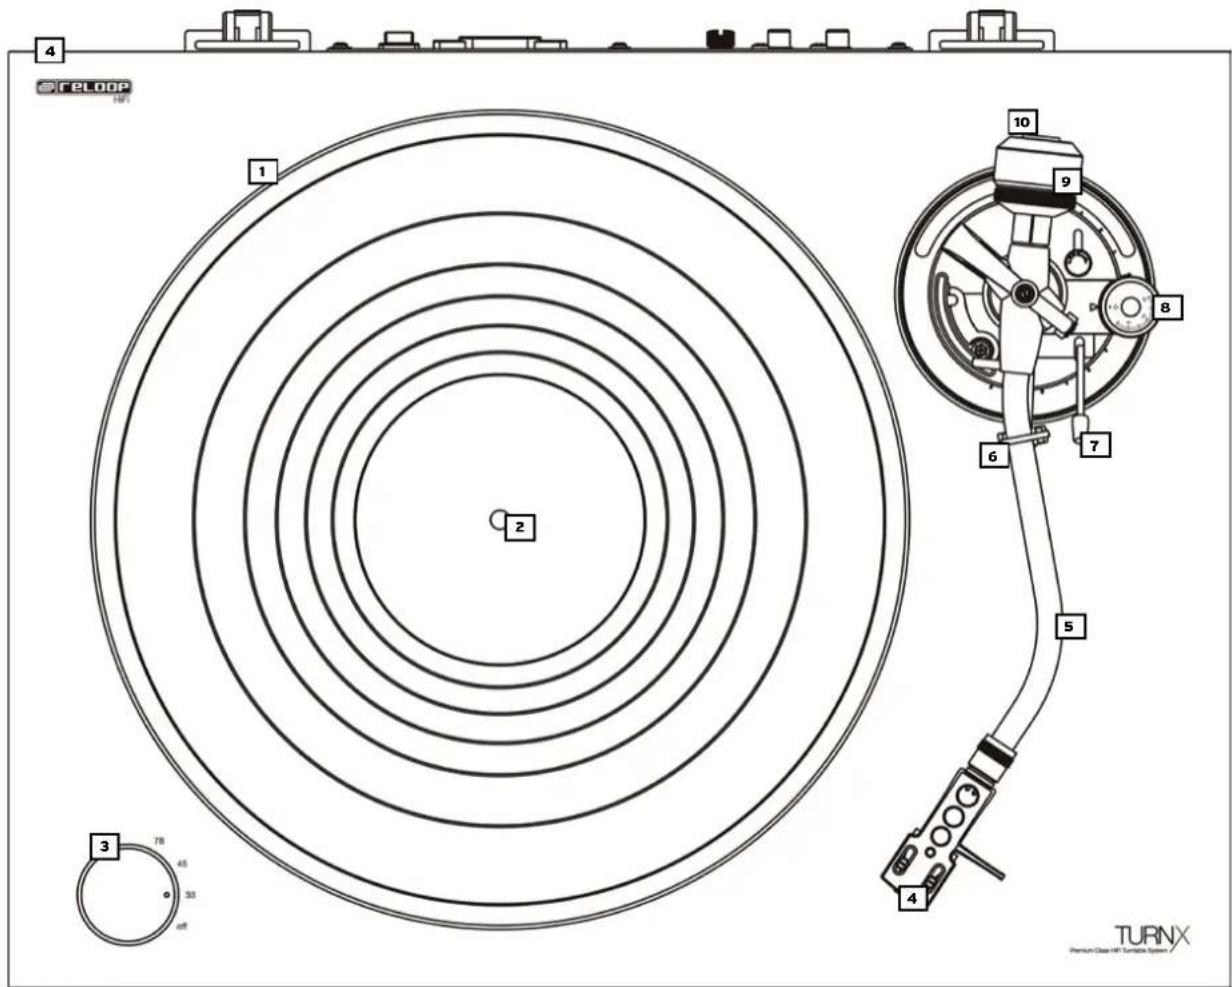
DESIGNATION
- Turntable platter
- Turntable platter Hub
- OFF/33/45/78 Switch
- Headshell with Ortofon 2M Blue (pre-installed)
- Tonearm (with SME Connection)
- Tonearm Support
- Tonearm Lift
- Anti-Skating Wheel
- Counterweight
- Counterweight Rod
- Audio Output (Phono/RCA gold-plated)
- Dust Cover
- Hinges for Dust Cover
- Power Supply Connection
- Power ON/OFF Switch
- Grounding Connection (GND)
- Height adjustable feet
SETTING UP AND CONNECTIONS
- Mount the Platter -1- onto the Record Platter Hub -2-.
- Place the supplied rubber mat onto the Record Platter -1-.
- Place the Counterweight -9- onto the Counterweight Rod -10-.
NOTE! The Counterweight Scale has to face forward.
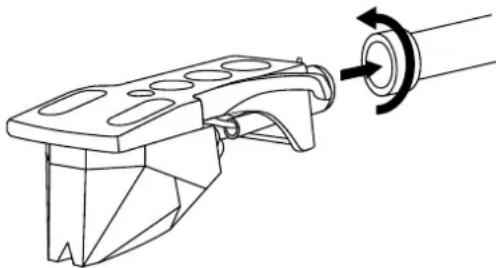
- Screw the Headshell with Pick-Up System -4- securely (hand-tight) into the Tonearm SME connection -5-. The pick-up cartridge is easy to exchange, if required (see below).
natural_image
Technical line drawing of a mechanical component with a rotating shaft (no text or symbols)a) First loosen the fastening screw on the headshell and disconnect the cable of the supplied pick-up system.
b) Remove the old pick-up system from the headshell.
c) Now connect the leads of the pick-up system and observe the assignment of wires.
| Colour Polarity | |
| I. White (L+) Left, Positive Pole | |
| II. Blue (L-) Left, Negative Pole | |
| III. Red (R+) | Right, Positive Pole |
| IV. Green (R-) | Right, Negative Pole |
d) Tighten the fastening screws on the headshell.
e) Align the cartridge using a cartridge protractor, following the Baerwald alignment principle.
- Connect the Included RCA cable to the Audio Output -11- and to a phono input of your amplifier or HiFi sound system. Further connect the grounding cable to the Grounding Connection -16- of your Turn X and amplifier or HiFi sound system.
- Connect the supplied power cable to its appropriate connection -14- and a power outlet.
OPERATION
- Counterweight
Move the tonearm -5- to just in front of the Record Platter -1-. Set the tonearm lift -7- to the „DOWN“ position. Adjust the counterweight -9- by turning it clockwise so that the tonearm -5- does not tilt up or down, i.e. it should be balanced parallel to the record. Then guide the tonearm -5- back into the tonearm support -6-. Adjust the counterweight scale on the counterweight -9- so that the position „0“ is above the marking line. Turn the counterweight further clockwise until the scale shows the value that corresponds to the recommended needle tracking force of the pick-up system.
- Anti-Skating Wheel
Adjust the Anti-Skating Wheel -8- so that the setting directly matches tracking force of the fitted cartridge.
- Turning on Power
After all connections have been made and all settings have been adjusted you can turn the device on via the ON/OFF Switch -15-.
- Playback
Place the record onto the rubber mat on the record platter -1-. Select the appropriate speed for your record with the OFF/33/45/78 switch -3-. Remove the needle guard from the pick-up system -4-. Now set the tonearm lift -7- to the „UP“ position and move the tone arm -5- over the part of the record you want to play. Then set the tonearm lift -7- to the „DOWN“ position so that the tonearm lowers onto the record groove.
NOTE! You can also leave the tonearm lift permanently in the „DOWN“ position and lower the tone arm manually to the desired position. When doing so, be careful not to damage the needle of the pick-up system.
- Playback of records with 78 RPM (Shellac)
Please also note, that an appropriate cartridge system should be chosen, suitable for 78 RPM shellac records.
- Dust Cover
Place the dust cover on the hinges and then insert the hinges into the holders -13- provided. The Dust Cover protects your turntable when it is not in use. However, we recommend to remove the Dust Cover when the turntable is in use, as it will have a negative impact on the acoustic performance. Furthermore, your turntable should be placed on a base that is as resonance-free as possible, such as a multiplex board or wood.
TECHNICAL DATA
Turntable Section:
- Type of turntable: Direct drive, fully manual
- Drive: ....Quartz driven upper-torque direct drive with precision rotation
- Motor: ......DC Motor, 16-Pole, 3-Phase, brushless
- Rotation speeds: 33 1/3, 45 & 78 RPM
- Starting Torque: ....More than 4500 g/cm
- Start-up time / rpm change: .... Less than 0.3 sec.
- Wow and Flutter: ....Less than 0.1% WRMS (JIS WTD)
- S/N Ratio: ....More than 60dB (DIN-B)
- Breaking System: Electronic brake
Turntable Platter:
- Turntable Platter: Aluminium die-cast
- Diameter: 305 mm
- Weight: ....About 2.1 kg
Tonearm Section:
- Type: ....Static balanced S-Shape
- Effective Length: 230 mm
- Overhang: 15 mm
- Tracking Error Angle: ....Less than 3 degrees
- VTA Adjustment Range: 0-6 mm
- Applicable Cartridge Weight: 17 - 25 g (incl. Headshell)
- Anti-Skating Range: 0-3 g
- Terminals: 1x PHONO Out (gold-plated), 1x GND Earth Terminal
Cartridge:
- Type of cartridge: Ortofon 2M Blue
- Output voltage at 1000 Hz, 5cm/sec.: ....5.5 mV
- Channel balance at 1 kHz: ....1.5 dB
- Channel separation at 1 kHz: 25 dB
- Channel separation at 15 kHz: ....15 dB
- Frequency response: 20-20.000 Hz + 2 / -1 dB
- Tracking ability at 315Hz at recommended tracking force: ...80 ↔ μm
- Compliance, dynamic, lateral: 20 ↔ μm/mN
- Stylus type: ....Elliptical
- Stylus tip radius: r/R 8/18 ↔ μm
- Tracking force range: 1.6-2.0 g (16-20 mN)
- Tracking force, recommended: 1.8 g (18 mN)
- Tracking angle: 20°
- Internal impedance, DC resistance: 1.3 kOhm
- Internal inductance: 700 mH
- Recommended load resistance: 47 kOhm
- Recommended load capacitance: 150-300 pF
- Cartridge colour, body/stylus: ....Black/Blue
- Cartridge weight: 7.2 g
General:
- Power Supply: AC IN 100\~240V, 50/60 HZ
- Power consumption: 3W
- Dimensions: 460(W) x 367.3(D) x 172.6(H) mm
- Weight: 10.35 kg
Note: Subject to alterations. The specified data is of approximate value.
HELP & SUPPORT
If you need additional help or have technical questions, you can contact our support team:
https://www.reloop-hifi.com/support-ticket-request
Reloop Hifi
www.reloop-hifi.com
Reloop
Global Distribution GmbH & Co. KG
Schuckertstrasse 28
48153 Muenster / Germany
Fax: +49.251.6099368
Subject to alterations.
Illustrations similar to original product.
Misprints excepted.
text_image
4 RELOOP 10 9 8 7 6 5 4 3 78 45 33 off TURNX Premium Class HFL Specification System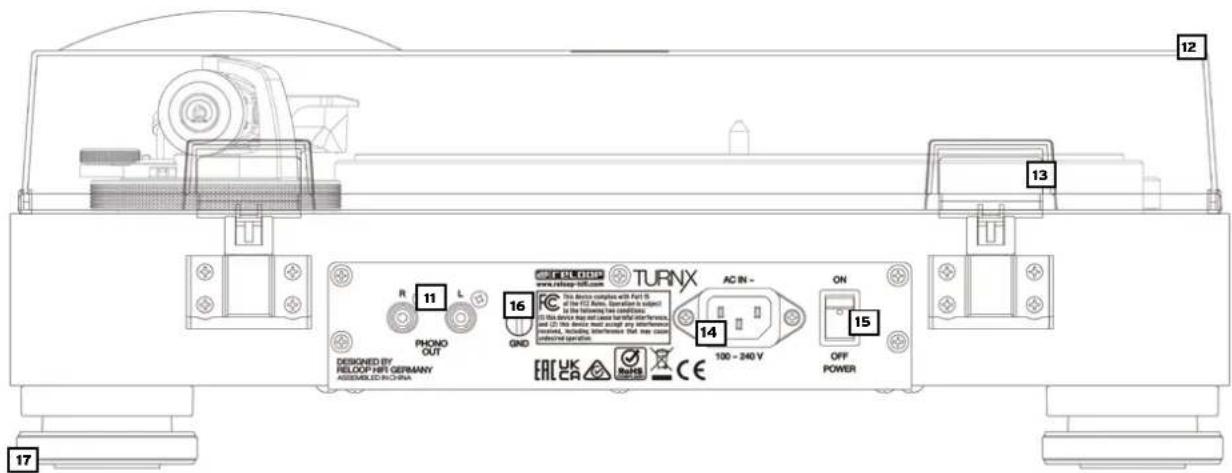
text_image
TURNX www.turloop-tu.com 16 GND R PHONE OUT 11 12 13 DESIGNED BY RELOOP HFT GERMANY ASSEMBLED IN CHINA AC IN - 14 15 100 - 240 V OFF POWER 17CONTENU DE LA LIVRAISON
natural_image
Technical line drawing of a mechanical component with a circular arrow indicating rotation (no text or symbols)Section bras de lecture:
https://www.reloop-hifi.com/support-ticket-request
Reloop Hifi
www.reloop-hifi.com
Reloop
Global Distribution GmbH & Co. KG
Schuckertstrasse 28
48153 Muenster / Germany
Fax: +49.251.6099368
text_image
4 RELOOP 1 2 3 78 45 33 off 10 9 8 6 7 5 4 TURNX Pension Class 1/1 Tunable System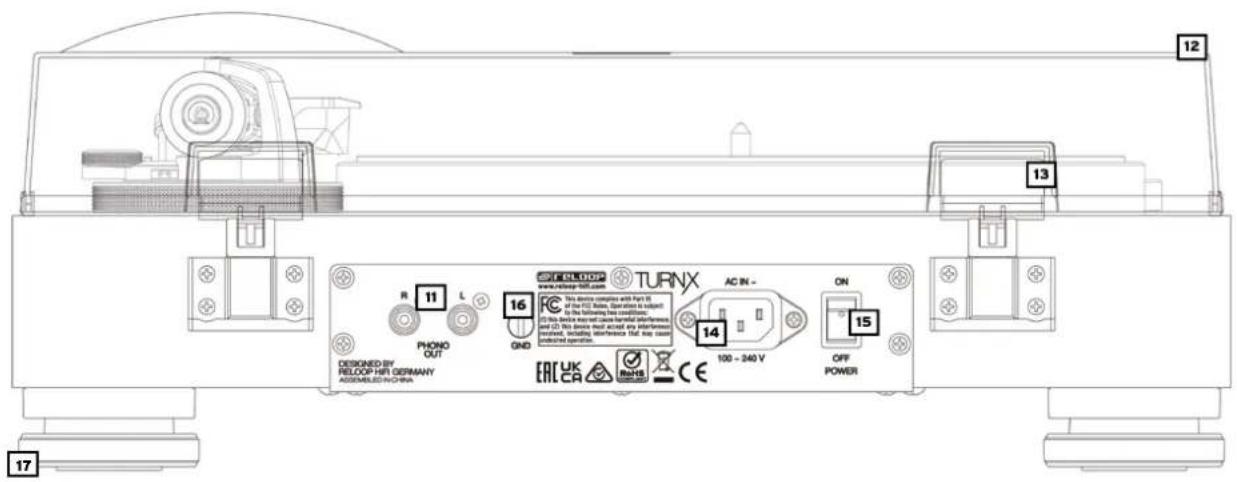
text_image
12 13 14 15 16 R PHONO OUT TURNX AC IN - DESIGNED BY RELOOP H&R GERMANY ASIKON ELECTRONICS EATC UK CA RMS CE 100 - 340 V OFF POWERALCANCE DE LA ENTREGA
natural_image
Technical line drawing of a mechanical component with a rotating shaft (no text or symbols)https://www.reloop-hifi.com/support-ticket-request
Reloop Hifi
www.reloop-hifi.com
Reloop
Global Distribution GmbH & Co. KG
Schuckertstrasse 28
48153 Muenster / Germany
Fax: +49.251.6099368
Subject to alterations.
Illustrations similar to original product.
Misprints excepted.